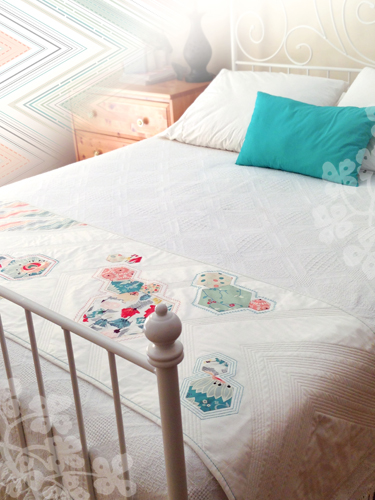
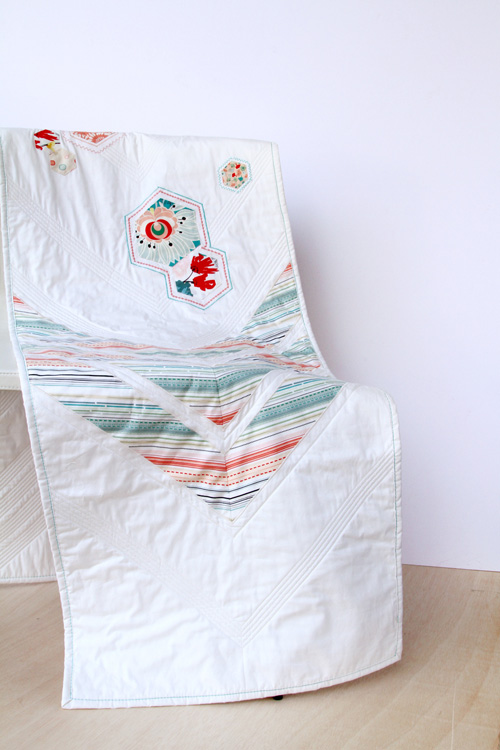
How to Make an Arrows and Hexies Bed Runner
Join Pat Bravo, textile designer and WeAllSew Sewing Expert, as she brings a modern twist to sewing hexagons on our first WeAllSew webinar, tomorrow, February 26, at bernina.com. Learn Pat’s unique technique of making hexies without basting, and a new, faster way to piece them with your sewing machine! Forget using a hand sewing needle and unleash the power of the decorative stitches on your sewing machine. See how hexies are used today in modern quilting and sewing.
Supplies
- 3 yards White Linen (PE-408) from the Pure Elements Collection
- Assorted prints from the Rapture by Pat Bravo Collection
- fat quarter of Vivacious Marvel Orange (RPT-2709)
- fat eighth of Wild Beauty Saffron (RPT-2702)
- fat eighth of Euphloria Coral (RPT-2704)
- fat eighth of Butterfly Bliss Aqua (RPT-2703)
- fat eighth of Hypnotic Paramour Rose (RPT-2706)
- fat eighth of Bonbons Candy (RPT-2075)
- fat eighth of Delicate Femme Apricot (RPT-2701)
- Hexies templates (download and print on cardstock) Floral_Geometry_Table_Topper_-_Hexie_Templates_121814.pdf
- extra small
- small
- medium
- large
- Iron and pressing surface
- Spray starch
- Stiletto
- 40-weight cotton thread, eggshell blue (Aurifil Pat Bravo Eye Candy #2311)
- 40-weight cotton thread, blush pink (Aurifil Pat Bravo Eye Candy#2415)
- 50-weight cotton thread, light jade (Aurifil Pat Bravo Quilting Heart #1148)
- 50-weight cotton thread, fleshy pink (Aurifil Pat Bravo Quilting Heart #2420)
- Microtex Sharp needle, size 80/12
- Hand sewing needle
- Spray adhesive, such as Sulky KK-2000
- Purple air-erasable marker
- Large 60° triangle ruler
- Cardstock for hexie templates
- All-purpose presser foot, open toe embroidery foot, or clear embroidery foot (BERNINA Reverse Pattern Foot #1/1C, Open Embroidery Foot #20/20C, or Clear Embroidery Foot #39/39C)
- Walking foot with seam guide or dual feed (BERNINA Walking Foot #50 or BERNINA Dual Feed feature)

Step 1) Cut the fabric pieces.
Sub-cut fabrics as listed below:
White Linen
- One (1) 20″ x 80″ rectangle (top)
- One (1) 22″ x 85″ rectangle (backing)
- Six (6) 2-1/2″ x WOF strips (binding)
Vivacious Marvel Orange
- Six (6) 17-1/8″ x 2-5/8″ strips.
- Trim the corners of three of these strips at a 45° angle going down from left to right, and parallel to each other.
- Repeat the previous step with the other three strips but this time the angle should go down from right to left (mirror image).
Wild Beauty Saffron
- One (1) 9″ square
- One (1) 4-1/2″ square
- Two (2) 3″ squares
Euphloria Coral
- One (1) 6″ square
- Two (2) 4 ½” squares
Butterfly Bliss Aqua
- One (1) 6″ square
Hypnotic Paramour Rose
- One (1) 4-1/2″ square
- One (1) 3” square
Bonbons Candy
- One (1) 4-1/2″ square
- One (1) 3″ square
Delicate Femme Apricot
- Two (2) 3″ squares
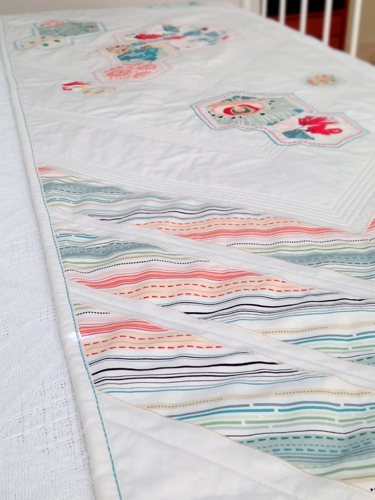
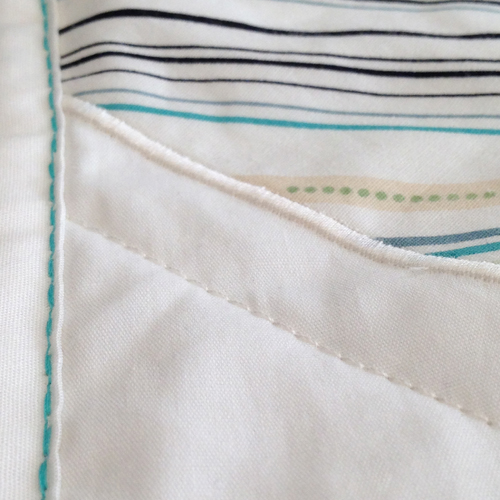
Step 2) Create and attach the slanted pieces.
Create the slanted pieces.
Take the six 45° strips and group them into three pairs of mirror-image strips.
Join each pair on the diagonal using 1/4”-wide seam allowances as to create an arrow once opened. Be mindful to pair strips that create an aligned design once you open the seam, or leave it at random if desired.
Trim the dog ears.
Attach the slanted pieces.
Press the quilt top (White Linen) lengthwise, creating a crease. This will be a guide to help you place the slanted strips (arrow pieces).
Spray the wrong side of the slanted strips with adhesive. Align the center of the strips with the center of the top and smooth them into place.
Add sticky stabilizer under the strips.
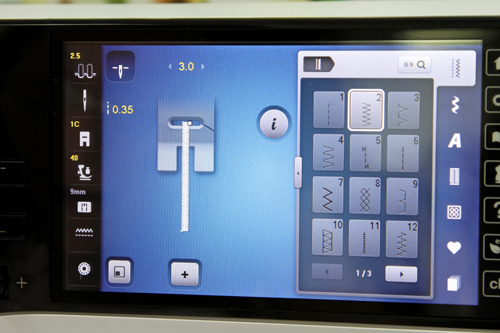
Set your machine for a satin stitch (zigzag stitch with 3.0 width, 0.35 length). Adjust the tension by lowering the needle tension or placing the bobbin thread through the finger on the bobbin case.
Appliqué the strips in place.
When stitching is complete, remove the stabilizer and clip the threads.
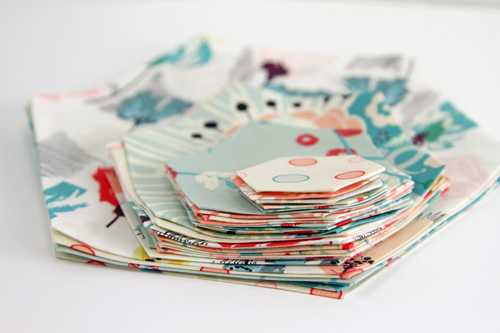
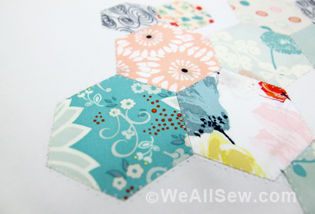
Step 2) Create the hexies.
Gather the squares to be used for the hexies:
- 9″ squarse for the large hexies
- 6″ squares for the medium hexies
- 4-1/2″ squares for the small hexies
- 3″ squares for the extra-small hexies
Download and print the hexies templates on cardstock; cut out on the lines.
Place the large hexie template on top of the large fabric square.
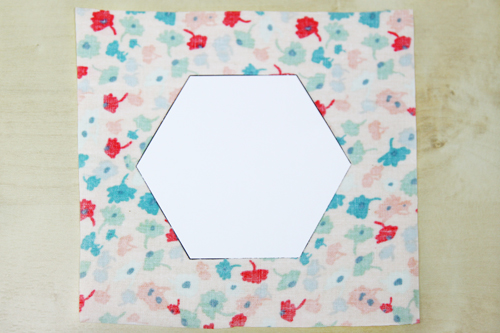
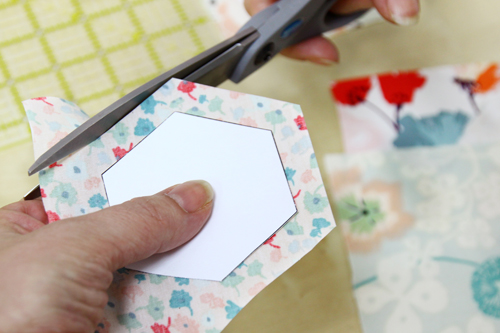
Holding the template in place with your fingers, trim the fabric around the hexie shape leaving approximately 3/8″ of fabric around all sides.
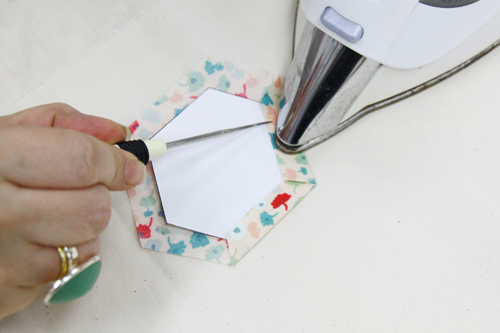
Heat your iron to its highest setting. Place one of the large hexies wrong wide up on the ironing board, with the large hexie template centered on top. Fold one edge over and press with the iron. Repeat for all edges, using your finger or a stiletto to hold the edge down as you fold each new edge over to press.
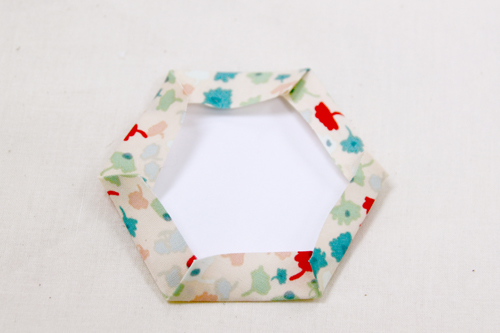
Flip the hexie over. Spray with starch and press, leaving the iron in place a few seconds. Remove the iron and wait a few seconds to let the hexie cool off. Unfold 2-3 sides and remove the cardstock template. Repeat to make a total of 14 hexies (including all sizes).

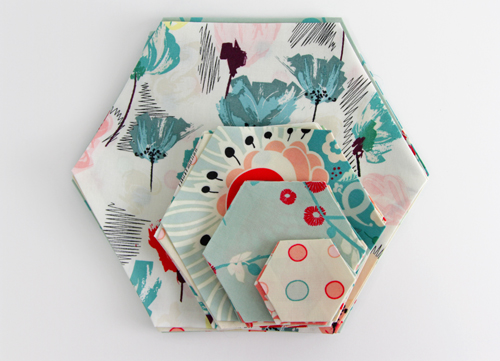
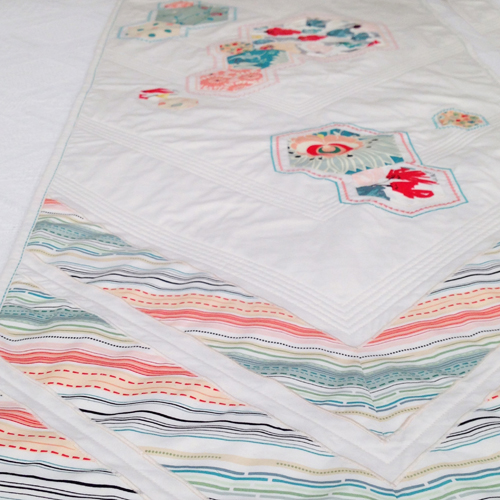
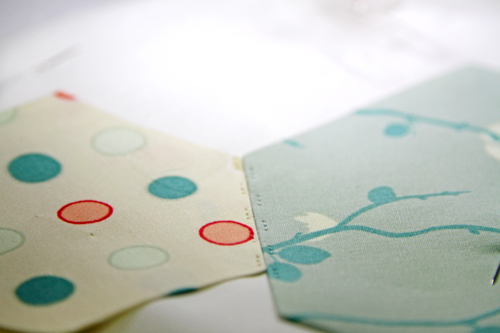
Step 3) Applique the hexies.
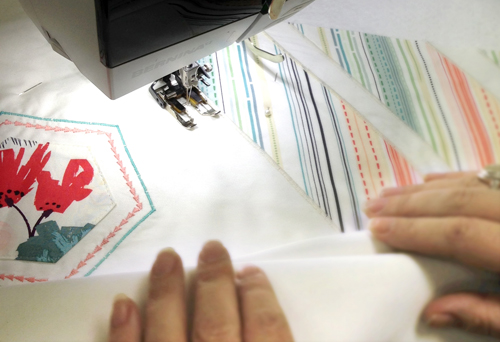
Position the hexagons as desired and pin them through their centers. For the smaller hexies, use smaller pins so that you do not interfere with the edges where the decorative stitching will go on.
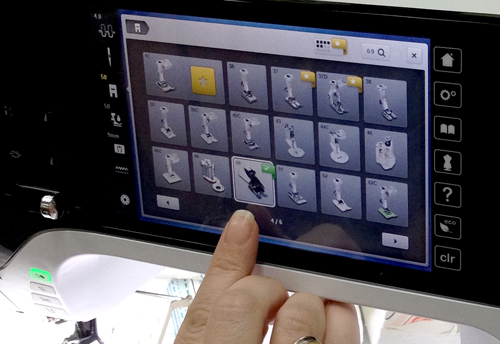
Set your machine for a universal stitch, with the settings on 3.0 width, 2.0 length. Engage the needle-position down function if available on your machine.
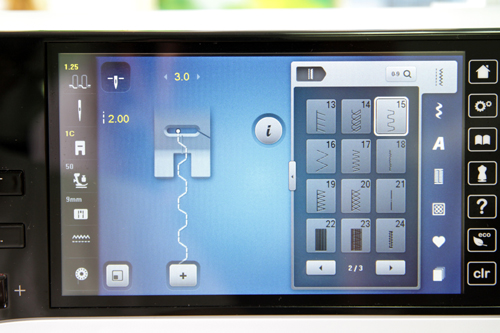
For best results find the longest continuous line in between the hexies and then join them there first, then sew the remaining “branches” afterward.
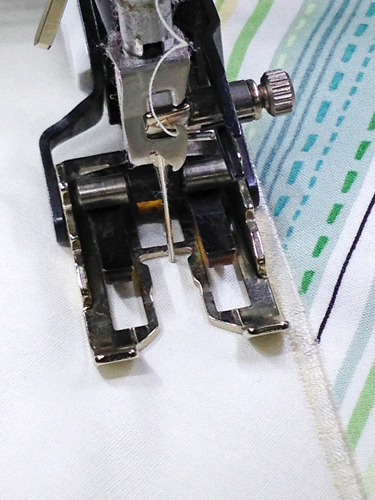
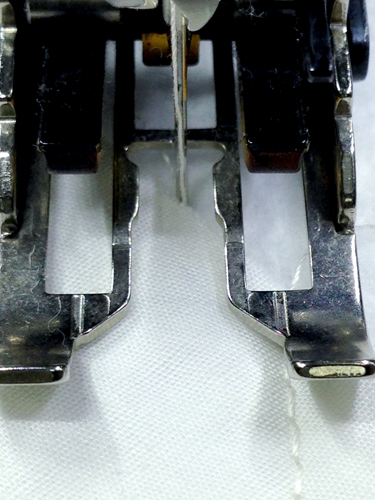
To join the hexagons I recommend the Embroidery Foot with Clear Sole #39. The red mark in the center lets you see where the stitch is going to be.
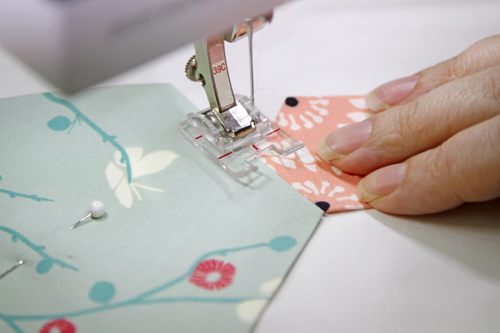
Attach the isolated hexies to the quilt top using a straight stitch with the needle moved two notches to the left.
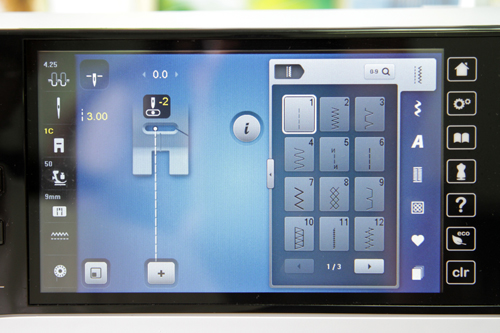
Start sewing at the center of one of the sides until you reach a point 1/16″ away from the edge. Raise your foot and pivot the fabric to start the next side. Adjust the stitch manually as needed.
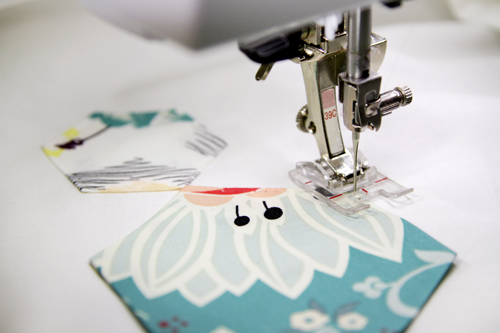
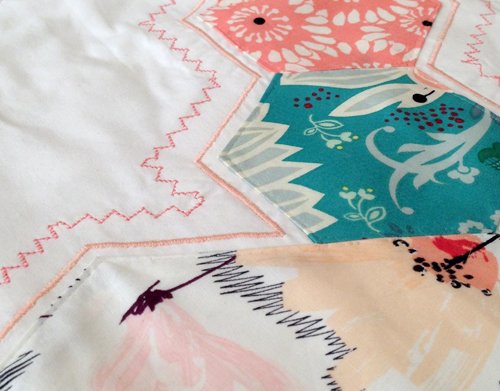
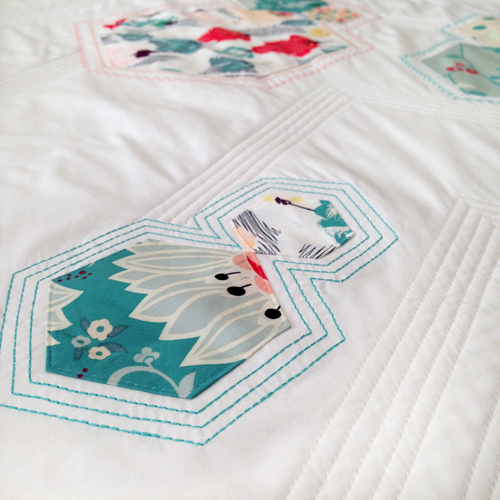
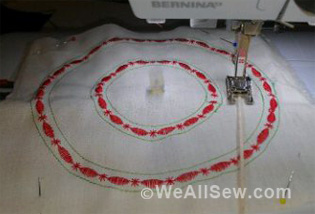
Step 4) Add echo stitching.
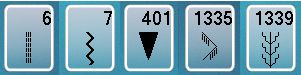
Use the Clear Embroidery Foot (#39c) to create decorative echo stitches around the hexagons, at distances between 1/4″ and 1/2″. Play with different decorative stitches and quilting decorative stitches to create dimension. I used triple straight stitch #6, triple zigzag #7, quilting stitches #1339 and #1335, and embroidery stitch#401. To find your preferred width and length, practice your stitches on a fabric scrap with stabilizer before you stitch them on your project.
Step 5) Quilt the runner.
Set your sewing machine for a straight stitch with a length of 3.0 mm (BERNINA pre-programmed quilting stitch #1325).

Tip: If your machine has this feature, select the walking foot from the alternate foot screen.
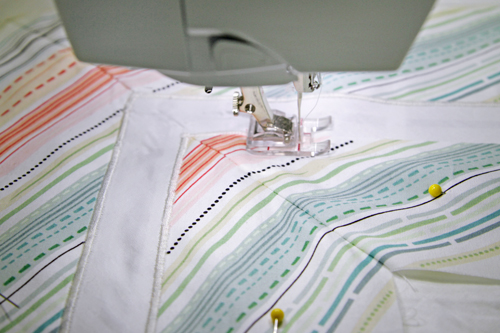
For the first line of quilting, sew 1/2″ away from the last slanted strip using your walking foot with the quilting/open sole.
Tip: Even when you’re using your seam guide I recommend using an erasable fabric marker to make sure that you are sewing on the right place and that all your seams are perfect.
For the second line, sew 1/4″ away from the line you just stitched using the 1/4″ line on the foot as a guide; align the previous line of stitching under this guide.
Attach the left seam guide to the walking foot and set it for 3-1/2″. Stitch another line, using the guide to space this one 3-1/2″ from the last line of stitching.
Stitch a second line, this one 1/4″ from the last one. Repeat for a second group of five lines spaced 1/4″ apart.
Tip: It’s likely that some of the hexies will get on your way while you sew the straight lines. Just stop before sewing on top of the hexie and back stitch to secure the stitching. Pull the thread a few inches (do not cut it) – enough to go over the hexies – and continue sewing at the other side.
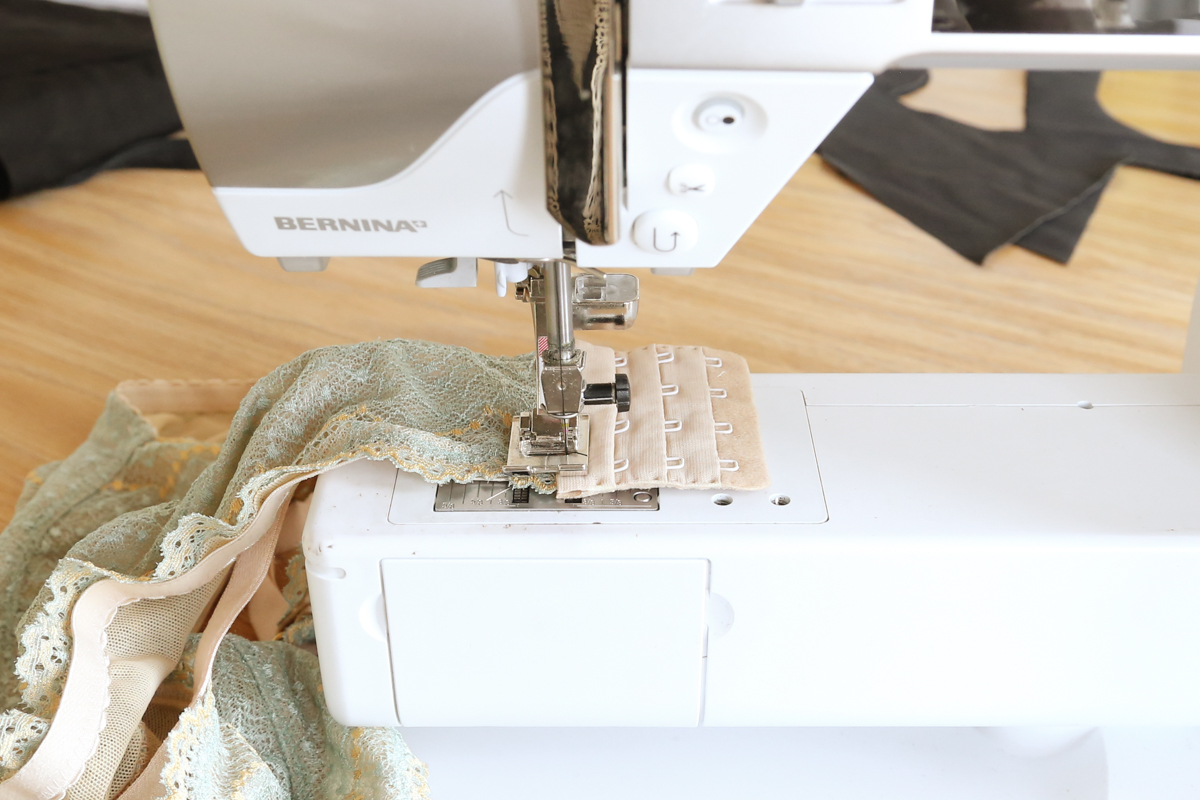
Step 6) Bind the quilt.
This project features a reverse binding finished with decorative stitching on the front of the quilt.
Stitch the binding strips together on the diagonal using 1/4″-wide seam allowances. Press seam allowances open and trim away excess fabric. Fold the strips lengthwise, wrong sides together; press.
Using a walking foot and a 1/4″-wide seam allowance, attach the folded binding to the back of the bed runner.
Select a decorative stitch and thread your sewing machine with contrasting thread. I used a triple straight stitch and light jade thread.
Bring the folded edge to the front of the quilt. Stitch in place 1-16″ from the inside fold.
For more information on how to sew hexies by machine, see my Floral Geometry Table Topper posted in January 2014 here on WeAllSew.
What you might also like


9 comments on “How to Make an Arrows and Hexies Bed Runner”
-
-
I really enjoyed Pat’s webinar! Would you please explain how she handles the loose thread that results from jumping over the Hexies when she is top stitching the rows? Thank you
-
Hi, Fran – I think she just clips it afterward, but let me find out if she has any tips about that. Jo
-
She describes this in her other project – Floral Geometry Table Topper: Tip: To secure all thread tails at the end of the project, leave a 5″ to 6″ tail of needle thread each time you start and end a line of stitching. Later, thread these tails into a hand sewing needle, then pass the threads to the backside of the project to hide them.
-
-
-
Want to make this as a gift for my sister, but have no way to print out the templates right now. Does anybody know what the finished size of the hexies used in this project are?
-
Hi, Elizabeth – The hexies are 2″, 3-1/2″, 5″ and 8″ wide. Jo
-
-
Could you add more pictures of the ends of the bed runners so that it will show the quilting a little better?
-
Hi, Rita – I don’t have more photos, but I’ll ask Pat to send some – Jo
-
I’ve added two more photos under step 5 – Jo
-
Leave a Reply
You must be logged in to post a comment.

Did not like this webinar. She was hard to understand, and she talked about the supplies more than the actual project.