How to Make Jo’s Zipper Tape Rose on Your Sewing Machine – NO Handwork!
Two weeks ago I showed you my Made to Create pillow and all the accessories I used to create the trims and stitch it together. And I promised to show you how I made the zipper-tape rose – which I made entirely by machine – no hand sewing!

First, a little background. I didn’t come up with this idea entirely on my own. Last Christmas I made ornaments and brooches using two patterns from Indygo Junction – Zipper Christmas Cheer and My Christmas Zips, plus two packs of Zipper Accents – one in Holiday and one in Classic. Robin Mackintosh’s instructions are great, and I spent a couple relaxing evenings hand-sewing these while watching holiday movies. But – being a sewing machine kind of person – I thought to myself, “Hmm. There must be a way to do this by machine.” Around that time I got my Make to Create Pillow assignment, and this pretty machine-stitched zipper-tape flower came about. Follow the steps below to make one – or more – of your own.
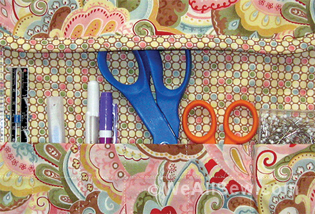
Step 1) Gather the supplies.
For this flower I went into my zipper stash and pulled out some long off-white upholstery zippers for the rose petals, and some heavy-duty beige zippers for the leaves. I also cut two circles of felt for the flower base. You’ll also need some fabric glue or a glue gun.
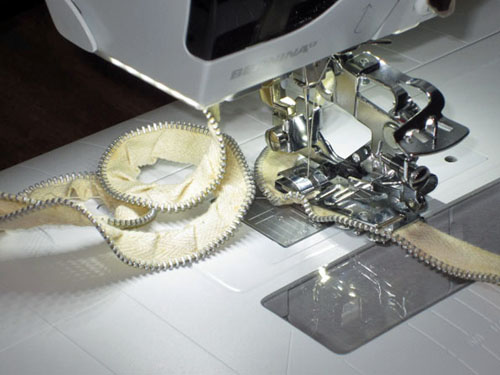
Step 2) Gather or pleat the zipper tape.
But how? Ruffler #86 to the rescue! The little pleater device is sturdy enough to put pleats into even heavy twill tape.
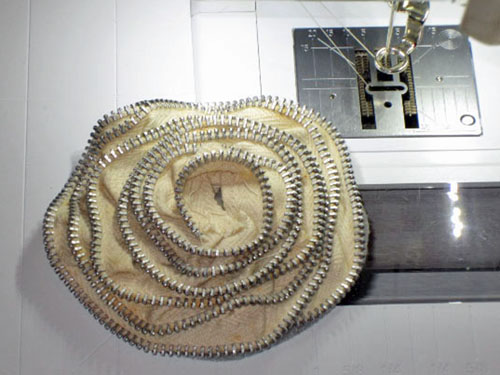
Step 3) Attach the pleated zipper to the felt base.
Now, I’ll warn you – this isn’t very pretty on the back during this step. But we’re only concerned with how it looks when it’s done, right? Right!
Put a small free-motion foot of your machine – I used Darning Foot #9 – and select a bartack stitch. Beginning at the outer edge of one felt circle, tack the zipper tape in place as you swirl it around in ever-decreasing circles, securing it every 1/2″ to 3/4″. Don’t try to make this even; it’ll look best if the placement is more-or-less random. Just be sure to cover the edge of the previous zipper tape as you go along.
Tip: If you don’t have a bartack stitch, select a zigzag stitch about 2.5 mm wide, lower the feed dog (or turn the length to 0 mm), and stitch in place 4-5 times.

Continue until there is just a small area left in the middle; we’ll fill this in later.
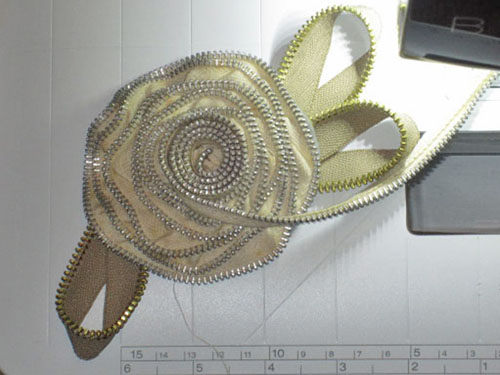
Step 4) Add the leaves.
Cut your “leaf” zipper into strips about 5″ to 6″ long; the length will depend on how wide your zipper tape is and how you want the finished leaf to look. Fold them in half with an extra twist, overlapping the ends. Place them under the felt base and tack them in place as above; do this from the top of the flower, positioning the presser foot between layers. (I told you it wasn’t going to be pretty!)

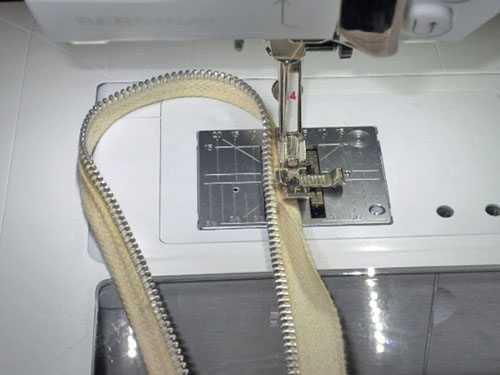
Step 5) Make the inner flower petals.
This part is so much easier by machine! Fold the zipper tape in half, then stitch the fold in place. For this I used Zipper Foot with Guide #14, adjusting the guide to ride against the zipper teeth. (You might remember this from my pillow; I used it to attach the trims.)
Step 6) Attach the inner petals.
We’re done with the sewing machine, ready for the glue. Start rolling the prepared zipper; when it’s about 3/4″ in diameter glue it to the center of the flower. Continue rolling the zipper around the center, gluing it in place, until you like how it looks. Clip the zipper (use pliers or wire cutters to snip between the teeth), tuck the end underneath, and glue it in place.
Step 7) Finish the back.
Here’s where the second circle come into play. Glue it to the back of the rose, over the first circle and all those messy tacking stitches. Looks better, huh?

Attach a pin-back if desired, or simply tack it in place as I did. Done!


![Have a habit of misplacing your keys. Losing your iPod? Forgetting your coupons? Now, with this handy organizer, all your little necessities are in one convenient spot when you're ready to head out the door - right on the door knob! How to Make a Door Organizer Supplies 1/3 yard or heavyweight fabric such as twill, canvas, or denim 1/3 yard of fusible interfacing Coordinating thread Scissors Water-soluble marking pen or tailor's chalk Ruler 1/4" presser foot (BERNINA Patchwork Foot #37 or Patchwork Foot with Guide #57) Download and print the keyhole template: [download id="88"] Step 1) Prepare the fabric pieces. Cut from the heavyweight fabric: Two 5" x 11" rectangles for the organizer body One 5" x 12" rectangle for the large pocket One 5" x 7" rectangle for the small pocket One 6" x 7" rectangle for the hanging pocket Fuse interfacing to the wrong side of both 5" x 11" fabric rectangles following the manufacturer's directions. How to Make a Door Organizer Cut the keyhole: Measure down 1" from the top edge of one 5" x 11" rectangle. Center the top of the keyhole template on this mark. Trace the template. Cut along the traced line. Repeat for the second 5" x 11" rectangle. How to Make a Door Organizer Step 2) Make the large and small pockets. With wrong sides together, fold the large pocket in half to create a 6" x 5" rectangle. Topstitch close to the folded edge. How to Make a Door Organizer Place the large pocket on top of the right side of one 5" x 11" rectangle, matching the raw edges along the sides and bottom edges. Baste in place. How to Make a Door Organizer With wrong sides together, fold the small pocket in half to create a 3 1/2" x 5" rectangle. Topstitch close to the folded edge. Place the small pocket on top of the large pocket, matching the raw edges along the sides and bottom edges. Baste in place. How to Make a Door Organizer Step 3) Make the hanging pocket. With wrong sides together, fold the 6" x 7" rectangle in half lengthwise. Press. How to Make a Door Organizer Unfold the strip and then fold the long raw edges to the center fold line. Press. Refold the strip along the center crease. Topstitch close to both long edges. How to Make a Door Organizer Fold under 1" on both edge of the finished 7" strip. Measure up 1-1/4" from the lower edge on the right side of the second 5" x 11" piece. Center the bottom of the strip on this mark. How to Make a Door Organizer Sew close to the folded ends of the strip, then again 1/2" away from the first stitching. How to Make a Door Organizer Step 4) Construct the door organizer. With right sides together, place the two 5" x 11" rectangles together, matching the raw edges and the keyhole opening. How to Make a Door Organizer Stitch around the entire rectangle, leaving the keyhole open. Do not stitch around the keyhole area! Clip the corners. How to Make a Door Organizer Turn the organizer right side out through the keyhole opening. Press. How to Make a Door Organizer Topstitch close to the finished edges. How to Make a Door Organizer Baste the raw edges of the keyhole opening together. How to Make a Door Organizer Satin stitch close to the keyhole edges. Position the fabric so the needle goes just barely to the right of the raw edges and encloses them in stitches. Tip: A satin stitch is a zigzag stitch with a very short stitch length, so the stitches are very close to each other. How to Make a Door Organizer How to Make a Door Organizer Fill your organizer with keys, pens, letters, etc. so you never leave home without your essentials! How to Make a Door Organizer](https://weallsew.com/wp-content/uploads/sites/4/2011/10/How-to-Make-a-Door-Organizer-WeAllSew.jpg)