Illuminated Star Quilt
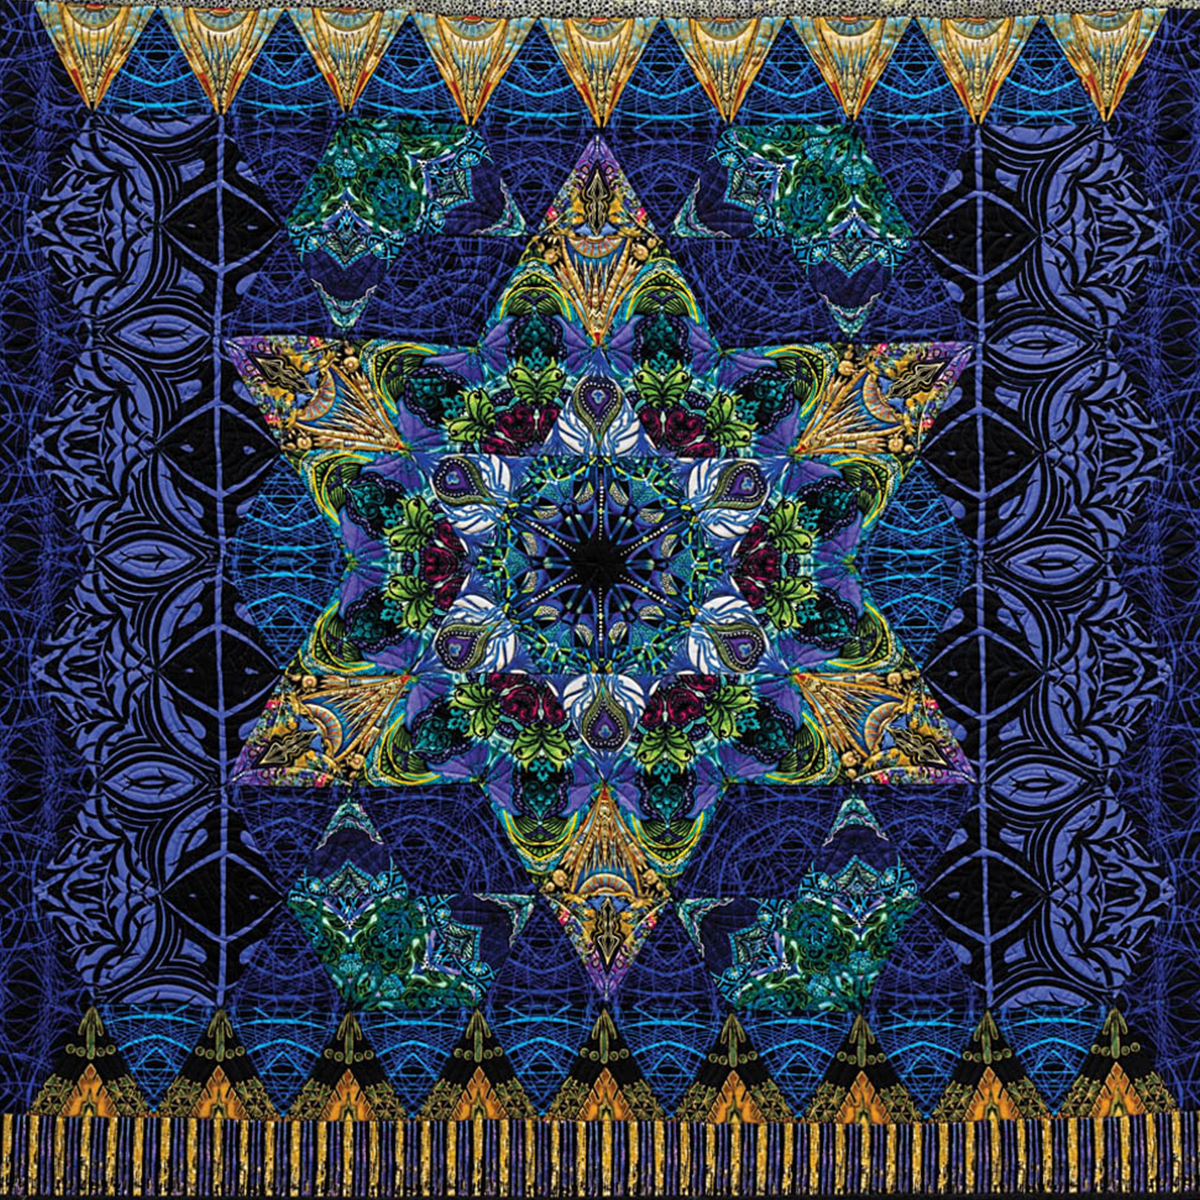
Illuminated Star, designed and pieced by Paula Nadelstern. Quilted by Claudia Clark Myers and Jessica Torvinen. 35 ¼” x 35 ¾”. 2015
I like to work in a series because, inevitably, you ask yourself lots of “What If” questions. The perk is that the questions you ask get more complex but the answers get simpler.
Illuminated Star is the third of three small quilts I made based on the traditional Thousand Pyramids quilt pattern. All three are included in my new book FABRICADABRA: Simple Quilts, Complex Fabric. The book demonstrates how quilts made of simple shapes can be transformed into complex-looking quilts that are easy to piece using gorgeous, intricate fabric. Some, but not all, of the quilts are traditional patterns, gift-wrapped with charismatic fabrics.
Thousand Pyramids, courtesy of quilt historian, Barbara Brackman, is an antique version of it. The quilt belongs to the Bresler Collection, Mint Museum. BlockBase #111a.
Illuminated Star began as an inkling: what if I used the same characteristic layout—but started the design from the center out instead of concentrating on the rows of triangles. I didn’t have a preconceived notion and I didn’t start out purposefully designing a star—certainly not one intended to be perceived as a Jewish star reflecting my family’s background. I didn’t begin with a palette and I didn’t foresee that triangles of cotton quilting fabric would spin into glimmers of regal gold, stately against a patterned but tonal ground. And yet, here it is: a resplendent cultural symbol in time for the holidays.
I’m going to show you the other two quilts I made first that have the same layout and then I’ll go into specifics about my design process for Illuminated Star. Of course, making this quilt took longer than I expected—in my experience, designing something good always does. Designing goes forward and back and wanders around in all directions. It’s not always a fun place to be. But ultimately the act of creating is a satisfying, if sometimes laborious, process. (It’s no secret that I’m one of those who celebrates artwork created in as much time as it takes. But just because how long it takes doesn’t matter to me doesn’t mean you shouldn’t figure out how to get “there” faster.) But, I’m getting ahead of myself….
Here’s the quilt layout and the layout key for the first two quilts in the series: Kaleidoscopic Marbles and The Pyramids of Fabrique-istan
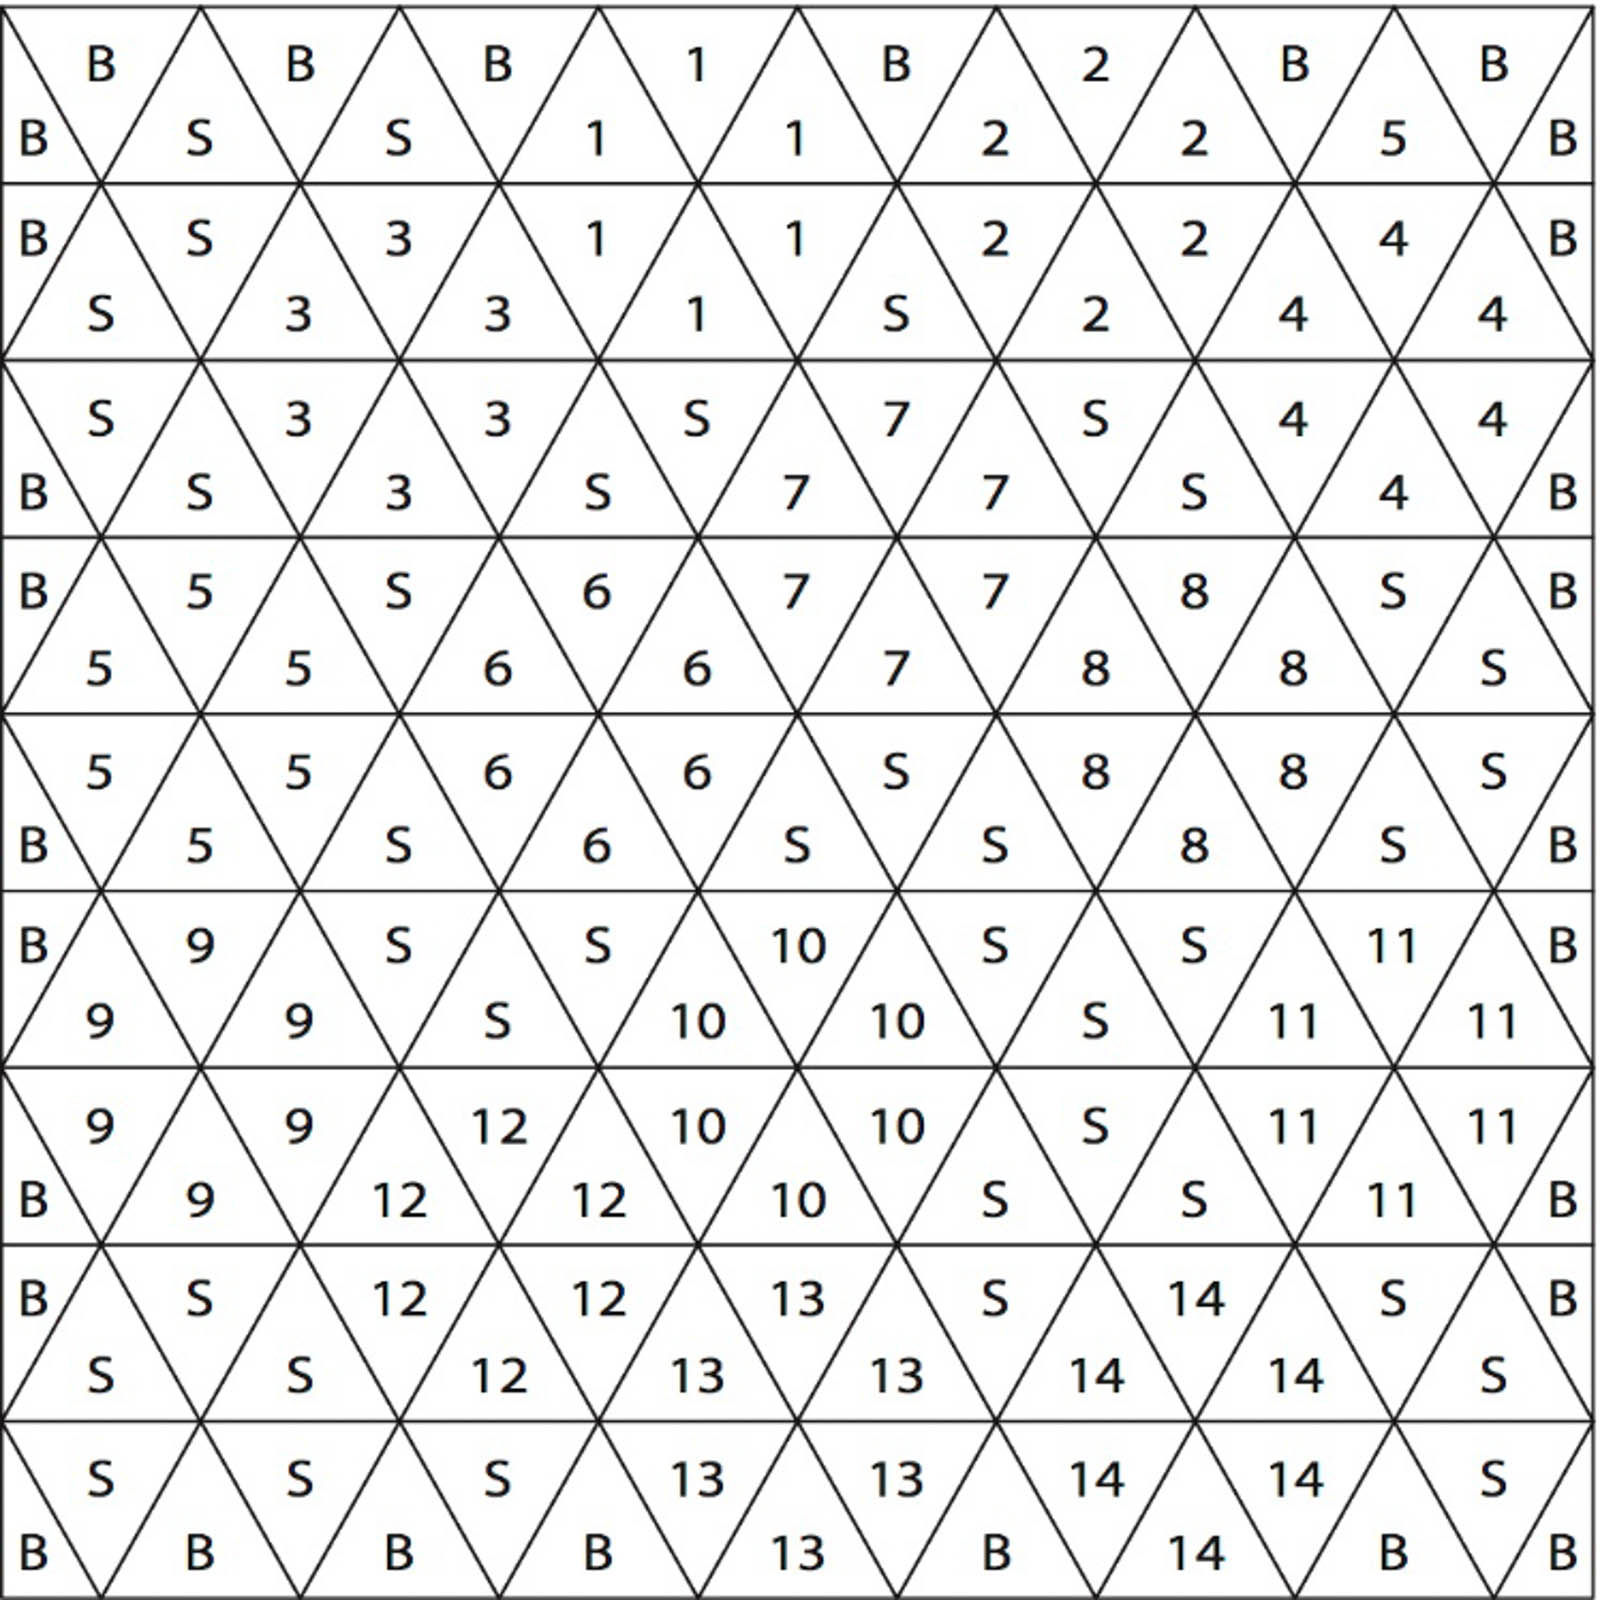
Quilt Layout Key
1-14 Kaleidoscopes
B = Border fabric used in the triangles along the four edges of each quilt
S = In KALEIDOSCOPIC MARBLES, S=Multiple black tonal prints
In THE PYRAMIDS OF FABRIQUE-ISTAN, S=Scroll pattern in multiple colorways
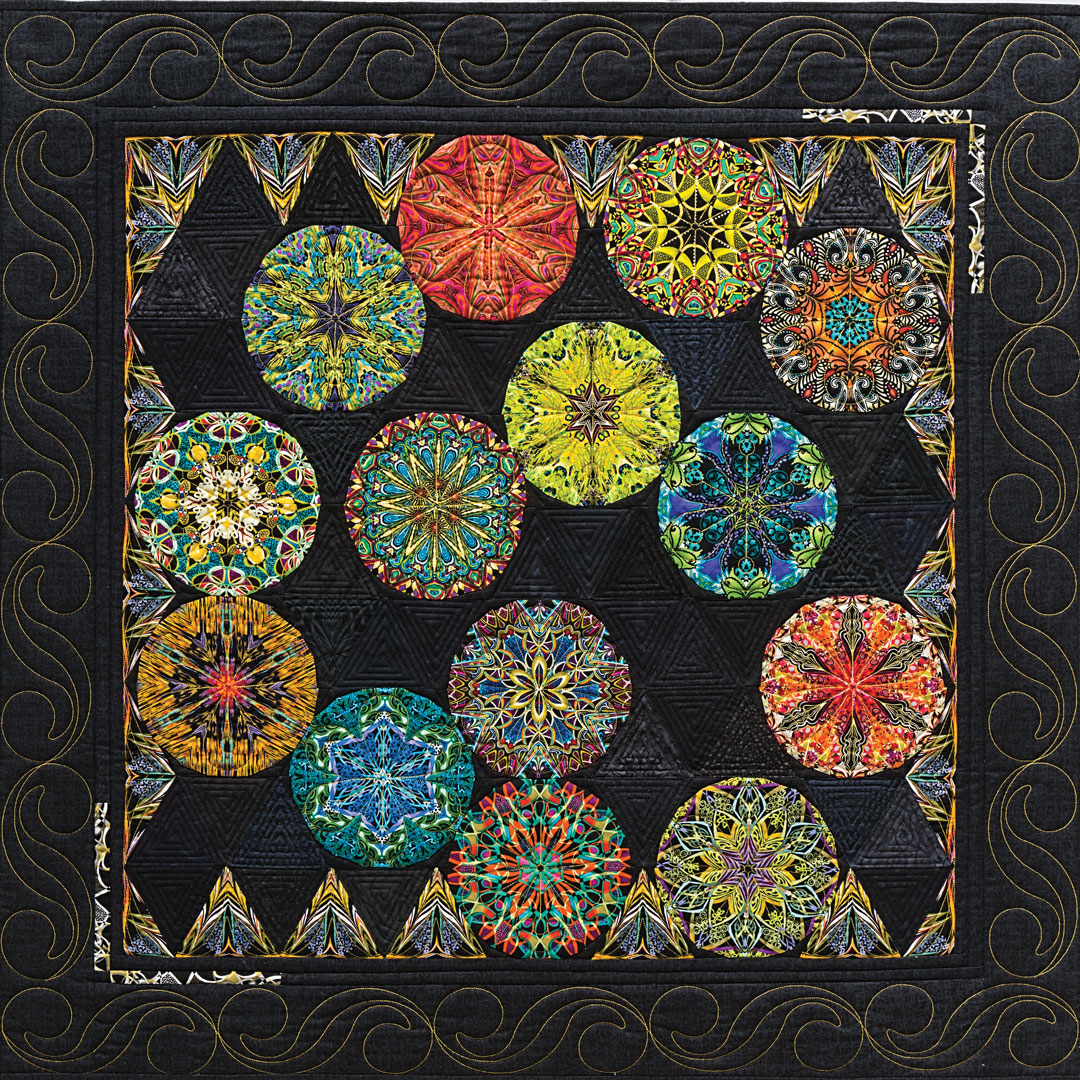
KALEIDOSCOPIC MARBLES
Designed and pieced by Paula Nadelstern, quilted by Marlene Hiltner, 40″ x 40″. 2015

THE PYRAMIDS OF FABRIQUE-ISTAN
Designed and pieced by Paula Nadelstern, quilted by Linda Leathersich. 36″ x 36″. 2012
Even though Illuminated Star appears more like a radial than a horizontal design, its underlying structure is like the other two quilts: horizontal rows 3 1/2″ high with 60° triangles. In a radial design, the elements develop around a common central point. Like a mandala which signifies closure and unity, a radial design directs the viewer’s attention into the important center, the primary focal point.
Here’s the quilt layout for Illuminated Star, very much like the quilt layout of the 2 quilts that came before it.
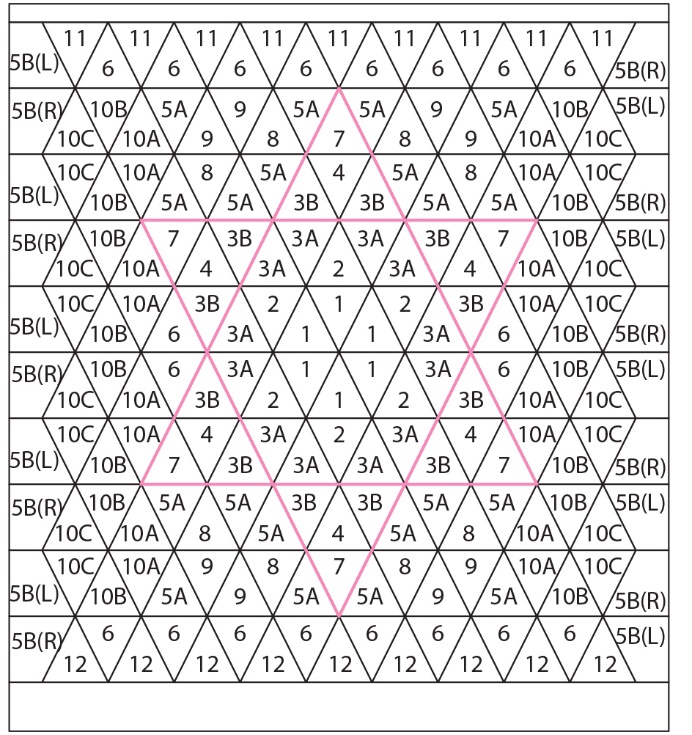
But unlike the other two, Illuminated Star is designed starting in the middle. Look for the six Patch 1s. Despite this, the piecing sequence for all three quilts is the same. Sewing can’t begin until each row is completely designed and decided. The process is to sew all the triangles in row 1, row 2, etc. Then connect row 1 to 2, 3 to 4. Next, the 1 + 2 unit to the 3 + 4 unit, and so on.
Patch 2 was intended to be Patch 1, and it wasn’t until I let go of this notion and switched the patches around that I had my first aha moment. As the quilt’s persona evolved, as the fabrics bewitched me into auditioning more and more, it felt like I was sculpting a three-dimensional object rather than collaging. It was a satisfying, hands-on, patch-by-patch creative act of fabric.

I considered more than 40 triangles before narrowing the collection down to the 12 selected fabrics, with some used more than once. Here are some of the 40 discarded fabrics auditioned but not included in the final quilt.
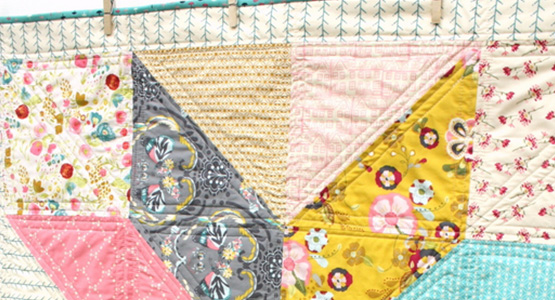
Note that Illuminated Star is a symmetrical quilt except for the top and bottom edges, which are treated differently from each other. This creates the illusion that the quilt is wider than it is high although, in fact, it is practically a square.

Top Edge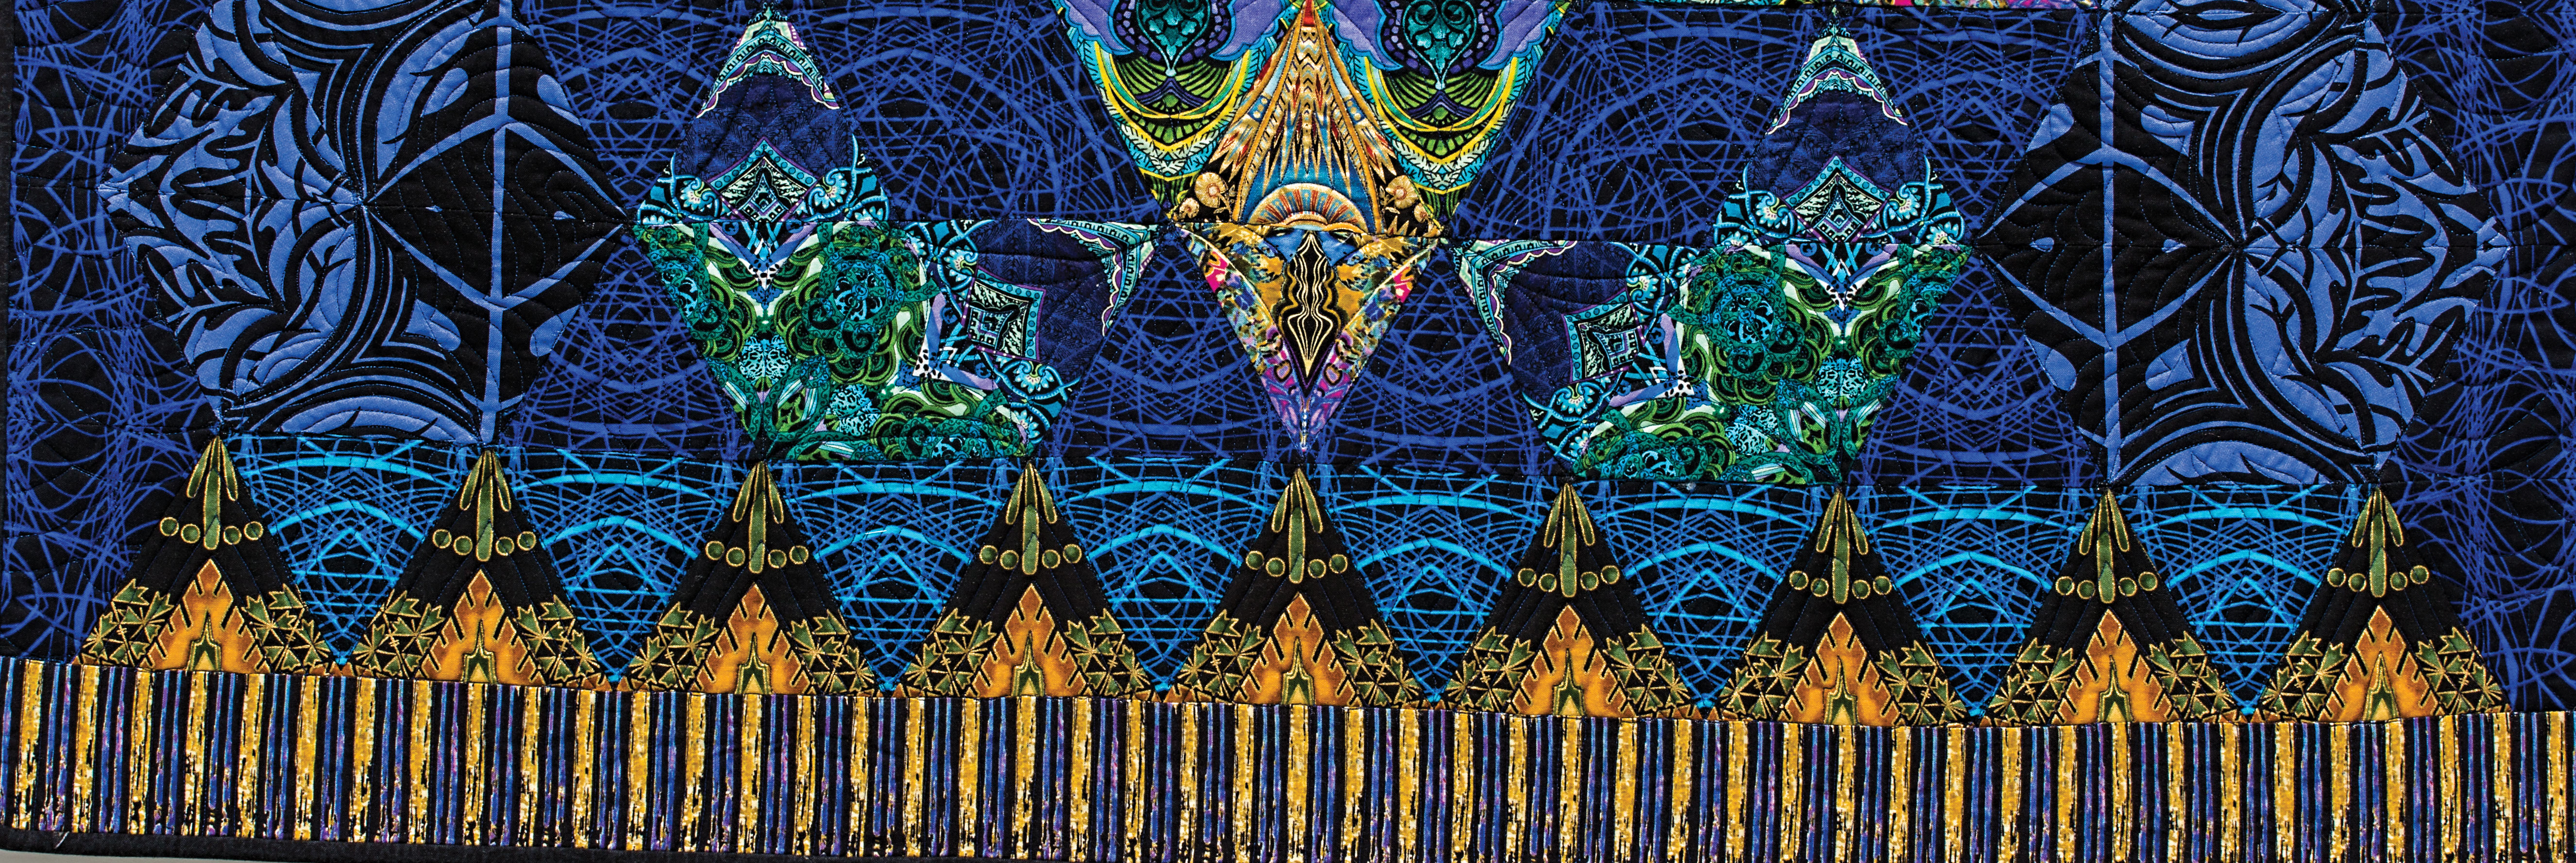
Bottom Edge
It’s probably difficult for you to see one triangular patch from another in this quilt. That’s because my design strategy is to camouflage seams and create seemingly seamless connections. This encourages an interrupted flow of color or design from one patch to the next. The viewer’s eye does not see the seam and stop.
You can read more about this seamless design approach in my WeAllsew blog Seamingly Seamless Quilting.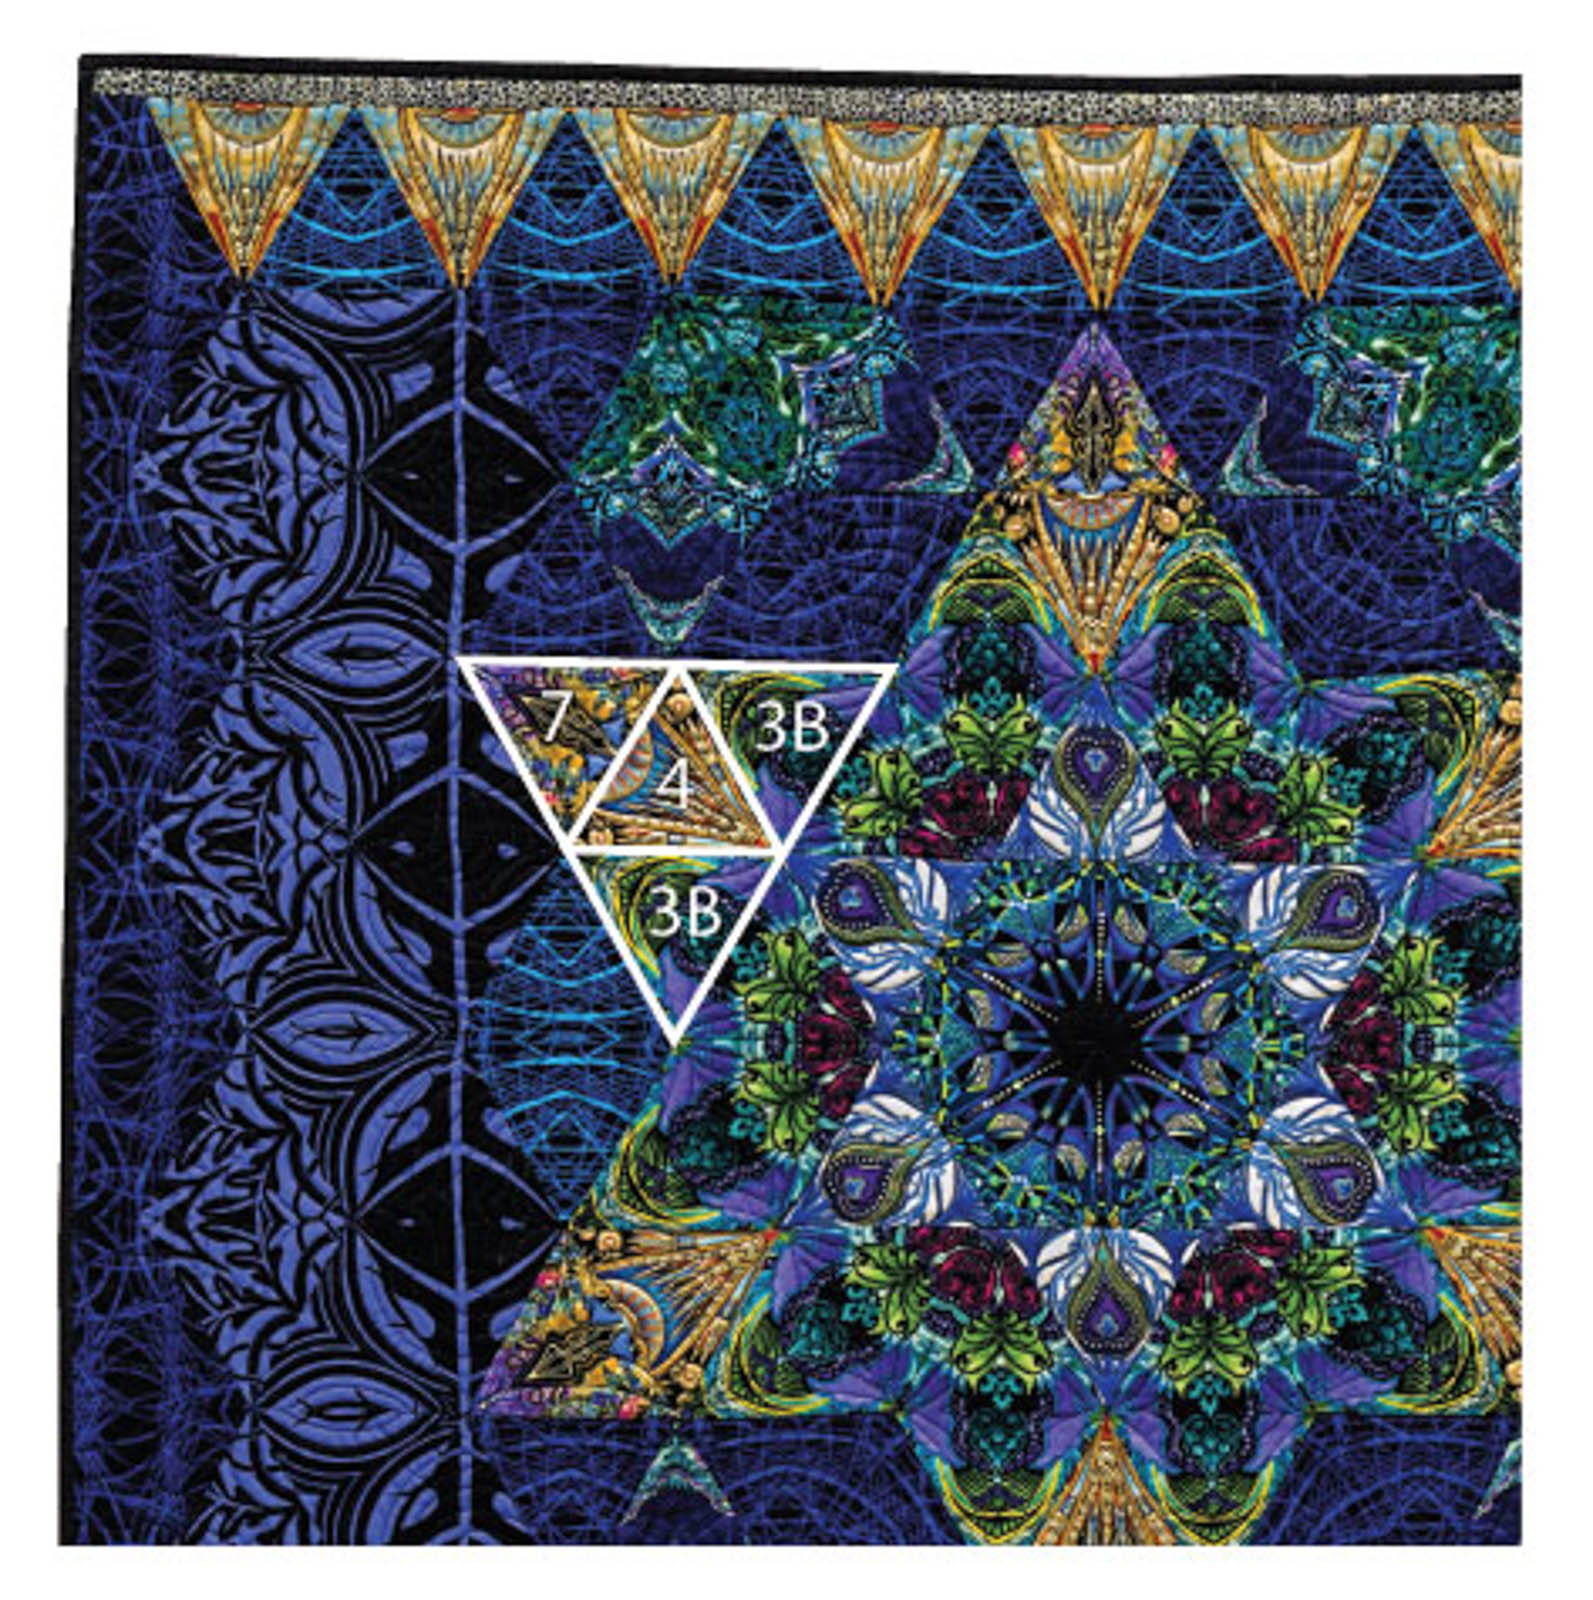 Each of the six star points seems seamless but is composed of four 60° triangles made from three fabrics (one fabric is used twice).
If you’d like to learn more about how to create quilts that look dramatic and complex but are easy to piece, please refer to FABRICADABRA: Simple Quilts, Complex Fabric by Paula Nadelstern. C&T Publishing, 2016.
Images and book give-away courtesy of C&T Publishing.

What you might also like


132 comments on “Illuminated Star Quilt”
-
-
My next project is a handkerchief quilt made with my friend’s late mother’s hankies.
-
I have quite a few ideas, something kinda modern and scrappy. White or grey background.
-
Really don’t have one I’m working on quilted purse
-
-
I have a few unfinished quilts that need to be finished. Hopefully I can get them done once Christmas is over so I can start on a new project. My local Bernina store is having an embroidered Block of the Month starting the end of January that I would like to start.
-
I will be working on a quilted tote bag. It has 28 fabric pictures of my family. They are printed in color on fabric paper and worked between single rows of quilted squares, the same size, with lots of different colors. One row on each side of each picture.
-
Iquilt place-mats, simple, quick and easy and a welcome gift.
-
I need to finish a block a month quilt that I’m going to give a a wedding gift in March, still need to do more than half of the squares and then quilt it,.
-
Looks like a great project to start in the new year.
-
My next project is nothing at all like these beautiful illuminated stars; it’s going to be a simple quilted potholder. A small beginning but a beginning, so that’s what counts. I would love to expand my skills to be able to create beautiful designs like Paula! Thank you for this fabulous blog post!
-
All I can say is wow! I just finished a 60 degree triangle quilt for my new grandson but it is not like that! As for next quilt not sure I have a counterpoint quilt I need to finish quilting first.
-
My next quilting project is to baste and quilt a Bonfire Sampler quilt I made from Anne Marie Chany’s book ‘Sister Sampler Quilts.’ The top has been finished for a few weeks, but holiday projects intervened. I will baste and start the quilting during the week between Christmas and New Years 2016.
-
Love this, what a great way to use up odds and ends.
-
Wow! Paula’s quilts are incredible!
My next goal is to finish a work in progress including quilting it myself. -
I am getting ready to to work on a special baby quilt and I will have to hurry as the baby is due in two weeks. Yikes!
-
Love that you can use up your pile of scraps and create something so beautiful!!!!
-
A custom quilt for my sister.I’m still kicking around ideas for it.
-
My next project is Stars Over Capri, a king size quilt made of batiks. Paula’s quilt is gorgeous!
-
I am working on a Cityscapes quilt from Hoffman. I would absolutely love to make the quilts in the Fabricadabra book. They are stunningly gorgeous.
-
What a stunning quilt! My next project is a baby quilt, can’t wait to get started on it!
-
I’m about to start a cobblestone quilt with bright scraps and a deep gray background.
-
I’m working on finishing UFOs right now, but looking for ideas for my next project.
QuiltShopGal
http://www.quiltshopgal.com -
I am working on a bee block for the Philadelphia Modern Quilt Guild
-
I’m going to work on some UFOs! Praying for Bernina under the tree! Hoping Santa has one on his sleigh!
-
I have had a beautiful panel of your fabric and I have been hesitant to do anything with it. Too beautiful to cut. Now I will have to make it a new year’s project.
-
I am starting an in-the-hoop quilting project that will take at least 5 months to complete; also attending a Paula Nadelstern event in January.
-
Like a lot of quilters, I have several projects I am working on. Newest is a baby quilt that will be a gift. Second, a gift for a friend in Taiwan that involves embroidery (on my Bernina) and a variety of decorative machine quilting steps. I love Paula’s quilts and the effect that beautiful fabric can have on the visual impact.
-
My next project will be a mug rug or a flying geese tote bag
-
Beautiful quilts! My next project is to learn free motion quilting. I have one practice small quilt top ready to begin. Also have a new to me Bernina 830 with a BSR. Can’t wait for the fun to begin.
-
I’m working on a radiating star quilt. For me! Thanks for the giveaway!
-
I am currently finishing a Christmas Tree Skirt. When complete I will begin a quilt I saw by Angela Waters on the Midnight Quilt Show! I love my Berninas. Merry Christmas, all!
-
Finishing up a QCR quilt and then get a few tops quilted.
-
Ha. Finishing up Christmas gifts – photo quilts – is in my future for the next month or so!
-
Awesome opportunity! My next project is my son’s Scrappy Mountain Majesties (A Bonnie Hunter pattern).
-
I need to complete a number of projects that I have ignored through the holidays. I would love to make one of Paula Nadelstern’s quilts one day. They are amazing works of art.
-
a little wallet for my daughter and grand daughter
-
My next project is to finish two table toppers from the Iowa Shop Hop 2016 fabric. I finished three of them and gave them as gifts. One of these will be mine! The next project is a red/white/blue exchange fabric quilts. Lots of cutting still to do.
-
I am going to make a wool quilt.
-
After I made a quilted kennel mat earlier this year, my friends want me to make kennel mats for their fur babies. So, I guess that is next on my schedule of things to do.
-
Seems like I always have several quilt projects going on at the same time. My goal for the new year is to finish the quilt I started this year – block of the month club – local Bernina dealer.
-
The illuminated star is absolutely gorgeous. The setting makes the colors even more vibrant. Thank you for the creative idea. My next quilting project is a string quilt that would use up a lot of my fabric stash with a kite template in the middle. It’s a pattern from quilt designer, Dodi Paulson, that she called String Me Along.
-
My next project is a princess quilt for my granddaughters bed with matching pillow sham – I didn’t get it done last winter because I had another granddaughter born in Feb so I stopped and made her a quilt!
-
My next project will be a BOM at my local quilt shop as well as work on finishing previous years quilts. Also have a number of projects started from my local Bernina store classes, too, that I hope to finish.
-
These quilts are absolutely beautiful! I would like to make some art quilts to hang on our walls. Thanks for the chance to play : )
-
Wow beautiful quilts, would love creating one like these! My next project is a Dr Who Tardis quilt for my granddaughter!
-
An easy beginner project! Nothing specific yet!
-
This work is unbelievably beautiful. My next project is to actually quilt a table runner with metallic thread. I haven’t used this thread for quilting so wanted to finish this Christmas project without time pressure. Ready for next year!
-
I am going to resume making some appliqué blocks for a quilt I will give to a new church friend who has multiple health problems. I think this quilt with lots of appliqué flowers and birds on it will cheer her up.
-
Amazing (in the truest sense of the word. I will never be able to do something so complex. And it is positively gorgeous! enjoy it.
-
Since we sold our house and I had to downsize my sewing from a room to a closet I discovered I have way to many UFOs. One is a xmas quilt I want to finish. That will be the first in my year of completing UFOs.
-
First I have to say that Paula Nadelstern’s quilts inspired me to try quilting. I did not master techniques required to assemble a quilt with the skills she has mastered. I turned to art quilting after discovering the beautiful work of Annemieke Mein. I am currently working on a quilt inspired by a painting of the Pre-Raphaellite artist, William Holman Hunt-Pandora. I am making good progress!
-
My next quilting project is a quilt for our church raffle in May. I am fascinated by the above quilts. Would love to make one. Thank you.
-
I want to make a blanket.
-
Great post on your process of designing Paula. Having recently met you and not having a lot of familiarity with your work this led me to a greater understanding and appreciation of your work-thanks.! Hope to have more conversations with you in the future!
-
A large block star quilt!
-
Vintage Rose!
-
First, all I can say about the Quilts in this post is “WOW!”. Amazing! And to answer the question, I’m still working on a Christmas wall quilt but I have two BOM quilts to put together so they are my priority in the New Year.
-
Beautiful quilts! My projects are 2 BOMs I am currently working on.
-
Gorgeous fabric and interesting insights into Paula’s designing! Thanks for sharing! I am working on a block for an upcoming block exchange!
-
Next up for me is three finished quilt tops that I need to quilt.
-
My next quilting project is to finish the 5 quilts I am working on now! I keep getting side-tracked by other projects! Merry Christmas to all!
-
I’d like to make a quilted fabric bag sometime in the near future. Merry Christmas Benartex and Paula Nadelstern! Thank you for a wonderful Christmas giveaway!
-
My next project is a queen size quilt for my daughter who just moved to Portland. She wants a quilt but doesn’t know I have already started the quilt.
-
A throw with applique cats for myself.
-
Quilts are great projects. However, my next quilting project is actually a zipper pouch with flying geese. I like to think of it as a mini quilt.
-
My next quilting project will be to help my husband make his first quilt.
-
First I plan to finish all my UFO’s, my usual January plan. Why do I start so many quilts and not finish them?? Next up is a throw for myself, made with purples and greens! Thanks for the great giveaway and Merry Christmas! [email protected]
-
these quilts are amazing to say the least. I’m working on a purple and ecru with gold stars -Hunter’s Star quilt. Paula your work is too great for words.
-
I’m starting a birthday quilt for my grandson.
-
Getting ready to start the blocks in the quilt block Bible
-
gorgeous.. love that its all about the fabrics/prints. Next project is for a friend, moroccan tile pattern using bold prints primarily in pink, orange and reds.
-
What a fabulous prize. I would love to win, but probably shouldn’t as it would inspire me to start a new project. My next quilting project should be to finish a work in progress, either my Christmas log cabin or Flower garden full size quilts.
-
I think my next project is a table topper, because I kind of need one and I have a layer cake that I need to use.
-
I am working on finishing some quilts so I can start work on chakra quilts. I plan to include crystal beading.
-
Beautiful, Paula! Now I want to try something like this!
-
My next project is a very enlarged paper-pieced Dr. Who Dalek for my granddaughter. The original pattern was about 12″ square. My finished center panel will be over 36″, but some of the pieces are still very tiny!
-
My next project is Trendtex Challenge for CQA. Love Paula’s work.
-
Beautiful! I’ll begin sewing a quilt for my grandson, as well as begin a block of the month class, which will teach this beginner many things.
-
What a beautiful quilt…her work is amazing! I am already on to my next project, which is to work on a fun setting for some patriotic BOM that I won earlier this year. Happy Holidays to all!
-
My beloved mom-in-law will be coming to stay us with us for a few months this spring. I want to make a new quilt for her to make her feel welcome.
-
I would love to make one of Paula’s lovely quilts! But for now, my next project is a baby quilt for my young friend, Betsy!
-
I left a comment earlier,but it’s not showing.My next project is a quilt for my sister.
-
My next quilting project will be a quilt for a bundle of joy due to arrive next month 🙂
-
I set it aside to work on Christmas gifts, but I’ve started a National Park themed quilt to use in our camper. Thank and I’ll be finishing up a couple of quilts to go in my guilds show in April.
-
A bunch of the ladies at our church will be making a rainbow cross quilt for our church. Plus I will be doing a quilt block of the month with a friend of mine.
-
Amazing quilts seen here. I just finished making my family all new Christmas stockings. Next project is to sandwich my son’s quilt and sew it together on my domestic…it is an oversized King. Should prove interesting to do…lol
-
Just learning to piece. This quilt is beautiful. It looks difficult
-
I would like my next project to be an art quilt of a beach and ocean scene. I made a shell covered frame to put it in.
-
Like some of the others I hope to work on half completed projects ( one a Paula project ) and to work on a design for my sisters quilt. We have all the fabric just need to find the best design for the fabric.
-
My next quilting project is a baby quilt for a friend. This quilting technique is incredible, may be a level or two beyond my color/fabric selection skill set but I definitely can admire!
-
This is absolutely gorgeous and going on my bucket list! My next project will be the new Vintage Rose quilt.
-
I’m beginning a quilt for my husband featuring bees and hexies because his hobby is beekeeping.
-
I will work on a Nautical Quilt
-
My husband has recently been diagnosed with ALS. He asked for a large enough lap quilt to cover him. I am still working out what I want to do–has to be relatively quick and easy since I will soon be taking more time looking after him and I want him to start using it soon.
-
A quilt from Fabricadabra…I have some Paula Nadlestern fabric, just waiting for it!
-
I’m going to be working on all those UFOs I have–unless I get distracted again!
-
I have two. A baby blanket for a new arrival at church and something that came to me as I was sewing this holiday season. I have a HUGE stash of polka dot fabrics that sit next to my sewing table. It is always there for inspiration. I noticed many red with white dots and whites with red dots in lots of different sizes. Will be designing a quilt using just those fabrics. Should be so much fun!
-
Love this quilt. One of my first quilts was an exercise in using a border print to make different star blocks. I can appreciate your ability to visualize the star and the borders. Love your work.
-
I will be quilting a block of the month that I did with my local quilt shop. Finished piecing it together and am waiting till after the holidays to machine quilt it.
-
I have a Christmas table runner to finish as a gift before heading to visit family on Tuesday!
-
I’ll be working on a weekly for my grandson who just turned 1.
-
That actually said “quilt” instead of “weekly. ” ?
-
I have two jelly rolls with Christmas patterns, plus some backing material. I’m going to start working on the Christmas quilt I didn’t have time to make over the holidays, lol.
-
My next project is to finish 15 laminated paint smocks and then 20 PCP smocks/bibs for the daycare that my granddaughter attends. The paint smocks are for those messy projects then the other ones can be used when they eat. Can’t wait to get back to sewing. The wall hanging is absolutely stunning.
-
My next quilt is a special present for my daughter and son-in-law’s 25th anniversary.
-
I will be deconstructing a baby quilt I made for my grand daughter so I can put a new but different batting in it. I used one with an adhesive on both sides. After washing , it shriveled and wrinkled terribly.
-
The next quilt I’m working on is a music quilt for my 14 year old nephew who loves to hip hop dance!
-
I am finishing up a quilt I started at a class I took at the Houston quilt show. I took a class from Paula several years ago and still have my block hanging in front of my sewing machine. She does beautiful work.
-
I am so intimidated by this process, I am in awe and would love to try this.
-
I am simply amazed by this quilt!
I am finishing my first quilt w 14″ blocks. Simple but I have learned so much. -
finishing a BOM (finally)
-
I would like this to be my next project…beautiful!
-
I am starting a snowball quilt out of flannel for my husband who wants something very soft for him and his cats!
-
Finishing my daughter’s dancing butterfly quilt.
-
I am coming along with a king sized bed quilt. My husband has been waiting anxiously for me to complete. Soon I tell him, soon.?
-
My next quilting project will be a belated Christmas present. I’m making a weekender bag for my best friend, who fortunately is used to getting her present late. 🙂 Thanks for sharing Paula’s quilts. Absolutely gorgeous!
-
These quilts are pretty amazing. I have to make a wedding quilt for my brother and his wife.
-
My next quilt project is to finish an UFO quilt for my bed.
-
My next quilt will be Bonnie Hunter’s mystery quilt, En Provence. I just finished 3 quilts for other people and it is time to do one for me! This will be my first scrappy quilt, which will be fun.
-
I am making a table runner for a friend from material she had dyed.
-
I have a long list of projects, but Illuminated Stars just appeared at the top. I am addicted to Paula Nadelstern fabrics. Loved taking the 30/60 class! Merry Christmas!!!!!
-
My next sewing project is going to be a wool applique quilt!
-
My next project is a barbell landscape
-
“Bargello” got to love auto correct. LOL
-
-
A Stack and Wack. First time.
-
My next quilting “project” is to quilt the art quilt that I have put together and layered
-
Gorgeous quilt. Hope to move on to finishing two UFOs and then I have several baby quilts to do. Would love this book!
-
That is beautiful! I’m not a quilter but should try one of these years. I mostly sew garments.
-
My next project is a quilted tablecloth. ❤❤❤ Love the beautiful quilt pictured above! Paula’s work is always outstanding!
-
This quilt is gorgeous! Starting to collect fabric – which takes me awhile. Currently hand appliqueing Simple Gifts; this is an ongoing project!
-
My next project is to do a double size bed quilt and a crib quilt of the same pattern for my granddaughters who are 3 months and 10 years old
-
My next project is going to be a wedding quilt for my daughter who is a Medieval re-enactor. I will be making a lady of the lake pattern background with the lady’s arm holding Excalibur aloft coming out of the water. It should be a fun challenge.
Leave a Reply
You must be logged in to post a comment.

I am working with a grand daughter on piecing with the end being a small quilt. We are enjoying the process.