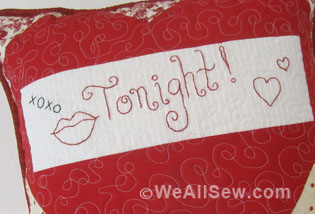
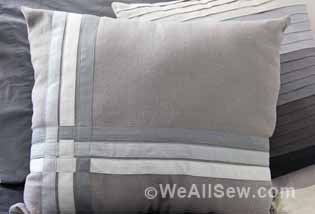
Make an “It’s a Wonderful Life” Pillow
This project is one of many featured in the BERNINA 2013 Holiday Look Book. Visit your local BERNINA store for more information.
There’s nothing like a Frank Capra movie to warm the heart on Christmas Eve. That’s why it’s been a family tradition in my house to sit with my loved ones and mugs of hot chocolate every year and watch “It’s A Wonderful Life.” This, pillow inspired by my favorite Christmas movie, seemed the perfect addition to my sofa. (Yes, I am that neighbor that takes the decorations down on St. Patrick ’s Day. So naturally I will use my pillow all year long.) I wanted to keep the pillow simple and let the words shine. Manipulating the fonts in the BERNINA DesignerPlus Embroidery Software 6 is one of my favorite things to do, so I wanted that to be my project, not hours of sewing in front of the machine. With a few clicks of a mouse and a few pushes of buttons on my BERNINA 830 the pillow embroidery was complete. Thanks to the BERNINA Dual Feed feature in sewing mode I was finished just in time to “veg” on the couch and watch “Elf.” Yes, unlike “It’s A Wonderful Life,” THAT movie runs on cable all year long.

Supplies
– BERNINA DesignerPlus Software
– Embroidery machine (sample sewn on a BERNINA 780)
– Your largest embroidery hoop and its positioning template
– Embroidery foot (BERNINA Embroidery Foot #26)
-Quarter-inch foot (BERNINA Patchwork Foot #37/37D or Patchwork Foot with Guide #57/57D)
– 1 yard of fabric
– 1 yard of fusible interfacing
– 20″ square of batting
– Isacord embroidery thread, red #1902
– Nifty Notions fine-tip water-soluble pen
– 202 Spray & Fix Temporary Fusible Adhesive
Digitize the Words
Open BERNINA DesignerPlus Embroidery Software 6.
Click the Show Hoop icon to deselect and turn off the hoop image.
Select the Lettering icon and click on the screen. Type It’s and press Enter on your computer keyboard. Click on the desktop or press Esc on the keyboard to deselect the lettering. Don’t worry about the alphabet style – we’ll change that later.
Again using the Lettering tool, type A and press Enter. Deselect the letter.
Type Wonderful and press Enter; deselect.
Type Life and press Enter; deselect.
You probably have something that looks like this:

Choose the Alphabet Styles
Right click on It’s; the Object Properties window opens and automatically directs you to the Lettering tab. From the Alphabet drop-down window select the Empress alphabet (or any other alphabet you like); click OK. Press Esc or click away from the lettering to deselect it.

Right click on A. Select the Bella Donna alphabet (or another alphabet style) and click OK. Deselect.
Right click on Wonderful. Select the Eliza alphabet (or another alphabet style) and click OK. Deselect.
Right click on Life. Select the Erika alphabet (or another alphabet style) and click OK. Deselect.
Arrange the Words
Click and drag the lettering as shown below.
 Select the A and enlarge, rotate, and place as desired.
 Select Wonderful and click on the Break Apart tool; this will enable you to select and work with just the W. Use the Polygon Select tool to select the entire W. Click the Group icon.
 Use the Polygon Select tool to select the rest of the word (onderful); click the Group icon.
Select the W and enlarge it by clicking and dragging one of the black corner blocks. Arrange the letters and words as desired.
 Press Ctrl + A to select all parts of the design; click on the Group icon. Select a red color chip from the Stitch and Color Bar to see an approximation of the stitched design.
Save the design as ItsAWonderfulLifeComplete.art60.
Create the Individual Embroidery Files
Select All and rotate the design 90 degrees. Enlarge to 11″ x 11-1/2″. With all elements of the design selected, click on the Fill drop-down menu and select Step.
![]() The size of your largest embroidery hoop determines how many hoopings will be needed. For instance, it only takes two hoopings to stitch the design in the Jumbo Hoop, while it takes three hoopings to stitch it using the Mega Hoop. The following instructions are for two hoopings in the Jumbo Hoop; adjust as needed for your machine and hoop.
The size of your largest embroidery hoop determines how many hoopings will be needed. For instance, it only takes two hoopings to stitch the design in the Jumbo Hoop, while it takes three hoopings to stitch it using the Mega Hoop. The following instructions are for two hoopings in the Jumbo Hoop; adjust as needed for your machine and hoop.
Right click on the Hoop icon and select BERNINA B780/750 Jumbo 208×400 #26 (or your largest hoop) from the drop-down menu. Make sure the Display Hoops box is checked. Under Position, select Manual. Click OK.

Select All. Click and drag the design to position it in the hoop. Note that two hoopings will be required: One for It’s and one for A.

Use the Polygon Select tool to select Wonderful Life. Right click and select Cut from the drop-down list; this saves the cut portion to the clipboard.
Select File > New to open a new file. Paste the cut design. Save as WonderfulLife.art60.
Use the tab at the top of the window to return to the previous design. Save it as ItsA.art60.
Select Write to Machine and send the designs to your embroidery machine or USB stick.
Print Paper Templates
Select the Print Preview icon; this will show what the template will look like. Select Print Options and set as follows: Selection = Whole Design; Size = Actual Size; Elements = Embroidery > Hoop, Picture, Connectors, and Start/End Crosshairs. Click OK. Repeat for the other design.
 Embroider the Design
Cut a 20″ square of fabric for the pillow front. Bond fusible interfacing to the wrong side of the fabric following the manufacturer’s instructions. Using a water-soluble pen, draw horizontal and vertical center lines on the fabric.
Spray the wrong side of the It’s A paper template with 202 fusible spray. Place it just above the horizontal center line so the A is just touching the line.
Spray the wrong side of the pillow front with 202 Spray & Fix Temporary Fusible Adhesive; center and adhere it to the 20″ square of batting.
Hoop the pillow front in the Jumbo Hoop, positioning it so the It’s A template fits within the gridlines of the plastic placement template.
Attach the hoop to the machine and remove the plastic template. Use Virtual Positioning, if available, to place the needle at the embroidery starting point on the paper template; otherwise use the positioning arrows to adjust the hoop position. Remove the paper template and stitch the design.
When the It’s A embroidery stitching is complete, remove the hoop from the machine and the fabric from the hoop.
Re-hoop the pillow front in the same manner as above, this time positioning Wonderful Life as shown in the diagrams. Embroider the design.
Assemble the Pillow
Trim the completed pillow front to 17-3/4″ square, centering the embroidered design.
Cut two 17-3/4″ x 21″ rectangles from the remaining fabric. Fold in half to 17-3/4″ x 10-1/2″; press. These will form the back of the envelope pillow.
Layer the pillow for sewing: Pillow top, right side up; one of the back panels, raw edges aligned with the upper edge of the pillow front; and the other back panel, raw edges aligned with the lower edge of the pillow front. Pin to secure.
Using a quarter-inch foot (BERNINA Patchwork Foot #37/37D or Patchwork Foot with Guide #57/57D) and a straight stitch, sew around the edges of the pillow with a 1/4″-wide seam allowance.
Turn the pillow cover right side out. Insert the pillow form. Your pillow is complete!
What you might also like


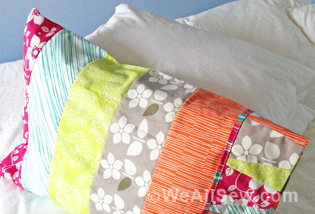
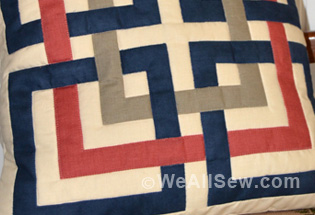

![Is that big, bold scrap of fabric staring at you? This quilt square is designed to let a large print fabric shine. This simple block is quick to make and easily stitched into a pillow. With a bit more fabric you can turn it into a placemat or table runner. The perfect project for turning fabric scraps into something bold and beautiful. Geometric Quilt Block Pillow Supplies Large scraps or fat quarters of 100% cotton quilter's fabrics: One large print One light solid or small print One medium solid or small print One dark solid or small print 1/2 yard of white cotton fabric for the pillow lining 1/2 yard of fabric for the pillow back Coordinating thread 14" square pillow form Universal or Sharp needle, size 75/11 1/4" foot (BERNINA Patchwork Foot with Guide #57) Straight stitch foot (BERNINA Straight Stitch Foot #13) Zigzag foot (BERNINA Reverse Pattern Foot #1) or overlock foot (BERNINA Overlock Foot #2) Rotary cutter and self-healing cutting mat Clear acrylic gridded ruler Download and print the Geometric Quilt Block Pillow Cutting and Piecing Diagrams: [download id="90"] Step 1) Cut the fabric pieces. Accurate cutting helps avoid crooked, puffy, or uneven seams in your quilt block. Use a self-healing mat, a clear acrylic gridded ruler, and a rotary cutter to cut the pieces for your quilt block. Rotary cutters Rotary Cutting Tips Self-healing mats come in different sizes. 24" x 36" is a good size to have, but if you don't have a dedicated sewing space or don't plan to use it often, try an 18" x 24" mat instead. Acrylic rulers also come in many shapes and sizes. A standard 6" x 24" ruler is a good start, and I've also found a 12-1/2" x 12-1/2" square ruler to come in very handy. Rotary cutters are measured by the size of the circular blade in millimeters. A 45 mm rotary cutter is perfect for making the kind of straight cuts needed for this project. Use the grid on your cutting mat to help square up fabric pieces when needed, but when measuring to cut the pieces be sure to use the gridlines on the acrylic ruler. Hold the ruler firmly on top of the fabric, and use a steady, firm, pressing motion when cutting with the rotary cutter. Cut one of each pattern piece from the corresponding fabrics (also see downloaded Cutting Diagram): Piece #1 - Light solid or small print, 4" x 3" Piece #2 - Dark solid or small print, 4" x 5" Piece #3 - Light solid or small print, 4" x 2-1/2" Piece #4 - Large print, 9-1/2" x 9-1/2" Piece #5 - Light solid or small print, 2-1/2" x 9-1/2" Piece #6 - Dark solid or small print, 14-1/2" x 2-1/2" Piece #7 - Medium solid or small print, 14-1/2" x 3-1/2" Step 2) Piece the block. Set your sewing machine for a straight stitch about 2.5 mm long. Attach a quarter-inch foot, such as BERNINA Patchwork Foot with Guide #57, to your sewing machine. The blocks will be sewn together using a 1/4"-wide seam allowance. Stitching an accurate 1/4"-wide seam will help your block come together with nice, straight seams and avoid pieces not fitting together as you sew on. Geometric Quilt Block Pillow Patchwork Piecing Tips Us a quarter-inch foot to help you keep the correct seam allowance width. The BERNINA Patchwork Foot #37 is designed specifically so that following the edge of the foot will create a 1/4"-wide seam allowance. BERNINA Patchwork Foot with Guide #57 is similar to foot #37, but adds a metal guide at the side of the foot to help you like up your fabric piece exactly at the edge of the foot. Attach a seam guide to the bed of your sewing machine along the 1/4" seam allowance mark on your stitch plate, then place the edges of your fabric pieces against the guide as you sew. Alternatively, place a piece of blue low-tack painter's tape along the 1/4" seam allowance mark on your stitch plate as a guide for your fabric. Piecing Diagram Geometric Quilt Block Pillow Start by stitching Piece #1 to Piece #2 along one 4" edge. Press the seam allowances to one side. Next, sew Piece #3 to Piece #2 along one 4" edge as shown in the diagram; press after stitching. Geometric Quilt Block Pillow Continue adding pieces to the block as shown in the diagram, pressing each seam as you go. Tip: When pressing seams, be sure to press DOWN with the iron as opposed to "ironing," or pushing the iron back and forth over the seam. Ironing (back and forth motion) can cause straight seams to go crooked. Pressing straight up and down with the iron will help your seams stay nice and straight. Press all seams again from the back of the block when finished. Geometric Quilt Block Pillow The finished block should measure 14-1/2" x 14-1/2". Geometric Quilt Block Pillow Step 3) Construct the pillow cover. Cut one 14-1/2" x 14-1/2" square of fabric for the pillow lining. Cut two 11" x 14-1/2" rectangles of fabric for the pillow back. Create a 2" hem along one edge of each 11" x 14-1/2" pillow pocket piece: Turn under 1" along one long edge; press. Turn under an additional 1"; press. Geometric Quilt Block Pillow Topstitch close to the inner edge of the folded hem with a straight stitch, using either a multi-purpose foot or a straight stitch foot. Geometric Quilt Block Pillow Layer and pin the pieces of the pillow together: Begin with the 14-1/2" square of white cotton for the lining. Add the finished patchwork block, right side up, matching all edges. Add one pocket pillow back, right side down, matching the raw edges. The finished hem will be about 5" from the other end of the pillow. Add the other pocket pillow back, right side down, on the opposite edge. The hemmed edges will overlap. Geometric Quilt Block Pillow Pin around all four edges of the pillow. Set your sewing machine for a straight stitch of 2.5 mm long. Stitch around all four sides of the pillow using a 1/2"-wide seam allowance. Trim all seam allowances to 1/4". Attach an overlock or zigzag stitch foot to your sewing machine. Set your machine for a zigzag or overlock stitch and sew over the raw edges to keep them from unraveling. Geometric Quilt Block Pillow Turn the pillow cover right side out, gently pushing each corner from the inside to turn it. Insert the 14"-square pillow form through the opening in the back of the pillow cover. If needed, use a little fiberfill to help fill out the pillow corners. Geometric Quilt Block Pillow Geometric Quilt Block Pillow](https://weallsew.com/wp-content/uploads/sites/4/2014/01/Geometric-Quilt-Block-Pillow-WeAllSew.jpg)
5 comments on “Make an “It’s a Wonderful Life” Pillow”
-
-
Hi, Vivian – Even though this isn’t a pdf file like some of our other projects, you can still print the instructions. If you want just the instructions and none of the web page info/graphics, I’ll tell you what I do: I use my cursor to select all the text and images in the blog post, then open a new Word.doc or Publisher.pub and paste everything there. You might need to tweak it a bit to make it pretty, as the blog formatting is very basic. Let me know how that works for you – Jo
-
-
Did you use a stabilizer in the hoop?
-
I’ll check with Gayle, but I think the fusible interfacing and batting would be enough to stabilize the fabric for embroidery. Jo
-
-
I love this pillow, so simple but so creative all at the same time!
Leave a Reply
You must be logged in to post a comment.

This is a beautiful pillow. Please tell me how I can download this project or save it.
Thanks,
Vivian fyke