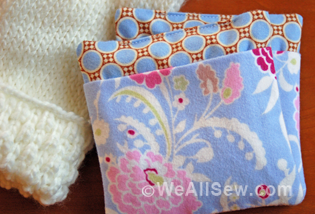
How to Make a Pacifier Pocket
End the hunt for your baby’s binky! This handy, easy-to-make pacifier pocket keeps the pacifier handy and, just as important to fastidious moms, clean. Personalize it with wild and playful colors to reflect your sense of style or your baby’s unique personality. A great and thoughtful gift for a new mom, too. When the crying starts, you’re only a snap away from contentment.

Read all of the pattern instructions before beginning. This will help you plan how to orient your fabric.
All seam allowances are 1/2″.
Supplies
- Outer fabric
- Lining fabric
- Fusible interfa
- cing
- Two sets of long-prong snaps, approximately 1/2″ in diameter
- Snap-setting tool
Step 1) Prepare the fabric pieces.
Print the pattern pieces: pacifier_pocket_pattern_pieces_121814.pdf
Cut the fabric and interfacing:
- Main Pocket Piece
- Cut two of outer fabric
- Cut two of lining fabric
- Cut four of interfacing
- Pocket Flap
- Cut one of outer fabric
- Cut one of lining fabric
- Cut two of interfacing
- Center Strip
- Cut one of outer fabric, on the fold
- Cut one of lining fabric, on the fold
- Cut two of interfacing, on the fold
- Strap
- Cut one of outer fabric, on the fold
- Cut one of interfacing, on the fold

Fuse a piece of interfacing to the wrong side of each fabric piece, taking care to place the adhesive side of the interfacing against the fabric (and not the iron or ironing board!).

Step 2) Sew the Main Pocket pieces together.
Line the top of the Center Strip up with the top of one of the Main Pocket pieces, with right sides together. Sew the Center Strip to the Main Pocket piece by sewing along the outer edge of the Main Pocket with a 1/4″-wide seam allowance. You’ll need to stop and readjust as you’re sewing, easing the Center Strip around the curve of the Main Pocket piece. If the Center Strip extends past the Main Pocket, trim away the excess so the edges match.

Attach the other Main Pocket piece to the other edge of the Center Strip, easing the Center Strip around the curves.

The three pieces stitched together should look like this:

Zigzag around each edge, and then trim off any excess fabric.

Repeat the previous steps to join the lining fabric pieces together.

Step 3) Assemble the Flap and Strap
Place the two Pocket Flap pieces right sides together. Stitch them together along the curved edge using a 1/4″-wide seam allowance.
Fold the Strap in half lengthwise, with right sides together. Sew along the long edges with a 1/4″-wide seam allowance, leaving both ends open.

Eliminate some of the bulk in the seam allowances by cutting notches along the outer curved edge.

Turn the Pocket Flap and Strap right-side out. Iron flat.

Step 4) Construct the Pocket and Flap.
Turn the outer fabric Pocket right-side out. Pin the raw edges of the Pocket Flap to the pocket with the outer fabrics facing each other, being sure to center the flap along one side of the pocket.

Pin the Strap to one side of the tote, centering it along the Center Strip. Make sure the seam of the strap is facing outward.

Slide the Outer Pocket, right-side out, into the Lining Pocket, wrong-side out. The right sides of each piece will be facing each other.

Slide the Outer Pocket completely into the Lining Pocket so the upper edges are even.

Stitch around the upper edge of the Pocket using a 1/4″-wide seam allowance. Make sure you catch the Flap and Strap pieces in the stitching, and leave about 1-1/2″ open along the side opposite the Flap. (You’ll turn it right side out through this opening later.)

Begin turning the Pocket right-side out through the opening.

Pull out the outer fabric first.

Then push the lining fabric back toward the inside.

After you poke out and straighten all the Pocket edges, tuck the seam allowances of the opening to the inside and pin it closed.

Sew all the way around the upper edge, nice and close to the edge. This stitching keeps the upper edge in place and also closes the opening – no hand stitching required!

Step 5) Finish the Strap and Snaps
Zigzag the raw edge of the Strap to prevent fraying.

Attach snaps to the Flap and the front of the Pocket.
Attach snaps to the end of the strap and the side of the Pocket.


9 comments on “How to Make a Pacifier Pocket”
Thank You for the idea!
such a great ideal
Great Idea
what are the names of the fabrics used for this please? i’ve tried to look for material for the lining that is wipe clean but not of its name.
Hi, Sarah – Ashley did this quite awhile ago, so the fabrics may no longer be available; I’ll see what I can find out. I think she used regular woven cotton fabric; it’s washable, but not wipe-clean-able. For that you might want to look at laminated fabrics, which are popular right now; my local fabric shops have a variety of pretty options. I don’t know about using it for the lining; it may be too stiff. Do you have an example of the type of fabric you’re looking for? I may be able to identify it for you. Jo
I’ve just made one of these and it turned out brilliant! Thank you so much for the free pattern it was easy to follow and finished up really quickly even though I was hand sewing due to my little one being under the weather and not being able to get the machine out x I think I will be making a second one just to put on the top bar of his cot as we have a dummy grave yard underneath from where he looses them in the night x