10 Tips for Photographing Your Quilts and Sewing Projects
In Kerby Smith‘s last post, he told us about five things that we need to know to get great pictures of the quilts and sewing project we stitch on our BERNINA sewing machines. This time he give us 10 specific tips for taking better project photos.
1. Pick a white wall and hang or pin the quilt to it so it is flat against the wall and square to the floor. Use a level to get the top of the quilt parallel to the floor. If your sewing project is three dimensional, like a pillow, use white background paper draped over a small table. Place the pillow on the table so it is upright. Move the table holding the pillow a few feet in front of your white wall. This will reduce any harsh shadow from your light source.
2. Find the center of your quilt or sewing project. First, use a tape measure to find the center of the quilt from left to right. From this center point, place the center of your tripod on a line that is 90 degrees perpendicular to the quilt wall. You want the tripod positioned from the wall where the normal lens of your camera will fill the frame of the camera viewfinder or LCD viewing screen. The second measurement is to find the center of your quilt from the floor, so when you place the camera on the tripod, the center of the lens is at the same height as the center of the quilt.
3. Using a small line level, get the back of your camera square and level with the quilt. If you have lined everything up correctly, the quilt should be centered in your camera’s viewfinder or LCD viewing screen.
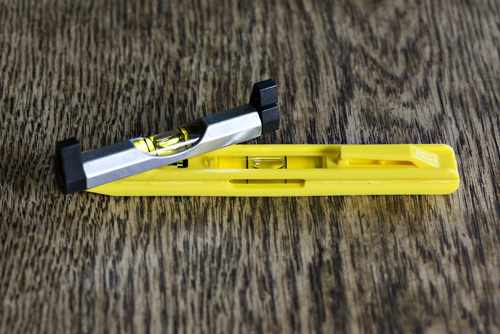
You can purchase a small “line level” at most hardware stores such as these two examples. It will sit on top of the flash shoe on most cameras and allow you to easily level your camera on the tripod to the quilt on the wall.
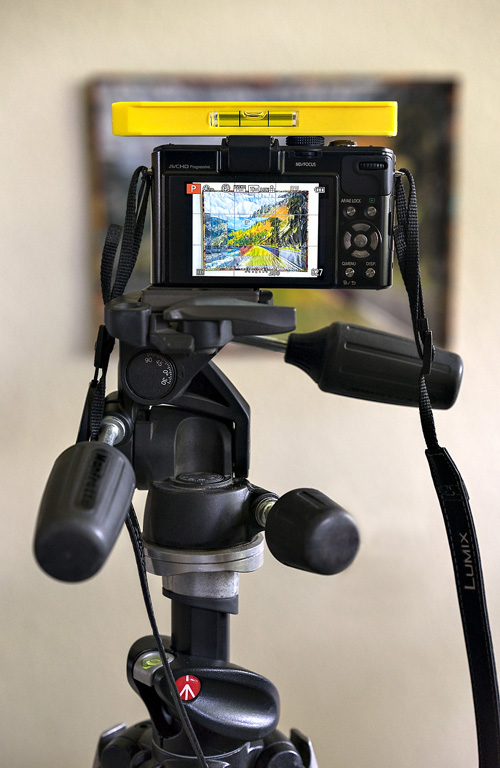
The line level is shown on top of this “point-and-shoot” camera leveling it to the quilt on the wall.
4. Light the quilt evenly. As simple as this may sound, it is very difficult for you to see differences in lighting as your brain takes what your eyes see, and then balances it out. If you are using a single light source such as the flash on your camera, take the quilt off the wall and shoot a picture of the blank white wall. Look at the picture of the white wall. If you see dark edges, then the flash unit is not large enough to evenly light the wall and it will not light your quilt properly.
5. Use a large enough light source. If your quilt is not evenly lit, get a larger flash unit or use two lights. If you see odd color on one side of the white wall it may mean you are getting a lot of light from another source such as a window or other lights in the room. Solution: Turn off other lights in the room, black out windows, or shoot at night.
6. Using two lights. If your single light source is not large enough to evenly light your art quilt, then you may want to use two lights. You can use two electronic flash units or two or more photo flood lights. Here is where your tape measure comes in handy again. You want to place each light at a 45-degree angle to the center line of your quilt and equal distance from the quilt so that they evenly light it. Again, take the quilt off the wall and shoot a picture of the white wall to make sure your lights are lighting the whole wall evenly. Note: round photoflood reflectors, like shop lights, often throw a small circle of light and, depending on the size of the quilt, you may need to use more than two of them. My preference is two rectangular soft-boxes.
An example of a two-light setup to photograph a quilt using a DSLR (Digital Single Lens Reflex) camera. The lights are photo floods in soft boxes. This image has not been color corrected and you can see the different color of the lights in relation to the ambient light.

7. Taking the Picture. Before you take your first picture, set your camera to its highest resolution and largest file size. You can always downsize the image later for your website but you can’t upsize a web image to a larger image for proper viewing and reproduction. Bracket your exposure using the +/- feature on your camera in the Aperture Priority mode. This will leave the shutter at its setting and vary the length of exposure if you are using photo flood lights. If you are using an electronic flash you can vary the intensity of flash unit with its +/- feature.
8. Shoot Horizontal or Landscape. Most cameras have a rectangular format. If your quilt is a vertical quilt, turn it sideways on the wall. It is much easier to line up your camera to shoot the image in the horizontal viewing position. It is very easy in all of the photo processing software to rotate the image of a vertical quilt shot on its side to its proper upright orientation.
9. Increase Your Color. JPEG images are processed by the computer in your camera. Most cameras use a very small range of color to create JPEG images. This is referred to as “color space.” The sensor in your camera actually records a wider range of color than it uses to process the JPEG image. The default color space for JPEG images is called “sRGB.” Many of the newer digital cameras now give you the option of increasing the color space of your JPEG images. To do this, go into your menu options and select “Adobe RGB.”
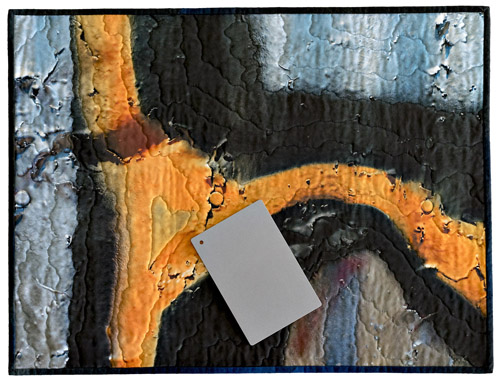
10. Advanced Technique for Post Processing to Get Accurate Color. If you have a digital camera that will shoot RAW files and software to process the RAW image such as Adobe Photoshop Elements, Adobe Photoshop CS or Adobe Lightroom, you want to shoot a picture with a digital grey card in the image under your light conditions. Shoot a picture of your subject with the Gray Card in it. Then remove the Gray Card and shoot the next frame without it. Use the image with the Gray Card in it during processing of the RAW file in Photoshop Elements, Photoshop CS or Lightroom to get the color right. You place the “White Balance Tool” eyedropper on the Gray Card and it adjusts the color of the image to the known color of the Gray Card. Then you use the same settings to process the RAW file of your quilt without the Gray Card in the picture.
Digital Gray Cards are available from most camera stores. The Digital Gray Card is a known neutral color that you can put in the picture setup of your quilt. This makes it easy to get the correct color in Post Processing Software.


One comment on “10 Tips for Photographing Your Quilts and Sewing Projects”