All Star Quilt-along Block 1
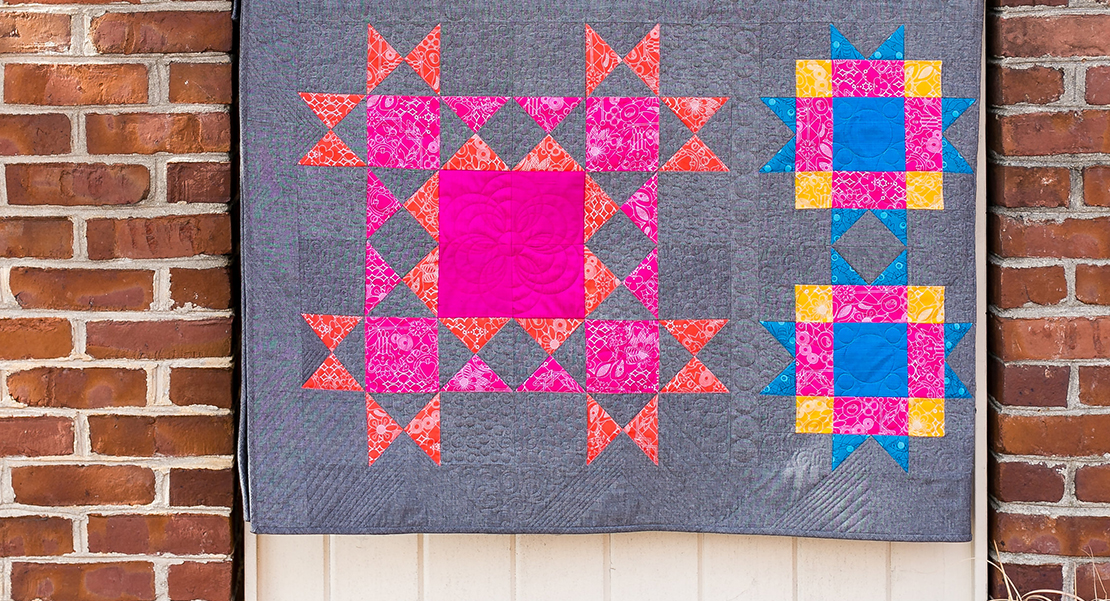
Do you ever see a line of fabric and immediately know exactly how you want to use it? That’s how I felt when I first saw All Stars by Tula Pink. All of my favorite Tula critters recolored…how could I not make a bunch of blocks to show them off?
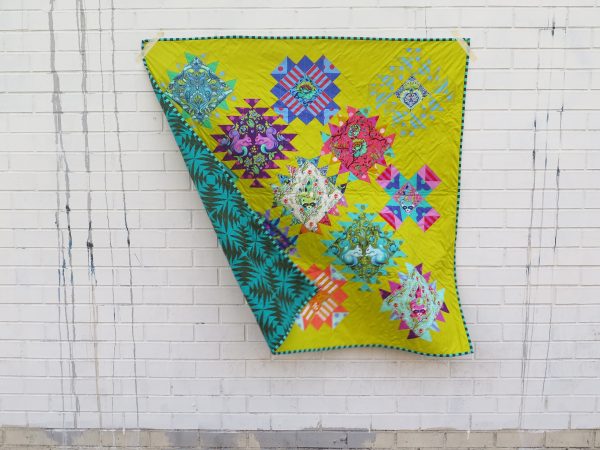
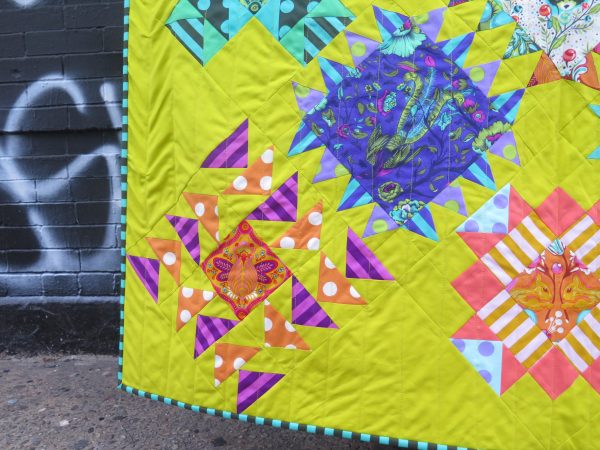
Since All Stars and the coordinating prints and solids are so bright, I decided I wanted the quilt to really pack a wallop. I knew I wanted it to be obnoxiously bright. So bright that you kind of roll your eyes when you see it because it is just dying for attention. I tried a bright clean white for the background, then a deep black, but it just didn’t feel bright enough.
The colors in All Stars sort of reminded me of a wind breaker I had in the early 90’s. It was bright coral with electric blue, highlighter yellow, and neon green. This yellow seemed like the perfect fit to really make all the colors shine. Since I was on a 90s kick anyway and the collection was called All Stars, it seemed obvious to name the quilt with a lyric from one of the biggest hits of 1999, All Star by Smash Mouth. I also just wanted the song to get stuck in everyone’s head whenever they see the name of the quilt. Because the song has pretty much been running on loop in my head since I named this quilt.
Over the next six weeks, we will break this quilt down every Thursday block by block. There are five blocks total. Week six will be all about finishing. The quilt finishes at about 50″ and comes together really quickly.
This is the schedule of the quilt-along here on WeAllSew. I also sew along over on Instagram (you can find me over there as @giucy_giuce).
- Block 1 – March 22
- Block 2 – March 29
- Block 3 – April 5
- Block 4 – April 12
- Block 5 – April 19
- Finishing – April 26
Materials to Make Hey Now, You’re an All Star Quilt
- BERNINA 770QE
- Patchwork foot #97D with seam guide
- BERNINA Stitch Regulator [BSR]
- Tula Pink All Stars—FQ Bundle
- Tula Pink Coordinating Pom Poms, Stripes, and Solids—F8 Bundle
- 2 1/2 yards background fabric
- Batting
- 3 1/2 yards backing fabric
- Thread
- Adhesive Spray (Like 5O5 Spray and Fix Temporary Fabric Adhesive)
- Rotary Cutter
- Cutting Mat
- Ruler
- Marking Pen (Like Pilot Frixion Pen)
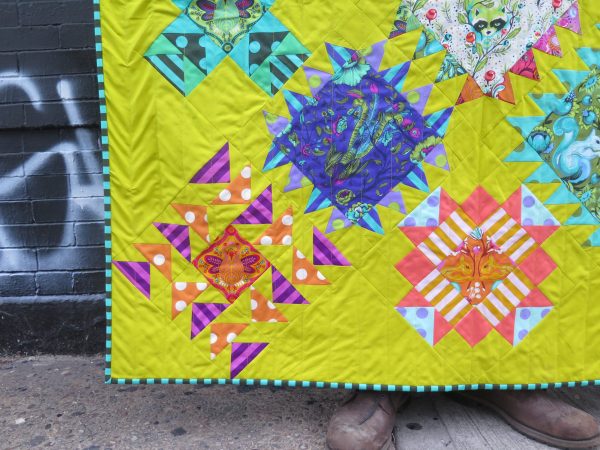
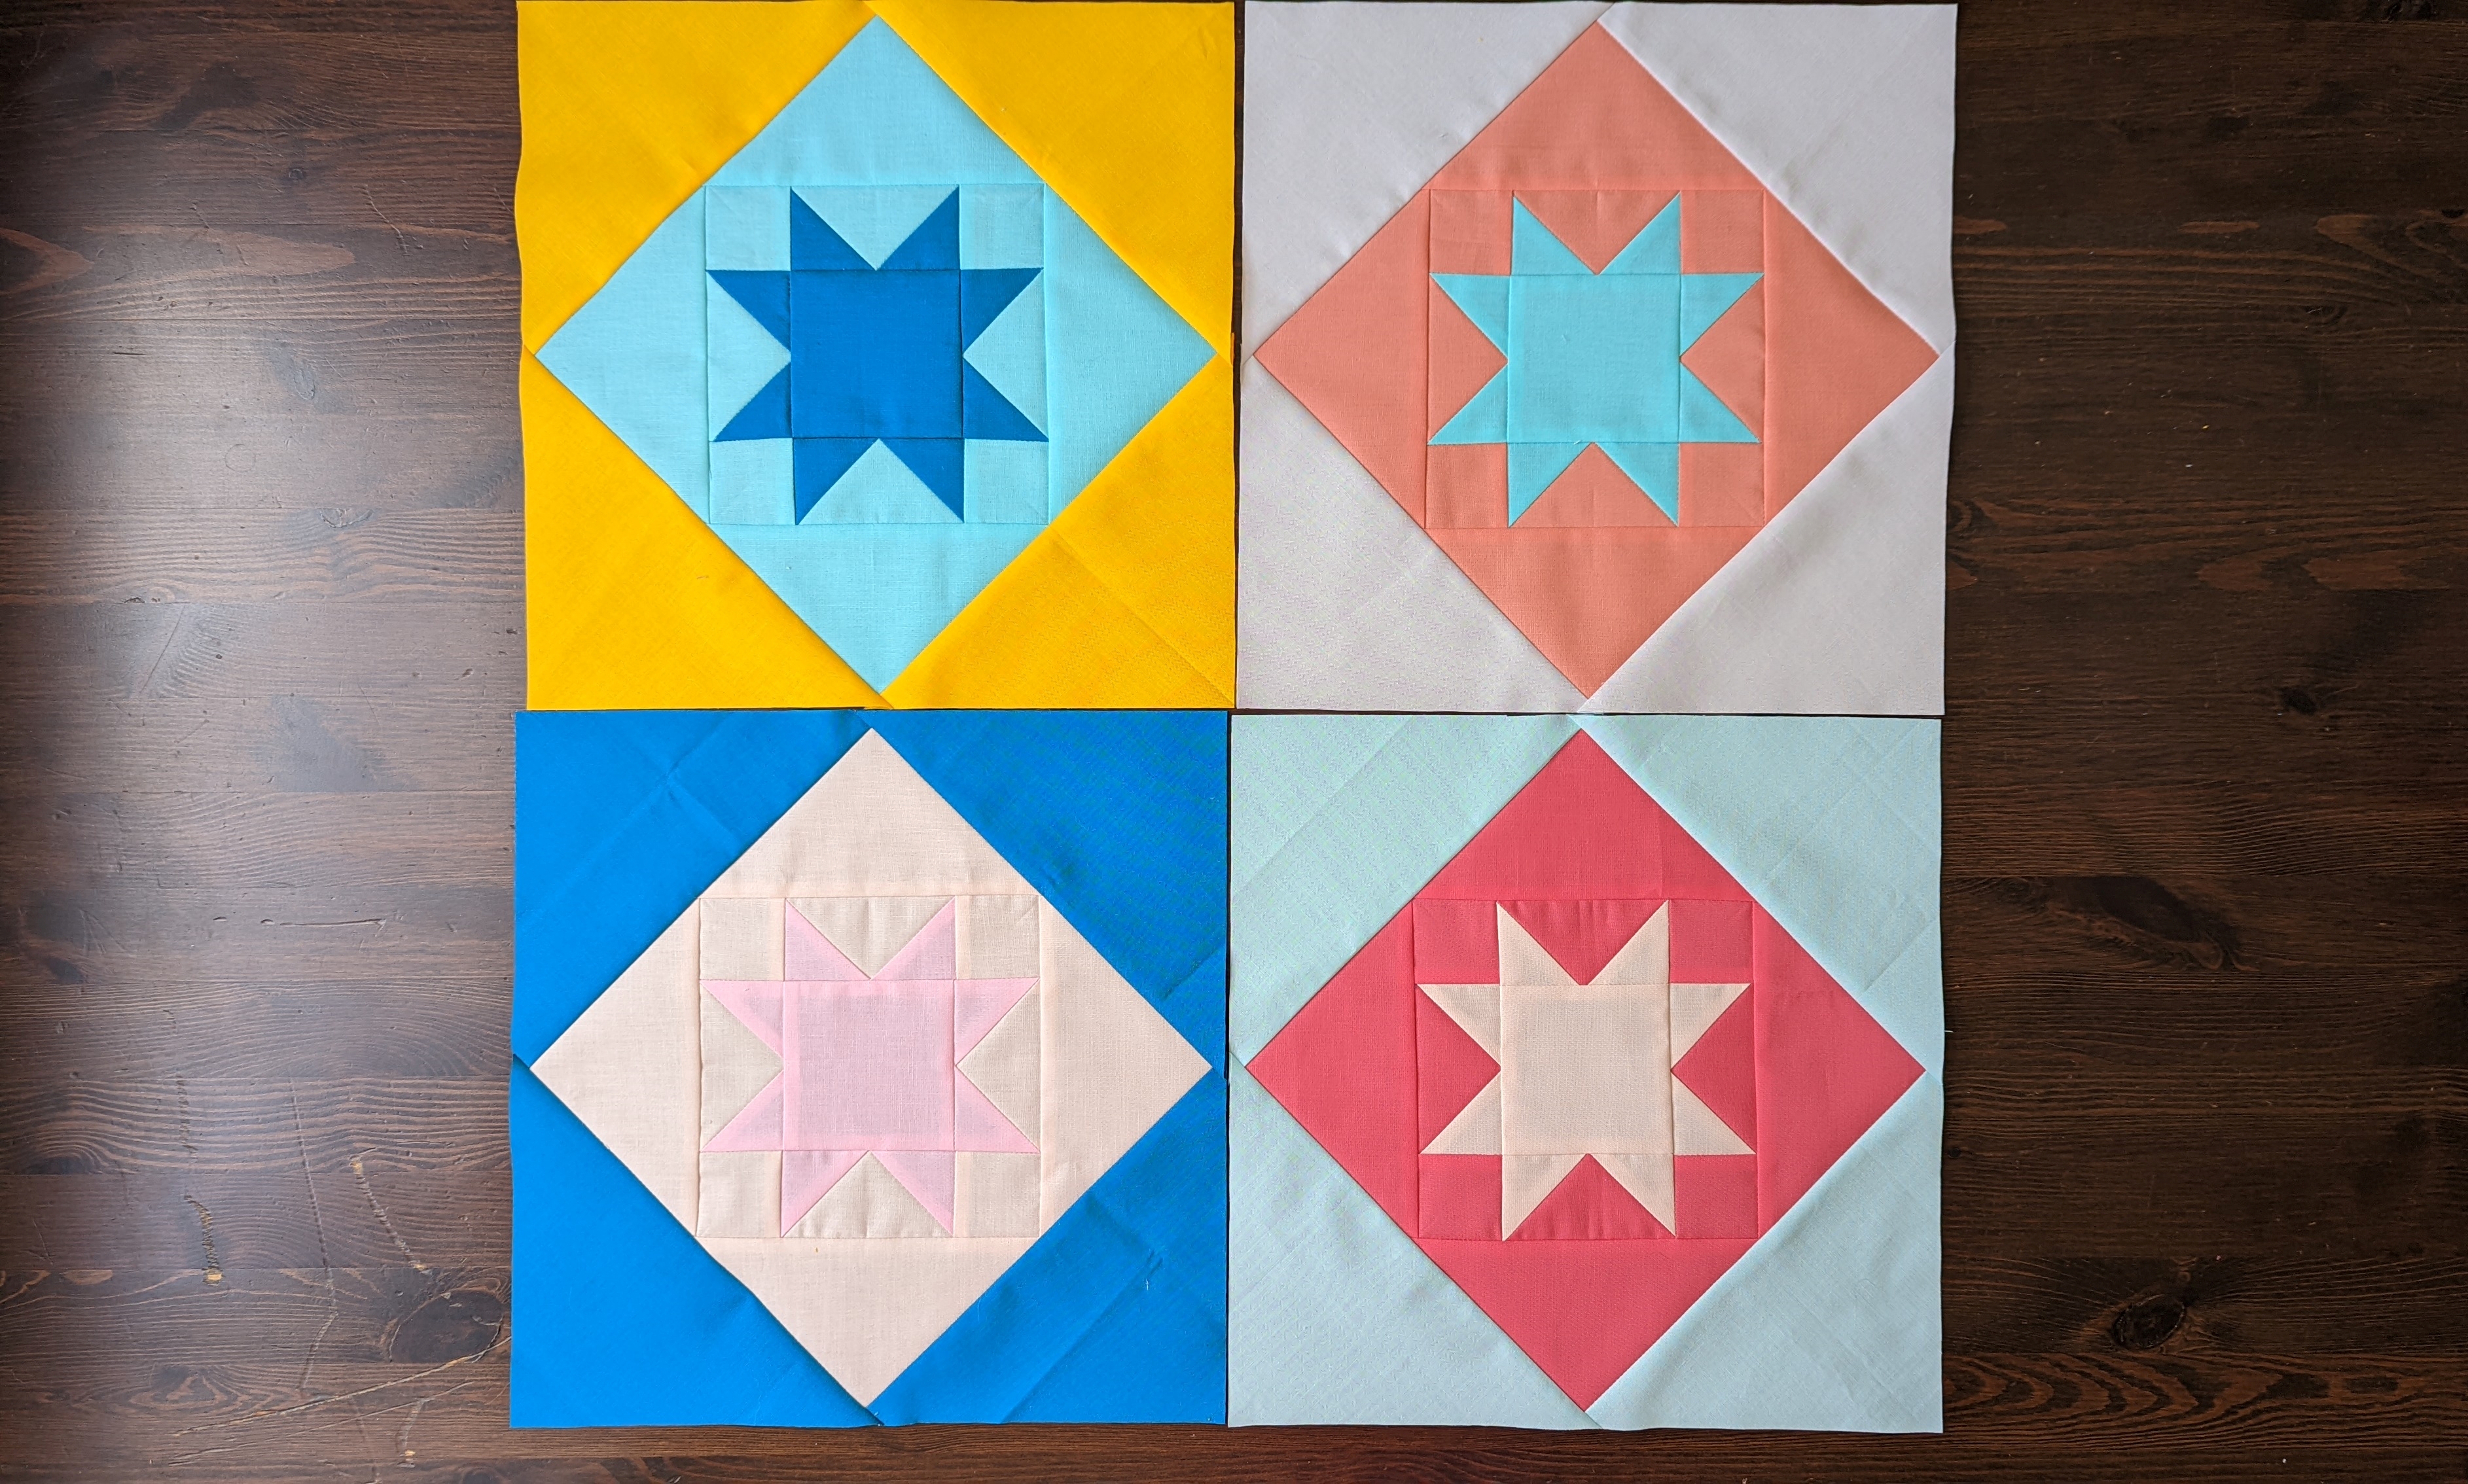
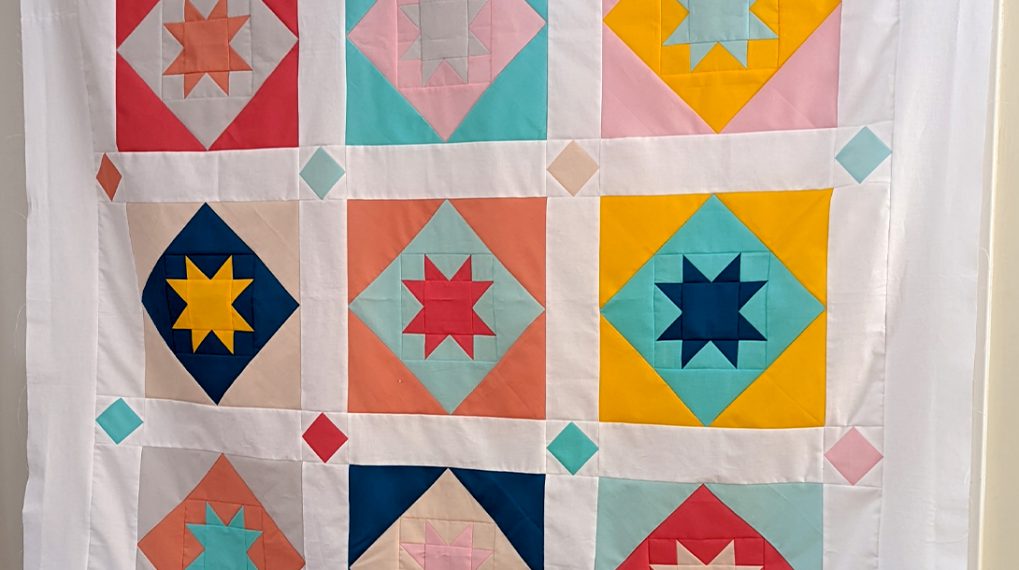
While I used Tula Pink’s fabrics for this quilt, feel free to use whatever you would like. The thing I like about this quilt is that it is great for showing off big patterns. The center of 3 of the blocks is 8″ finished, turned on point, while the other 2 blocks have 4″ finished centers.
Blocks 1-4, we will be making 2 of each. Block 5, we will make 5 blocks. This will give us a bakers dozen, a total of 13 blocks.
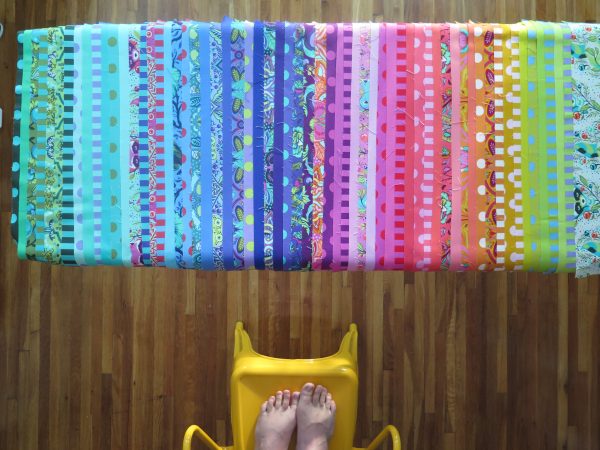
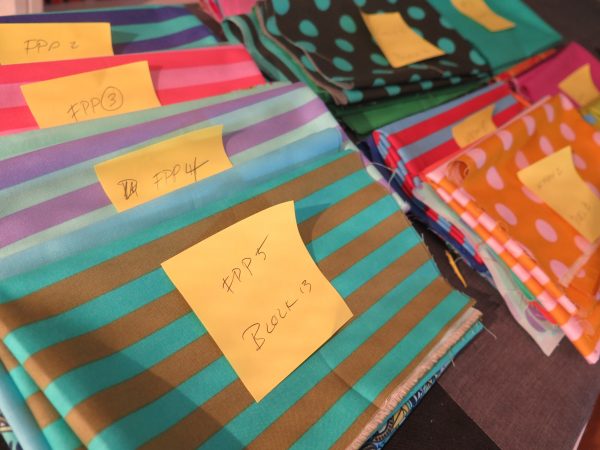
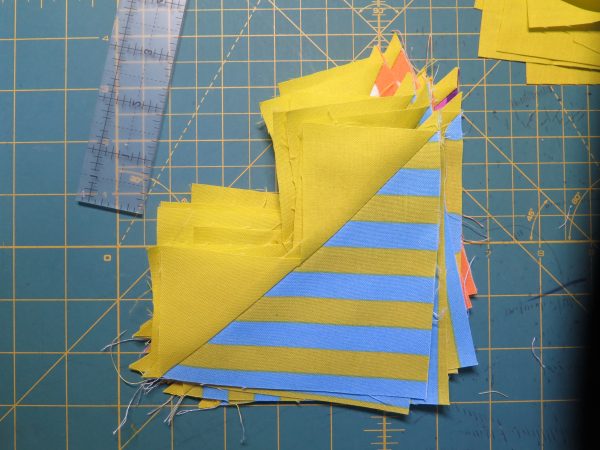
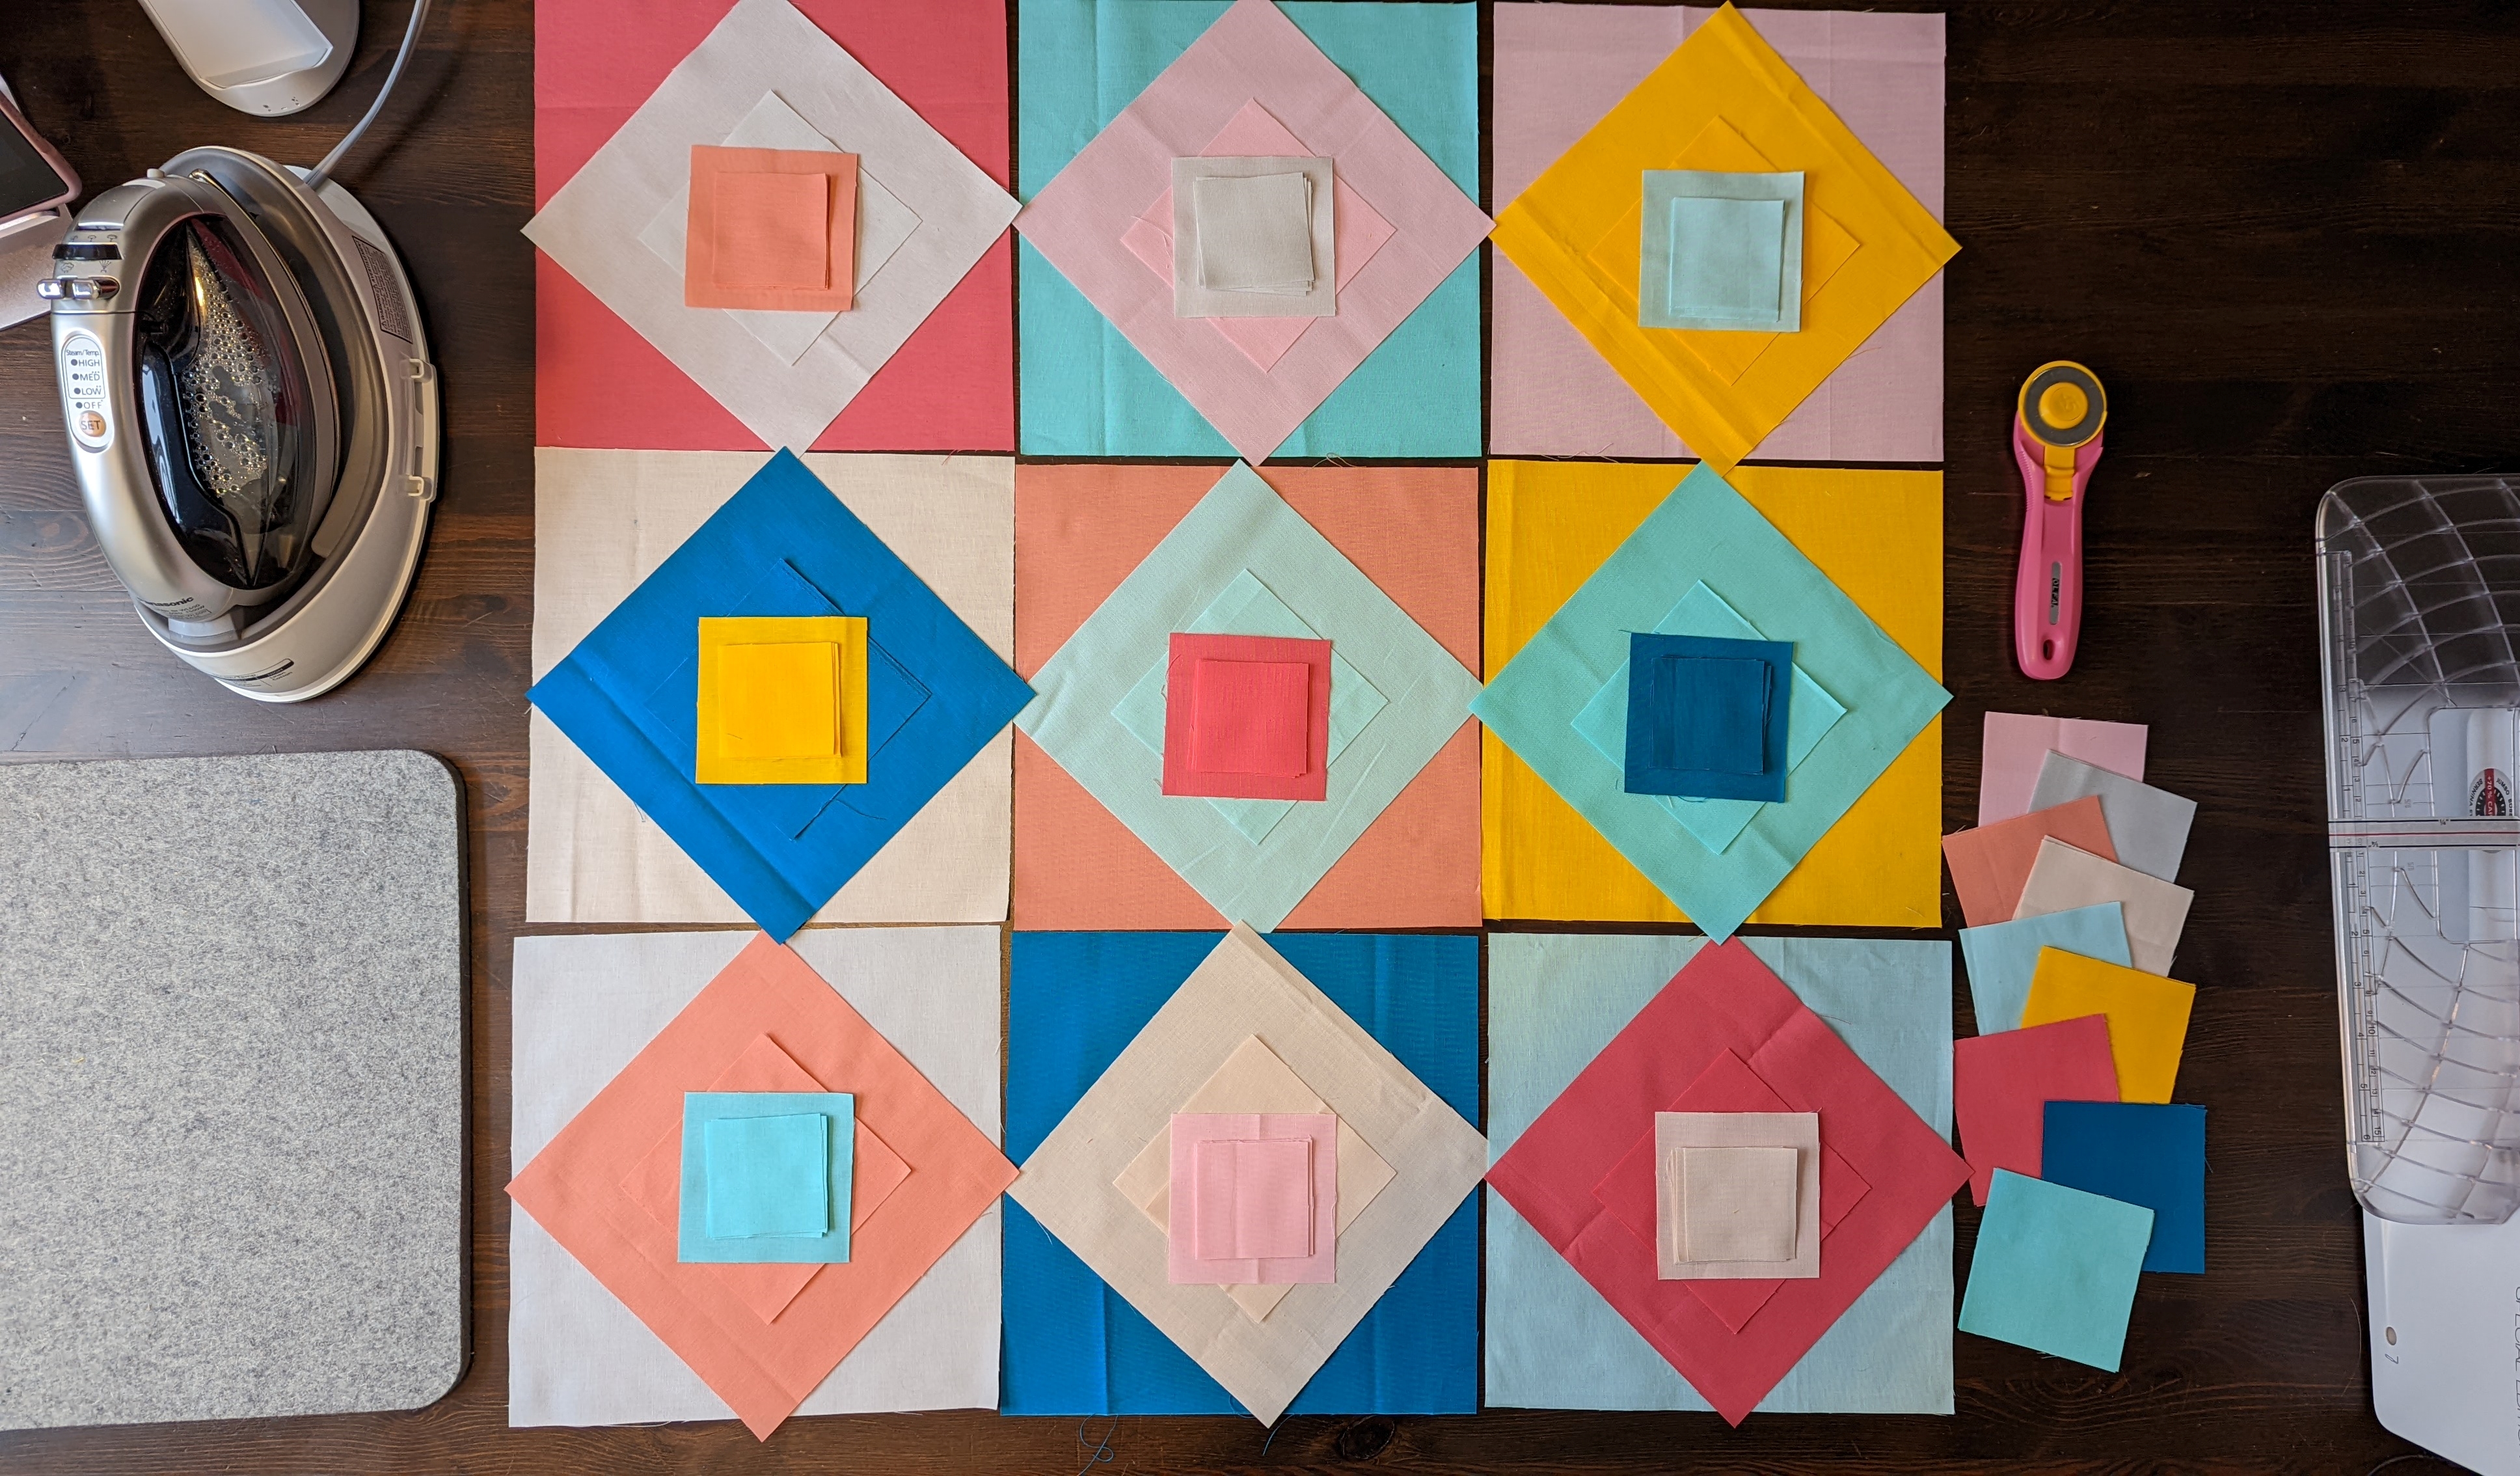
I started by breaking my blocks into color groups. Normally, I make a really specific plan for how I am going to layout my fabrics. For this quilt, I just wanted to have fun. I made them all and laid them out how I liked them when I was done. I didn’t get bogged down in envisioning what it would look like before hand and I am so glad I didn’t. it was a real challenge for me to be a little more carefree with this project, but I love how the finished quilt turned out. I encourage you to do the same. Play!
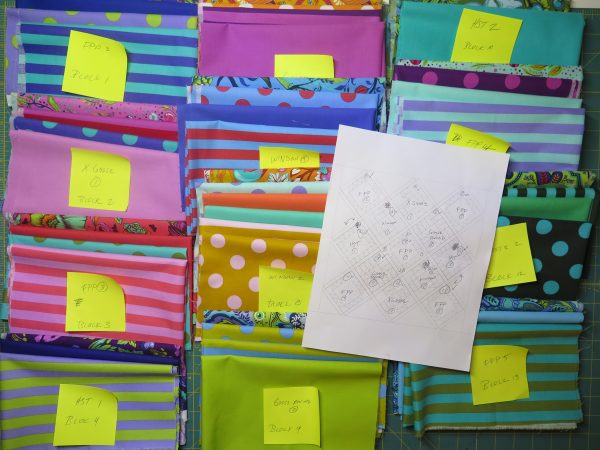
I chose between 3-6 fabrics for each block, labeling them to keep them straight. When it came time to cut the fabric, I either added more color or took away, depending on how many pieces I needed for each block.
The first block I worked on was a round of flying geese surrounding a 4″ square on point. Three of our 5 blocks have flying geese in them. These come together really quickly and easily with the no-waste method of assembly.
My friend Hayley Grzych has a terrific BERNINA tutorial on this method. Check it out by clicking here. It’ll fill you in on what we will be doing to make these geese.
We will be making 16 flying geese to surround our 4″ square for each block. Here is what you’ll need to cut for ONE block:
- 1 – 4 1/2″ center (be sure to cut the block on point if you are using a focal fabric like the one below)
- 4 – 5 1/4″ for the “body” of your geese
- 16 – 2 7/8″ background fabric

Begin by marking your 2 7/8″ background fabric from corner to corner. Then lay your fabric squares on your 5 1/4″ squares and sew 1/4″ on either side as pictured below with right sides together.
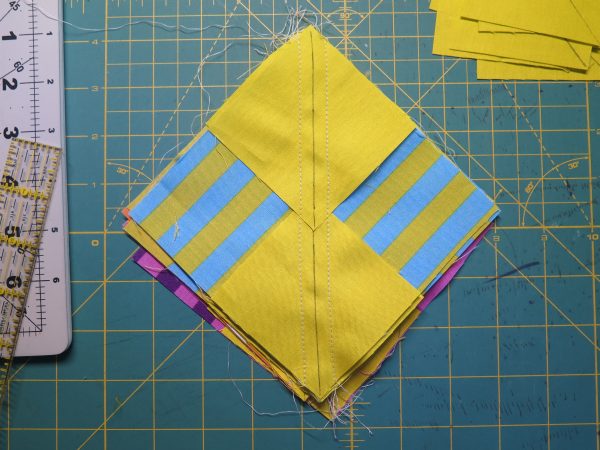
Slice the unit in half along the drawn line.
Press your seam toward your background fabric.
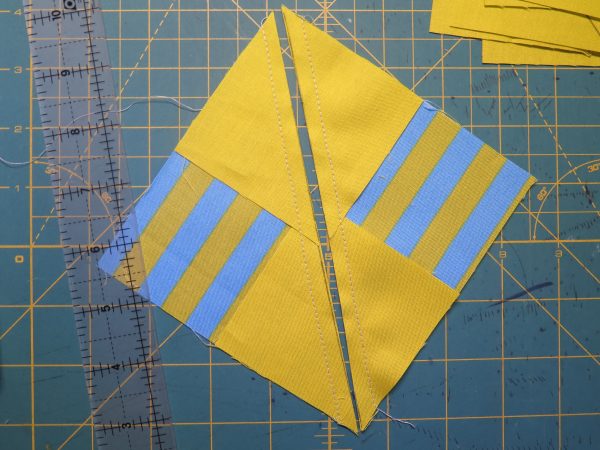
Add another 2 7/8″ square and sew on either side of the drawn like as pictured below.
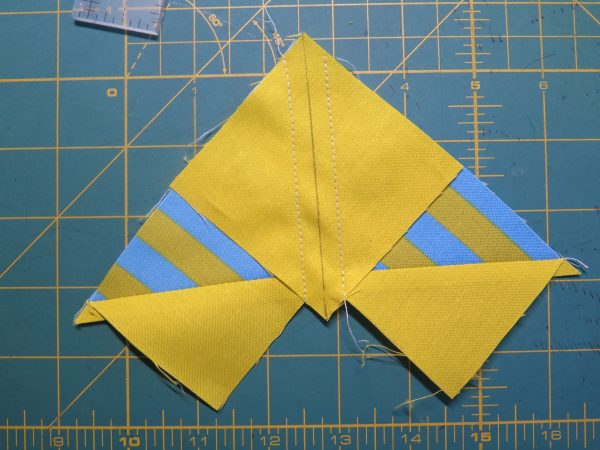
Slice in half again along the drawn line.
Press toward your background fabric. Done! Perfect flying geese!
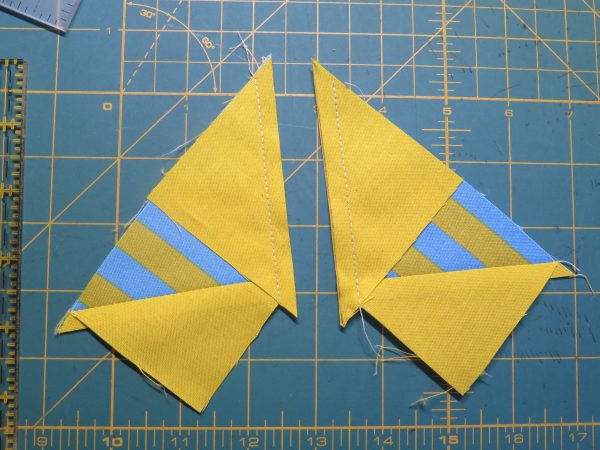
When you have 16, lay out your blocks in rows of 4 in any way you’d like.
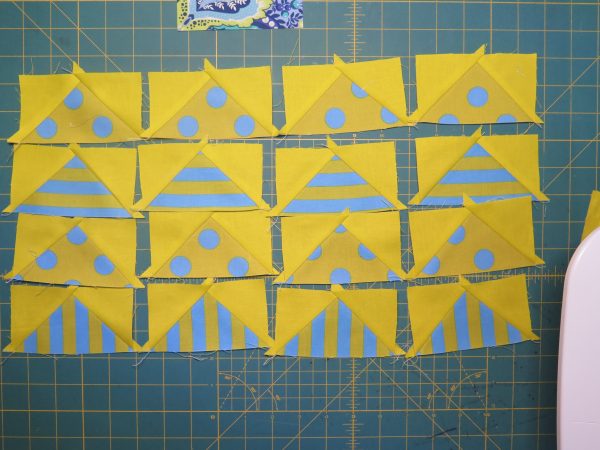
With 1/4″ seam allowance, sew 2 rows of 4 and 4 rows of 2 as pictured below.

Lay out your geese around your 4 1/2″ center square as pictured below.
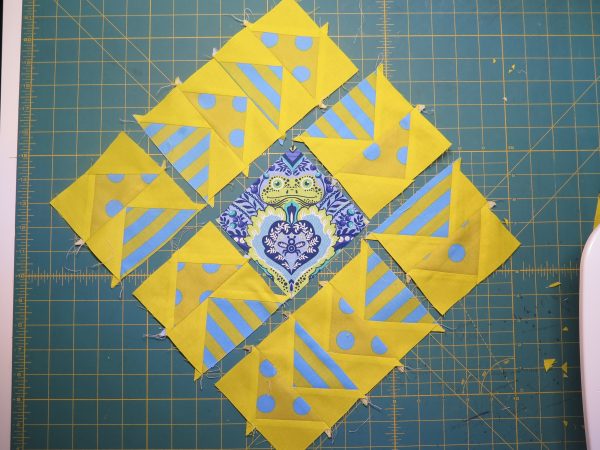
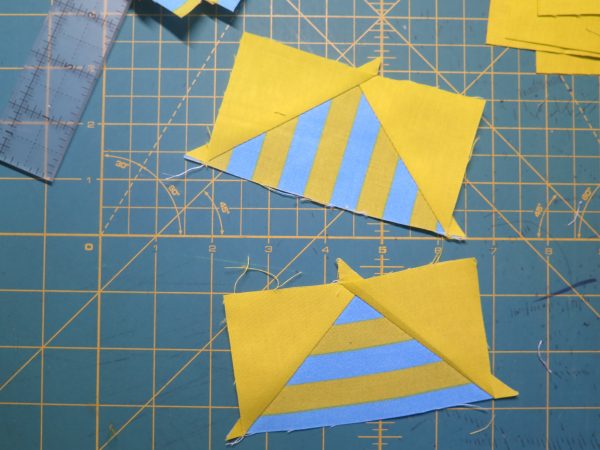
Join your units into 3 rows as pictured below.

Now sew your 3 rows together like so. Press your seams any way you’d like. And voilá!
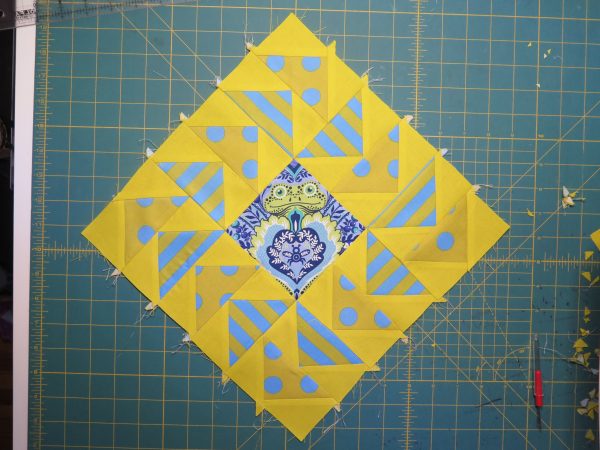
Your block should meassure 12 1/2″ Repeat these steps for 1 more block.
We’ll see you next week for block 2! And be sure to use #HeyNowYoureAnAllStarQuilt, #GiucyGiucePatterns and #weallsew when posting your progress on Instagram!
Used Products


What you might also like


34 comments on “All Star Quilt-along Block 1”
-
-
Hey there! There are tons of shops stocking All Stars by Tula Pink, both brick and mortar and online stores. Try Googling it and I bet you’ll find a ton of stores. Thanks!
-
-
Love this! One question….Is there a printer-friendly version?
-
I’d like to know this too.
-
For now I believe we are only posting to the blog, but perhaps in the future there will be a PDF version!
-
Hope so.
-
I really hope you decide to do the pdf! I’m keeping my fingers crossed. It’s much easier to make notes directly on the instructions, if need be. More user friendly 🙂
-
-
Our WeAllSew blog content is posted in an open format. If you wish to print the post, you can easily print the tutorials directly from your screen. If you attempt to print directly from the screen a pdf will be generated for your convenience. Please give it a try.
Thank you for reading WeAllSew!
-
-
May I ask that you post the expected size of the pieces we are making for the block ie: the size of the flying geese? I calculated that they were 2 1/2” x 41/2”. Is that right? I’m old fashioned and find I do much better making the geese another way. Thanks!
-
You are correct! All the flying geese in the blocks are 2″ x 4″ finished!
-
-
Pic looks like 13 blocks. Is it larger than pattern directions?
-
Yes there are 13 blocks, 5 different blocks. There are 2 of 4 of them and 5 of 1 of them. Each week we will share a new block.
-
-
Is there a Fabric kit for this project?
-
Not that I know of but if I hear of one I will let you know!
-
-
Would also like a printer friendly version
-
For now I believe we are only posting to the blog, but perhaps in the future there will be a PDF version!
-
Our WeAllSew blog content is posted in an open format. If you wish to print the post, you can easily print the tutorials directly from your screen. If you attempt to print directly from the screen a pdf will be generated for your convenience. Please give it a try.
Thank you for reading WeAllSew!
-
-
I LOVE this quilt. It is so happy and the size makes it a manageable project. Can’t wait to get started but I have a couple projects that I must finish first. Thanks for this wonderful pattern! I would also love it if you could make a pdf of each part. Thank you!
-
For now I believe we are only posting to the blog, but perhaps in the future there will be a PDF version!
-
Looks lovely. What is the finished size of the whole quilt? I’m math challenged when it comes to blocks on point. Thanks
-
NEVERMIND! I see now in my rush through this post, you said it is about 50″ square.
Thanks for this idea; I have some large print Christmas fabric I’ve not been able to use yet, but might work well for these blocks with large centers. I’ll have to see just how much I have to make it bold and colorful.
-
-
Hi Giuseppe,
Can you give me the number of fat quarters involved? I looked up TP and stores sell the “FQ bundle” in different quantities.
Thanks!-
And for the F8 as well?
-
-
Can you give us the name of the solid fabric that was used for the background?
-
Yes, it is called Pear.
-
-
Do we need to “sign up” somewhere or do we just go to the blog every Thursday? On other weekly or monthly on-line quilts, I seem to never get the “e-mail” or the “facebook” post and have to go looking so want to make sure I don’t miss anything.
-
Just pop back here every Thursday! No sign up necessary!
-
A sign up to have it emailed would be lovely! Since I cannot print out the directions to be able to complete when I’m done with my current projects, I’d already forgotten about this! And I dearly love it.
-
-
-
So sad – can not find all of the fabric for this quilt ! 🙁
-
Have you tried searching online? A ton of shops are stocking it.
-
-
Could you please give us the name of the background color. Is it a Tula Pink fabric or a Kona?
-
It’s called Pear. It is Tula Pink’s.
-
-
My sister got Tula material on ebay and I would also try Amazon. Good luck with your quest!
Cathy -
I’m thinking of making this with a different fabric from a panel. How many 8 1/2″ and 4 1/2″ each on point blocks will there be? I’m not sure I have enough.
Thanks, Laura
Leave a Reply
You must be logged in to post a comment.

Where can I get a Fat 1/4 pack of Tula’s fabric?