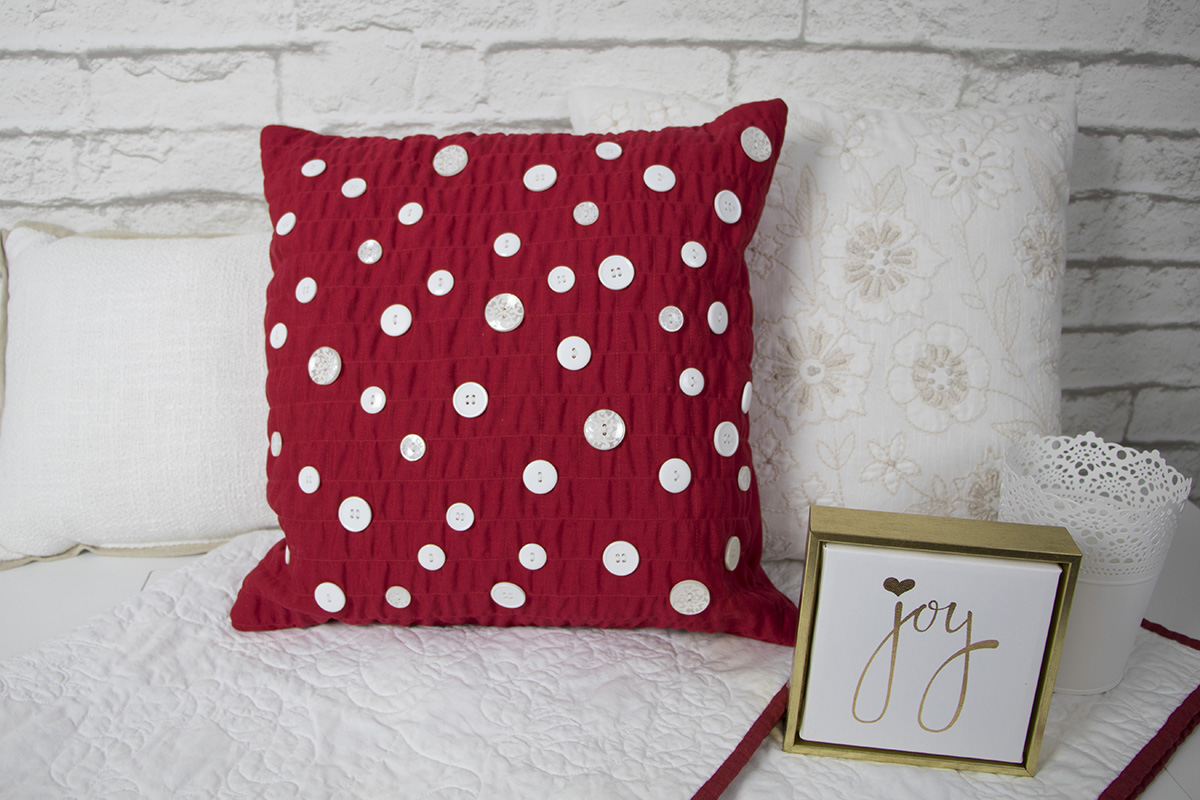
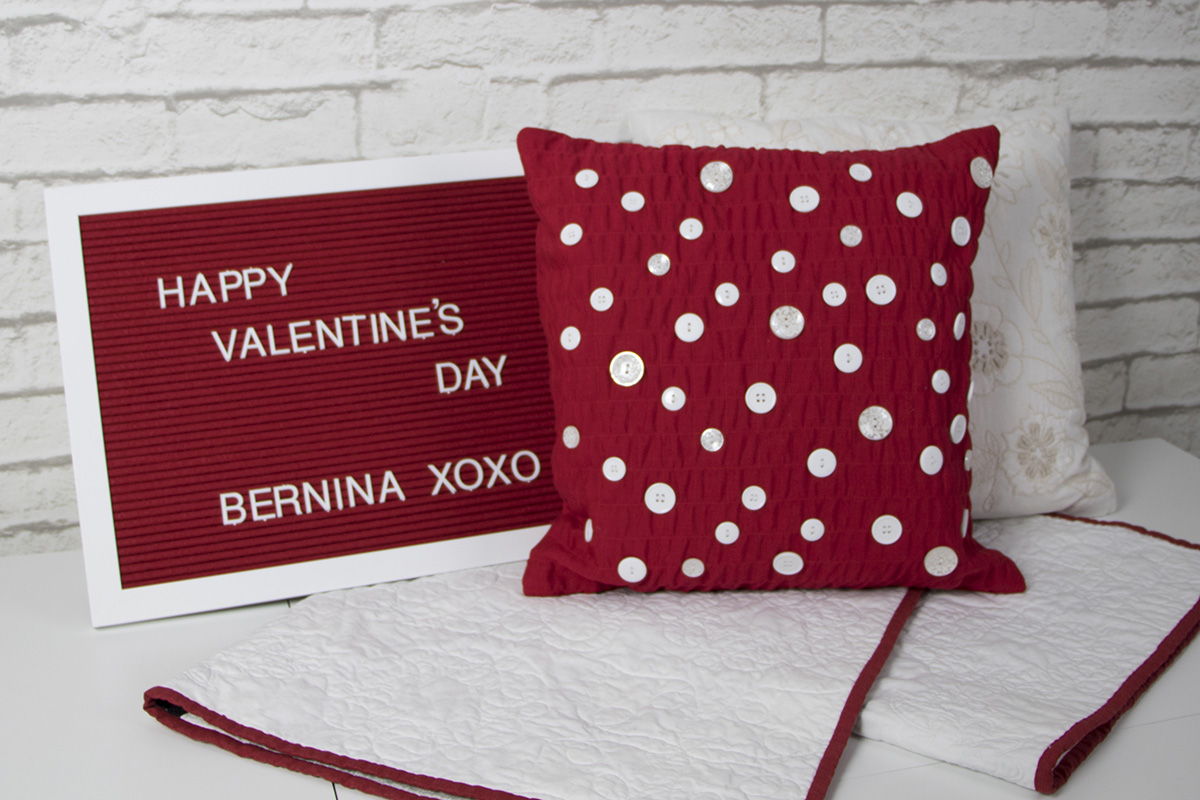
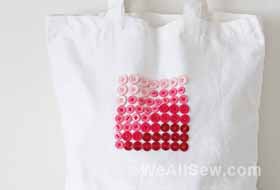
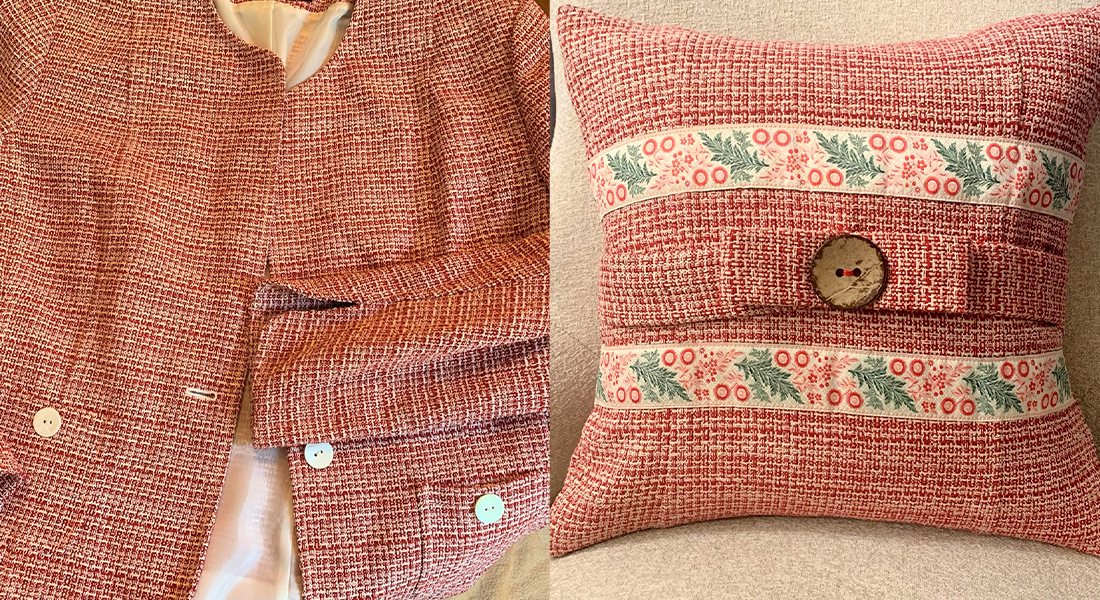
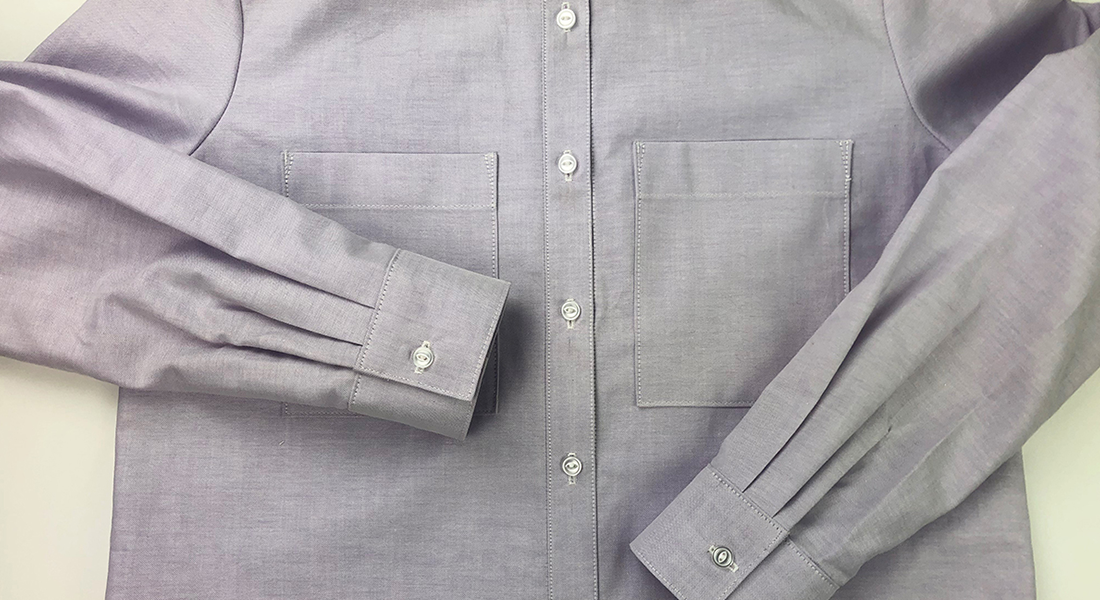
Button-up Pillow
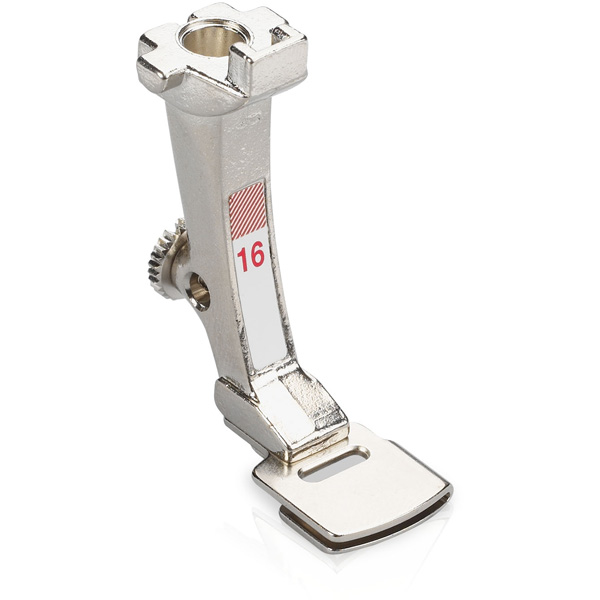
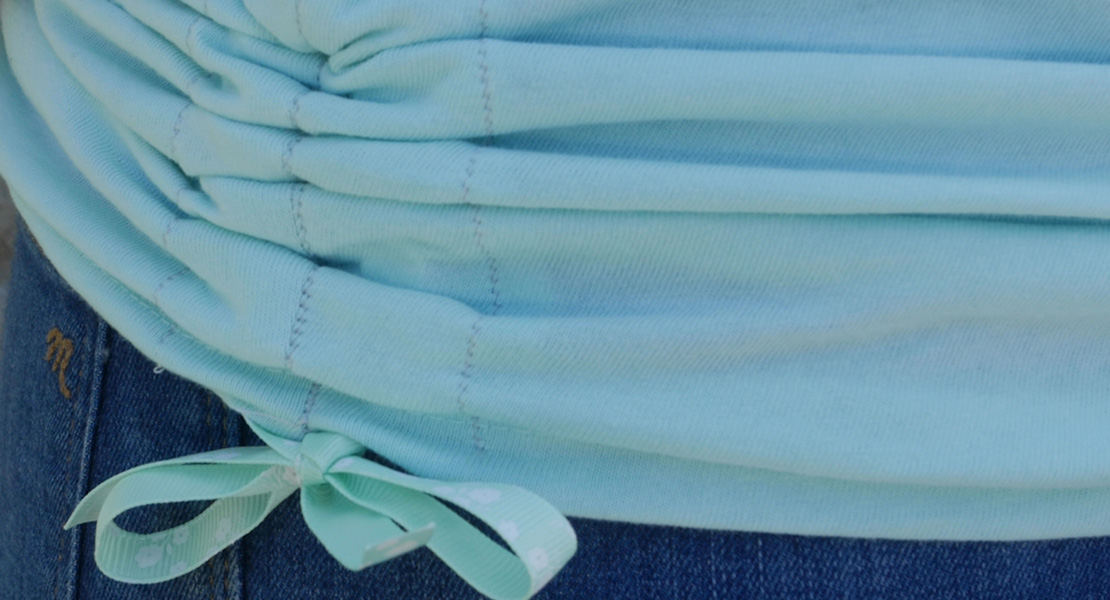
One thing I enjoy when using BERNINA’s many presser feet and accessories is finding non-conventional uses for them. The BERNINA Gathering Foot #16 was designed to create soft gathers for home décor and clothing. However, when the foot is used while sewing a crosshatching pattern on a piece of lightweight fabric, a delightful texture of puffs develop.
The traditional use of the Gathering Foot #16 is for gathering a ruffle to use as an embellishment; gathering to a flat piece all in one seam; imitation smocking; puffing an insert; or elastic shirring.
The amount of gathering is dictated by the presser foot pressure and the stitch length. To create a puffier texture, lengthen the stitch. Be mindful that a puffier texture will require a larger piece of fabric for the pillow top as more fabric will be drawn into the gathers.
Materials for making the Button-up Pillow
- BERNINA sewing machine (I used the BERNINA 880 PLUS, but any BERNINA machine will work).
- 1 1/8 yard lightweight woven fabric (red linen) for pillow front and back
- 1/4 yard lightweight woven fabric (white linen) for buttonhole placket
- Batting—18” square
- Lightweight woven fabric for lining pillow top—18” square
- Lightweight fusible interfacing
- Rotary cutter
- Cutting mat
- Ruler
- Thread
- Buttonhole Cutter with Wooden Block
- Flowerhead pins
- Hand sewing needle
- Iron
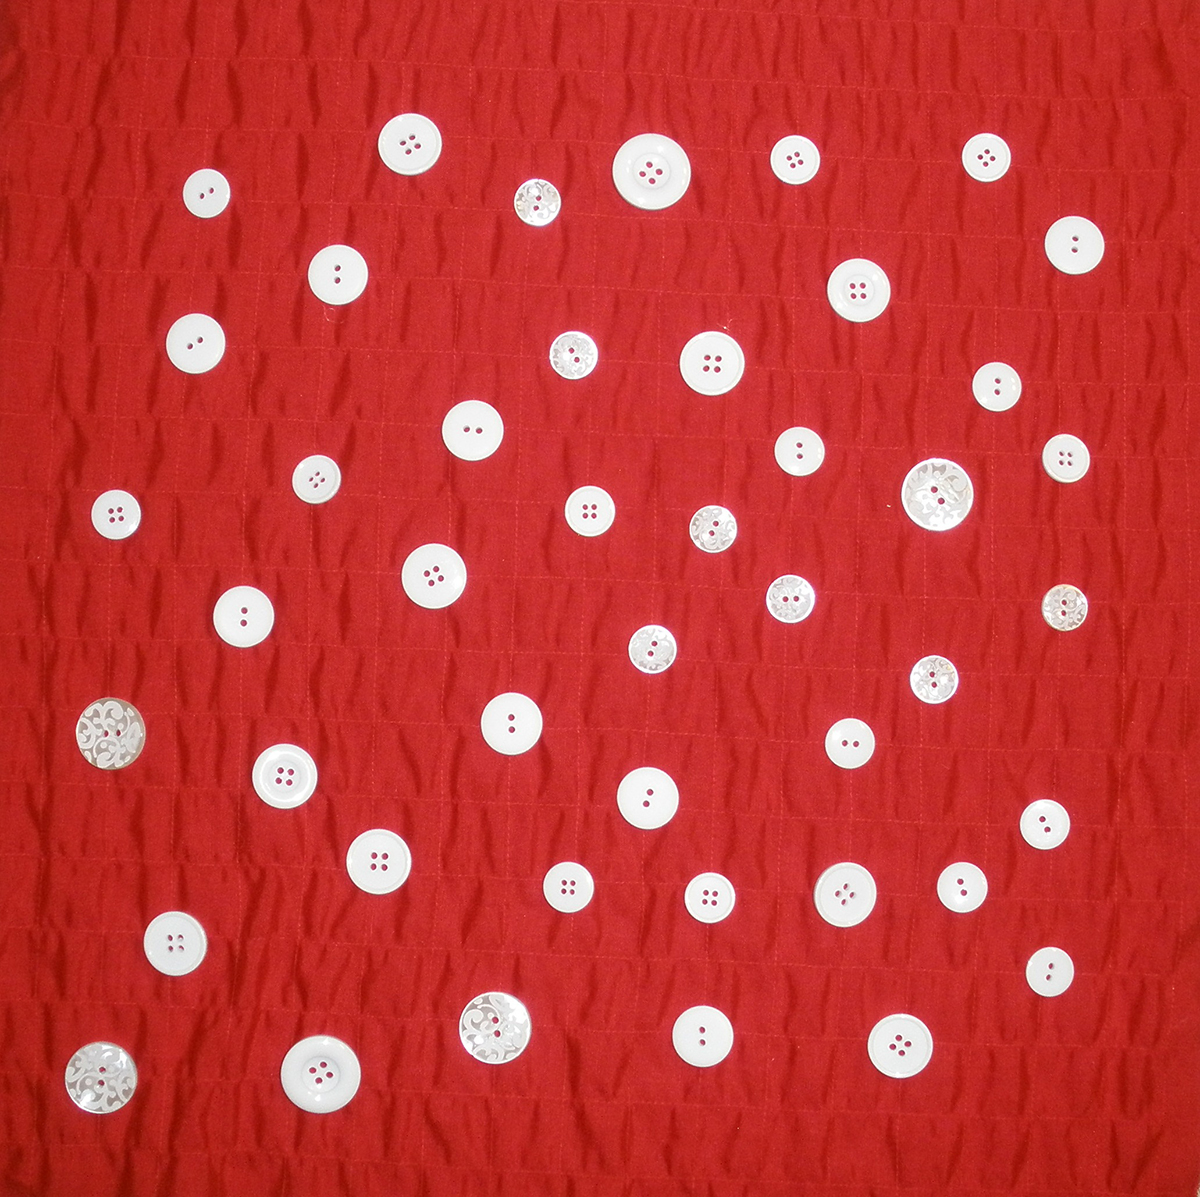
- Buttons – approximately 45 white buttons in a variety of sizes for pillow top
- 3-Buttons for closure on back side of pillow (22 mm size)
- Pillow form – 16”
Presser Feet:
- Reverse Pattern Foot #1/1C/1D
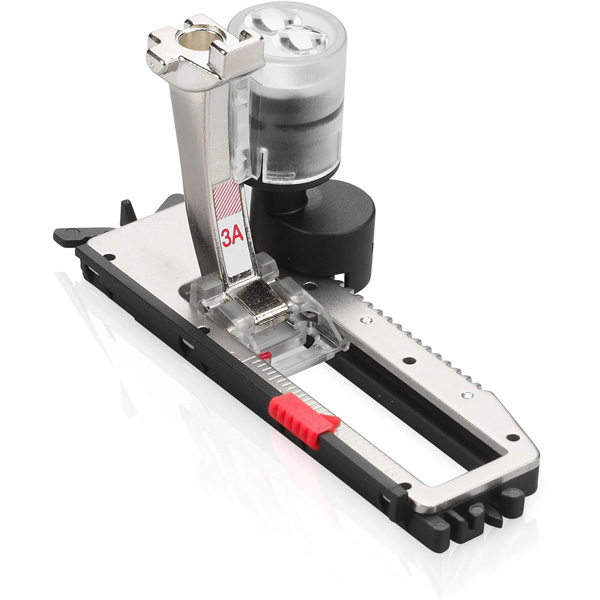
- Automatic Buttonhole Foot #3A (or Buttonhole Foot #3C for 9 mm manual buttonholes)
- Edgestitch Foot #10/10C/10D
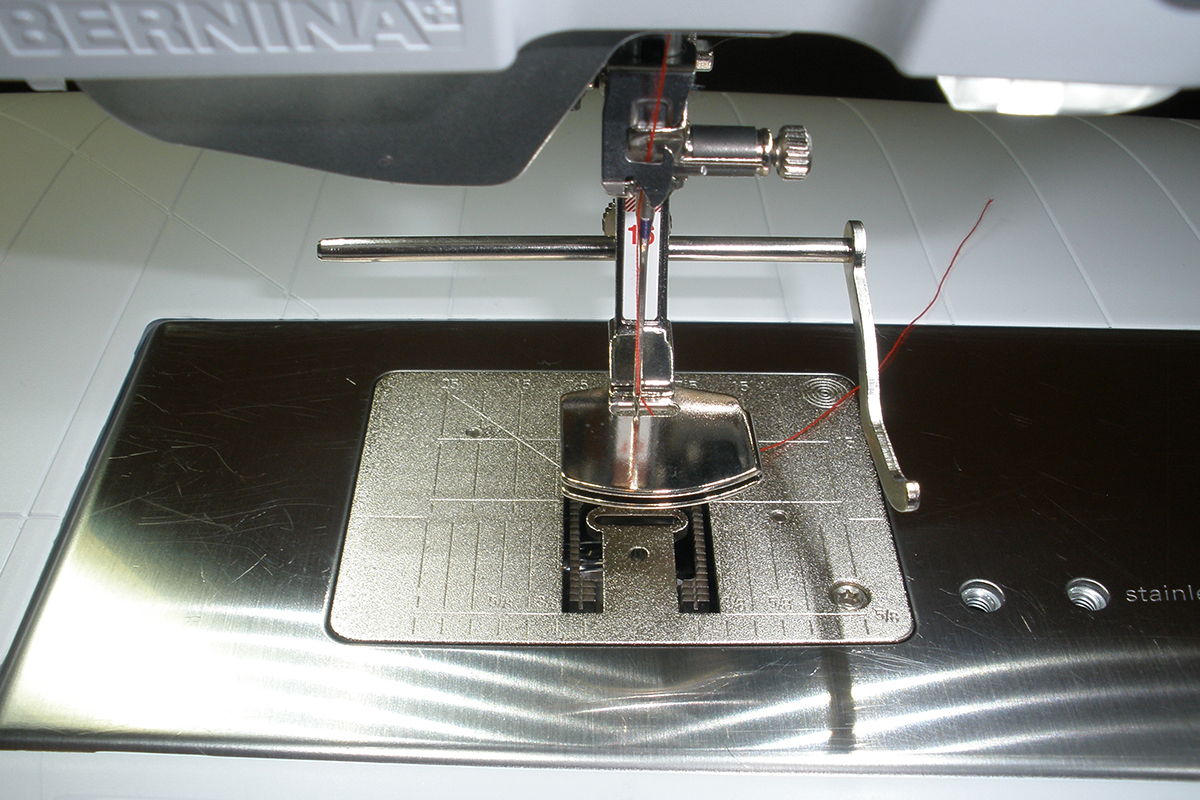
- BERNINA Gathering Foot #16 (wide)
- Right Seam Guide
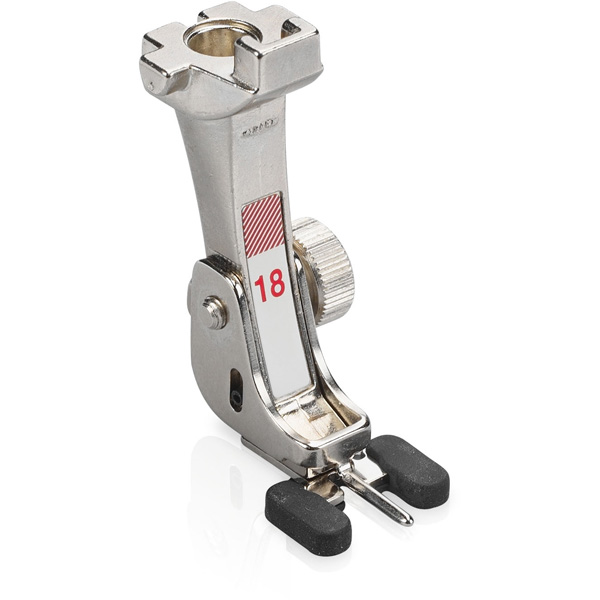
- BERNINA Button Sew-On Foot #18
Step 1: Pillow Fabric Prep
Pillow Top:
- Cut lightweight woven fabric (red linen) for pillow top – 20” square.
- Cut lining fabric – 18” square.
- Cut batting – 18” square.
Pillow Back:
- Cut lightweight woven fabric (red linen) for pillow back:
- 1 – 18” square
- 1 – 20” x 18”
- Buttonhole Placket – Cut lightweight woven fabric (white linen) for pillow back – 5” x 18”.
- Cut lightweight fusible interfacing – 5” x 18”
- Heat fuse the fusible interfacing to the cut 5” x 18” lightweight woven fabric for buttonhole placket (white linen) following manufacturer’s instructrions.
Step 2: Machine Setup for Pillow Top
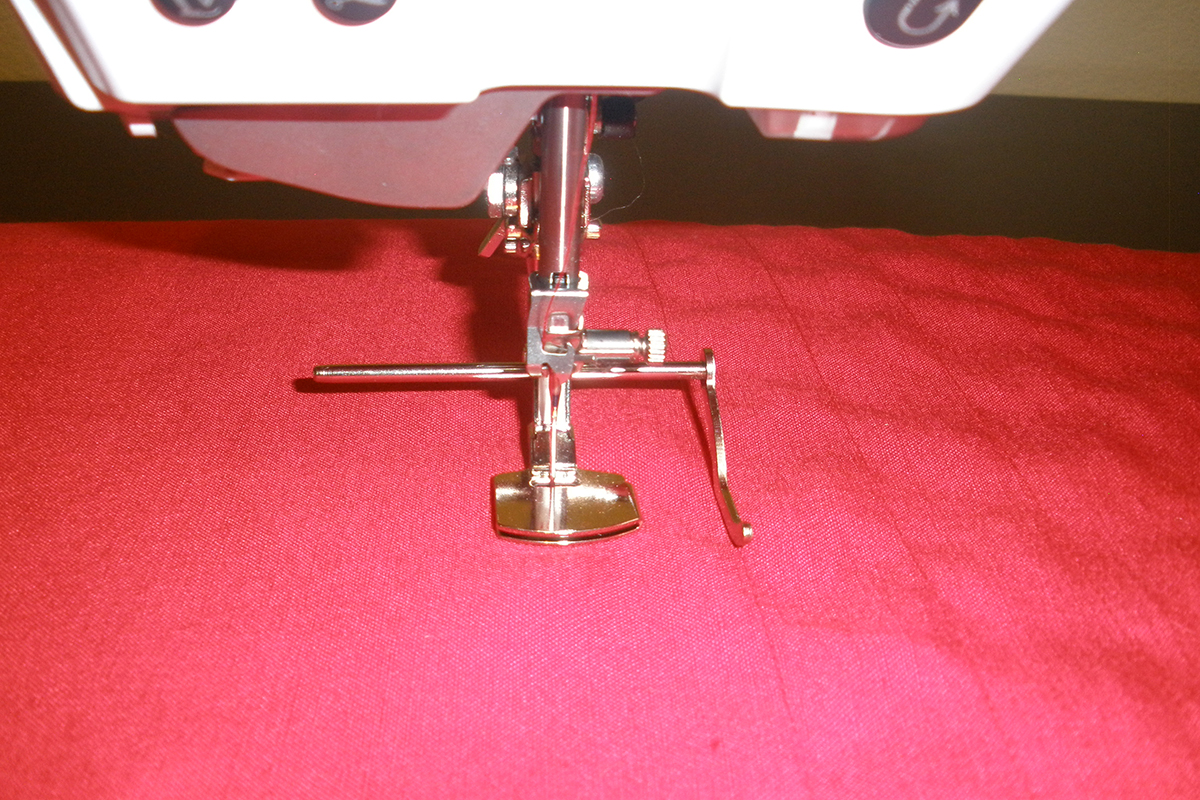
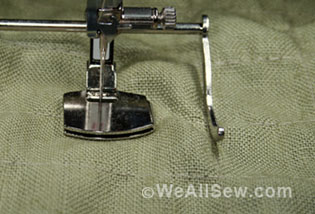
Attach the adjustable seam guide to the Gathering Foot #16. Note: The Gathering Foot is available for 5.5 and 9 mm machines. Use the foot appropriate for your machine.
Attach the presser foot to machine. Set seam guide to 1” from needle.
Settings for machine:
- Stitch #1 – straight stitch
- Stitch length – 3
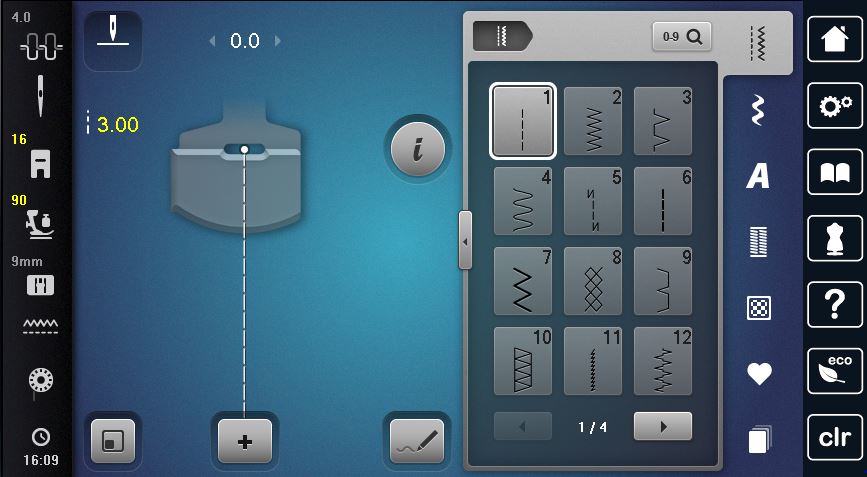
[Red_and_White_Pillow_02_Settings_for_Stitch_Length_for_Gathering_Foot_#16_BERNINA_WeAllSew_Blog_867x477px.JPG.jpg]
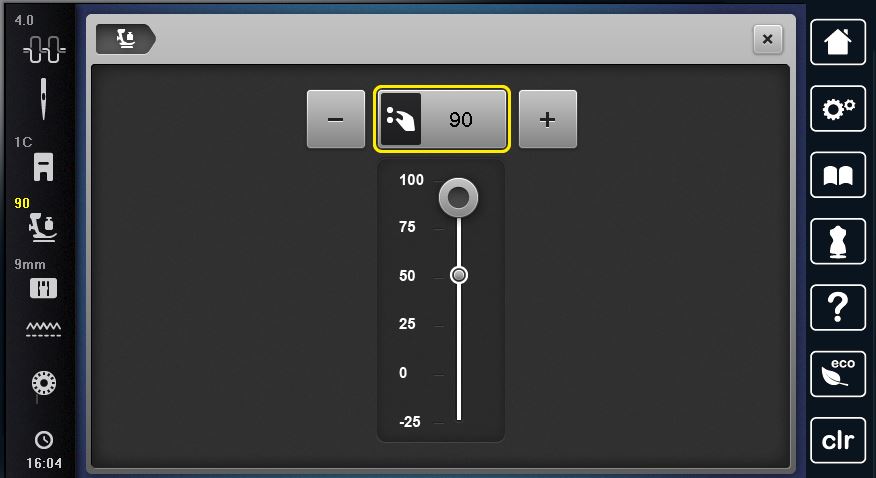
- Presser Foot Pressure – 90
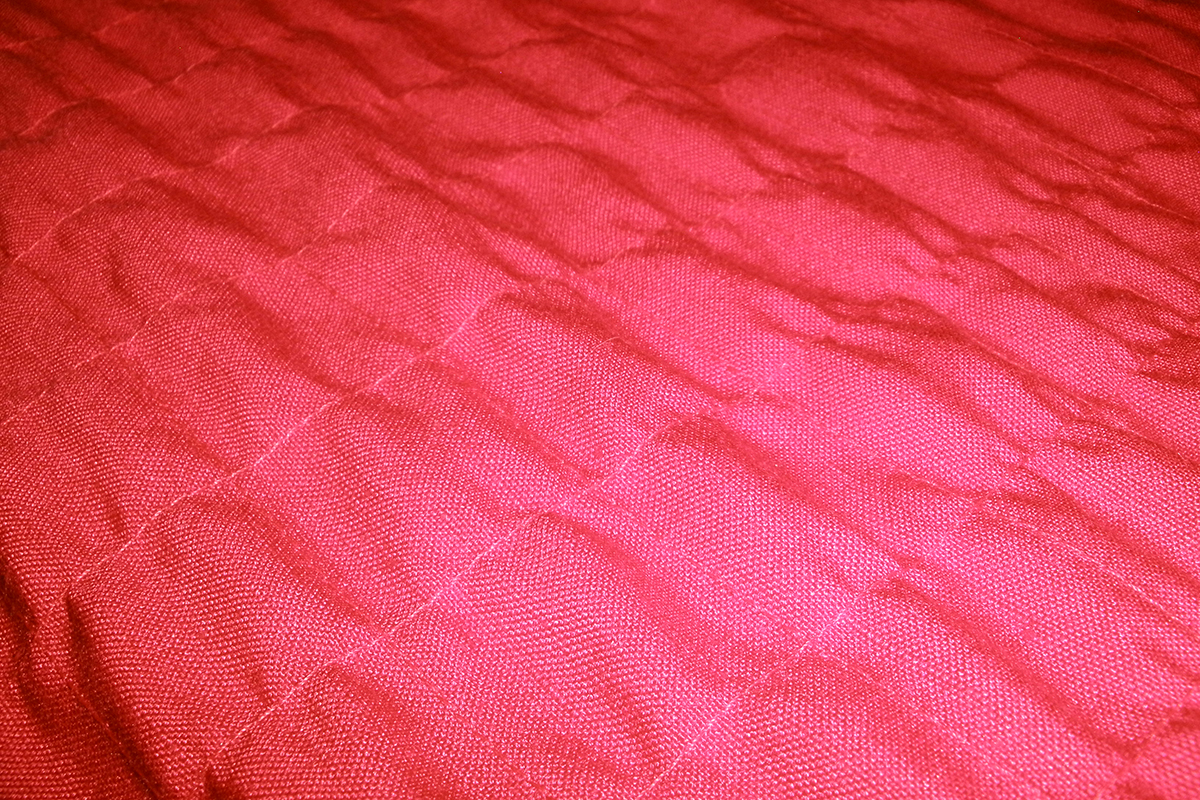
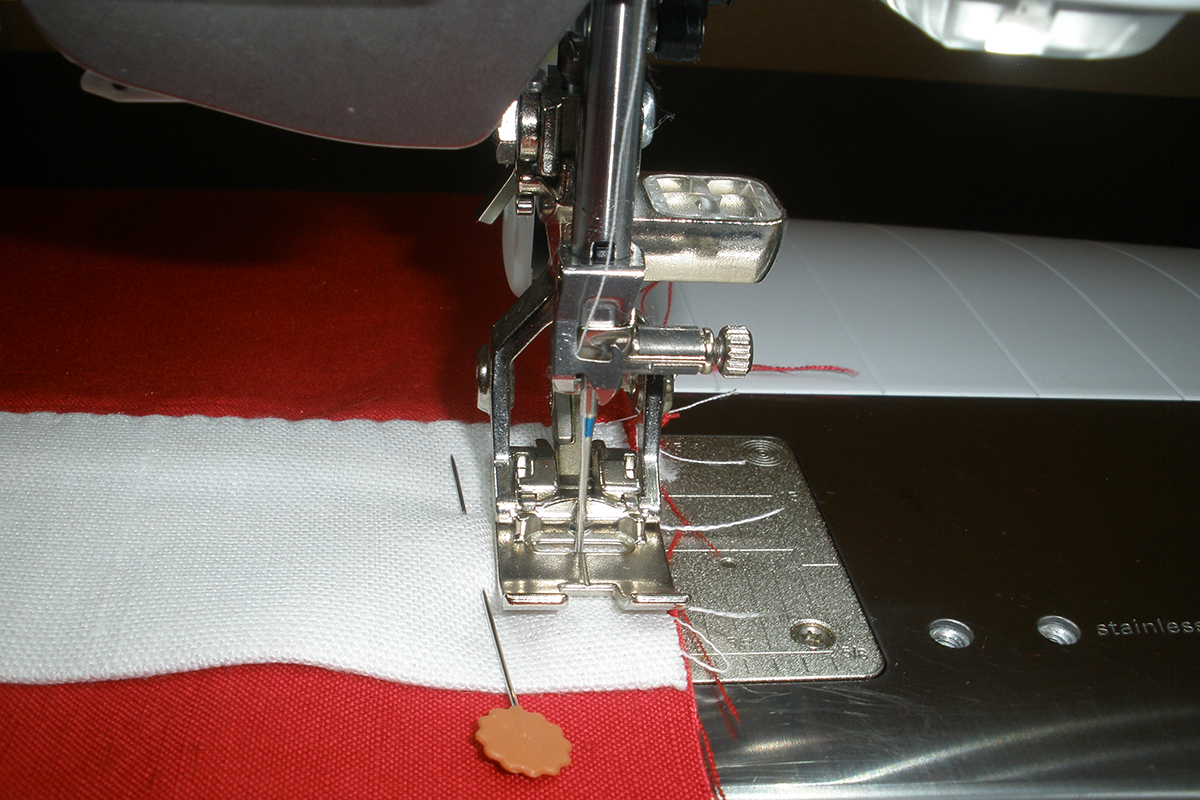
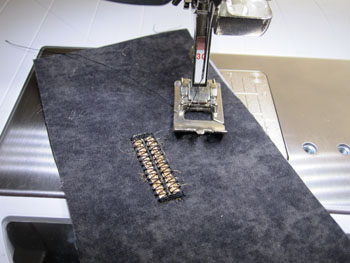
Step 3: Crosshatching the Pillow Top
- Finger press a center fold line in the 20” red fabric.
- Using the center fold line, stitch the first row, being careful to not pull or push the fabric as it is stitching.
- Move the fabric so that the adjustable seam guide is on the sewn first row of stitching.
- Using the adjustable seam guide, sew the next row 1” from previously sewn row.
- Continue sewing until the top is filled with rows spaced 1” apart.
- Note: it is not necessary to stitch all of the rows in the same direction. Once the first half of the pillow top rows have been sewn, the fabric can be turned to line up the adjustable seam guide on the first row of stitching.
When all the rows have been completed:
- Finger press a center fold line perpendicular to sewn rows to create crosshatching.
- Sew the first row and repeat until pillow top is filled with 1” sewn grids.
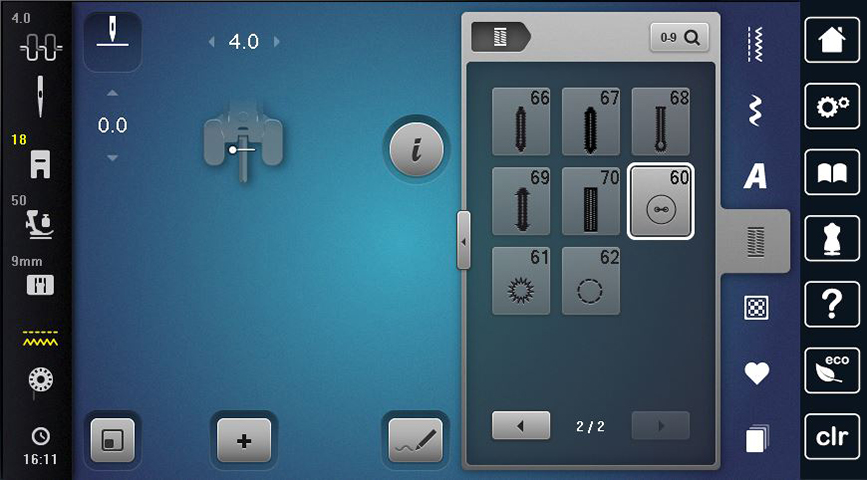
Step 4: Pillow Top Button Embellishment
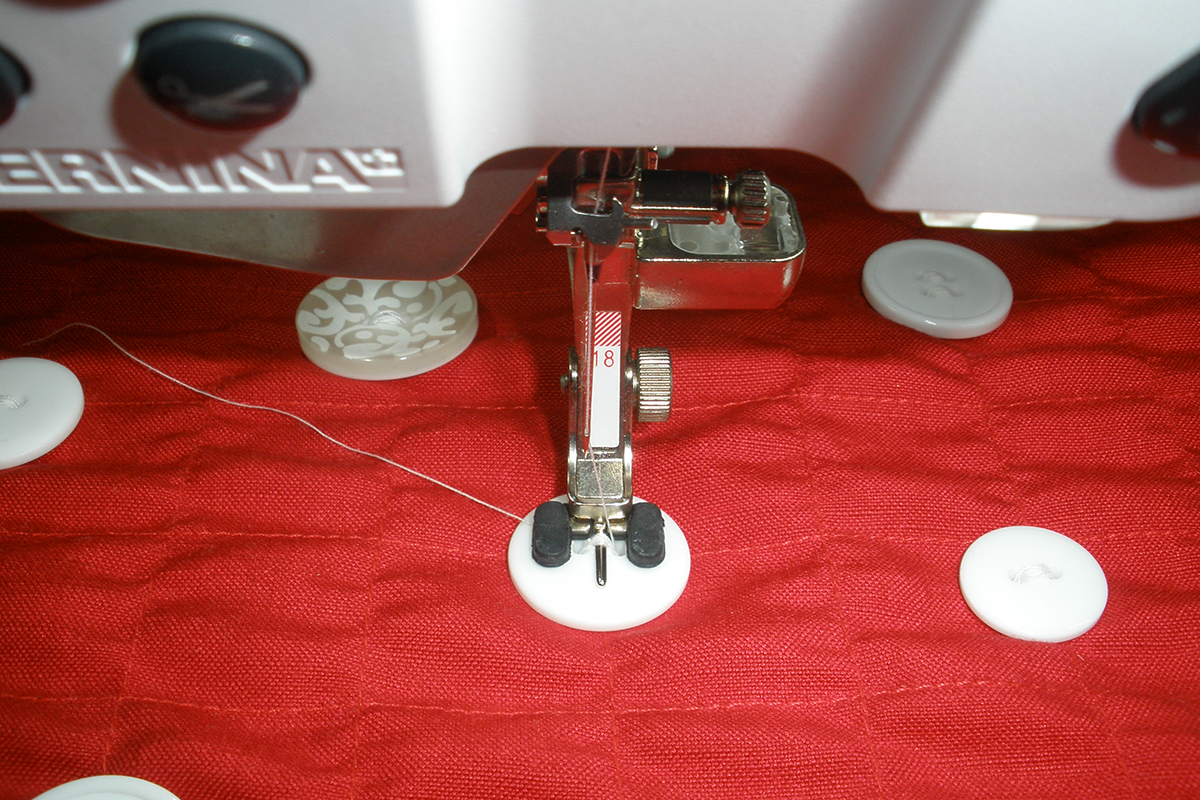
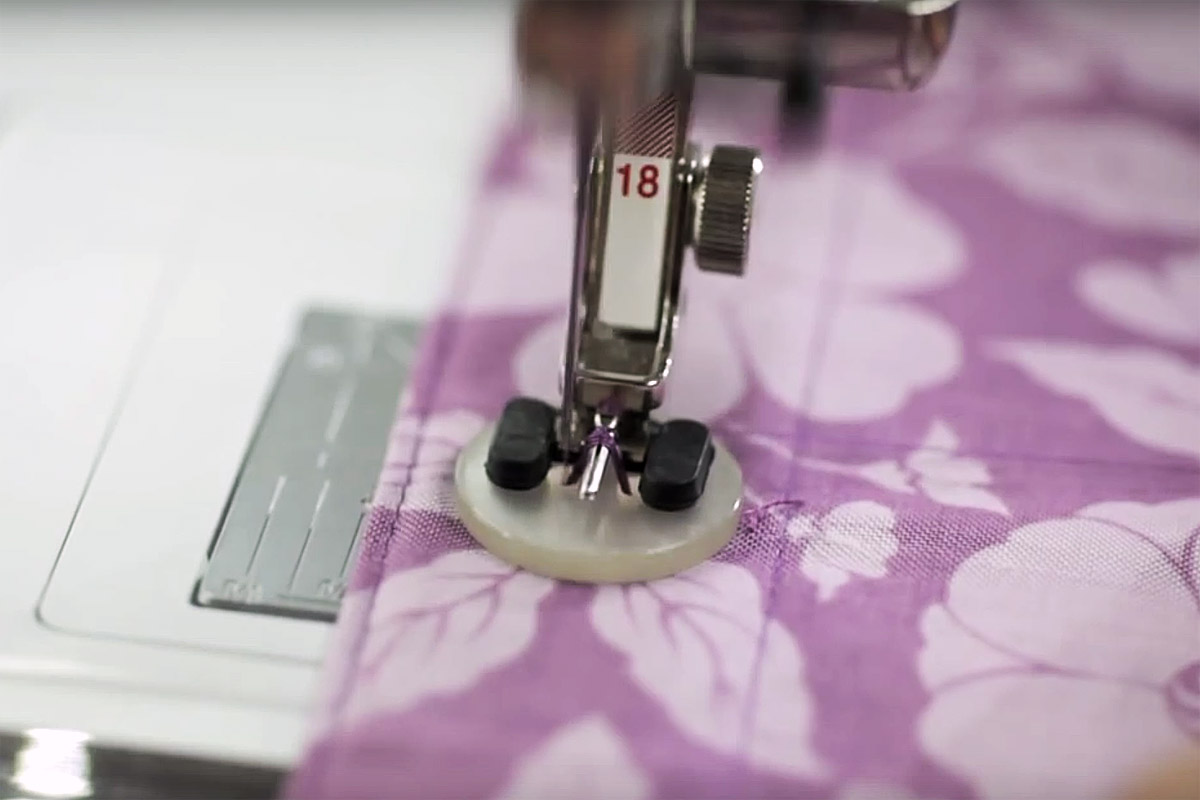
- Remove Gathering Foot #16 and attach the Button Sew-On Foot #18 to the machine.
- Change the Presser Foot Indicator to foot #18 if your machine has that feature.
- Select button sew-on stitch #60.
Layer the following pieces together before sewing on the buttons:
- Lightweight lining fabric – if using printed fabric, place printed side down
- Batting
- Gridded/textured pillow top fabric
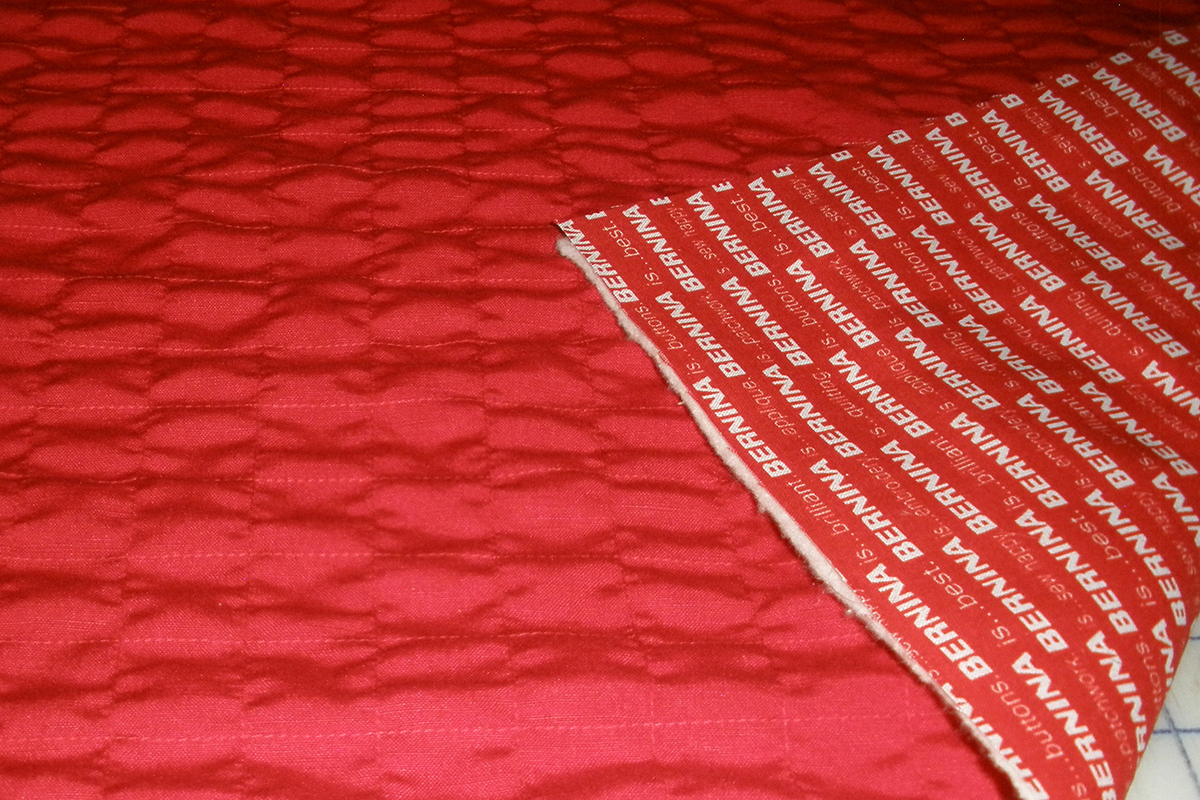
Sewing on the button embellishment:
- Randomly place and sew the buttons on the pillow top.
- After the buttons have been stitched, use the hand sewing needle to individually thread the thread tails. Place the needle in the closest hole of the button to move the thread tail to the backside of the pillow top.
- Knot the tails for each button for added security and trim the thread tails to tidy the work.
Step 5: Pillow Back
- Machine setup:
- Stitch #1 – straight stitch at default setting
- Reverse Pattern Foot #1/1C/1D
- Fold the two fabric (red linen) pieces (18” square and 20” x 18”) in half and press the fold. The folded pieces should measure 9” x 18” and 10” x 18”.
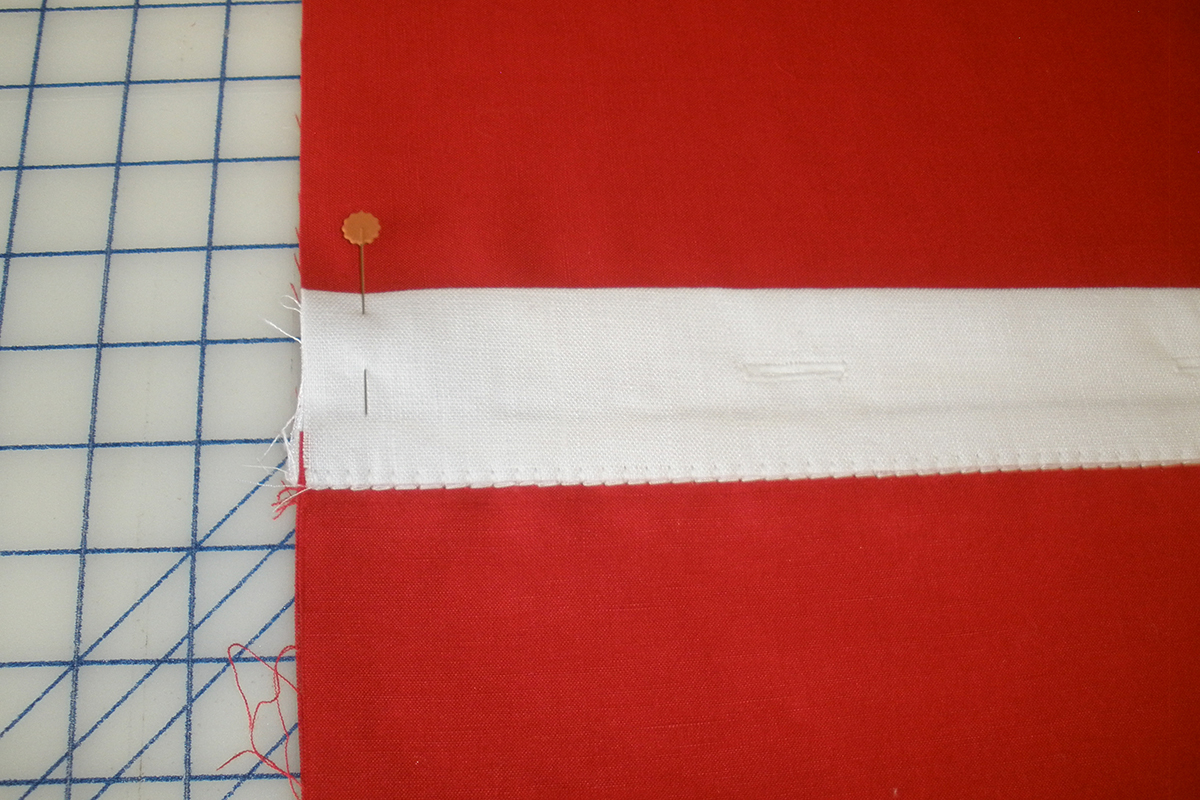
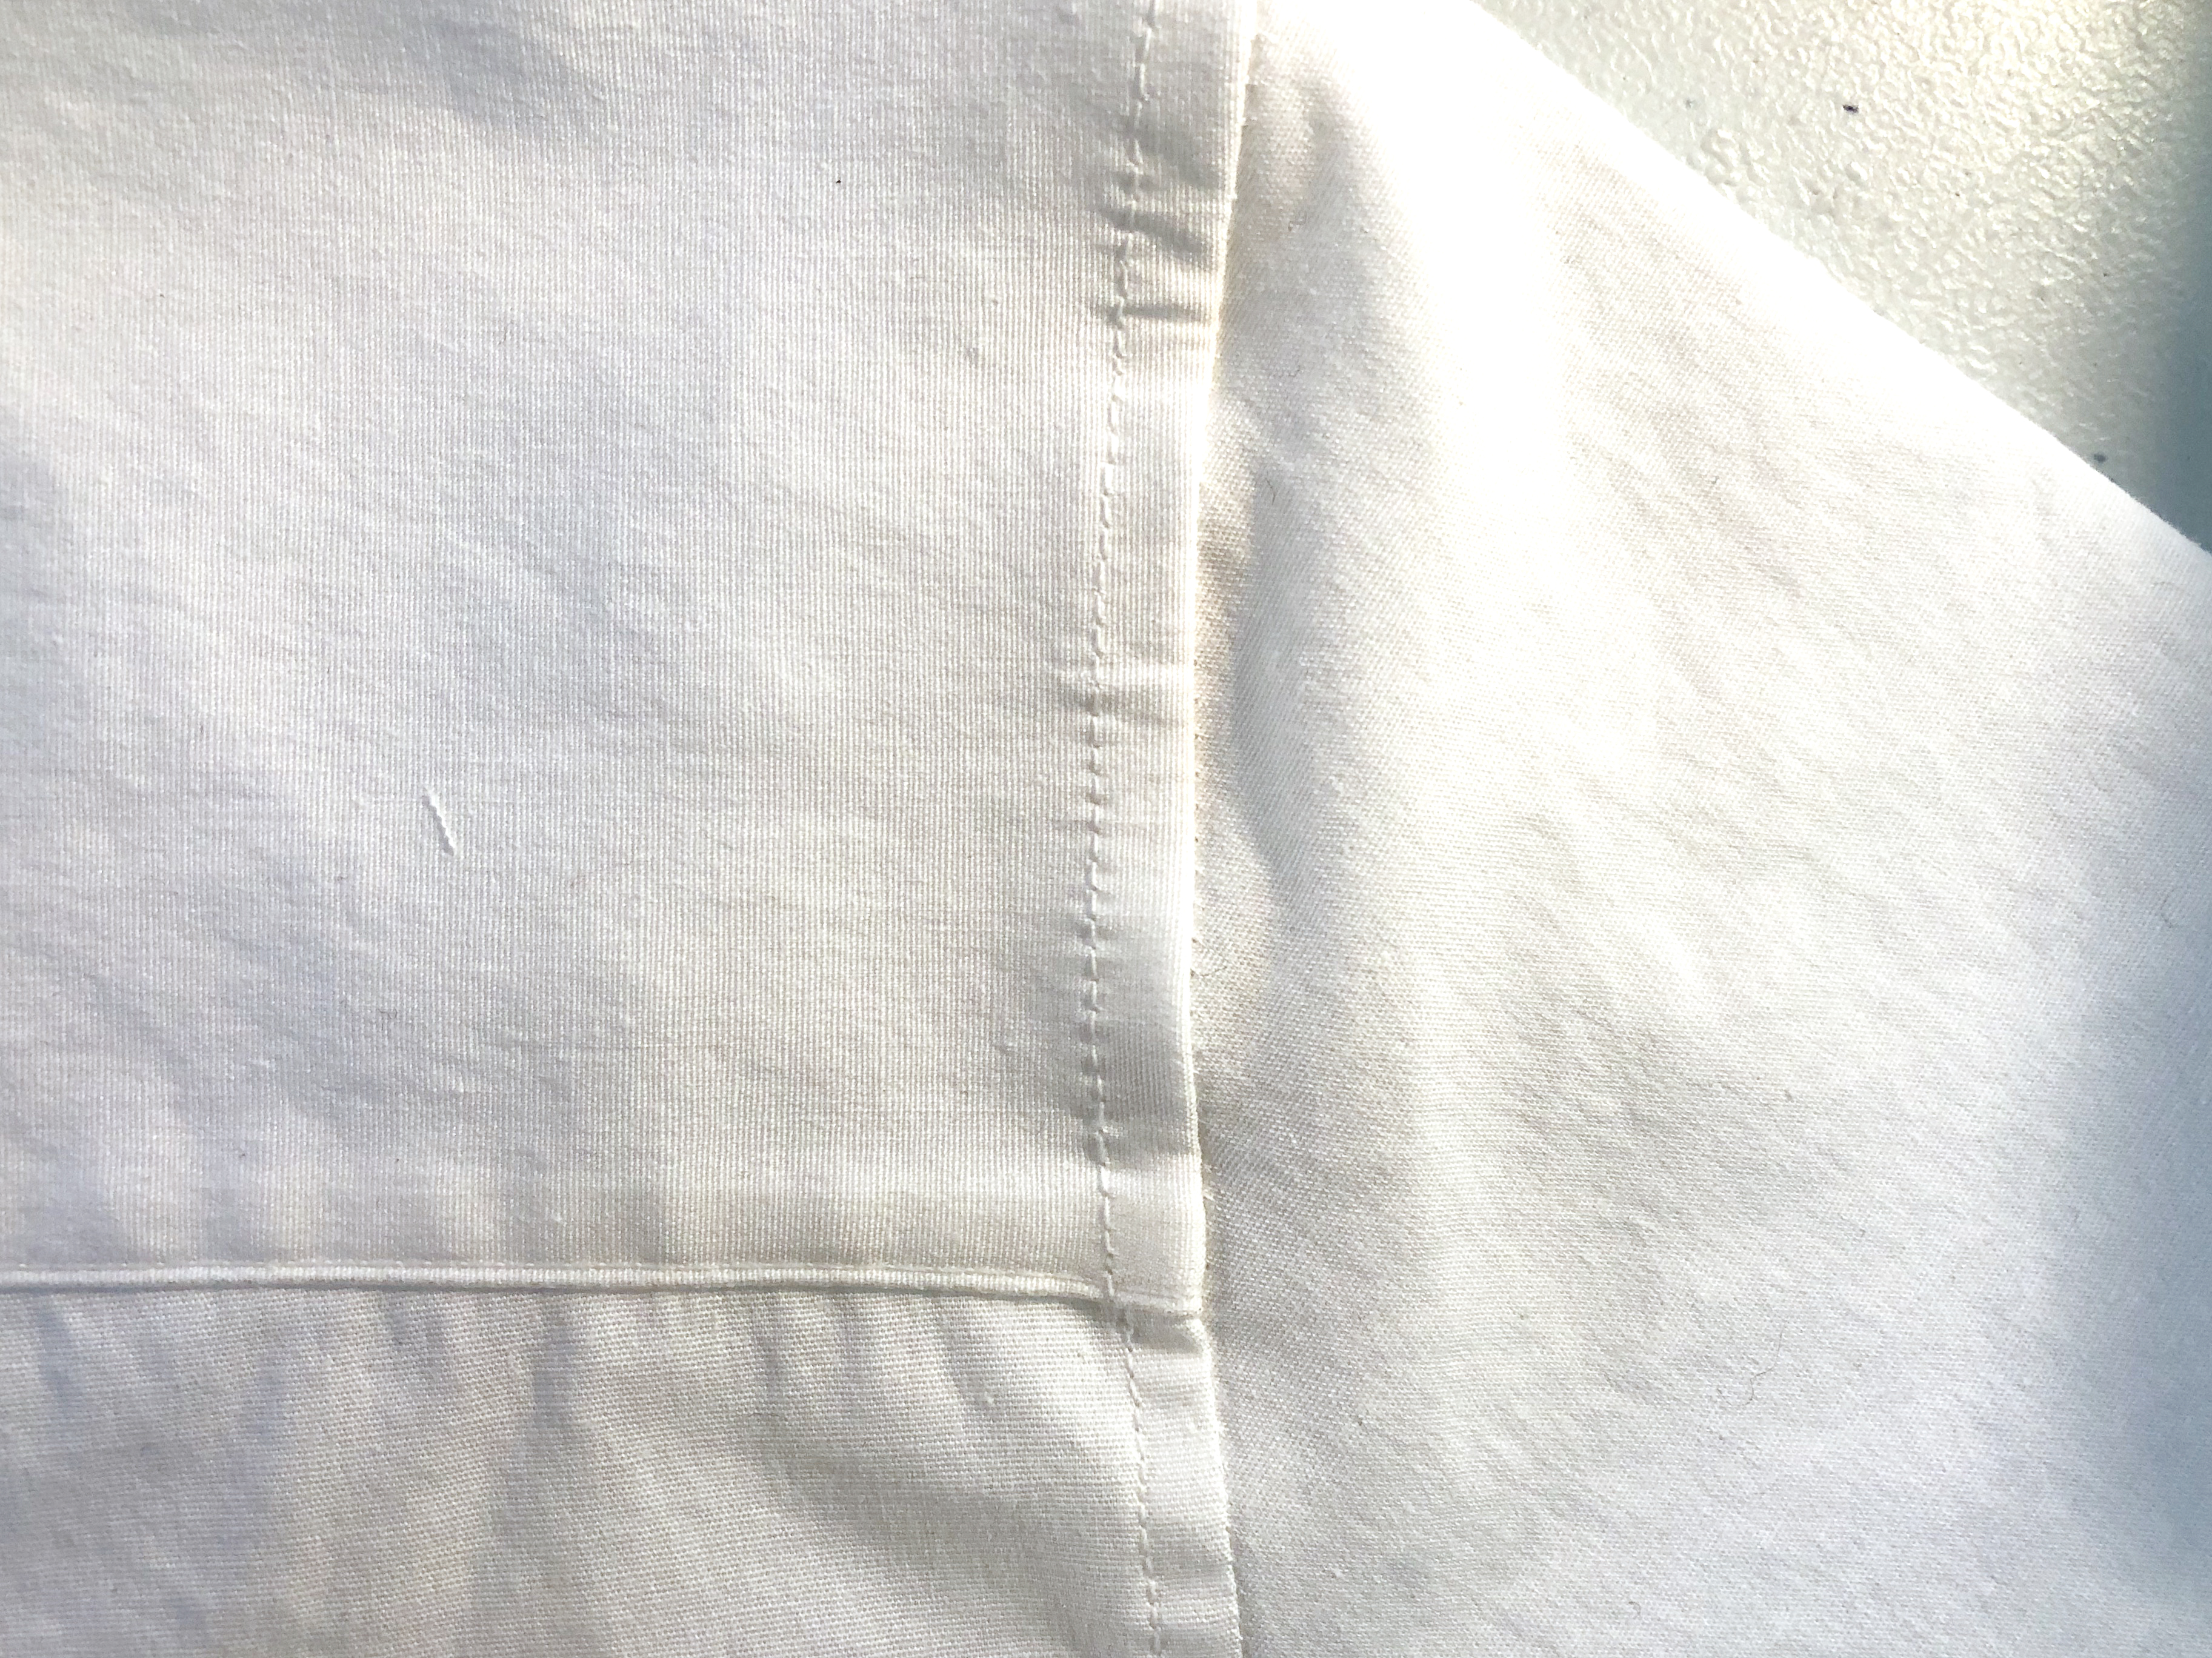
- Fold in half and press the fold for the 5” x 18” white linen placket piece of fabric to 2 ½” x 18”. Unfold the placket.
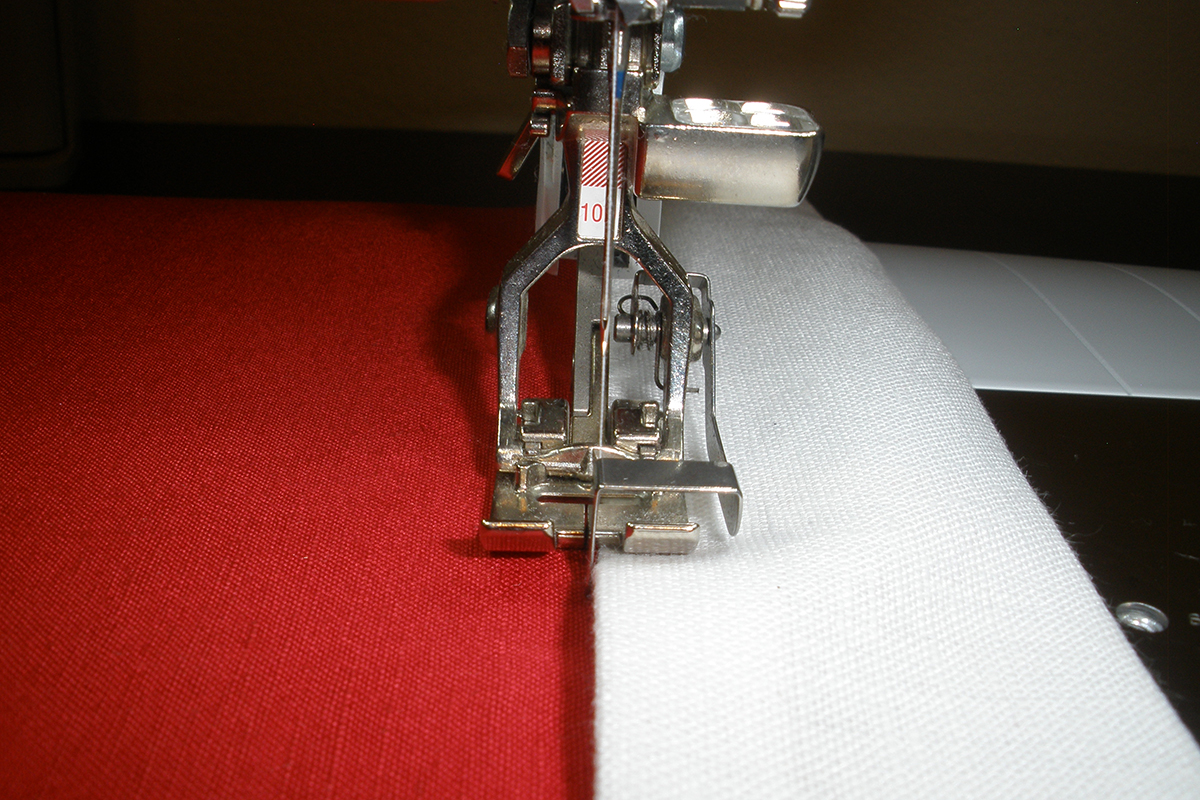
- Using a 1/2” seam allowance, sew one edge of the 5” x 18” placket fabric to the folded edge of the 9” x 18” piece of fabric.

- Press the seam allowance in the direction of the placket fabric. The seam will be encased within the placket.
- Press a 1/2″ seam allowance on the opposite 18” edge of the placket fabric.
- Pin the pressed edge of the placket fabric using the sewn edge as the guide. A decorative stitch will secure the placket to the pillow back.
Decorative Stitch:
- Machine setup:
- Stitch #1345 – blanket stitch
- Stitch Length – 6
- Stitch Width – 3.5
- Needle Position – 5
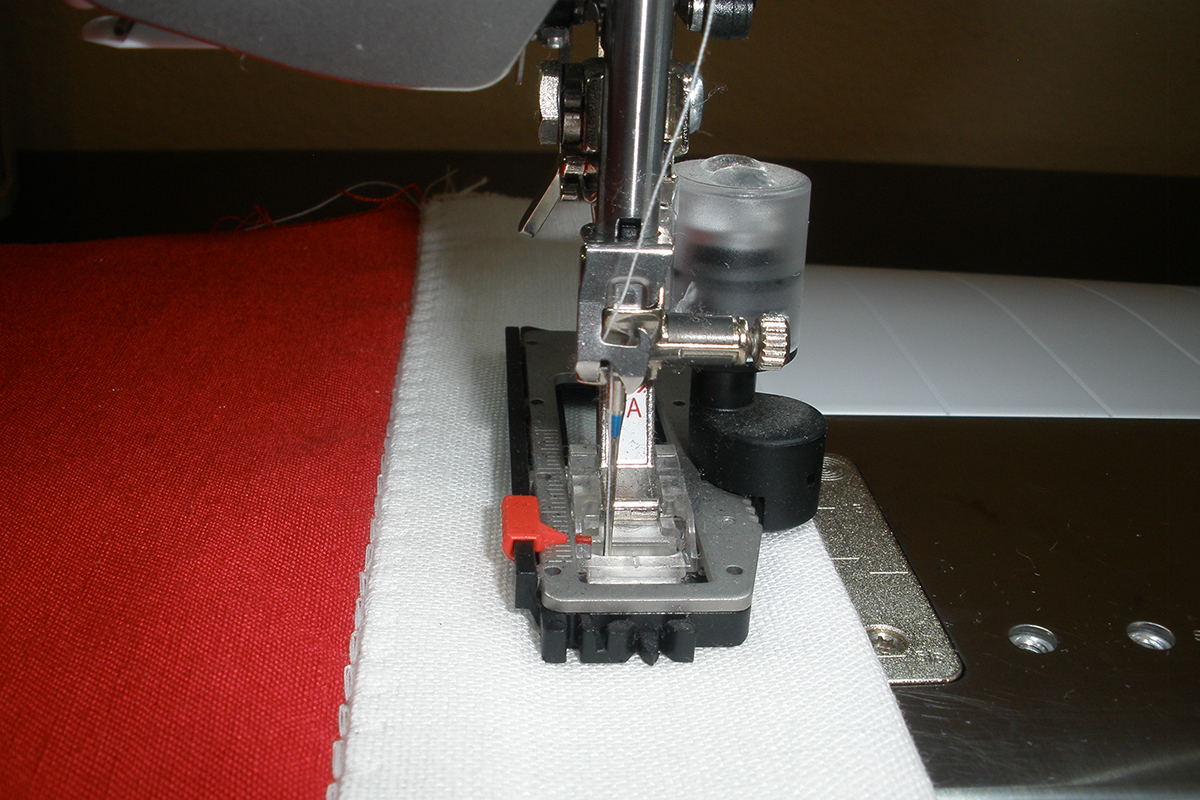
- Edgestitch Foot #10/10C/10D
- Align the blade of Edgestitch Foot #10/10C/10D along the pinned edge of placket fabric.
- Sew the length of the placket.
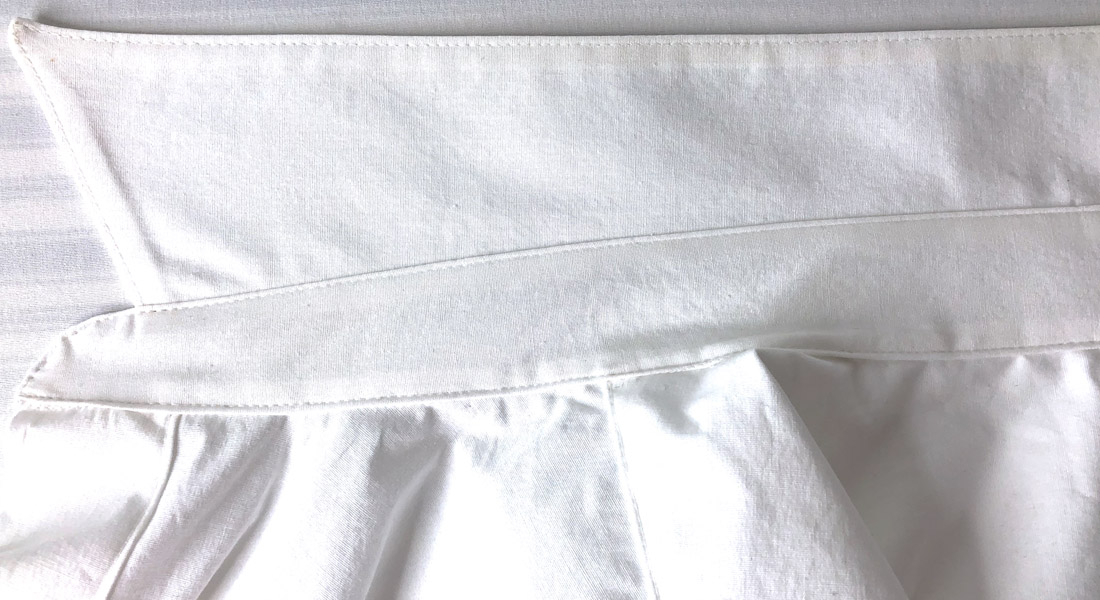
Buttonholes:
- Machine setup:
- Attach Automatic Buttonhole Foot with Slide #3A.
- Stitch #51 – Standard Buttonhole
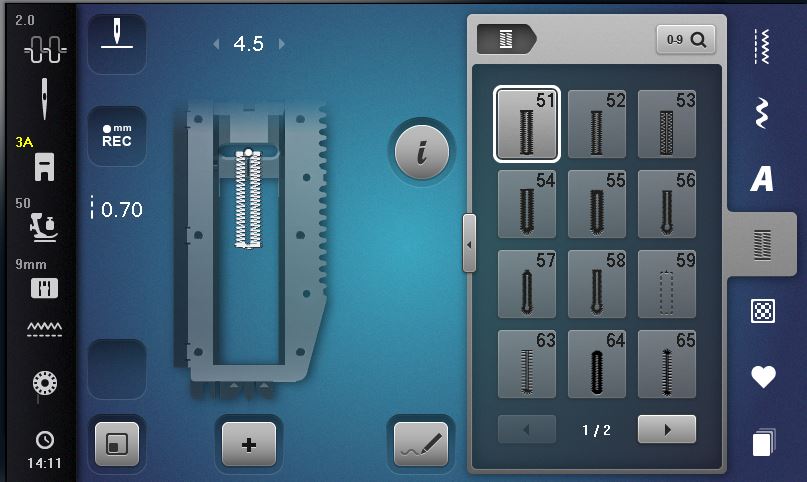
- Buttonhole Length – 22 mm button size/24 mm buttonhole length
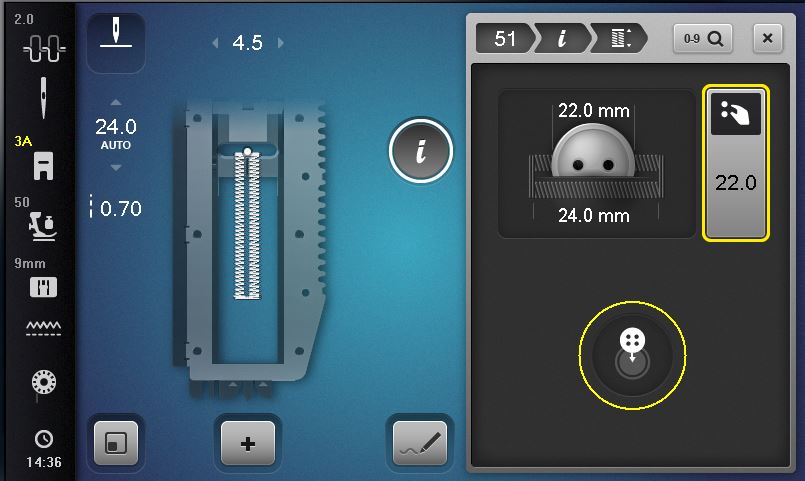
- The buttonholes are sewn in a horizontal orientation. Mark center placement for the first buttonhole.

- Stitch the remaining two buttonholes 4” from the center buttonhole.
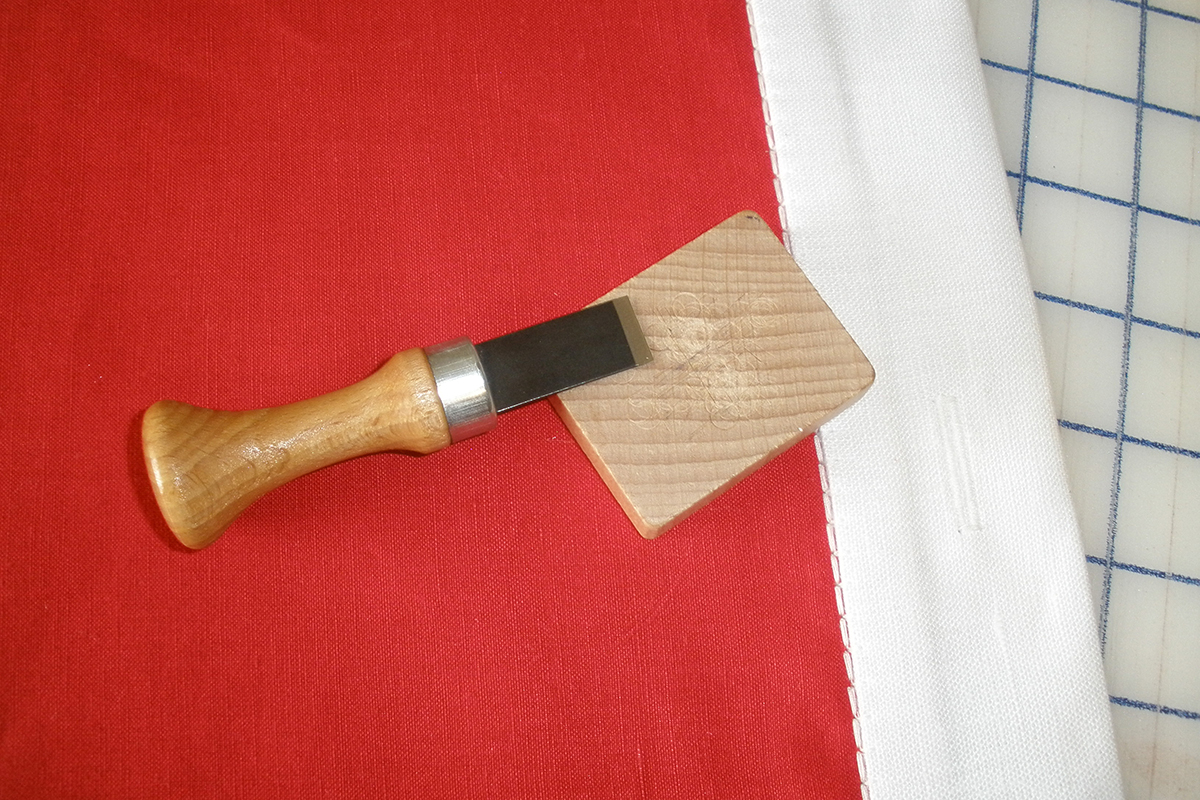
- Using the Buttonhole cutter with wooden block, cut open the buttonhole slits.
Combining the two back pieces together:
- Lay the 9” x 18” piece down and then overlap the placket end on top of the folded end of the first piece. Adjust the overlap until the length of the two pieces measures 18”.
- Pin the two pieces together.
- Sew the pieces together at each side using:
- Stitch #1 – Straight Stitch (default settings)
- Reverse Pattern Foot #1/1C/1D
Sew-on Buttons for Pillow Closure:
- Mark placement of buttons for pillow closure.
- Using the Button Sew-on Foot #18 and button sew-on stitch #60, stitch the buttons to the back piece overlapped by the buttonhole placket.
- Using the hand sewing needle, move the thread tails to the back; knot and trim.
Completion of Pillow Cover:
- Lay right sides together and pin in place.
- Sew the pieces together using:
- Stitch #1 – straight stitch (default settings)
- Reverse Pattern Foot #1/1C/1D
- 5/8” seam allowance
Recommendation: With the three buttons inserted into buttonholes, sew the side pieces where the two back pieces were joined first to minimize shifting. Then sew the ends to complete the pillow cover.
- Turn the pillow cover right side out.
- Insert pillow form.
Used Products


What you might also like


3 comments on “Button-up Pillow”
-
-
Wow! What a creative way to use a gathering foot. I sure have lots on my “bucket list” for sewing.?. Love the ideas.
-
Great project! Could also use texture magic to create additional texture!
Leave a Reply
You must be logged in to post a comment.

This uses techniques I need practice on so maybe I will make this item. Thank you Bernina!