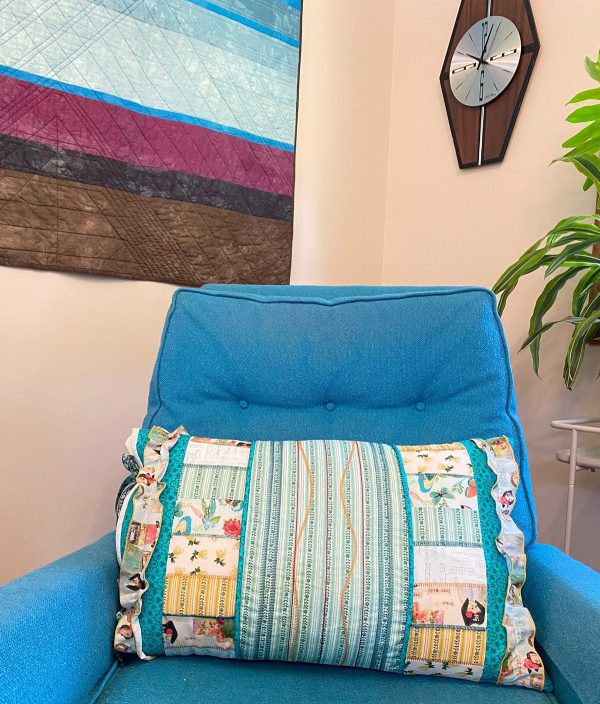
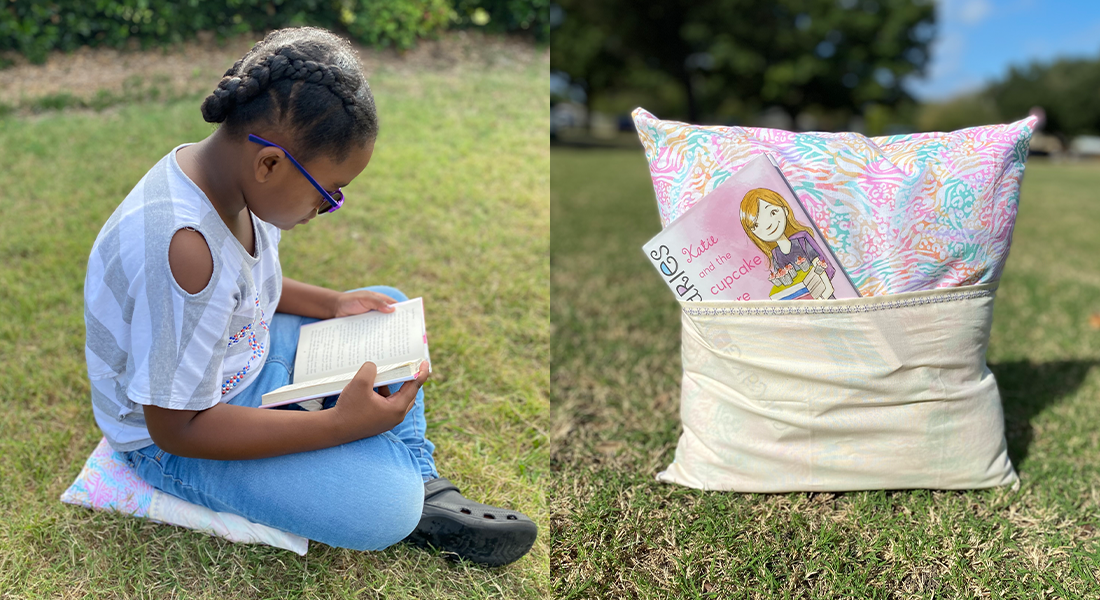
How to Create a Pillow with a Serger
Machine and Accessories Featured
Supplies to Create a Serger with a Pillow
- (11) 2 1/2″ strips
- (3) Fat Quarters
- (2) Fuse and Fleece stabilizer 10”x36”
- (2) 1/4″ Cording 36”
- (4) Ribbon 12”
Download the PDF handout below.

Thread
This project will explore a variety of stitches and techniques while making a fun decorative bench pillow. The pillow will be made in sections, then all the sections will join together to make the final pillow. You can take some design liberties as you like for the final design, but the directions will specify one order for the sections.
Technique: Patchwork
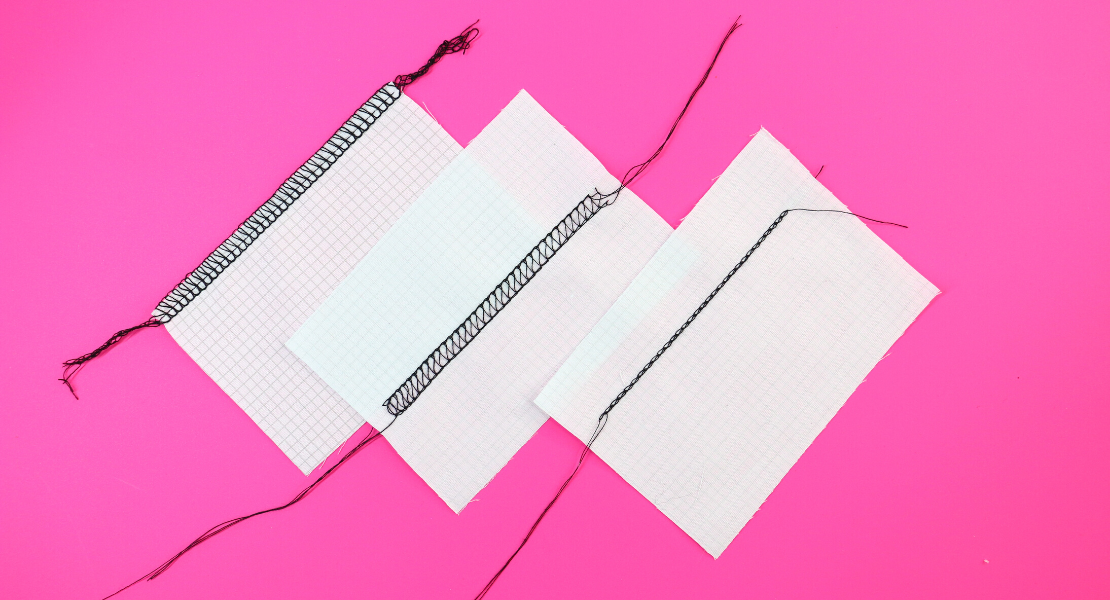
Set up the machine for a 3-thread Flatlock using the right needle and Stitch 6.
Foot
Threads
- Needle: Seracor (ladder side)
- Upper Looper: Decorative Thread (looper side)
- Lower Looper: Seracor
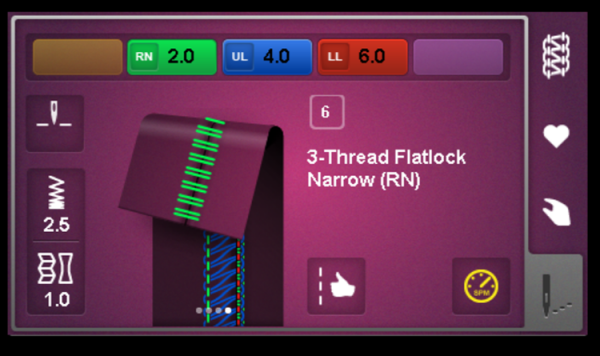
Sew two strips together WST (wrong sides together)—pull the fabric apart so that one lays on top of the other (upper looper side showing on top).
Continue to join strips together using variations of this stitch; try the following changes:
- Adjust the stitch length.
- Place decorative thread in needle (use topstitch needle 90/14) and sew with RST (right sides together) to reveal the ladder side of the stitch.
- Try wide 3-thread Flatlock Stitch 5 (move needle to LN).
- Try 2-thread Flatlock options (great to show ladder stitch)—don’t forget to close the upper looper with the Upper Looper Converter.
- Don’t love the flatlock? Try a 3-thread Overlock Stitch 3 or Stitch 4.
Trim strips and stack until you have:
(2) 6” x 33” strips (close is good enough-does not need to be exact).
Technique: Ruffles
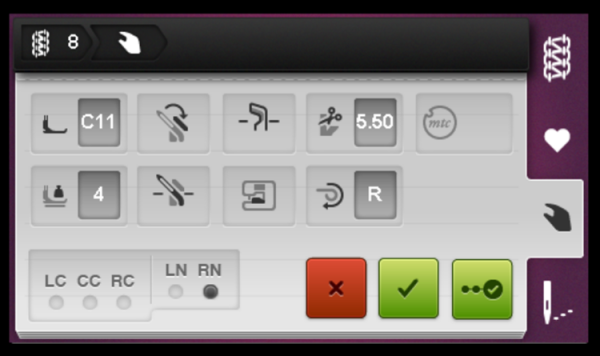
Set up the machine for a 3-thread Rolled Hem using the right needle Stitch 8.
Foot
- Standard Overlock Foot #C11
Threads
- Needle: Seracor
- Upper Looper: Wonderfil Softloc
- Lower Looper: Seracor
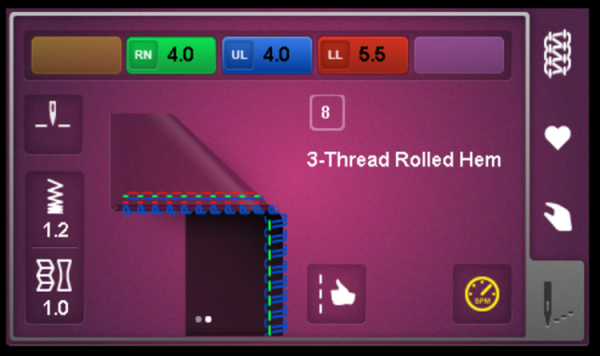
Don’t forget to check your manual settings:
- Change the Rolled Hem Selection Lever to R.
- Cutting width to 5.5.
- Stitch length and tensions to default but adjust as you like.
- Test the stitch and perfect!
Add the rolled hem stitch to both sides of (2) strips.
Set aside until chainstitch gathering technique (later in directions).

Technique: Piping
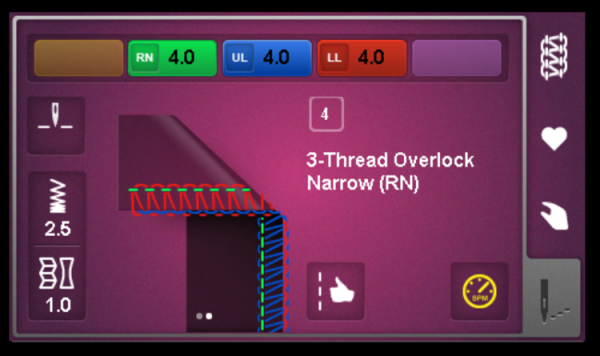
Set up the machine for a 3-thread Overlock using the right needle and Stitch 4
Foot
- Piping Foot #C16L
Threads
- Needle: Seracor
- Upper Looper: Seracor
- Lower Looper: Seracor
Don’t forget to check your manual settings:
- Move the Rolled Hem Selection Lever back to O.
- Change cutting width back to 6.
- It is recommended to increase presser foot pressure.
Using 1/4″ cording (cut two pieces) and two strips, wrap the strip around the cording leaving a tail of cording to place into the groove of the presser foot with raw edges of the fabric in front of the cutting knife.

Make the piping for both sides and trim the fabric length to fit the cording.
Set aside until adding to the center panel (later in directions).
Prepare the Center and Side Panels
- Choose one fat quarter for center panel (deco stitches) and one fat quarter for side panels (under ruffle).
- Cut the fat quarter in half (18”x10 ½”).
- Sew the fat quarters back together with the 3-thread Overlock on the short end, so you have a strip 36” long (approximately).
- Add the Fuse and Fleece iron-on stabilizer to the back of the fabrics.
- Cut the Side Panel strip in half lengthwise (hotdog)—so you have two long strips.
Technique: Decorative Stitches
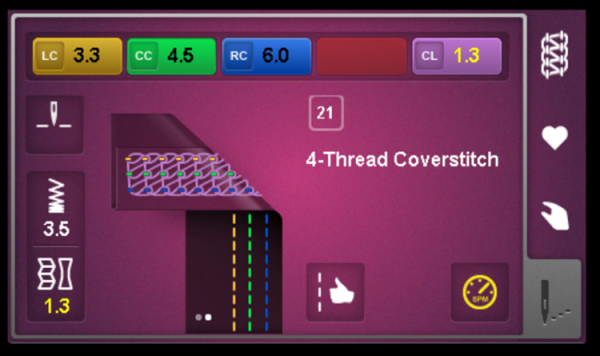
Set up the machine for a 4-thread Coverstitch using all three coverstitch needle positions Stitch 21.
Foot
- Cover/Chainstitch #C13
Threads
- Needles: Seracor
- Cover Looper: Wonderfil Spagetti
Follow the setup Wizard to make sure that you make all the correct manual changes:
- Change the presser foot to C13.
- Lower presser foot presser back to 4.
- Move needles to coverstitch positions.
- Lower the Cutting Knife and set cutting width to 5.
- Attach the Coverstitch Insert.
- Lower and lock the Upper Looper.
- Thread the Cover Looper (foot up).
- Thread the needles (foot up).
Test on a scrap. (Trim off ends of center panel 3”).
Recommended: Increase stitch length and lower the cover looper tension.
Sew rows of decorative stitches along the large center panel fabric with the wrong side up—you may want to use a pen to mark lines on the stabilizer so you have something to follow.
Continue sewing decorative rows of stitching on center panel (press between each row), try the following:
- Use various color threads.
- Use various coverstitch options: Stitch 22, Stitch 24.
- Use chainstitch: Stitch 16.
Make the Ruffled Side Panels
Using the 2-thread Chainstitch Stitch 16, gather the ruffle strips from the technique above and then attach to the side panels (trim to 33” long).
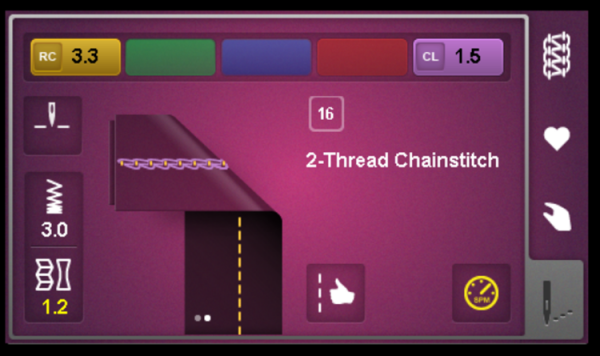
Make the following adjustments to create a gathered effect:
- Thread Cover Looper with Seracor.
- Return to default settings by pressing clear.
- Set Differential Feed: 1.2
Sew the chainstitch down the center of the strip, gathering slightly as it goes (it will gather more, but if you do too much the strip with be too short for the side panel).
Clear the chainstitch settings back to the default setting and use the chainstitch to attach the ruffle to the side panel (this is a lot like a sewing machine).

Build Your Pillow
Set up the machine for a 4-thread Overlock Stitch 1
Foot
- Piping Foot #C16L
- Standard Combo Foot #C11
Threads
- Needles: Seracor
- Loopers: Seracor
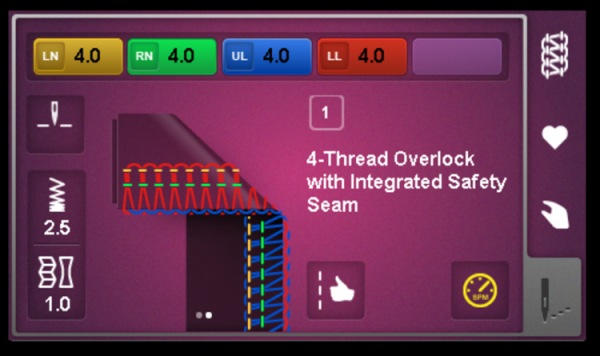
Follow the setup Wizard to make sure that you make all the correct manual changes and test sew for a balanced overlock stitch.
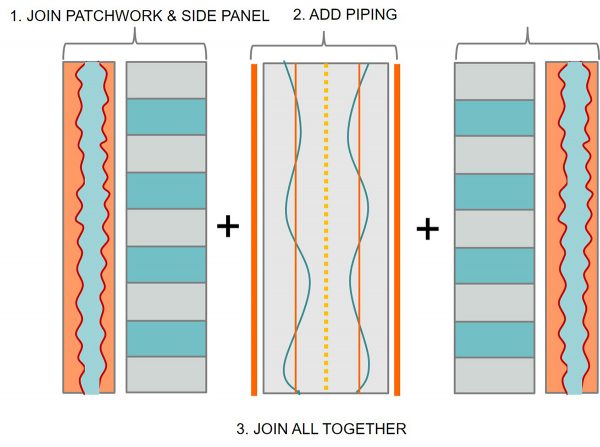
Assemble the Pillow Cover
- Using Foot C11, join the ruffle side panel to the patchwork section.
- Using Foot C16L, add the piping to the center panel.
- It is recommended that you increase stitch length, and increase presser foot pressure (to hold fabric firm so it moves through flat).
- Add the patchwork section to the piped center panel and use the Piping Foot C16L to join the sections together.
- Trim thread tails and square up pillow top: 32”x24-26”
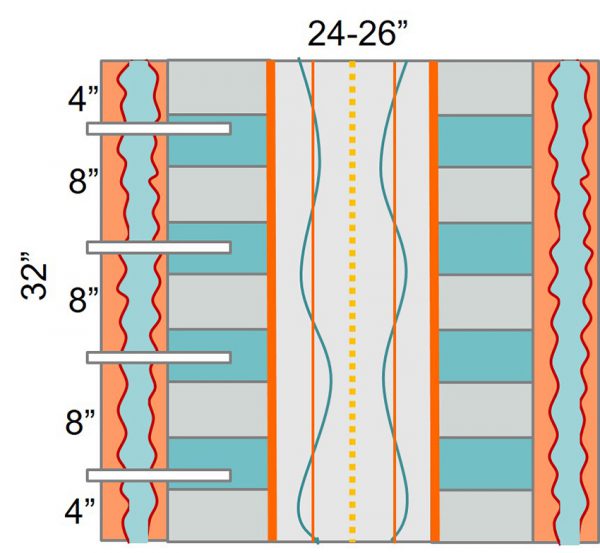
- Evenly place the ribbons along the left side, starting at 4” from the edge with 8” between ribbons.
- Add one strip (trim to length of 33”) to edge with ribbon RST and sew.
- Press strip to the left.
- Fold the pillow top in half RST.
- Clip along the edge at the seams of the pillow sections (so they meet nicely).
- Sew the long edge first, then sew the short end.
- Trim the thread tails and press the strip (at ribbons) to the inside of the pillow.
- Turn right side out, fill with pillow and tie—ENJOY!

Used Products

What you might also like


One comment on “How to Create a Pillow with a Serger”
Leave a Reply
You must be logged in to post a comment.

I may try this because it seems like a great way to experiment with the serger’s features. These instructions would be so much better if you showed real photos instead of drawings. Thanks.