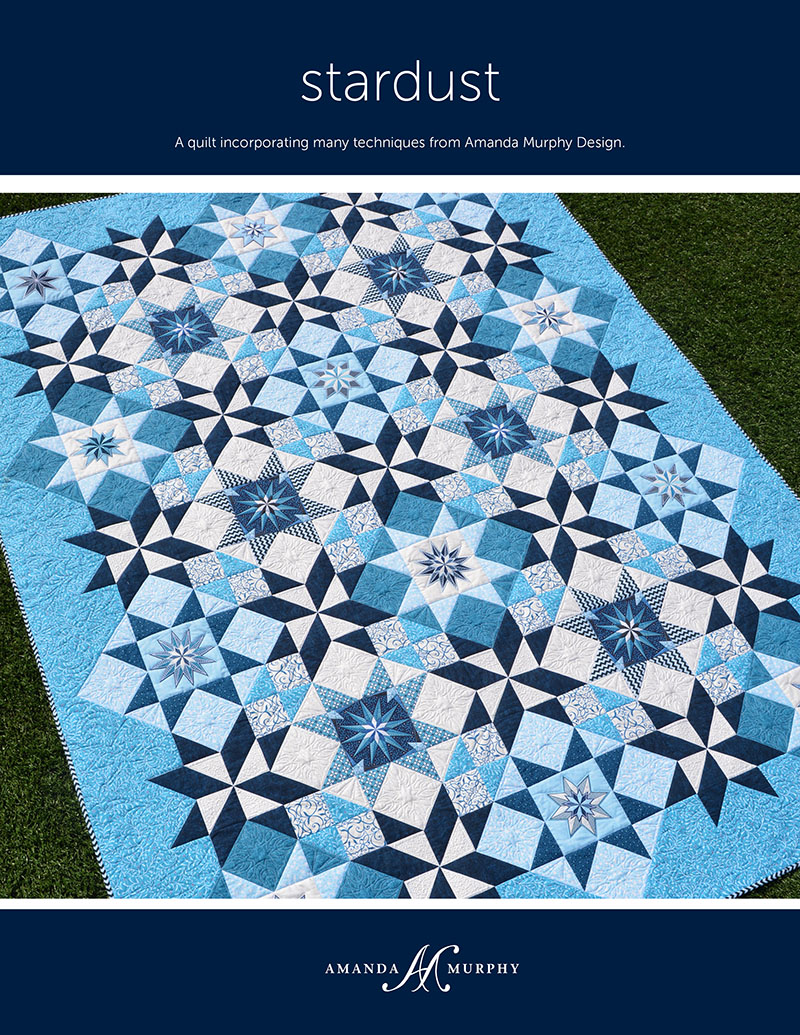
Stardust Quilt-along: Piecing Tips and Tricks
Welcome back to the Stardust Quilt-Along!
For those of you trying to search out Celestial Lights fabrics, more are arriving on the boat this month.
Stardust Quilt-along Schedule
Stardust Quilt-along: Ribbon Candy
This month I made a video showing you some piecing tips!
Piecing Tips and Tricks
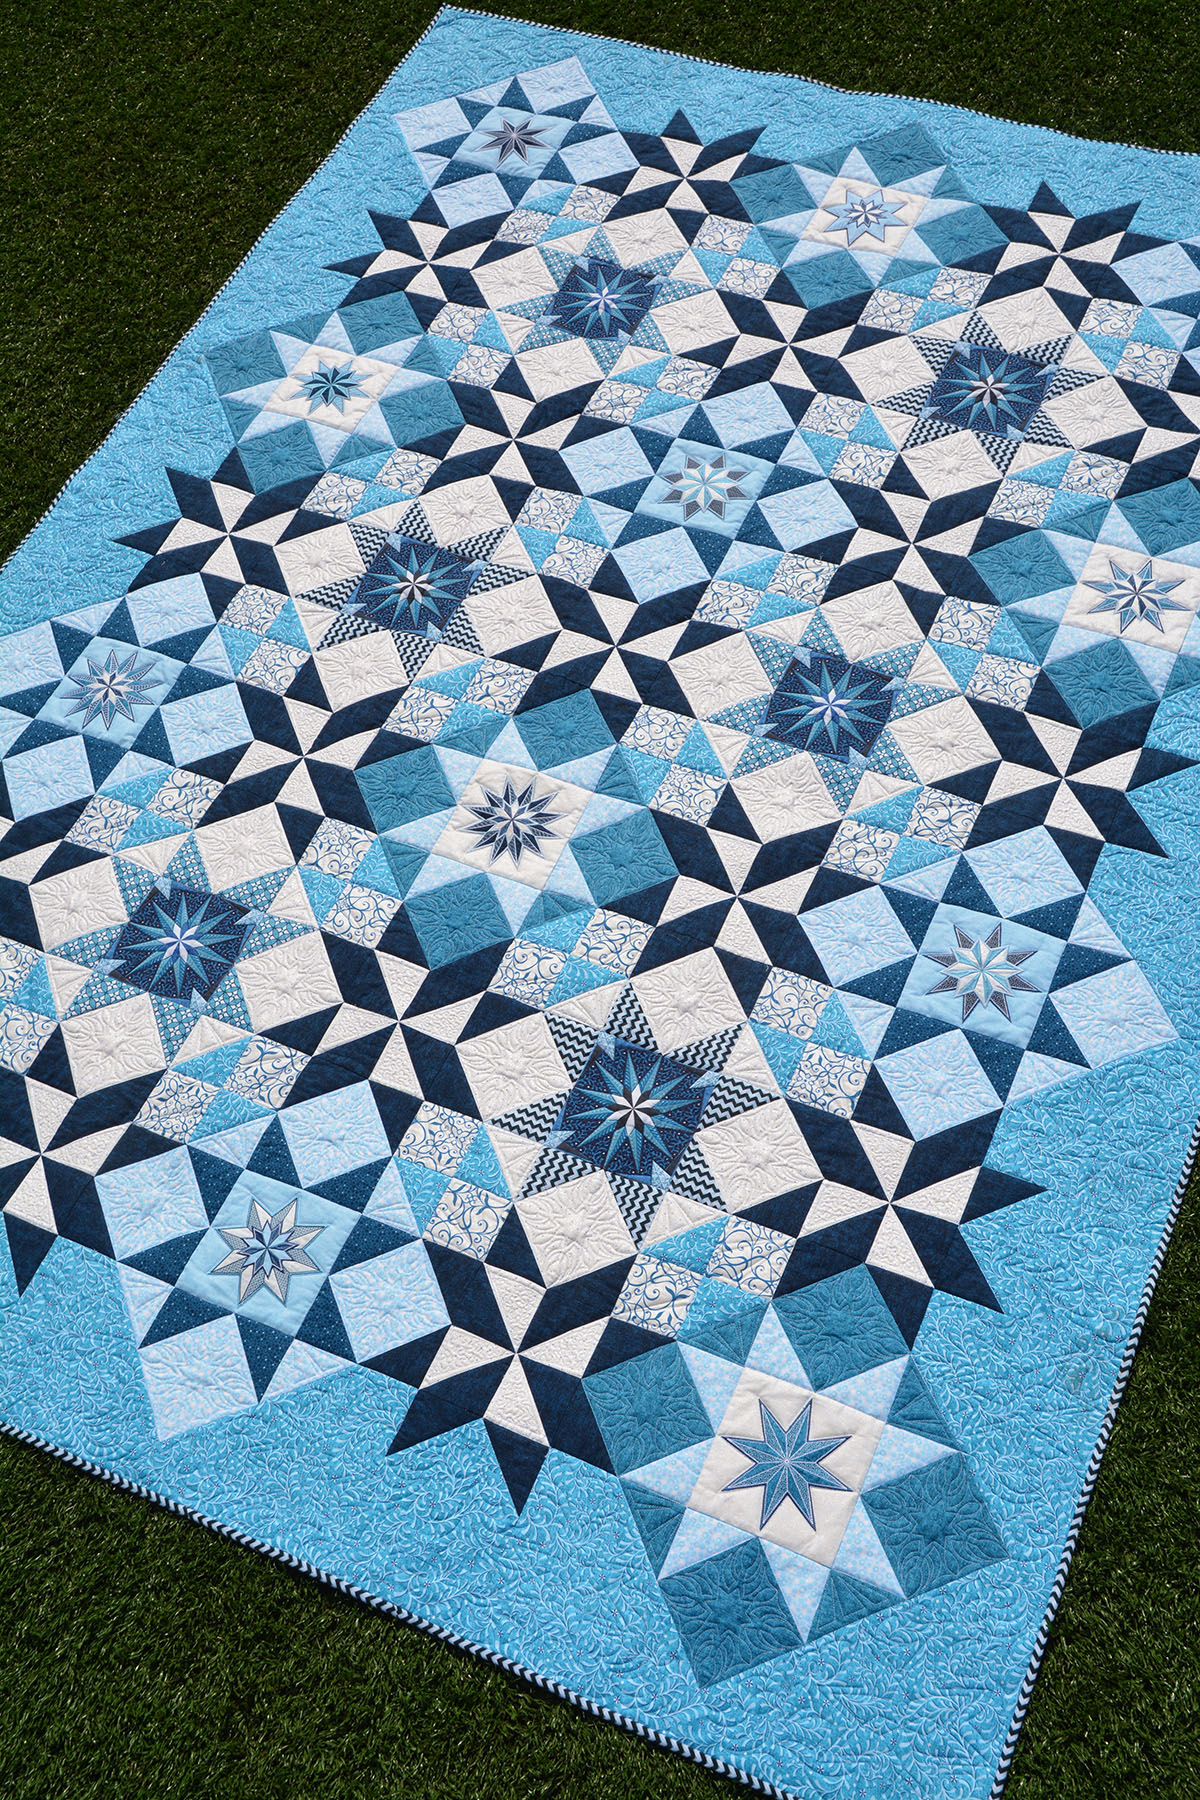
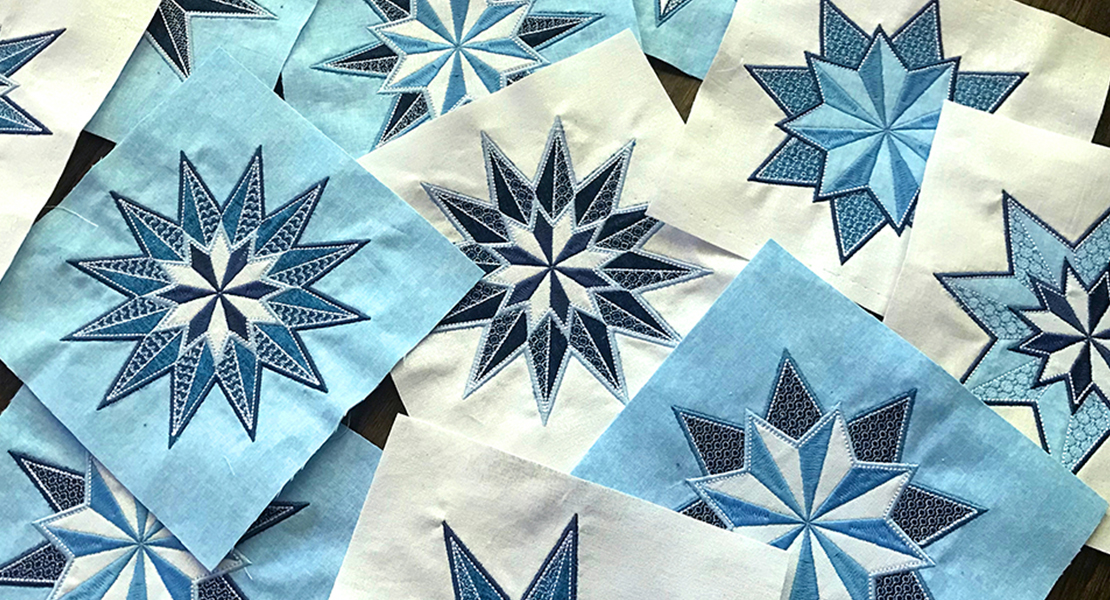
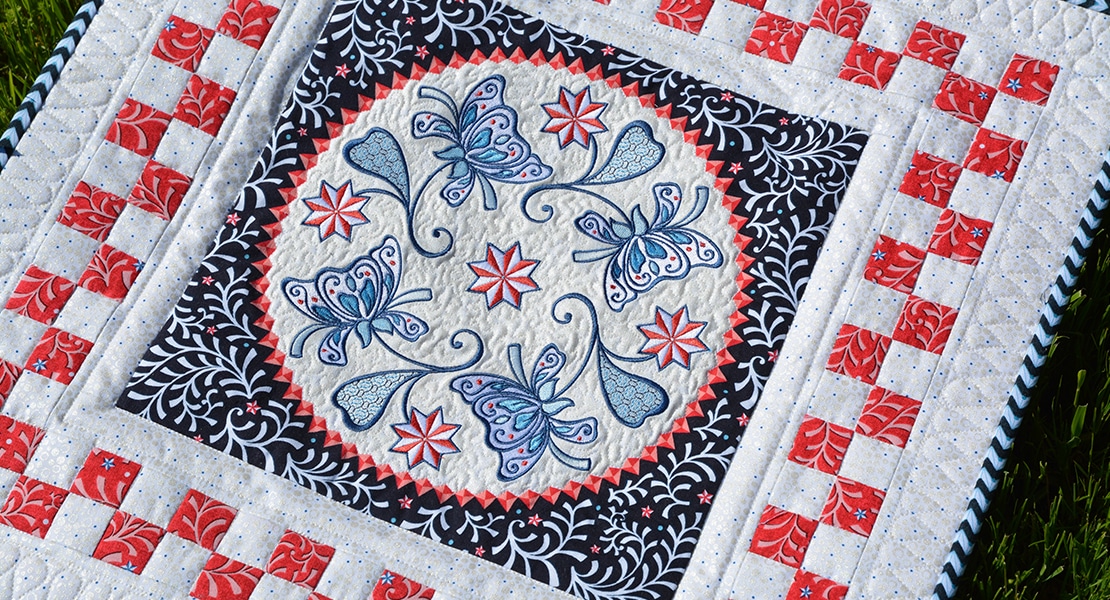
The Stardust Quilt
The Stardust blocks are fairly simple—it is their placement and repetition that produces dynamic movement throughout the quilt top.
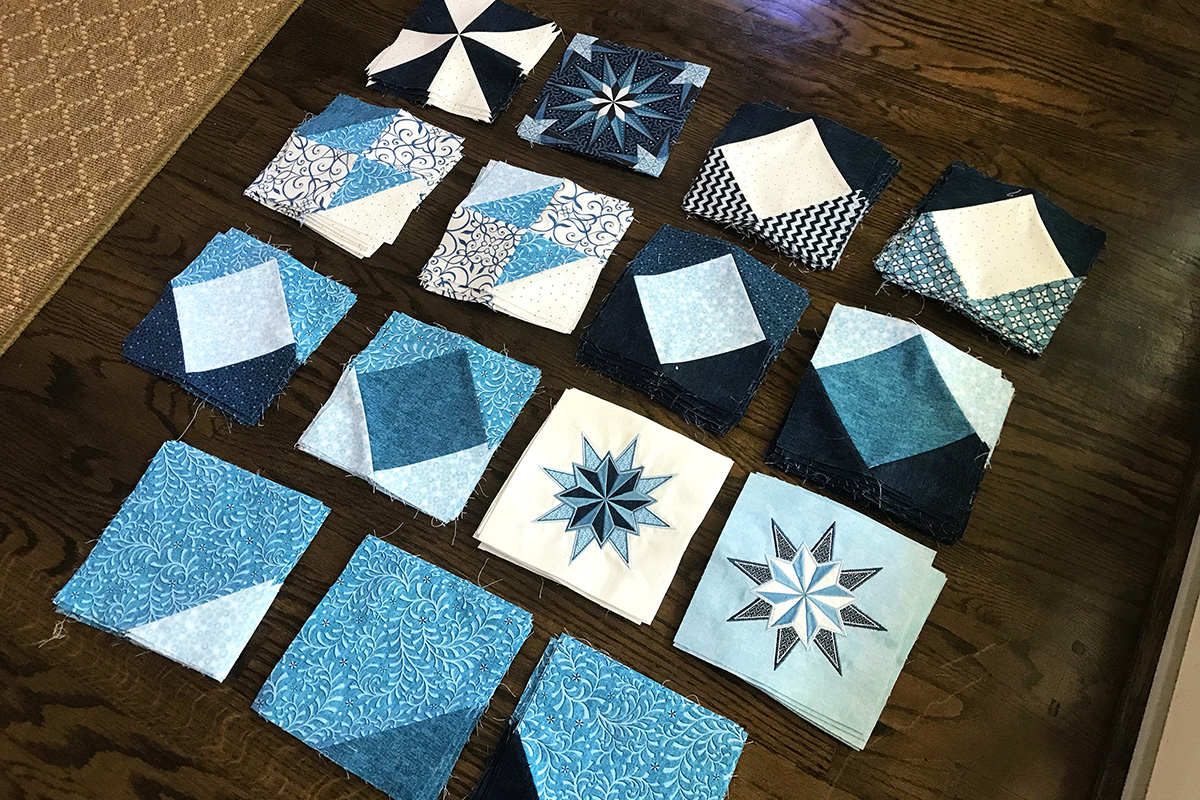
The pieced blocks from the Stardust Quilt
An Accurate 1/4 Seam is Key in Quilting
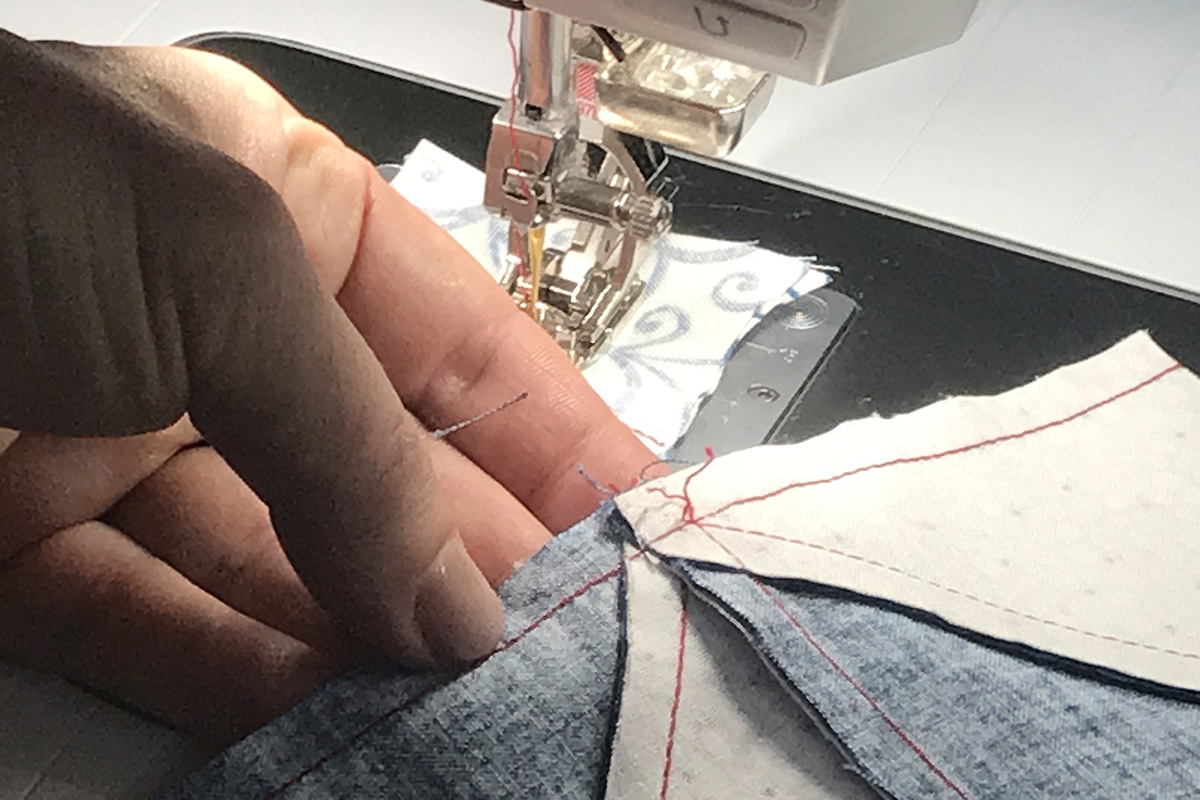
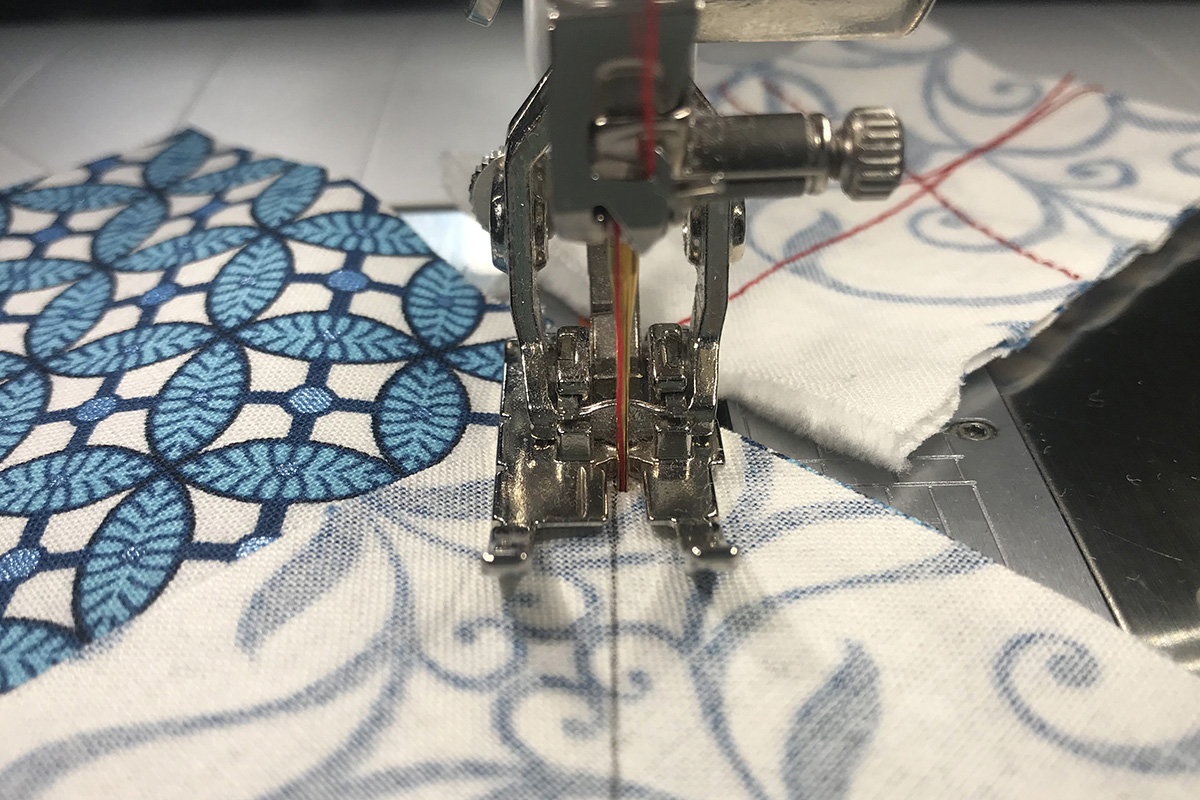
The most important thing when piecing is to make sure you have an accurate 1/4” seam. If it is even a little off, it can really add up across a quilt top!
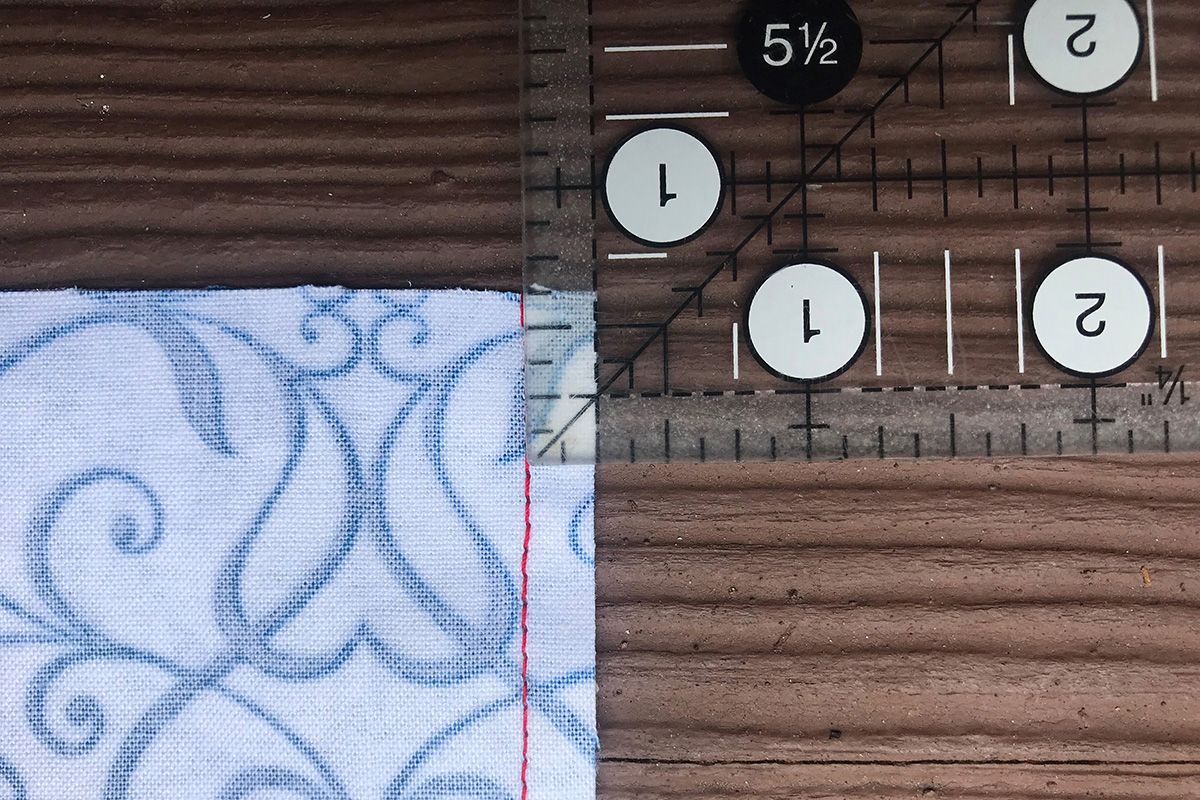
I’m using contrasting thread here so you can see, but note that red would not be my normal thread choice unless piecing an all-red quilt!
I like to use my BERNINA Patchwork foot #97 D and center stitch plate for piecing. I actually also use it for attaching binding too, lowering my presser foot pressure when feeding through a quilt sandwich.
Typically, I watch the edge of the foot while I sew, rather than the needle.
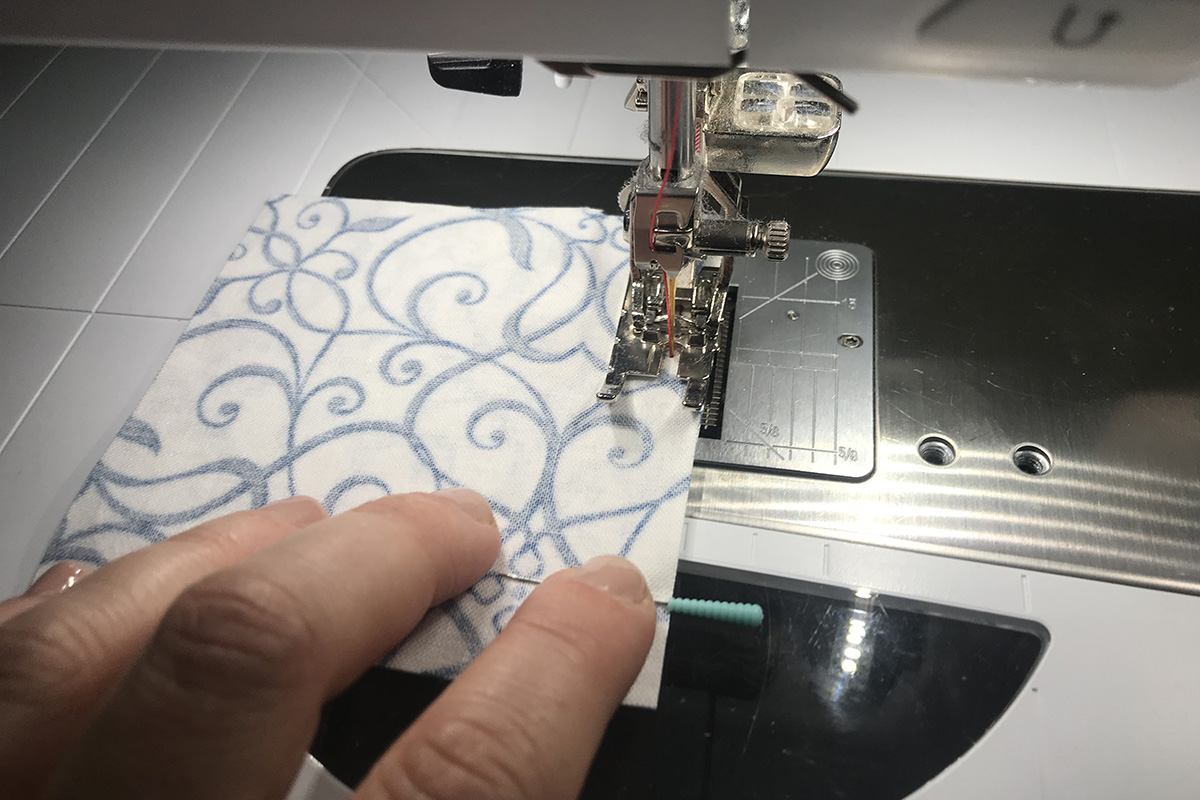
Piecing with my BERNINA Patchwork foot #97 D on my BERNINA 790 Plus.
One of the most important things when piecing is to press all your seams flat BEFORE pressing them open or to one side. This sets the seams and reduces their bulk!
If your BERNINA isn’t sewing just as it should, make sure you engaged the dual feed!
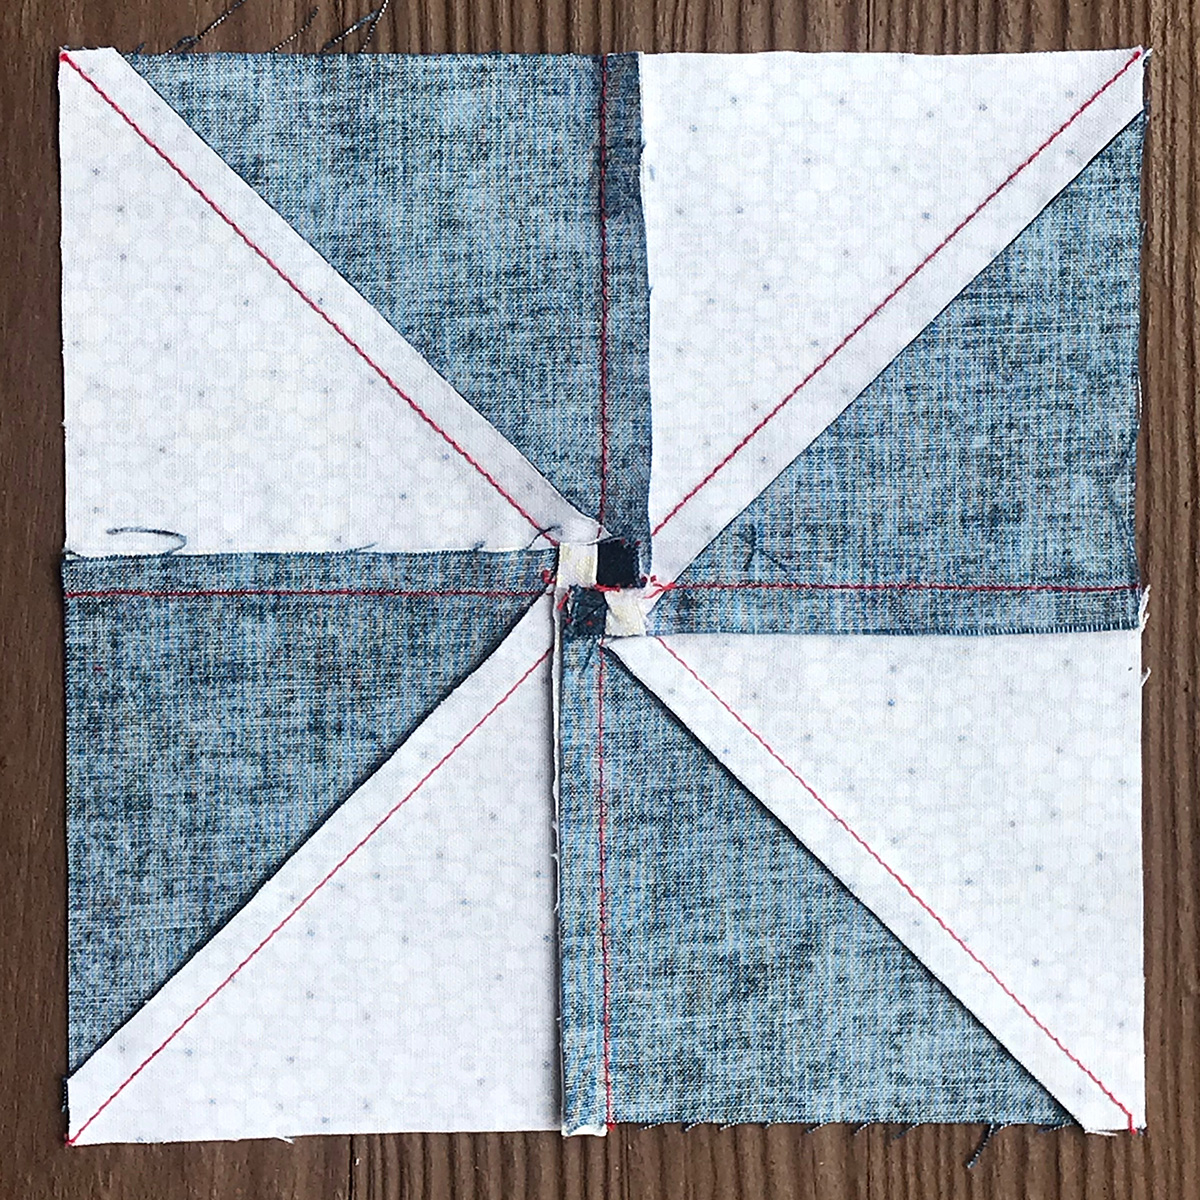
How to Achieve Flat Pinwheel Blocks
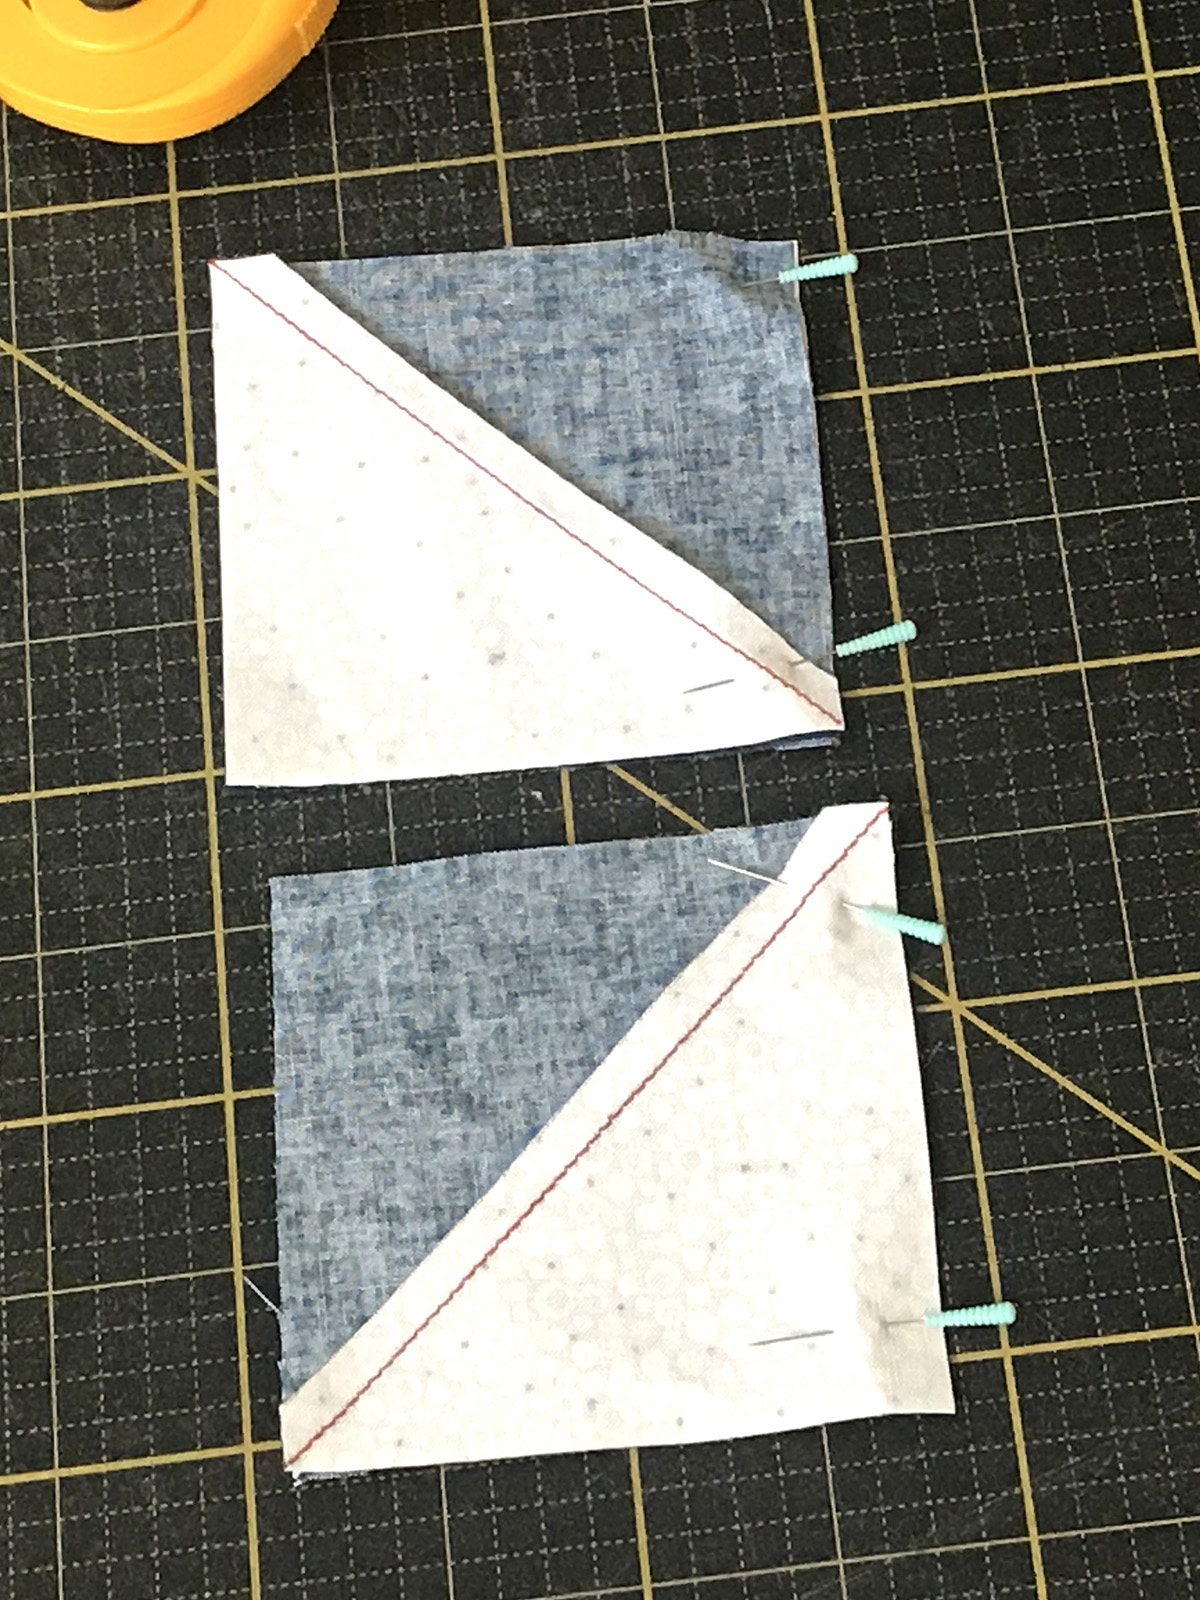
Press all the half-square units the same direction. I pressed the seams toward the darker fabric.
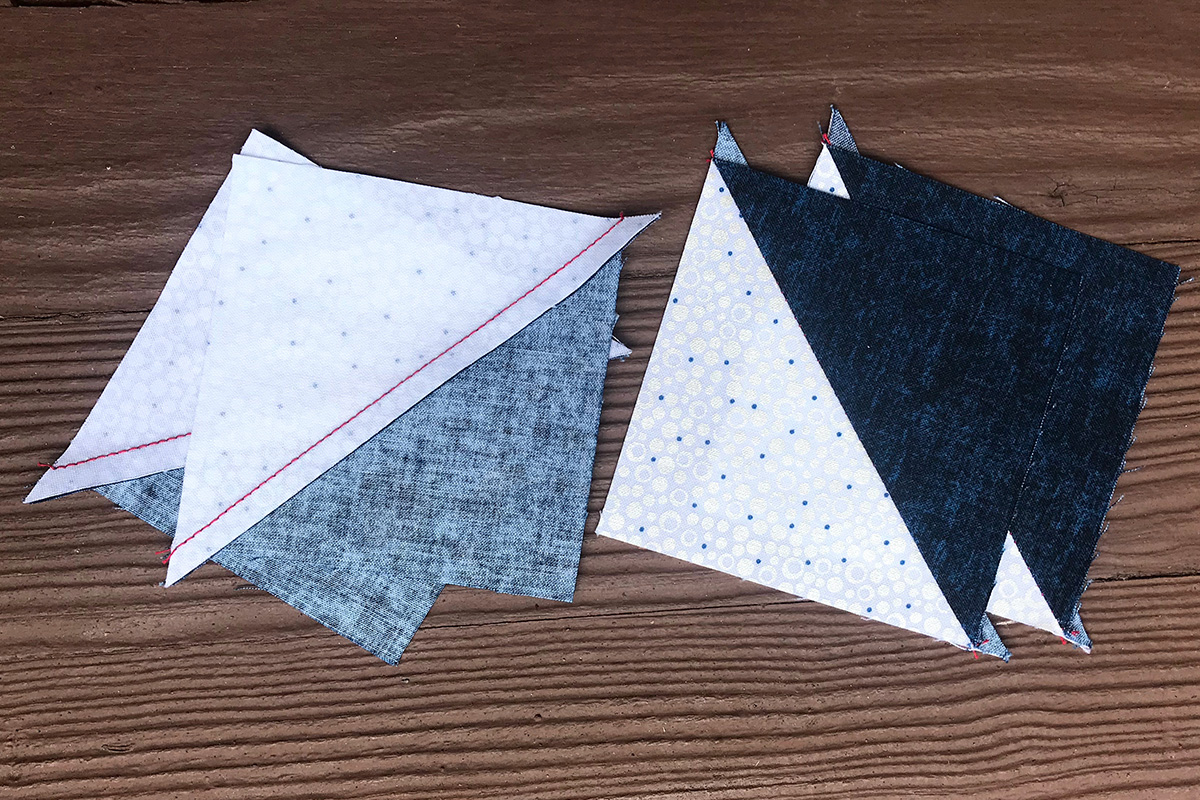
I prefer to make my half-square triangles a little oversized, and then trim them down so they are all the same. This takes a little more time, but I find that it gives me more uniform blocks.
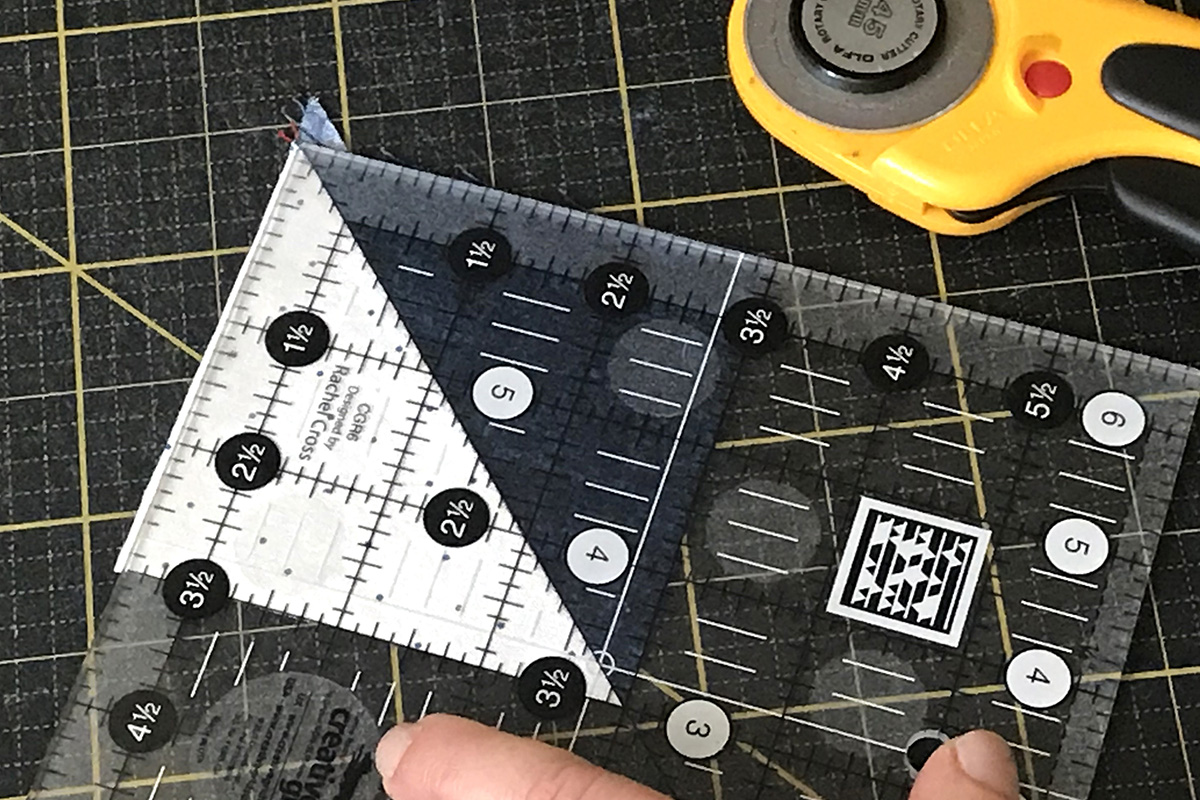
Trimming half-square triangle units, aligning the diagonal line of the ruler over the seam.
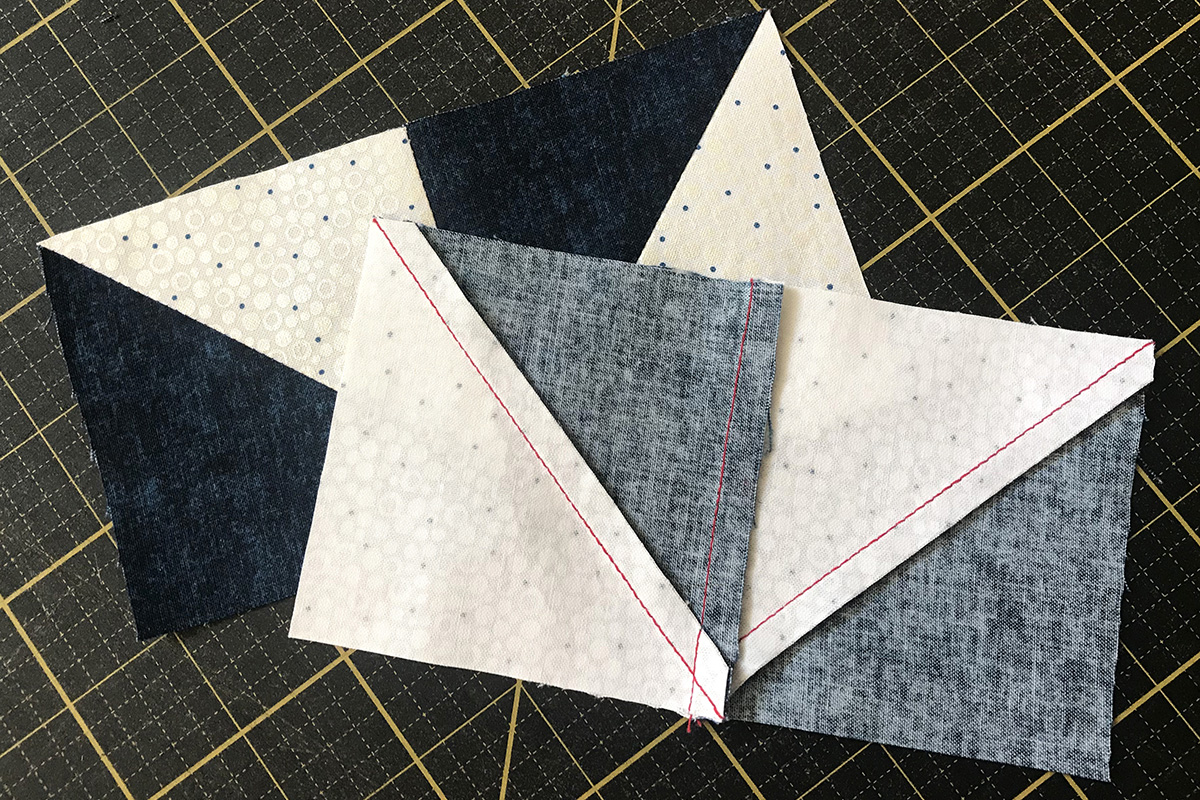
Arrange the blocks into a pinwheel unit. Pin the blocks together in rows.
You should be able to feel the seam allowances nest through the fabric. Press the seams in the same direction as the half-square triangle seams. I know that in this case I’m not pressing toward the darker fabric, but I find that having a really flat block is more important here.
At this point I like to go to my ironing board and use a the rows together straight down into the ironing board surface, making sure that all of the unit seams nest once again.
Then I pin the rows together on either side of the seam.
Once again, I join the rows with an accurate 1/4” seam.
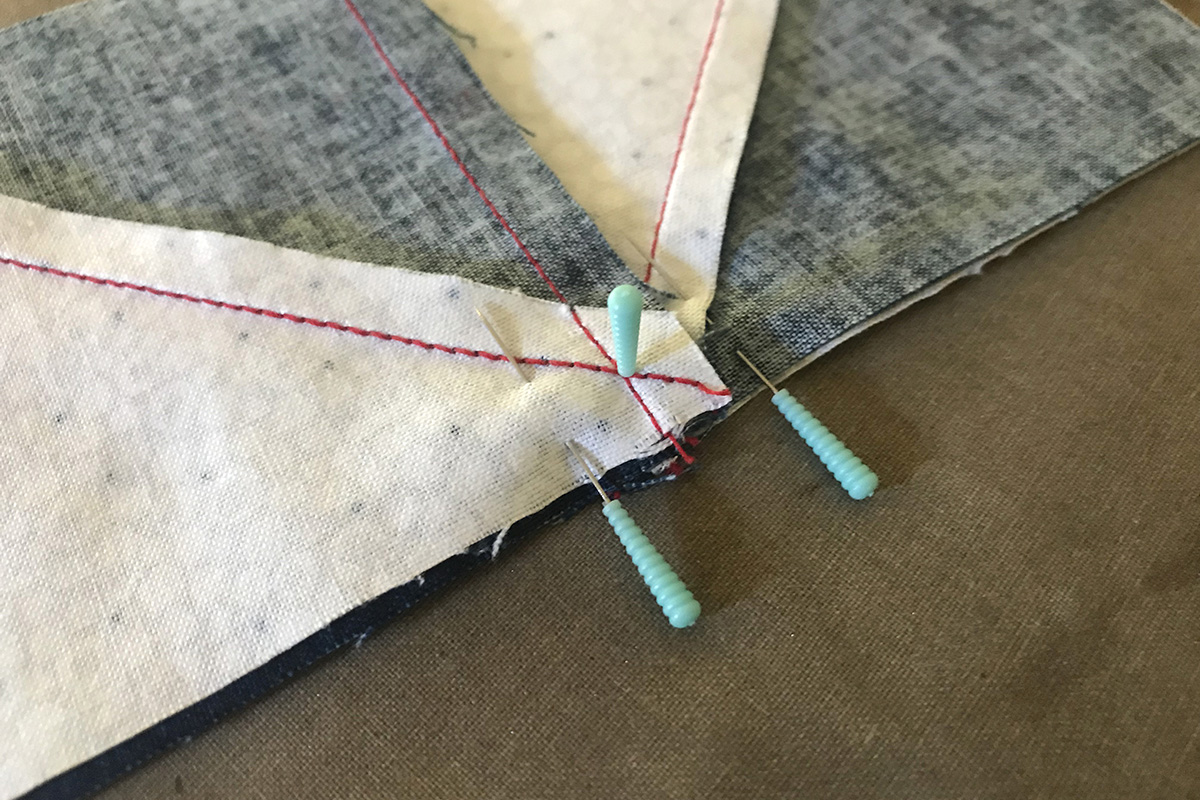
There are still a lot of seams meeting in the middle of the block. So I hold off on pressing and pick out the seams in the center of the block of all but the last piecing step. This allows me to “spin” the seams at the center and press them flat!
Stitch-and-Flip Corners
Tip: Sometimes people find that when piecing “stitch-and-flip” corners their blocks come up a little short. This is because the fabric thickness takes up a little room. So to avoid this problem, when piecing I like to sew right ALONG the diagonal line, a hairline more toward the outer corner of the block. I find that this helps me produce blocks that are the right size. You can always press back the corner of the block to make sure that it lines up correctly before trimming the seam. Also note, all the points should be 1/4” away from the raw edges of the blocks.
For Blocks five and six, you can press the seams toward Fabric G to make the seams nest.
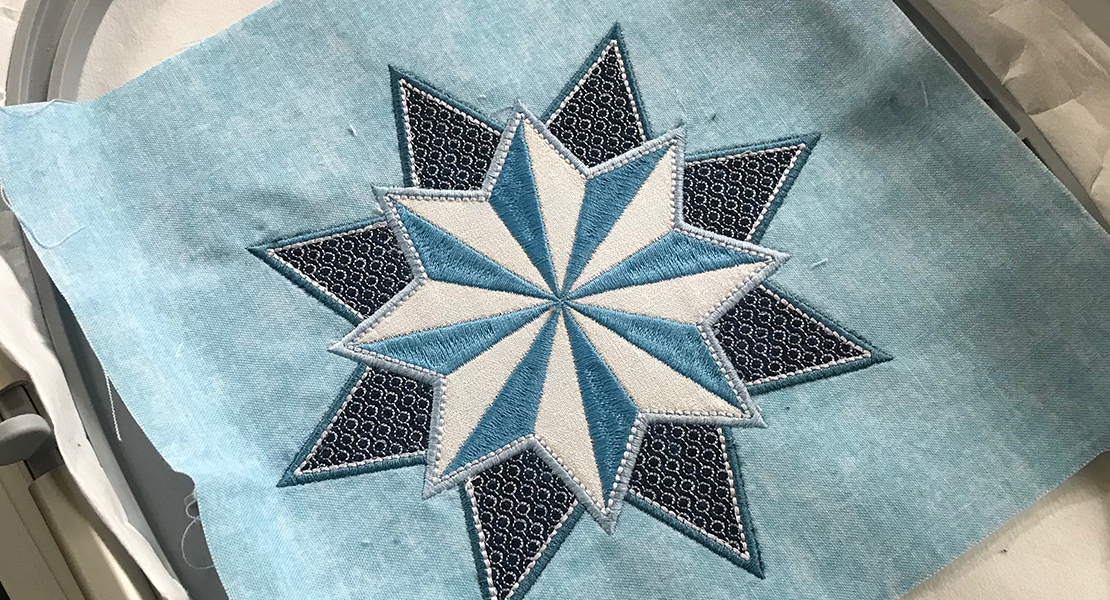
I’ll be back in two weeks to talk about stabilizers for embroidery in quilts because in November we will embroidery the star blocks! The intricacy of the stitching in these designs is mesmerizing and you won’t want to stop at just one! And don’t feel rushed—you can continue piecing these blocks in November as you are doing the embroidery!
Stardust Quilt Pattern Giveaway
One lucky WeAllSew reader will win a one Stardust Quilt Pattern by Amanda Murphy!
All you have to do is post a comment below and answer the question:
“What is your favorite quilting technique?”
The giveaway is open to residents of the 50 United States and the District of Columbia. One comment per fan. Comment must be submitted to the WeAllSew.com blog by Wednesday, October 9, 2019 at 11:59 PM Central Time. Winner will be chosen randomly. Winner will be notified by email and will have 48 hours to contact to claim the prize.
Good luck and happy quilting!
Amanda
Used Products


What you might also like


52 comments on “Stardust Quilt-along: Piecing Tips and Tricks”
-
-
Why thank you!
-
-
It is such a pretty quilt. My favorite piecing tip is to starch and iron my fabric before cutting and piecing. It improves the accuracy and appearance of the quilt.
-
That is a great tip!
-
-
I love a scrappy quilt. I use my walking foot to do straight-line quilting. The Stardust pattern is beautiful!
-
Thank you!
-
-
The Bernina Store that I purchased my Bernina from has closed and went out of business. I do not know anywhere else where I can purchase the Stardust Quilt Pattern. I want to make a queen size of this pattern for my son as a gift. Would you kindly let me know where I can purchase this quilt pattern. Also how many squares will I need to make for a queen size quilt of this same pattern. Thank you.
-
You can find it on my website if you aren’t lucky enough to have a BERNINA dealer near you. https://blog.amandamurphydesign.com/product/stardust-printed/
-
-
My favorite quilting technique is paper piecing – love the precision
-
My favorite quilting technique is to press, not iron my fabrics, so they don’t get stretched out.
-
Love the blue colors selected! Would love to win this pattern!
-
The sewing of an accurate 1/4 inch seam is the most important. I still have a hard time doing it. I love your patterns.
-
Thank you!
-
-
I like doing ruler work on a large quilt. Now trying to get better doing FM with the BSR.
-
Love the pattern! I am learning how to quilt with rulers.
-
My favorite (and most useful) tip is checking my 1/4″ seam before I begin. I use my 97D foot and guide, and always begin with a test.
-
I love the 97D foot with its adjustable ruler. In combination, the foot and ruler make accurate, consistent seams almost easy! Love Bernina feet!
-
My favorite quilting technique is chain piecing.
-
Keeping an accurate 1/4″ or slightly under is a consistent challenge, but so critical. I like to wash all my fabrics and press them using Best Press before cutting and sewing. The fabric is easier to work with and there are no nasty surprises about colors running after one has put all that work into the product.
Gorgeous pattern! Looking forward to next month’s embroidery lesson.
-
I love this quilt. I would like more information on ruler work.
-
I like paper piecing. Love when a design comes together in the end!
-
My favorite technique is using my Bernina Patchwork foot to help ensure accurate 1/4 inch seams.
-
Why do you prefer a #97 foot rather than a #57?
-
Because the guard is optional on the #97 – so I can keep pins in up until they get close to the needle!
-
-
The Stardust quilt is stunning. Appliqué is my favorite quilting technique.
-
I would love to make this beautiful quilt. I like to use my clapper when I press seams. It really helps to make them flat and less bulky.
-
I love to use the Quilt Motion and Creative touch with my Bernina for perfect quilting every time!
-
I love the accuracy of paper piecing.
-
Starch is my key to a good 1/4″ seam. I use Best Press, Terial Magic, or just old fashioned spray starch, depending on what I am making. It makes all the difference in the world. Of course it washes out the first time I wash the item.
-
This is such a beautiful quilt ? My favorite quilting technique is that I love pressing my seams open. For me, it seems so much easier to match up the seams. However, for your pinwheel block, I will try folding them to one side as you make it seem easy.
-
I love applique quilting best.
-
Where can I get this pattern?
-
My favorite technique is traditional patchwork, but I have to say embroidery appliqué runs a close second. I’m looking forward to making this quilt.
-
FMQ. I love to see a top come together (and boy does accuracy matter for an easier time completing the top), but free motion is my favorite part! It’s intimidating at times, material management is the crux for me it seems (I do all my work on a Bernina 350PE), but figuring out what pattern works for a quilt and seeing the end result turn out as you imagined, or better, is joy!
-
I really like this pattern. I just read about pressing the fabric before cutting it. I can’t wait to try this technique!! I am a fairly new quilter, so all the techniques are my favorites!!?
-
I really like to use Best Press to help with getting accurate seams. Rather than spray I soak the fabric in a plastic tub then hang to dry.
-
I actually enjoy the piecing process. I find it relaxing. I saw what looked like one of the stars embroidered as a Christmas ornament you could hang on the tree in one of your photos. Would love directions for that!
-
That is a great idea!
-
-
Having the 1/4 inch foot is essential to accurate piecing! Love the colors in the quilt.
-
This quilt is beautiful. I have always been partial to blue.
I don’t have a favorite quilting technique. I enjoy some less than others, because of the time commitment, but each has its own rewards. -
Purchased the pattern & hope to make for king size bed spread. My favorite piecing technique is starching my fabric before cutting. Also, using the entire feed dogs on a 9 mm plate by placing post-it notes with a very accurate 1/4″ seam. I move the needle to the farthest right side.
-
I always use a clapper that my husband made for me to get nice flat seems.
-
I like to use the #10 foot to do my quilt binding by machine – it makes it very simple and accurate.
-
This is a beautiful quilt. My favorite piecing technique is paper piecing.
-
Beautiful quilt, love the blue and white! My favorite quilting would be free motion and paper piecing. Love Thankful Thursdays and going to try ruler quilting with free motion next!
-
My favorite technique is using starters and enders and chain piecing.
-
I just had my Bernina 570QE “same day” serviced at Augusta Sewing, Augusta, GA Bernina dealership and am ready to get back to learning and improving my piecing.
They are a great dealership with lots of Bernina machines, beautiful fabrics, large thread collection, notions and great customer service.
It was a 3 hour drive from my house, but worth it!
-
beautiful quilt. Love the technique for the center of the block.
-
I knew it was Amanda’s pattern even before I saw her name! Beautiful! Right now I am into “hand appliqué by machine”. An oxymoron- but it is fun and looks amazing! Thanks for the opportunity to win such a lovely pattern! Keep on Quilting.
-
My favorite quilting technique is using rulers to get smooth, straight, beautiful lines in my patterns and designs.
-
I am just learning different quilt techniques so I don’t have a favorite. I am starting to learn ruler work and have used the BSR to ‘fill in’.
-
This quilt is beautiful and caught my eye right away. My favorite quilting technique is always trying a more difficult pattern than the one I did before. I am retired now and finally have the time to tackle the more difficult patterns. I also love to FMQ my quilt when done, again, trying something a little more difficult than the time before.
Leave a Reply
You must be logged in to post a comment.

I love the Stardust quilt project. But then I love all the projects that Amanda Murphy does.