Threading an 8 Series BERNINA
Tips for fast and easy threading of the upper thread.
The first thing to be noticed about an 8 Series BERNINA is that it is different. Starting with the Triple Spool Holder and the telescoping thread guide, it’s clear from the outset that this machine won’t be threaded like your typical sewing machine. And there is a good reason for it!
The 8 Series is composed of fast machines that perform a lot of highly creative stitching tasks. From the 1200 stitches per minute of the B 880 to sewing in multiple directions, the machines at times even move the fabric while keeping the needle bar parked in the up position, e.g. for large sideways motion patterns and monograms.
One key design element of these machines is the promotion of smooth thread flow and high-speed delivery while making the threading process on such large machines fast and easy.
In this article, we will review the threading process for the 8 Series machines in general, with tips along the way to get the most out of the threading options offered. Before we start, let me point out a very informative blog post by my colleague Erika Mulvenna on WeAllSew: Sewing Machine Thread Spool Pin Tips.
Now that I’ve mentioned that the 8 Series is a bit different when it comes to threading the upper (needle) thread, let’s review the process. The following video is a narrated version of the on-screen animation on a B 880. There is a similar animation on B 830 and B 820. It will give you the whole process of threading the machine and the needle.
A couple of things to note before we start threading the BERNINA 8 Series:
- The Automatic Needle Threader works with needles size 70 and above, assuming we are using regular weight threads. Needles smaller than that simply have too small an eye to allow the threading hook to fit in with strands of thread.
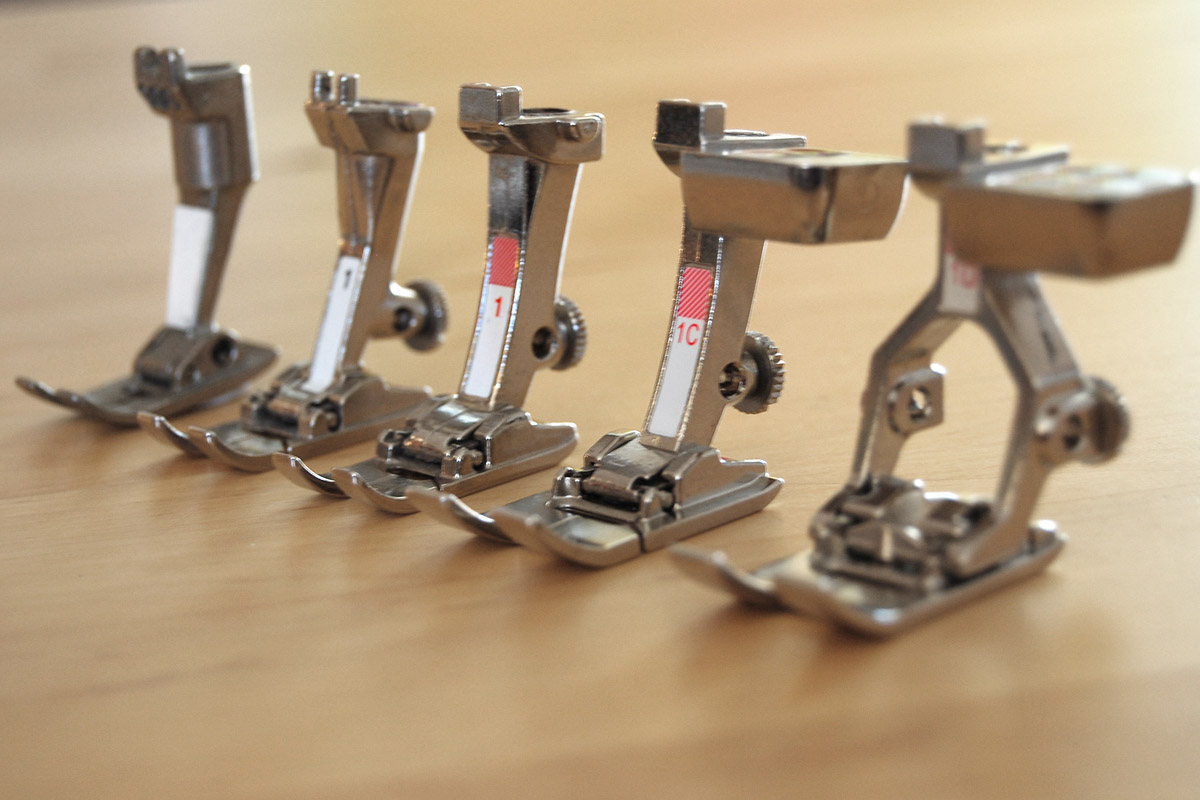
- You cannot use the automatic threader with certain presser feet like the Walking Foot # 50 or Leather Roller Foot # 55 since they pose a physical obstacle between the threader mechanism and the needle.
- For such feet, the automatic threading process will be limited to the portion inside the machine but will have to be completed manually at the needle.
- This can be triggered by touching the ‘manual threading’ function on the screen after starting the threading process.
Note: If such a foot is selected on the machine (via Presser Foot Selection), the machine will automatically know to allow manual threading of the needle.
Click here to download an excerpt of the owner’s manual about threading the upper thread here. While it’s from a B 880 PLUS manual, the process is the same for all 8 Series models.
Now let’s look at the process step-by-step threading process of the BERNINA 8 Series.
The following will feel like a slow-motion replay of what actually takes less than 10 seconds in real life.
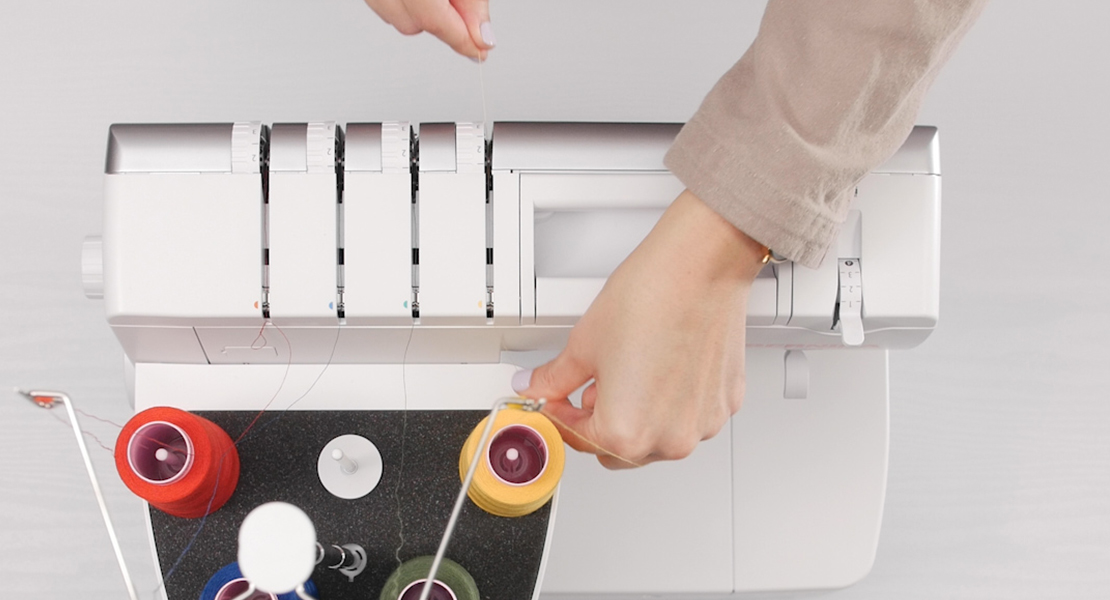
For regular operation of the machine, the Triple Spool Holder needs to be swiveled out and the telescoping stand (‘antenna’) needs to be fully extended.
Note that each segment of the telescoping stand has a spring-loaded button that will latch in its proper position if you rotate each segment back-and-forth a little. This will guarantee that the open thread guides at the top line up directly above their respective spool pins.
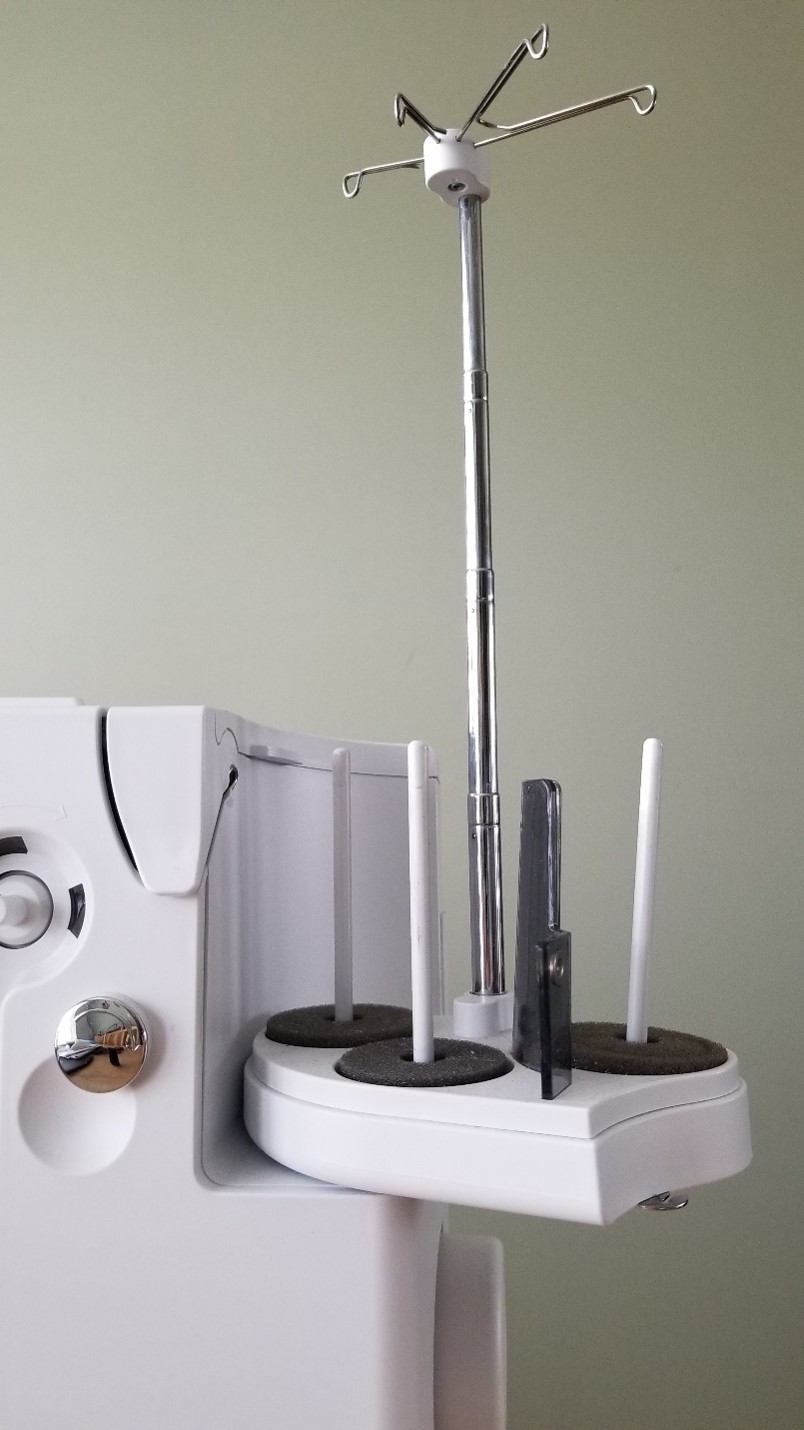
Notice the 3 spool pins:
- On the left are the two regular pins to stand up spools for sewing, embroidery, etc.
- The furthest one of the two is considered the rear pin. This one has an alternate use for specialty thread that require special handling. More on that later.
- The front pin is the easiest to use in every day sewing and embroidery as it is closest to you.
- The third pin on the far right is for winding bobbins and not for regular sewing and embroidery. Notice that is intentionally slightly slanted. This will aim thread delivery off a spool or cone of embroidery thread toward the first of the two open guides used for bobbin winding.
Now for the actual threading process.
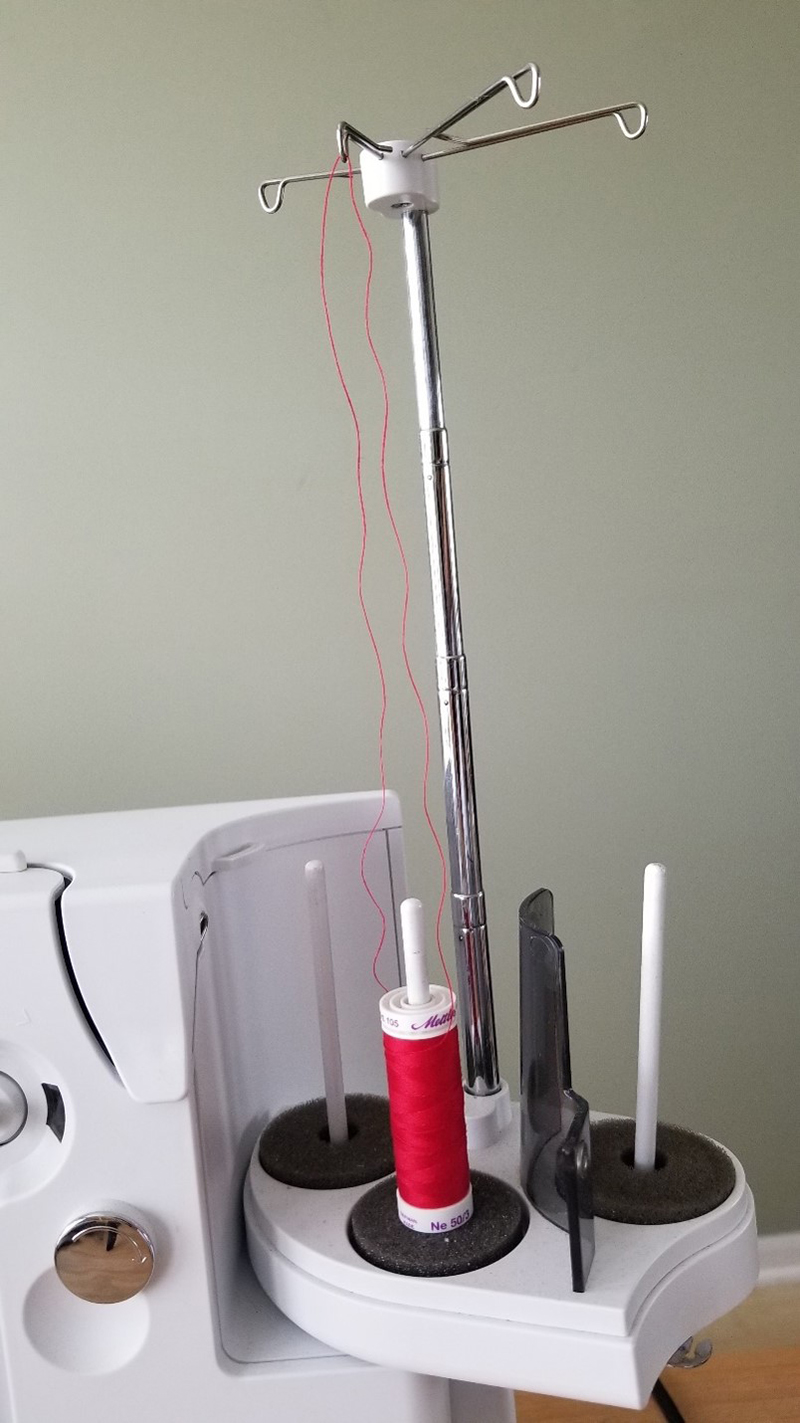
Place your spool on one of the two spool pins. Note: If your spool has a catch for the thread on one end, put that end down first so it won’t interfere with thread flow off the spool.
Pull the thread off the spool and pass it through the open guide immediately above the spool pin and pull the thread down until you reach the first opening on the machine.
The beauty of the telescoping thread stand is manifold:
- It promotes free release of the thread from the spool, being far above it. High-speed industrial machines have similar thread stands for that purpose.
- It gives a chance for the thread to relax when coming off the spool given the long pull up and return down before entering the machine
- It works for over 95% of thread spool types, whether the thread is cross-wound or stacked (radial) on the spool.
And now for the most important step as the thread enters the machine…
The first guide at the top right corner of the machine is most important. It tells the machine that the threading process has started. Once this sensor is triggered, it puts the following in motion:
- Positions the mechanism inside the machine that will later thread the Take-up Lever.
- Lowers the Thread Grabber (we often call that part ‘the lips’) to be ready for action.
- Starts the display of animation on the screen showing the threading process (a version of which was shown at the beginning of this post).
TIP: The animation on the screen has a Pause button, so you can pause it as you perform the steps.
To thread the first guide, simply:
- Hold the thread with both hands.
- Let the thread slip under the lip of the first guide.
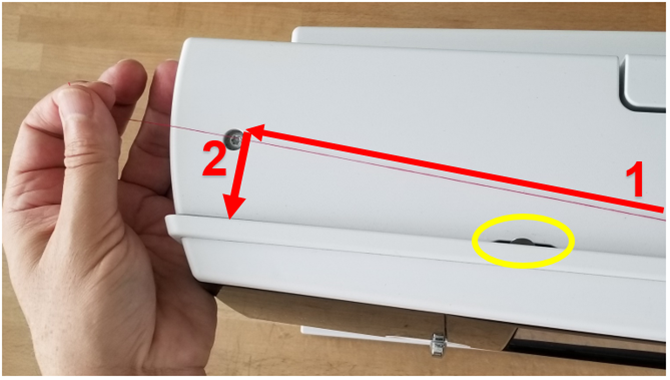
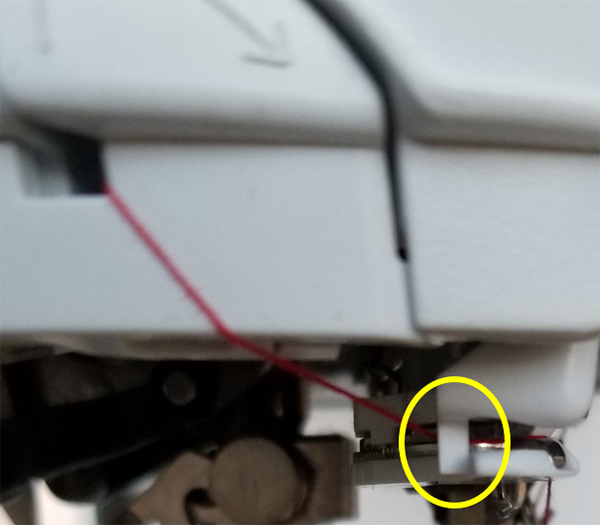
- Pull the thread up with both hands (see red arrows in the image below) until it butts up against the eyelet shown on the right-hand side (in the yellow circle of the picture below).
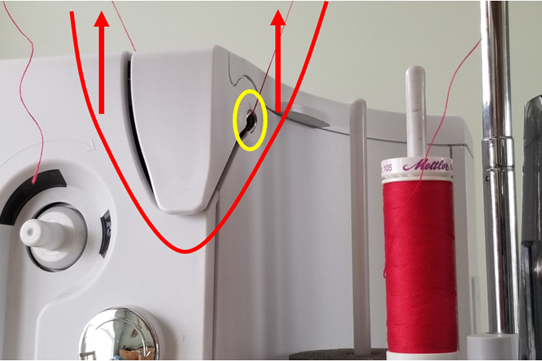
Once the thread is placed just below the first guide near the Triple Spool Holder, it is essential to pull the thread up from both sides of the thread sensor opening. Note the yellow circle on the right-hand side: make sure the thread reaches up to this point in order for it to properly trigger the sensor.
At this point, it is advisable to pause for a second… literally, one second.
When all the above things are done, the Automatic Needle Threader button on the front of the machine will light up, indicating that you can proceed with guiding the thread through, as the machine is now ready to receive and handle the thread.

TIP: Some of us don’t like to wait…if you drive fast, you know who you are. If you don’t want to wait for the mechanism to position itself (and the Automatic Threader button to light up) after you insert the thread through the first guide and sensor on the machine, you can use the ‘speed threader’ method. Instead do the following:
- Press the Automatic Needle Threader button first.
This will trigger the positioning of the internal mechanism while you reach for your thread - Grab your thread with both hands and thread the machine as you normally would.
(I use this method myself.)
And since I mentioned that it’s important for the thread to reach up to the eyelet on the right-hand side of the first guide, it’s also a good idea to do so here!
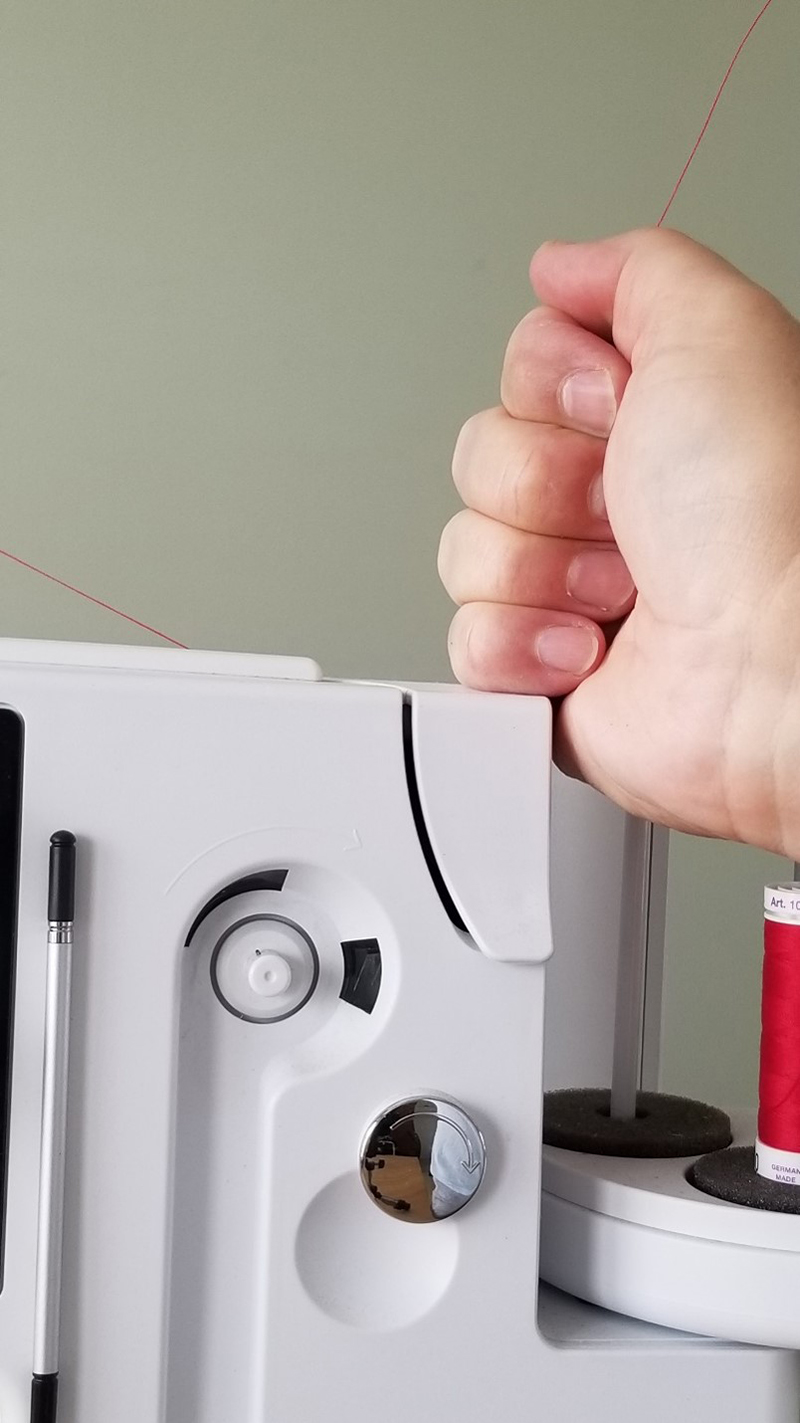
Also, it’s recommended to manually keep the thread under tension while threading any type of sewing machine. This helps ensure that the thread will enter all guides and seat itself properly. That’s essential for the machine to deliver a well-regulated thread tension later while using it.
The easy way to do both of these is to simply hold the thread with your right hand and park your hand on the top right corner of the machine until threading is done:
Now comes the fun (and my favorite) part!
The next part of threading is with the long groove on the top of the machine. Rather than try to place the thread in the groove, we can just let it slip in place in two quick steps:
- With your right hand keeping tension on your thread, pull the thread with your left hand all the way to the far left of the machine, at an angle away from the front of the machineTIP: Aim for the screw that holds the top cover of the machine in place (see photo below), just about one inch back from the groove itself. See red line #1 in the following image.
- Next, pull the thread toward you with your left hand until it falls into the groove by itself.
See red line #2 in the following image.
You may have noticed the little metal piece in the middle of the groove on top of the machine. See the yellow circle in the following image.
This is a thread separator, which is used for double needlework. It is very similar to the ones found on conventional machines and operates the same way.
By bringing the thread from the back toward the front, it will seat itself right behind the separator, which is fine. If using a double needle, you can manually place the second thread in front of the separator by laying the thread down from above it.
Once the thread has slid into the long slot on top of the machine, the next step feels almost like magic.
Continuing to pull the thread with your left hand (right hand still parked at the starting point):
- Pull the thread down and then to the right until your hand reaches the needle area.
- The thread should now be right in front of the needle, but not into any thread guides yet.
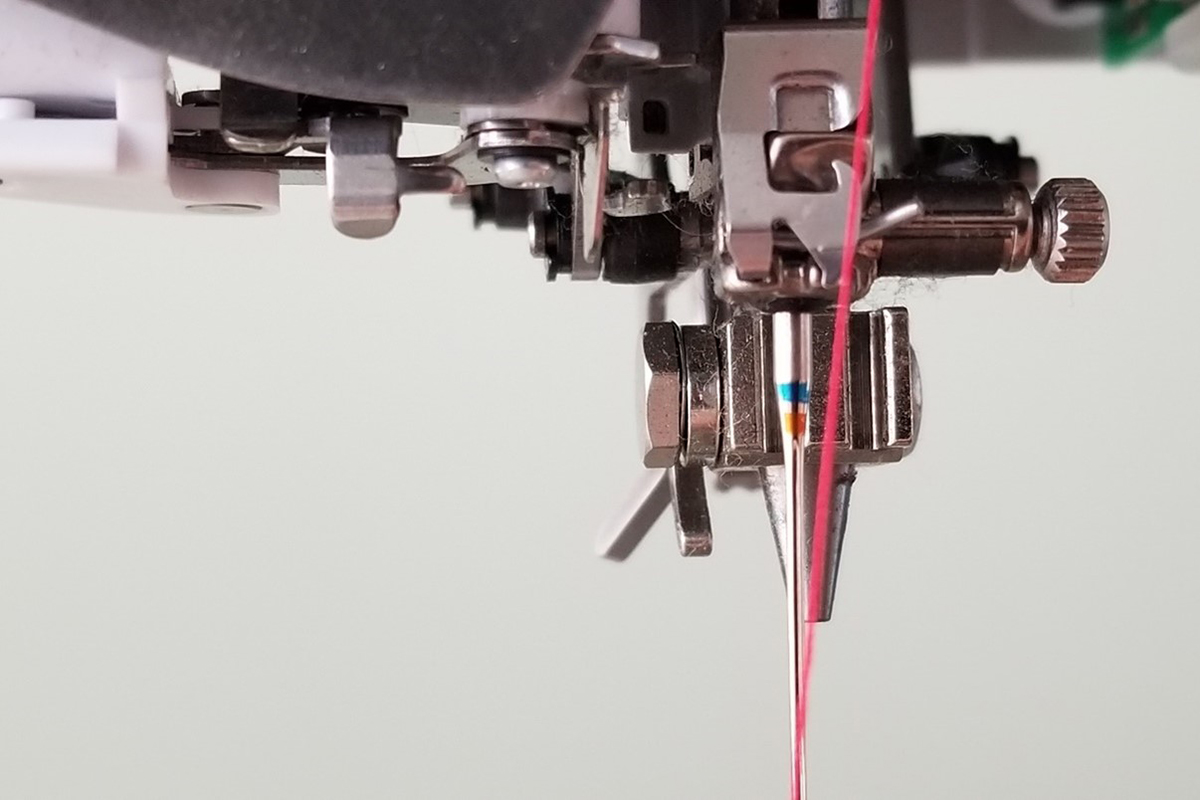
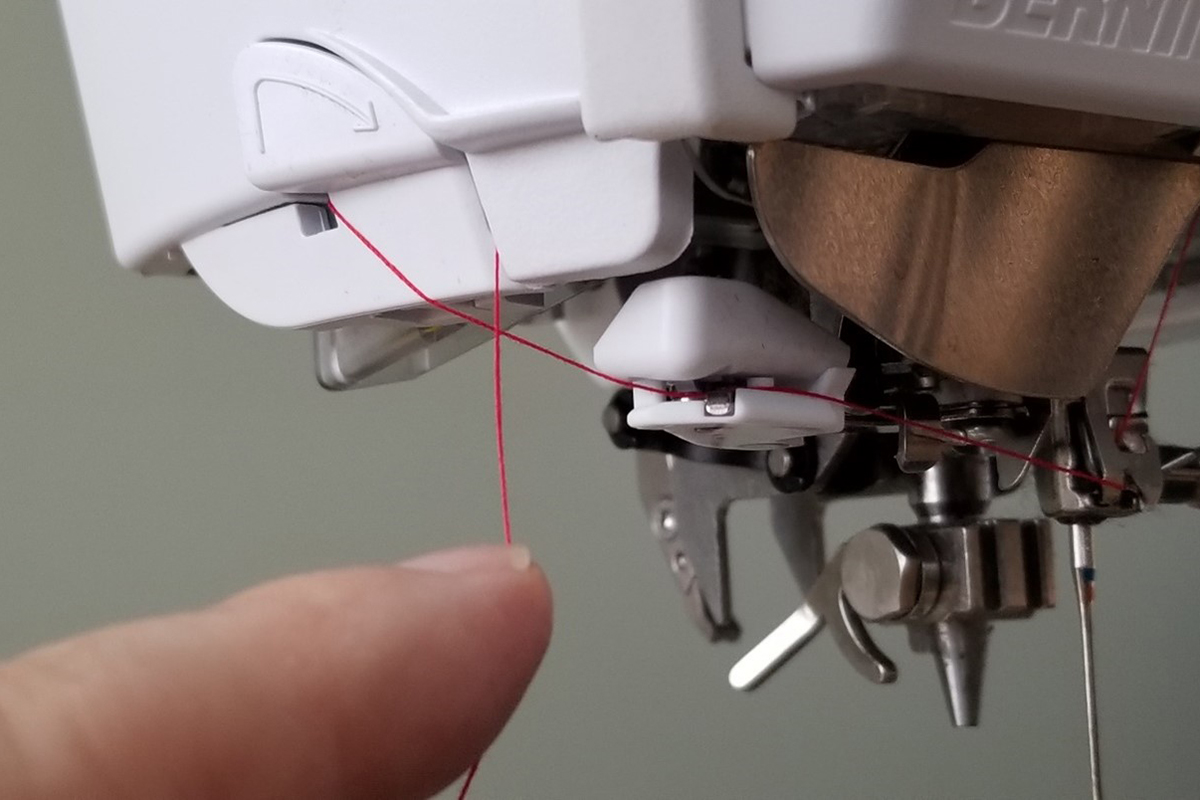
Next, look for the thread guide at the needle clamp (where you screw the needle in place). It looks like a floaty pin.
- The key is to slide the thread behind the pin. This is easy when there is tension on the thread.
- You will hear a slight snapping sound as the thread is forced behind the pin.
- The purpose of this guide is to keep the thread aligned with the needle.

The following image shows the thread seated behind the guide at the needle clamp.
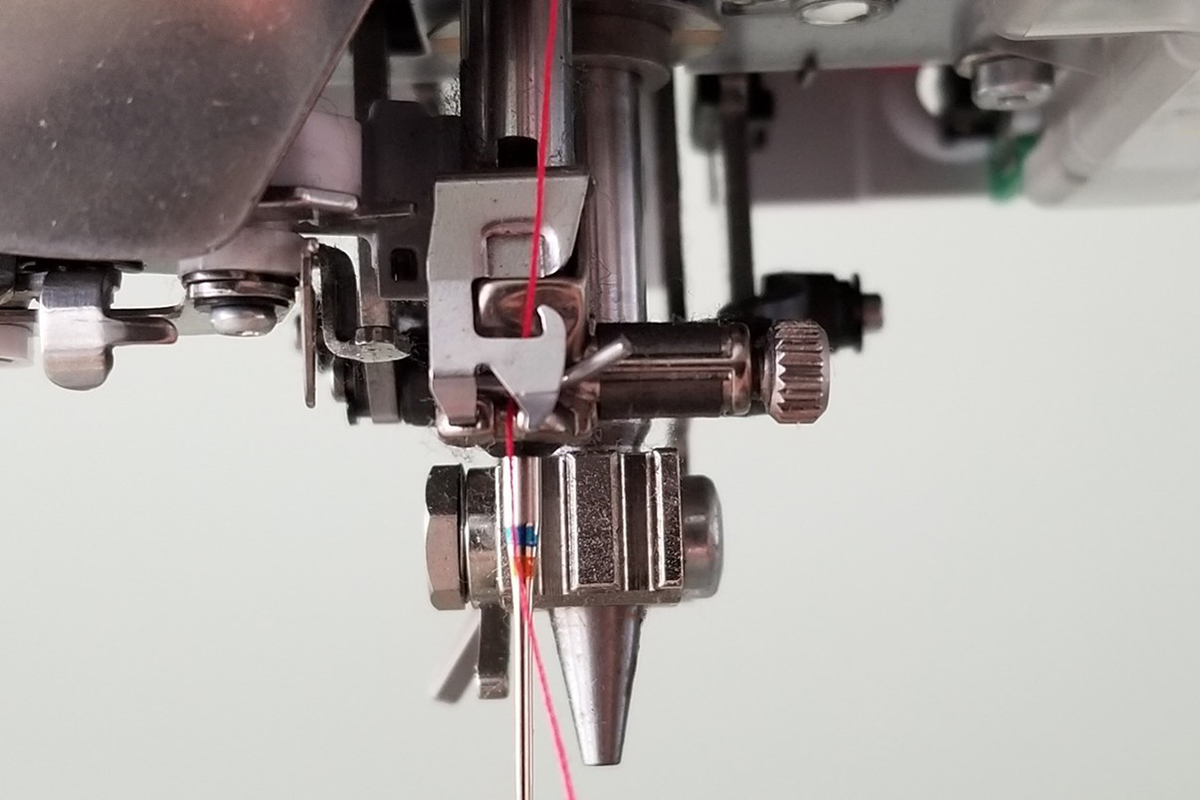
Next is the grabber, sometimes called ‘the lips’.
- It will hold the thread as the automatic threader swings around to pull the thread through the eye of the needle.
TIP: When pulling the thread around the corner (and into the grabber), the grabber should lean back just a little (like 1/16 of an inch) as the thread inserts itself between the lips of the grabber.
TIP: There is an extra finger at the back of the grabber (see the yellow circle on the following image). If you pass the thread down and behind it, it will put an additional grip on the thread. This is useful for ‘wiggly’ or slick threads that don’t hold in place well. It is not necessary for regular sewing and embroidery threads.
Once the thread is seated in the grabber, loop around the thread cutter from back to front (follow the arrow) and pull straight down to cut the thread. This will give you a clean cut and the machine will hold that thread securely. That will ensure that there is tension on your thread at the beginning of the threading motion, which is essential for the threader mechanism to work properly.
You can see here that when the thread is cut in a straight down motion, it seats itself automatically between parts of the machine housing. This way, it will stay put while the threader mechanism swings toward the needle.

It’s now time for the magic.
Simply push the lit Automatic Needle Threader button on the headframe and the machine will thread the needle. After the motion is completed:
- The grabber will be retracted behind its metal shield.
- The needle will return to its position.
- The threader button will no longer be lit.
Now a key question: Does it work every time?
The answer is: Just about.
For one of my recent embroidered quilts (Chantal: Impressions d’une Âme Sœur), I had to change thread colors on my B 830 over 1500 times. You read that right…there were over 3800 spool changes across 3 machines and over 1500 of those were on my B 830. The front of the quilt was in cross stitch…with a lot of color changes. So I got to put the automatic threader through its paces. I’m happy to report that it performed with flying colors (pun intended), with very few misses.
The keys to successful threading are simple:
- Maintain tension on your thread as you pull it through the path. It will seat itself properly without any special handling.
- Make sure the thread seats itself in the grabber.
- Cut the thread at the end with a straight down motion.
The machine will take care of the rest.
Some What If’s:
Here are a few things to check if your threader missed:
- Make sure the needle is inserted all the way up. The threader is calibrated to the exact (standard) position of the needle eye and will miss if the needle is below its intended position.
- Rethread while paying particular attention to maintaining tension on the thread as you go through the steps.
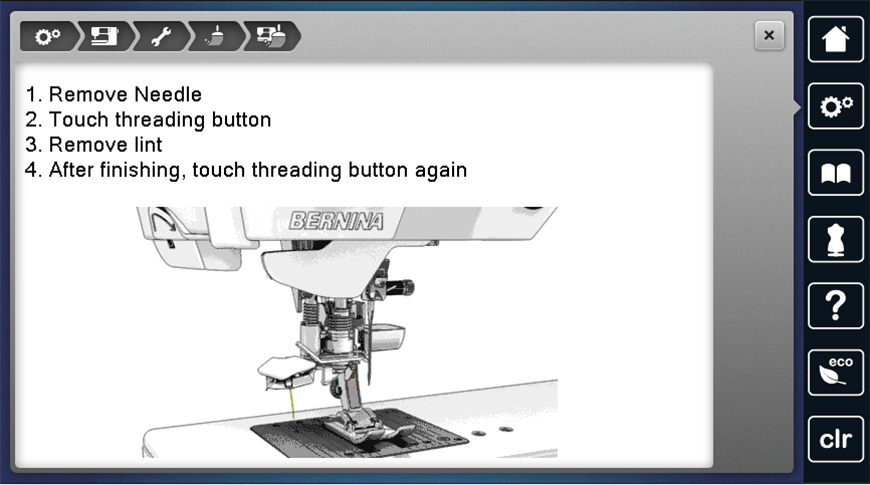
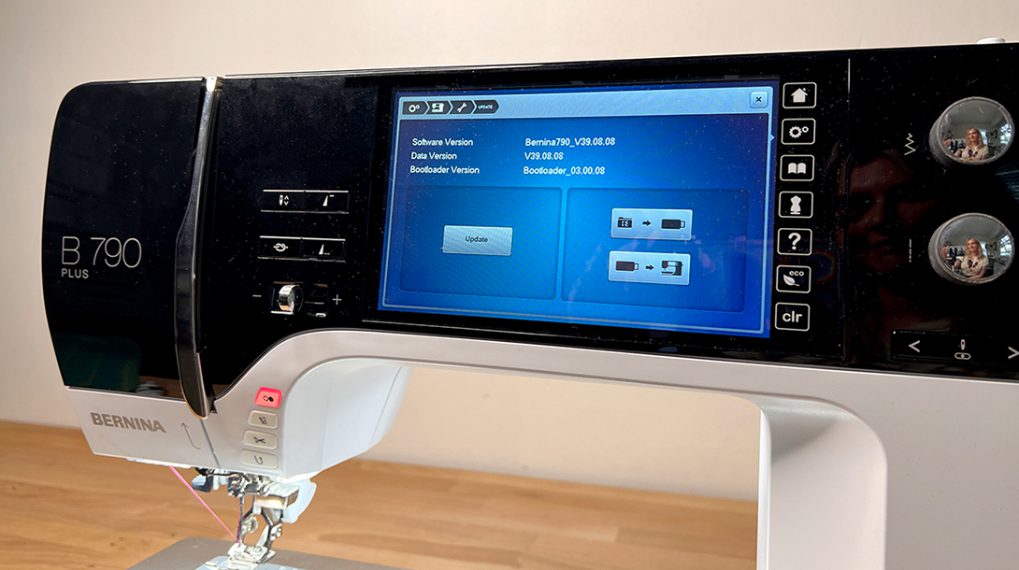
- Check that there isn’t any lint in the grabber. If you need to, you can clean the grabber (using the brush included with the machine) by exposing it. To do so, go to:Settings > Machine > Tools > Cleaning > Cleaning the thread clamp
See the navigation breadcrumbs and instructions in the following image:
One last thing about threading the machine…
Another key to successful threading is…unthreading!
When you are ready to unthread the machine, there is definitely a right way to do it.
- Clip the thread near the spool, just before it enters the machine.
- Pull the thread in the sewing direction through the machine by pinching it at the needle and pulling it toward you.
- NEVER pull the thread backward into and through the machine! You risk leaving tangled thread inside the machine, and that would interfere with your next thread flowing properly through your machine.
TIP: I was once a bad boy, and in a pinch, pulled my thread backward (more than once). My technician knew I’d done it when she found a scrap of thread looped inside my machine. I did promise (in shame) never to do that again. This applies to any sewing machine by the way. Pulling the thread backward risks double-wrapping it around the take-up lever, which is not a good thing.
What if the needle comes unthreaded during sewing or embroidery?
Alas, thread breaks happen. Whether the needle sewed over the thread and cut it or the thread frayed and broke, rethreading the needle is part of sewing. There are two scenarios:
If the thread is still hanging outside the machine around the needle area:
- Make sure the presser foot is up (to release tension on the thread).
- Pull on the thread to extend it.
- Press the Automatic Needle Threader button to request a threading. It will position the mechanisms inside and outside the machine and will light up.
- Pass the thread through the guide at the needle clamp.
- Thread the grabber (the lips).
- Cut the thread.
- Press the Automatic Needle Threader button again to thread the needle.
Note: The grabber will automatically park itself behind its shield after threading is completed and the button will no longer be lit.
If the thread snapped back and recoiled into the machine:
(Some threads will develop a lot of tension when they begin to fray and can whiplash back into the machine.)
- Open the front cover with the Multi-purpose Tool
- Clip the thread near the spool, right before it enters the machine.
- Unthread the machine by pulling the thread from behind the cover, toward you.
- Close the cover.
- Rethread the machine from the start.
Wait! There’s more!
The Triple Spool Holder on the 8 Series machines is wonderful (many thousand times over, if you ask me!). As mentioned at the beginning of this post, it works on its own for most sewing and embroidery scenarios.
However, there are times where specialty threads need special treatment. Think heavy metallic or glittery threads. Some threads benefit from an application of silicone lubricant to flow properly. For these applications, there is a thread lubrication adapter included with 8 Series machines.
Note however that the silicone thread lubricant is not to be used elsewhere in the machine.
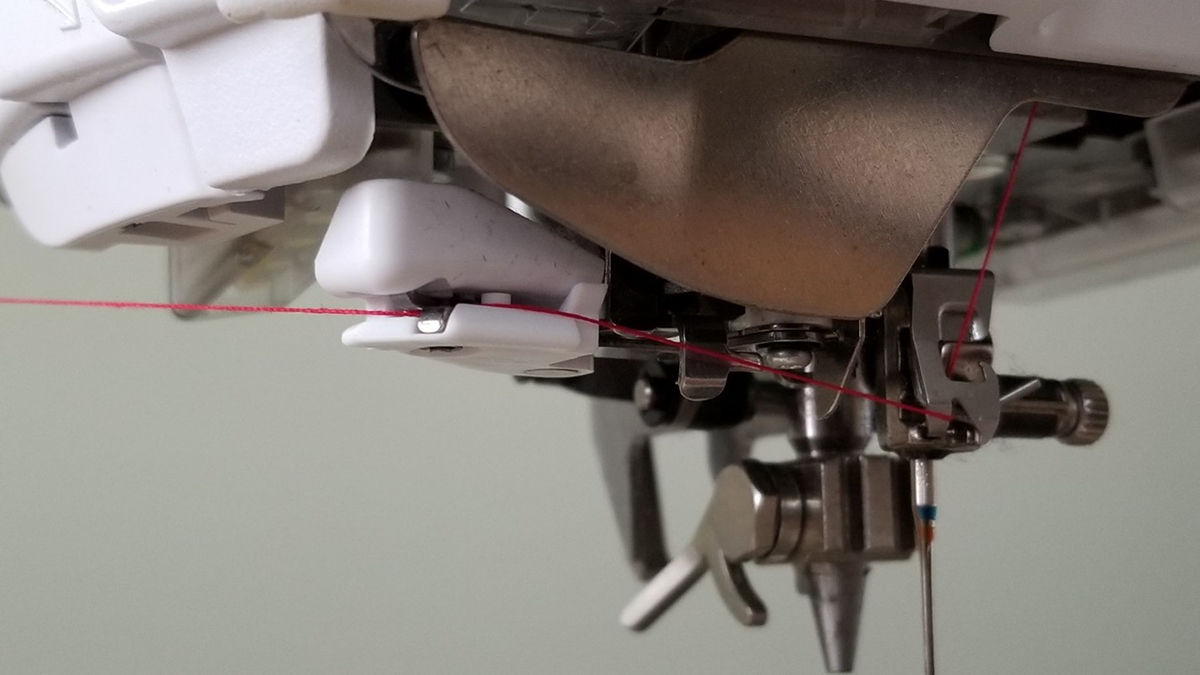
The thread lubrication unit is shown here with regular red thread for better visibility. Note that you may need to lower thread tension to compensate for the added friction on your thread contributed by routing it through the lubrication unit.

For more info about the thread lubrication unit and the handling of specialty threads, here’s an excerpt from the B 880 manual that covers it.
Sometimes, 2 spool pins are not quite enough.
For projects calling for multiple thread colors, such as when doing embroidery, the Multiple Spool Holder can be used on an 8 Series machine.
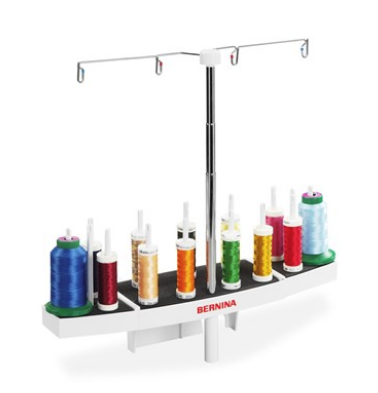
It comes with a mounting plate that slots right into the vents at the back/top of the machine.
The spool holder slides into place against the mounting plate.

It lets you place a lot more spools (or cones) of thread and pre-position up to 4 threads through its telescoping thread guides.
Here’s how the thread goes right from the telescoping guide(s) of the Multiple Spool Holder and into the first (sensor) opening of the thread path on an 8 Series machine:

How about using an old-fashioned thread stand next to my machine?
I have rarely needed to use one of my old thread stands in the last 12 years, thanks to the Triple Spool Holder and the Multiple Spool Holder. In the few instances when I had to use an extra-large cone of thread, I have found that this is the best placement for it:
- Place the thread stand to the right of the machine, with the stand’s stem just behind the spool holder’s telescoping stand.Note: You do not have to close the spool holder or collapse the telescoping stand.
- The thread can now go straight from the external stand’s guide and into the machine first (sensor) guide.
- I have not found the need to adjust thread tension when using an external stand for regular threads. Since larger cones may be for atypical threads, test your thread tension after threading the machine.

In conclusion:
I first started work with 8 Series machines with my B 830 in 2008. I currently work also with a B 880 PLUS. I love them both! I have enjoyed threading the machines more (thousands of) times than I can count. And every time, it brings me a smile hearing the machine doing its bit of magic threading the needle while I’m already switching to what I’m about to sew or embroider. It makes me feel pampered and I count that as a good thing!
Used Products

What you might also like


10 comments on “Threading an 8 Series BERNINA”
-
-
Thank you, Sylvain, for a very thorough discussion on threading the 880 Plus. A quick question: what is a ballpark number to lower the 880’s tension when using metallic or Mylar thread? Since the normal tension is set to 3.75, is there a “sweet spot” for metallic/Mylar thread? 3.0? 2.75? Just wondering. Thanks!
-
You’re going to love my answer…
It depends 😉 on the type of stitch you are using, the fabric density, needle, etc.
The only way to know is to do a representative test seam.Make sure you have the right needle first (Metafil for these types of thread.
You’ll have to test sew with representative layers of the material(s) being sewn and the thread in question. I usually lower the thread tension by 0.25 increments if it appears to be needed, until it’s too low… then I increase it back up to the last ‘good’ setting.Note that a straight stitch will sew out more consistently in general and that decorative stitches are more likely to require testing (aka tweaking).
-
Thank you. This makes sense.
-
-
-
How or where do I sign up for the needle and thread give away?
-
Hello! The instructions to enter the giveaway can be found at the bottom of this post: https://weallsew.com/sewing-needle-and-thread-tips/ We hope this helps!
-
-
Thank you so much for your articles. I’ve learned more from your articles than from my Bernina dealer.
-
Maybe I just missed it, but what about threading when the thread on the spool is stacked? Is that considered “radial?” Is that when I should first take the thread from the spool and pass it through that small hole on the spool shield? My manual is rather vague about this and the pictures and diagrams are not easy to follow.
Thank you so much!
-
Yes, stacked thread is what the manual refers to as ‘radial’. Some stacked threads can be threaded through normally. If the thread doesn’t spool off smoothly on its on, you can use the ‘extra’ guide built into the divider between the sewing spool spindles and the bobbin thread spindle. To use the extra guide:
1. replace the standard foam disc with the foam rotary disc (with
white plastic inner part) on the rear spool pin and place the thread spool on it
2. unspool the thread and pass the it through the extra guide (it will emerge on the ‘bobbin’ spool side of the divider)
3. pass the thread through the open guide nearest you at the top of the telescopic stand (not the one above the spool itself)
4.thread the machine as you would normally
-
-
Thank you for the information. My 880+ is in the shop right now but when I get it back I will review how I begin threading my stacked spools of thread using the hole on the plastic divider.
Leave a Reply
You must be logged in to post a comment.

EVERYthing an 8 Series owner needs to know about threading!