The Story of Chantal: Impressions d’une Âme Soeur

Description
I’d like to tell you a story. It involves my most meaningful quilting project to date, a memorial quilt for my best friend. So grab a coffee or any beverage you enjoy and let me tell you how it came to be.
Chantal was more than my best friend. She was my soul sister. In our native French we use the expression “Âme Soeur” (literally: sister soul, the word ‘âme’ being feminine). Its meaning bridges between a soul sister and a twin soul. We had this deep, instant connection and with only a look at each other we knew what came next. We usually would give each other the look when we heard a good dance tune and we’d already be dancing together on the way to the dance floor.
Chantal died of breast cancer in 2000, after two and a half years of fighting for her life. I wasn’t able to attend her funeral service given that I was working at BERNINA University. I got the call the day before we walked our annual 5K walk as a fundraiser for breast cancer research. Needless to say, the yearly walk had a much deeper meaning the next day.
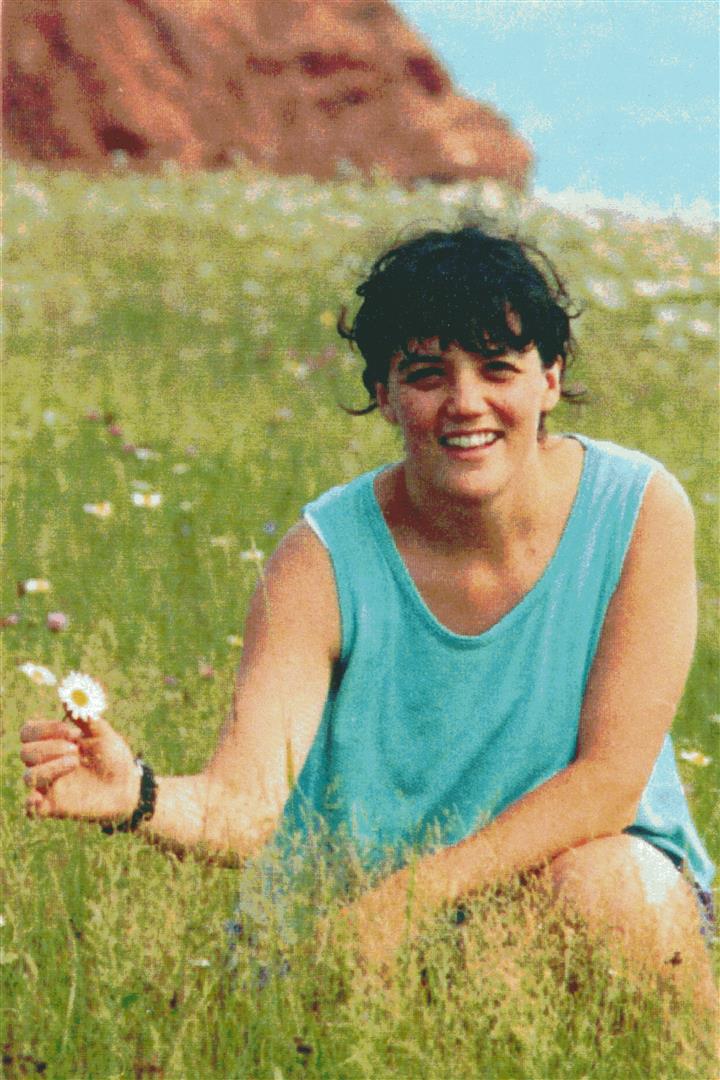
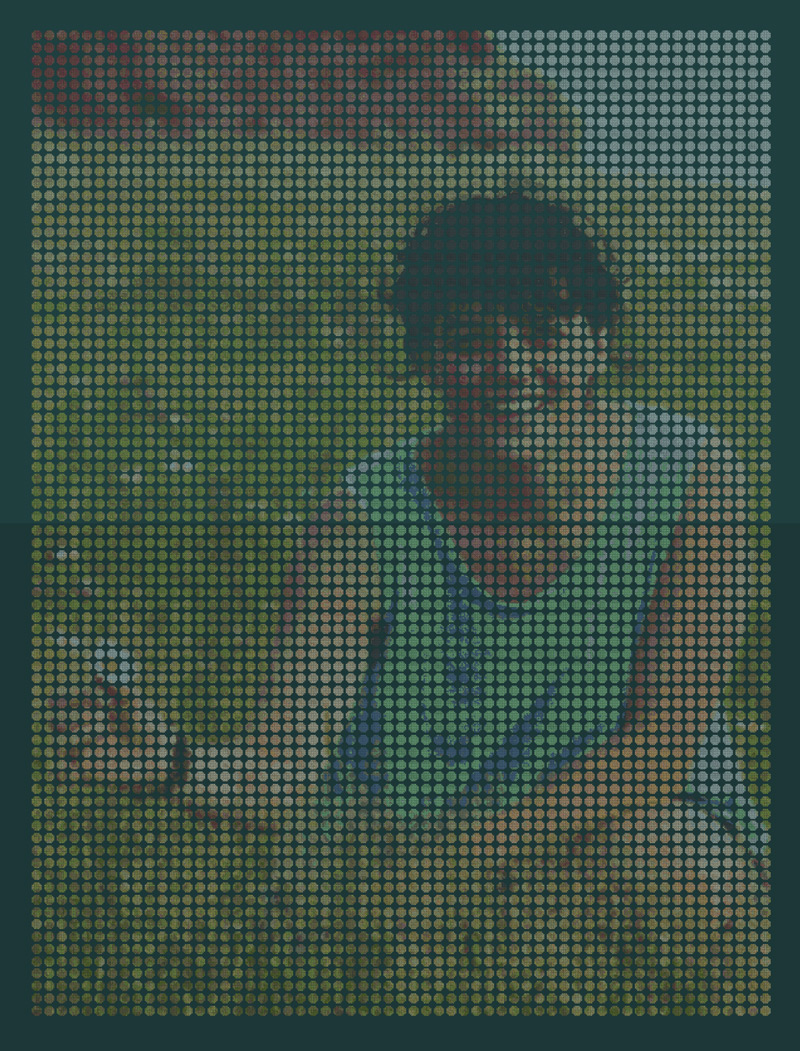
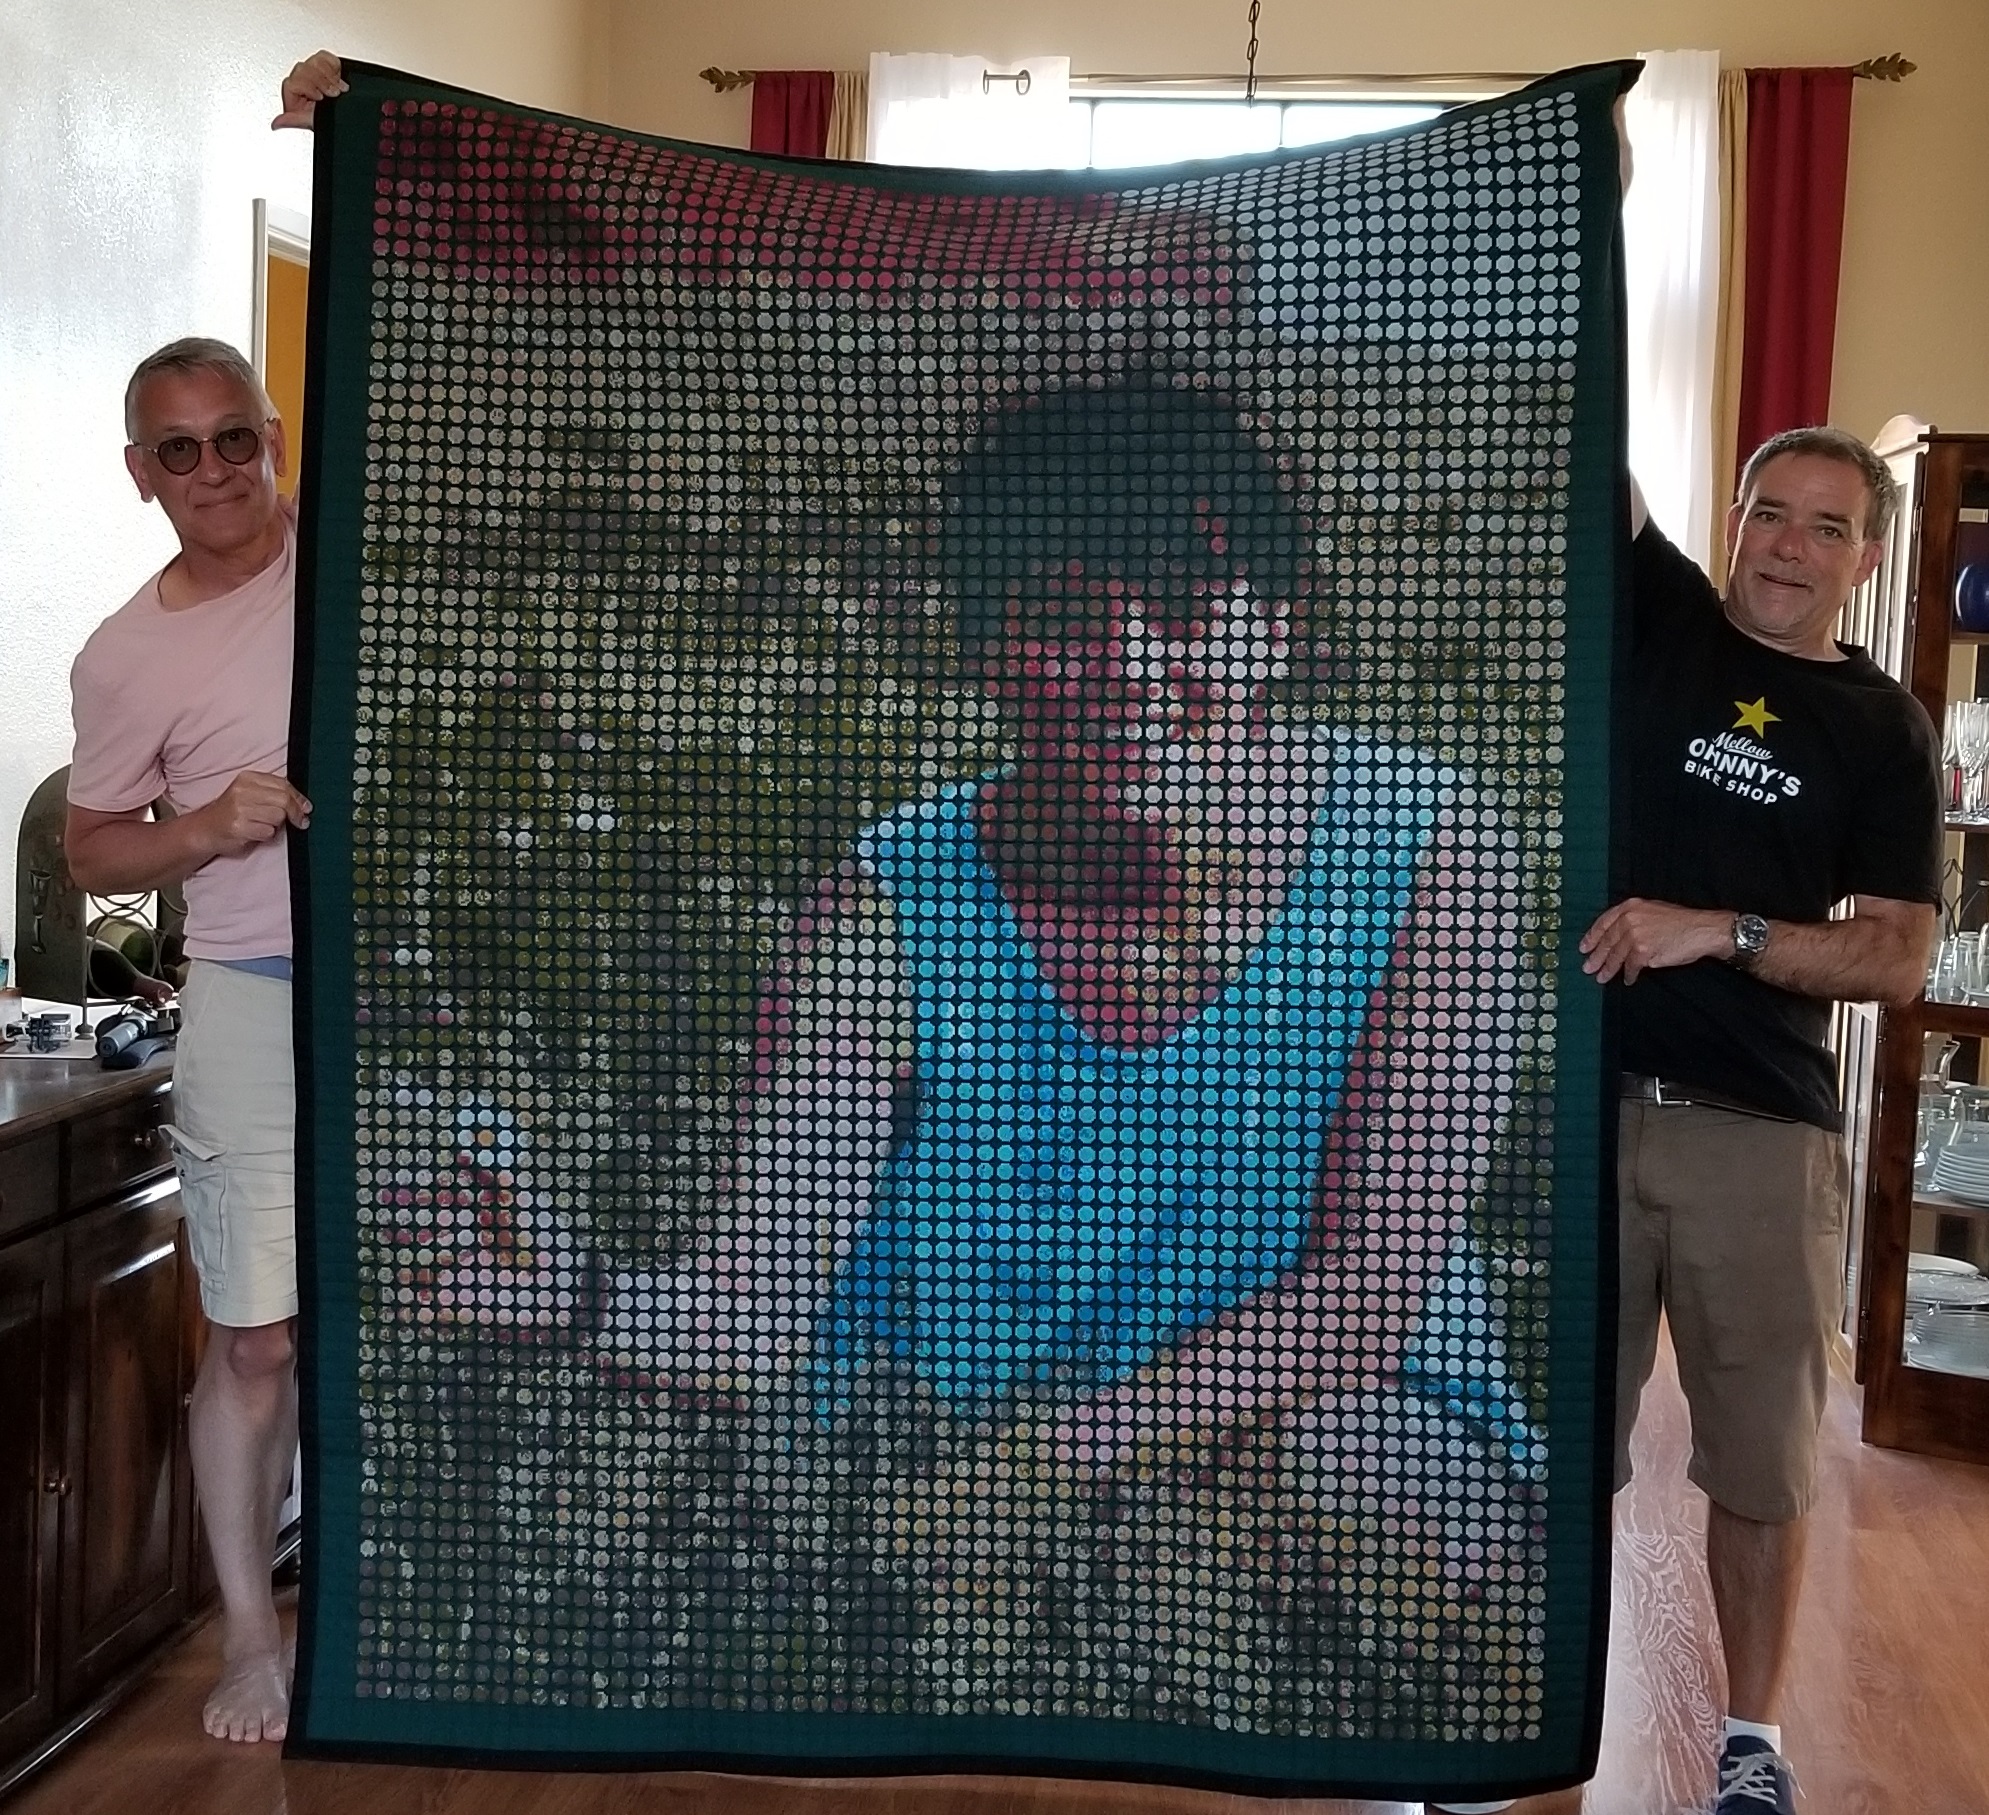
A couple of weeks after her funeral, Marcelle, her mother, mailed me a copy of her funeral picture. The caption for this image should be Totally Chantal. If you knew her, this IS her. Smiling, happy kneeling in a field, holding a daisy. Chantal was well traveled, had bicycled her way alone in Northern Europe and Scandinavia, was an avid skier. That picture stayed with me.
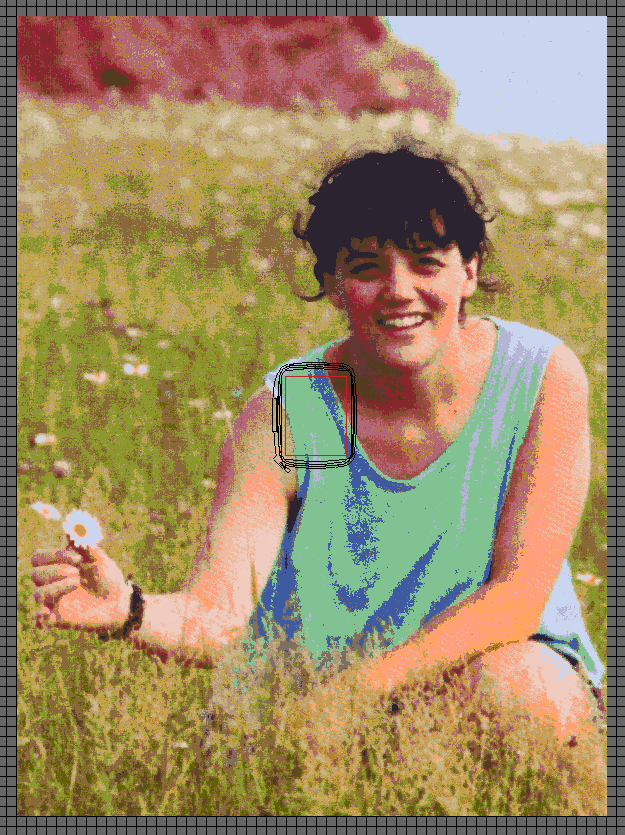
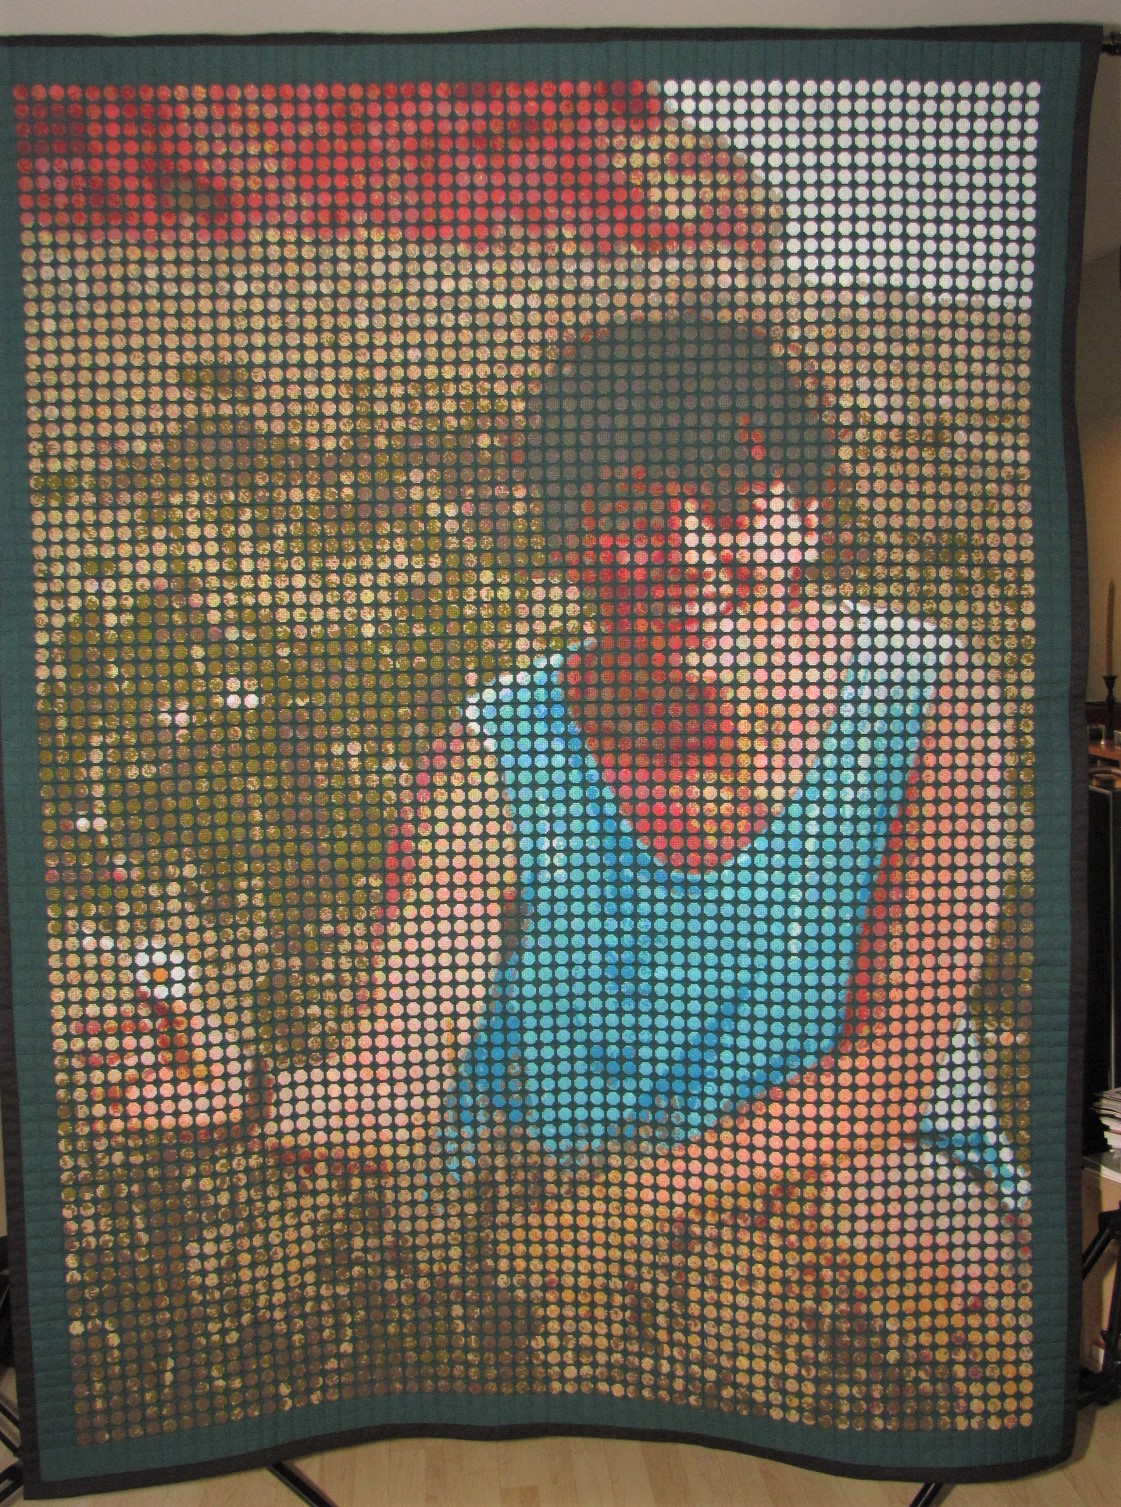
In 2005 I began making art quilts, with the motifs composed entirely of abstract embroidery. Along the way I developed a process to break down a large motif into manageable blocks I could embroider and piece back together. By 2010, I decided to pull out Chantal’s picture and attempt to turn it into a photo quilt. The challenge was to turn a 5×7 inches image into a 5×7 feet embroidery design. Oh yes… and in cross-stitch. Why not 😉
So here’s how I went about realizing the project.
CONVERTING THE IMAGE TO STITCHES
STEP 1: Scanning The Image
NOTE: the ‘photo’ was laser-printed, which fortunately flattens the pixels and reduces the fine grain of the image. That would make life easier when it came to converting pixels to crosses
- I ran tests of various scanning resolutions and color depth.
- I opted for 600 dpi and 32 bit depth
- I typically scan at higher resolution and color depth than I may need. It’s easier to reduce the details of the image later… it’s impossible to get details back if they were not scanned in.
- I reduced the file to 64 colors
- I tested at 16, 32 and 64 colors and found that the detail of the picture, which was already limited somewhat from being a laser-printed original, was better preserved at 64 colors
- The resulting file was 290 MB! Made my computer burp 😉
- Next: I cropped the file to keep the image without the noise on the edges
- I saved the file as a bitmap (bmp format)
STEP 2: Importing The Image Into The BERNINA Cross Stitch Program
(included with the BERNINA Embroidery Software)
- First: I set up my cross stitch canvas with basic settings and 10 crosses per inch
- I inserted the image in the Cross Stitch program.
- I resized the image so that it would match the grid .
- The final dimensions were 59 inches wide by 80 inches tall (almost 5×7 feet).
- I saved the file with just the image in it.
TIPS:
- Save your Files! Save them early… and often!
- If you want to tackle large-scale projects like this, make sure your computer has a generous amount of memory. By today’s standards that would be 16GB of RAM.
STEP 3: Converting The Image To Crosses In The BERNINA Cross Stitch Program
- I used the Auto Stitch tool to convert the image (pixels) into crosses
- First: I selected the 2 Threads setting in the status bar so I would end up with double strand crosses (a good setting for image density).
- Clicked on Auto Stitch
- Clicked on the image
- In the Auto Stitch Image dialog box
- I selected to Map Image To: a Specific Thread Chart / Isacord 40.
- Maximum Number of Colours: Restricted to 48
Note: this stage was done iteratively, starting with 64 colors (same as the image), then 32… then 48 as I saw no significant difference in the resulting image. So 48 colors it was. - The software automatically remapped the image colors to 48 colors of Isacord 40 thread and added these 48 colors to the default palette already in the file.
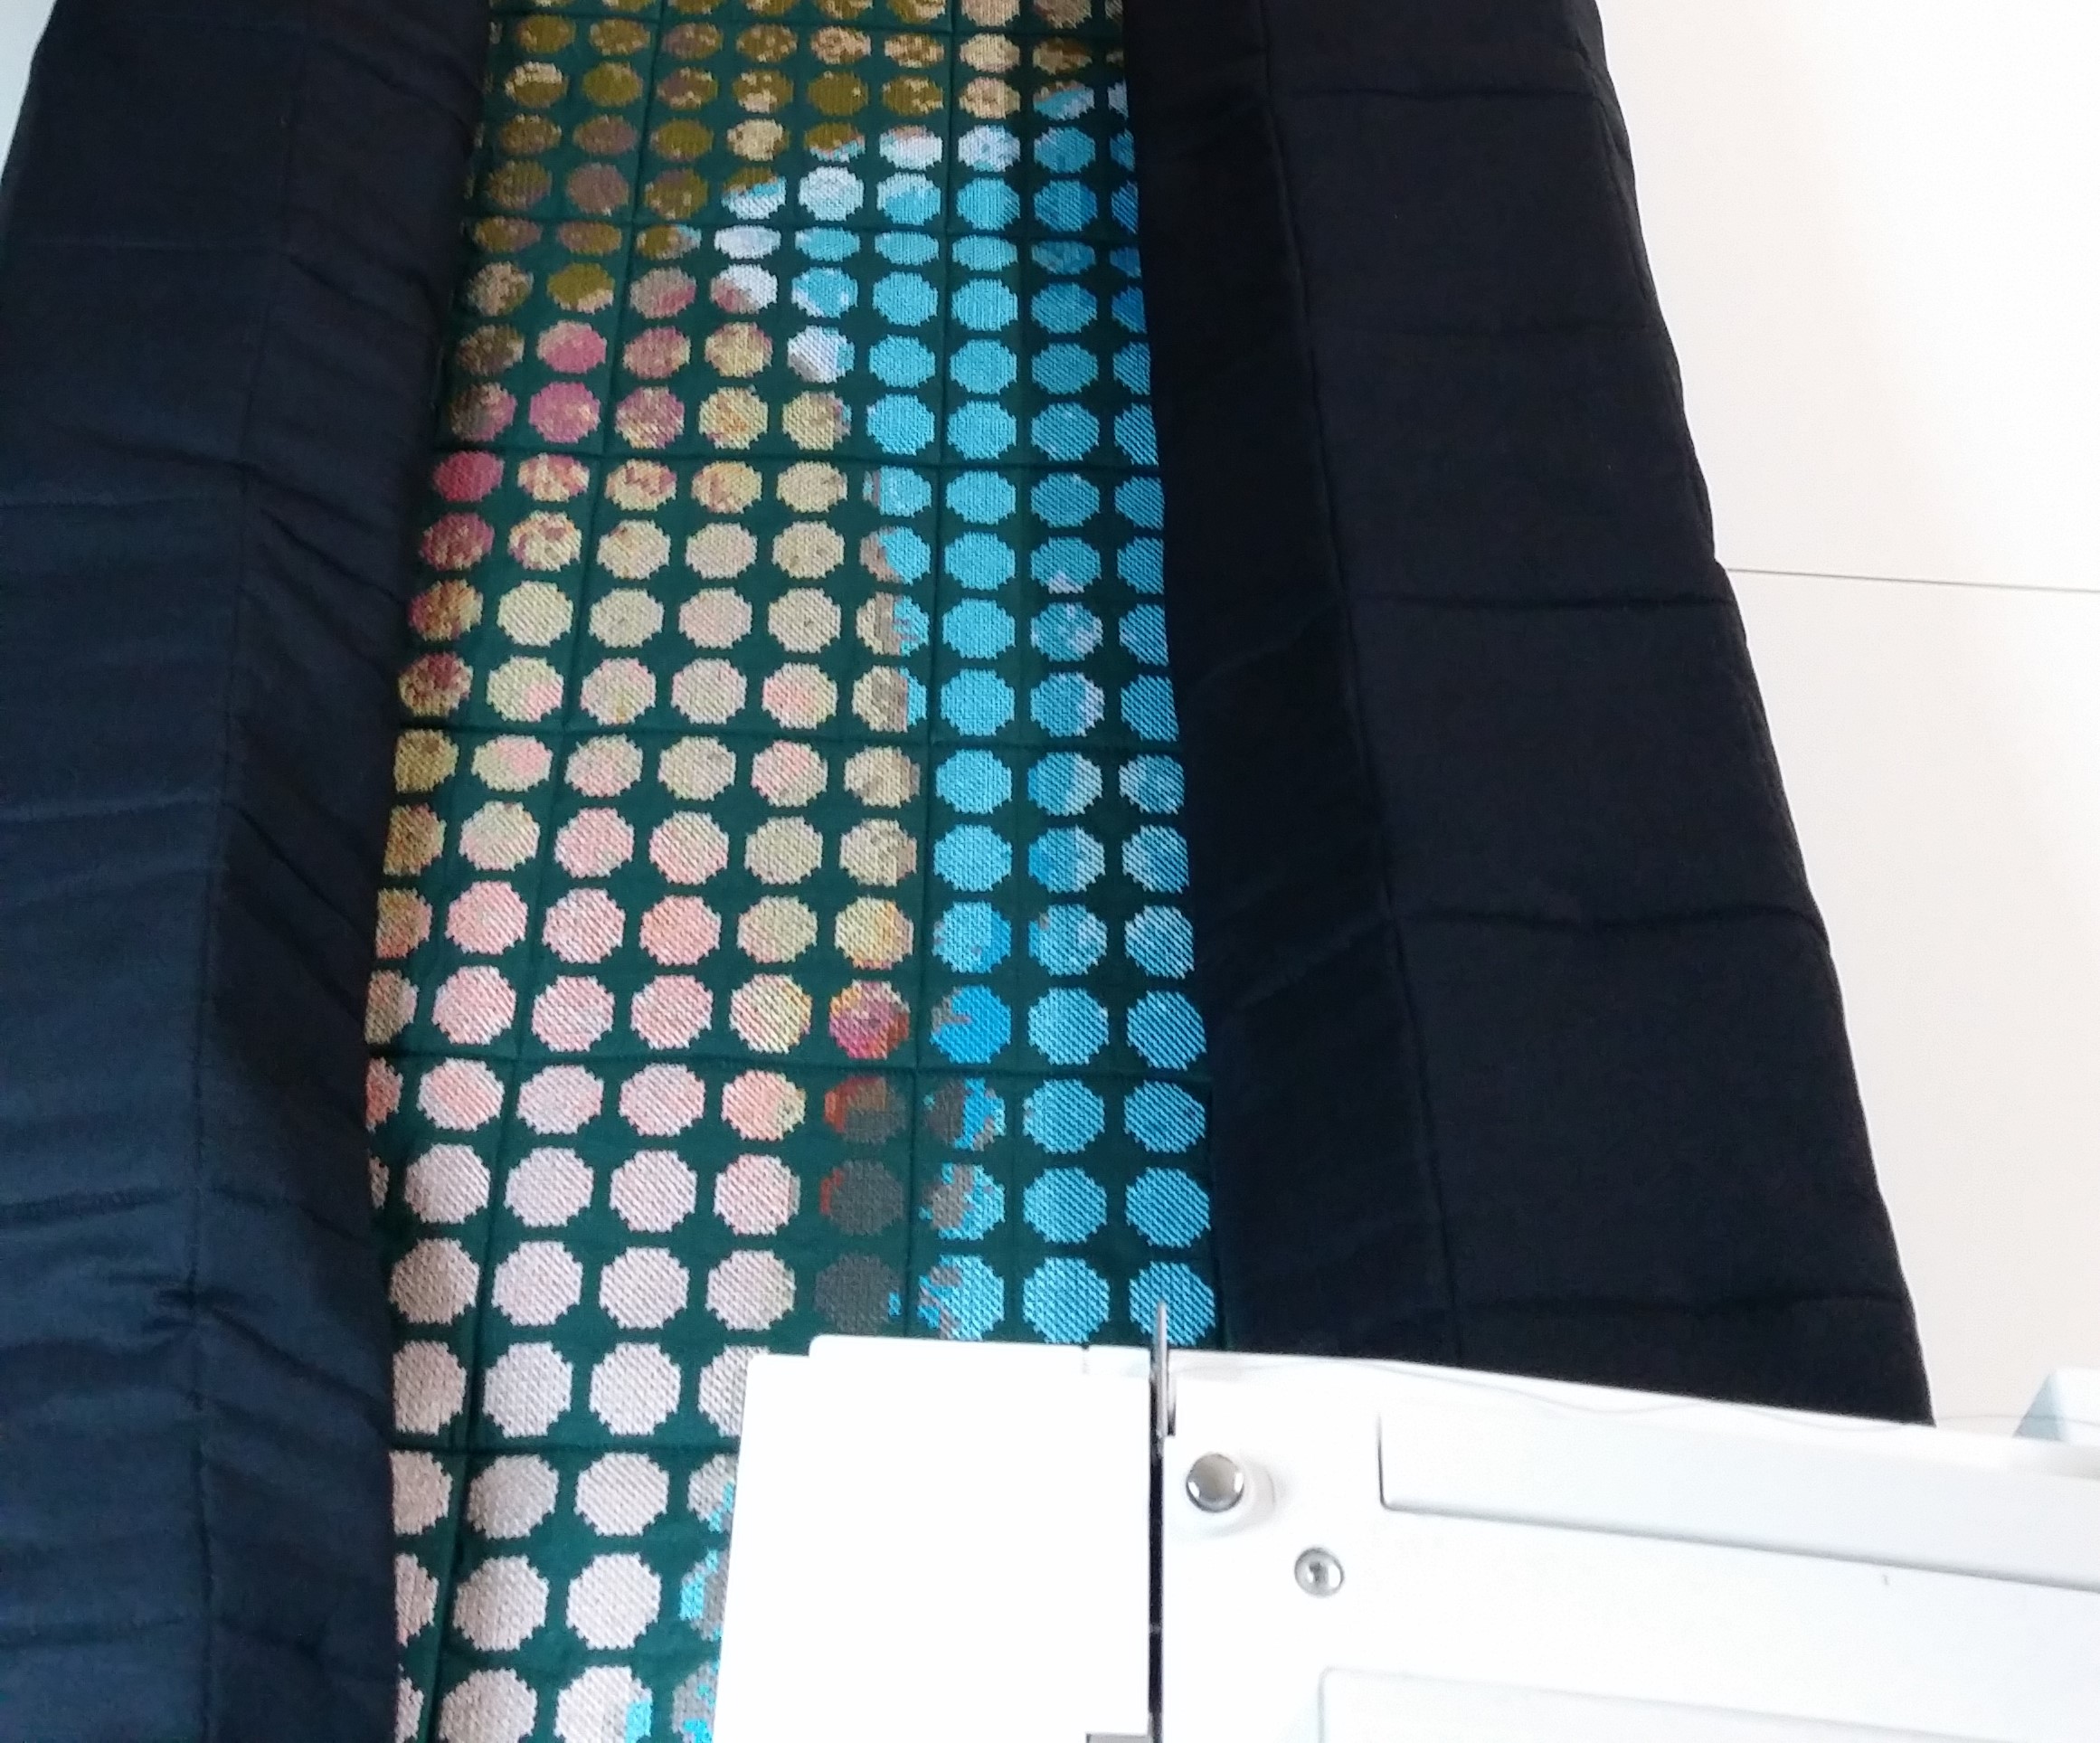
At this point, I had one monster slab of crosses. Unfortunately, while my B 830 had the largest embroidery field in a single hooping without rotating the hoop, it would take something like a BERNINA 9000 to cover that large an embroidery slab ;-). So I would have to break it down into a manageable embroidery block size, to be pieced back together later.
ADAPTING THE GENERATED CROSSES TO MAKE THE EMBROIDERY PROCESS POSSIBLE
STEP 4: From A Slab-O-Crosses To Cross Stitch Circles
In principle, subdividing the slab of crosses should be straightforward. The Cross Stitch program lets you select a rectangular area (e.g. 4×4 inch square) at once and you could copy/paste into another file and save it. However… embroidery is about stitches on fabric, which entails some pull. That, and more pull… as there is residual pull on the fabric from all those stitches having been put on. And with cross stitch, stitches tend to pull from the corners to a middle so I would expect the edges of a rectangular area to pull in a little bit, even with good stabilizer. So matching up rectangular mini slabs (4 x 4 inch squares) edge-to-edge and expecting to match all the crosses along the way might pose a challenge for the final picture to line up accurately.
One thing I’ve discovered (and enjoyed) along the way since I started making art quilts is that my quilts usually require me to engineer a process (or more) to make them happen. That often means pausing the project at one stage and digging back in the engineering side to find a solution to the current challenge. I refer to it as jumping into the deep creative end of the pool without looking whether the pool has been filled yet ;-).
The requirements for the solution were:
- Eliminate the border pull effect from a 4 x 4 inch square
- Make it efficient to subdivide (aka chunk out) the slab into individual files
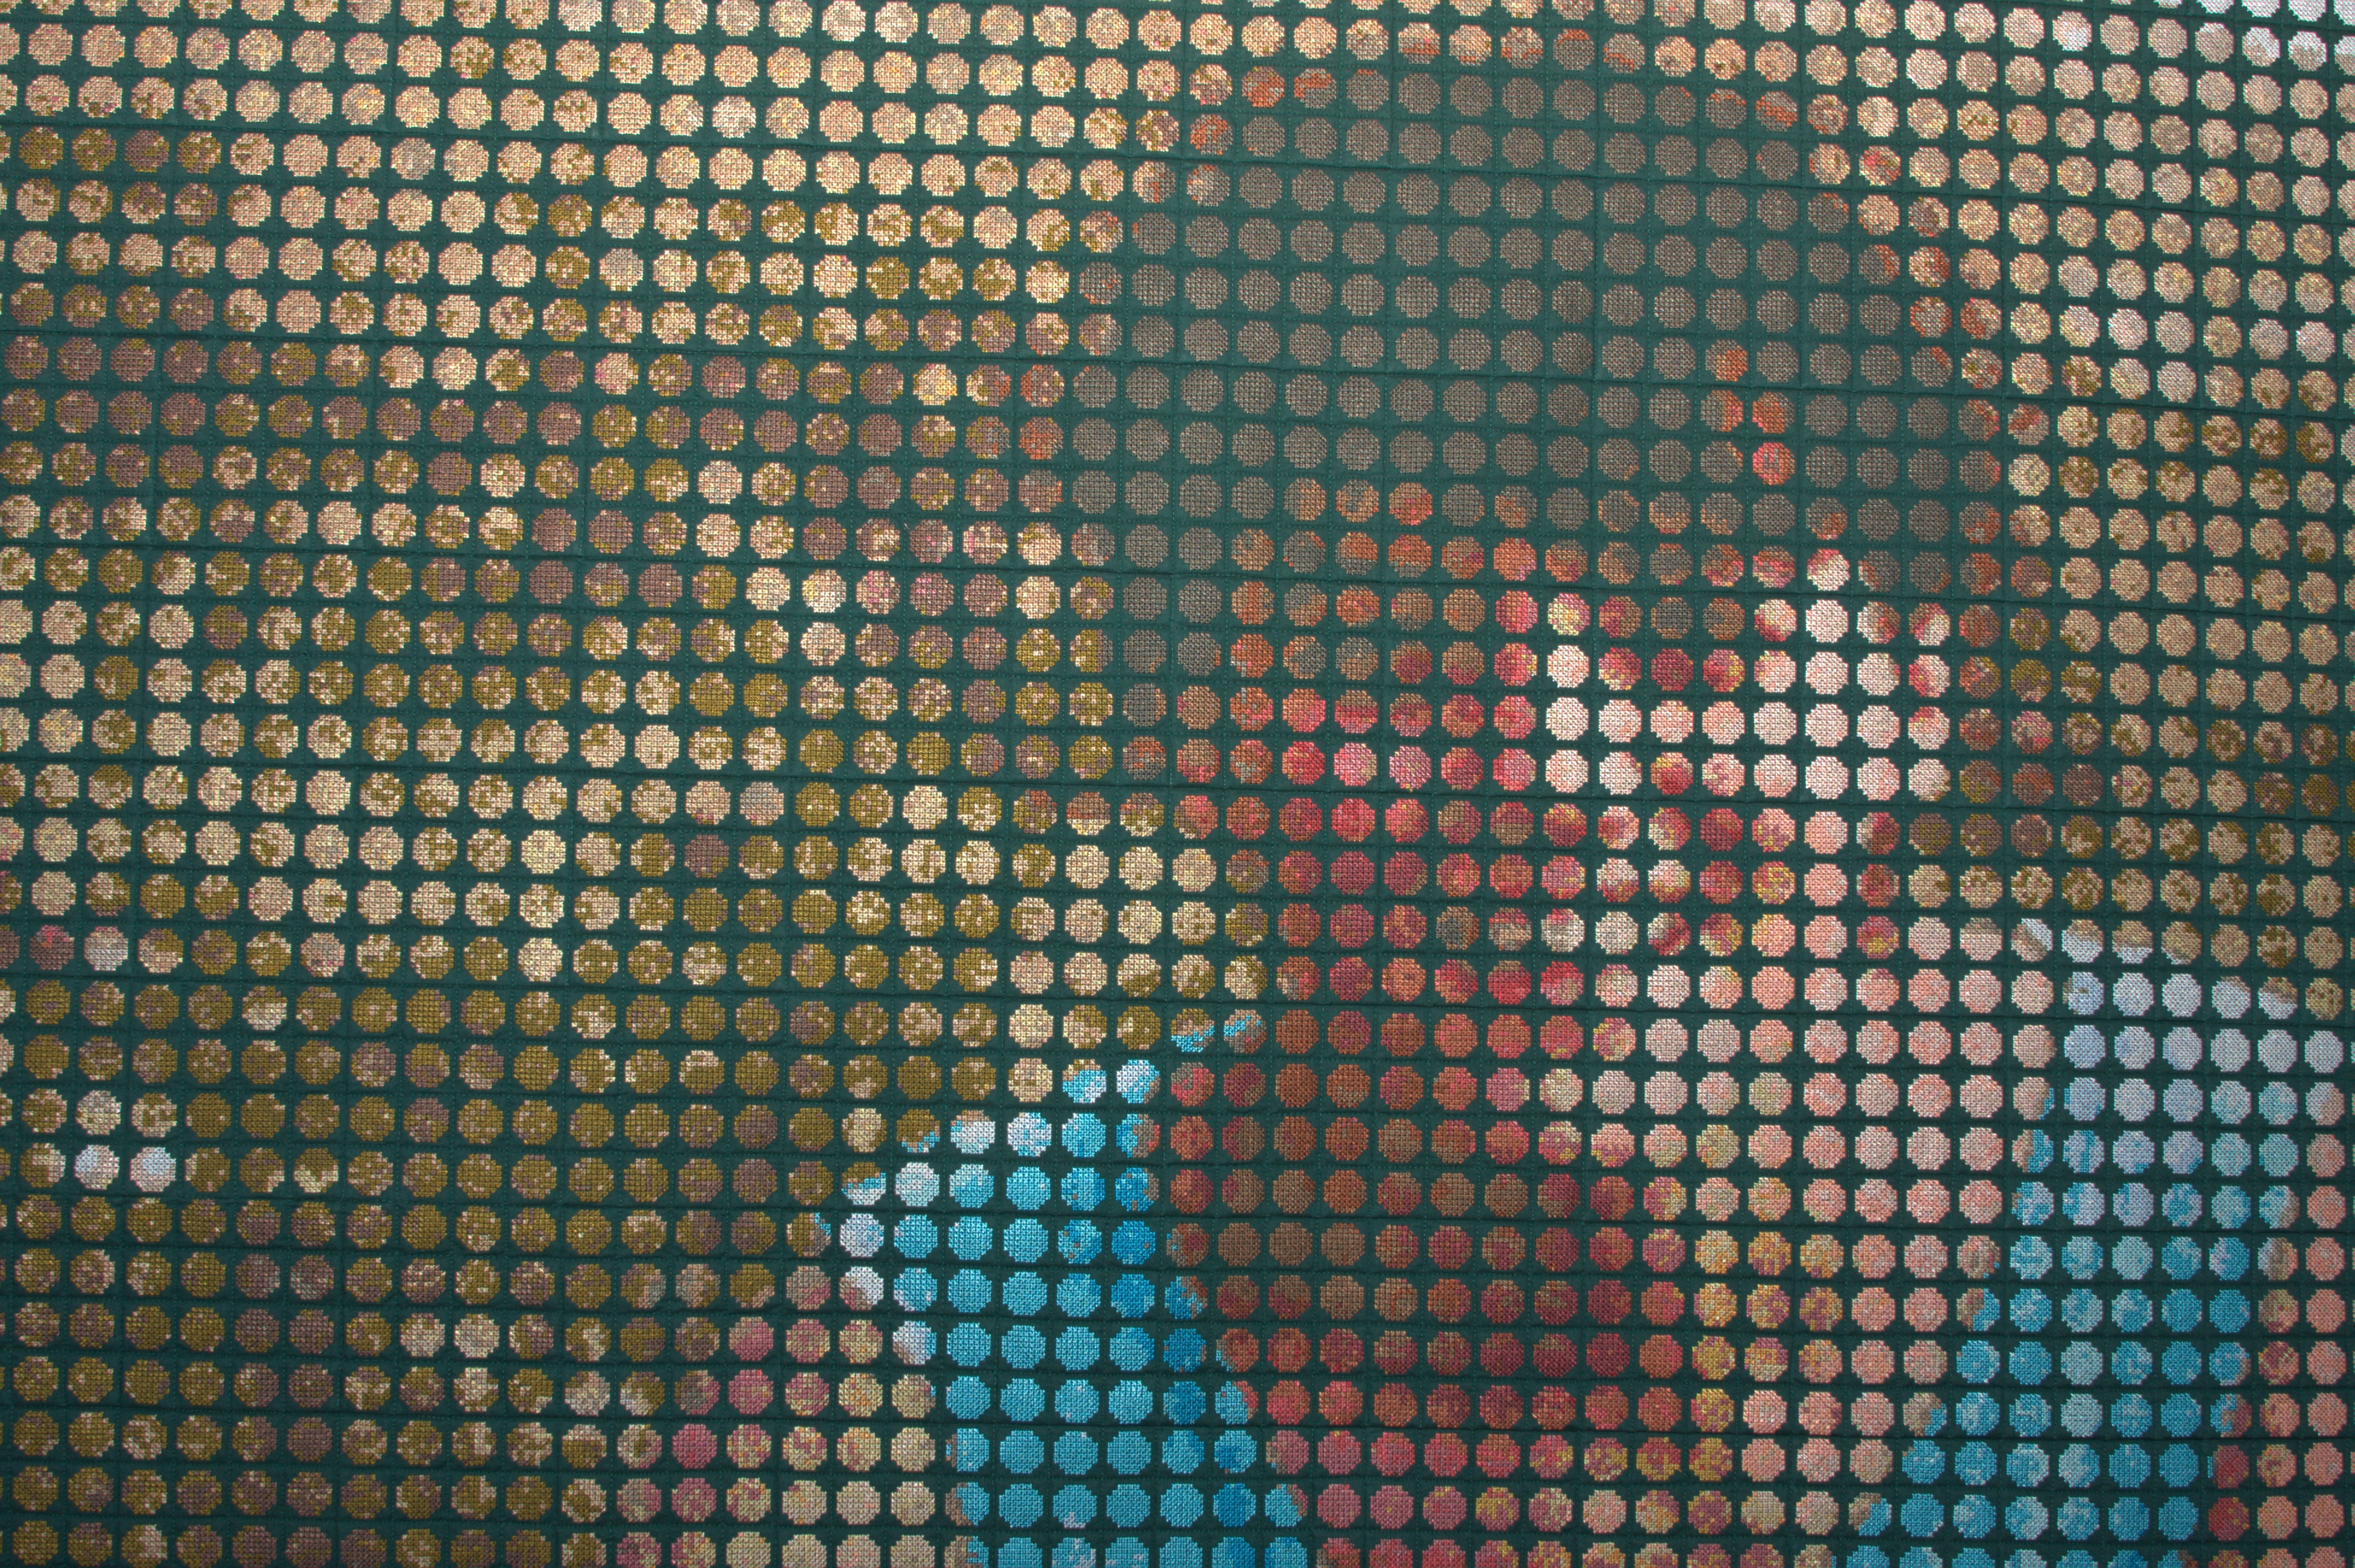
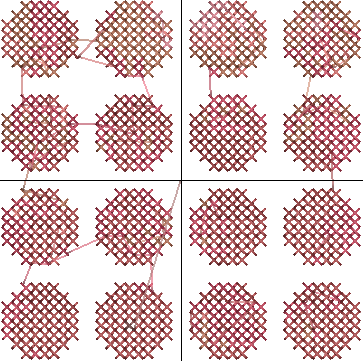
The solution I came with was to modify the solid slab so I would end up with cross stitch circles (after a few random try-outs).
- This way, there would no solid edges to match, it would eliminate compound pull across areas and would let the cross stitch float on the surface without any distortion.
- With a small gap between the circles, this would make piecing easier as any 1 or 2 mm discrepancy would not show, not having to match 40 crosses to another set of 40 (with a 4 inch block at 10 crosses per inch).
To create cross stitch circles, I had to eliminate crosses from the edges of each square inch and from the corners. After a few trial-and-error runs, I came up with the following method. Thanks to the following features of the Cross Stitch program, this process was fairly straightforward:
- When applying a new cross/color to an existing square on the grid it automatically replaces the previous assignment, so there is no stacking of crosses going on. Think of the Cross Stitch program as a pattern designer.
- The Auto Select tool
- The Rubber Stamp tool
TIP: when developing a technique to manipulate a design I open a second file as a sandbox. I can mess up in the sandbox all I want without the risk of unwanted changes to my main file.
In my sandbox file:
- For each square inch on the grid, I assigned the default color 1 (C1, a neon green) to 1 cross around the perimeter of the square and 3 additional ones in each corner, leaving a circle alone in the middle
- Next: I use the Auto Select tool to select all the green crosses
- I then used the Rubber Stamp tool to stamp the same group of green crosses next to the first square
- From there I could re-select the double square and rubber stamp it next to the first pair, etc. This would rapidly tile up to a 4×4 inch mask of green crosses:

- I auto selected the entire 4×4 inch mask
- I used the Rubber Stamp tool and stamped the 4×4 inch mask along the first row until I reached the width of the slab

Since I was planning on embroidery blocks of 4×4 inches, I now had my First Row deletion mask.
- I auto selected the entire mask
- Copied it
- Pasted it into the main design file
- Adjusted the position to the top left of the slab
- Reassigned the green Color 1 (C1)
By now, all I had to do was to clone the cropping mask across the slab in the main file:
- I created the deletion mask for the first row of 4×4 blocks
- Then I created the deletion mask for the next 19 rows of 4×4 blocks
- I auto selected the neon green crosses for the entire first row
- I used the Rubber Stamp tool and stamped the mask on each of the next 19 rows.
I loved that part! It went fast!
Operation Shazzam!
To delete all the neon green cross and implement the deletion mask was the easiest thing to do:
- I auto selected the entire mask by pointing at the crosses in neon green
- I pressed Del on my keyboard
- That was it!
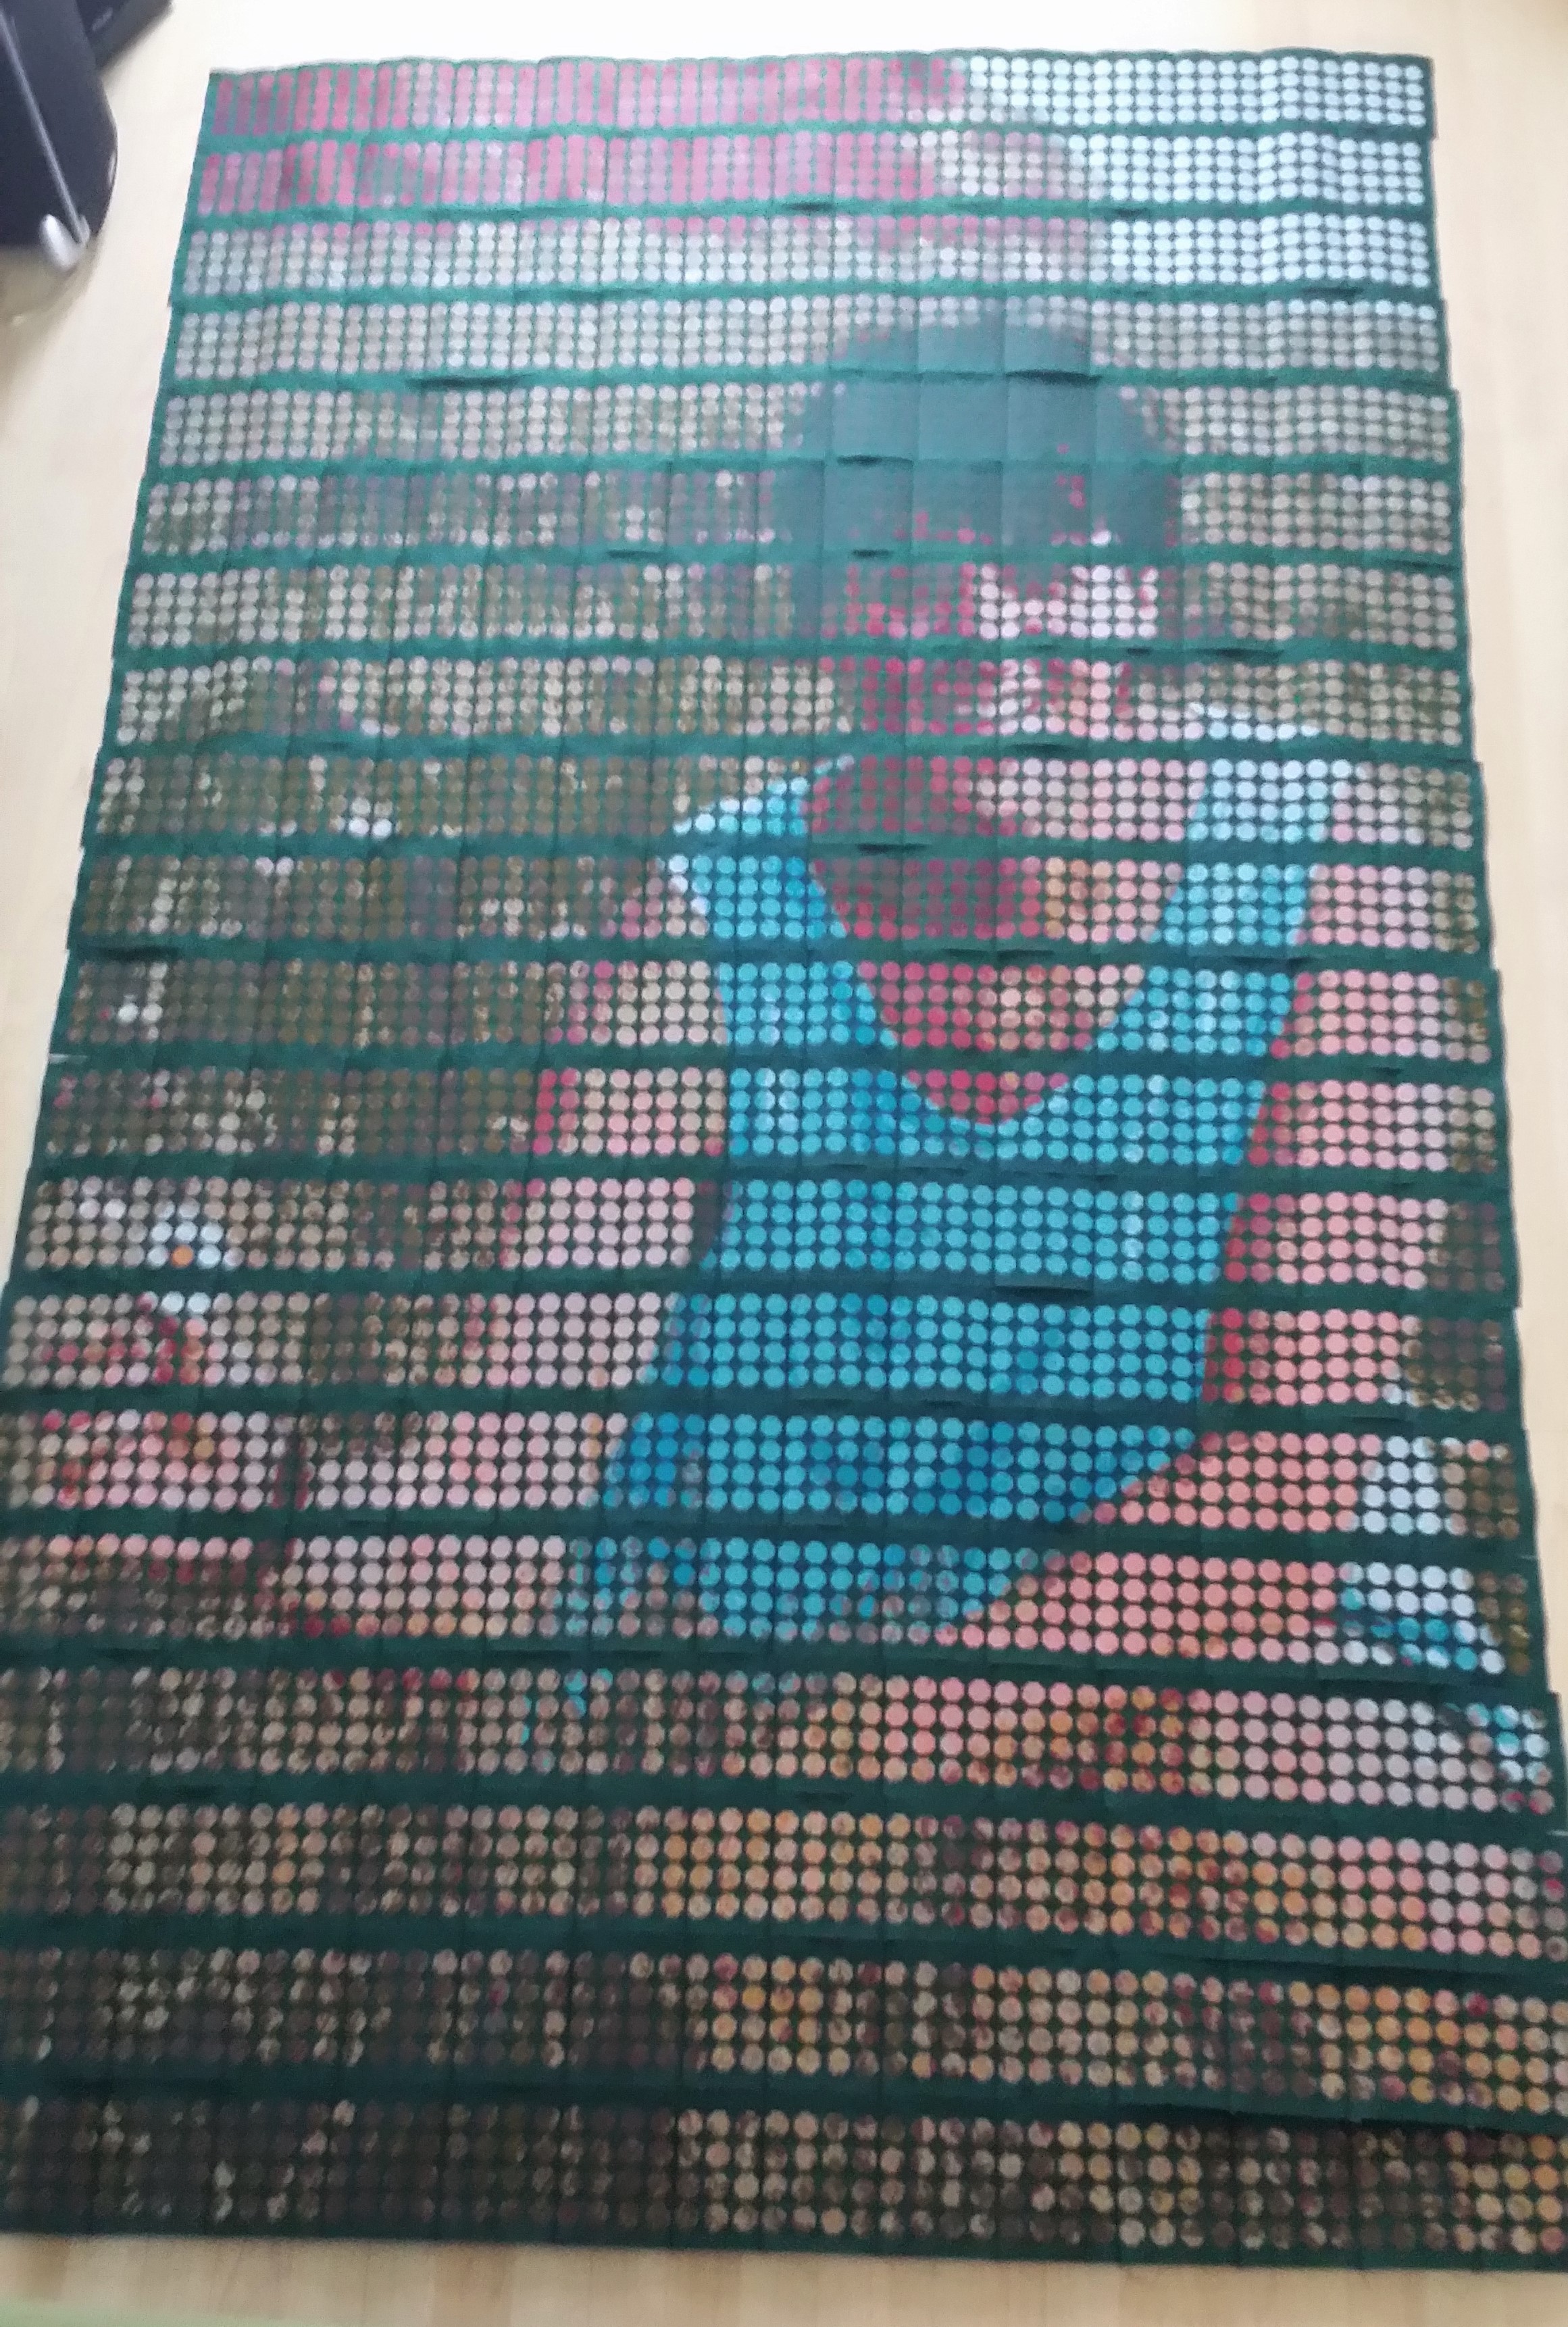
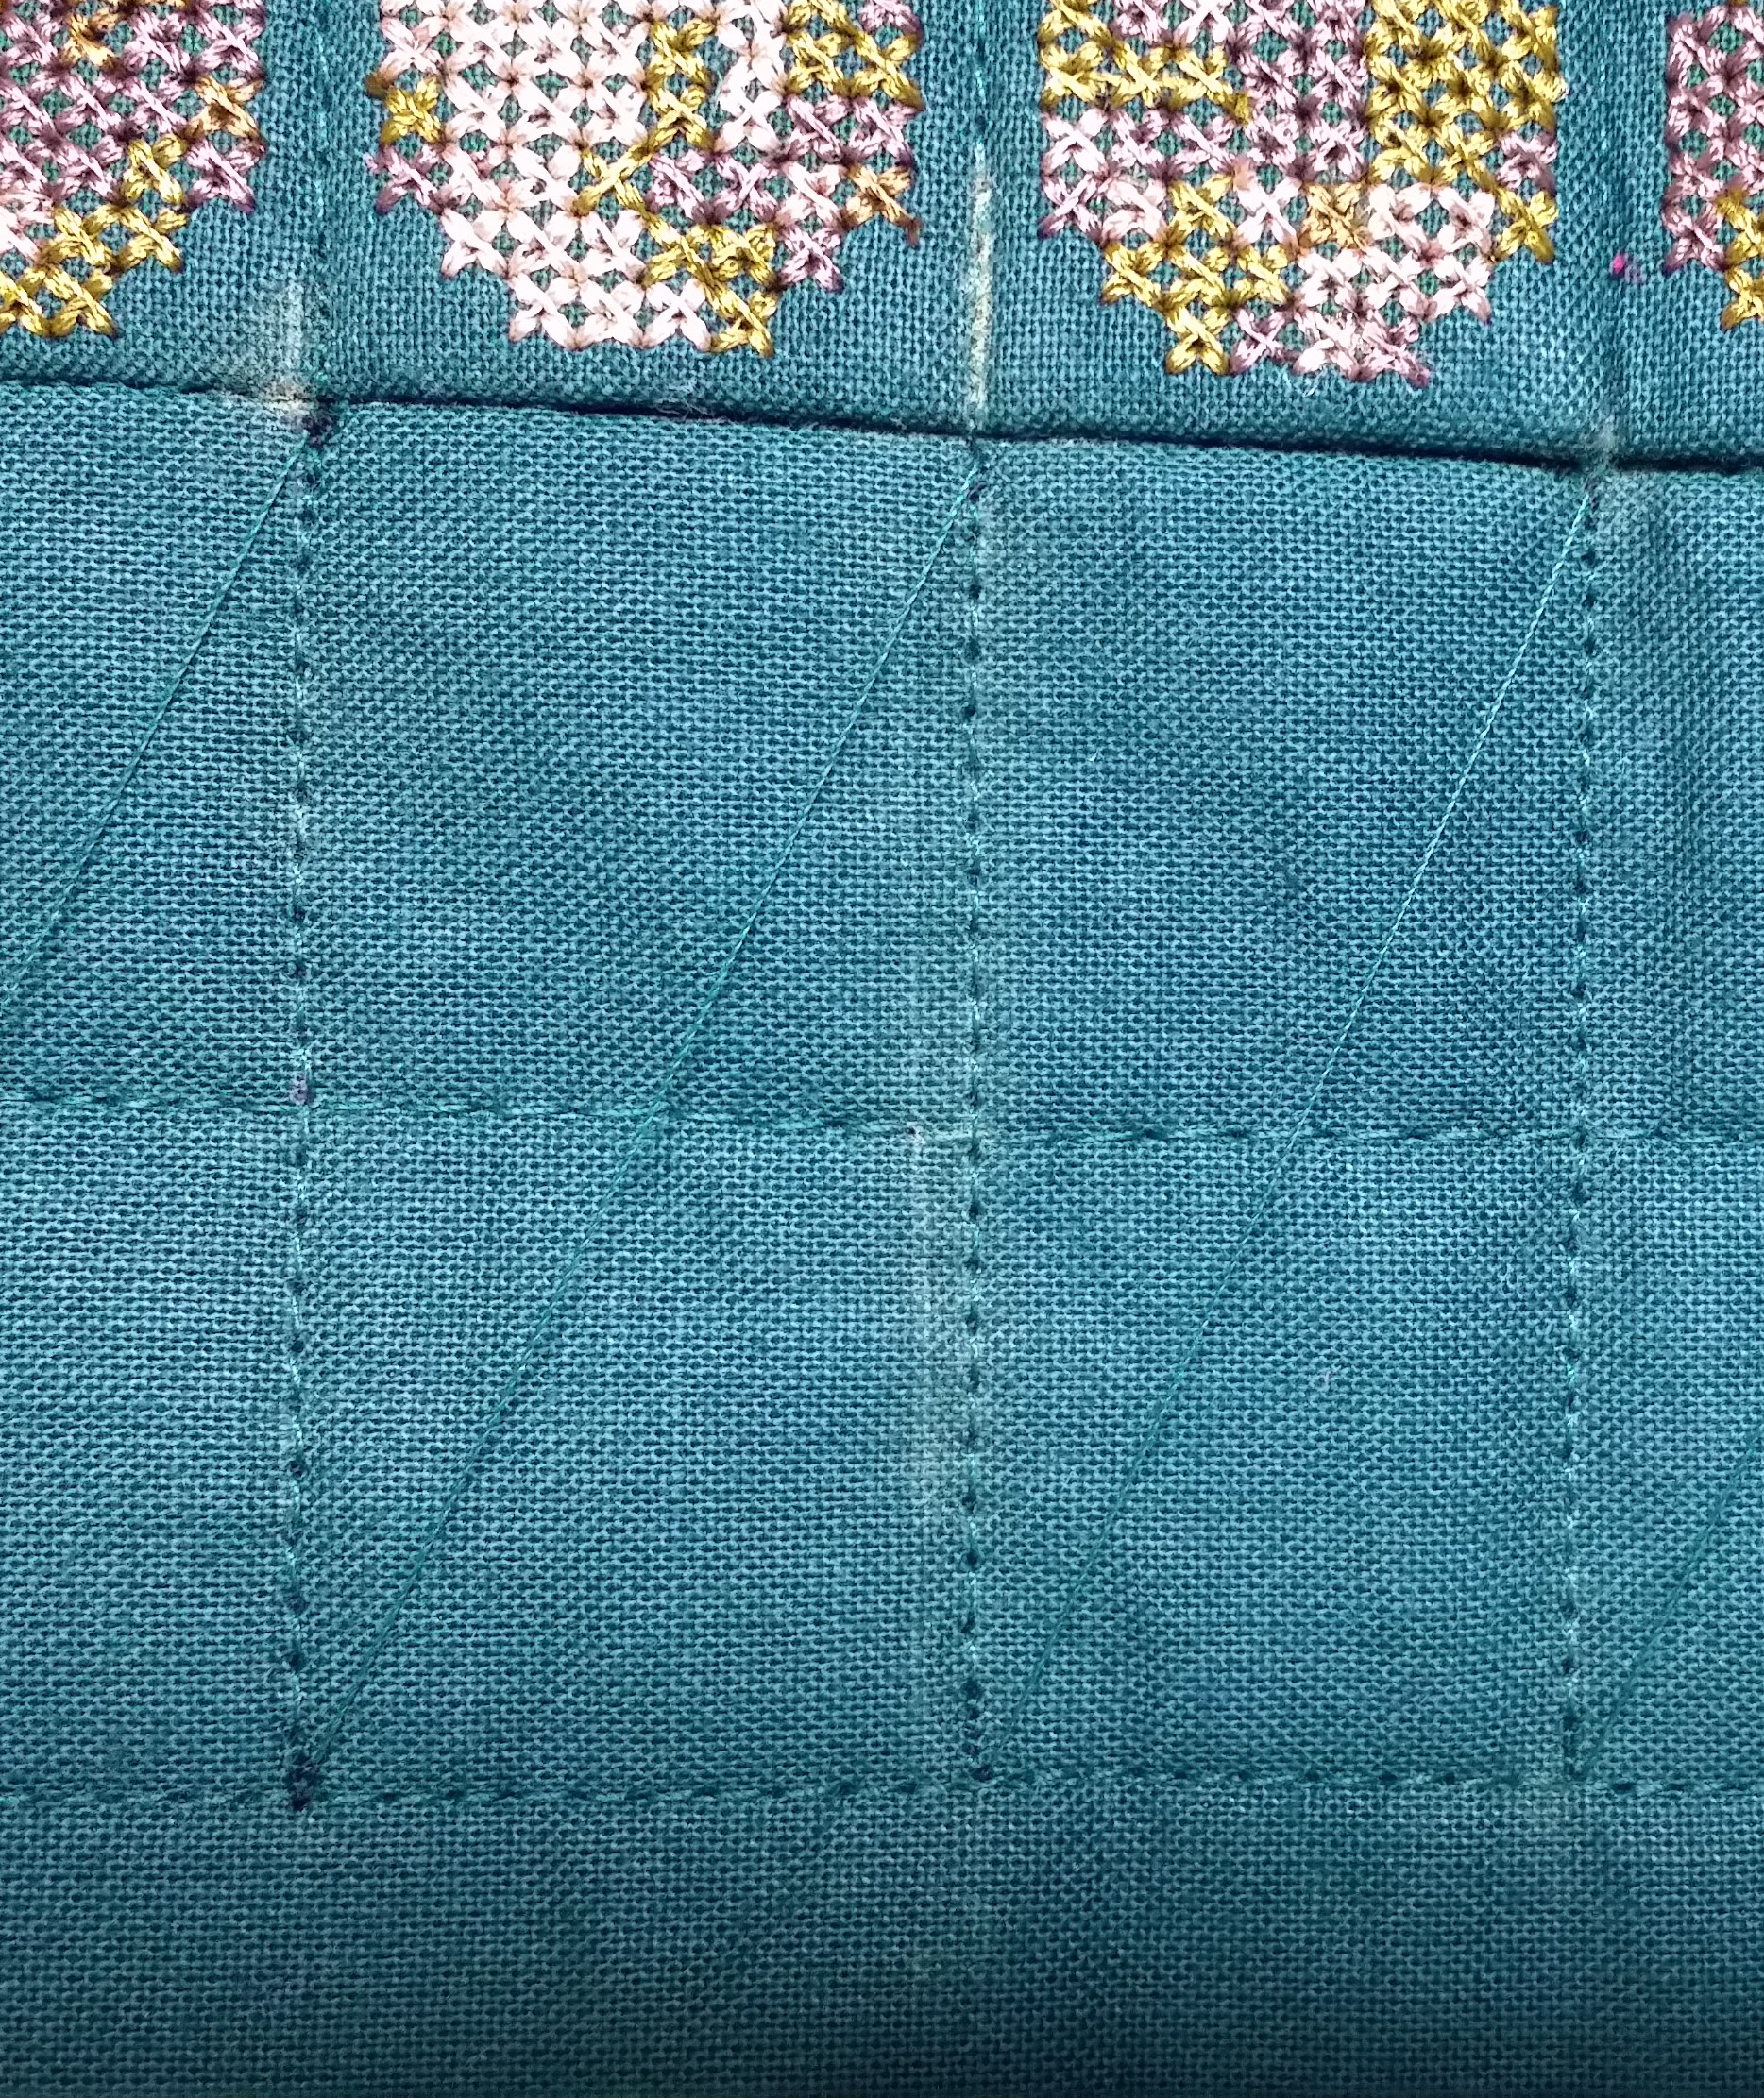
I now had the slab modified to a giant (meta) dot matrix in double cross stitch!
NOTE: as you can see in the previous image I selected a dark green fabric (it was called Spruce) to use behind the fabric. The Cross Stitch software let me render the fabric color for a reliable preview.
I learned from my abstract quilts that a dark fabric background affords two design elements:
- Allow the embroidery to stand out over the background. A light background would flood the image from the back, washing it out
- By selecting a color with a saturated hue that is related to some of the thread colors in the motif it anchors the design
The dark green background for this piece allows the wild field to grow out of the fabric base while remaining in the background and allowing the thread colors to define the picture in the foreground.
Now on to subdividing the big file. That was a process of its own.
STEP 5: Subdividing The Big File.
Try once:
- I selected a 4 x4 inch area (containing 16 cross-stitch circles) at the top left of the main file
- Copied it
- I opened a new file
- Pasted it
- OOPS! That didn’t work:
- When pasting into a new file, that file lacked the additional Isacord colors that were inserted into the main file when Auto Stitch converted the image to crosses.
- The pasted set of cross-stitch circles was re-colorized to the default program colors… with a very psychedelic effect.
Try something different:
To make sure the recipient file had the 48 Isacord colors in it so that pasted blocks of cross-stitch would retain their colors I did the following:
- Saved a copy of the main file as Blank block and deleted all the crosses from the file
- In the main file: I selected a 4 x4 inch area (containing 16 cross-stitch circles) at the top left of the file
- Copied it
- Switched to the Blank block file
- Pasted it
- Saved the file as Row 01 Block 01
For the next block:
TIP: to prevent errors when generating a large number of files (here: 300), immediately after saving one file with its intended name, I Save As with the next name. I can then delete/edit the content of the file and Save without the risk of overwriting the previous file by mistake.
- Saved As the current Row 01 Block 01 file with a new name: Row 01 Block 02
- Selected All and Deleted the content of the file
- Switched to the main file and selected the next 4×4 inch block
- Switched back to the Row 01 Block 02 file
- Pasted the block of crosses
- Saved
Rinse and repeat another 298 times. And yes, that was a little trippy on the eyes 🙂
At this stage, I had 300 Cross Stitch program files (with the .ARX extension). In order to embroider them I had to stitch file formats. I used the (then) Portfolio program to batch convert the files.
TIP: The current version 8 of our embroidery software has an Embroidery Library with more tools and functions (read: easier, convenient and faster).
I then:
- Converted the ARX files to ART files. These would be the master files for embroidery.
- Saved an EXP stitch version of each file for my BERNINA 830 and artista 200 to run
- Saved a PES version of each file so it could be run on my old Deco 600.
Talking of embroidery…
PREPARING FOR THE BIG EMBROIDERY RUN (400 Hours of it)
When looking at 300 files I realized it was time to devise another process for the stitching out of the embroidery. As much as I loved my B 830, one machine just wouldn’t do. So I rallied my troupers, including 3 generations of embroidery machines:
- BERNINA 830: my Beauty and my Beast
- artista 200: proven and dependable if not quite as fast
- Deco 600: oldie but still a goodie (with only a 4×4 inch stitching field)
Now you can see the method to the madness: by using a 4×4 inch block I could run any block on any of the machines. Also, my two BERNINAs could share my pool of medium hoops (I own 11 medium hoops… go figure why 😉
So now I had to convert the master ART files so they could be used on the machines.
Generating the machine files:
Before you think ‘Oh no he didn’t… open each of 300 files and converted to two machine formats each’ (in case, EXP and PES)… Thankfully, the Portfolio program then in version 6 of BERNINA Embroidery Software (now replaced by the even better Embroidery Library in the current version) let me convert all the files at once, including both export formats. I just love software 🙂
In the process a little light bulb went off in my head… While my artista 200 could use ART for Machine file format, since it was windows based, I didn’t need the full ART file as I was only planning to open and stitch files as is. So here’s a tip…
TIP:
- If you still own a BERNINA artista 200 or 730 (they are classics!)
- if using a ready-to-stitch file that will not require any modification once opened on the machine
- Use the BERNINA EXP format for your machine files. They:
- load faster,
- won’t bloat the machine memory with any leftover artwork that may have been in the ART file
- have all the stitch and color info to obtain the identical stitch-out.
- Since I have embroidery software, I only send EXP files to my artista 200.
Getting the files to the machines
At this point, all I had to do is load the respective USB sticks for the 830 and 200 and the cards for the Deco. That gave me the flexibility to run designs in sequence across the machines.
Early Run/trial:
I did a trial run with a single file on each machine and determined that I would cut the jump stitches by hand, rather than letting the machine cut them. The reasons being that:
- the machines slow down before they cut
- they ‘slow up’ as they resume stitching
- there was an average of 20 or so jump stitches for each color and
- an average of 15 or so colors per block
- the net slow down for the process was adding up
- cross stitch being more vulnerable to stitches coming undone (with so many jumps and cuts)
- by turning off the thread cutters the bobbin thread would remain continuous, with the added benefit that the tie-ins and tie-offs would remain more secure.
Here’s a sample of what the jump stitches look like (in quantity) for a photo cross-stitch:

So I opted for tweezers and snips… with a speed enhancement device:
TIP: knowing I’d need good tweezers to pluck the jump stitches for snipping, especially the pesky short ones only a cross away, I ordered 6 different types to evaluate which would work best.
- The hands-down winner: my trusty BERNINA tweezers that came with my B 830. They can pluck a thread anytime, even a super short one.So I ordered 3 more of these as I wore the tips out by tapping on the cabinet surface to release the snipped threads.
- For the snips I used the Snip-Eze Embroidery Snips by Havels. They have just the right curvature in the blade to shave a thread off the surface.
AND NOW FOR THE BIG EMBROIDERY RUN
This is the biggest part of the making of the quilt. All my quilts require that I have the process down… and for me to hunker down for a few hundred hours’ worth of it.
The process I use for embroidery a large number of blocks, without mixing them up is straightforward:
Hooping and stabilizing:
- I uses fabric pieces 7×8 inches: just large enough to be secured by a medium hoop
- Note: I used a dark fabric as it lets the cross-stitch pop on the surface
- Using a lightweight fabric with this kind of embroidery stitching would wash out the image
- A dog-ear notch is cut off on the top right of each fabric piece so that orientation is obvious
- I fused a layer of Fusible Polymesh to the back of the fabric: this helps the finished embroidered fabric stay flat and pucker-free. This was done as a batch for the whole set, 320 pieces (to have spares)
- I doubled it with a layer of OESD Heavy Cut Away stabilizer: this layer does the real work of supporting the stitches (so the fabric doesn’t have to)
- I used a dark cut-away since my fabric was dark. It prevents peekaboo’s where sometime the stabilizer is visible from the top through some of the stitch holes
- I pre-cut the stabilizer pieces so they would be ready to use
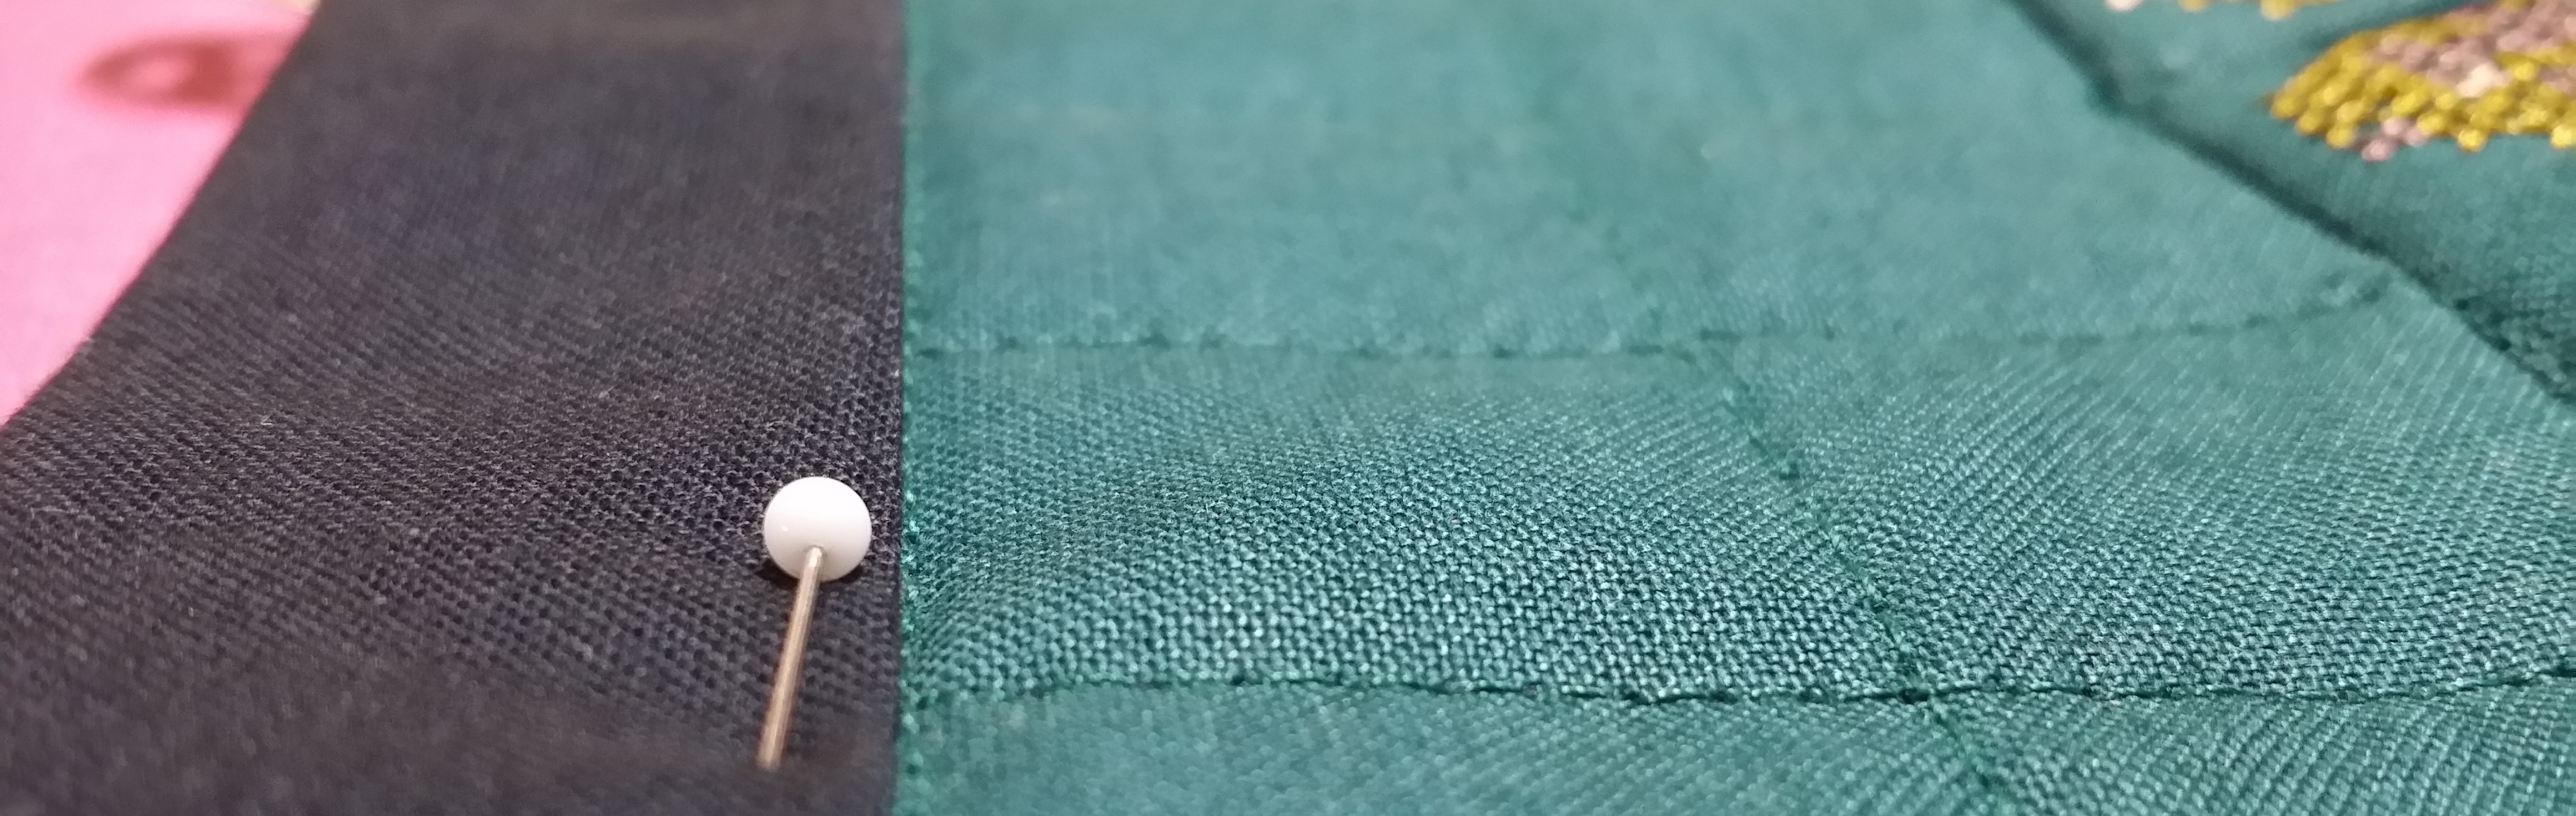
- I labeled each block to be embroidered on the back with a Row/Column code:
- g. R7 C6 is Row 7 Column 6
- the labeling is done above the area to be embroidered so it remains after embroidery
So an embroidered block (at least the back 😉 looks like this:

- Once it comes out of the hoop and while trimming the cut-away stabilizer off, the label is transferred to what will be the top seam allowance
- Again, the orientation of the block is easy to recognize.

And now for an Isacord and bobbins marathon… For about 350 hours worth of it 😉
The setup:
- I had my 3 machines set up near each other
- Arrayed all the Isacord spools on the extension (over the drawer) of my sewing cabinet, in numerical order (for easy grabbing)
- OESD Bobbin fill cones (in black) parked at each machine for on-the go bobbin winding (with several wound ahead to prevent interruptions)
TIP: Every embroidery machine entering service in my studio gets its own Multiple Spool Holder as a welcome present :-). It makes embroidery easier is small and big ways. The bobbin thread cone can live on the far right, always ready to refill bobbins. The telescopic thread guide promotes ideal thread delivery off the Isacord spools.
- My old Deco 600 did not show Isacord colors on screen since it’s format converted colors to generic names only. Since I was still using a netbook at the time, I used it to put the print preview of the design running on the Deco next to the machine to track the actual thread colors. My BERNINA’s didn’t require assistance in that regard.
The process:
For the next few hundred hours (in my spare time, over several months), I ran the three machines:
- Hooped fabric/stabilizer and labeled the block
- Kept a hooping ready for each machine so that I could start the next block as soon as one was done. This is where having more than one hoop per machine makes batch work possible.
- Ran the embroidery files, pulling Isacord spools from the pool of 48 as needed
- Trimmed the jump stitches (top thread only) when the machines stopped at the end of a color
- Drank more coffee 🙂
Glitches can happen:
- When converting the image to crosses I noticed that for the turquoise tank top the 4 shades of blue I should I found in the color list had been mistranslated as what I’d call ‘questionable’ greens.
- I worked around the glitch by selecting 4 suitable colors
- I substituted the 4 wrong colors with their replacement, on the fly, why running out the files. I did have to pay attention 😉
- Also, at one point the motor died on my old bernette Deco. It had been a trusty little workhorse for years but not being a BERNINA I shouldn’t have expected that it would cruise through that kind of labor scot free, like my BERNINAs
Sweet moments also happened along the way…
At 10:20 AM on a Saturday morning, the DAISY came through and I saw it clearly as the yellow center of the flower was done. As luck would have it, the auto stitch process had landed the center of the daisy smack on one of the cross stitch circles. I paused for a few seconds, savoring the moment. To me the daisy is the signature detail of the whole motif.
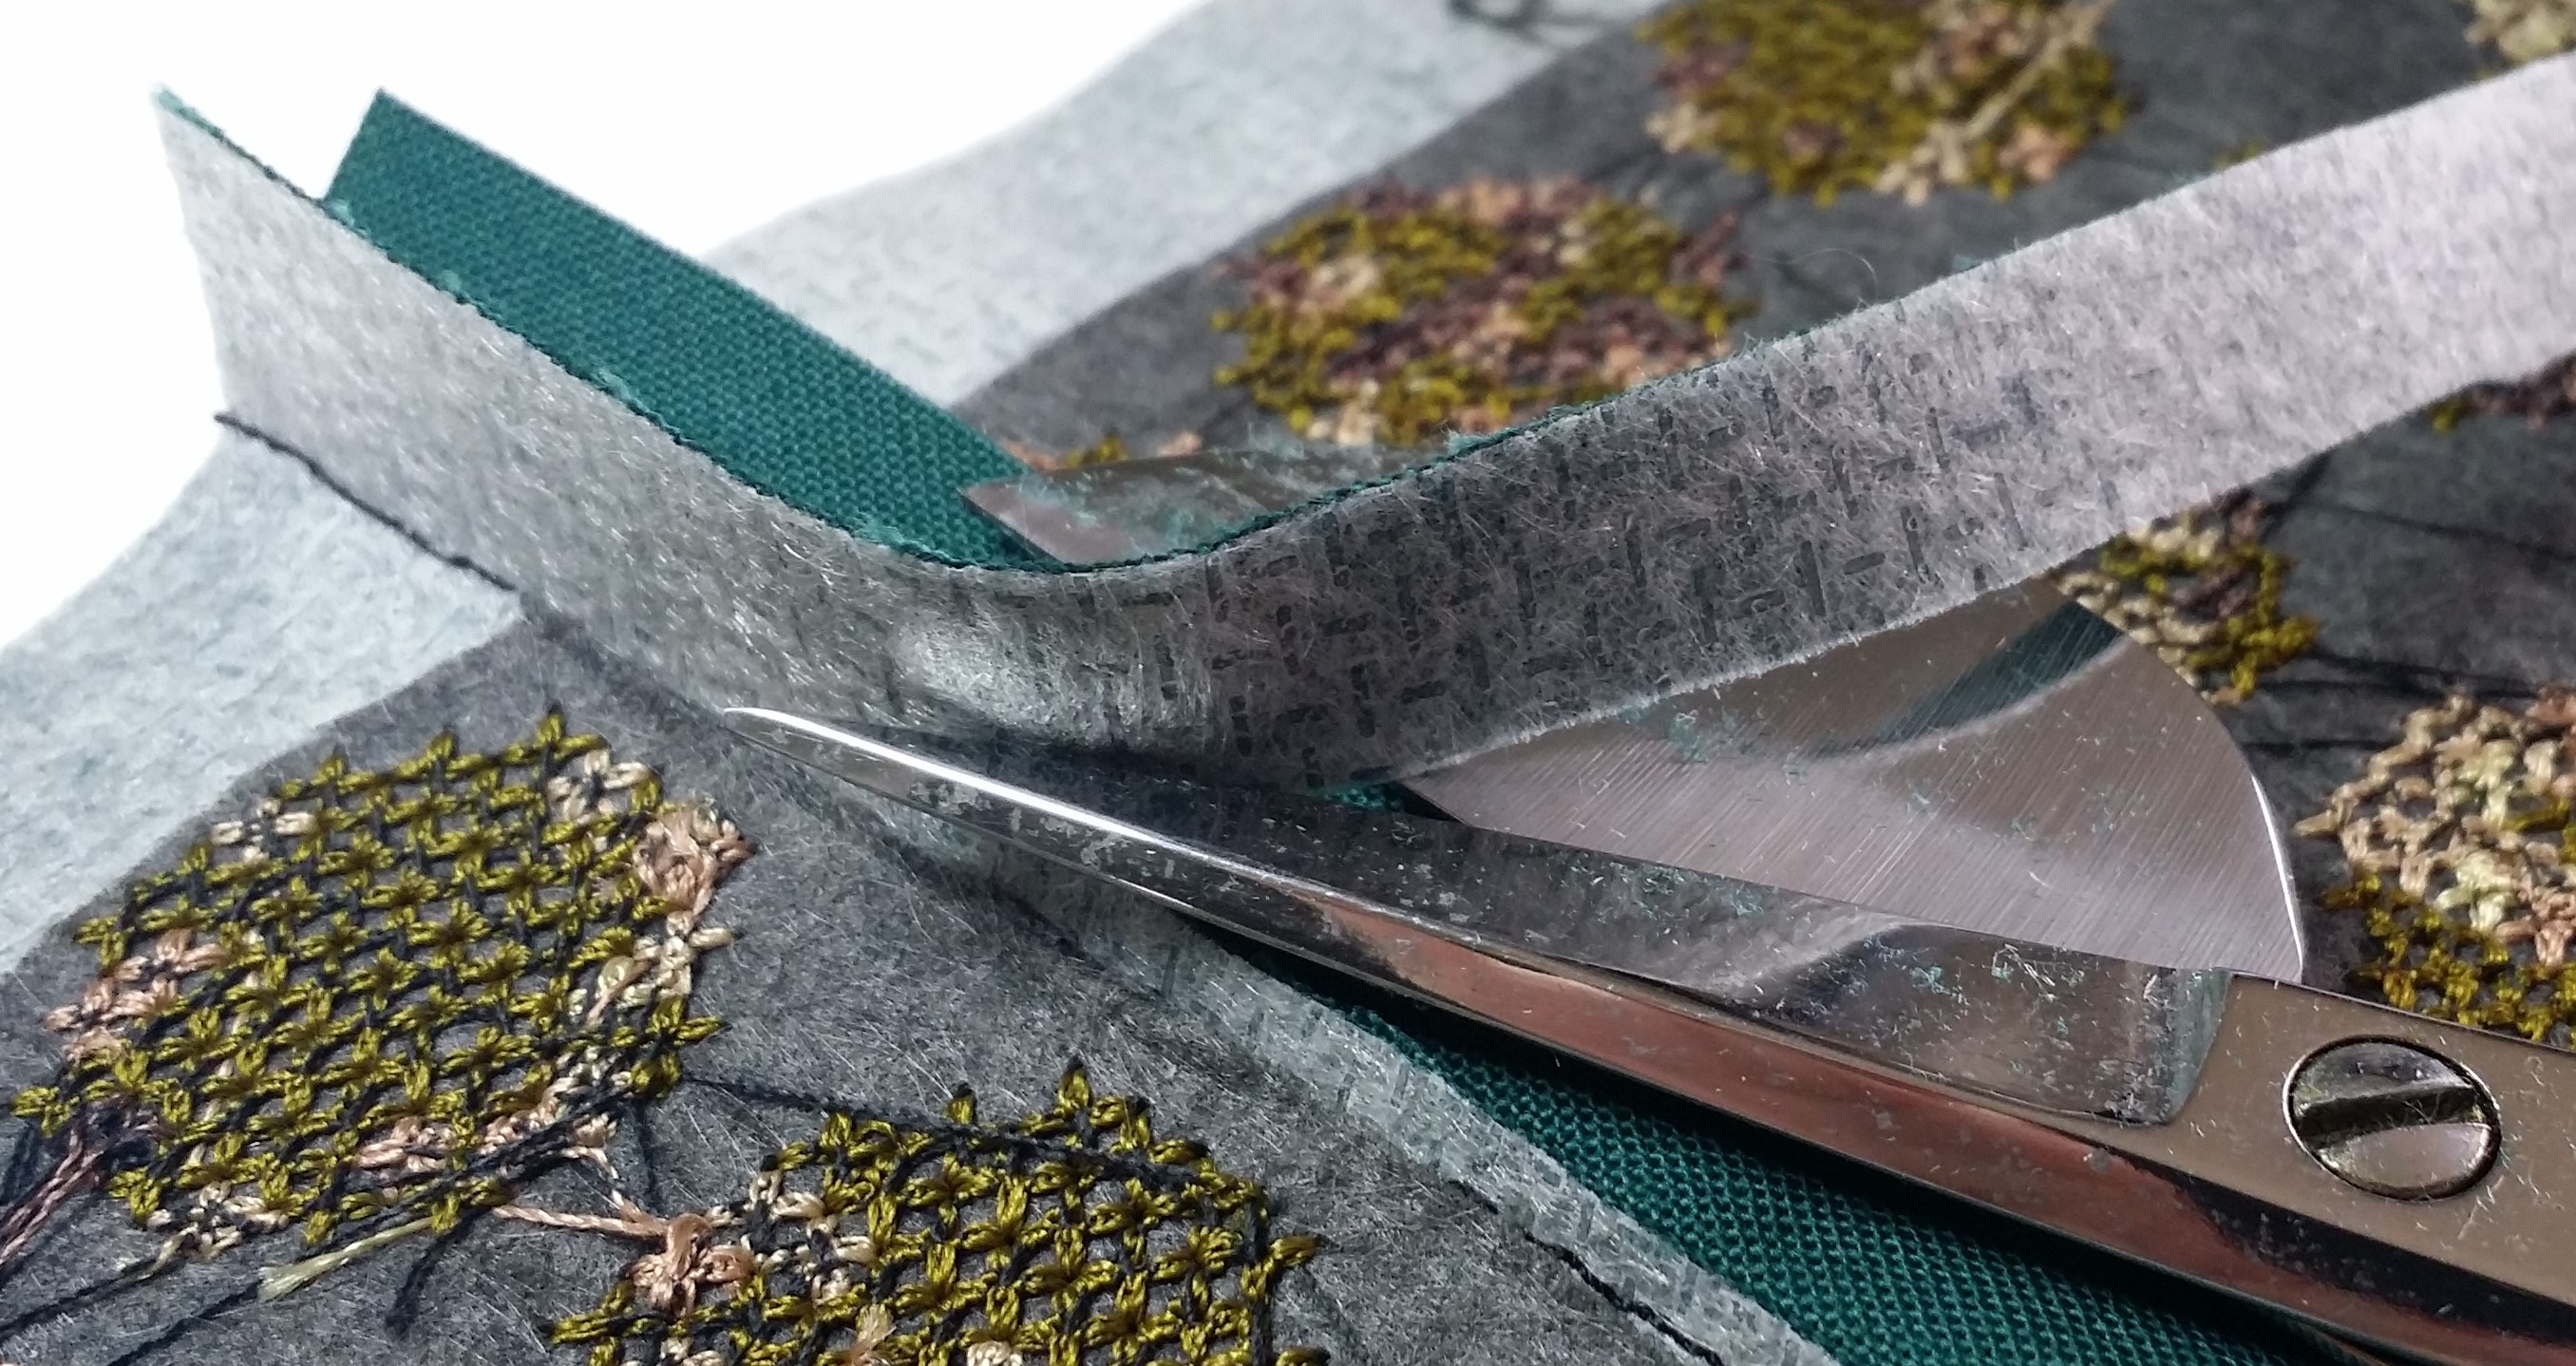
Cleaning up the embroidered blocks and trimming them to size
- As a block came off the embroidery machine, I trimmed the excess cut-away stabilizer while rewriting the block label near and above the top of the embroidery.
- The raw pieces were then stacked until all the blocks were done. There was no time to cut the blocks to size at this stage.
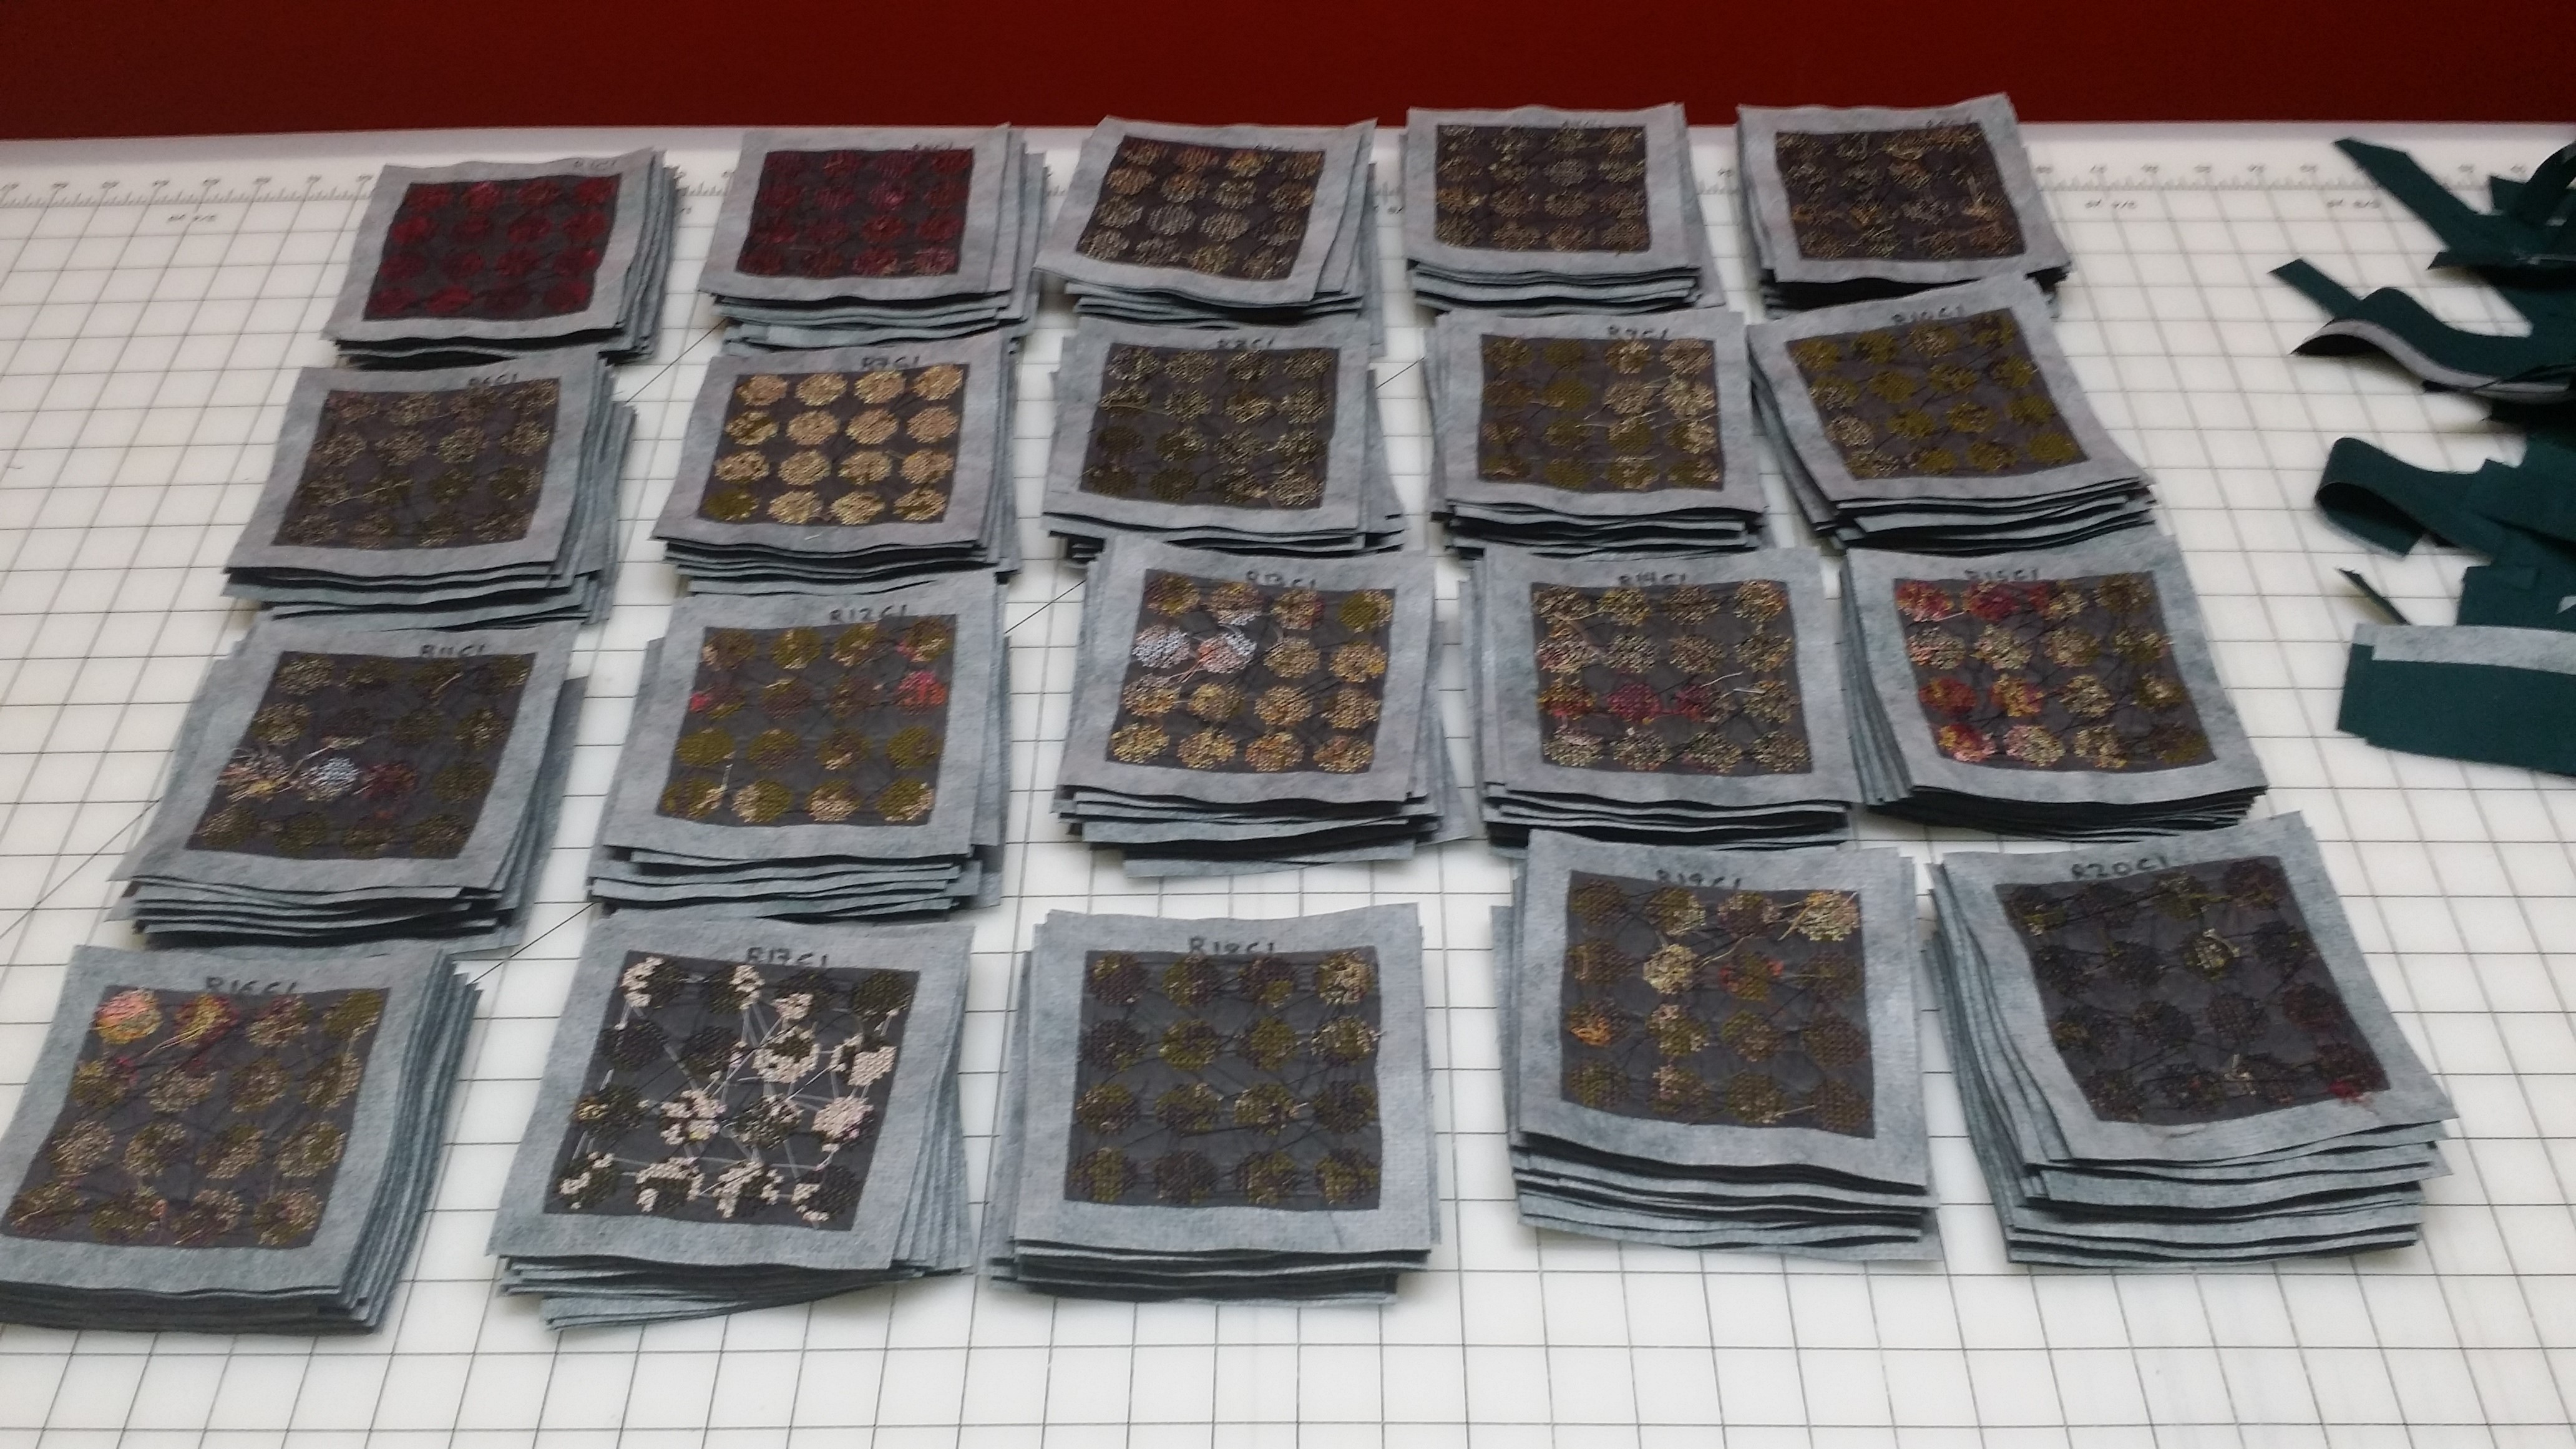
I ended up with stacks of blocks, one for each row of the quilt:

When the whole stack was completed, it was time to cut and square the blocks.
- I used my trusty rotary cutter an ruler, using the center of the embroidery as my reference point
- I cut 5 inch blocks for a 1/2 inch seam allowance on each side
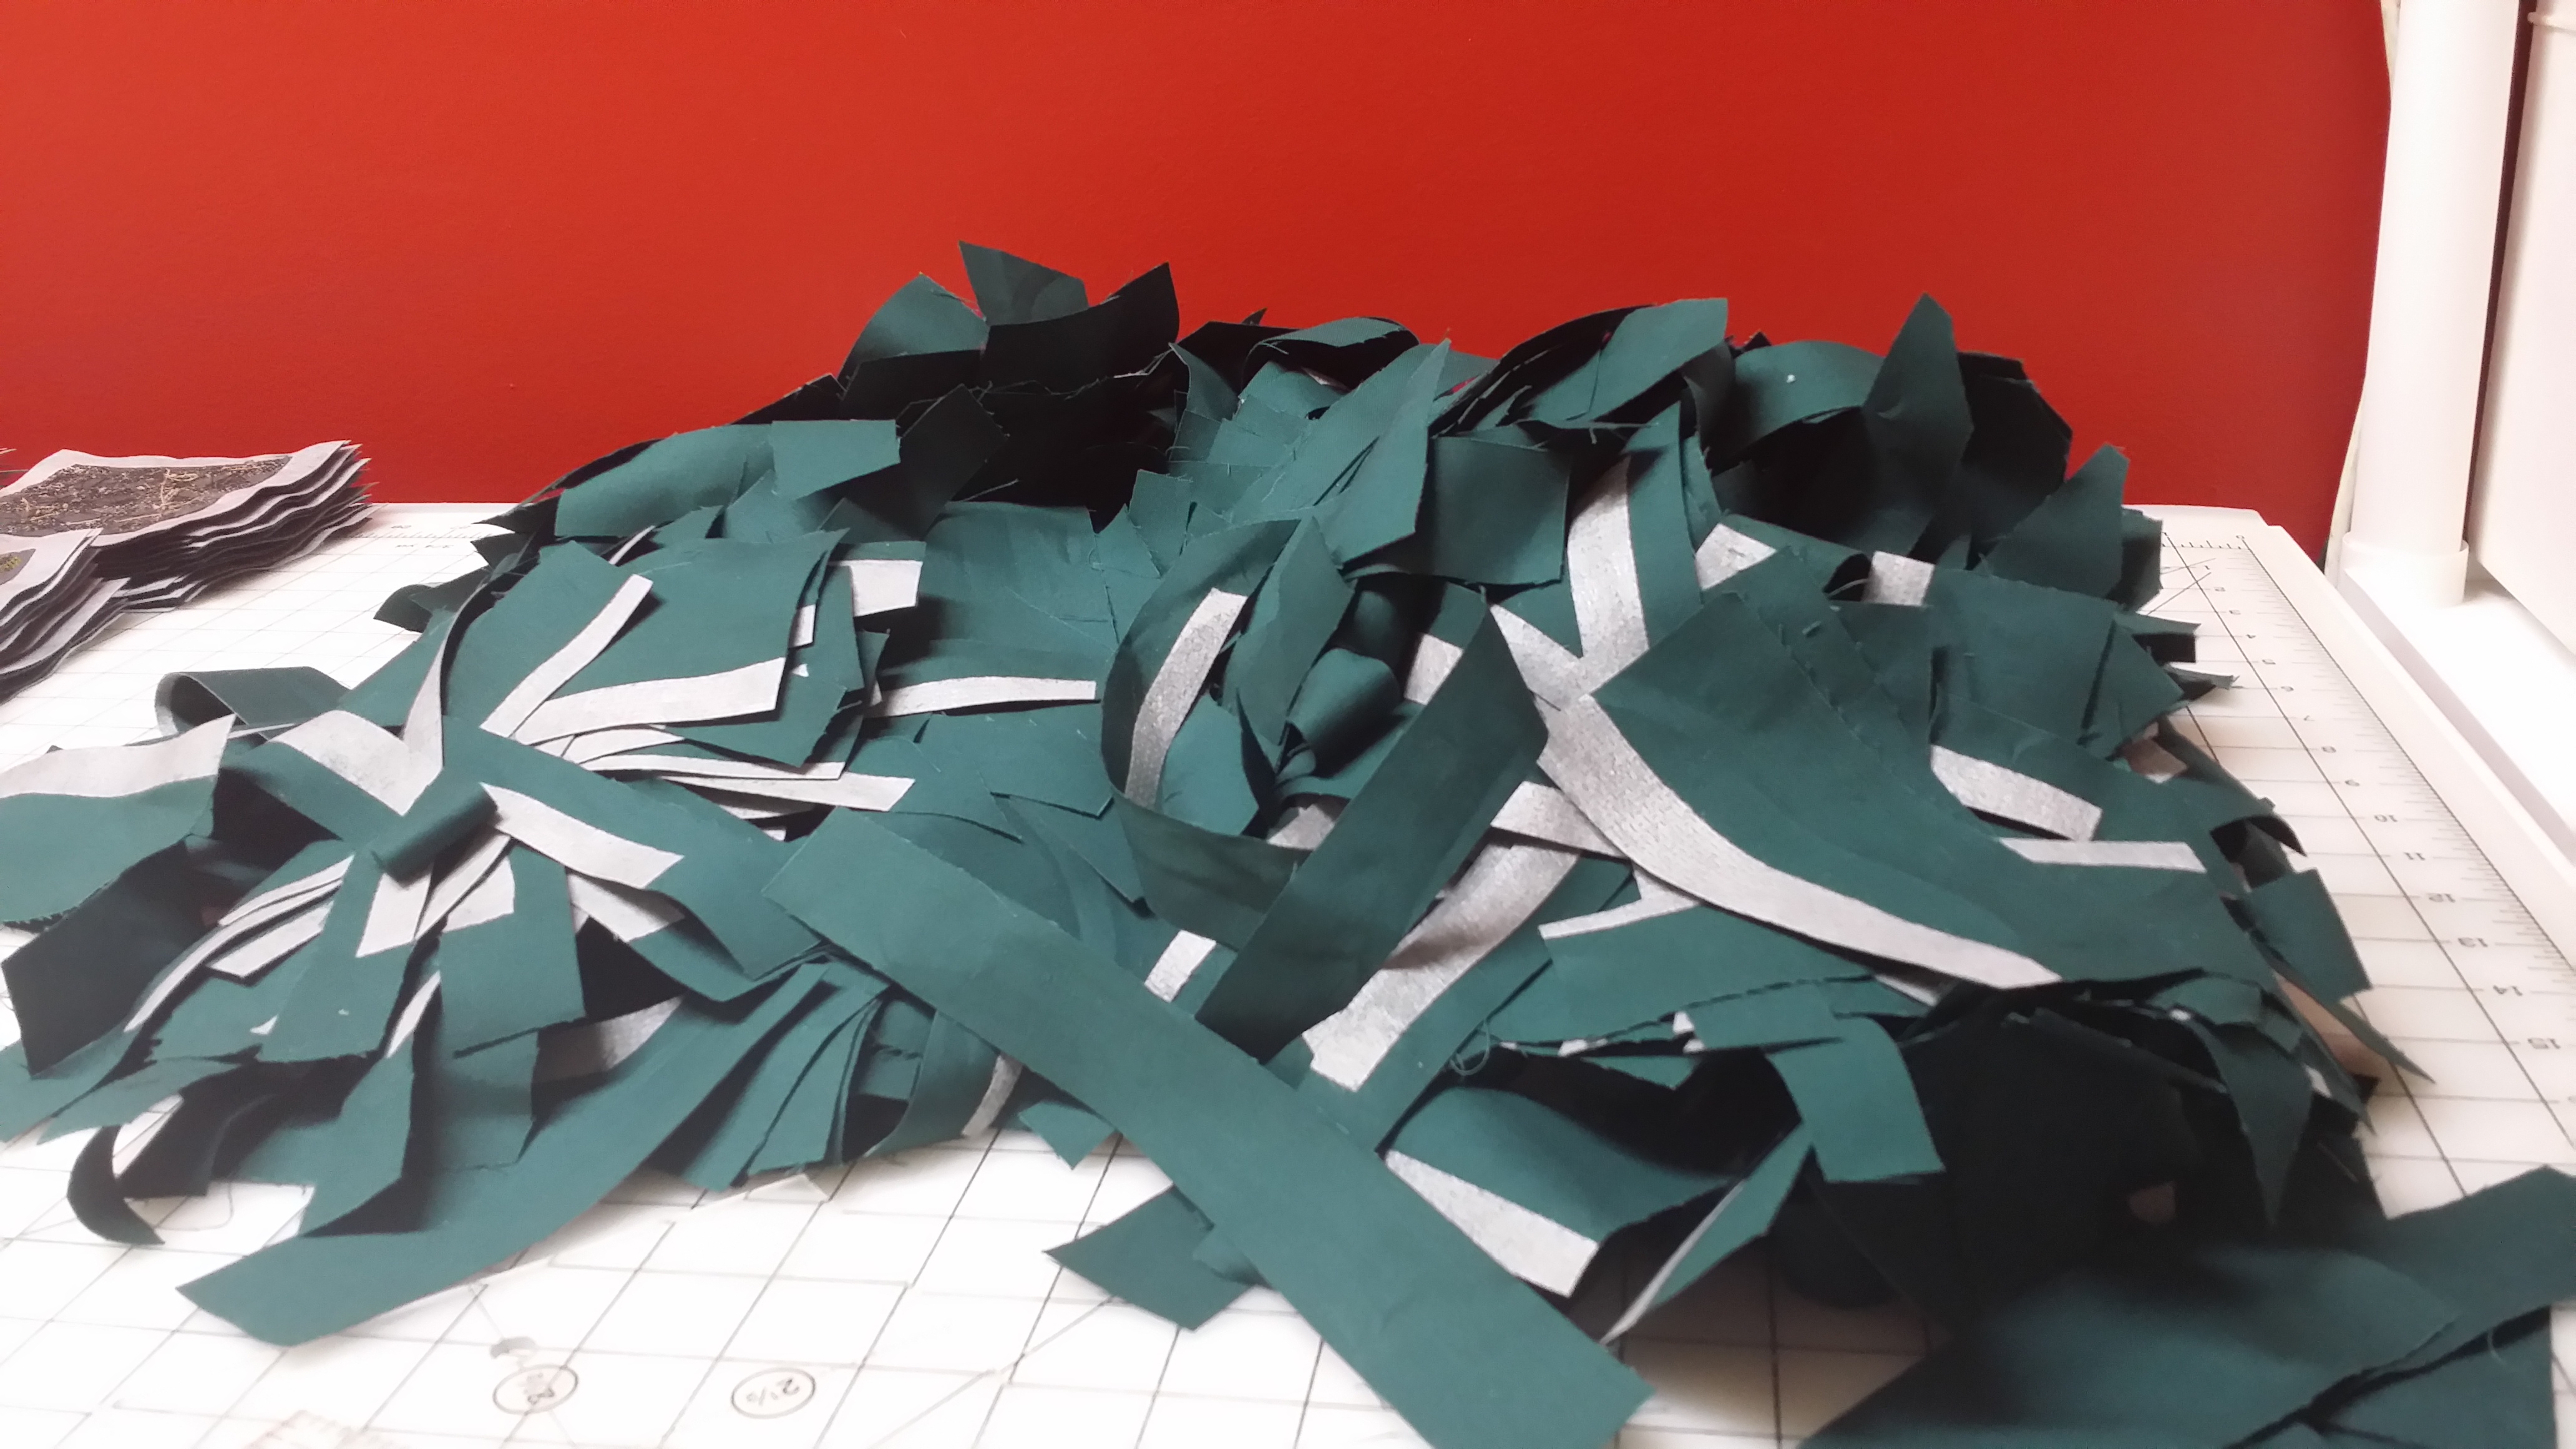
I now had a stack of ready-to-piece-together blocks.
And a whole lot of trimmings!
TIPs:
- when created ‘all-over embroidery’ blocks, there will be some residual pull on the fabric. To get an accurate finished size, always trim the block to size after the embroidery is done, never before.
- Using a 1/2 inch seam allowance makes it much easier to piece such a quilt, given the relative thickness of the pieces, with the fusible polymesh stabilizer extending through the seam allowances. The wider seam allowances becomes even more important as the weight of the quilt top accumulates along the piecing process
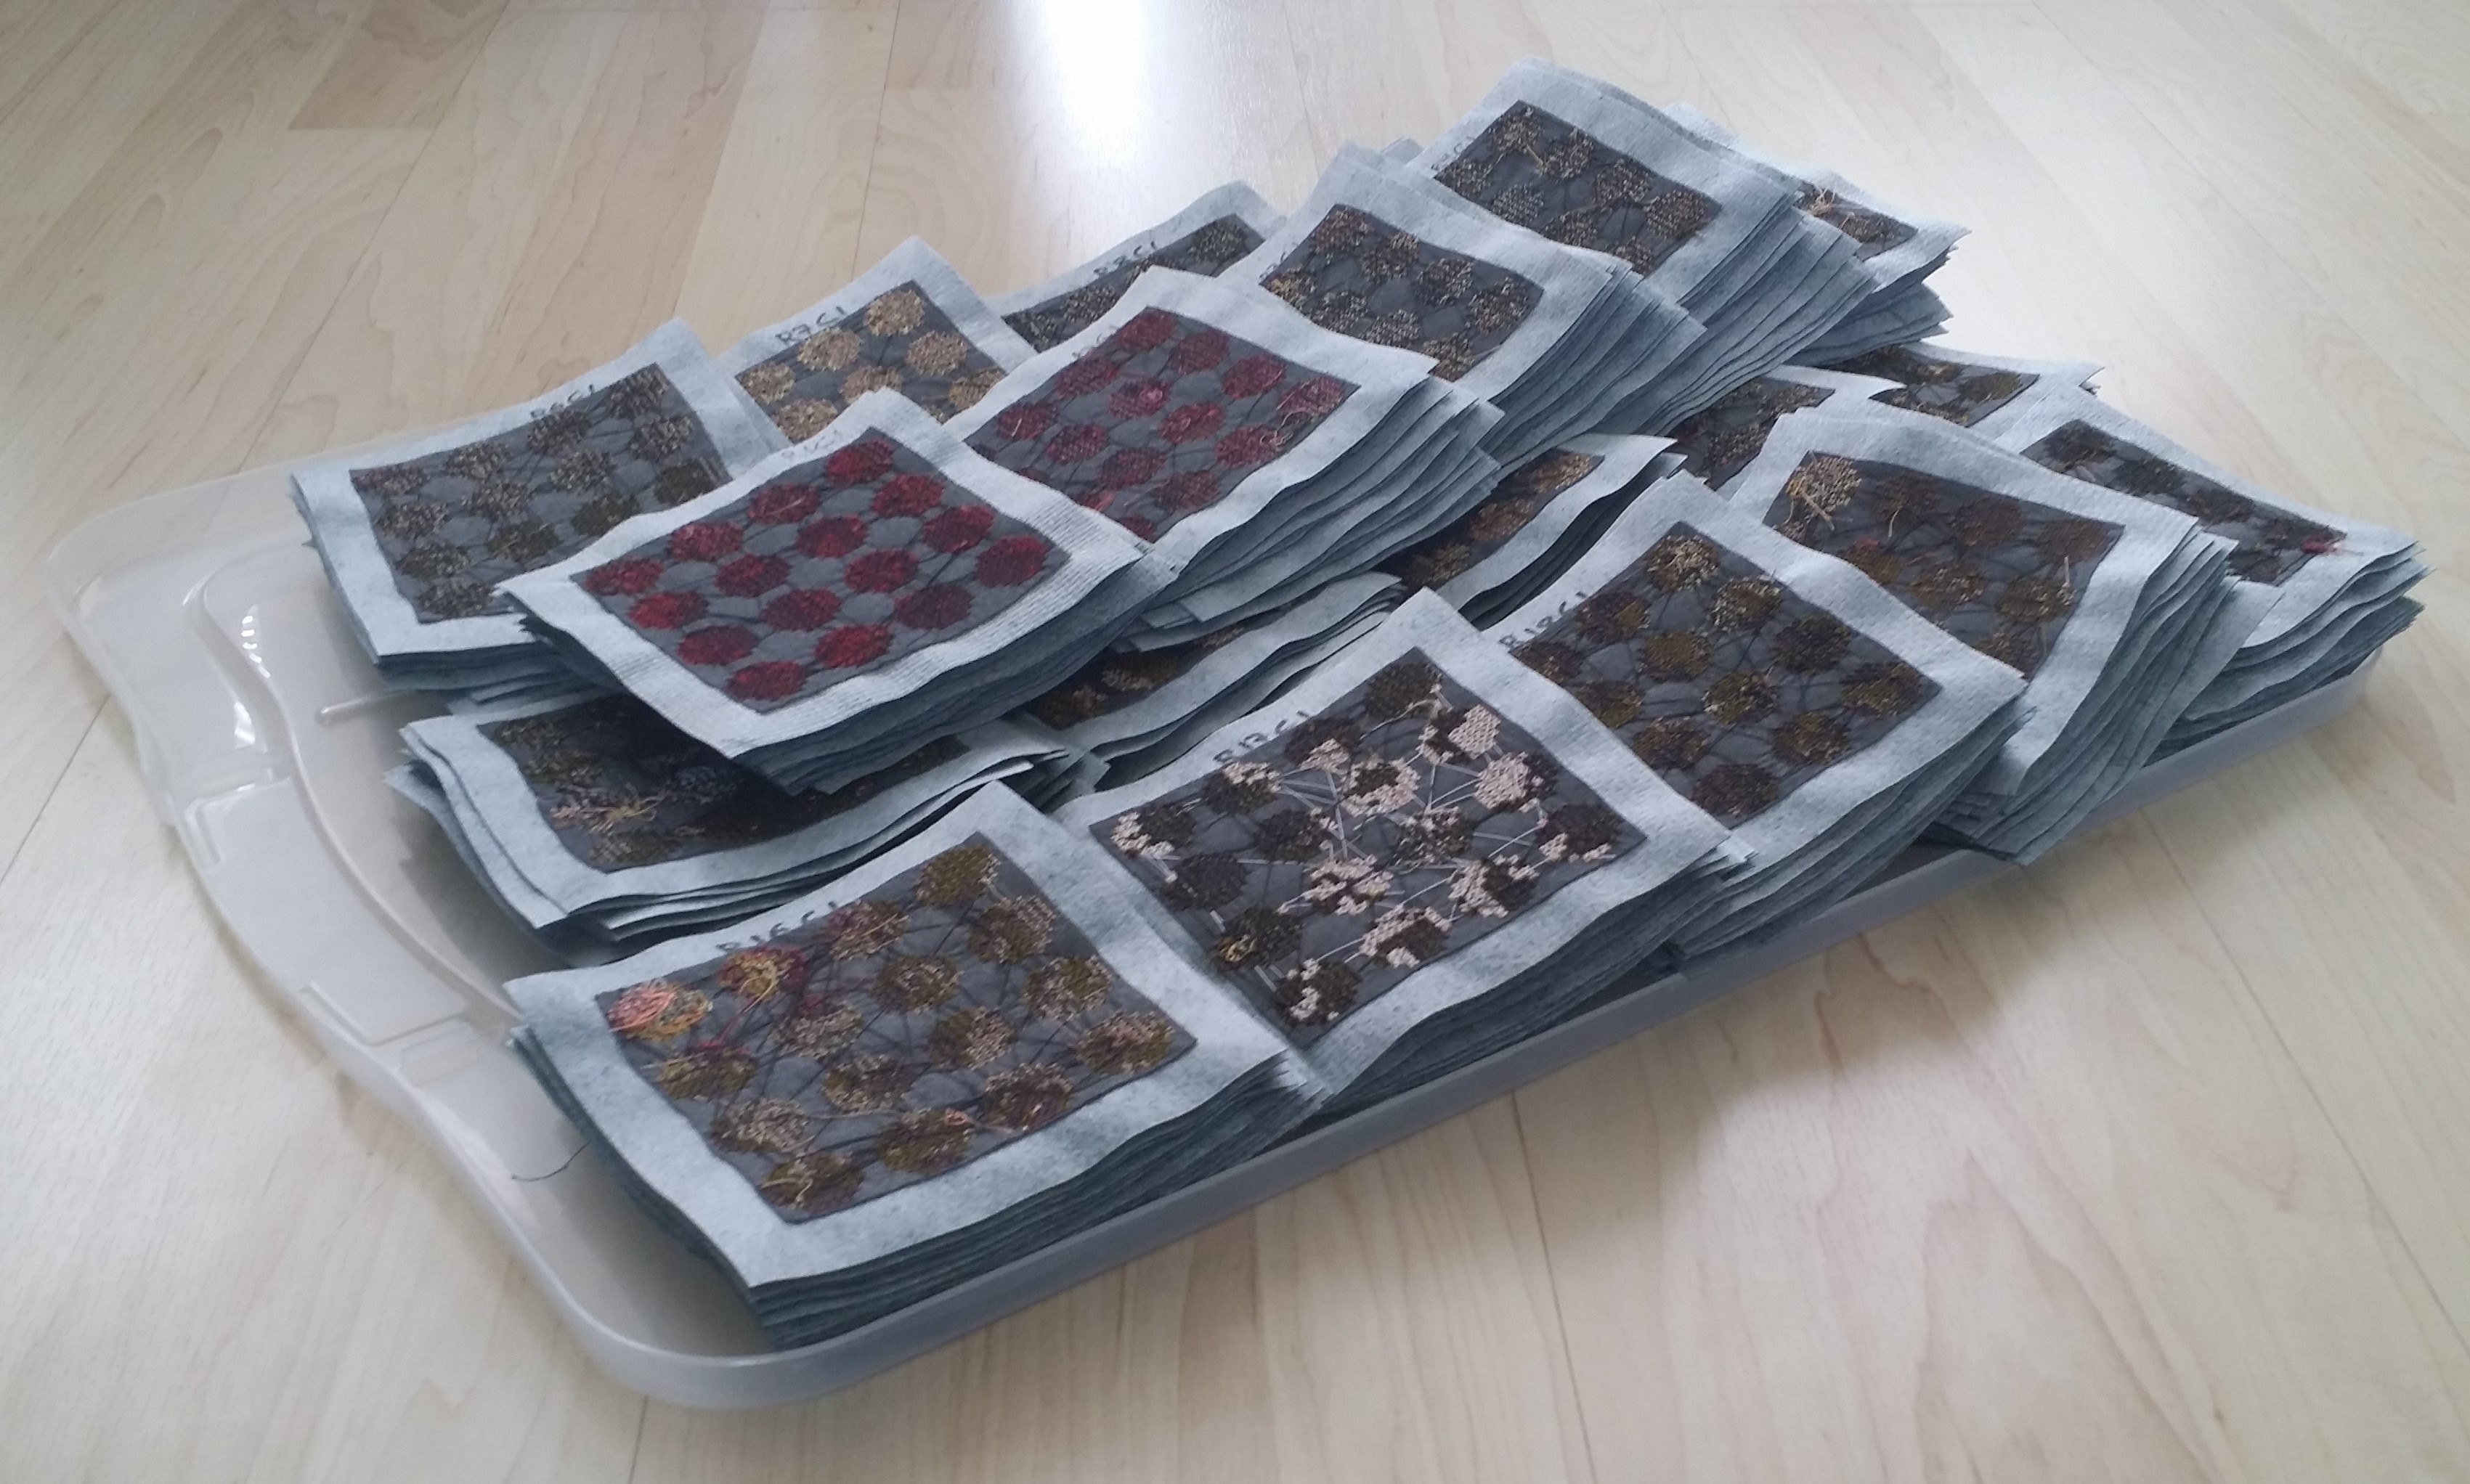
It was now pudding time. AKA the proofing stage!
I stacked the blocks on a tray (storage tote lid)
This is a ritual stage for me for every quilt. There a bit of trepidation every time… There was a bit of apprehension this time.
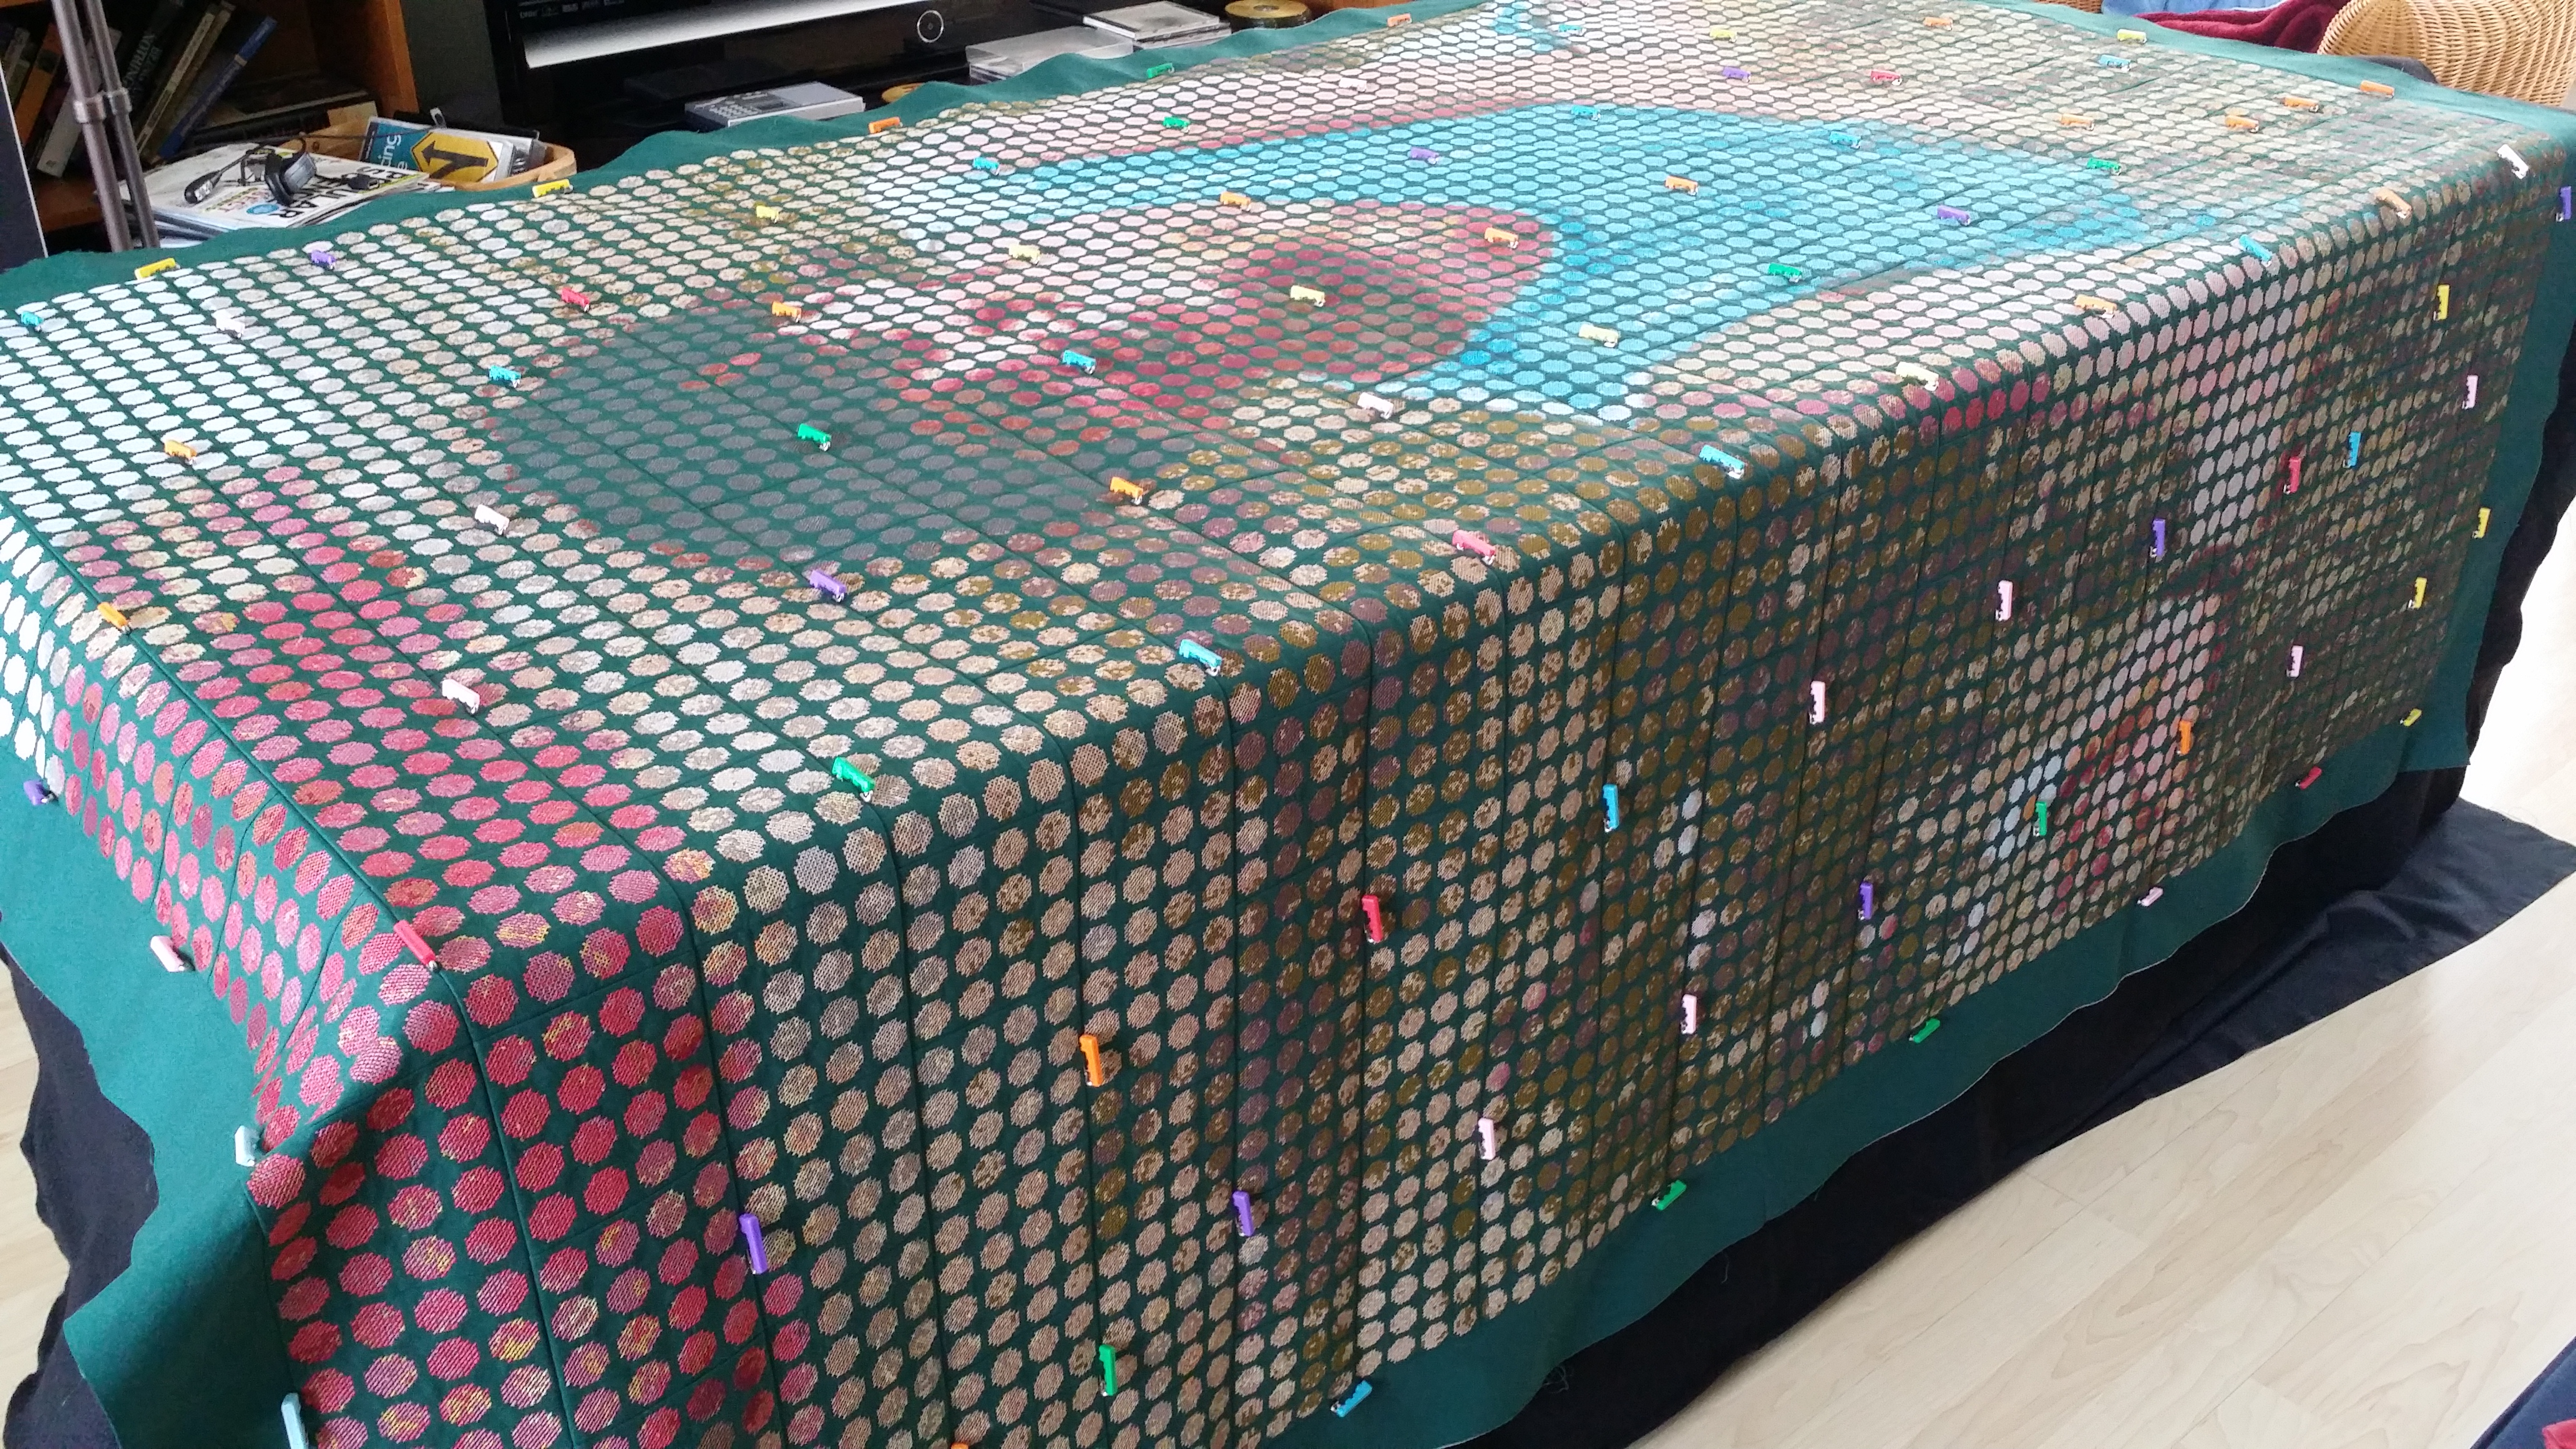
I laid down the blocks on my (emptied) family room floor, overlapping their seam allowances to minimize the gap between blocks:
Using my gardening kneeling pad, I set to work aligning the blocks row by row. This is the zen part of the process. I’m known generally for a fast pace. Not here. Here I took my time, meticulously placing all the blocks until the design was laid out.
As soon as all the pieces were laid out, I stood at the foot of the piece and looked at it, anxious to see how (and whether it worked). To my dismay, I didn’t see it! From up close, all I saw were cross stitch circle vaguely forming something of a picture but Chantal wasn’t there.
I then realized I was probably standing too close to the piece for the image to form. So I climbed on the couch with my cell phone, held the phone against the (8 foot) ceiling and took several shots while moving the phone a bit this way and that, hoping to get a shot that would cover the whole quilt.
When I looked at the phone screen I started breathing again. I could see Chantal again. She was there, all there, daisy, smile and all.
I’ve determined since that the image forms best at a distance of about 15 feet (~5 m).
Now that I knew I had the design down and ready to piece, I moved on to the next stage.
DEADLINES ARE THE DRIVERS OF DILIGENCE: PUTTING THE QUILT TOGETHER
The deadline to enter the quilt in the 13th Quilt Nihon Exhibition in Tokyo was in August. So come July guess who was busy in the sewing room ;-).
Piecing the quilt
- I pieced the quilt row by row. This is the easy part.
- Then I assembled the rows together.
- I used my B 830 and with foot #1D and Dual Feed so piecing was a breeze.
TIP: The fusible polymesh yields a bit of firmness to the individual blocks so it’s almost like piecing paper together.

Once the top was pieced together, I determined that I needed to reduce bulk in the seam allowances.
- They were difficult to press open… and keep open
- They would be too bulky if pressed to one side
So I trimmed one of the two allowances in a seam segment to about 1/8 inch (with duck billed scissors, to protect the block). This allowed me to press the remaining (intact) seam allowance to the opposite side, eliminating the bulk.
I was now ready to press the quilt top and layer the quilt for pinning. Back to the Family room where the dining room table was commandeered.
- I used black (solid) fabric for the backing
- I used a low loft black batting for the middle layer, eliminating the risk of batting peekaboo’s on the back
Finally, it was ‘quilting’ quilting time.
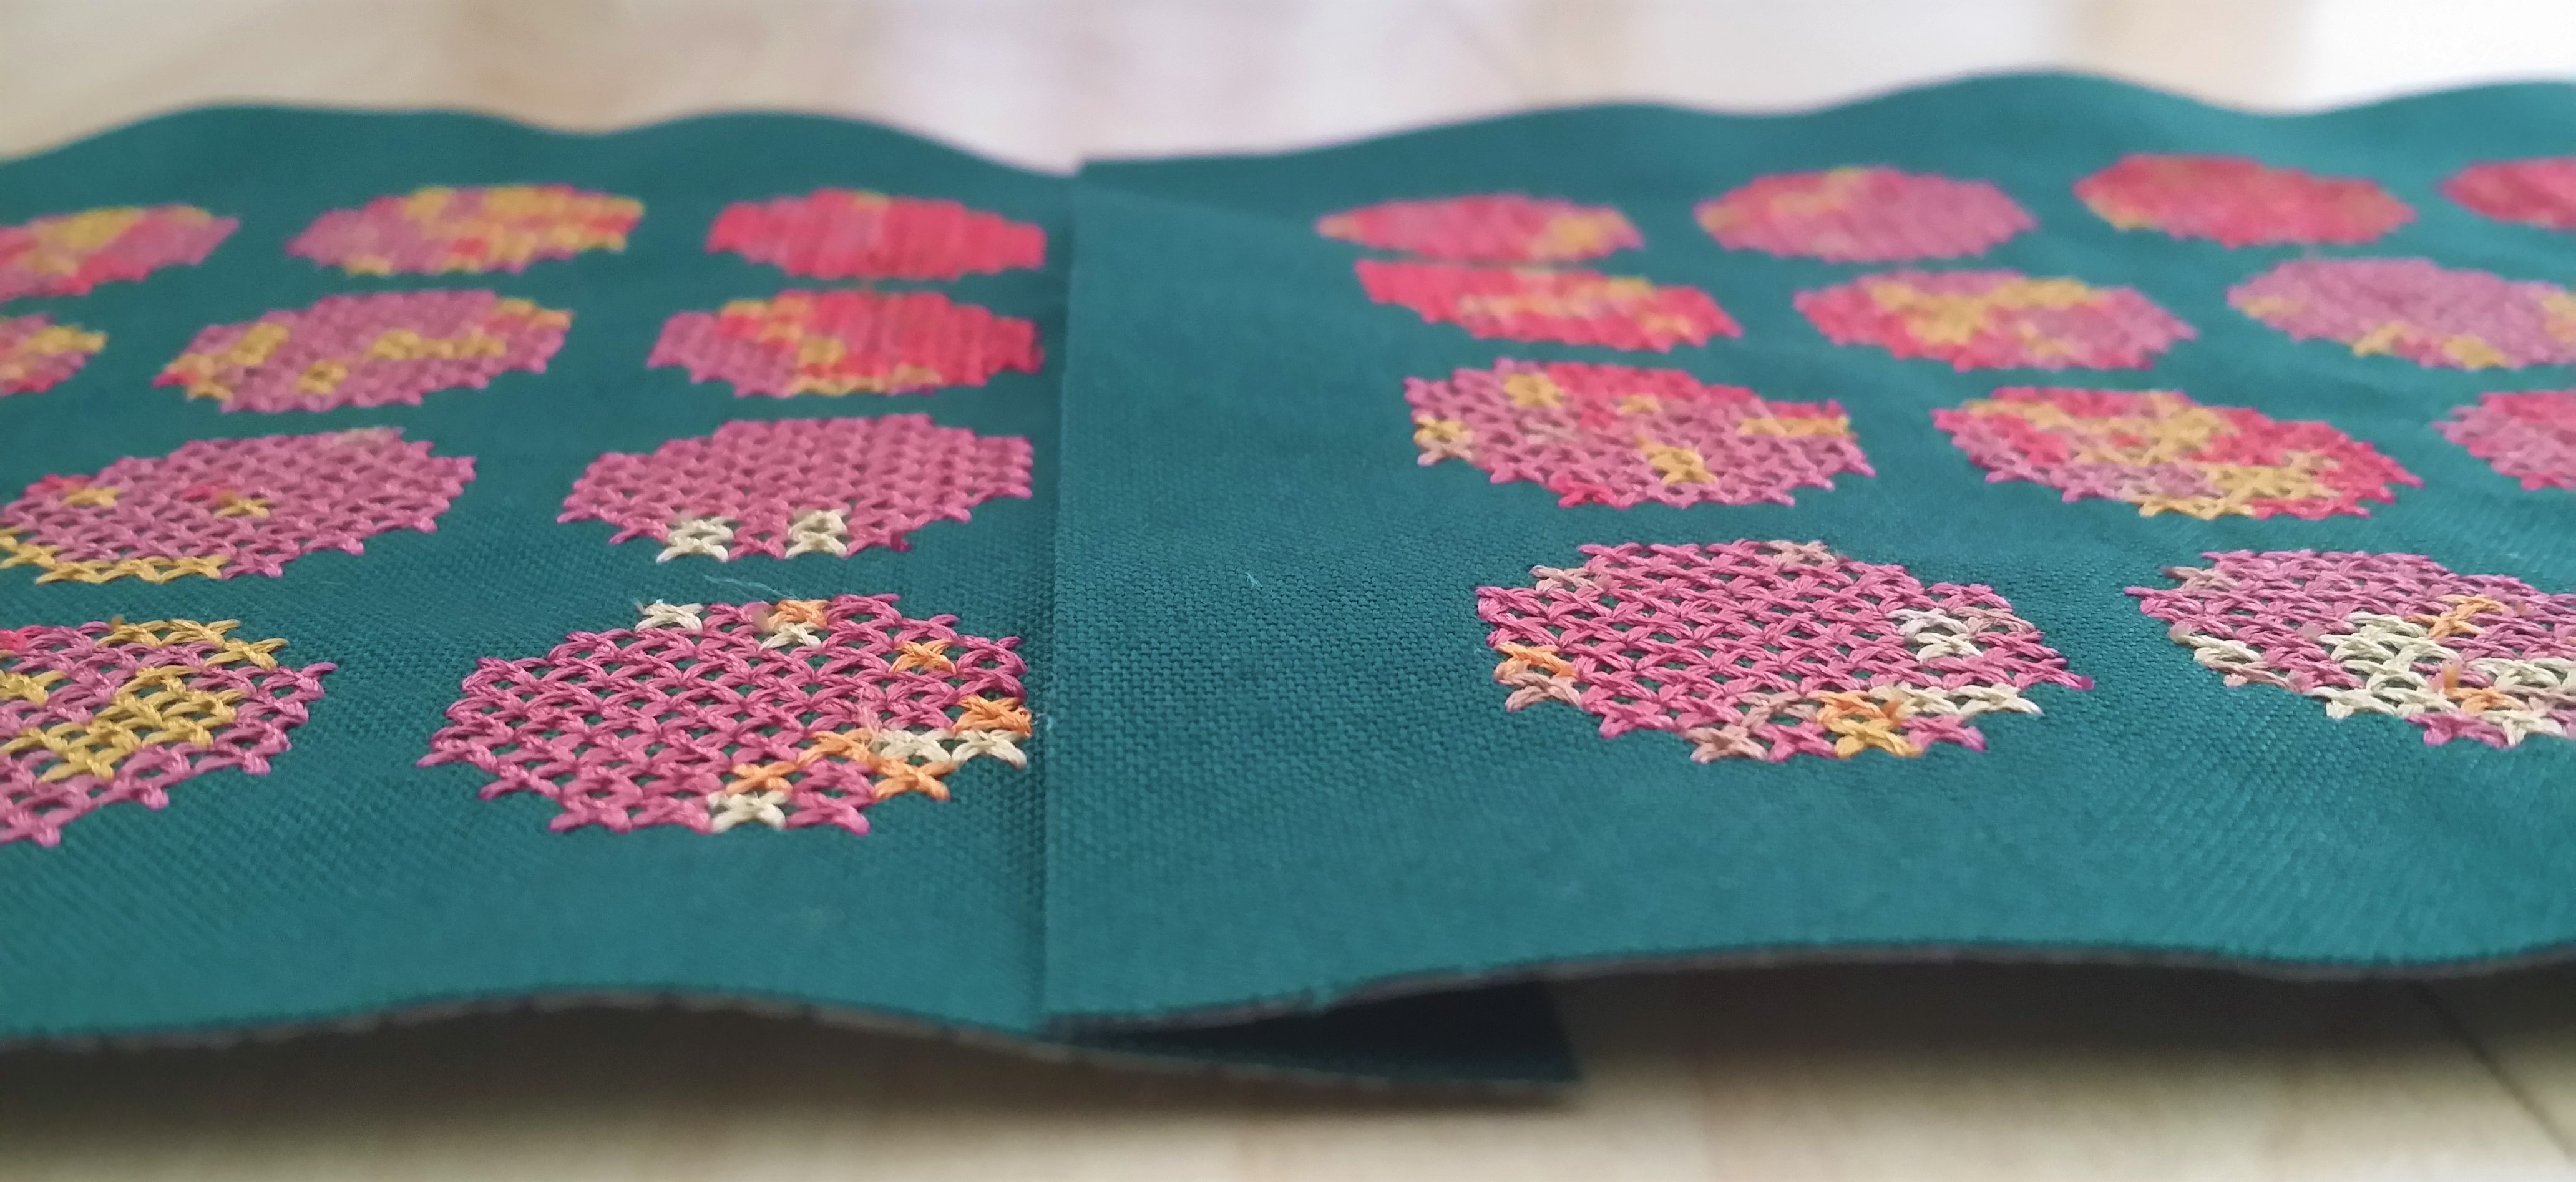
Quilting the quilt
For this quilt, the quilt stitch had to blend with the base fabric, letting the embroidery be the whole design. The quilt stitch would serve a textural role, forming a grid around the cross stitch circles, making them stand out like a raised dot matrix.
Alas, the time had come for my beloved B 830 to go in for service. It had been a while a several million stitches. So I put my artista 200 to best use. It was good getting reacquainted with my trusted machine.
I set up my artista 200 in one sewing cabinet, with a second cabinet extending it so I would have enough depth to sew the quilt together without having it hanging out the back. This kind of quilt is heavy to start with, it doesn’t need an assist from extra gravity.
I rolled up the quilt from both ends to facilitate handling at the machine.
- I used Mettler Metrosene plus thread in dark green (matching the base fabric
- I used a straight stitch, length 2.5 mm
- I quilted over the block seam ditches first: this nailed down the whole quilt and allowed me to remove all the pins, eliminating obstacles to the rest of the seams
- I then quilted the horizontal lines, every inch in between

And then… Yikes! I ran out of the quilting thread!
So I went online and searched for the thread by color number so I could order more… and couldn’t find that color number anywhere.
It turns out that in the time between when I first bought the thread to start on the quilt and the time of using it Metter had revamped their entire thread numbering system and had retired that number. I was now sweating it!
Lucky for me, the next day at work a colleague searched and found the new number for the same color, with a new color name: Swamp. Indeed, I was now out of the swamp (or back in it, depending on the angle 😉
I was able to finish quilting the quilt.
For design continuity, I stitched the same grid lines onto the border, after the main design area was all quilted. This allowed me to square the border one last time before quilting it.
BINDING THE QUILT
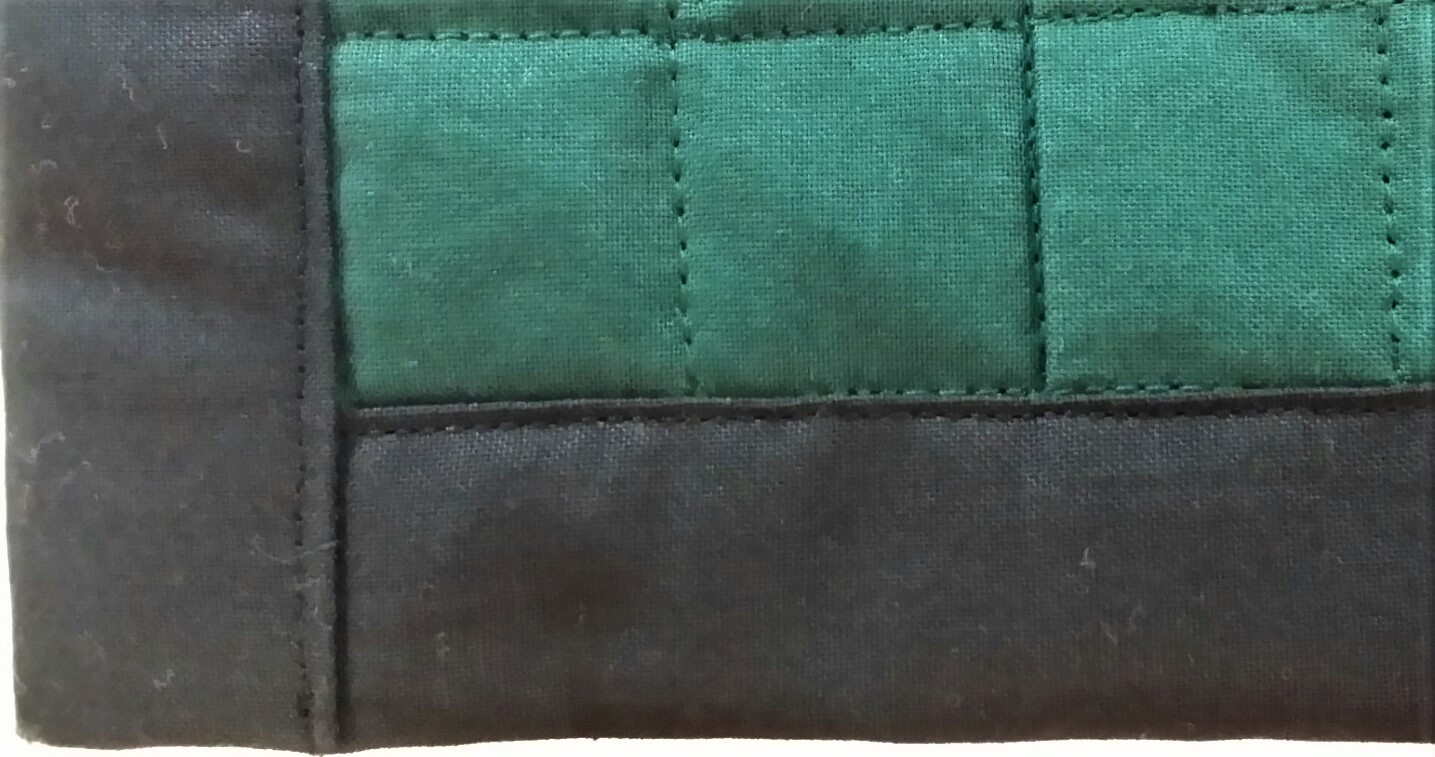
This is one of my favorite parts. It’s all done on near the edge so handling the bulk (about 17 lbs / 8 kg) is easier. It also means I’m on the home stretch. Since the quilt is a photo, I went for a poster like binding: a narrow black edge all around. A self-binding using the backing fabric in a horizontal border style.
Personally, I don’t see the need for a bed quilt style binding on a wall piece as it adds a bit of bulk at the edges. A self-binding remains completely flat and flush with the rest of the quilt. It’s also great for table runners, so the edges stay flush with the surface of the table.
To obtain a 1-inch wide self-binding:
Once the quilt was ‘quilted’ through, even on the border:
- I trimmed the batting flush with the quilt top
- I trimmed the backing fabric so it exceeded the quilt top on all sides by 2 1/8 inches
- This way I could turn in 1 inch of the binding allowance
- While leaving a 1/8 inch gap near the edge of the top:
- this is the ‘roll over’ allowance. It allows the binding to rest flat once double turned, without waving.
- When I folded the binding allowance over a second time I pinned and clipped (barrette clips) the binding in place, after trimming the excess bulk in the corners
TIP: I no longer pin or use barrette clips on my binding: I use Wonder Clips by Clover. They work so much better!
- Easier to clip on
- Easier to remove
- They don’t disturb the edge in any way (unlike pins and barrette clips that cause ridges and valleys where applied)
- I used the walking foot with the open toe sole (for visibility) to stitch down the binding.
- I aligned the folded edge to be stitched against the inner edge of the left toe.
- I moved the needle position to the desired distance from the edge to be stitched (2 needle positions).
- I used a slightly shorter stitch (2 mm) to secure the edge of the piece (and binding) for structural purposes.
TIP: I always stitch the binding down ‘around the square’, in a single pass. This lets me secure the entire binding in a single operation. I then go back and stitch down the ‘winglets’ (small overhangs in the corners) separately.
MAKING THE QUILT LABEL
My quilt labels are a distillation of the design on the front of the quilt. For this piece it was obvious to me that the original photo had to be printed on the label. Here’s how I composed the label:
I used the BERNINA Embroidery Software Designer Plus (then v6) in both canvases: Artwork and Embroidery.
The plan was to print the 5×7 photo on a sheet of printable fabric, to one side, covering roughly half the sheet. Then I would frame the picture with stitches and add the text and motif to the other half of the sheet.
In Artwork Canvas
- I imported the picture and sized it to fit on the half sheet, leaving enough margin to turn under when the label was done
TIP: since Artwork Canvas consists of a version of Corel Draw, it let me print the photo on the printable fabric sheet, exactly in the position I selected.
- I printed the photo on the fabric

Still in Artwork Canvas:
- I traced the contour of the image with a thin line and selected the line
- I used the Convert feature (button) to convert the line to embroidery stitches
In Embroidery Canvas:
- The contour line I just created would now serve as a placement line,
- to be stitched right on the hooped embroidery stabilizer
- on which the printed fabric sheet would be aligned so that the edges of the photo match up to the placement line
- I duplicated the placement twice:
- 1) to make a stitch down line to secure the printed fabric sheet to the stabilizer
- I used a separate color so the machine would stop after stitching the placement line
- 2) to make a satin stitch frame for the photo
- I used the Textured Edge feature to make the line more like on the inside
- 1) to make a stitch down line to secure the printed fabric sheet to the stabilizer
- I created the text for the label in 2 sections
- CHANTAL: Impressions d’une Âme Sœur
- Sylvain Bergeron Summer 2015
Note: I always include the season and year when the quilt was finished. It hearkens back to my gardening and agronomy days 😉
- I borrowed 3 cross-stitch ‘dots’ from the front of the quilt and made them monochrome
- I placed them between the two sections of text
Stitching out the label:
The process of stitching out the label was as follows:
- I stitched down the placement line on a tear-away stabilizer sprayed with 505 Temporary Adhesive
- After the machine stopped: I placed the printed fabric sheet on the stabilizer, using pins to align all 4 corners of the printed photo to the corners of the placement lines
- I ran the ‘stitch down’ line that secured the fabric sheet to the stabilizer along the contour of the photo.
Now that the fabric sheet was secured in place around the printed image, I needed to baste down the entire sheet (which fit in my Jumbo hoop btw).
- I backtracked and activated the Basting around the Design function on my B 830
- Stitched the basting line
- Skipped forward through the design until I reached the satin stitch frame
- Stitched the textured satin stitch frame around the photo
- Continued with the rest of the design until completion
The result was the following:

All I had to do now was to turn under the edges of the fabric sheet and hand stitch the label to the quilt.
I also attached the hanging sleeve to the quilt (also with hand stitching)
And it was done!
I always hang the new piece in my family room to get a good look at the finished work. This time, the quilt stayed up a few days rather than a few hours.
CHANTAL GOES TO JAPAN
Actually, I took the quilt on a family tour first, as I finished it right before going on vacation to visit my family in Québec. The heart of the trip was visiting with my friends Marcelle and Gérard (Chantal’s folks). It was a very special family moment when we huddled together to see the quilt.
Back to Japan…
Since I had already participated in the 9th Quilt Nihon Exhibition in 2008 in Tokyo (I was awarded the Gold Prize) I used the 13th Quilt Nihon Exhibition as my ‘deadline driver’ impetus to make and finish the quilt.
The process of preparing and packing the quilt for shipping turned into a special evening.
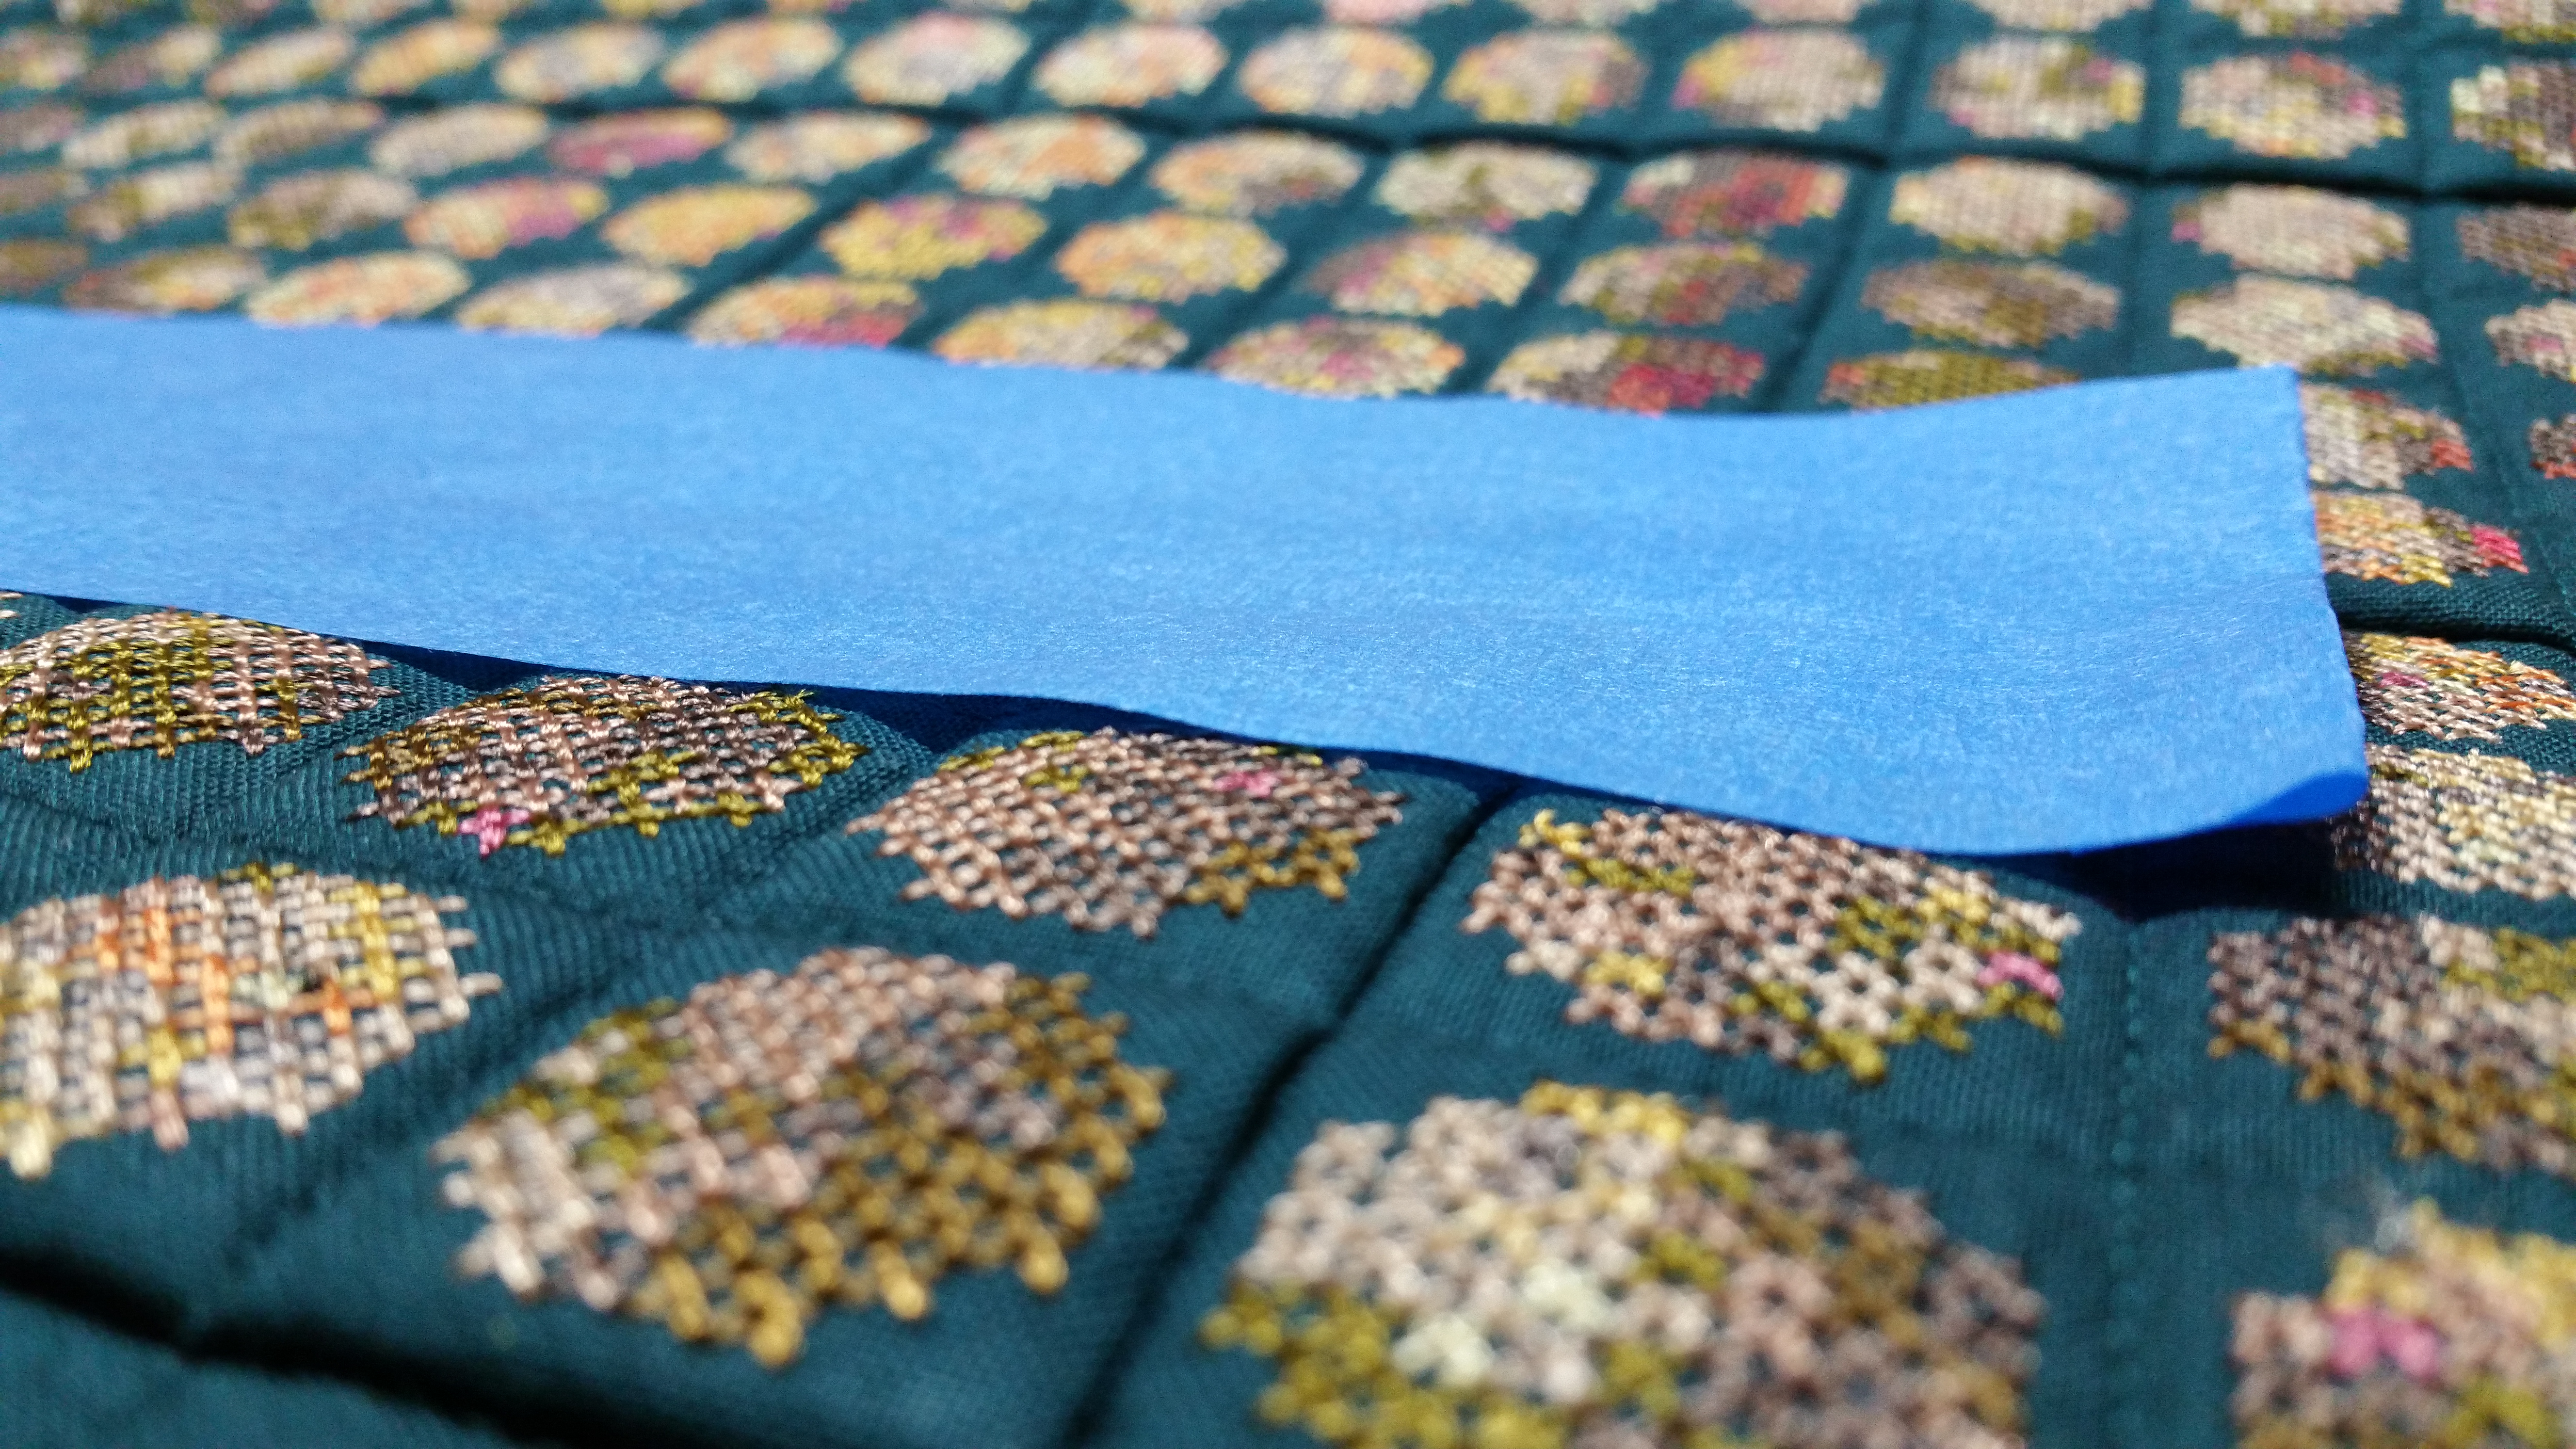
First, there was the de-fuzzing of the piece, using painter’s tape (4 inch wide, long strips tucked in at the ends):
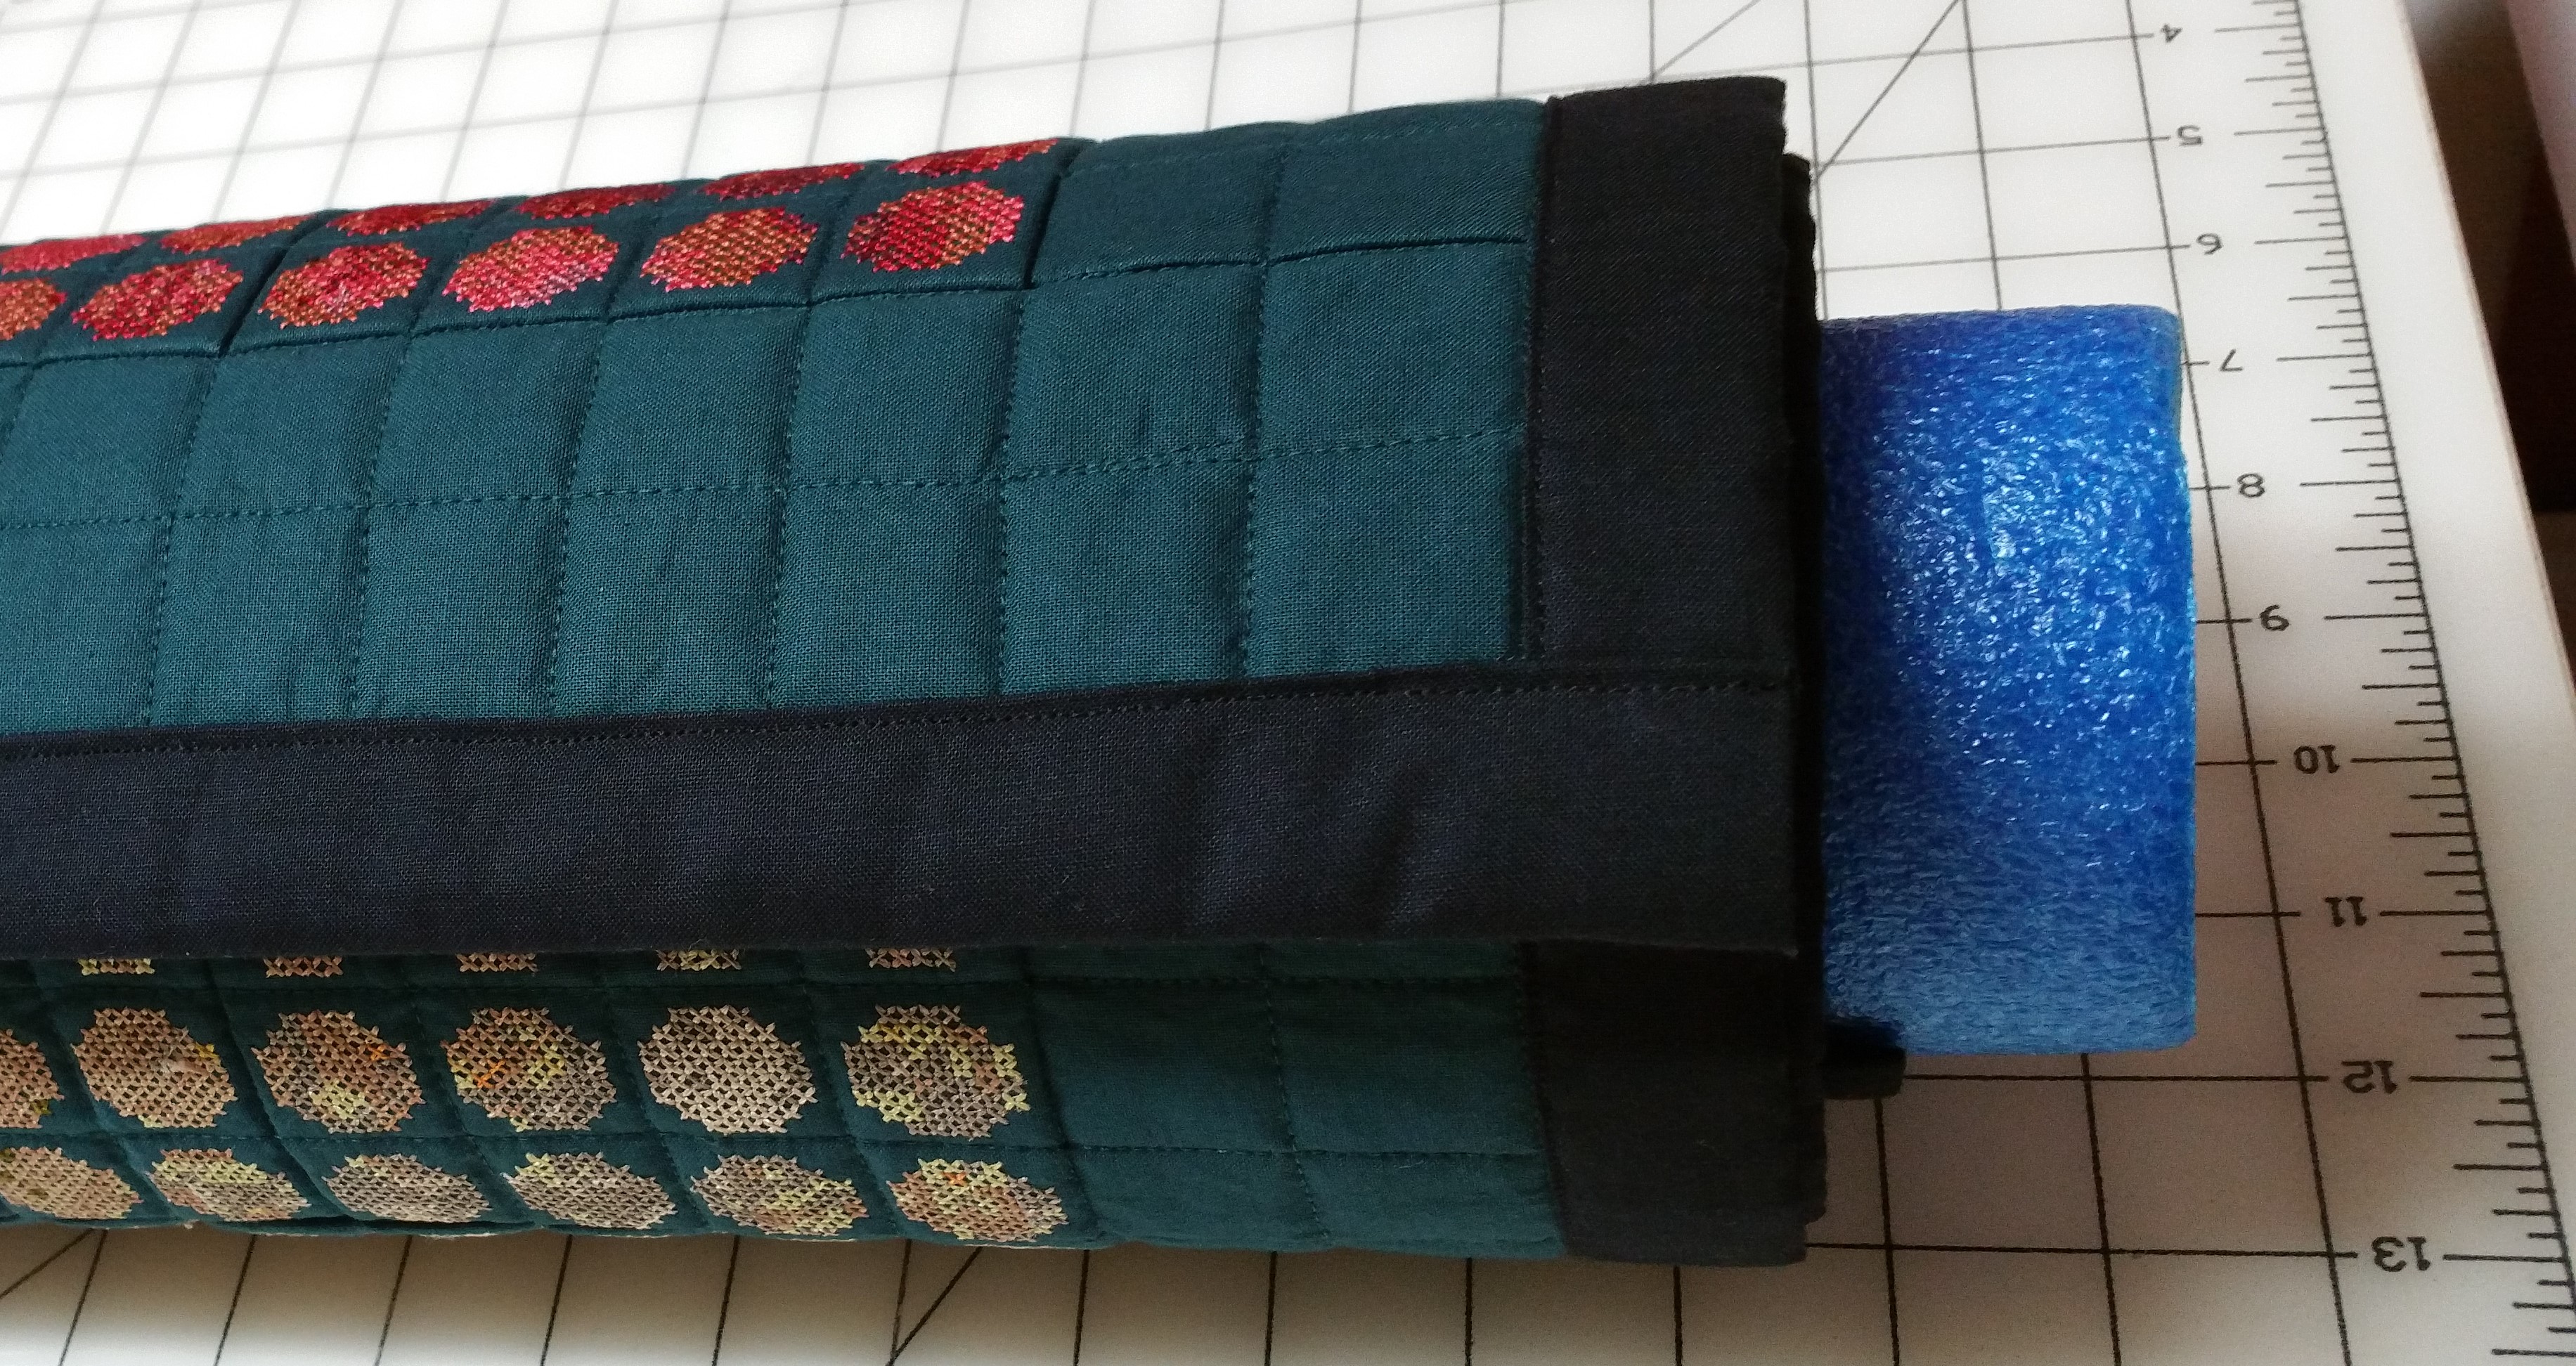
Then, rolling the piece on a pool noodle:
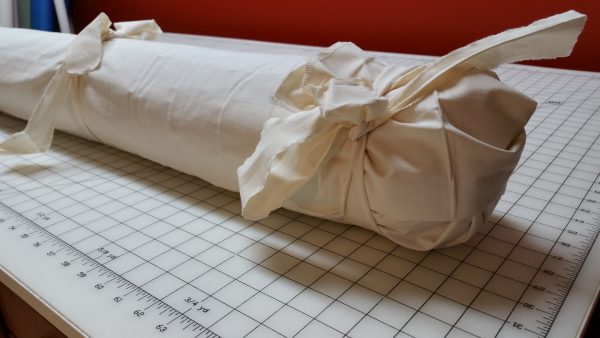
TIP: always roll the quilt with the top (motif) side toward the outside: we all know from driving that the inside of a curve is shorter than the outside curve. When rolling up a quilt, the three quilt layers are fixed and cannot slide against each other so the difference in dimensions between the inside and outside of a turn on a roll can only be accommodated by the inner layer gathering up a bit. By rolling the quilt with the backing to the inside of the roll and the quilt top toward the outside, we can ensure that the front of the quilt remains smooth. See the next image for an illustration.
Next, it was time to wrap the quilt to protect it before boxing it.
I made a muslin shroud and wrapped it around the roll. With torn muslin strips I gently tied the roll to hold the shroud in place.
This is when I remained frozen for a minute or two.
I was preparing Chantal (as I’d come to refer to the quilt) to travel to Japan and the wrapping reminded me of a Shinto burial. Having missed Chantal’s funeral in 2000 this was now my chance to give her the personal send-off I wasn’t able to originally. It was a quiet, reflective and peaceful moment.
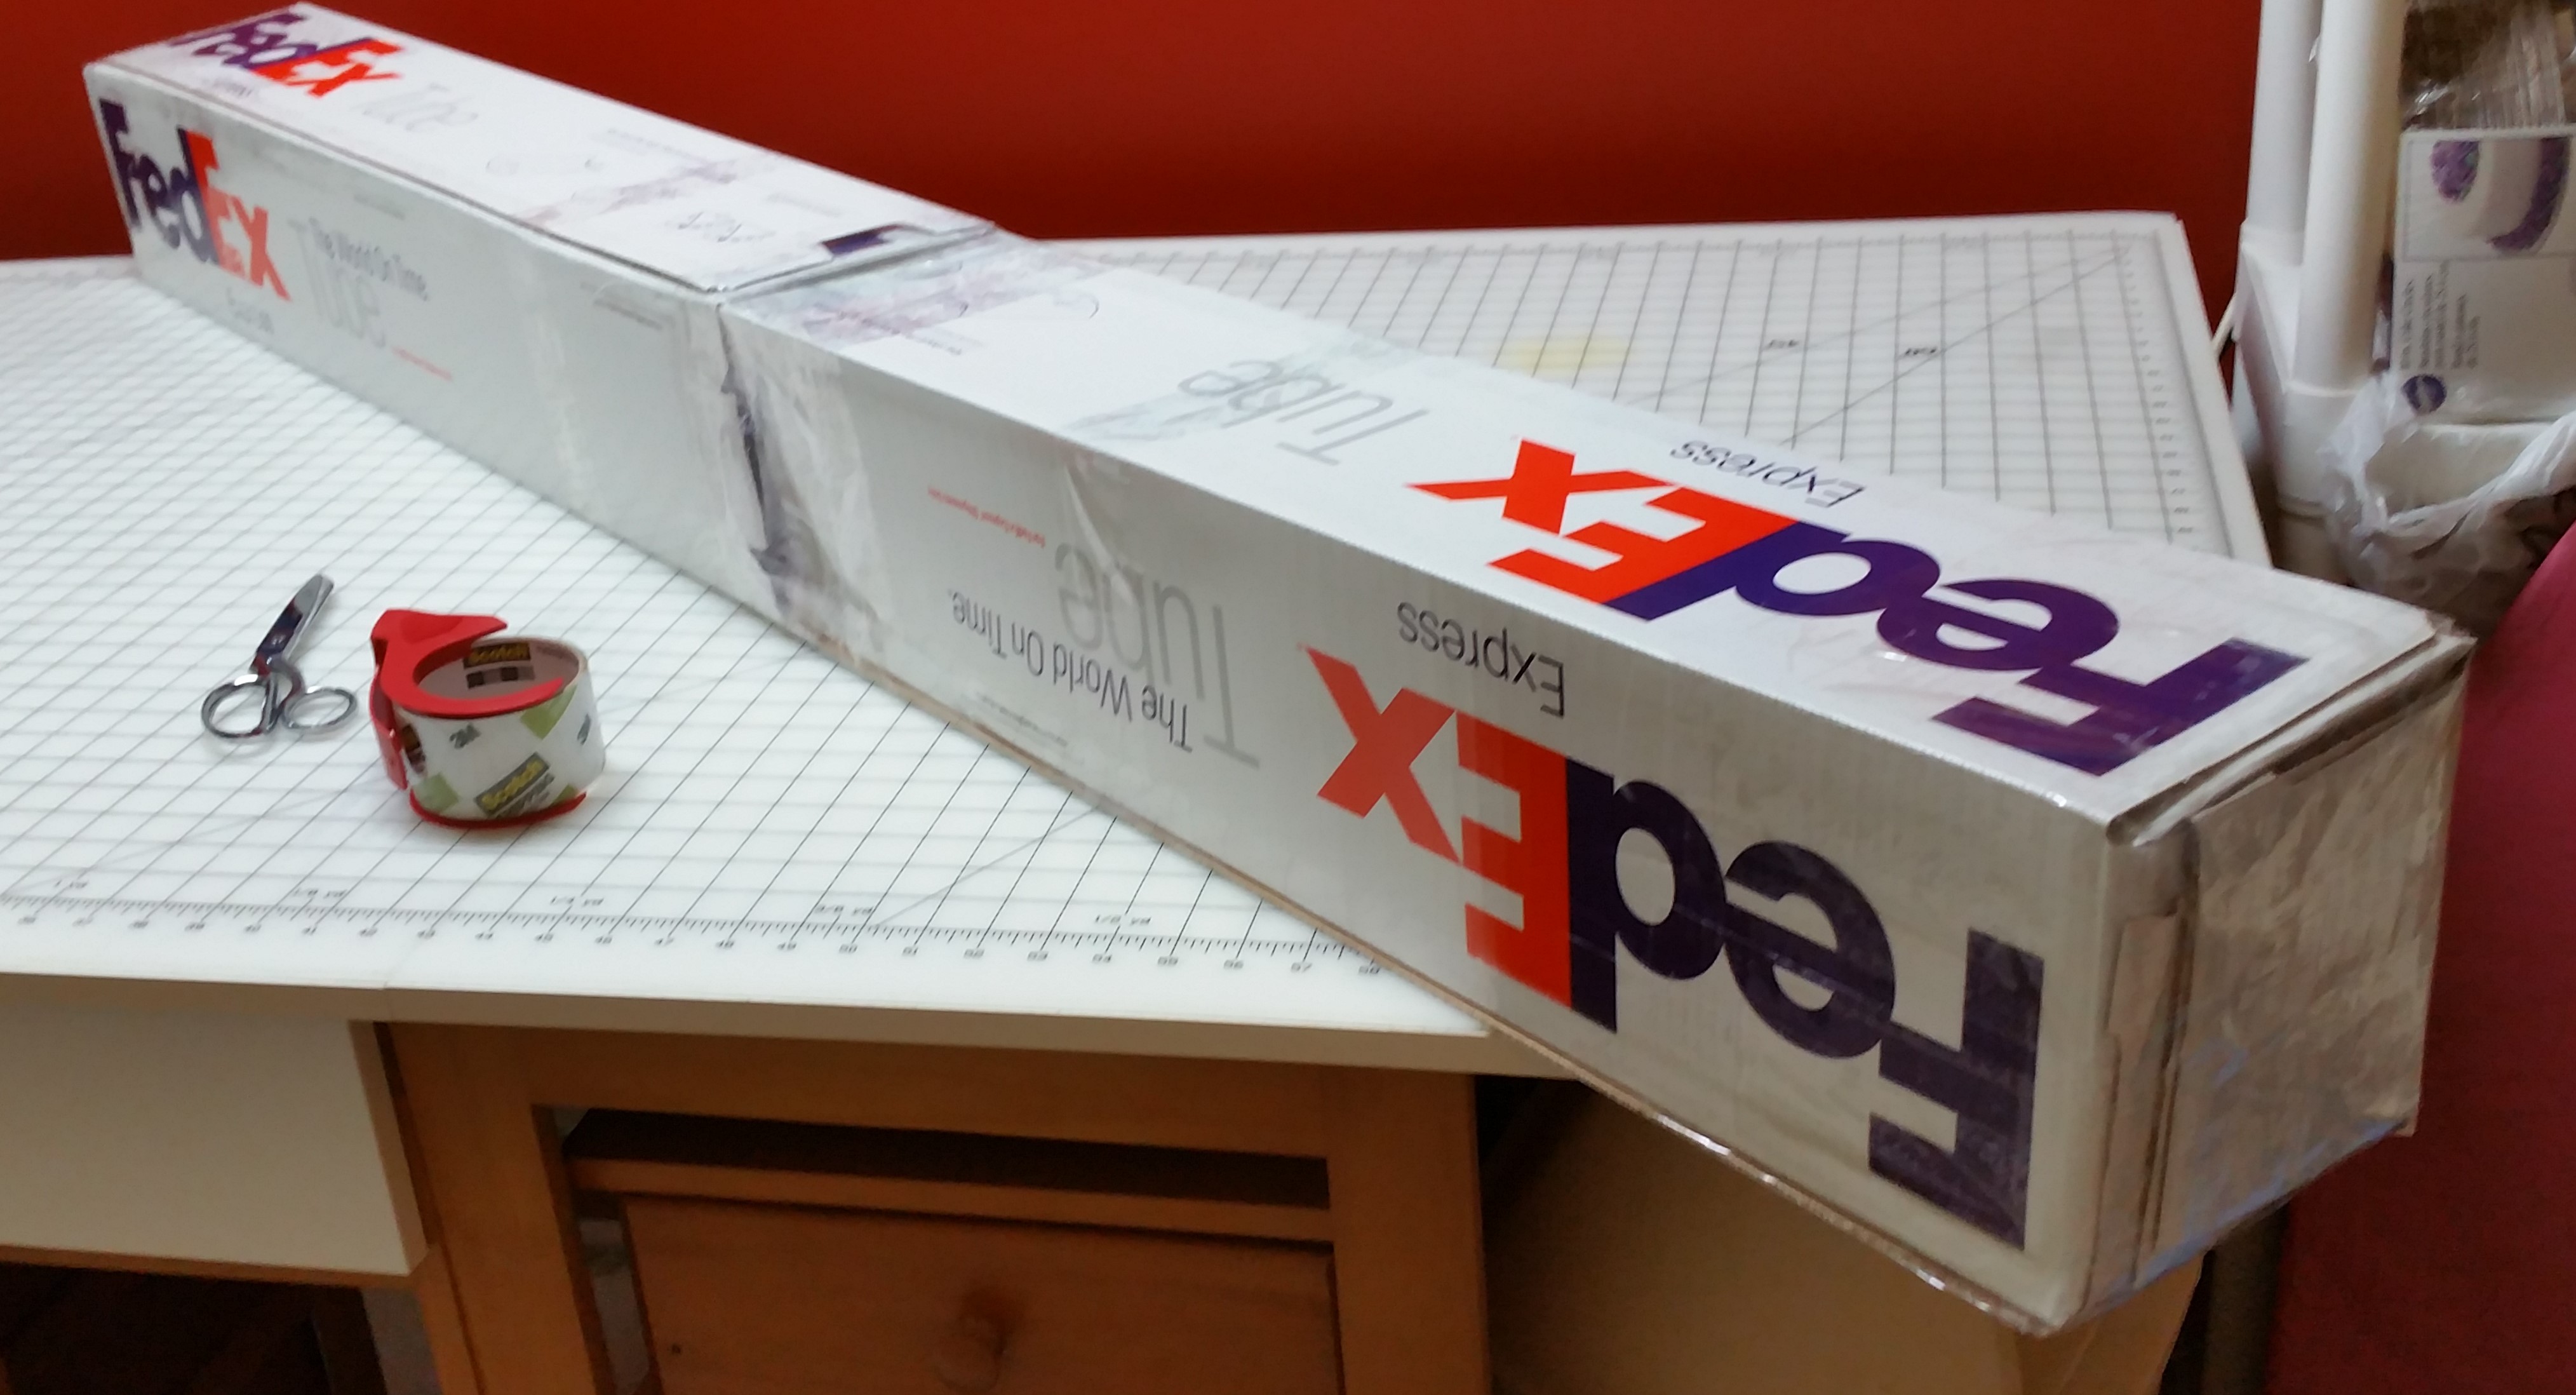
Finally, I had to kludge FedEx boxes together to fit the roll for shipping:
Chantal went to Tokyo and was awarded the Bronze prize at the 13th Quilt Nihon Exhibition. She toured Japan for a year before coming back to me.
THE FAMILY TOUR WAS EXTENDED. TWICE.
Chantal’s two children didn’t get to know their mother since she passed away when they were so young. On two separate trips to Québec I brought back the quilt so that they could both see it (a couple of years apart). They both knew the funeral photo of their mother well, however the quilt gave us a pretext to talk about friendships that can mark a life in the best of ways. Interestingly, Chantal’s daughter is now in art school. She was interested not only in the theme of the quilt but also the techniques used to create the image.
There was one more stop to make on the family tour. Chantal’s brother François lives in San Diego and I was able to visit him and his wife Marie-France in April this year (2019). I brought the quilt and we shared another family moment. Chantal could now come home.
THE QUILT IN NUMBERS
While working on the quilt I was well aware that I was racking up some numbers. While they didn’t matter while working on the project as Chantal was my only motivation, I still was curious at the end. So I downloaded a tiny 15 KB program that reports basic stats about an embroidery file, like number of colors, stitches, jump stitches, etc. I filled a spreadsheet and found out the following:
- 4 Million embroidery stitches on the front
- 3822 Isacord spool changes across 3 machines from
- 48 Isacord colors
- 136,000 jump stitches, hand trimmed, so…
- 272,000 snips by hand
- 300 blocks pieced together
All done in
- 500 hours over a 5 year period, most of it in the 5th year
- I didn’t count the bobbins 😉
While the numbers above imply the need for technique and determination (and on some days stamina), they really take a second seat to meaning. This piece has a meaning for me that made any other consideration pale in contrast. Those 500 hours just went by, my focus remaining on the end result.
Epilogue
I miss Chantal a little more every year. It is a sweet sorrow by now. Every time I dance there is a piece of Chantal in my heart… and in my boogie :). I have been lucky to count her folks, Marcelle and Gérard as my friends for 40 years now and never miss a chance to visit them. They are amazing people. After visiting her brother François and his wife Marie-France this year, we agreed that we should visit each other when possible. It brings me a quiet happiness to continue our extended family connection.
Thank you Chantal for the happy memories, for a friendship that remains at the center of my consciousness. Looking at your image always bring me the fondest of smiles.
2 comments on “The Story of Chantal: Impressions d’une Âme Soeur”
-
-
Hi Cathee,
thank you for your kind words 🙂
You are on the right track with using a quilt project to work with your embroidery machine.
Even though you work on a Mac computer, our BERNINA Embroidery software v8 (now 8.2) will work on your Mac through a Windows adapter like Bootcamp.
We have several resources for you to learn your v8 software.
1. an extensive series of videos on Youtube. The playlist can be found at:
https://www.youtube.com/playlist?list=PLfT1DJU1aEloiXEB1KEZPjh22yuJG0IYb2. We offer courses at the BERNINA Creative Center for our BERNINA Embroidery Software, as well as for DesignWorks software. If you are already receiving emails from BERNINA, make sure you subscribe to the Creative Center segment to receive listings of upcoming courses.
sylvain
-
Leave a Reply
You must be logged in to post a comment.


Thank you Sylvain for the beautiful story of your beloved friend. What an incredible healing tribute. How do I begin to learn the digitizing process of imaging for embroidery at this incredible level? I am recently the owner of a Bernina 790+. I want to be able to embroider garments and other fiber art such as quilts. I have been sewing at many levels for many years though not with continuity as life has had other ideas for me over the years. Now retired, I’m dedicating more consistent time to being a maker. Currently I’m making a Kimberbell quilt to run myself and my machine through some of it’s creative paces though I’d like to do more self created designing with the embroidery applications. I am a MAC user and know that also may be an impediment with the embroidery software/digitizing capabilities. I have attended two Bernina University programs but have yet to attend classes for the advanced embroidery software and these classes are pretty limited in my area. What other resources could you recommend in addition to dealer’s offered classes for self study and advancement?