How to Make a Fun Fabric Book with Zipped-Up “Secret Messages”
Yesterday Amy Smart recommended a dozen of her favorite scrappy quilt projects for using up some of our ever-growing scrap stashes. Today Annie Smith, of Simple Arts and Annie’s Quilting Stash, shares a wonderful fabric book she created for her granddaughter using scraps of fabric and trims – another great scrap-stash-busting project! –Jo
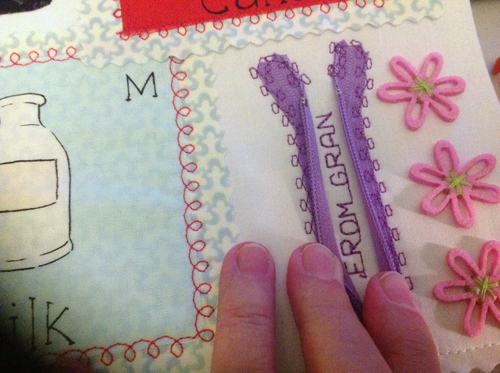
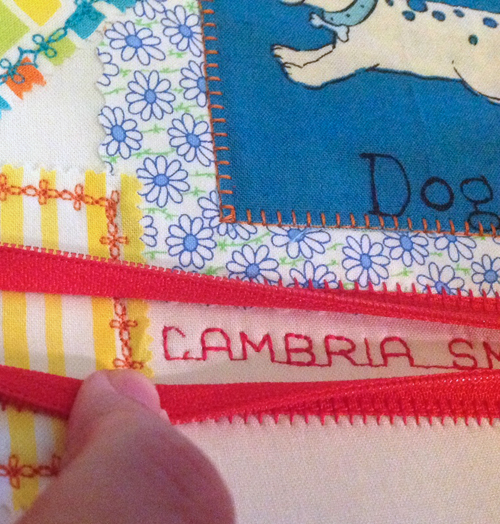
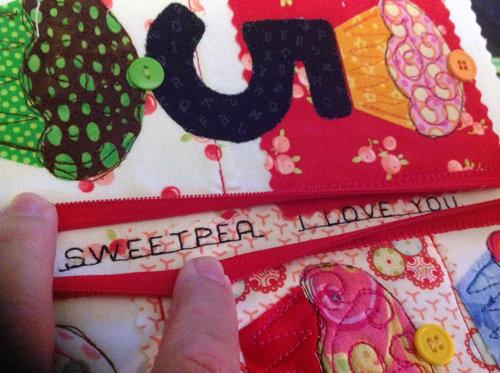
I love to make special little presents for my granddaughters, as I did for my children. I created this book and the design for my granddaughter, Cambria, who is learning her letters, numbers, and how to count. I added little love notes using the alphabet stitch that can be viewed only when the zippers are opened.
I designed each page as I went along, adding letters, numbers, shapes, and trims. The fabrics were randomly selected out of my scrapbag and notions stash. I love scrappy projects, so I have a lot of leftovers from previous projects. I’ll describe what I did for each page in Cambria’s book; you can design your pages like mine, or add your own decorative twist to your book. The fun part is using all of the cool decorative stitches your BERNINA machine offers that you haven’t had a chance to use yet.
Supplies for 10 pages
- Nine 10ʺ x 10ʺ squares of muslin or white fabric for the blank page backgrounds
- Nine 10ʺ x 10ʺ squares of printed fabric for backing the blank pages (I used pieces from a stack of Layer Cake pre-cuts)
- One 10ʺ x 10ʺ print square for the cover
- Nine 9ʺ x 10ʺ rectangles of heavyweight fusible interfacing or stabilizer (fusible on just one side)
- Assorted 5ʺ x 5ʺ fabric squares (I used pieces from a Charm Pack)
- Assorted 3ʺ x 3ʺ fabric squares (I used pieces from a Cookie Mini-Charm Pack)
- Assorted die-cuts or fabric scraps for numbers, letters, butterflies, cupcakes, etc.
- Assorted “I Spy” quilt-type fabrics (I used an ABC novelty fabric from my stash)
- 1 yard of Heat-n-Bond Lite fusible web or your favorite double-sided paper-backed fusible web
- 3 yards of 1ʺ-wide twill tape or grosgrain ribbon for the page spines
- 20 eyelets (get the package with the eyelet setting tool if you don’t already have one)
- 1 yard of printed ribbon or printed shoelaces for the book tie
- Scraps of ribbon
- Assorted trims: Ribbon, rickrack, felt flowers, buttons
- Assorted zippers (nylon teeth) for “secret messages”
- 1 brad for the clock hands
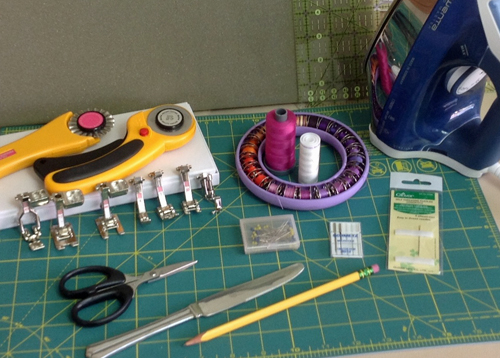
- Assorted colors of thread, with matching bobbins
- A Slice™ cutter or other cutting machine, or the BERNINA CutWork Tool (optional)
- Slice™ “Heartland” and “Spring Has Sprung” design cards or other applique designs and shapes
- Fabric shears
- Small, sharp embroidery scissors
- Rotary cutter, rulers, and mat
- Wave or pinking rotary cutter blade (or pinking shears)
- Schmetz Microtex or Sharp needles, size 80/12
- Iron and ironing board
- Starch – not sizing – for the cover
- A Wave-edge or Pinking blade for the Rotary cutter
- Hand sewing needle
- Hammer (for setting the eyelets)
- Open-toe applique foot (BERNINA Open Embroidery Foot #20)
- All-purpose foot (BERNINA Reverse Pattern Foot #1)
- Zipper foot (BERNINA Zipper Foot #4)
- Open-toe darning foot (BERNINA Freehand Embroidery Foot #24)
Tip: I match the needle and bobbin threads for every color I use, so if I use ten different thread colors, I have ten bobbins that match. I keep the bobbins for the project organized in a BobbinSaver® ring so I don’t lose track of them during the project. When I work on multiple projects at the same time, I use BobbinSavers® in different colors.
Step 1) Prepare the blank design pages.
Fuse the 9ʺ x 10ʺ interfacing rectangles to the 10ʺ muslin/white fabric squares, centering them on the fabric (there should be 1/2ʺ fabric allowance on the sides, and the upper and lower edges should match).
Note: When constructing the book, the seam allowances will be on the left and right edges of each page, and the upper and lower edges will be sewn and trimmed with a wavy or pinking blade.
Step 2) Stitch the Clock page, which is also the front inside cover.
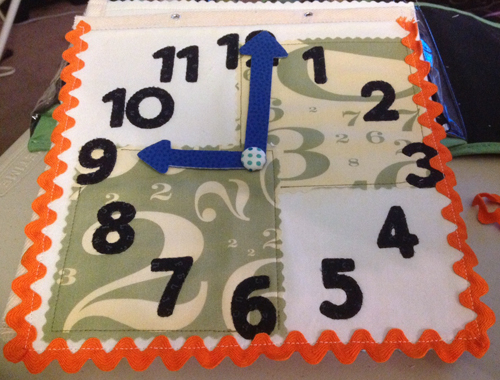
Embellish the fabric with two 5ʺ squares of fabric. Straight stitch around each one to secure it.
Mark the center of the page. Position the numbers 12, 3, 6, and 9 an equal distance (about 3-1/2ʺ) from the center of the page, keeping them at least 1/4ʺ from the outer edge of the stabilizer. Arrange the remaining numbers around the clock face. When all the numbers are in place, gently fuse them to the page. Stitch around each number with a blanket stitch.
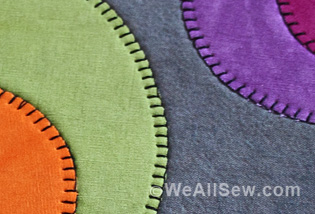
Tip: An open toe applique foot, such as BERNINA Open Embroidery Foot #20, provides a totally open view of your stitching when appliqueing with a blanket stitch, which is essential for accuracy. If you like up the edge of the applique shape with the inside right edge of the foot, your stitch will land in the perfect spot every time. I use a blanket stitch for appliqued elements so the stitching will frame the shapes and not detract from them.
Create two clock arms with arrow tips, sandwiching a scrap of fusible interfacing or stabilizer between two pieces of fabric. Make one arm 3-1/2ʺ long and the other 2-1/2ʺ long. Poke a hole about 1/2ʺ from the plain ends for the brad.
Poke a hole at the marked center of the clock. Insert the brad through the end of the long clock hand, then the short hand, and then through the center of the clock. Open the brad.
Set aside. The edges of this page will be finished at the end when the cover is constructed.
Step 3) Embellish the number 2 page with a zippered “secret message” and felt flowers.
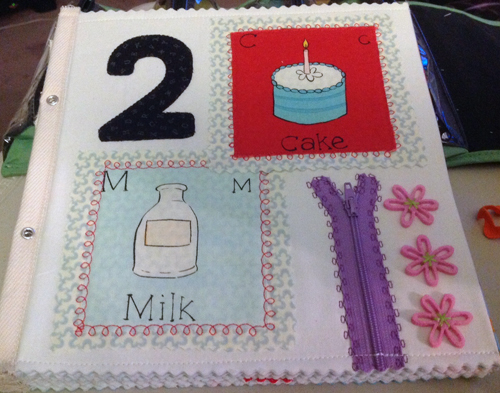
Layer two 4ʺ novelty fabric squares with two 5ʺ print squares. Position the squares and a large 2 on the page as desired. Use a decorative stitch to sew around the edges of the 4ʺ square; leave the edges of the 5ʺ squares unsewn. Fuse the 2 in place and blanket stitch around the edges.
Pin the closed zipper in place, leaving room for the felt flowers. Select a decorative stitch and sew the edges of the zipper tape. (Don’t worry about the bottom of the zipper yet.)
Tip: Before adding your secret message, make a sample using the words and alphabets you plan to use on the page. This will make sure your message will fit, and also help you feel comfortable when stitching the words later.
Place a pin across the bottom edge of the zipper so the zipper pull won’t slide off. Carefully open the zipper down to the pin. Hold the zipper tapes away from the middle; I find this was easier than pinning them to the page to hold them out of the way. Stitch your secret message and trim the thread tails. Close the zipper.
Place the felt flowers on the page and stitch the center in place. I hand-stitched mine, but you could use your sewing machine instead.
Tip: Use a regular Open Embroidery Foot #20 – the one for 5.5 mm stitches – and it will fit perfectly into the opened zipper. If using a 7 mm foot, #20C or #20D, adjust the stitch width to a maximum of 5.5 mm and take care to sew only on the background fabric and not the zipper tapes.
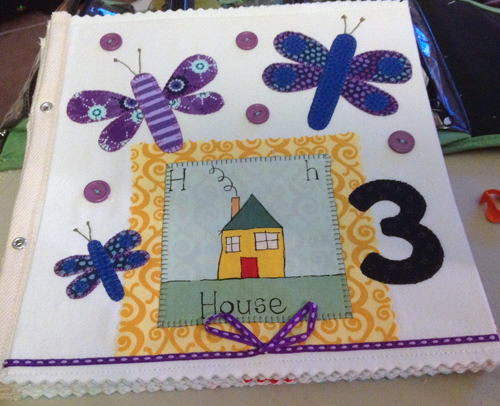
Step 4) Embellish the number 3 page with buttons and appliqued dragonflies.
Layer a rectangle of print fabric behind a novelty fabric square. Position it on the page and applique it in place with a blanket stitch.
Position three dragonflies (butterflies would also be nice) on the page, tucking the ends of the wings under the bodies. I cut mine using a Slice™ cutter; if you don’t have a cutter, draw your own shapes or use applique designs. Fuse them in place and applique with a blanket stitch. Change thread colors and freeform doodle antennae on the dragonflies.
Tip: When I want to have a totally open view of my free-motion doodling, I use a free-motion open-toe foot such as BERNINA’s Freehand Embroidery Foot #24. Be sure to drop the feed dog when free-motion stitching.
Position, fuse, and applique a large 3 on the page.
Tie a bow in the center of a 20ʺ to 24ʺ length of ribbon. Pin the ribbon in place along the lower edge of the page as shown. Stitch along both edges using a straight stitch.
Tip: For this project I used a zipper foot for topstitching. I set the needle position to the far right side of the foot so the width of the foot would add stability for an accurate line of stitching. Do NOT use this foot for decorative stitching, only for straight stitching.
Hand- or machine-stitch buttons to the page with contrasting thread as desired.
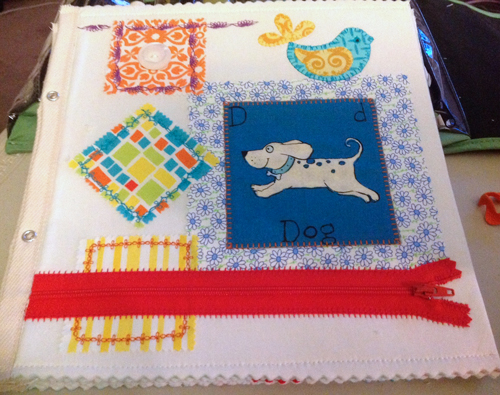
Step 5) Stitch a “freeform” page with a zippered “secret message.”
Layer a novelty square on a 5ʺ print square and blanket stitch it to the page.
Place three 3ʺ fabric squares on the page, overlapping the 5ʺ print square as shown. Using different thread colors and stitches for each square, stitch them in place 1/4ʺ from the raw edges.
Applique a bird on top of the large rectangle using a blanket stitch.
Stitch a zipper in place as shown; I used a double blanket stitch to sew the edges of this zipper. Add a secret message as done in step 3.
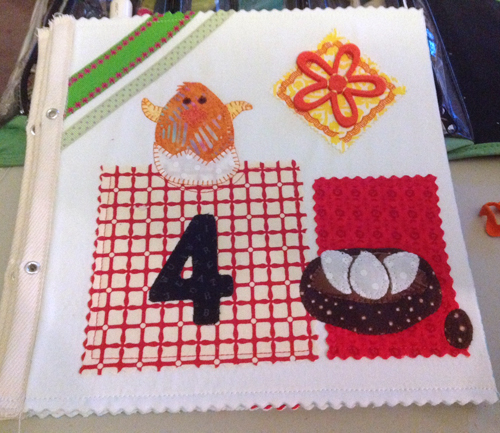
Step 6) Embellish the number 4 page with ribbons and an appliqued chick and nest.
Position a 5ʺ print square and a 4-1/2ʺ x 2ʺ rectangle as desired; straight stitch in place.
Applique a large 4 and a chick and nest in place as shown, using a blanket stitch.
Place a 3ʺ square on-point as shown; stitch in place using contrasting thread and a decorative stitch. Stitch a felt flower in the middle of the square.
Position and stitch two ribbons in the upper left corner as shown. I used a 1ʺ-wide solid grosgrain ribbon and stitched it in place with a decorative stitch, and a 1/2ʺ-wide dotted grosgrain ribbon sewn with a straight stitch so it wouldn’t take away from the print.
Step #7) Embellish the number 5 page with cupcakes and a zippered “secret message.”
Position three 5ʺ print squares on the page and sew them in place with a straight stitch.
Fuse and applique five cupcakes in place using blanket or decorative stitches. Freeform doodle “crimps” in the cupcake papers and swirly curlicues for the icing on the cupcakes. Use contrasting thread on the cupcakes. Finish the cupcakes by sewing buttons at the tops.
Applique a large 5 on the page using a blanket stitch.
Blanket stitch the zipper in place and add a “secret message.”
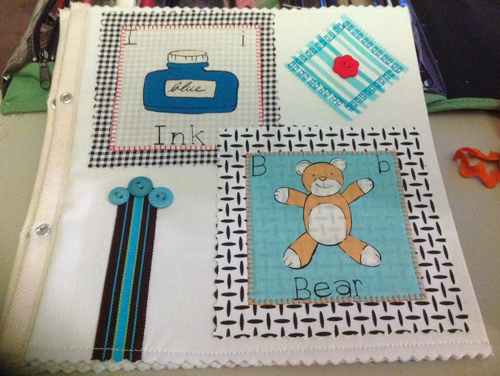
Step #8) Create another scrappy page.
Layer and place novelty and print fabrics as shown; stitch in place using contrasting thread and a blanket stitch.
Place a 3ʺ print square on point and sew in place with a decorative stitch. Sew a button in the center.
Position a 1ʺ-wide striped ribbon vertically as shown; stitch in place. Sew three buttons at the top edge of the ribbon.
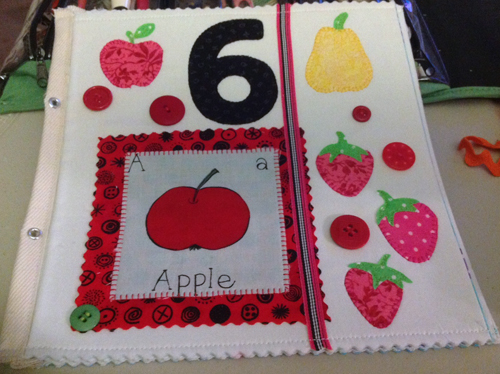
Step #9) Embellish the number 6 page with buttons and appliqued fruit.
Layer the novelty and print fabrics and position on page; sew in place with a blanket stitch.
Applique various fruits to the page using matching thread. I used blanket stitch to applique the main parts of the fruit, and freehand “doodling” to attach the strawberry tops and fruit stems.
Applique a large 6 on the page using a blanket stitch.
Layer a 1/4ʺ-wide ribbon on top of a 1/2ʺ-wide ribbon; sew in place with a straight stitch.
Stitch buttons in place as desired.
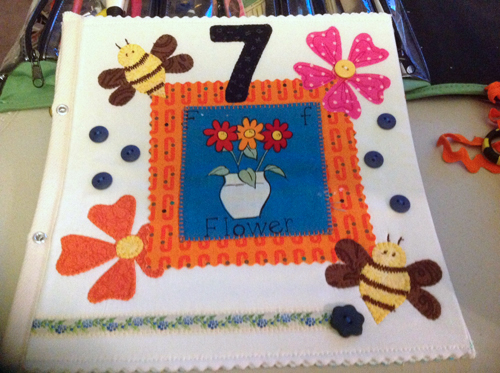
Step #9) Embellish the number 7 page with appliqued bees and flowers.
Layer the novelty and print fabrics and position on page; sew in place with a blanket stitch.
Position bees and flowers to the page as desired, tucking one flower under the edge of the print square; applique in place using matching thread. I used blanket stitch to applique the bees and orange flower, and freehand “doodled” the pink flower in place. Stitch a button in the center of the pink flower. Zigzag stitch across the bee bodies a few times to create stripes. Freeform “doodle” eyes and antennae.
Applique a large 7 on the page using a blanket stitch.
Position an embroidered ribbon on the page and sew in place using a straight stitch. Handstitch a button over the end of the ribbon. Scatter additional buttons over the page and stitch in place.
Step #10) Create the cover.
For the cover, starch a 10ʺ square of print fabric from the wrong side, making sure the fabric is completely dry and stiff like cardstock (not cardboard).
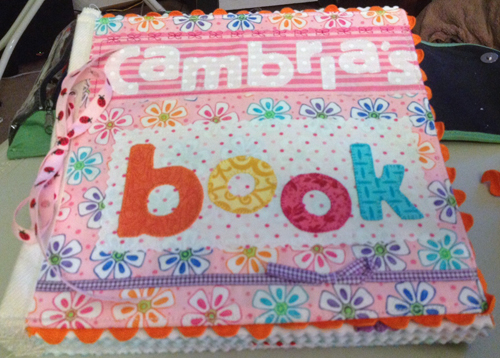
Layer a 2ʺ x 10ʺ strip of fabric on the page 1-1/2ʺ from the top edge. Stitch in place with a straight stitch 1/8ʺ from the raw edges, then add a decorative stitch across the top of the strip. Position the letters of the child’s name on the strip as desired. Fuse and blanket stitch in place. (I’m one of those people who would rather have something be off-kilter or odd-numbered than straight and even. I played with the placement of the Cambria’s letters for a bit before I got them where I liked them.)
Place a 3ʺ x 6ʺ print rectangle on the page 1ʺ from the lower edge of the 2ʺ name strip. Sew in place with a serpentine (wavy) stitch. Position the letters b-o-o-k on the rectangle; fuse and blanket stitch in place.
Tie a bow in the center of a 20ʺ to 24ʺ length of 1/2ʺ-wide checked ribbon; sew in place with a straight stitch.
Step #11) Complete the cover/clock page.
Place the cover and clock pages right sides together; pin the upper, outside, and lower edges, leaving the inner/spine edge unpinned. Stitch the pinned edges together using a 1/2ʺ-wide seam allowance and back-stitching at the beginning and end. Trim the corners at a 45° angle.
Tip: I use an all-purpose foot, such as BERNINA Reverse Pattern Foot #1, for ultimate control when stitching over bulky seams, and change the needle position as needed. Use this foot for constructing the cover and finishing the pages.
Turn the page right side out. Insert the butter knife into the page and run the smooth edge along the inside of each seam while flattening the seam with your other hand. You’ll need to get into the corners, too, to make them uniform. It’s okay if they are not absolutely square; they can be a little rounded. Press the edges flat – this will take some steam and muscle. You want the seam to be as flat as possible so it doesn’t stick up when you are stitching the rickrack to it.
Starting at the top of the page, pin the rickrack to the three sewn sides of the clock page. Hold the page upside down (with the cover facing up and clock facing down) and pin the rickrack so you can see half of the scallop edge on the cover side of the page. Fold the rickrack at the corners so you have a continuous piece with no raw edges. Straight stitch around the page, 1/8ʺ from the edge of the page, catching both the top cover and the rickrack in the stitching.
Cut a 10ʺ-long piece of 1ʺ-wide twill tape and fold it in half lengthwise. Place it over the raw edges and pin in place, making sure you catch both the cover and the clock page. Topstitch 1/8ʺ away from the edge of the tape, backstitching at the beginning and end. Stitch a close zigzag or satin stitch along the upper and lower edges of the twill tape to close the ends, then trim away any excess tape.
Step 12) Finish the remaining pages of the book.
Place a decorated page and a 10ʺ print square right sides together. Pin ONLY the right/outer edge of the page. Stitch the pinned edge using a ½ʺ-wide seam allowance, backstitching at the beginning and end.
Press the seam allowances toward the 10ʺ print square, then flip the printed fabric to the back of the embellished page, matching the three raw edges; press.
Pin the edges in place and straight stitch ½ʺ from the upper and lower edges of the page, backstitching at the beginning and end. When you come across a zipper, just carefully stitch right over it; the nylon teeth will not harm your sewing machine or needle. Do NOT stitch the spine at this time.
Using a wavy or pinking rotary cutter or pinking shears, trim the upper and lower edges of the page a scant 1/4ʺ.
Cut a 10ʺ-long piece of 1ʺ-wide twill tape and fold it in half lengthwise. Use it to encase the spine (inner edges of the pages); pin in place, checking to be sure the twill tape is even on the front and back. Topstitch 1/8ʺ away from the edge of the tape, backstitching at the beginning and end, catching both edges of the twill tape in the stitching. Finish the ends of the twill tape with a tight zigzag stitch; trim excess tape.
Complete the remaining pages in the same way.
Step 13) Assemble the pages and complete the book.
Measure 3ʺ down from the top of each page “spine” and make a pencil mark in the center of the twill tape. Repeat, making a pencil mark 3ʺ from the bottom of each tape.
Very carefully, make a small clip through the twill tape at each pencil mark. (Test on a scrap piece of twill tape before cutting into your completed pages.) Make a hole just large enough to insert an eyelet and no bigger. If it’s too big, the eyelet will fall out; if it’s too small, the twill tape won’t go all the way around the eyelet.
Using the eyelet setting tool and following the instructions on the package, use a hammer to set the eyelets.
Put all of the pages in order, with the cover on top and the #7 page on the bottom.
Insert one end of a one-yard-long piece of 1/4ʺ-wide ribbon through the top eyelet, working from the top/cover to the back/#7 page. From the back, insert the ribbon through the bottom eyelet, working from the back/#7 page to the top/cover. Pull the ribbon so each of the ends is even, then tie the ends in a pretty box. Trim excess ribbon from the tails.
A great thing about the book being put together with eyelets and ribbon is that it can be unstrung so the child can play games with the separate pages. My granddaughter likes to play with them out of order so she can remember individual numbers, rather than just knowing them in sequential order. She also turns the pages over and plays a guessing game with her sister.
I hope you enjoy this project! If you have any questions, please contact me at [email protected].
What you might also like
3 comments on “How to Make a Fun Fabric Book with Zipped-Up “Secret Messages””
-
-
This is a lovely project for your granddaughter. It must have taken you hours to make.
Leave a Reply
You must be logged in to post a comment.








Love this idea!