Making a Barbara (Genshin Impact) Cosplay

Description
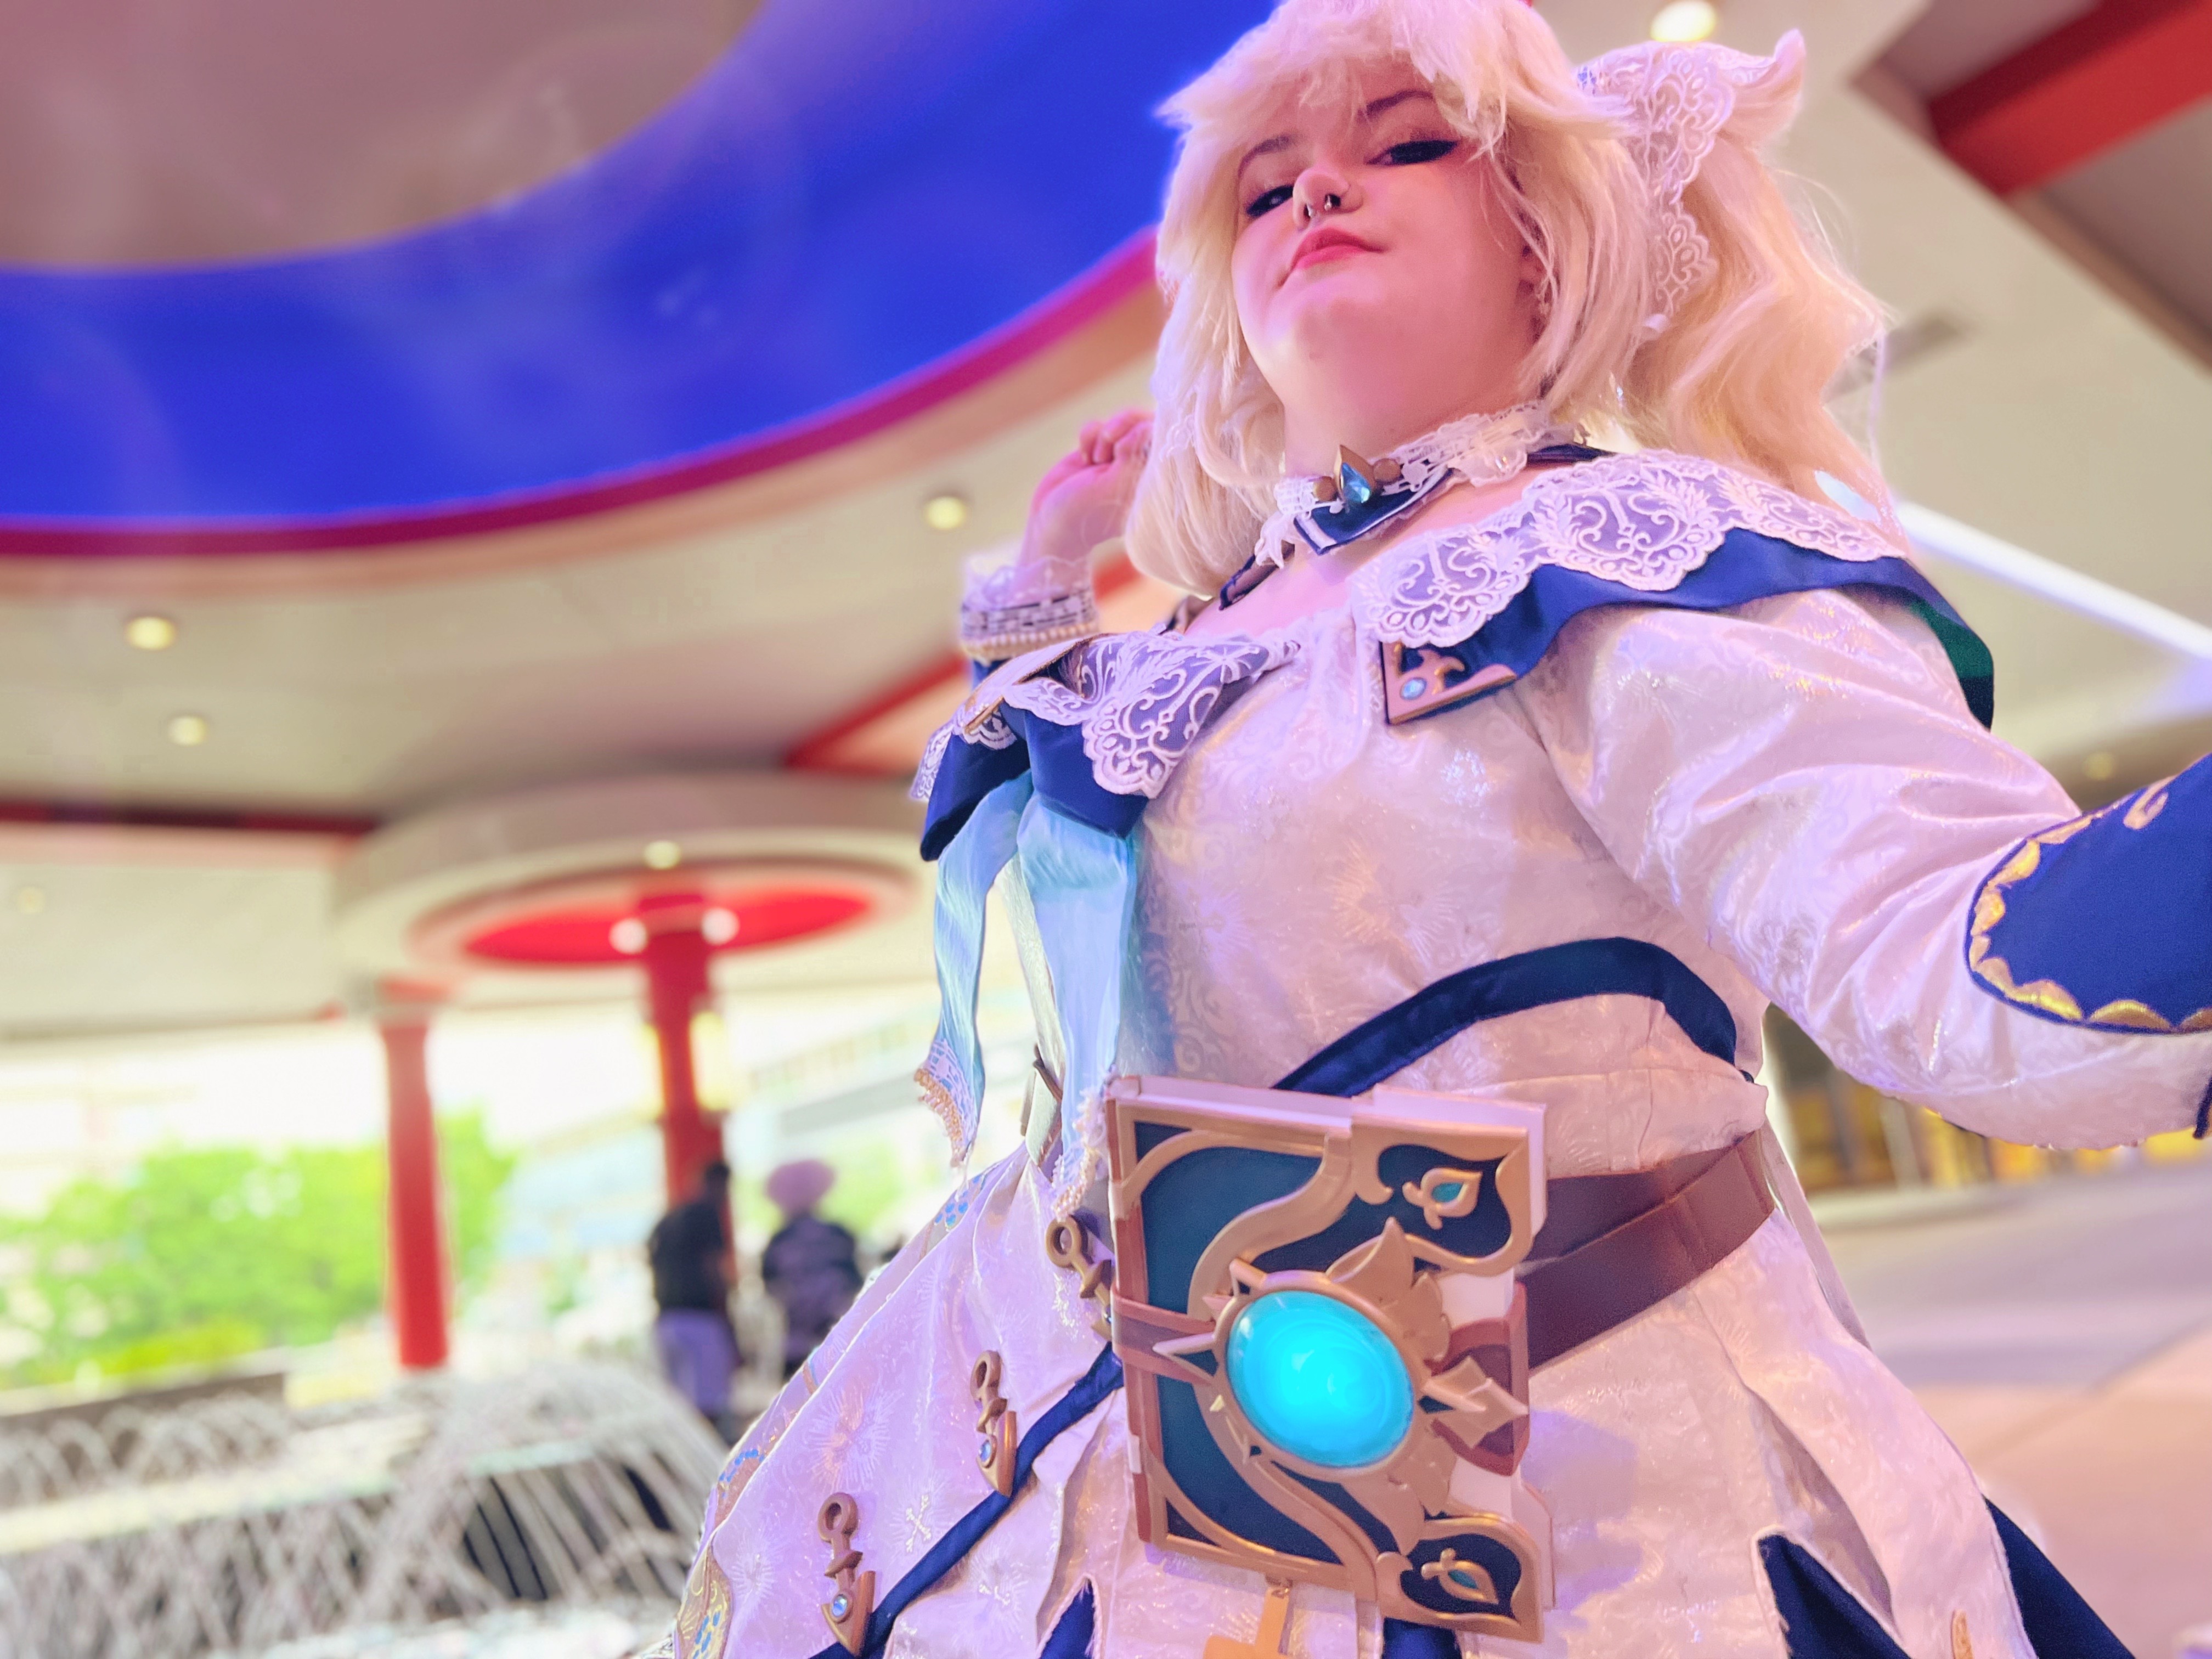
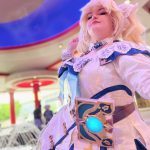
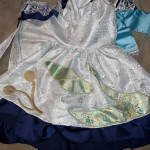
Hi again! This post is going to be an in-detail explanation about how I made my cosplay of Barbara from Genshin Impact entirely from scratch! The whole process for this dress and accessories took about a month, but I did a lot more planning beforehand, and to be honest, I don’t know how I managed to finish it all in time while working on two other cosplays in tandem with this one, but I’m really happy with the final product. Barbara’s outfit is pretty complicated, and though I’m a huge proponent of the recent popularity of ready-made costumes being available online for people who want to start cosplaying but might not have the technical skills necessary to dress up as their favorite character, I was really disappointed by the quality of many of the Barbara costumes I found for sale online because they weren’t up to par with now I would want a costume of her outfit to look. I think her dress, and whole look, is absolutely beautiful, and I wanted to do that justice. In addition, there just isn’t a lot out there to help people make her dress, so, I hope that by posting this, other people will be inspired to make their own Barbara cosplays!
(If you keep reading this and you haven’t played Genshin Impact, you should look up Barbara so you can see what the dress is meant to look like!)
PART ONE— HOW DO YOU EVEN MAKE THIS THING?
Would you believe me if I said that the easiest part of the dress was making the hoop skirt? Barbara’s dress has a really weird shape, with half of the skirt being pleated and half of it being flat, all hanging off of a strapless bodice, so, needless to say, this wasn’t something I could just go buy a pattern for (though there are a lot of patterns for other Genshin Impact characters on Etsy!). So, I had to pattern this dress myself. Thankfully, my mom and I both have huge collections of patterns, and, as I am home from college for the summer, I went through her stash and mine to pick out some patterns that I could mesh together to get a base for this dress.
There are three main components of Barbara’s dress: the blue underskirt and a dress consisting of a skirt and bodice, so I looked for patterns that I could use for those. For the other parts— the bow, hat, sleeve cuffs, belt, shoes, etc. it was a process of guessing and checking if different things worked.
One thing I try to do when I make a cosplay is build a story— because Barbara is a deaconess and very well-respected and loved in her community, but she is still a teenage girl who loves to sing, it was important to me that the choices of fabrics and embellishments reflected that and that I captured the little details in the animation, as well as added my own touches to the design.
I was really lucky that I was home for the summer while I was making this, because not only was I able to use my own Bernina 770 Plus, but I also was able to use my mom’s Bernina 880 Crystal Edition for most of the construction of the dress. Though I love my 770, there are a lot of features on the 880 that were just totally indispensable while making this dress, and I really loved sewing on it! In addition, I was able to use her Bernina 890 for some parts of the dress as well as the underskirt! My 770, then, is what I ended up doing all of the embroidery on as well as all the extra accessories.
I think that, though Berninas aren’t super common in the cosplay community from what I’ve seen, they’re amazing tools for making cosplays and getting one has elevated my cosplays on many levels. I used to sew on a different machine when I was younger and newer to cosplay, and to be honest, there were plenty of cosplay fabrics that I couldn’t put through that thing without jamming it up or ruining the project entirely. On my Bernina, though, not only could I do just about whatever I wanted, but I don’t have to worry about ruining my project. I cosplay as a hobby and because I love it, and to have a machine that lets me make just about anything I want with very few limits lets me get super creative with my cosplays, which is a great thing!! And the FEET, oh my, I could not have made this cosplay without Bernina feet. I’ve gone through and included all the feet I used throughout this post, but I want to give a list here just so you can see how vital some of these feet were to making this cosplay.
All the feet I used:
1D— Main construction of dress
23— Attaching embroidery and appliqué to the dress
6— Satin stitching and decorative stitching
25— Trim edge on the white skirt (the dress would have completely fallen apart without this)
16C— Attaching and gathering blue skirt to the bodice when constructing the dress
86— Ruffle on blue skirt
10D— Top stitching and attaching lace
52D— Making the leather belt
43— Couching for embroidery
71— Attaching bias binding to skirt
See?? I had no clue I would need to use so many feet —10!!— for this project, but they were all necessary and I probably couldn’t have done it if I didn’t have all the options and so many different ways to use my machine.
PART TWO— WHAT GOES UNDERNEATH
Because Barbara’s dress has a very round, full shape, and, being an animation, she can do this without any visible petticoats or crinolines under her dress, I wanted to mimic this same look by using a hoop skirt, which gave the dress the fullest shape possible with minimal bulk. I used a half-length hoop skirt pattern that I found on Etsy and made that out of twill tape and sewing with my 1D foot— it was a lot easier than you would expect and only took me a few hours with the hardest part being trying to cut through the steel boning. I ended up also adding one more hoop than the pattern called for, just so the bottom of the dress would have a little extra stability.
After I finished following the pattern, I added a nice touch to the hoop by sewing on a stars and moons lace trim on the very bottom so it would just barely peek out from under the dress when worn. This was inspired by a trend in Japanese Lolita fashion— a style that heavily influenced how I approached making the embellishments for this dress.
For the top, because this dress is strapless, I purchased a no-show over-bust corset to wear underneath, which also provided a very structured base layer for the dress to lay on.
PART THREE: THE DRESS
Bodice–
The first part of the actual outfit that I worked on was the base dress, most of the construction being done with foot 1D. This was the make-or-break part— I knew going in that I could make everything else work, but this was a challenge. I decided on using an off the shoulder top pattern for the bodice and a pleated skirt pattern I had worked with before for my Himiko Toga cosplay, knowing that I would have to do some editing to make them work in tandem for a dress.
For the bodice, I cut the top pattern as directed, but I had to do a lot of tailoring to the sleeves, making them a bit more form fitting than the billowy sleeves that the pattern wanted, as well as taking in the sides and back a considerable amount. This was mostly a process of trying it on, pinning, sewing, and repeating that process until the fit worked.
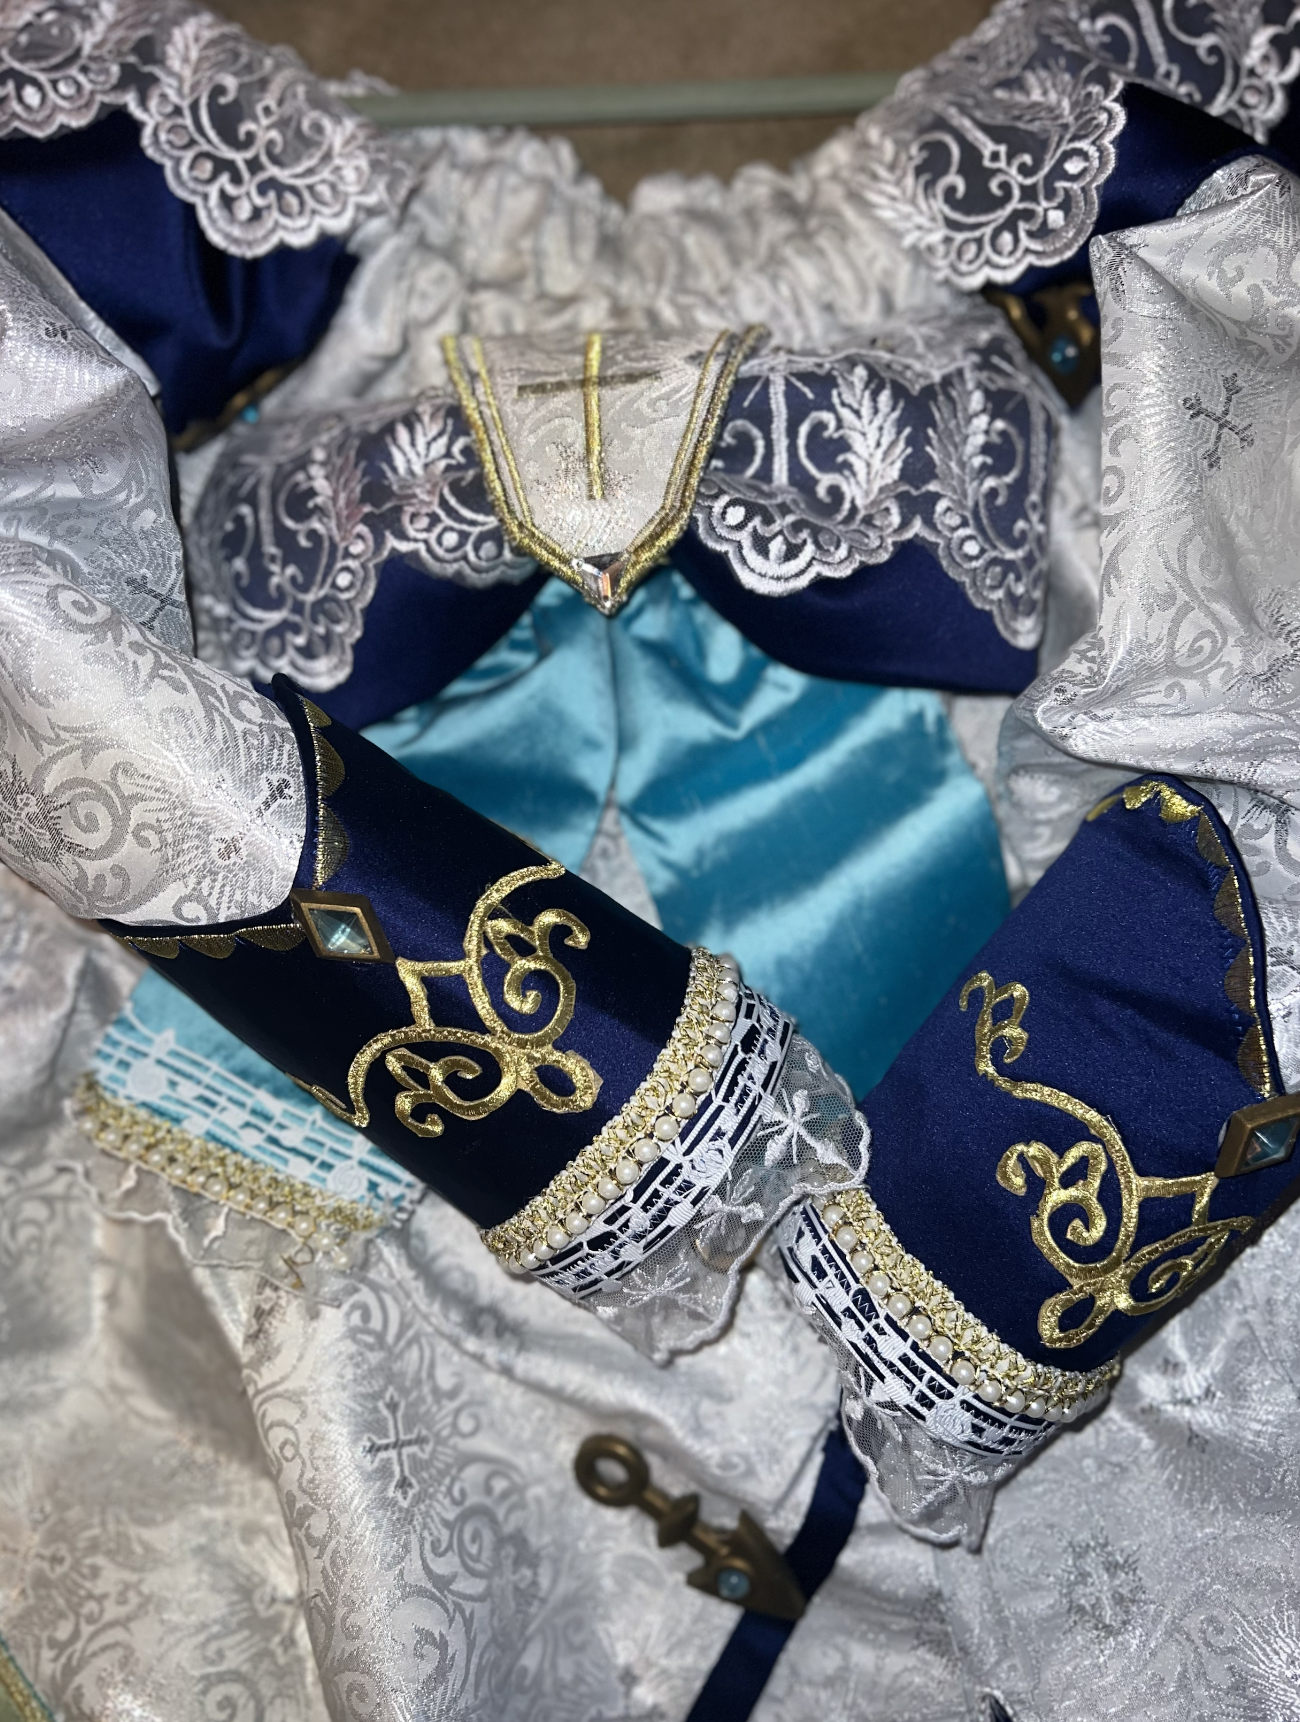
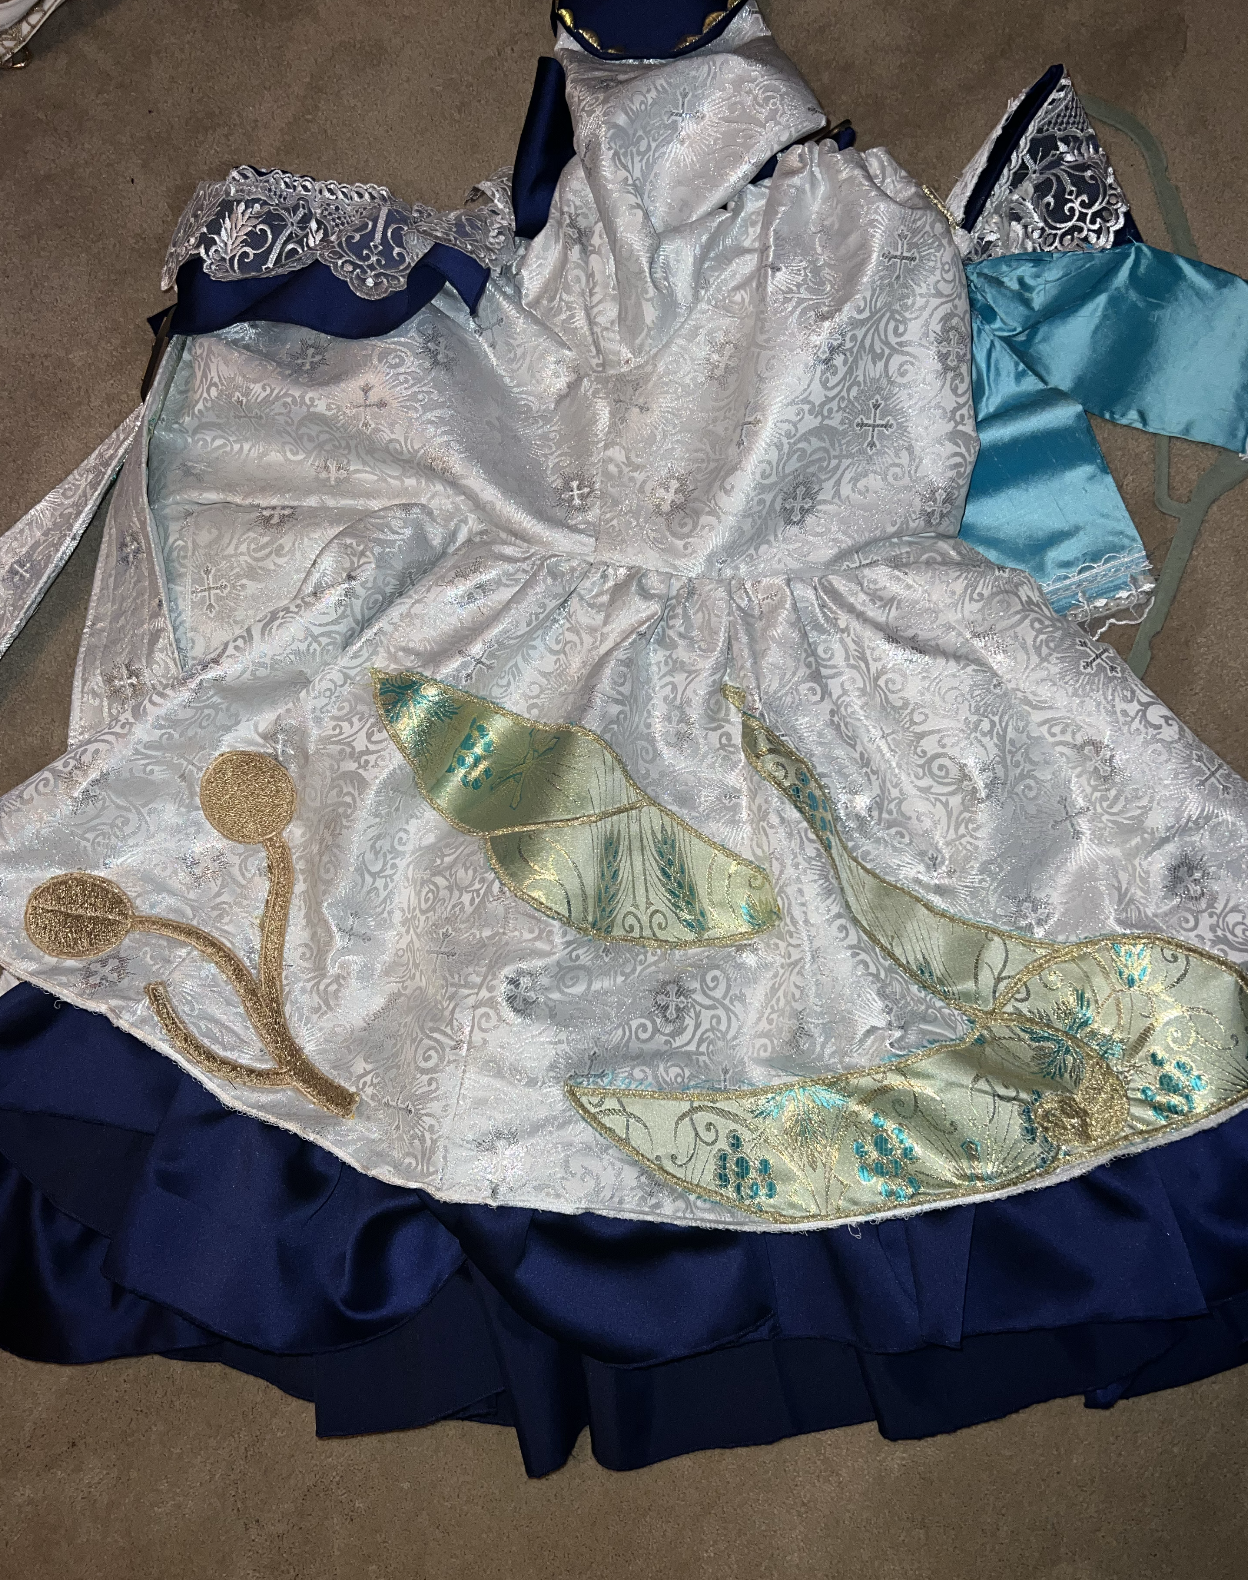
For the bodice (and entire overdress) I used a white jacquard with small crosses in a shiny silver-white— I love using interesting fabrics for cosplay and I think that’s one of the details that you just can’t get with a most pre-made costumes, which lack that kind of pedantically obsessive attention to detail that I love to do for my cosplays. And, because Barbara is a deaconess of a fictional church that uses similar iconography as modern day Catholicism, I was able to explore a lot of really interesting liturgical fabrics and trims with cross motifs, something I don’t use often in my sewing, so I had a lot of fun combing through Etsy looking for that kind of stuff.
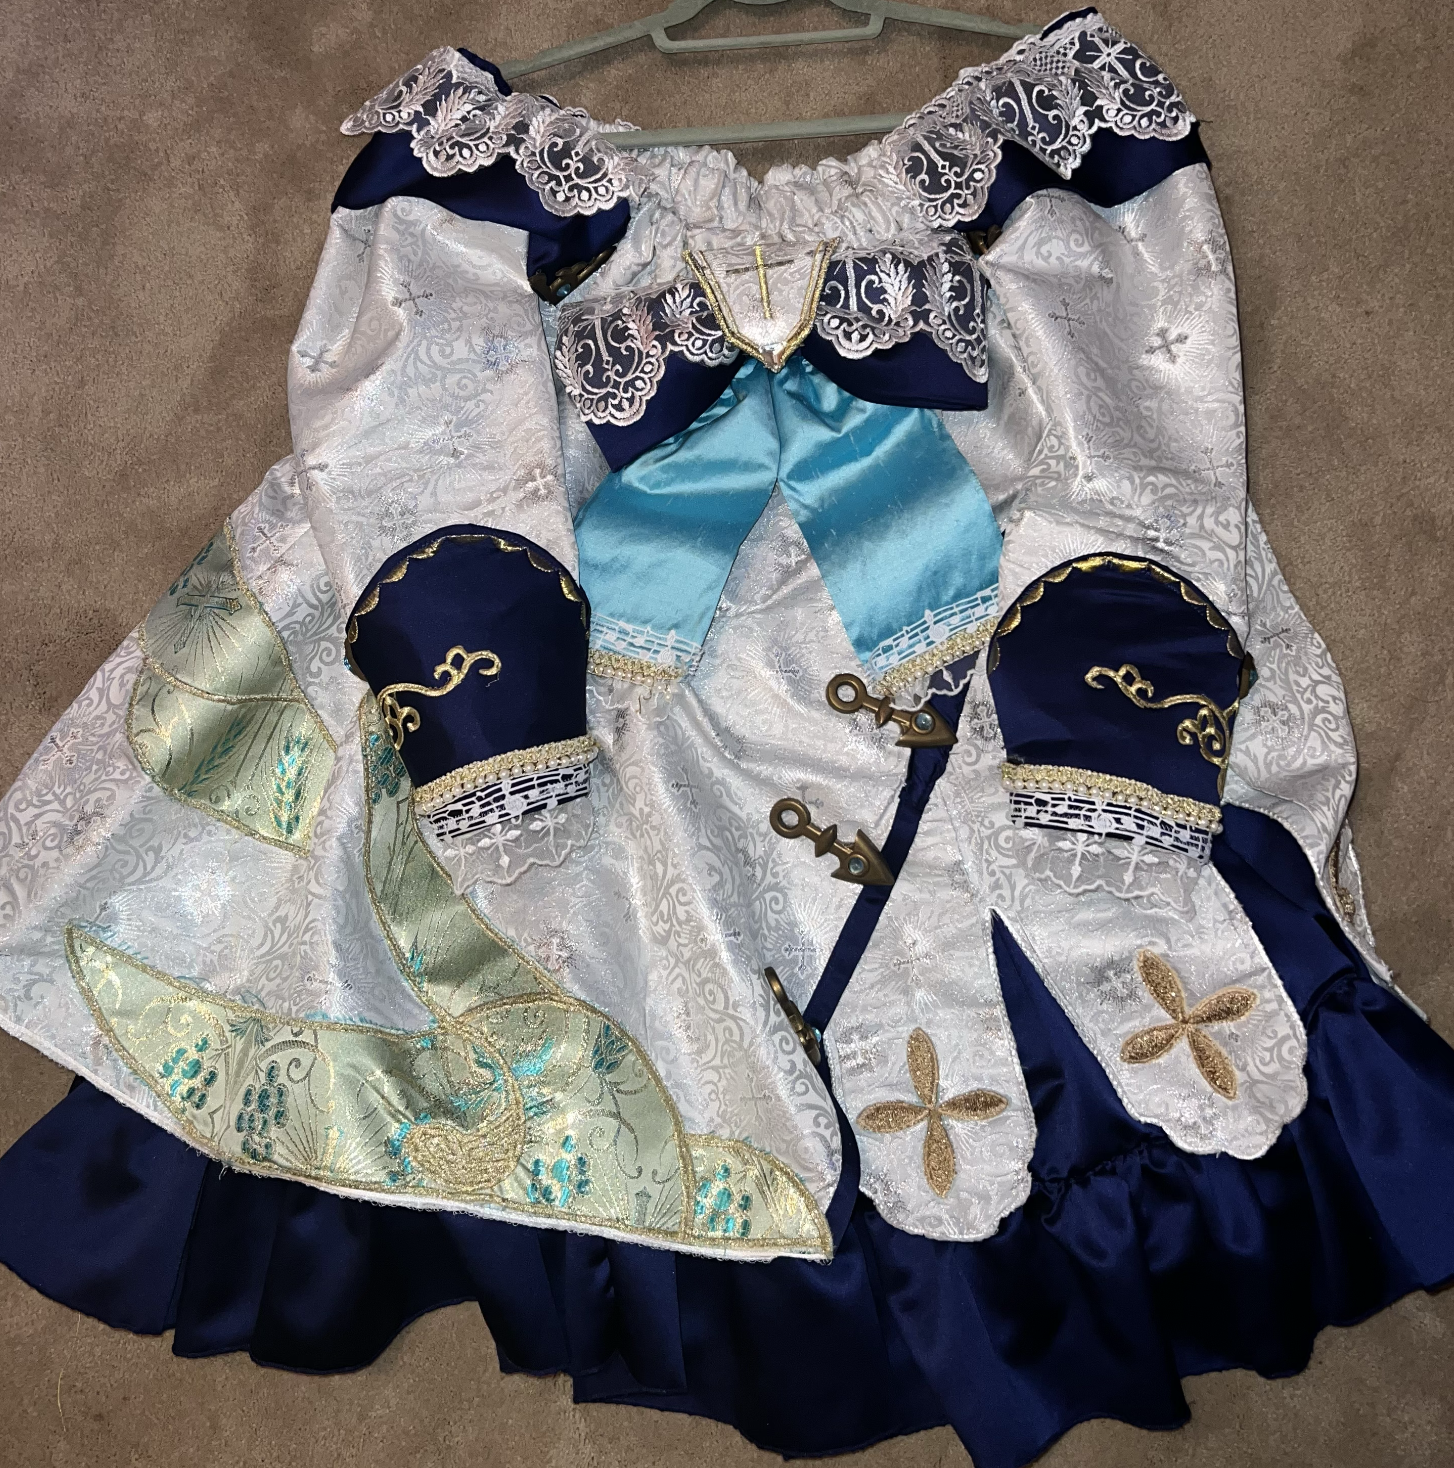
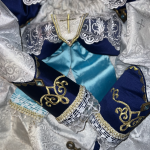
I used the same blue fabric that I used for the underskirt to create a small blue ruffle to put on the tops of the sleeves and the back, which covered the appearance of the casing around the elastic, and, to replicate the look of the white scalloping over this, I used 3” white lace with a cross motif.
Overskirt–
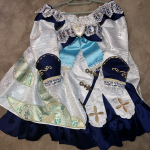
For the a-line skirt, which was the hardest part of this dress because of how the two sides are totally different, I cut out the white fabric and made the two halves, one pleated and one flat. For the pleated side, I made box pleats, sewed them down, and cut the bottoms into the scalloped pattern you see with a template I made using an old file folder. This part was truly horrifying because between cutting the scalloping and then cutting the pleats apart on the bottom few inches so the blue underskirt could show, if I had messed anything up, I would have had to completely restart, which is not something I wanted to do two weeks before I was meant to show this costume at an anime convention. But, thankfully, it all went well and I was able to finish the edges of the pleats with a white chord (foot 25)!!!
After that was done and I had recovered from the stress of doing this without messing something up, I attached the other panel for the flat side of the skirt, which I also finished with the white cord (25) so everything would look cohesive and blend together well!
Underskirt and attaching the whole thing–
Beneath the white overdress, Barbara has a dark blue skirt peeking out. For this, I used a circle skirt pattern from a lolita fashion pattern and added a ruffle at the bottom (ruffler attachment 86) to add some volume. Unlike the rest of the costume, this part was super straight forward and I got to practice using the Bernina 890 to finish the ruffle with a rolled edge!
After finishing each of the individual pieces, it was time to put it together! I attached (1D) the overskirt to the bodice and did a few edits to make it fit better, and then, once I was happy with it, I added the blue underskirt. I decided to make the overdress and underskirt all one piece since this was already a huge costume with a lot of moving pieces, so I gathered the skirt (foot 16C) to attach it to the waistband I put into the bodice to give the skirt more support.
Finally, once all the pieces were put together, I made and added a strip of blue binding to the edge of where the flat half of the skirt overlapped with the pleated half (foot 71) and then added another strip that reached up to the waist (foot 23). Once that was done, the dress was done and I was ready to give it details!
PART FOUR: LITTLE DETAILS
What really made this cosplay special, in my opinion, were all the details and embellishments that I added to it to make it look not only like the animated dress, but also to help build the story of the cosplay. There’s a lot, so I’m going to go through them quickly, but in the future I’d be happy to do more detailed tutorials for any of the pieces or answer any questions!
BOW–
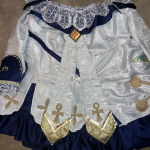
In the front of Barbara’s dress, there’s a big bow over her chest. To give this the same anime-style fullness that the animation has, I followed a tutorial on YouTube and adjusted it slightly to fit the size of the dress, using the blue fabric I used for the skirt, a lighter blue fabric, the white lace I used for the sleeve caps, and heavy weight interfacing. I attached everything with foot 1D.
For the cross clip that folds over the bow, I traced out a shape onto heavy weight stabilizer and covered it with white fabric, sewn down with the 10D foot, and then added gold satin stitching with foot 6. After that, I added three different trims— the music note trim, the pearl trim, and a smaller lace trim with a cross motif, to the bottom of the tails of the bow.
SLEEVE CUFF–
The sleeve cuffs were a guess-and-check project, but what I did was use a rounded sewing ruler and traced out a shape onto heavy weight interfacing that I thought would work, covered it in the dark blue fabric (foot 1D) , and then added gold decorative stitching on the top (foot 6), an appliqué I found on Etsy (ironed on then secured with the foot 23), as well as the same three trims I added to the tails of the bow (10D). Then, I sewed the edges together so they were tubes and I hand sewed them onto the sleeve.
TAILS–
In the back of Barbara’s dress, there are two tails that hang down across her back. I created these by making a pattern for the shape of them on medium weight interfacing and sewing down 3” horsehair lace to them and covering the back of them in light blue fabric and the front of them in white (1D). I sewed down the embroidered crosses and capped the ends of the tails in sparkly gold fabric and gold faux-leather bias tape (10D).
EMBROIDERY–
As I made this cosplay before I had the Embroidery Software 9, I commissioned someone on Etsy to digitize the necessary embroidery files for this cosplay— the square crosses at the bottom of the pleats, the dandelion on the side of the dress, and the rounded crosses on the tails. When I stitched them out, I used a gold isacord thread and my couching foot (43) to couch in a sparkly gold razzle dazzle cord! I then appliqued these onto the parts of the dress they needed to be on with the appliqué foot (23) and the same gold thread I used to embroider them!
APPLIQUÉ–
On the flat side of Barbara’s dress, there’s this design that’s supposed to look like a gust of wind blowing a dandelion; this is because the city she is the deaconess in, Mondstadt, is protected by the in-game god of wind (the church for whom she is a deaconess), and their representative flower is a dandelion. It’s kind of a nitpicky thing to put on the dress, but because with this dress I was in for a penny in for a pound, I got what I thought was just the most beautiful turquoise brocade and traced out the shapes for the wind gust with a heat-removable pen. This was another trial and error process, but once I got the shapes right through some good eyeballing and a lot of different rulers and measurements, I cut them out and adhered them to some medium weight stabilizer and used the foot 6 to outline them with gold satin stitching! Later, I appliquéd these onto the side of the dress along with the dandelion embroidery.
PART FIVE: EVERYTHING ELSE
At this point, I was pretty exhausted by the cosplay, but there was still more to do!! A cosplay is nothing without some good accessories!!!
HAT–
Having never made a hat before, I just boiled Barbara’s hat down to the basic parts— the top, sides, and the front, and cut out each of these on heavy weight stabilizer. I did a lot of hand sewing to make the base of the hat, but also used hot glue to reinforce things as needed. I added lace and other trims to make it fit with the rest of the cosplay, as well as hair clips on the inside so I could attach it to the wig.
BELT–
In the game, some characters carry around “visions”, which are small icons that store their powers. Barabra’s is embedded into a book that she wears on a belt. Though I didn’t make the book nor the circular buckle at the front of the belt (I purchased them on Etsy), I had a really easy time making the belt by cutting up and repurposing a long pleather belt and using foot 52D and a leather needle to sew it together with the double straps needed to hold the book properly!
NECK PIECE–
The neck piece had a few different drafts, and it was originally a lot bigger, but I decided on going smaller and using a piece of twill tape and attaching a few of the different trims (10D) that I incorporated into the cosplay (the music note and small cross lace) as well as adding shapes that I cut out of medium weight interfacing, covered with blue fabric (1D), and added satin stitching with a slightly iridescent thread (6).
HAIR TIES–
Similar to how I made the neck piece, for the hair ties, I used twill tape and sewed down various lace trims (the music notes and the cross lace) to it (foot 10D) so I could easily tie them around the pony tail clips once they were attached to the wig.
CRYSTALS–
So… As I was home for the summer while making this cosplay, and my mom recently got the 880 Crystal edition, she was nice enough to let me take some of the Swarovski crystals that came with the machine to add to the neck piece, bow, and hat. Though this was a super small detail, I wanted to make sure I touched on it because I felt like it really elevated the cosplay.
PLASTIC DETAILS–
Because there are a lot of things that just can’t be made out of fabric when making costumes from video games, I finished off the dress, belt, hat, and neck piece with 3D printed accessories that I purchased on Etsy from DangerousLadies that were made to be used for making a Barbara cosplay! Once these were all attached, the costume was done and looked even better than I could have imagined it turning out!
And… I think that’s everything! If you stuck around to read this, thank you. This cosplay is the biggest one I’ve made yet, and I’m very in love with it. If you’d like to see more pictures or ask me about it, you can find my cosplays on instagram @CtllusCos. Otherwise, if you want to know anything else, please comment on this post!!


