Explore the New Features on Q-matic 4.0

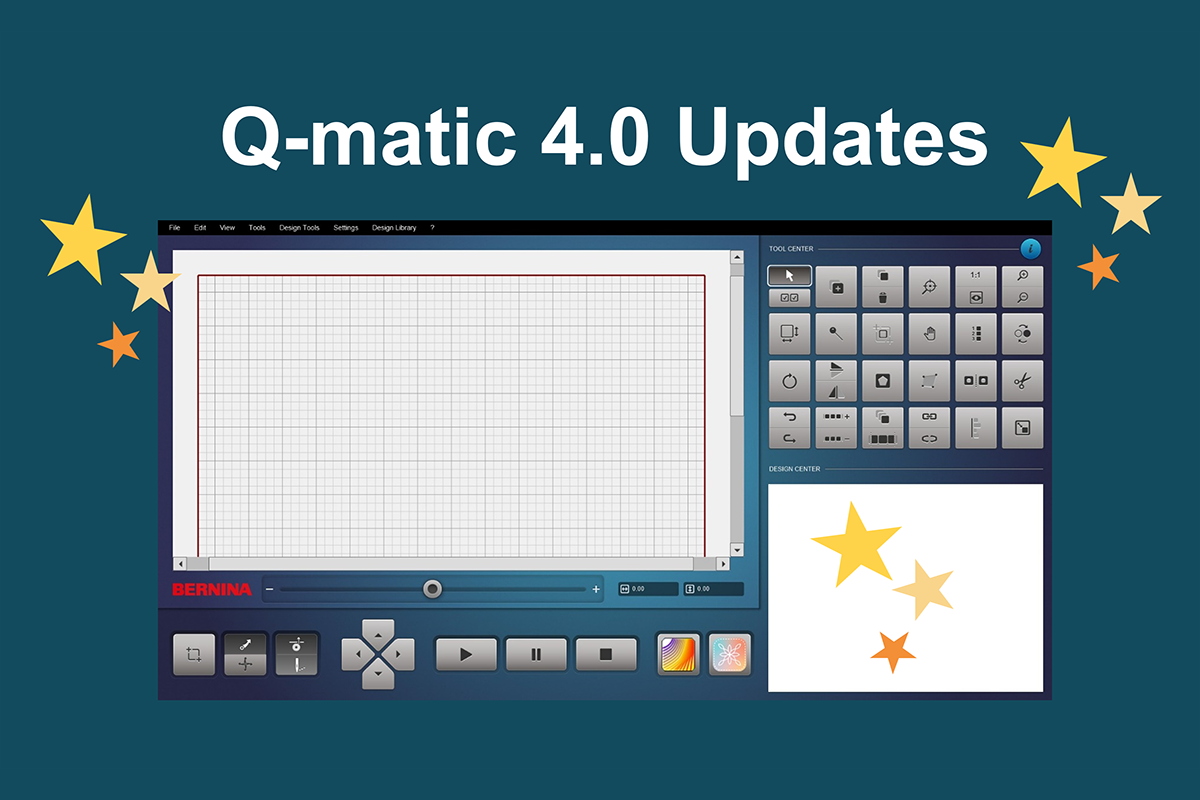
Q-matic 4.0 has launched! There are new tools to spark creativity and many new methods to increase efficiency in automated quilting.
How to Update to Q-matic 4.0
First, let’s get the update portion out of the way. If you have already completed this step, skip down to the feature explanations below.
If you are on your personal computer (not your Q-matic computer), go directly to this link: Q-matic Update. Once completing the download, you will need to copy it to a USB stick and download it onto your Q-matic computer to proceed.
If you are on your Q-matic computer, you will not need a USB stick. Simply follow the link, then continue with the software update as instructed below.
If you cannot follow the link, open a web browser and do the following steps:
- Go to bernina.com
- Select Website Search from the top menu
- Type Q-matic Update in the search window and press SEND
- Select the article titled–BERNINA Q-matic – Support
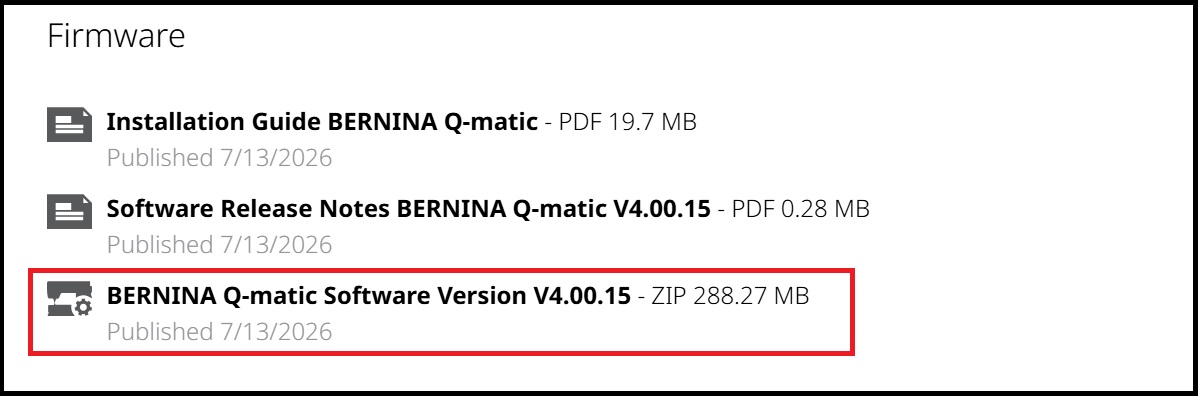
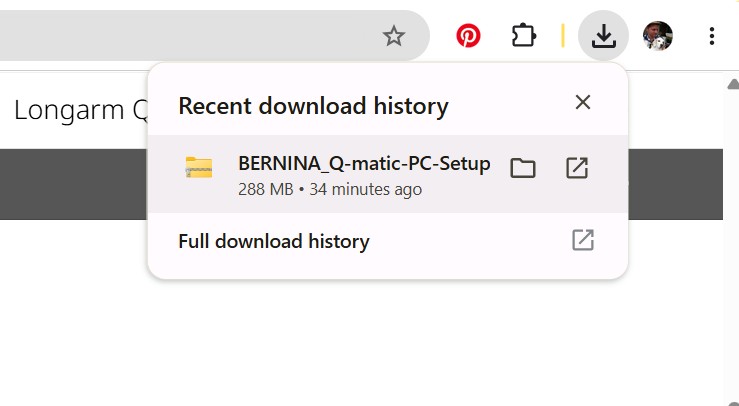
Underneath the FIRMWARE heading, select BERNINA Q-matic Software Version V4.00.15. The software will begin to download onto your computer. Once downloaded, copy it to a USB stick to transfer computers or simply open it up on your Q-matic computer. Open the update file and follow the prompts.
Q-matic 4.0 New Features
Now that you have updated the software, let’s take a look at what is new.
1. Print your catalogue of designs
Now you can print your catalogue of designs. This is particularly helpful for those of you who longarm for others. Underneath the File tab on the top menu, you will find the Print option. Select it and you will see a screen that looks much like the screen when you are searching through designs to use on your project. And you can search and print designs in the same way.
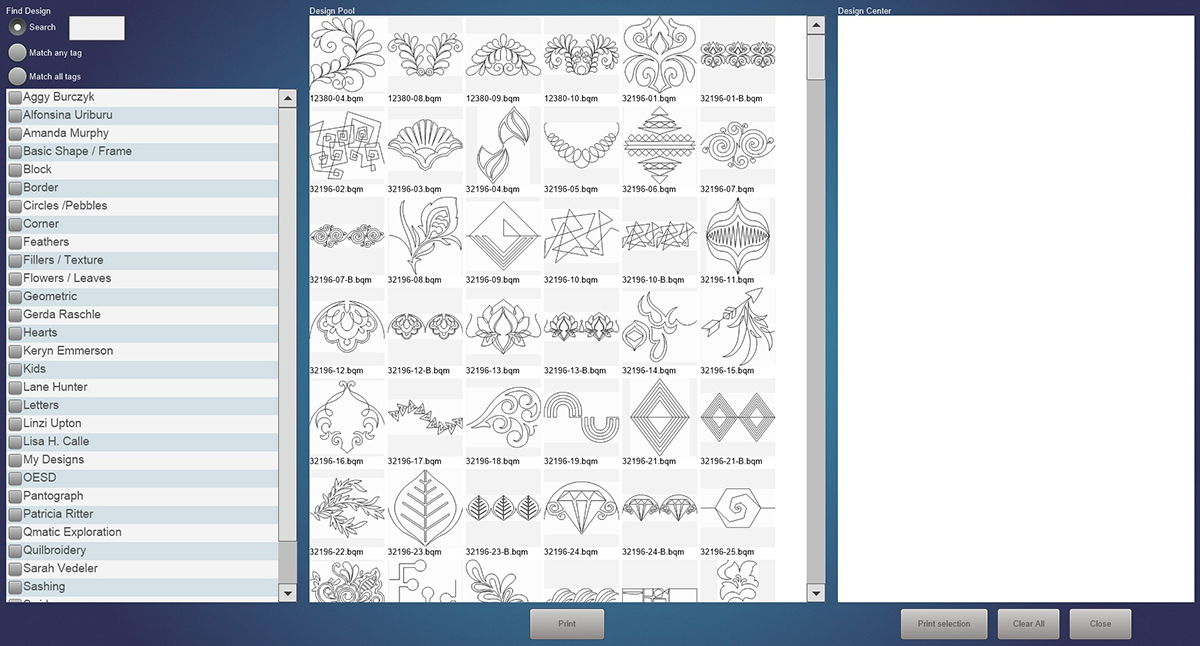
If you would like to print your entire catalogue, simply select the Print button beneath the center column.
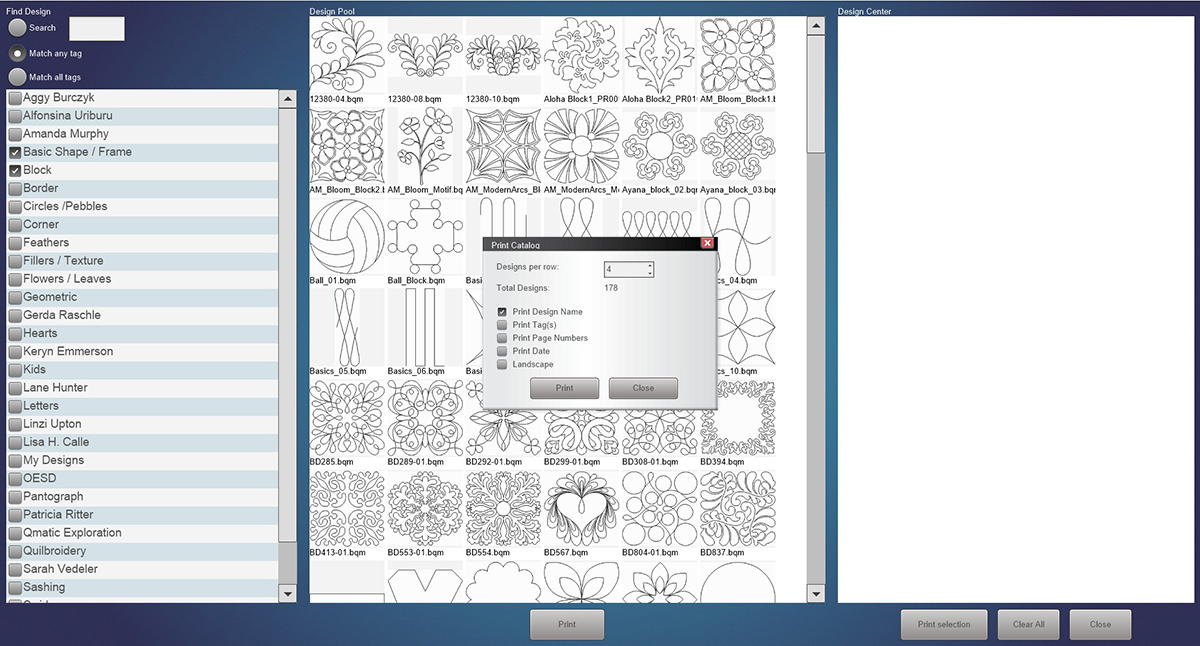
If you would like to print designs based on their assigned tags (for example: Pantograph), select Match Any Tag or Match All Tags and select the tag(s) that you would like to include. The center column will populate with the designs that match those selections. Next, select the Print button beneath the center column.
Last, you can print specific designs that may or may not share the same tags. Simply select the designs from the center column and move them to the third column. (Spoiler: You will learn more about this in another new feature later, but you can double-click the design as usual OR you can now drag the design to the third column. Try it out!)
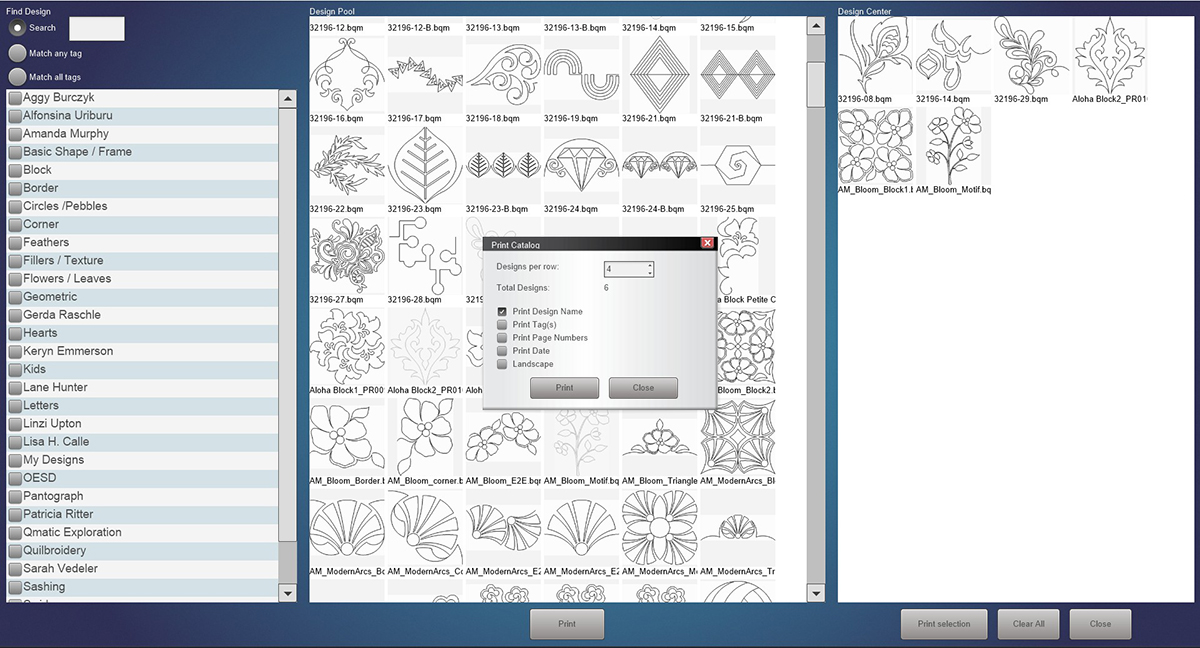
Once Print has been selected, you will receive a prompt that will help you customize your printout:
- Set how many designs per row you would like to print.
- By default, it will print the design name.
- You can also include the tags associated with the designs.
- You can include page numbers.
- To help you know how current your printout is, you can add the printout date.
- You can choose if your printout is Portrait (default) or Landscape.
2. Adding and Removing Design Tags is Easier
Speaking of tags, it is now easier to add or remove them from designs. On the top menu, select Design Library and scroll down the drop-down menu to Design Tags. A second menu will open, and you choose which of those actions you would like to take. Previously, this happened on the same screen and could become confusing. So, we’ve simplified it.
Adding a tag is particularly helpful if you forgot to add it when importing a new design. Select Add, and the screen will open with three columns. The first holds all your designs. The second is blank. The third shows all of the available tags.
Double-click or drag (new feature) a design(s) into the second column. From the third column, select which tags you would like to add to the design(s). When finished, select the green checkmark. You may then begin again by clearing the second column (Clear button below) and start selecting designs anew. When you are finished adding tags, select the red X at the bottom to go back to the main page.
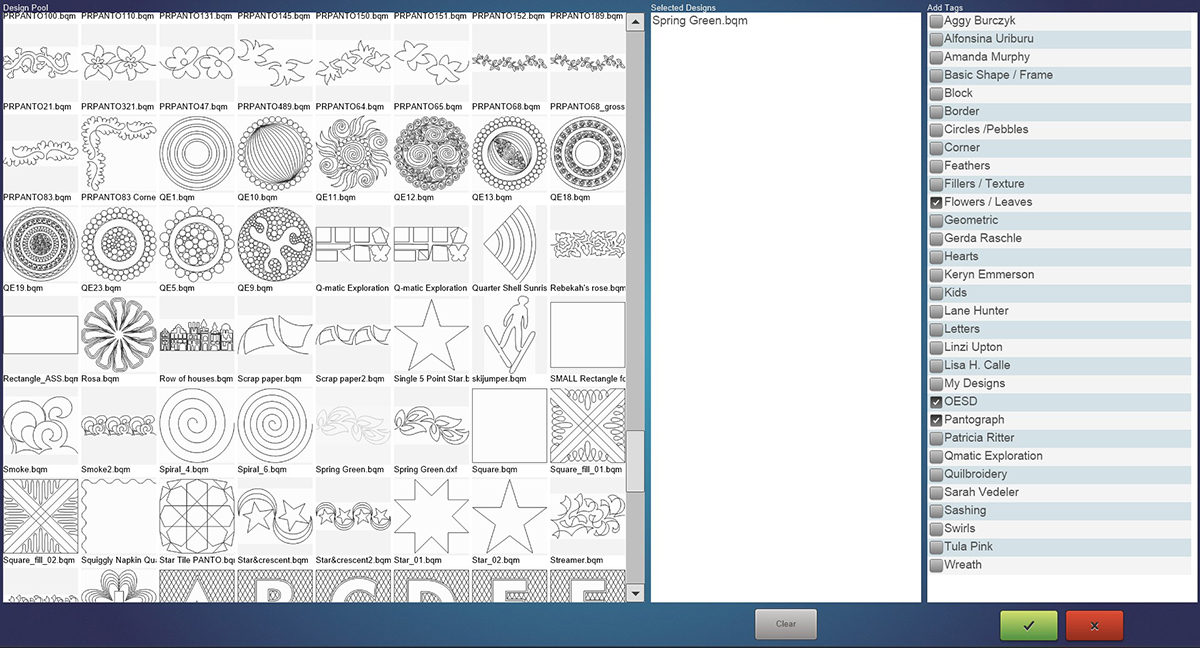
To remove tags, select Remove, and a similar page will open, except that the third column is also empty. Double-click or drag a design(s) into the second column, and the third column will populate with the associated designs. Deselect the tags you wish to remove and select the green checkmark at the bottom of the page. Clear the second column (button below) to continue or select the red X at the bottom of the page if you are done.
3. The Direct Link to the OESD Website
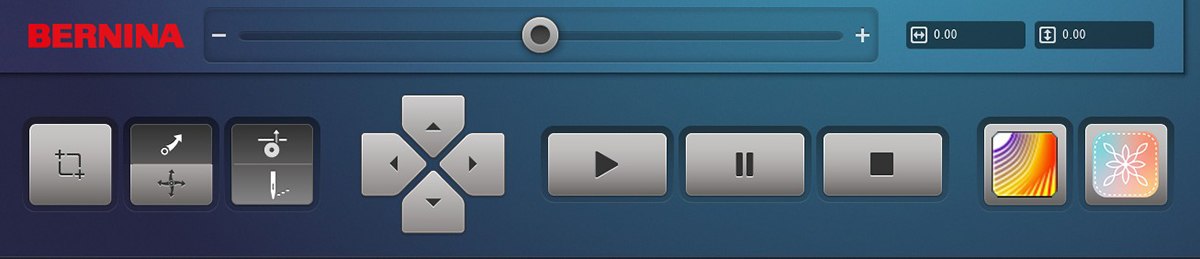
Maybe you noticed that some of the buttons on the lower portion of the screen have been rearranged. The nudge arrows have been moved to the left, and the Art & Stitch icon has moved to the right to join a new icon: the direct link to Totally Quilted, the OESD Longarm Design Website.
Have you been working on a project and you just can’t find the right design? Now, it’s very simple to pop over to OESD’s ever-expanding roster of fun designs to purchase. In addition to lots of cute designs to choose from, Totally Quilted keeps track of your purchases so you don’t accidentally buy the same one more than once.
There is also a direct link in the Design Pool where you go to retrieve designs for your project.
4. Single Select and Multi-Select
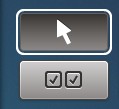
Single Select: Notice that the Selection Tool in the top left corner of the Tool Center has been divided into an upper and a lower button. The upper button acts the same as before with one amazing exception. You can select one item at a time, but if you click and drag a box around multiple items, it will temporarily select all the items. While they are selected, you can use tools such as Rotate or Trim. But the best thing you can do is select the Delete tool and throw multiple items away all at the same time. You cannot, however, move the multiple items because when you click on the screen, it releases the selections.
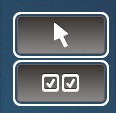
Multi-Select: When activated, the Multi-Select tool allows you to select multiple designs that may or may not be next to each other. Click on the different designs that you would like to manipulate. When they are all selected (red), you can move them all together to another place on the screen. It is as if they are temporarily grouped without officially grouping them. Note: Multi-Select must be deselected to stop using it.
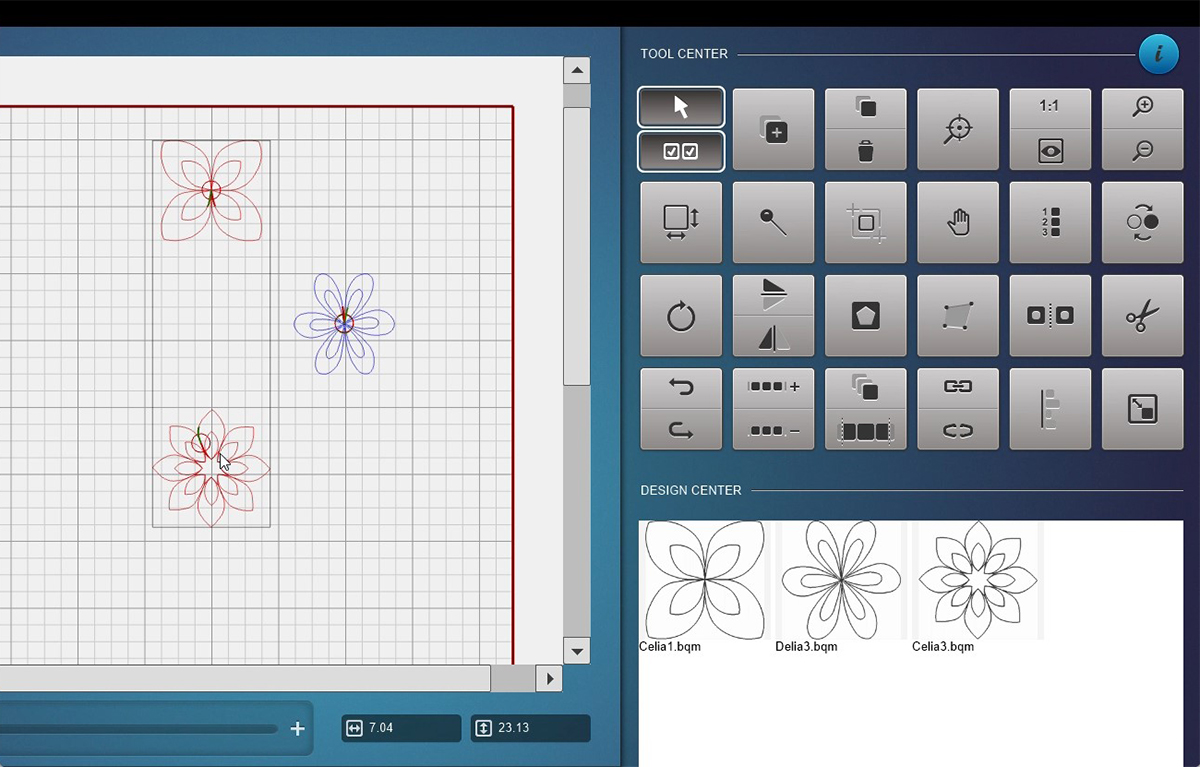
5. Drag Design Onto the Workspace
Previously, to bring a design onto the workspace, you would double-click on it from the Design Center, and it would land wherever the needle was. This is still true and can be very useful if you place the needle near where you want to work. And, when you double-click the design onto the workspace, the Grab/Drop tool is automatically activated. So, when you move the needle, it takes the design with it.
Now, you also have the option to click and drag a design from the Design Center directly to the workspace and drop it wherever you would like to, regardless of where the needle is.
6. Split a Design Into Multiple Segments

If you only want a portion of a design, you could use the Trim tool and slice off the portion you don’t want. But sometimes a design is too complex to only trim the section that you want. Enter the new Split tool. Select your Design then select the Split tool.
With the tool open, the default Split Type is “Split”, meaning that you want to split this design into two pieces. Select the place on the design where you wish to split it. A green dot will appear. If you don’t like the placement of the green dot, you can do one of three things: 1) simply touch another place, 2) use the single arrows in the Move Point area of the tool left or right to move the dot in small increments, or 3) use the double arrows to move the dot in larger increments. After confirming with the green checkmark, the two parts of the design are individual designs in and of themselves. They are not grouped. You can delete one of them. You can Move, Copy, Resize, Attach, and manipulate in any way that you would a single design. Cool, huh?
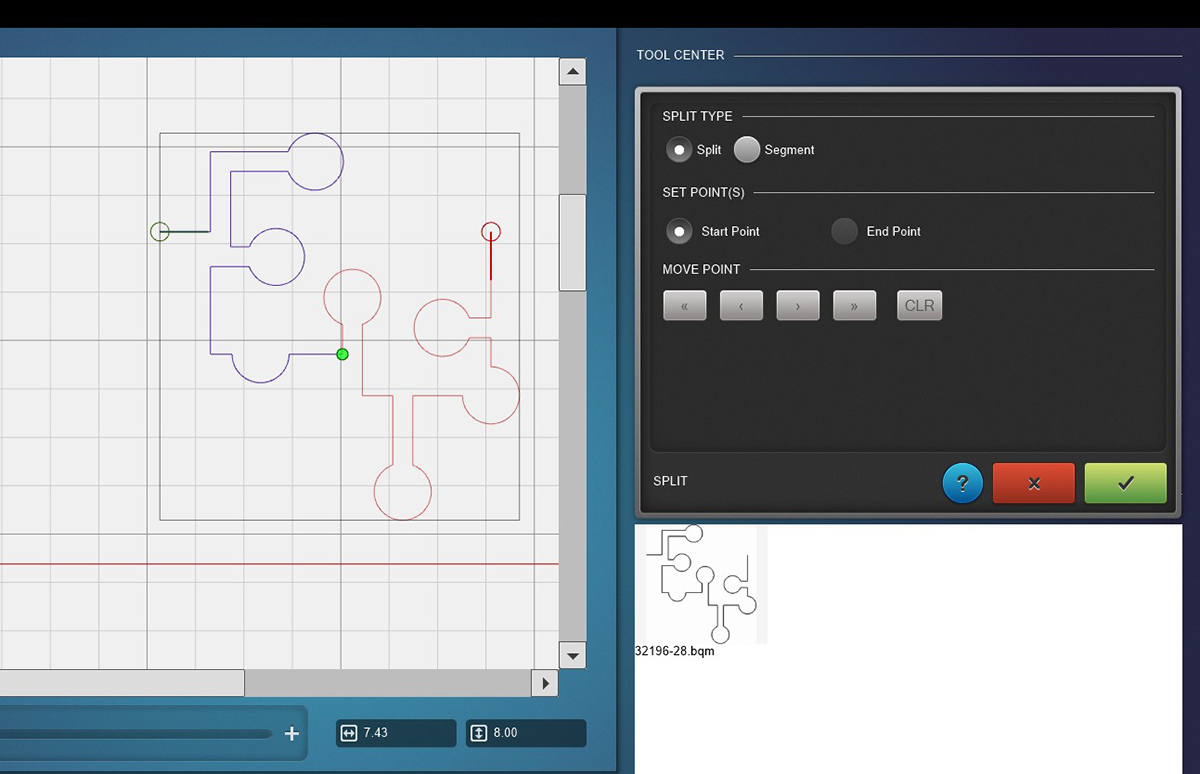
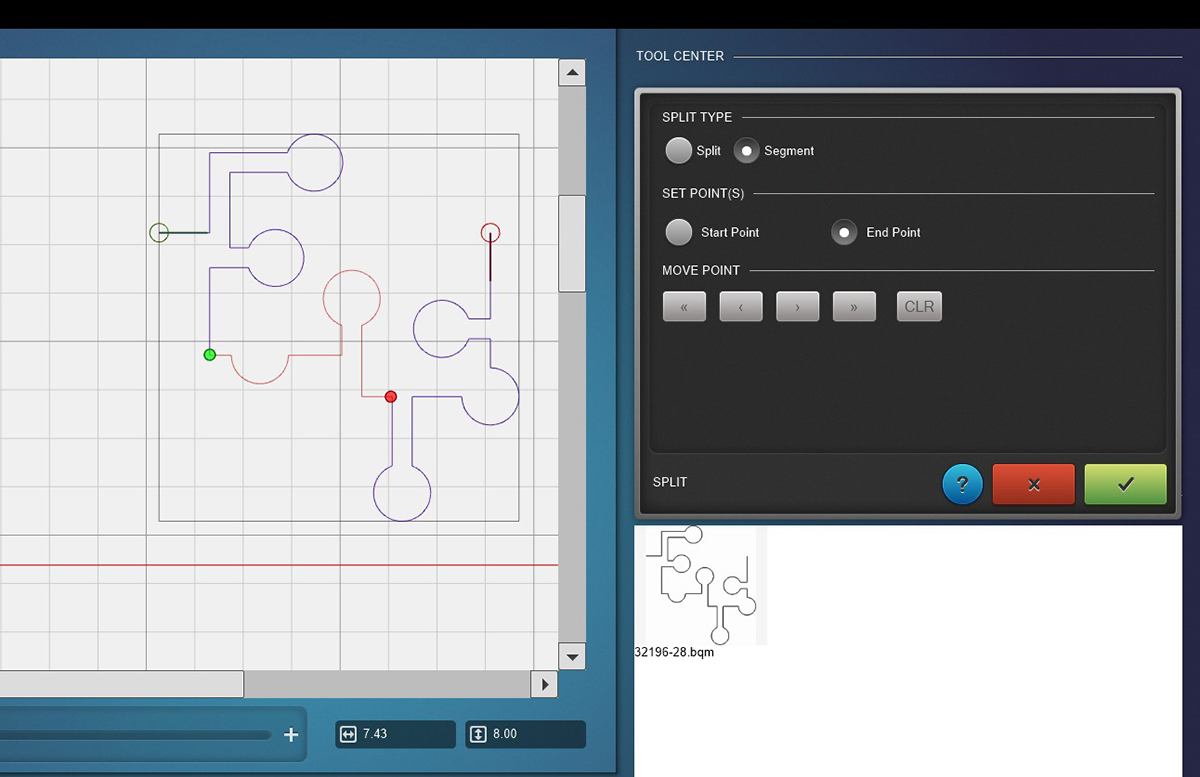
The second option for Split Type is “Segment”. Segment means that you want to divide the design into three portions. Select Segment, then place the dot where you would like the middle segment to begin. Next, select End Point in the tool, then touch the design where you would like the middle segment to end. Move the dots as needed and confirm with the green checkmark. You now have three designs where there was once one. Use them individually as desired.
7. The Trim Tool Can Make Multiple Cuts
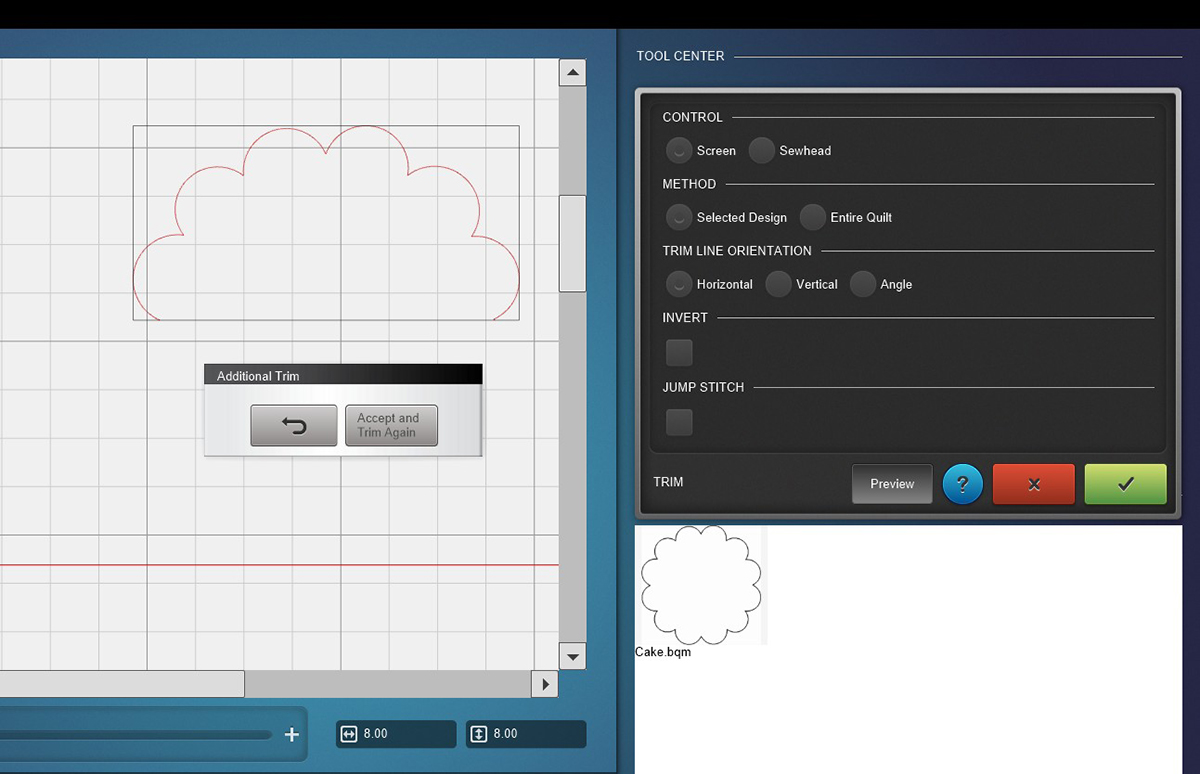
Previously, if you wanted to trim more than once (for example, trimming the sides, top and bottom of an E2E layout), you would make the first trim and then confirm by selecting the green checkmark and go out of the tool. To make the second trim, you go back into the tool a second time. In and out. In and out. Now, you can make all the desired cuts and then exit the tool once.
To do this, make your first trim, then select the Preview button. A pop-up prompt will appear with two options. The first is the Undo symbol, just in case you don’t like what happened. The second says, “Accept and Trim Again.” Select this option and trim again. Keep selecting Preview until all the desired cuts have taken place. Then confirm all cuts at once by selecting the green checkmark.
8. The Mask Tool Allows for Multiple Masks Simultaneously
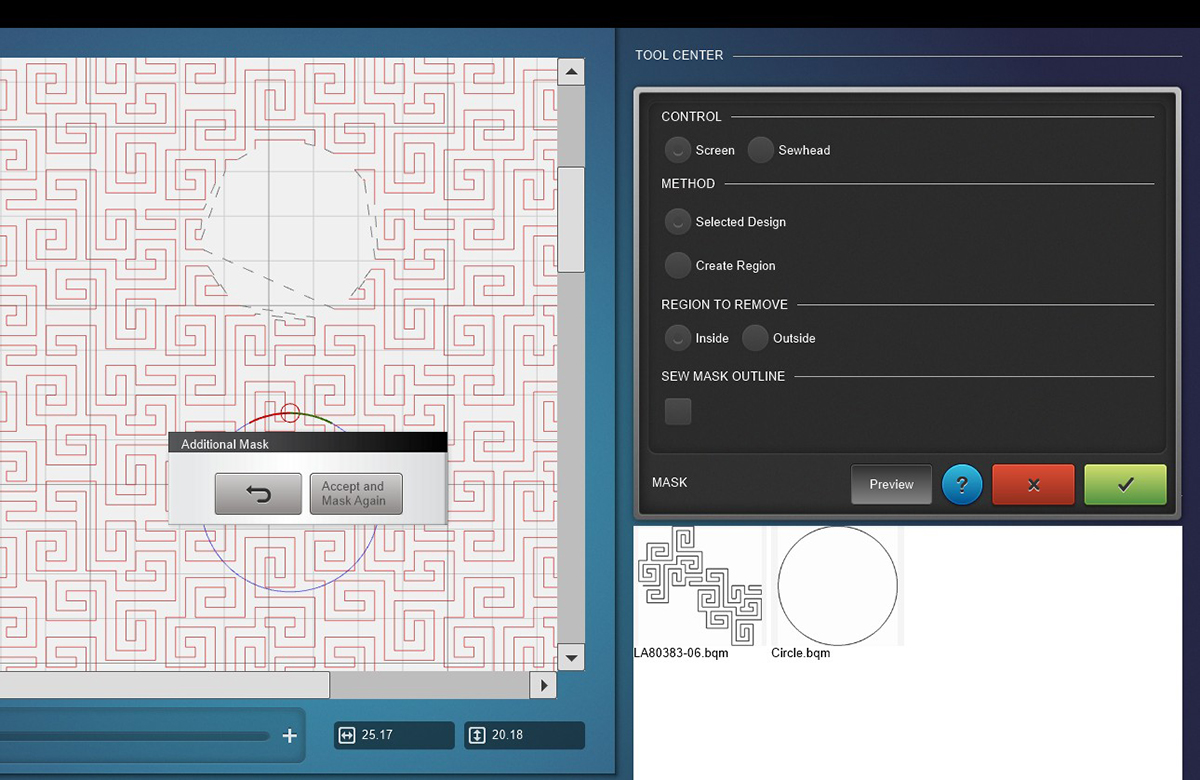
Just like the Trim tool, you can also make multiple masks by making the first mask, selecting Preview, and then you will be given a prompt to Undo or Accept and Mask Again. Confirm all the masks at once with the green checkmark.
9. There Is an Undo Button in Markers
When plotting out the landmarks of your quilt using the Markers tool, you have the ability to undo a misplaced mark. This is a new feature within a long-standing, useful tool. The Undo button will remove the marks in the reverse order of which they were made. However, once you confirm with the green checkmark, the markers can no longer be undone individually.
10. E2E Autofit

This is the feature you scrolled past all the other updates to get to. With the click of one button, a single design will multiply into rows, filling the whole quilt and trimming off the edges. Let’s see how to do it.
First, you need to measure your physical quilt top. Take horizontal measurements in three different places: near the top, middle, and bottom of the quilt. Take note of the largest number. Next, take three vertical measurements in the same manner. Note the largest number in this direction as well. Then, use the Quilt Size tool and enter these two largest numbers. The E2E Autofit Tool uses these measurements to populate the quilt, so it is important to be a little more accurate.
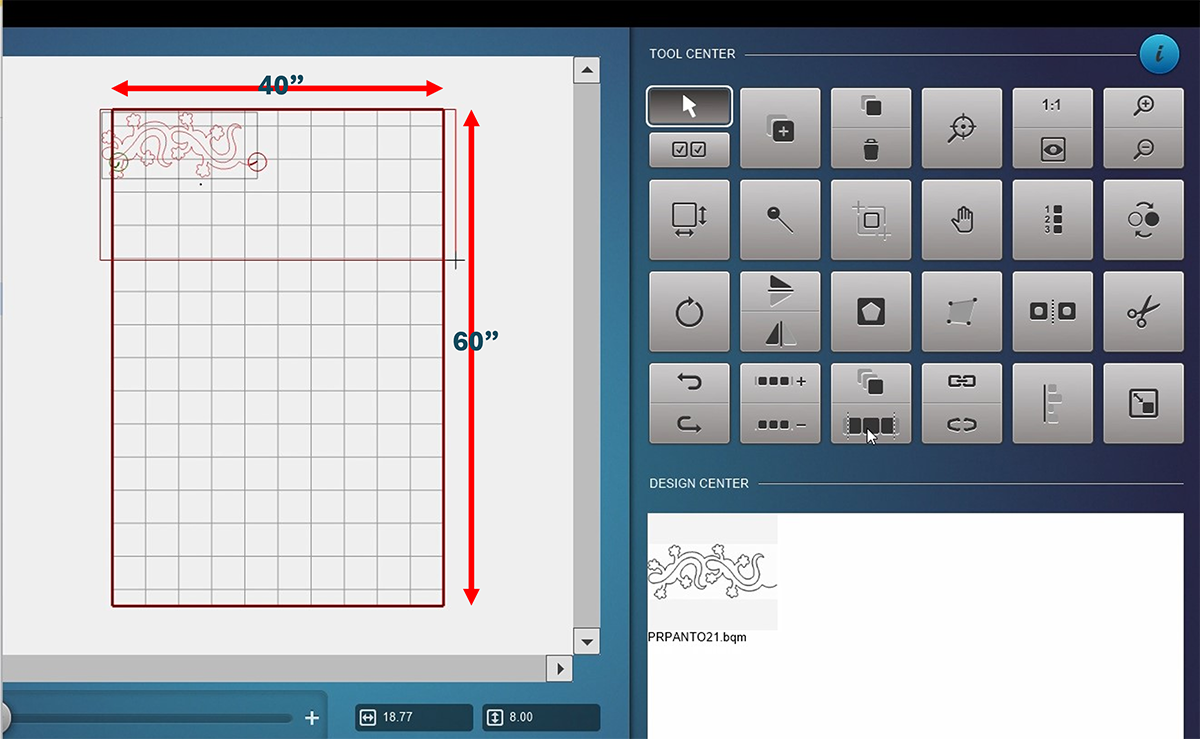
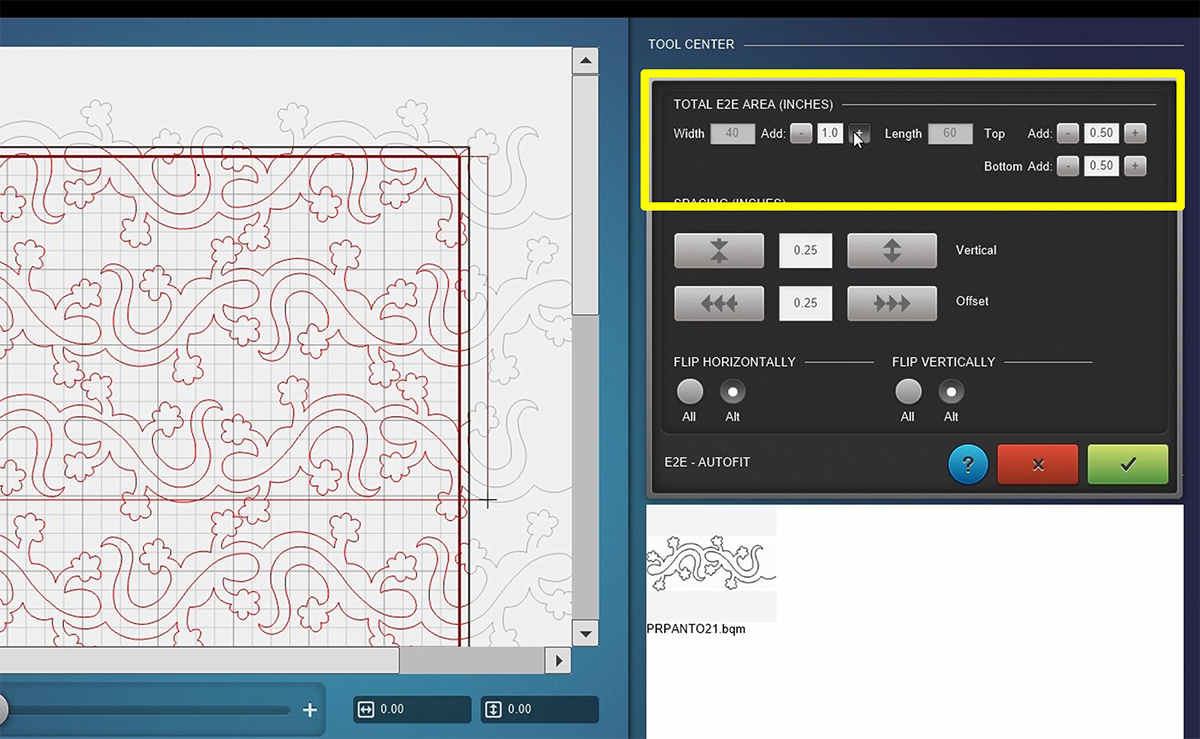
Place your design anywhere on the quilt. It doesn’t have to be in the top left corner. Remember, you can now drag the design from the Design Center onto the workspace! With the design selected (red), press the E2E Autofit icon, which is now the lower half of the Multiply tool. The design will automatically multiply into rows.
As with the Multiply tool, you still have the flexibility to push the rows closer together and pull them apart. Notice that the more you push the rows together that new rows will appear if necessary. You can still offset every other row to make the designs nest nicely. You still can flip the rows horizontally or vertically all together or alternating.
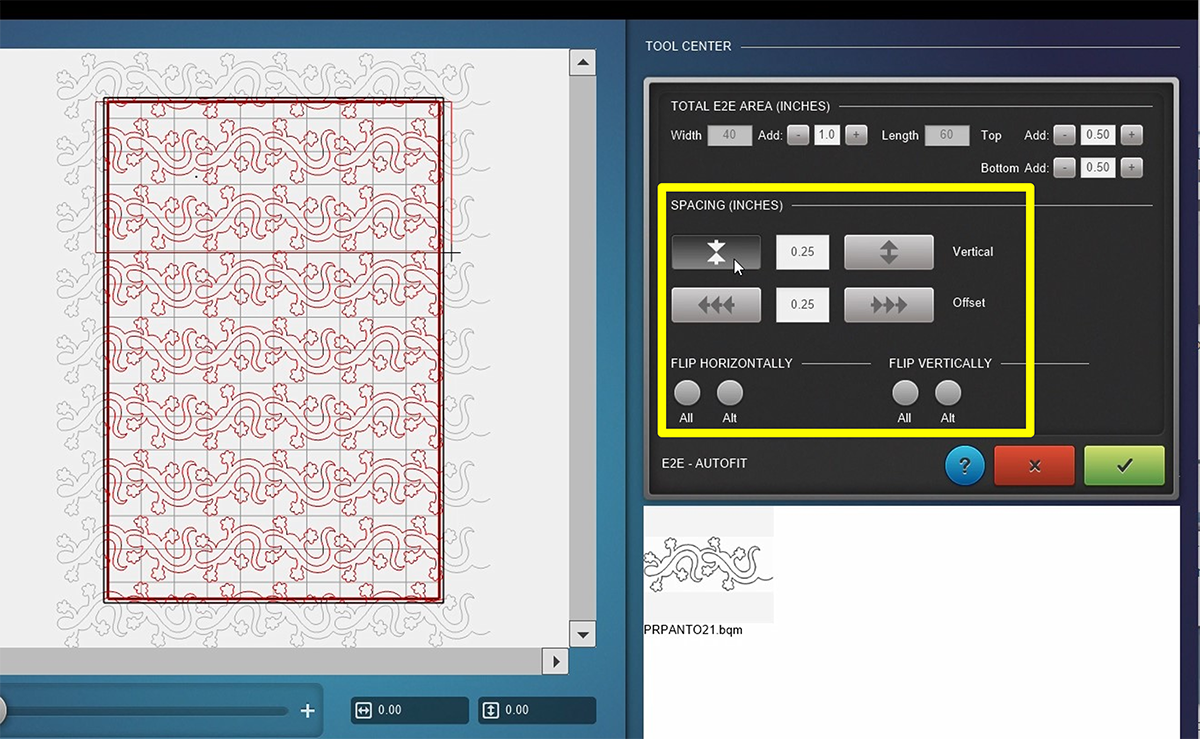
The E2E Autofit tool also includes a margin outside the quilt where it trims the design. The default is 1/2″ all the way around. This is why it is important that you enter the largest measurements in the Quilt Size so that you have enough design to cover your entire quilt. You can increase the margin by increasing the number. If you add or subtract from the horizontal measurement, it does it to both sides of the quilt simultaneously. You can adjust the top and bottom measurements individually. This is useful because we can see the top edge of the quilt, but the bottom edge is rolled up on the bar. Therefore, adding more margin to the bottom edge will allow you to trim it more accurately once you can see it. Once satisfied, confirm with the green checkmark.
The name E2E Autofit refers to the design populating the quilt. There are still some things you will need to do before you’re ready to stitch. Depending on the design and the Safe Area, you may want to Link rows together to stitch out more efficiently. You will need to Ungroup the rows. You may need to change the direction of stitching with the Reverse Sew tool and then Link rows according to how many fit inside the Safe Area.
It is necessary to Realign the Safe Area, as the program always places the top of the Safe Area at the same level as the Quilt Top. Your real quilt top is probably sitting below that placement so that you can stitch on and off the top edge of the fabric. Currently, the top margin is poking above the Safe Area and will not let you stitch it out.
Those are the new features of Q-matic 4.0! We know that you are going to enjoy playing with all these new functions and can’t wait to see your creativity bring them to life.