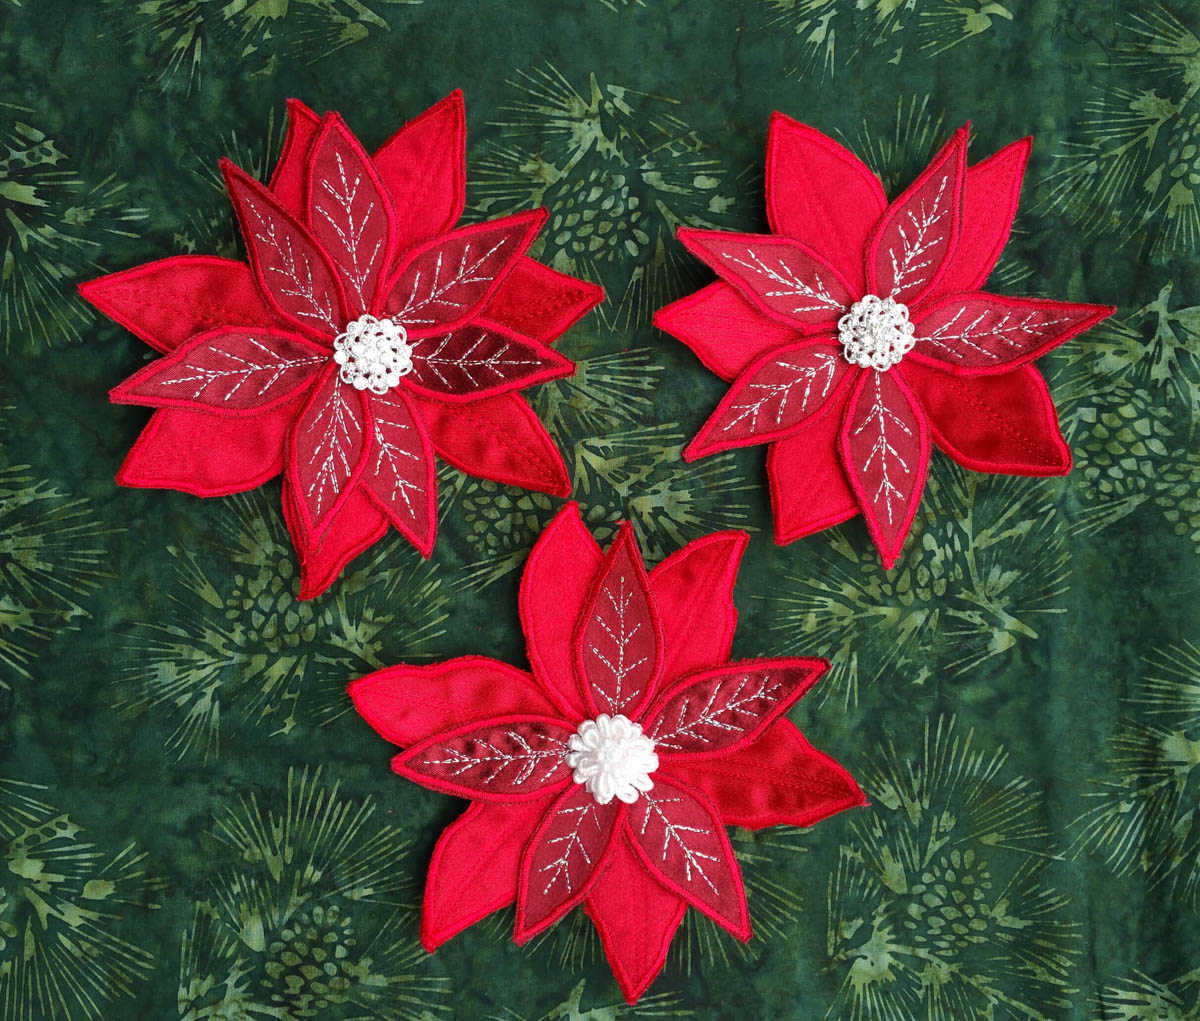
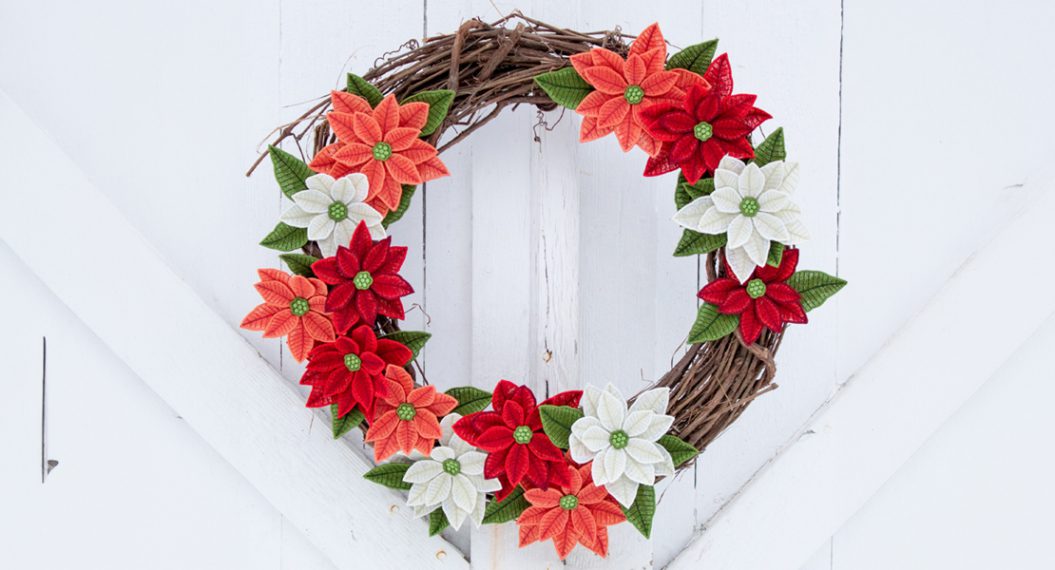
Holiday Poinsettia Pin
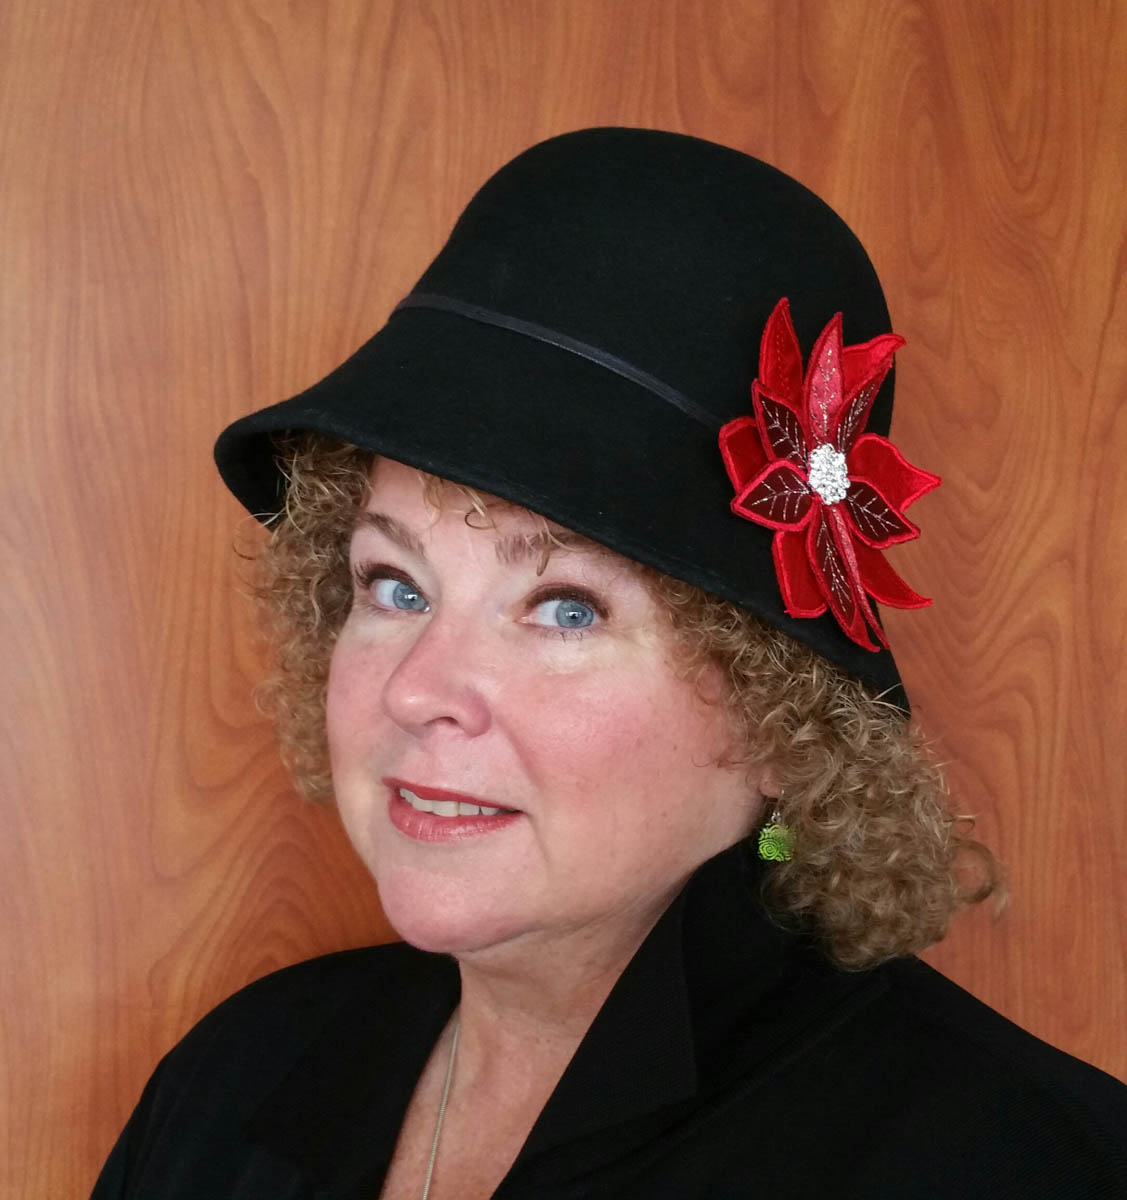
Join BERNINA Ambassador Heidi Lund and create a wonderful Poinsettia pin to wear on your lapel or hat this holiday season. They will make great gifts for family and friends.
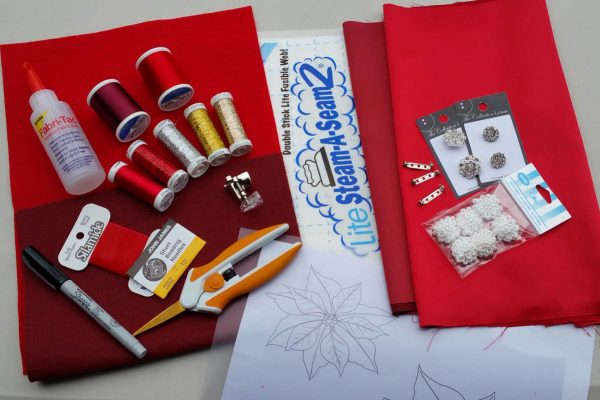
Supply List to Create a Poinsettia Pin
- 3-4 squares of Felt
- 1/4 yard of Satin Fabric in 2 coordinating colors
- Rayon and Holoshimmer Thread
- 90/14 Embroidery or Topstitch needle
- Steam A Seam II Lite or other double sided fusible web
- Scissors
- Size 10 Beading Needle and Silamide Beading Thread
- Thimble
- Template Plastic and an extra-fine point Sharpie Marker
- Fabri-Tac glue
- Rhinestone button or beaded ribbon flower trim
- BERNINA Quilting foot #29
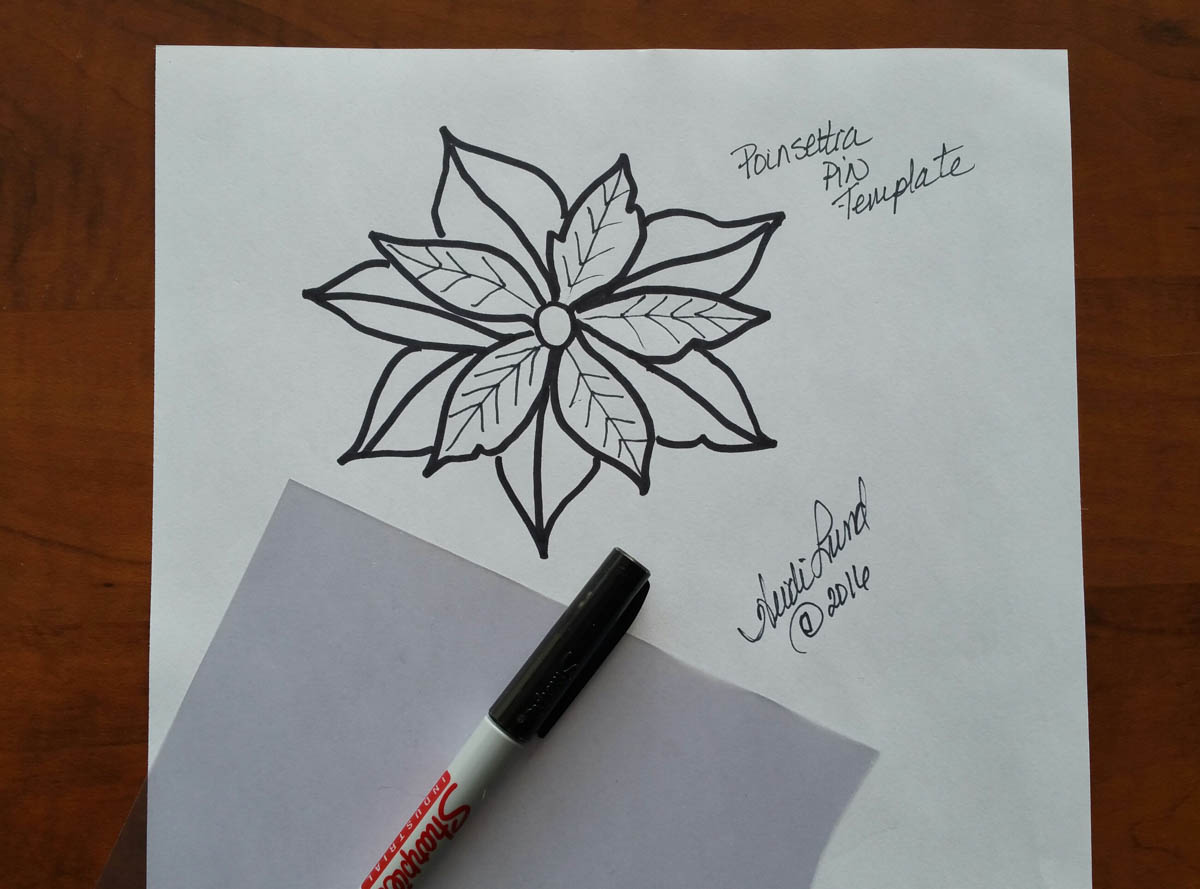
- Poinsetta Pin Template

Instructions to Create a Poinsettia Pin
Using the double sided fusible web, fuse an 8.5″ x 11″ piece of the satin to a piece of the color coordinated felt. Next fuse two pieces of satin together.
Note: Turn your iron down to medium so you do not shrink the satin and the fusible.
Trace Poinsettia Pattern onto template plastic. I have included an entire pattern, but you really only need 1 large petal and 1 small petal. Once traced, cut your templates out.
Trace the larger petal shape onto the fused satin and felt. You will need 6 large petals for the base of the flower.
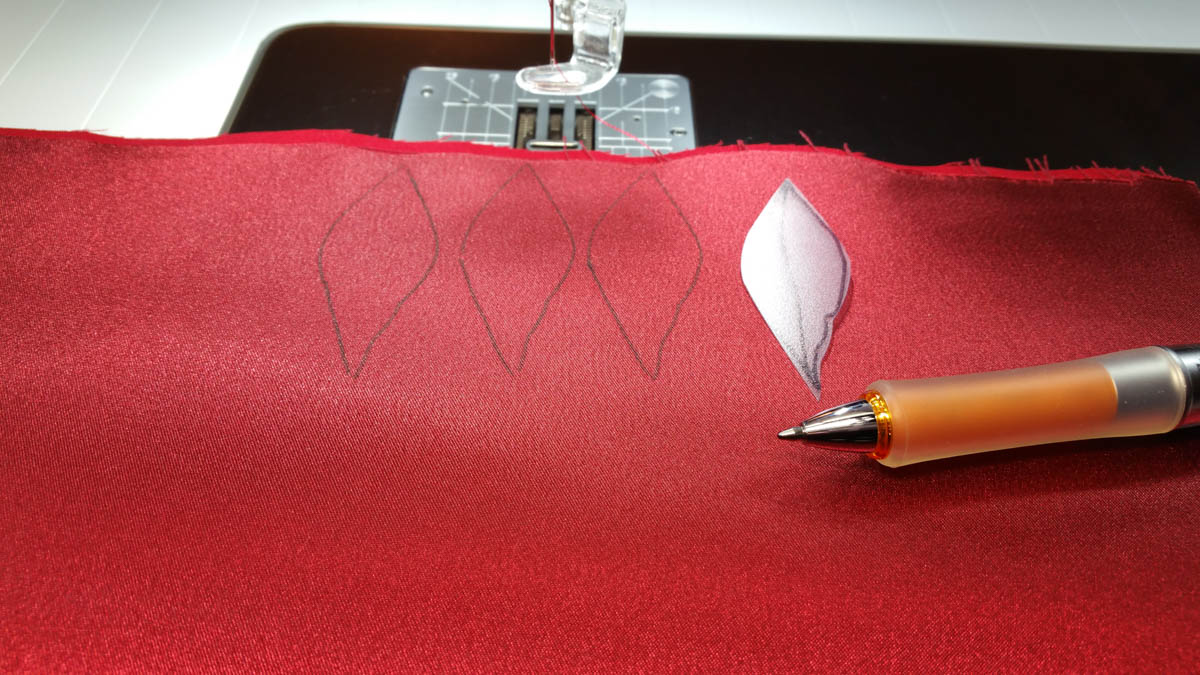
Now trace the smaller petal onto the two fused satins. You will need 5 small petals for the top of the flower.
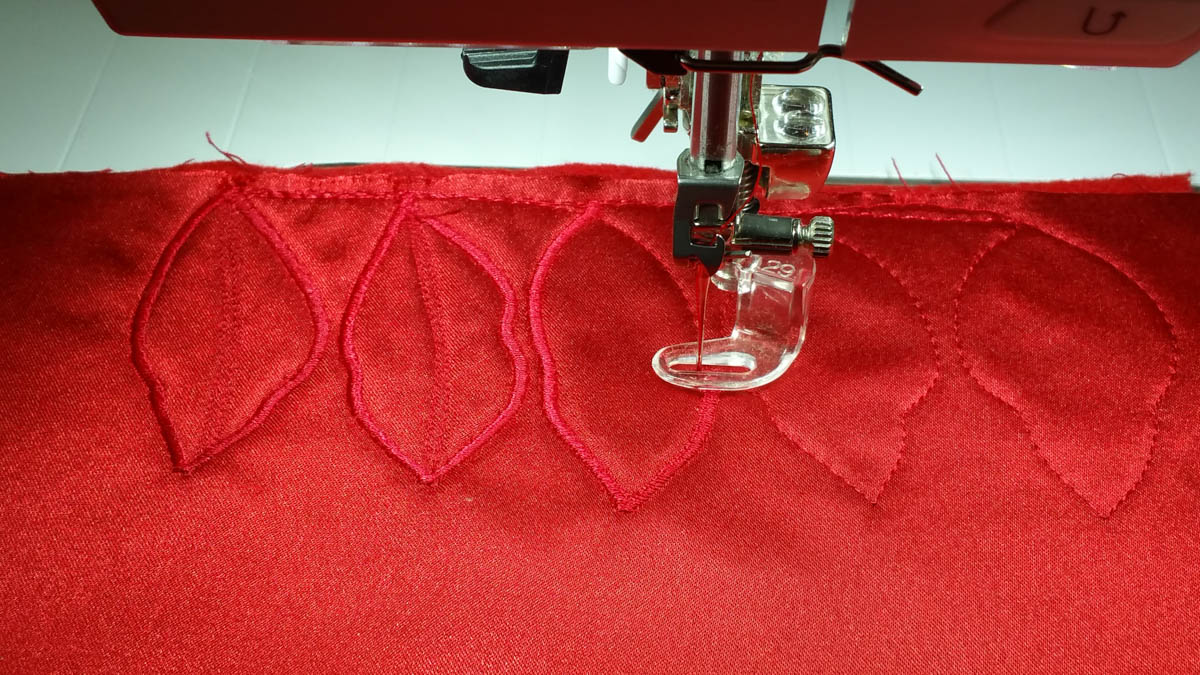
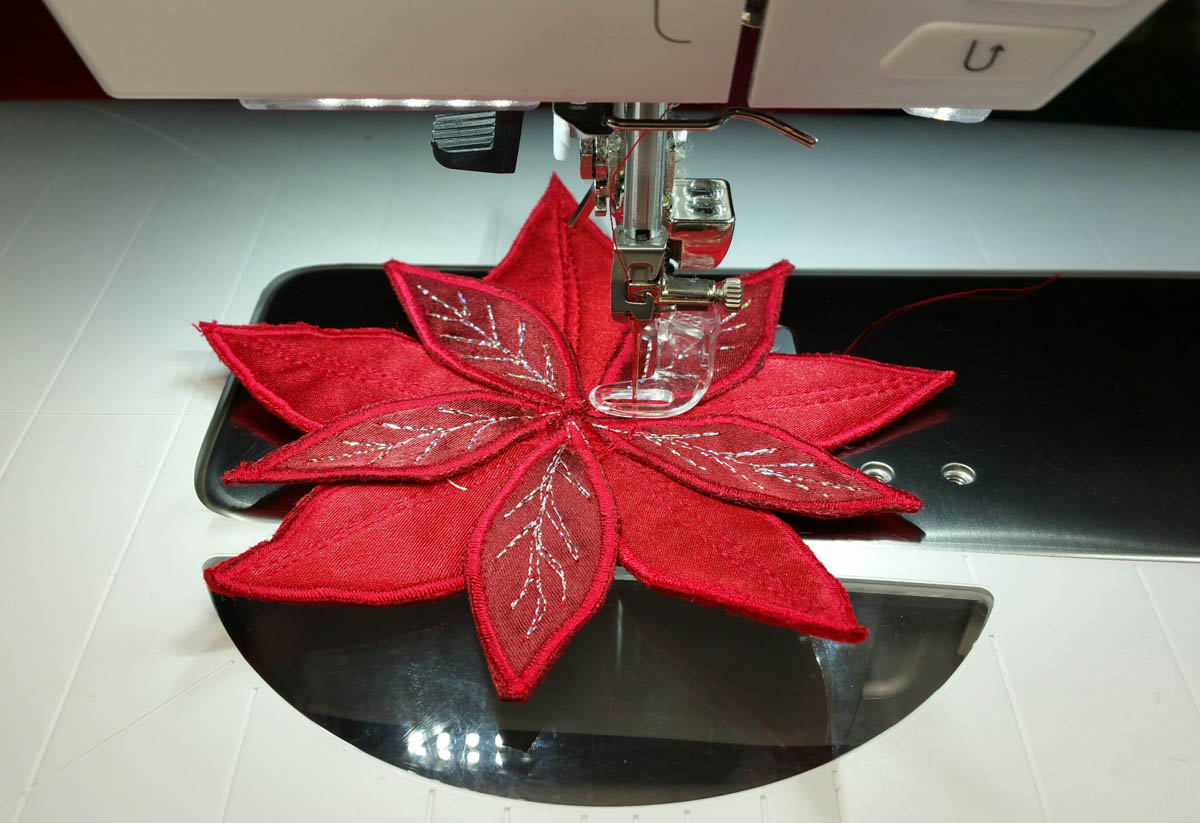
Set your machine up for free-motion. Make sure your machine is cleaned and well oiled. Drop your feed dogs and attach your BERNINA Quilting foot #29.
Load the top of your machine and your bobbin with matching rayon thread.
Set your machine for a zigzag satin stitch approximately 2.5 to 3.0 in width. You do not have to set your length, because you are sewing free-motion.
Starting at the bottom of each petal, stitch free-motion zigzag around your leaf design. Once you get back to the bottom of the petal, switch to free-motion straight stitch and add center veins to your leaf. Move onto the next petal and repeat.
When you have completed your smaller petals, change your top thread to the sparkly Holoshimmer thread and then free-motion stitch the veins inside the leaves.
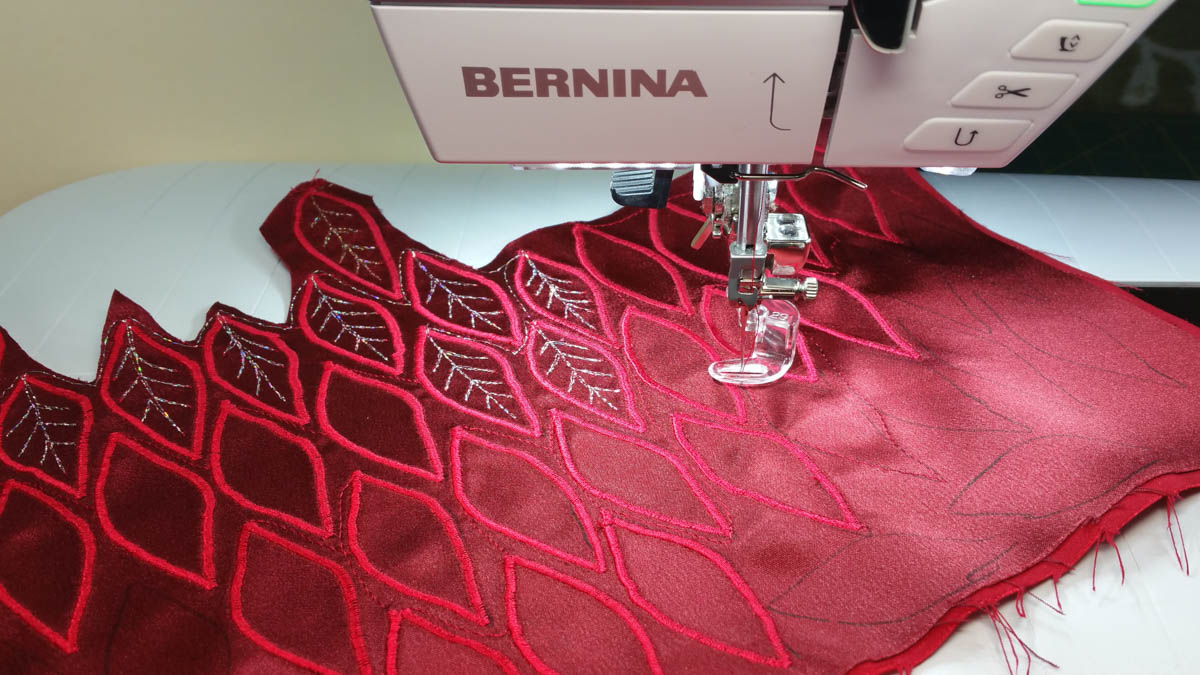
Once you have completed a “sheet” of petals, use a sharp pair of scissor and cut out each petal by trimming close to the stitching lines.

Take your leftover felt and cut into circles about 1.5″ wide in circumference. This is the base that you will be attaching your flower petals to.
You now should have 3 flower components: large flower petals, small flower petals and felt circles. It is time for assembly.
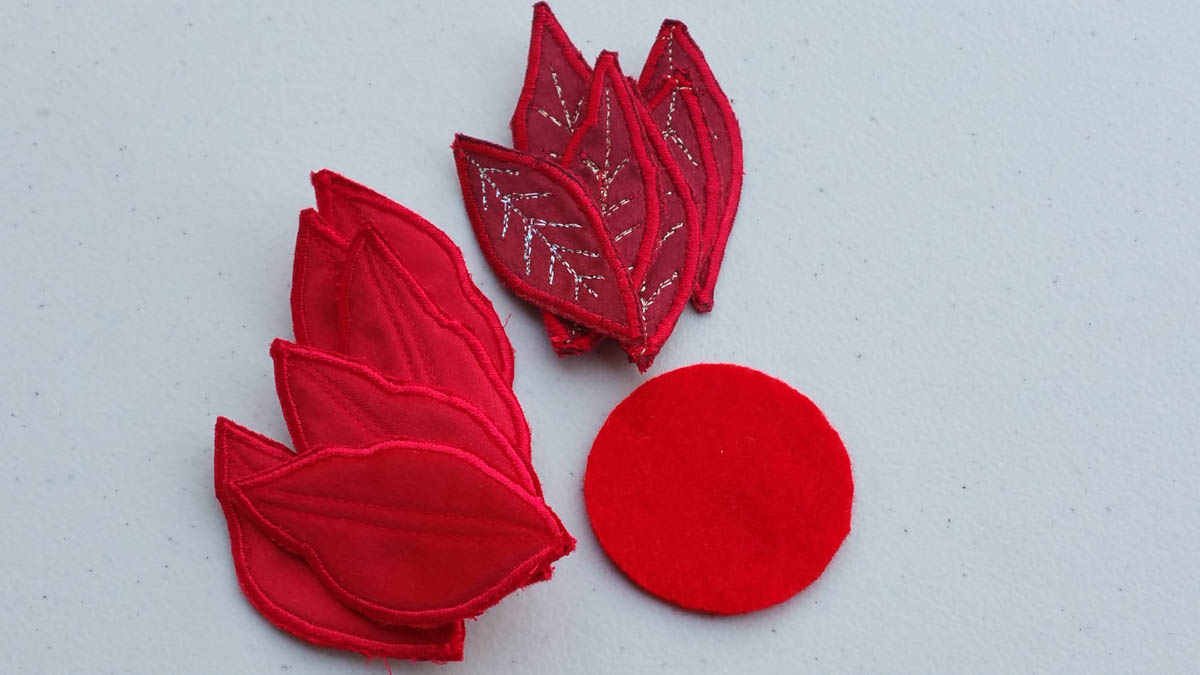
To make each flower you will need 6 of the larger petals, 5 of the smaller petals the center piece.
Lay the cut circle on your work surface and place the six large leaves over the top of it with their points meeting in the center.
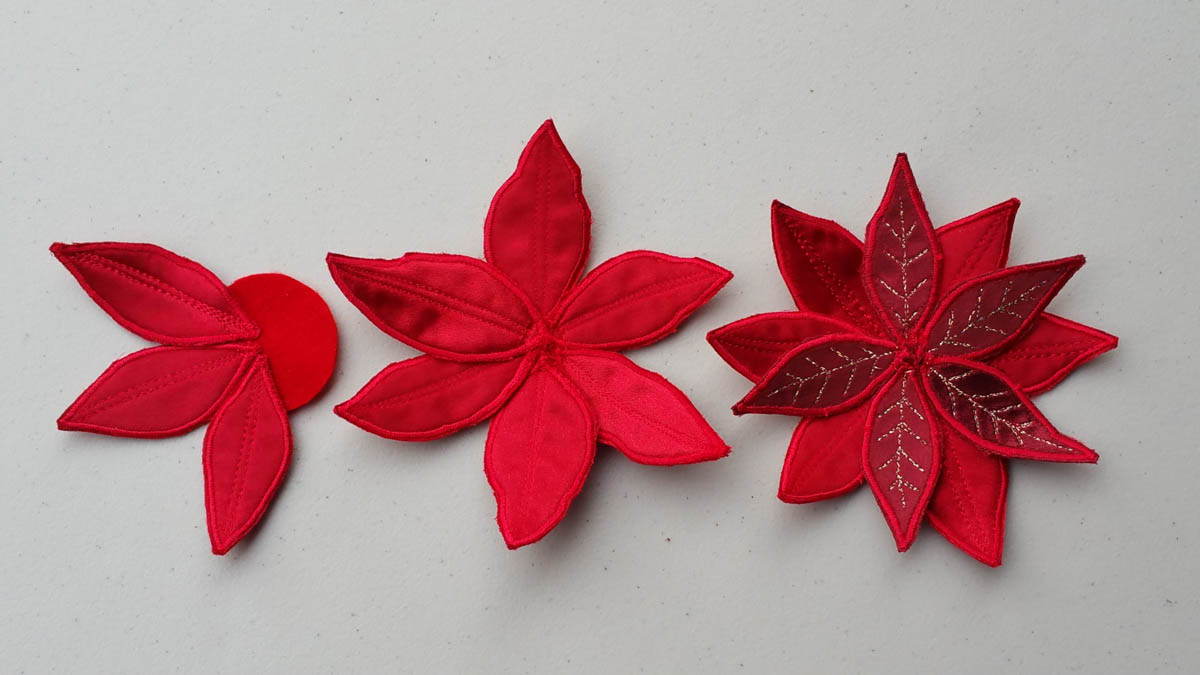
Take this first layer to your machine and using the same rayon thread, you will free-motion straight stitch a circle a couple of times around the center. Make sure that each petal is stitched down to the circle. Now add the smaller petals on top and free-motion straight stitch a circle tacking these down as well.
It is time to add your embellishments and this is where the handwork starts. Load a size 10 beading needle with beading thread and you choose what you would like in the center of your poinsettia. Pick a fancy rhinestone button, a ribbon flower, or even beads to stitch into the center for stamens. Secure the button in place.
Note: you may need a thimble to get your needle thru all the layers.

Using the same needle and beading thread, turn the pin over and secure a pin-back finding to the back side of the circle base.
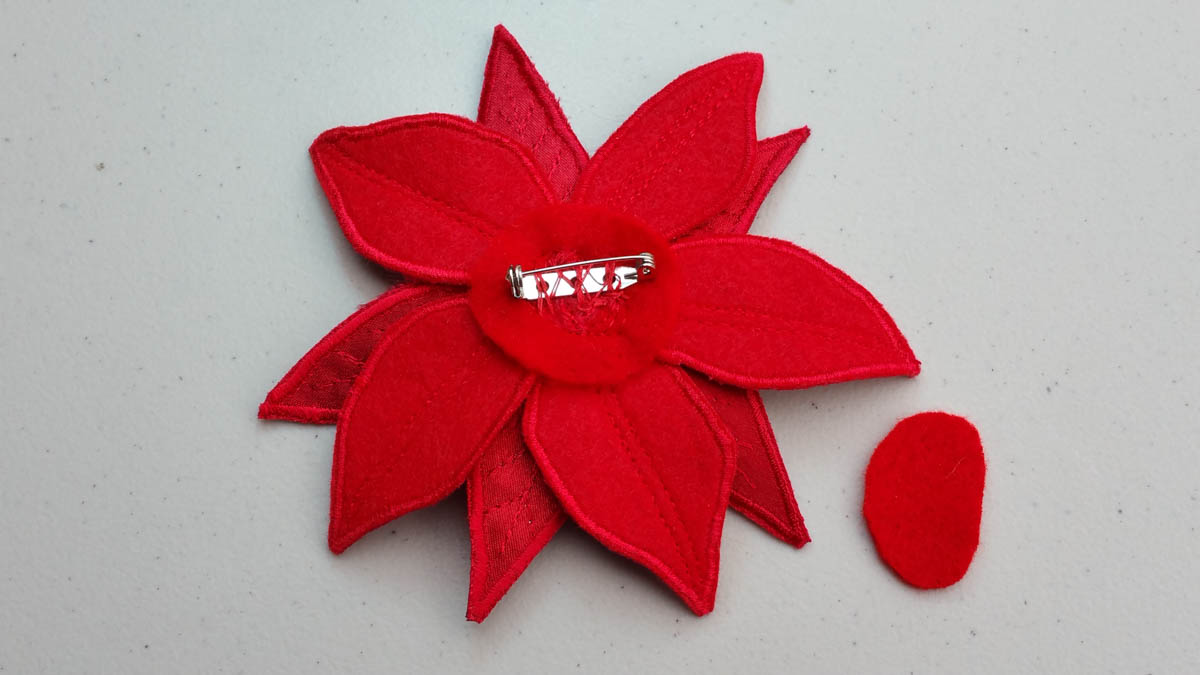
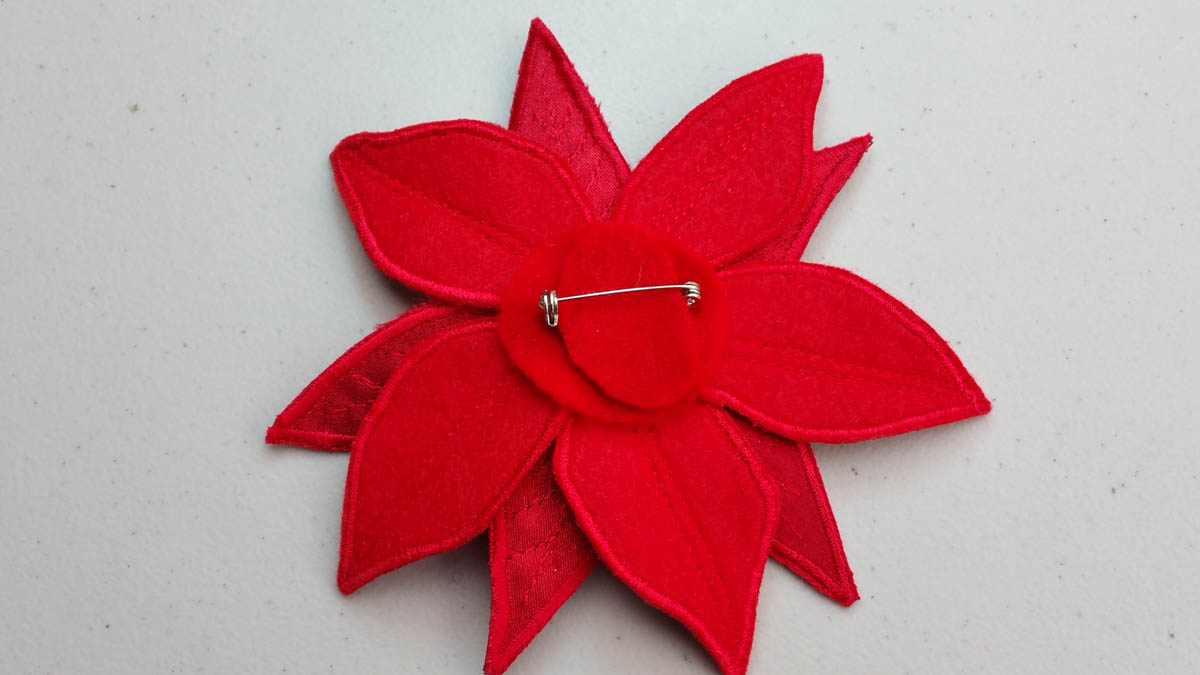
Once pin-back is secured, use your leftover felt scraps to cut a small oval to cover the pin back. Secure in place with Fabri-tac glue.
You now have a wonderful pin to give as Holiday Christmas gift. They are addicting to make and you can easily modify this pin into an ornament by adding a small ribbon loop to them instead of a pin-back. They can then be used as on ornament for your tree or to dress up a package or a bottle of wine for a great gift.
To make these have your own take on the Holidays, change your fabrics, your threads, and your embellishments. The combinations are wonderful. Wishing you all a wonderful Holiday season from the Great Pacific Northwest.
Happy Holidays! Our December 25 Gift for You:
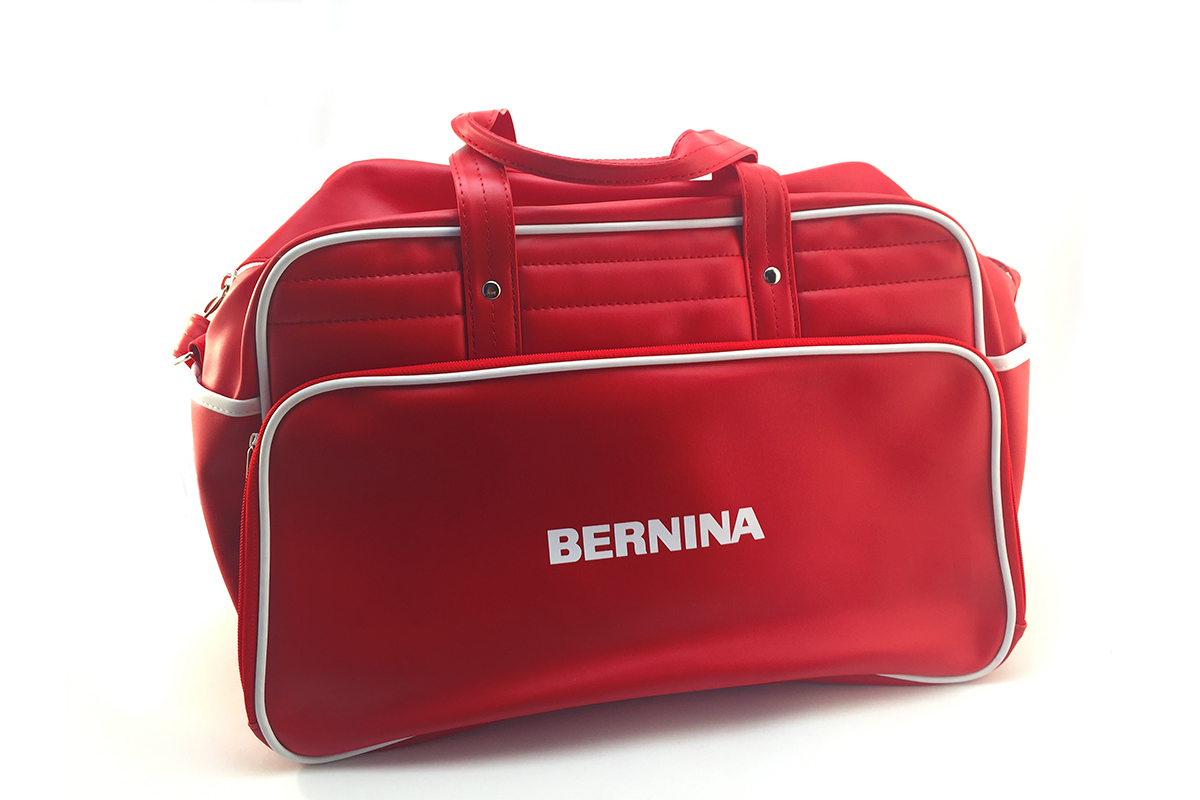
Today’s gift is a BERNINA Weekender bag waiting to be filled with sewing projects when sewing with a friend, or just for toting your stuff to the gym.
All you have to do is post a comment below answering the following question:
What kind of pin would you like to create?
A winner will be chosen at random on December 26, 2016 and announced the following week!
Good luck!
The contest is open for comments until December 25 at 12:00 midnight Central Time. Click here for contest rules.
Congratulations to WeAllSew reader “dharry1215,” the winner of our December 25th gift. Enjoy!


What you might also like


80 comments on “Holiday Poinsettia Pin”
-
-
Butterfly hair clips sound wonderful! Happy Holidays
-
Cute a daisy pin
-
-
I would love to make the poinsettia pin for my friends in my craft group. I know they would love it! Thanks for the instructions!!
-
Oh a stocking pin is a really great idea! Just think of all the embellishments you could add like rick rack, baby buttons, beads and even fur for a band. Happy Holidays!
-
Your craft group would love these pins fusemeister. I made them as gifts across country and just received several thank you’s.
-
-
I’d love to create an ornate pin that lays flat…something that could be pinned to my coat without being jeopardized by a seatbelt. I love brooches!
-
Hi Terri, These work great pinned to a coat or jacket. I wore them all December, pinned them on my right shoulder as I carry my bags on my left. I also covered it with my hand when I slid my heavier coat on it so not to curl the petal edges up. Have fun, I found some rhinestone snowflake buttons that looked great in the center too!
-
-
I would love to create a pine tree pin because I love pine trees!
-
You could do this same technique and make virtually any shape.
Enjoy and Happy Holidays!
-
-
I make lots of Scottie pins. Think I want to try that poinsettia. It would be lovely in white and golds.
-
Yes, it would be great in white and golds. I have made it up in fuchsia and purple. It is really pretty!
-
-
Love the poinsettia, but I would like to see a tutorial for a snowflake pin because it can be worn all winter, not just for the holidays.
-
Sounds like an idea for next year! My mom loved snowflakes!
-
-
A free motion pin
-
Yes, this was done free motion on my BERNINA 770qe machine. You could do it on an embroidery machine as well using similar techniques. Either use a poinsettia pattern, or digitize the petal shapes.
-
-
That is a beautiful pin and a project for me to attempt. I do like flowers but for some reason a dragon fly pin or hummingbird pin sounds pretty cool.
-
Liz, I am sure you can use this same technique to make a dragon fly or a hummingbird. You could google a royalty free bird pattern to use. The decorating (embellishing) on top would be fabulous with iridescent threads, beads and sequins.
-
-
I think it would be fun to make a house pin since I work in the real estate business.
-
A house pin sounds really fabulous, you could layer/fuse the windows, panes and even a great bright colored door!
-
-
I would create a stocking pin–love Christmas stockings!
-
Oh a stocking pin is a really great idea! Just think of all the embellishments you could add like rick rack, baby buttons, beads and even fur for a band. Happy Holidays
-
-
I think the Poinsettia Pin is awesome and I would love to try and make it. Thanks for the great tutorial.
-
You very welcome, Happy Holidays!
-
-
I would like to make a Christmas tree pin. Thank you for all your good ideas.
-
A Christmas Tree pin would be awesome! There are so many great embellishments you can add! Happy Holidays
-
-
I love this pin, it’s so clever how she made and assembled the parts. Bravo! And a Merry Christmas to all!
-
Thank you Gloria, Merry Christmas and Happy New Year
-
-
one for each holiday season
-
Awesome idea, valentines is coming!
-
-
I really like the poinsettia pin. It is very pretty. Any other type of flower pin would be very nice.
-
This would be so fun making Daisy’s and Cone Flowers.
-
-
I have seen zipper pins that are quite unique that look like a flower…a tutorial on how to do that would be great!
-
I’ve seen them as well. I will have to investigate. I am not sure how you would use a machine for assembly, but will research.
-
-
A snowman!
-
A snowman sounds really fun. Thank you for the idea.
-
-
Holly with red berries
-
Yes, Holly is great. If you need a template, search under my name on this blog and there is a holly template from the ornament project I did last year. Happy Holidays.
-
-
I think you could easily adapt this technique to make a sunflower pin.
-
A sunflower would be fabulous!
-
-
I would like to make a snowflake pin.
-
A snowman is a fabulous idea!
-
-
It would be a flower pin. I think it would go with most outfits.
-
I think this technique can be used to make several different types of flowers.
-
-
A pin for a napkin ring would be wonderful! I have some gold napkin rings and these poinsettia pins would look wonderful with them!
-
A pin on a napkin ring would be terrific. You could then send each guest home with one as a thank you gift or party favor.
-
-
I live in mountains so I tend to go woodsy. Pinecones, oak leaves.
-
I have a great tutorial on this BERNINA blog that shows you how to make thread leaves including oak ones. Just put my name in the search bar and it will bring it up. Have fun!
-
-
I think a gardenia pin would be nice. Ever sense I was a teen I have loved their scent. Thank you and Merry Christmas.
-
A gardenia would be fabulous. Happy Holidays to you and yours.
-
-
I would love to create a flower pin, something like a gerbera (sp) daisy perhaps.
-
You can indeed use this technique to make many different flowers.
-
-
Thank you for pin idea. I probably would create an embroidered huckleberry pin with a swirly leaf applique.
-
That sounds wonderful!
-
-
poppy pin
-
Great idea!
-
-
I would love to duplicate this pin exactly as designed!
-
Hi Janice, please do. That is what this blog is for. The template for the poinsettia is above under the supply list. Just click on the link. Have fun!
-
-
Love that one, but what about pansies or
a lilly?-
Pansies or Lily’s would be a great addition as pins!
-
-
I am a flower type person and I like irises so that would be an ideal type of pin for me to create.
-
An Iris would be wonderful done using this technique.
-
-
So pretty!!! I’d like to make a snowflake.
-
I think a snowflake would be very festive for the winter months!
-
-
I would like to create a shamrock pin.
-
A shamrock would be great, you have a couple months before St. Patrick’s day!
-
-
A flower pin to add to hats that I make for charity purposes for refugees and women and children in crisis.
-
You can use your imagination and make any kind of flowers you like. I love adding them to hats too.
-
-
I like making flower pins and bow tie / tie pins to pin on little onesies for babies. It lets them be fancy and dress up there favorite comfy clothes. Perfect for the holidays!
-
That sounds like a perfect way to dress up onesies! Happy Holidays
-
-
I’d love to create more flower pins. The poinsettia is lovely.
-
Thank you, I think you can use your imagination and make any kind of flowers you like. Happy Holidays.
-
-
A little reindeer pin would be sweet. I do plan on making the poinsettia pin, it’s pretty.
-
Thank you – Happy New Year!
-
-
How adorable. These could be made in a variety of colors. I can see ornaments, addition to flower or other arrangements. The possibilities are endless. Thank you.
-
You very welcome, yes indeed the possibilities and color combinations are endless.
-
-
I would make pins that are portraits of my dogs.
-
Dog portrait pins would be awesome!
-
-
A snowflake would be very cool!!! I love this lesson.
A Lilly or rose even a daisy would be nice.
I was thinking a pin for our quilt quild-
A guild pin would be fabulous and you could get multiple people working on the project to make sewing and assembly faster. Happy to inspire you! Take care and Happy New Year.
-
Leave a Reply
You must be logged in to post a comment.

Very cute poinsettia! Not sure of what I would make, I did butterfly hair clips for my granddaughter.