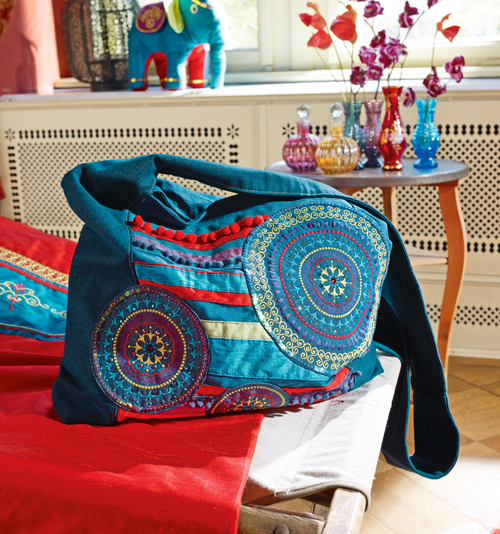
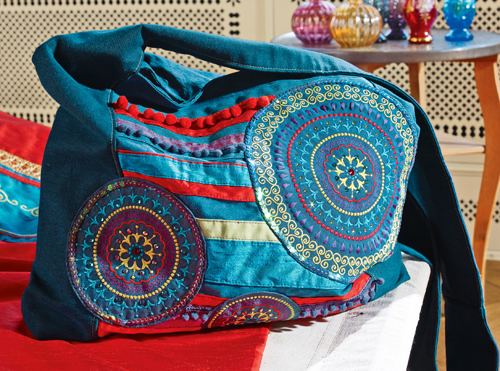
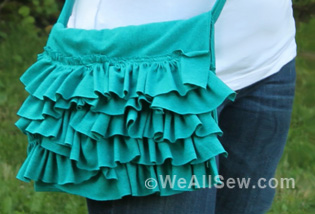
How to Make a Bohemian Shoulder Bag – from Inspiration Magazine and WeAllSew
Looking for a fun and practical project for sewers of all levels? This cool-looking bag goes from super simple to super trendy with plenty of options for embellishment. Enjoy playing with decorative stitches on your machine and splash some color in the process. Walk away (and around!) with a casual bag that shows some serious groove.
Step-by-step samples and photos by Gayle Schliemann. First published in BERNINA International’s Inspiration magazine, Special Issue “Living” 2012.
 Supplies
- 1/2 yard 100% silk dupioni in royal blue
- 1-1/8 yards dark blue fabric (for lining and appliques)
- 1/2 yard denim (for strap)
- Pieces of silk dupioni in red, turquoise, purple, and light green (for appliqued circles and stripes)
- 1/2 yard pompom trim (or other dangling ribbon)
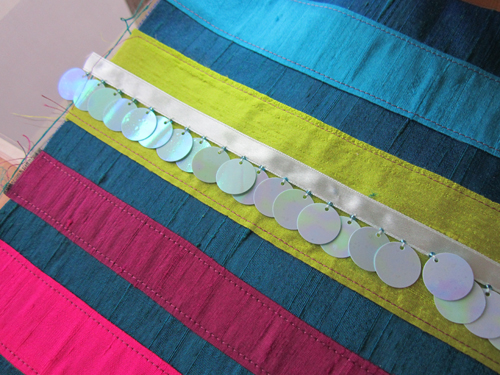
- 1/2 yard sequin tape or other trim
- Iron-on Swarovski rhinestones and applicator
- Isacord embroidery thread in coordinating colors
- Construction thread to match bag
- Fabric glue stick
- Water-soluble fabric marker
- Small, sharp scissors
- Rotary cutter, ruler, and mat
- Edgestitch foot (BERNINA Edgestitch Foot #10/10C/10D)
- Braiding foot (BERNINA Bulky Overlock Foot #12/12C)
- Open-toe foot (BERNINA Open Embroidery Foot #20/20C)
- BERNINA Circular Embroidery Attachment #83
Prefer to embroider your embellishments? Download the free design from bernina.com/en-US > Free Downloads > Inspiration Special Issue Living US > Design #S812. You’ll also need embroidery software and accessories, including your largest hoop, OESD MediumWeight Cut-Away stabilizer, and 505 temporary fabric adhesive spray.
Step 1) Cut the fabric pieces.
Cut the following:
- Two 12″ x 17″ rectangles of royal blue silk dupioni
- Two 8″ x 40″ rectangles of denim
- Two 17″ x 19-1/2″ rectangles of dark blue lining fabric
- Assorted 12″-long strips of silk dupioni, each 1″ to 4″ wide
Stabilize the remaining dark blue fabric with medium-weight cut-away stabilizer, affixing it with fabric adhesive spray.
Cut pieces of stabilized dark blue fabric large enough to accommodate the applique circles:
- 12″ diameter circle (cut at least 14″ square)
- 9″ diameter circle (cut at least 11″ square)
- 6-1/2″ circle (cut at least 8″ square)
- 5″ circle (cut at least 6″ square)
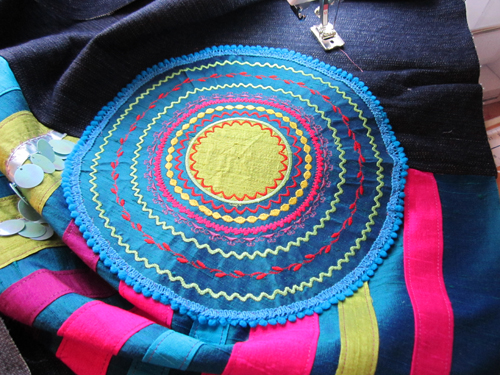
Step 2-a) Applique and embellish the circles using the circular embroidery attachment.
Prefer to embroider the circles? Skip to Step 2-b.
Attach the circular embroidery attachment and open embroidery foot to your machine.
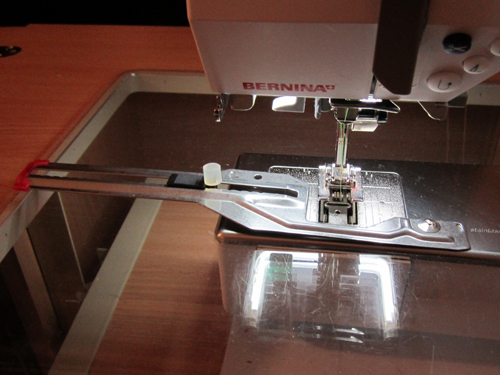
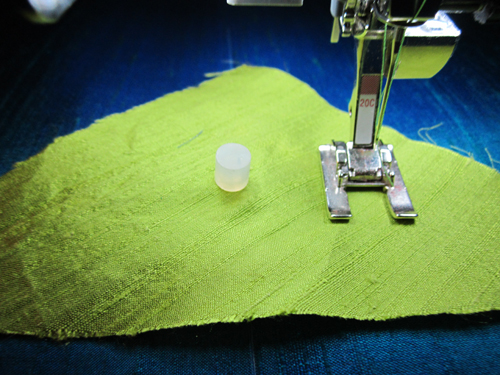
Mark the center of the largest “circle-accommodating” stabilized blue rectangle with a water-soluble marker. Place the fabric on the pin of the circular embroidery attachment. Don’t poke yourself!
Place a piece of silk dupioni over the pin. Place the rubber stopper over the pin.
Set the circular embroidery attachment at the shortest setting.
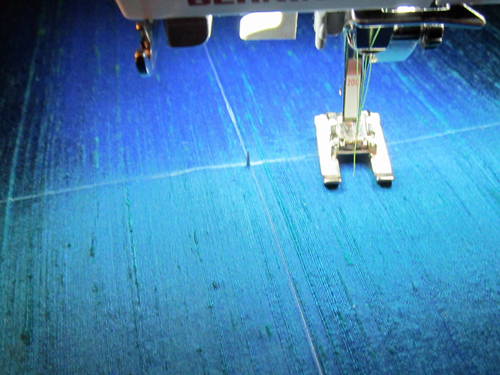
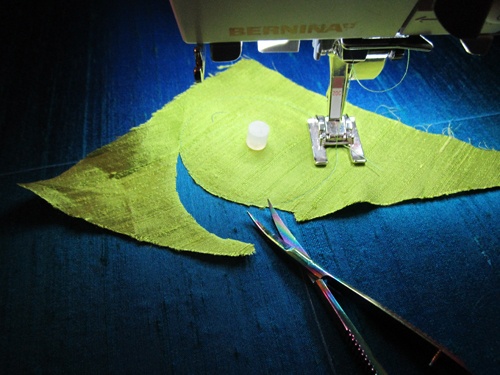
Straight stitch around the circle, making sure the fabric lies flat and doesn’t wrinkle.
Trim the excess fabric from the outside of the stitched circle.
Do not remove the fabric from the attachment until all of the circular embellishments are complete.
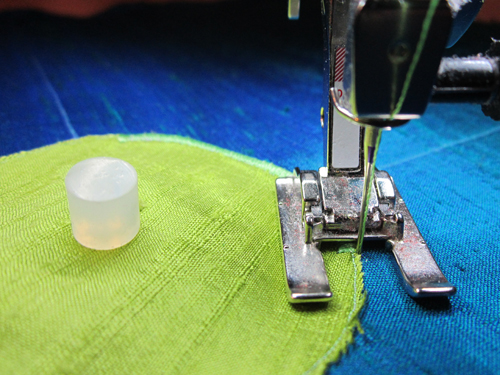
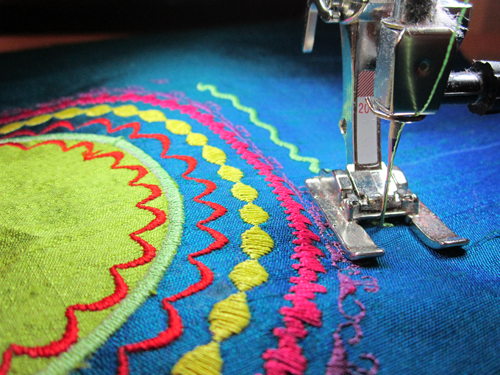
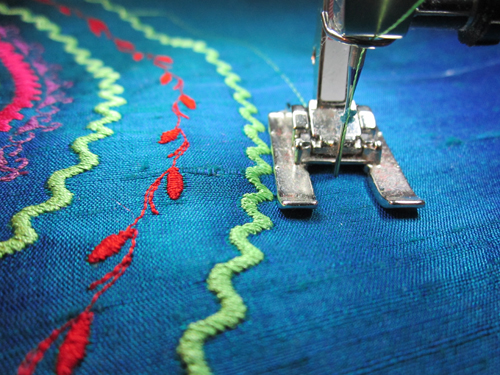
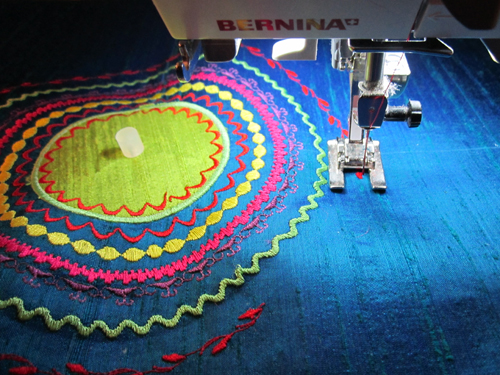
Set your machine for a satin stitch with a width of 3.5 mm and length set at satin stitch (about 0.3 mm).
Sew over the straight stitching all around the circle.
Raise the presser foot and move the circular embroidery attachment out one or two “clicks” as desired.
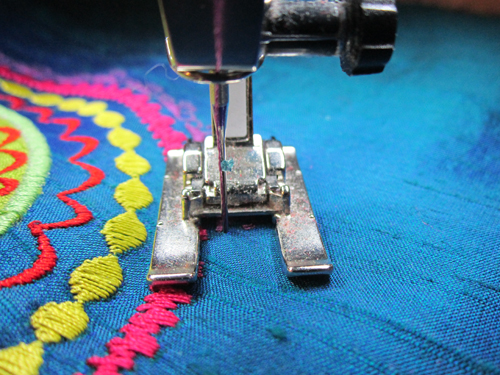
Select a stitch from your machine’s decorative stitch menu. Change to a different thread color if desired. Stitch completely around the circle.

Here are a few stitch suggestions:

Continue in this manner, adding stitches and changing thread colors until the circle is 9″ in diameter.
Remove the embellished fabric from the attachment.
Repeat for the remaining circles using the next largest piece of stabilized blue fabric, for a total of three circles: One 5″, one 6-1/2″ and one 9″ diameter.
Finish the circle edges:
- Sew a long straight stitch 3/8″ from the raw edges. Gather the edge, turning 1/2″ under to the wrong side; press.
- If you prefer a rough look, simply leave the edges exposed and do not turn them under.
Step 2-b) Applique and embellish the circles using your embroidery machine.
Let your embroidery machine to the stitching for you! Download the free embroidery design at bernina.com/en-US > Experience > Free Downloads > Inspiration Special Issue Living US.
Cut a 14″ x 18″ rectangle of blue silk dupioni for the Jumbo Hoop. Stabilize by affixing a layer of cut-away stabilizer to the wrong side with temporary fabric adhesive spray.
Embroider the large ornament. Cut out the circle, leaving a 1/2″-wide seam allowance.
Cut two 12″ x 14″ rectangles of blue fabric for the Large Oval Hoop. Stabilize as before. Embroider the small ornament on each piece. Cut out the circles, leaving a 1/2″-wide seam allowance.
Finish the circle edges:
- Sew a long straight stitch 3/8″ from the raw edges. Gather the edge, turning 1/2″ under to the wrong side; press.
- If you prefer a rough look, simply leave the edges exposed and do not turn them under.
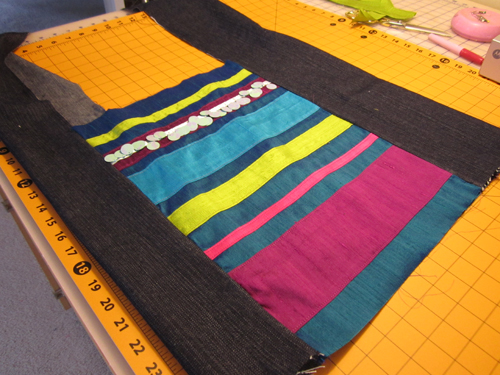
Step 3) Prepare the embellished fabric strips.
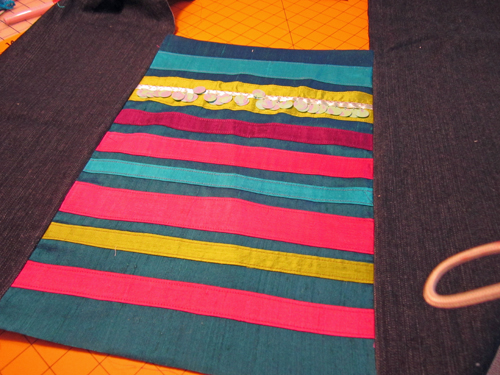
Prepare the decorative strips of silk dupioni on the royal blue foundation front and back panels.
- Turn under 1/4″ and press.
- If you prefer a rough look, simply leave the edges exposed and do not turn them under.
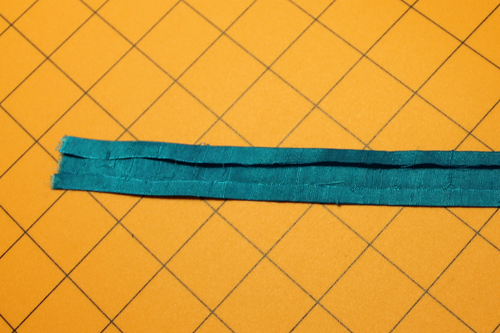
Lay out the royal blue silk rectangles and position the decorative strips on them as desired. Notice that they are 12″ long, the same width as the rectangles.
Once the strips are arranged as you like, use the fabric glue stick to hold them in place so they don’t move around as you sew.
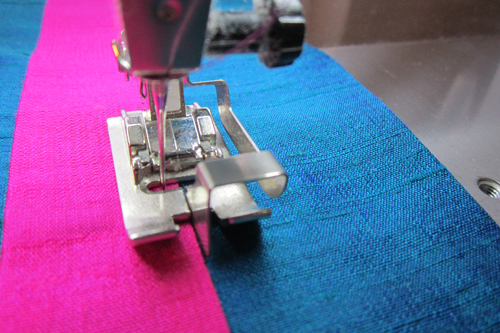
Attach the edgestitch foot to your sewing machine. Select a straight stitch and move the needle position left three steps.
Place the folded edge of a strip against the left side of the guide in the center of the foot. Stitch. Repeat for all strips.
Fold the upper edges of both panels under 1/2″; press.
Select one panel for the front of your bag.
Stitch pompoms, sequins, or other trims randomly on the front panel using decorative stitches of your choice.
Tip: Try using Binder Foot #95 for pompom trim. With only one toe, the trim won’t catch on the foot as you sew.

Step 4) Attach the straps and appliqued circles.
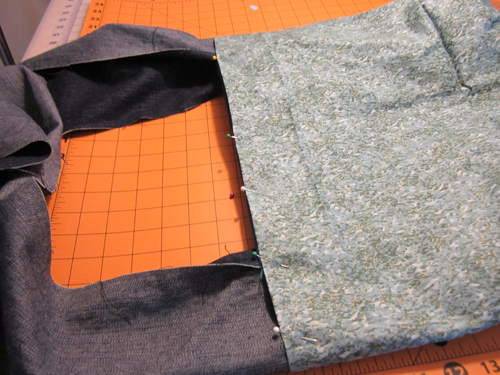
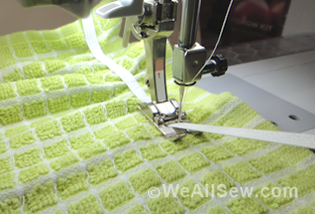
Stitch the long strips of denim (the strap pieces) to the right and left edges of the front panel, aligning the lower edge of the bag front with the short ends of the straps.
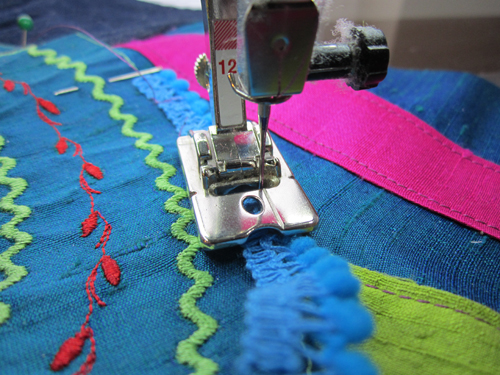
Attach the braiding foot to your sewing machine. Select the running zigzag stitch and set the stitch length at 4 mm.
Tip: Bulky trims move easily under the “tunnel” in the sole of Bulky Overlock Foot #12/12C.
Position the embellished circles on the front panel, overlapping the straps. Stitch them in place, adding small pompom or sequin trim as you sew down the edges.
Step 5) Construct the bag.
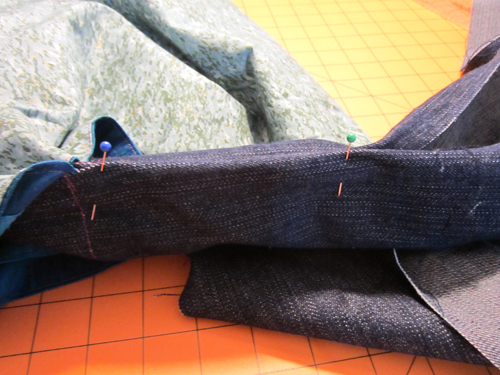
Sew the back panel between the straps at the same end as the front panel, aligning the lower edge of the bag back panel with the short ends of the straps. Press the seam allowances toward the straps.
Place the ends of the straps right sides together; stitch. Press the seam allowances to one side and topstitch the seams.
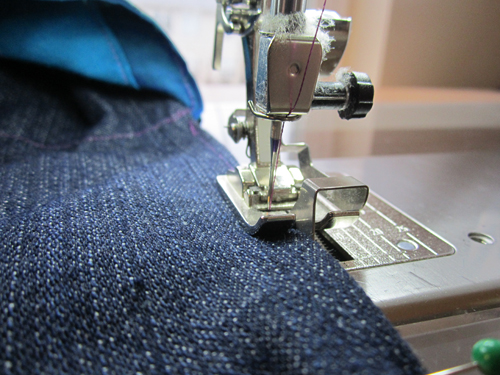
Stitch the lower edge of the bag together.
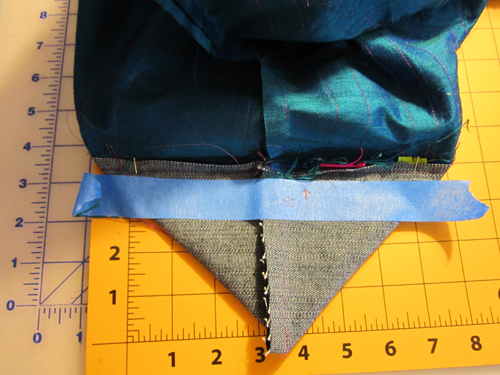
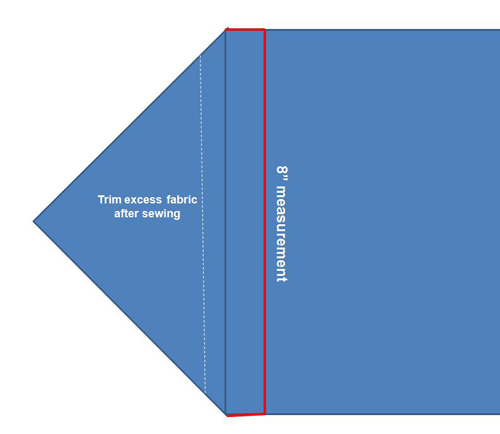
Box the corners to make a base for your bag:
- Fold the corners diagonally as shown, matching the side seams with the base seam.
- Mark a line across the corner where it measures 8″ across. Stitch along this line.


What you might also like


21 comments on “How to Make a Bohemian Shoulder Bag – from Inspiration Magazine and WeAllSew”
-
-
Isn’t it beautiful? The pattern for the elephant is in the same issue of Inspiration magazine, available from BERNINA International: http://www.bernina.com/en-US/MetaCenter-us/Inspiration-Magazine. Jo
-
Hello, I am wondering where I can find the instructions for putting the elephant. How do I purchase the magazine in English. Thank you, bettie
-
Hi, Bette – You can purchase the special Living 2012 issue from BERNINA International: http://www.bernina.com/en-US/MetaCenter-us/Inspiration-Magazine. Just be sure to select the English version rather than French or German. Jo
-
Thank you for your quick reply. bettie
-
-
-
-
I love this project, but the instructions for the putting the bag together (handles especially ) are not very clear. Can you give some additional instructions to clarify?
-
Sure – I can try! Which part are you having trouble with? Jo
-
-
Beautiful project!
-
Page 2 ends with step 3 and page 3 starts with step 7? I was practicing these circles and wonder am I missing something since it appears that step 4,5,6 are missing? Thanks
Candy
-
Oops! No, all the steps are there, they’re just misnumbered. Our proofreaders didn’t catch that! I’ll fix it and repost today. Jo
-
-
I made this bag and would love to post a picture. I have several suggestions. Because the box bottom is so big a positioning suggestion would keep the medallions in the upper 2/3rds of the bag. When putting the lining inside the bag there is no side seam of the outer bag to match with the side seam of the lining. And Why do you have use leave a hole in the lining for turning purposes when we are sewing wrong side to wrong side?
-
Hi, Phyllis – If you’ll send a photo to [email protected], I’ll see if I can add it to your comment – Jo
Sorry – I can’t add your photo to your comment. I could link to it, though; do you have it online anywhere? Jo
-
-
Done, thanks
-
I am a bit confused about adding the straps to the front and back panels, then sewing in the lining before sewing the long edges of the handles together. I keep reading it over and it just doesn’t make sense how we can sew the long edges of the straps together when the lining has already been sewn down to the top of the bag. I hope you can understand my confusion and help clear it up for me. Thank you
-
I’ll see what I can find out – Jo
-
I agree with the above question about sewing the handles after putting the lining in the bag. I am really confused because if you hem the straps, then what happens where they meet the bag? Can you post a picture showing the inside of the bag where the handles meet?
-
Sorry – I don’t have the bag or photos of it, but I can try explaining the construction a little differently: The two embellished panels are sewn between the two long strap pieces, both at the same end, raw edges even. The other 8″-wide ends of the straps are free; stitch them together to make a continuous strap. At this point the straps are still 8″ wide with raw edges (except where they’re seamed to the front and back panels). Put the lining into the bag; when pinning the upper edge, turn under the edges of the straps 1/2″ (you’ll be seaming the long strap edges together later with a 1/2″-wide seam). Stitch the lining into the bag. Fold under the long strap edges 1/2″, align and pin the folded edges, and stitch them together close to the fold. When you fold the edges together you’ll find you have to fold the top edges of the sides together as well, creating big tucks at each side of the bag; this is what gives the bag its shape. Stitch up the opening in the lining and you’re done. Jo
-
I will try it. Thanks for answering so quickly.
-
-
-
-
-
I’m going to try this! Comments about complications are kind of scary!
-
Write us at [email protected] if you have any problems; I think you’ll do fine! Jo
-
Leave a Reply
You must be logged in to post a comment.

Do you have a pattern for that gorgeous elephant as well? Would love to make several for my kiddos. Thanks!