5 Tips for Taking Great Pictures of Your Quilt
Photo artist and BERNINA Ambassador Kerby Smith shares tips on photographing quilts:
You have spent many hours in front of your BERNINA sewing machine creating the best quilt that you can. It doesn’t matter whether the quilt is a gift to your family, a donation quilt for a charity, or a work of art that you want to enter into a quilt show. It may soon be gone and you want a great picture of it. If you are going to enter it in a quilt show, then you need good pictures of it just to have a chance for it to be accepted for exhibit.
The number one reason that most judges reject a quilt from a show is a poor picture of it. It does not matter how good your quilt is, if the photograph of it is poor, then the entry goes straight in the rejection pile.
The large quilt shows receive hundreds of entries for the limited wall space they have in many venues. This means that the judges may only see the image of your quilt for 15 seconds or less on the first round of jurying. That’s right – you have only seconds for the judges to be grabbed by the image of your quilt. If the photograph of it is blurry, if it is too small, if it is not hung square, if there are strange color casts, if it has muddy colors with no distinction between the main image, background and border, if it has other objects in the picture that distract from the quilt, it does not get a second glance by the judges.
What kind of digital camera should you use? The short answer is: the best camera you can afford.
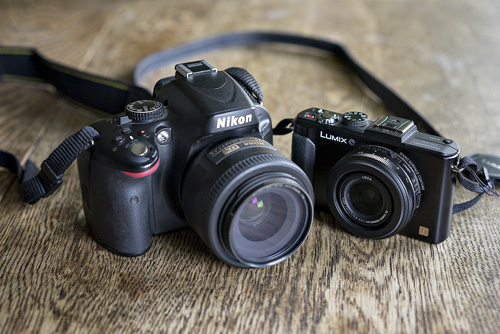
Whether you use a digital single lens reflex camera, left, or a “point-and-shoot” camera, right, it is possible to get great pictures of your quilt or sewing project.
Here’s the longer answer. The best digital camera to use is one that will allow you to shoot a RAW file as well as a JPEG file. But knowing how to use RAW files and process them requires intermediate to advanced photography and computer skills.
Does that mean you cannot take a good picture with a “point-and-shoot” camera that only shoots JPEGs? No. What it means is that you need to take extra care in using the settings on your “point-and-shoot” camera. You also need to make sure that your camera has a tripod socket on the base of it.
Your camera, such as this “point-and-shoot” camera, should have a tripod socket on the base of the camera.
Can you shoot a good image with your smart phone or digital tablet? While the resolution of the better camera phones may be good enough to record the image, there are other issues that make it difficult for you to get a good picture of your quilt or sewing project using one. For one thing, cell phones don’t have a tripod socket so it is very difficult to get the camera in the phone parallel to the quilt. If you need to process the digital image to get the color correct or resize the image for other purposes, it may not be easy to move the image from your smart phone to your computer.
At this time, to get a great picture of your quilt or sewing project my recommendation is to use a digital camera that has a resolution of at least 10 megapixels, and a tripod socket on the base of it. This includes many of the popular “point-and-shoot” digital cameras as well as the digital single lens reflex (DSLR) cameras and the new generation of “mirrorless” digital cameras.
Here are five things you need to know, to get a great picture of your quilt.
1. Know your camera. Even if it is a simple “point-and-shoot” camera you have many options on how to take a picture with it. The camera’s settings can be simple or as complex as using a remote control for your television. The different settings on the camera can dramatically affect how your quilt will look. Use the wrong setting and the colors in your quilt can be way off. Read the manual that came with your camera or go to the manufacturer’s website to download it. Many camera companies offer videos on their websites that you can watch about how to use your camera and its many features.
2. Use a tripod. Handheld camera movement can result in a picture that is blurred even if your focus was correct. It is very difficult if you hand hold the camera to get a quilt square in the viewfinder or display screen. You may think it is framed square but the pressure of pushing the shutter release can send the camera askew. If the camera lens is not aligned with the quilt, then distortion of the quilt can be introduced into the picture. A tripod steadies the camera and allows you to lock the camera into position so it is square to the quilt.
Use a tripod to get your camera square to the quilt hanging on the wall.
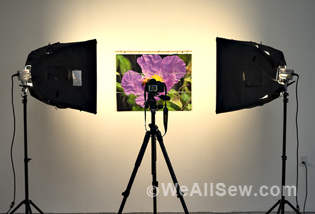
3. Get the right light. Your quilt needs to be evenly lit from top to bottom and side to side. Ideally, the light should be from a single source and should be the same in the center and from corner to corner of the quilt. You may be able to use the electronic flash built into your camera. If you do, then you need to be sure that the flash will cover the entire quilt and that there will not be a hot spot in the center of the quilt. One of the easiest ways to get even light over the entire quilt is to photograph it in open shade.
4. Hang your quilt on a neutral background. Use a bare wall with nothing around the quilt. The wall needs to be larger than the quilt and the quilt needs to be flat against it. If you are photographing the quilt in open shade, then you need to make sure that it is a calm day and the wind will not blow the quilt.
5. Keep the back of your camera parallel to the quilt. The easiest way to do this is to use a level and a tape measure to square the quilt on the wall. Then use them to square your camera to the quilt. Once that is done, lock the tripod and camera in place.




2 comments on “5 Tips for Taking Great Pictures of Your Quilt”
Such advice in practice and your’s great resources!! I’ve gotten so good! It feels like a conversation, even though I’m in a home office looking into a camera on a desk. Your pictures and quilts are fantastic. For some time now, I’ve wanted to enhance my picture quilt, and I’m so inspired.