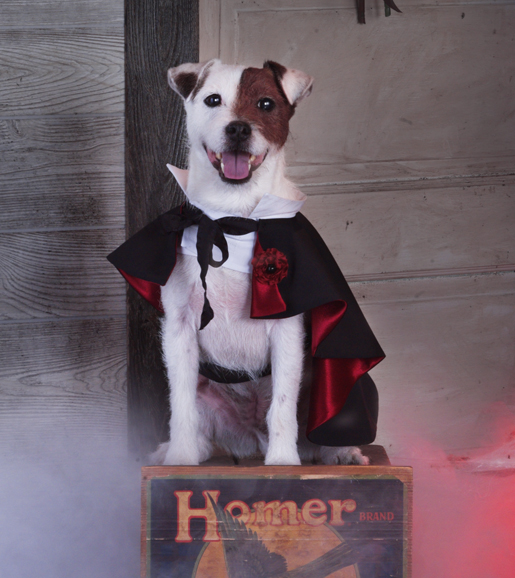
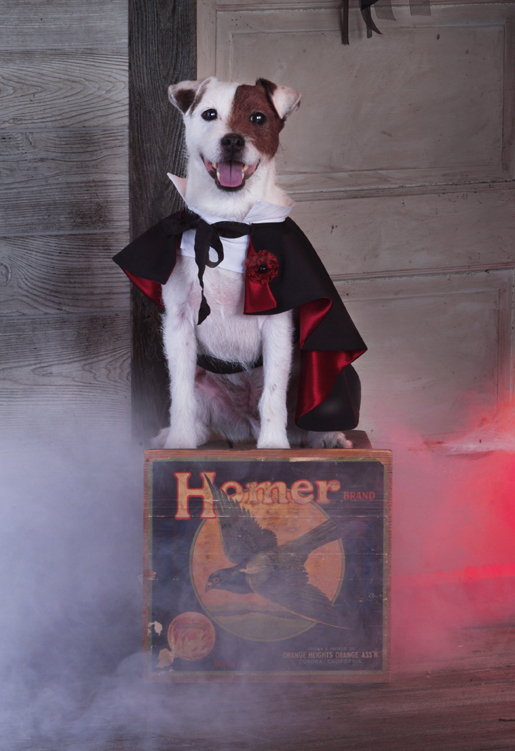
DIY Doggedly-Dandy Dog Cape
Your pooch will be up for any occasion when the fancy strikes. This stylish cape fits dogs of medium size, but is big on style. Think Halloween, holidays, etc. Fun-to-make and fab to wear! Have twice the fun and match your little friend’s outfit to yours – strut your stuff together!
Created by Wanda Clasen of Stamp with Wanda, www.stampwithwanda.com
Supplies
- 1/4 yard white fabric (shirt)
- 1/3 yard black fabric (cape and belt)
- 1/3 yard red satin (cape lining)
- 1/2 yard red ⅝ʺ-wide ribbon (flower)
- 2/3 yard black 1ʺ-wide ribbon (tie)
- 1ʺ-wide white hook-and-loop tape—5” white, 2½ʺ black
- 1/4 yard sew-in interfacing (collar)
- One button (flower center)
- Small piece of black felt (flower)
- 1/2 yard 1/4ʺ-wide black double-fold bias binding
- White thread for shirt construction
- Black thread for cape construction
- Ruler
- Fabric marker
- Hand sewing needle
- Edgestitch foot (optional) (BERNINA Edgestitch Foot #10/10C/10D)
Step 1) Prepare the pattern pieces.
Download and print the cape pattern pieces, enlarging to 200%. Dog_Cape_Pattern.pdf
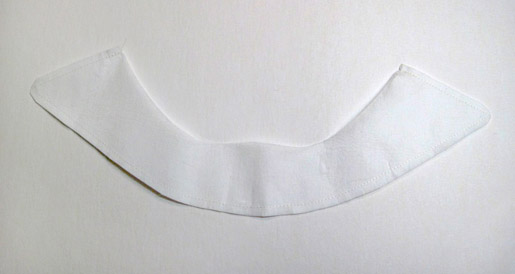
Step 2) Make the cape.
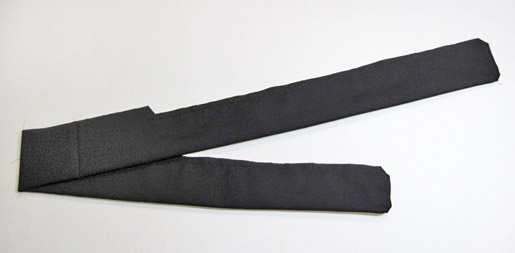
Cut one cape piece from the black cape fabric and one from the red cape lining fabric.
Cut along the foldline from the inner circle (neck opening) to the outer edge.
Place the cape and lining pieces right sides together; pin.
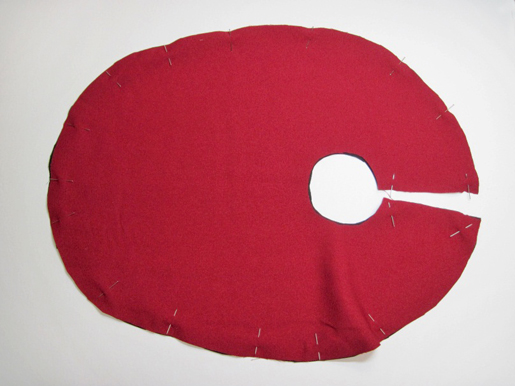
Stitch around the outer edge and the center front opening using a ⅝ʺ-wide seam allowance, leaving the center circle (neck opening) open.
Trim the seam allowances to ¼ʺ and clip the excess fabric from the corners.
Turn right side out and press.
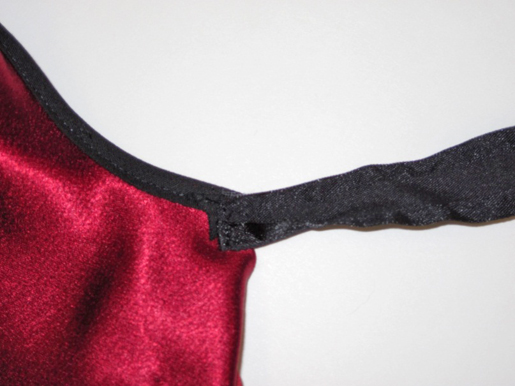
Bind the neck edges:
- To make the edges easier to bind, baste them together 1/8ʺ from the raw edge.
- Leaving 1/2ʺ extra at each end, wrap the double-fold binding around the raw edges, with the narrow half on top. Turn the ends under. Pin the binding in place.
- From the top, stitch close to the inner folded edge of the binding. If you have an edgestitch foot, use it here.
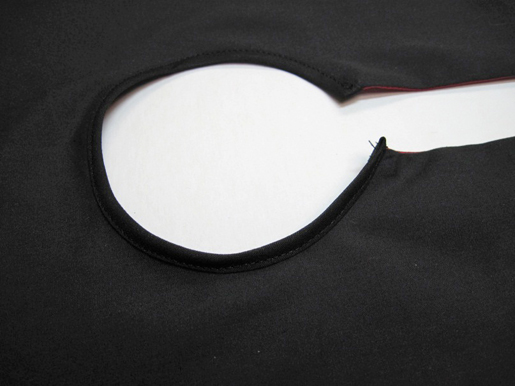
Cut the 1ʺ-wide black ribbon in half into two 12ʺ-long pieces.
Fold one raw edge of each ribbon under 1/4ʺ; stitch in place.
Turn the other raw edge of each ribbon under 1/4ʺ; tack one ribbon to the lining side of the neck edge, one on each side of the opening.
Step 3) Make the shirt.
Cut two collar pieces from the white fabric and one from the sew-in interfacing.
Cut two shirt pieces from the white fabric.
Place the two white collar pieces right sides together; place the interfacing on the wrong side of one collar piece.
Stitch around the collar using a 5/8ʺ-wide seam allowance, leaving the neck edge open. Trim the seam allowances to 1/4ʺ and trim the excess fabric from the corners. Turn right side out and press.
Place the two shirt pieces right sides together, leaving an opening as indicated on the pattern; pin. Insert the collar between the two shirt pieces, matching the center marks.
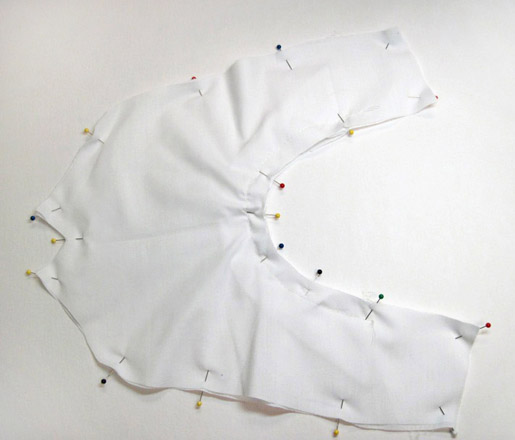
Stitch around the shirt edges using a 5/8ʺ-side seam allowance, leaving an opening on one side for turning. Trim the seam allowances to 1/4ʺ and clip the excess fabric from the corners. Turn right side out and press.
Cut two 2-1/2ʺ loop strips and two 2-1/2ʺ hook strips from the white hook-and-loop tape.
Place one “hook” strip near the top edge of the shirt, 1/4ʺ from the shirt opening. Place the other “hook strip” near the lower edge of the opening. Stitch close to the outer edges of each piece. This is another good place to use an edgestitch foot.
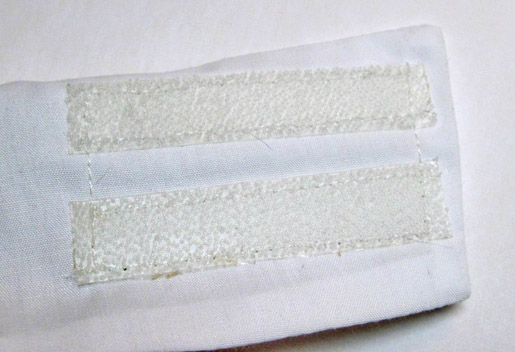
Position the other side of the shirt front over the hook-and loop tape; mark the location of the hook-and-loop tape pieces on the underside of the shirt.
Stitch the “loop” strips to the underside of the shirt at the marked locations. (Photo shows stitching from the outside of the shirt.)
Step 4) Add the belt.
Cut a 25ʺ x 6ʺ strip of black fabric for the belt. Fold it in half lengthwise; pin.
Stitch the raw edges together using a 5/8ʺ-wide seam allowance, leaving a 5ʺ opening near the middle of the long edge. Trim the seam allowances to 1/4ʺ and clip the excess fabric from the corners. Turn and press.
Cut one 2-1/2ʺ loop strip and one 2-1/2ʺ hook strip from the black hook-and-loop tape.
Attach one “hook” strip 1/4ʺ from one end of the belt. Attach the other “loop strip” to the underside of the other end of the belt.
Fold the belt in half and mark the center.
Pin the center of the belt to the outside of the shirt as indicated on the pattern, matching the center of the belt and the center of the shirt.
Stitch the edges of the belt to the shirt. This is a good place to use an edgestitch foot.

Mark the center of the cape and the center of the shirt next to the collar.
Pin the cape to the shirt, matching the centers. Stitch the cape to the shirt close to the collar.
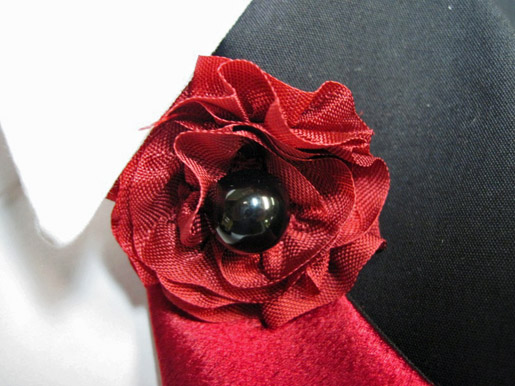
Step 5) Add the rosette.
Cut a 1-1/4ʺ-diameter circle of black felt.
Gather one long edge of the 3/4ʺ-wide red ribbon. Beginning at the outer edge of the circle, sew the gathered ribbon to the felt circle. Then, without cutting the ribbon, continue stitching the ribbon in spiraling circles until the circle is completely filled. Cut the ribbon.
Sew a button to the center of the ribbon flower.
Fold one edge of the cape so the lining shows.
Tack the flower through all layers to hold the fold in place.
Used Products


What you might also like


3 comments on “DIY Doggedly-Dandy Dog Cape”
-
-
Hi laurel769, we did have some issues with the download when the story first went up, but we fixed the issue. Have you tried again to download the PDF?
-
Comments are closed.

tried to download the doggie cape and it won’t work.