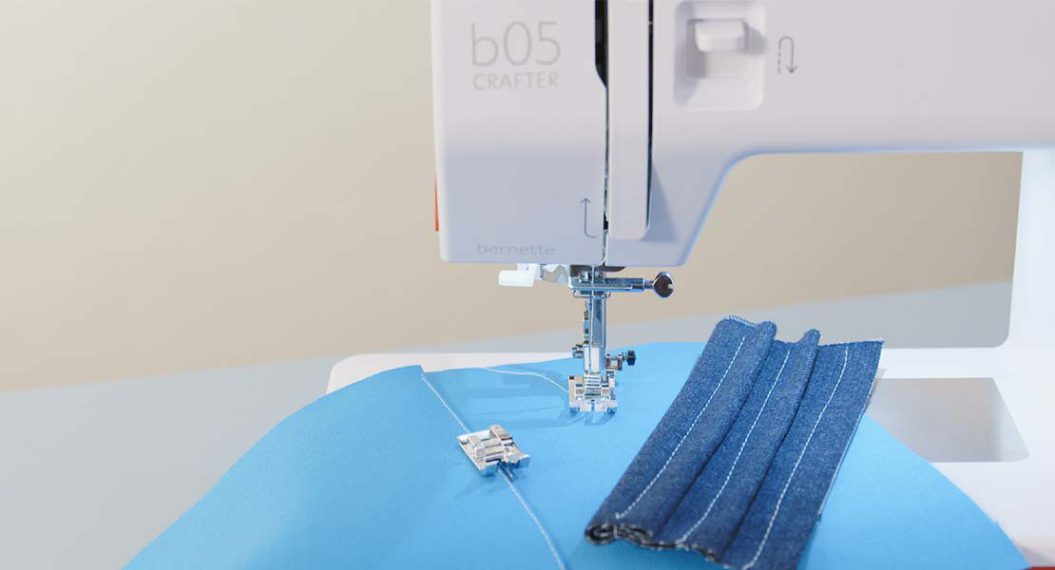
Photography Tip for your Sewing Project
Whether you take photos to print on fabric, as I do for my art quilts, or you use your pictures for inspiration on your next sewing project, you want the best image you can get. It is almost impossible to take a bad picture anymore. The old Brownie Instamatic point and shoot camera has evolved to the point where you can take photographs and instantly send them around the world with the camera in your cell phone.
The point and shoot cameras in cell phones are so easy to use and the pictures are so good we get stunned when we get a bad photo. So, then why do we need any other kind of camera? The reason is those bad photos that occasionally happen. As good as the cameras are in cell phones, like most point and shoot cameras, they have their limitations.
One of the most common problems is a picture where only one area is sharp. One of your subjects may be sharp but the subject in front of it and the subject behind it are out of focus. How much will be sharp in your photo is known as “depth of field.” When only one object or objects in the same plane are in focus, that is known as having “shallow depth of field.”
If you want everything to be sharp in your picture, from the foreground to the background, then you want to have “maximum depth of field.” The two most common things that control depth of field are the focal length and aperture of the camera’s lens.
Focal length is a measurement of how strongly a lens converges or diverges light, and this is reflected in the angle of view seen through the lens. From a fixed point to the subject of your photograph, angle of view is how much magnification you will see in the image. Camera lenses with a narrow field of view magnify the subject. They are called telephoto lenses. Camera lenses where the subject is the same size proportionally in the picture are known as normal lenses. When you want a large field of view and you do not mind that your subject is small, those lenses are called wide-angle lenses.
Because of the way light focuses through a wide-angle lens you have a large depth of field in the images taken with one. At the other extreme are telephoto lenses. While these magnify the subject, they tend to be sharp only in a narrow range, or shallow depth of field. Most commonly, with a telephoto lens the subject in the foreground is in focus and everything else is out of focus.
Cell phone cameras use fixed focal length lenses. In most cases they are wide-angle lenses. Because of this and the small size of their photo sensor, they create images with a lot of depth of field. As a side note, if you zoom the image in your cell phone’s camera to make it larger, what you are really doing is enlarging only a portion of the image on the sensor.
The other factor that controls how much will be in focus in your picture is the size of the opening in your camera’s lens. This is known as the aperture. Aperture is the size of the diaphragm that lets light pass through the camera’s lens to the sensor. Aperture is commonly measured in f-stops. The nomenclature of f-stops can be confusing. A small f-stop number like f/2 is a large opening and lets in a lot of light. At the opposite end of the scale, a large f-stop number like f/36 is a small hole, and lets in only a very small amount of light. It is like a pin-hole.
But when talking about depth of field, the numbers make more sense. If the opening of your lens or aperture is set at f/2 you will have very little depth of field in your picture. If the lens’ aperture is stopped down to f/36, you will have a lot of depth of field in your picture.
Here are some photography tips for your sewing project working with the adjustment of aperture:
Using a short telephoto lens on a 35mm digital camera, let’s look at how aperture changes the depth of field in a still life setup in our sewing studio. For those photo experts, I will mention that the camera was on a tripod and it was set on the Aperture Priority mode. So, as I changed the f-stop, the camera automatically changed the length of time the shutter was open. In this way I had a constant image and exposure. The focus was in the center of the picture on the front most spool of thread. The only variable was the camera’s f-stop.
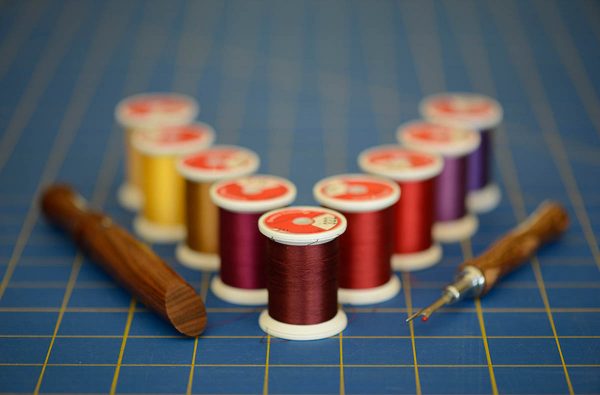
The maximum lens opening for my 105mm Macro lens was f/2.8 and my exposure time was 1/30 of a second. In this image, all you can see that is in focus is the front spool of thread.
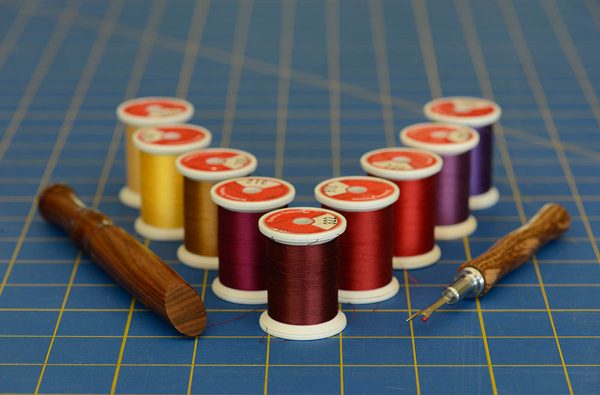
My next picture was taken at f/8 and the shutter speed increased to 1/5 of a second. Here we see that the front spool of thread is again in focus, and so is the tip of the seam ripper. The second roll of thread spools is also starting to come into focus.
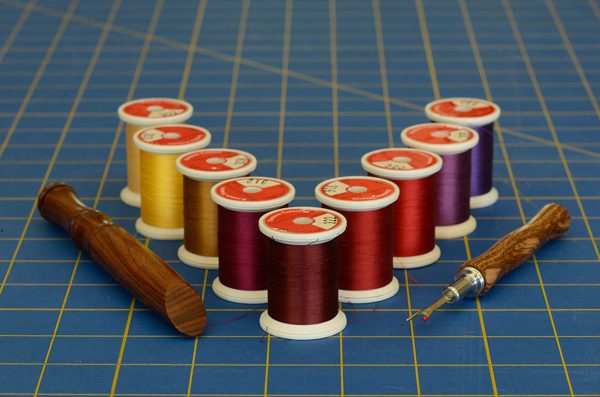
Next to increase my depth of field, my f-stop was set to f/16. To compensate for the smaller opening in the lens, my shutter speed had to increase to .77 seconds. The front spool of thread and the second row of thread are now in focus. The third roll of thread is starting to come into focus.
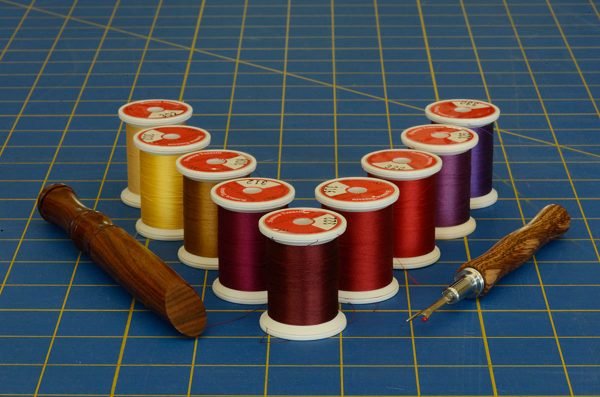
To get the maximum depth of field in this image, I stopped the lens down as far as it would go to f/36. This increased my exposure, or the length of time the shutter was open, to a full three (3) seconds. Once again, my point of focus was on the front spool of thread, but at f/36 all five rows of thread are in focus.
So, next time you want to have everything in focus in your picture, try changing to a camera and lens that gives you the option of changing your aperture to increase your depth of field.