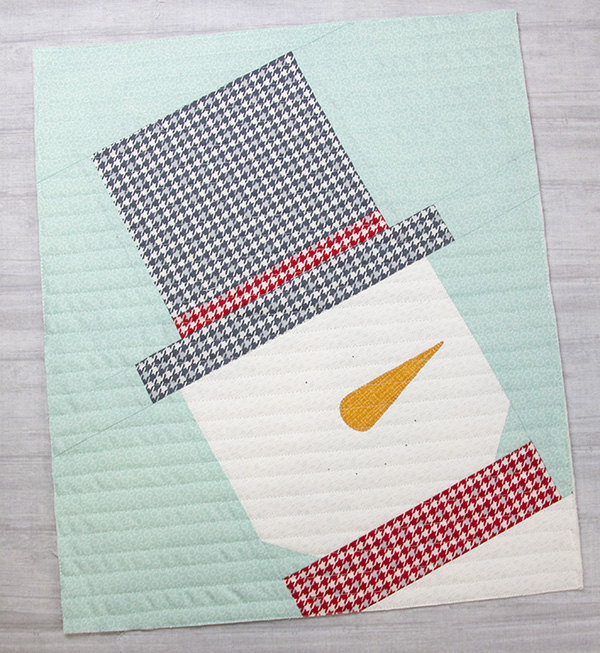
Winter Table Topper
Need a quick last minute gift or decoration for the holidays? Hi, I’m Cherry Guidry, and today I’d like to share Jolly, an easy to piece table topper made with fabric scraps, a little appliqued carrot and a few buttons.
Materials to make the Jolly Table Topper
- Sewing machine, I love sewing on a BERNINA 880
- BERNINA Open Embroidery foot #20
- BERNINA Patchwork Foot with guide #57
- Download the Jolly Layout and Template
- 2″ x 4″ scrap of orange fabric for carrot applique
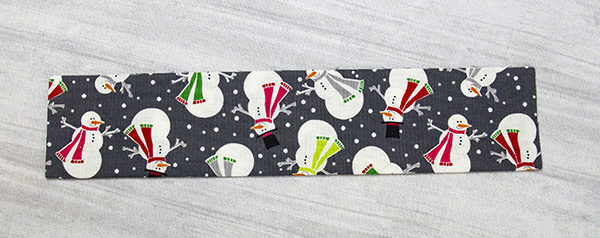
- 5 ½” x width-of-fabric white strip for snowman body
- 5″ x width-of-fabric black strip for hat
- 1/4 yard of red fabric for scarf, hat and binding
- 1/4 yard of aqua fabric for background
- Fat-quarter for backing and hanging sleeve
- 14″ x 16″ piece of batting
- 2″ x 4″ piece of paper-backed fusible webbing
- Fabric scissors
- Black buttons:
(2) 1/2″ for eyes
(5) 1/4″ for mouth - Paper scissors
- Fine tip permanent pen
- Light box (optional)
- Piecing and quilting thread
- Temporary spray adhesive or quilting pins
- Water erasable marking pen
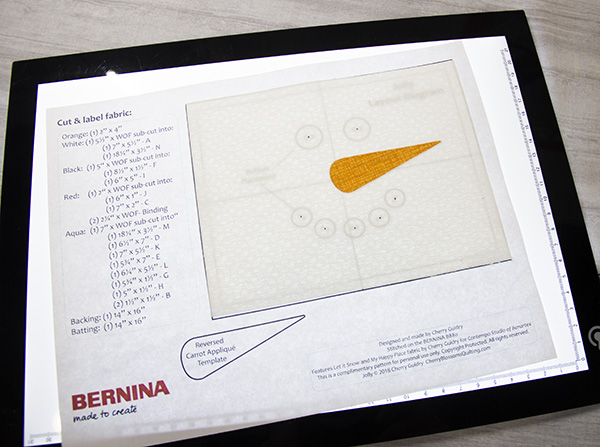
Step 1: Cut and label all fabric
- White 5½” x WOF sub-cut into:
(1) 7″ x 5 ½” – A
(1) 18 ¼” x 3 ½” – N - Black 5” x WOF sub-cut into:
(1) 8 ½” x 1 ½” – F
(1) 6 ” x 5 ” – I - Red 2″ x WOF sub-cut into:
(1) 6″ x 1″ – J
(1) 7″ x 2″ – C
(2) 2 ¼” x WOF – Binding - Aqua 7″ x WOF sub-cut into:
(1) 18 ¼” x 3½” – M
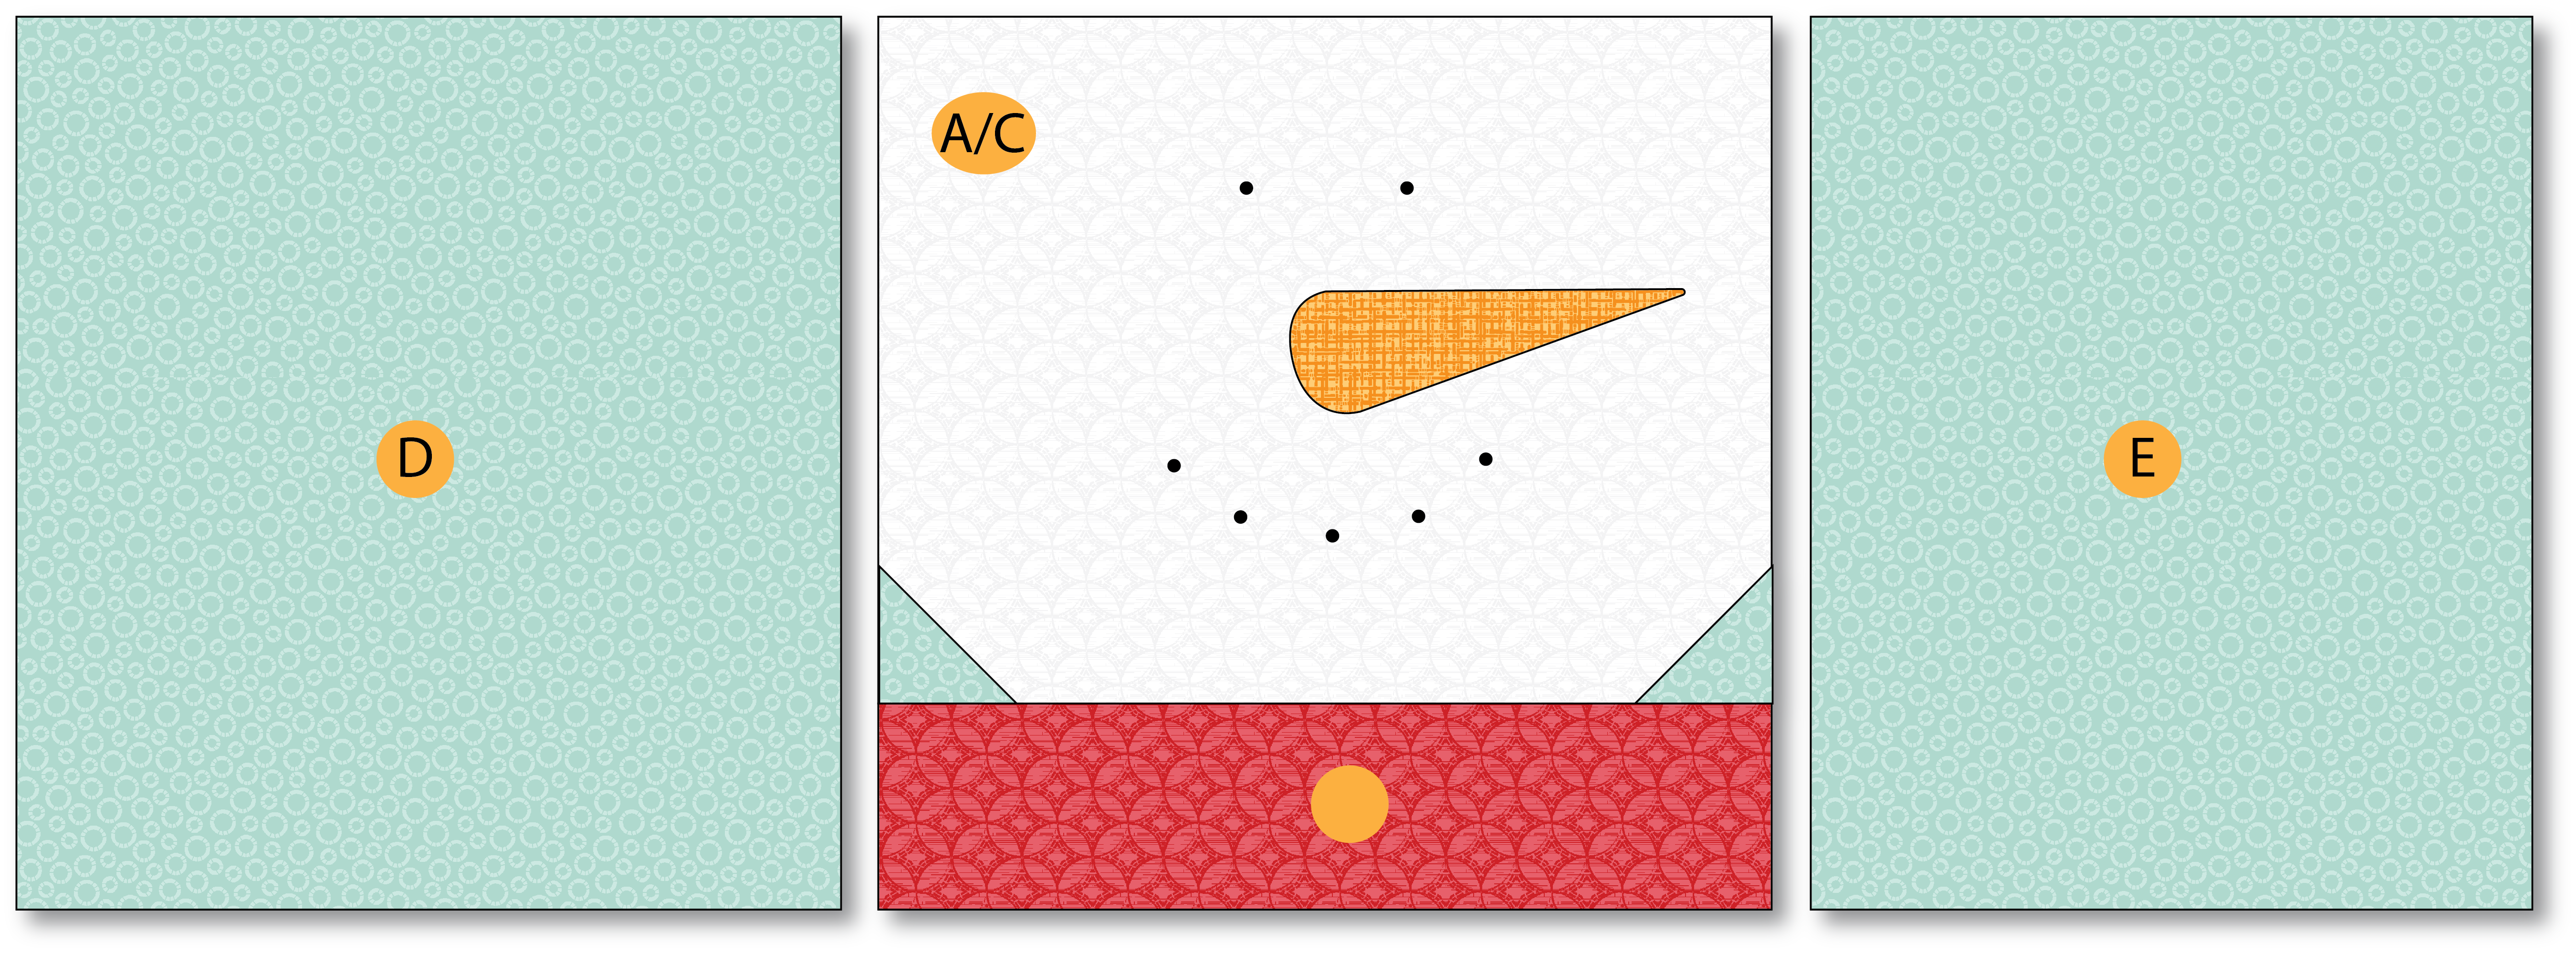
(1) 6 ½” x 7″ – D
(1) 7″ x 5 ½” – K
(1) 5 ¾” x 7″ – E
(1) 6 ¼” x 5 ½” – L
(1) 5 ¾” x 1 ½” – G
(1) 5″ x 1 ½” – H
(2) 1 ½” x 1 ½” – B - Backing fabric: (1) 14″ x 16″
(1) 10″ x 4″ – hanging sleeve
Step 2: The Appliqué
Place the 2″ x 4″ piece of paper-backed fusible webbing over the reversed carrot template, paper side up, and trace the carrot onto the fusible with a permanent marker or pencil.
Place the traced carrot shape, fusible side down, onto the wrong side of the 2″ x 4″ orange fabric and fuse in place.
Cut the carrot on the traced line.
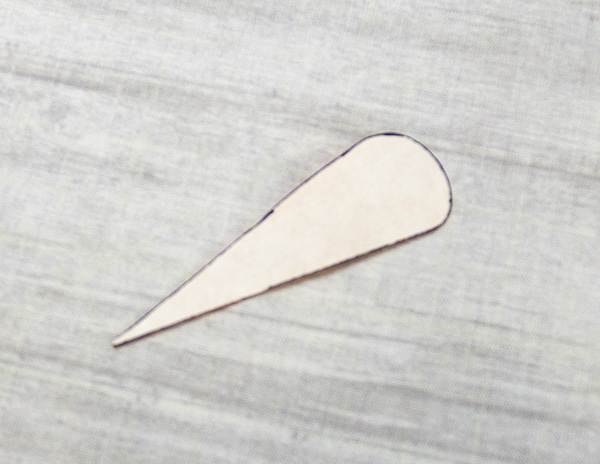
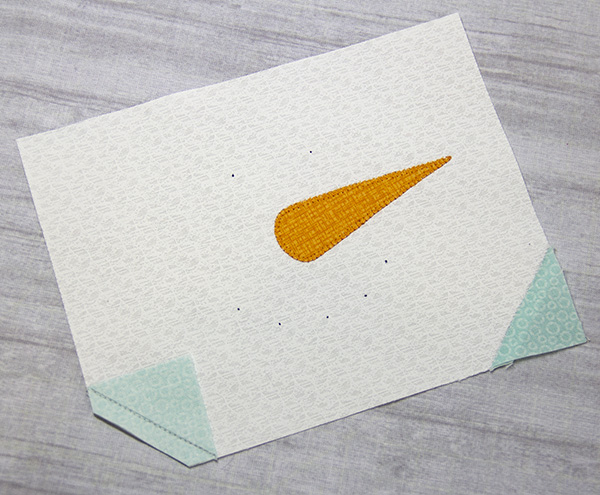
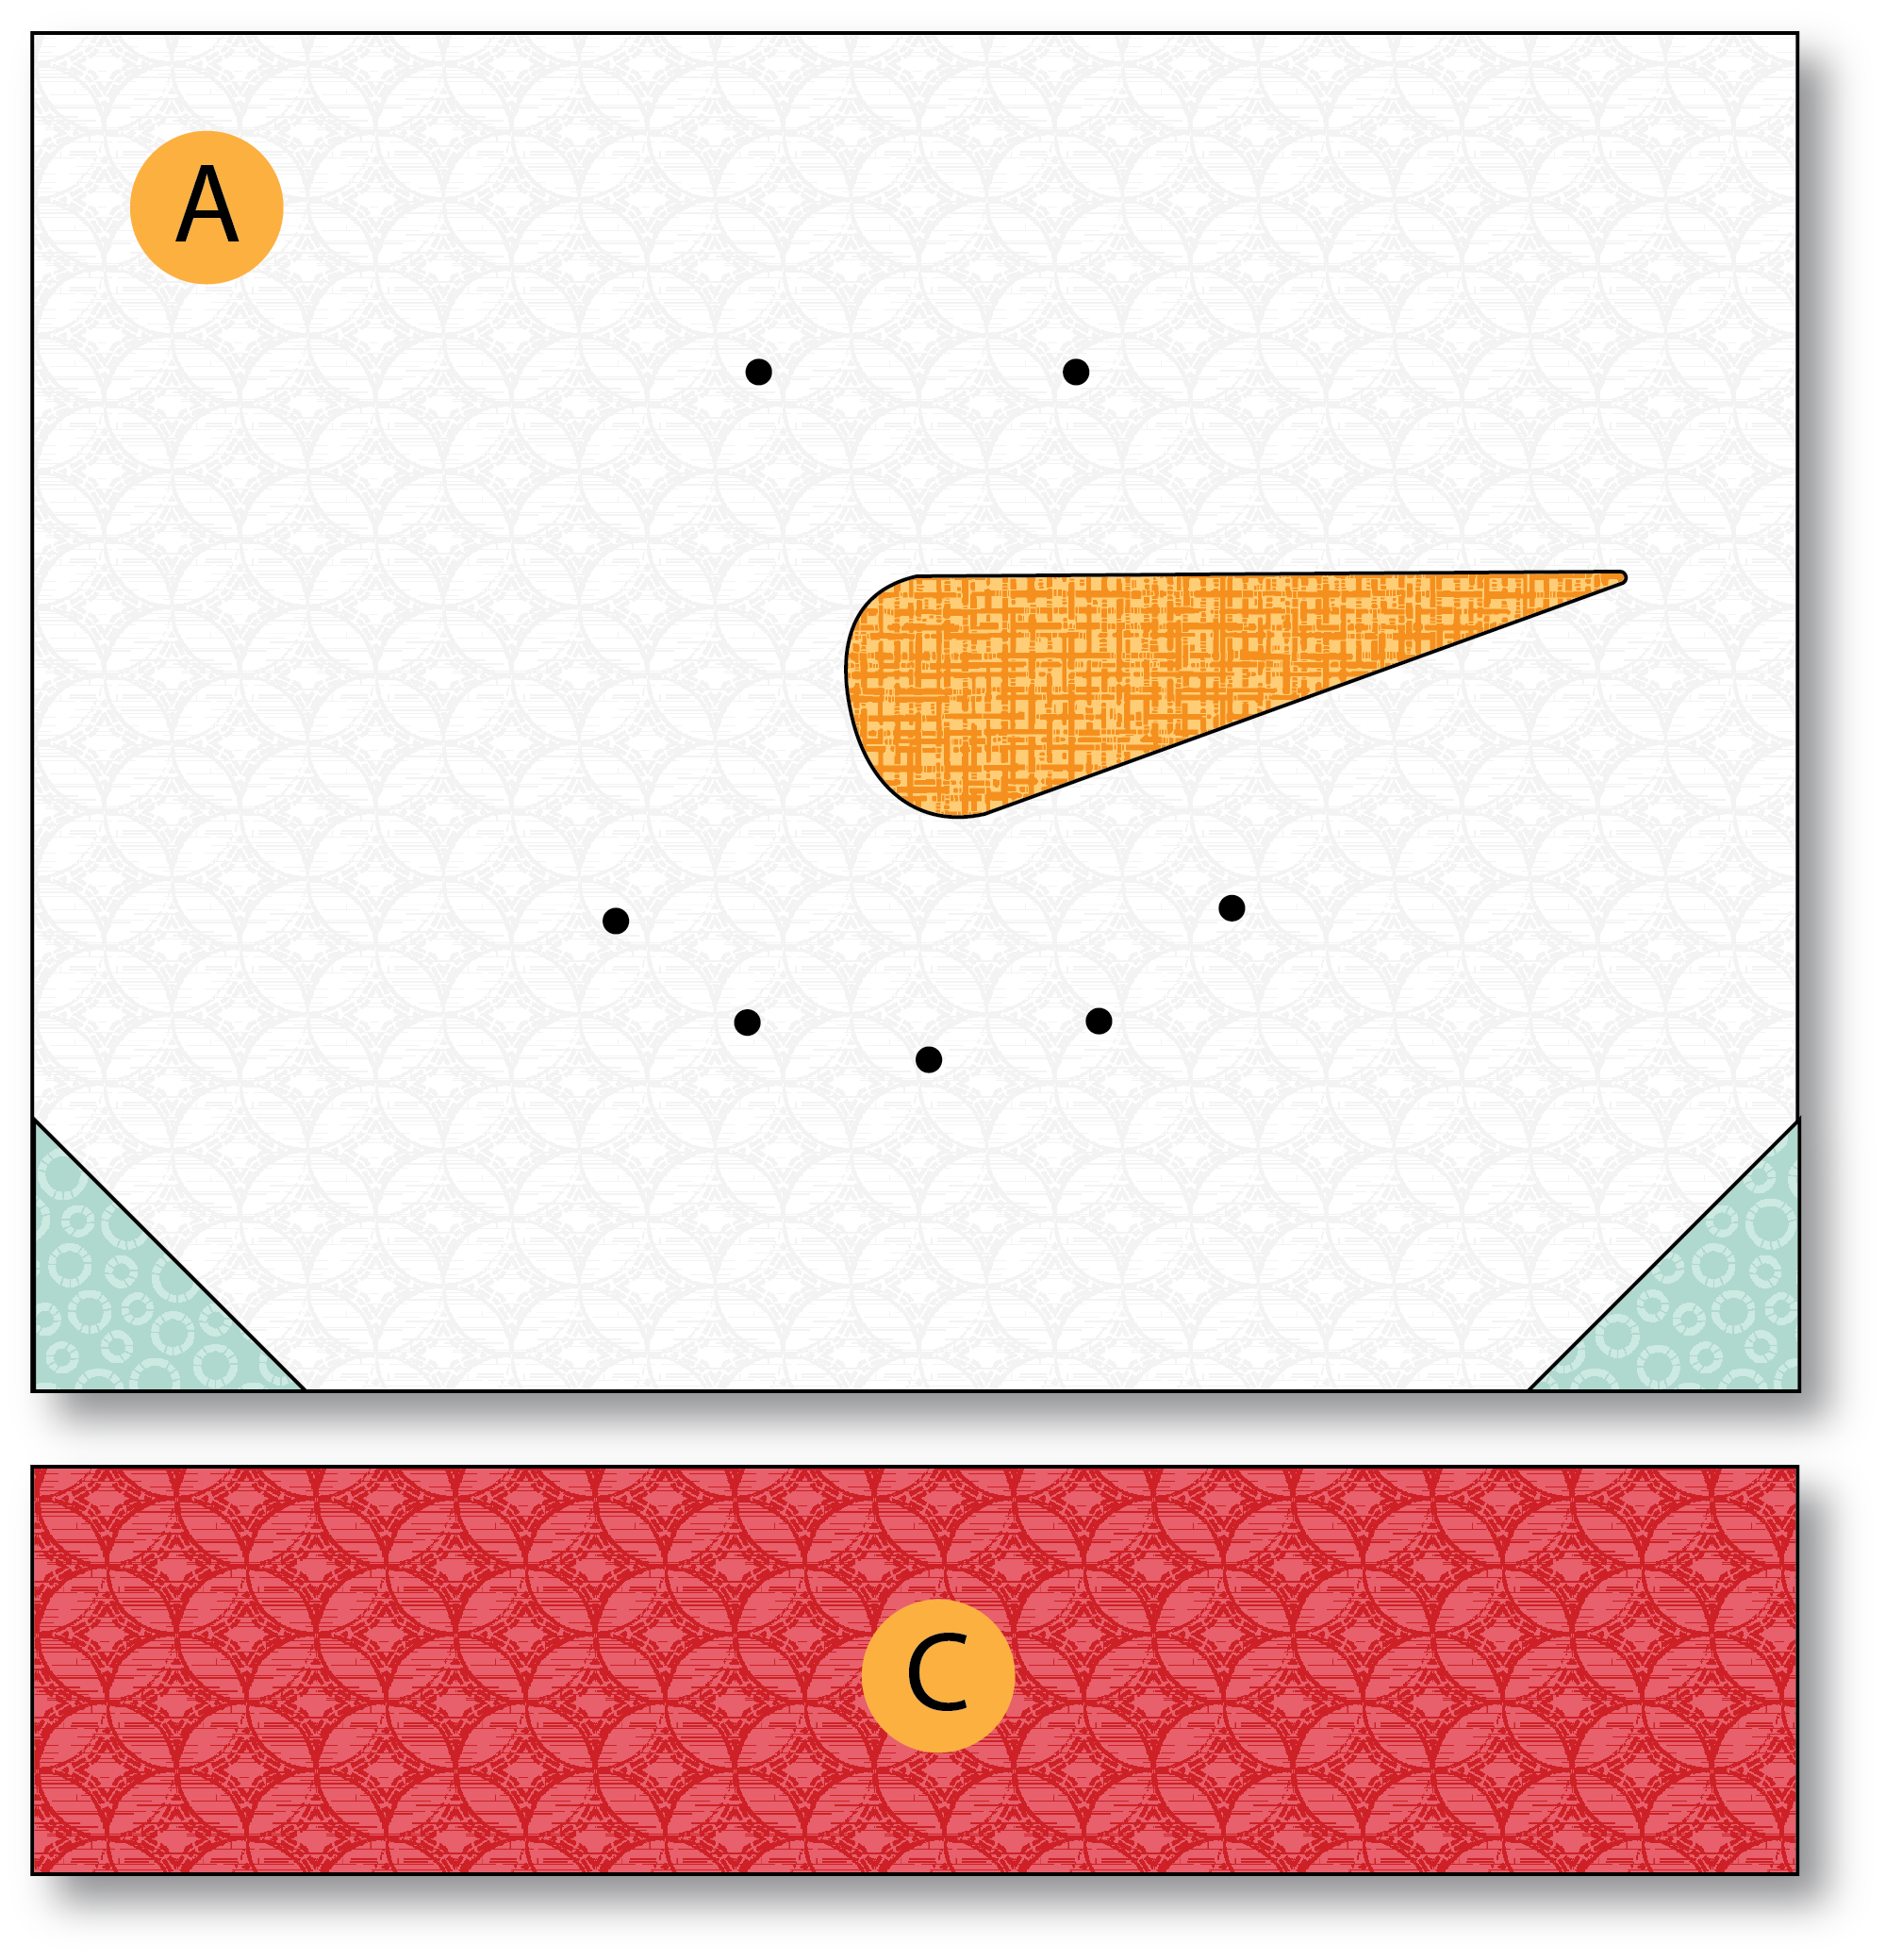
Center the white 7″ x 5 ½” A fabric over the Jolly layout diagram. Peel the paper backing off the carrot shape and fuse onto the white fabric.
Place the fused A fabric over a light source and use a pencil to transfer placement dots for the buttons onto the fabric.
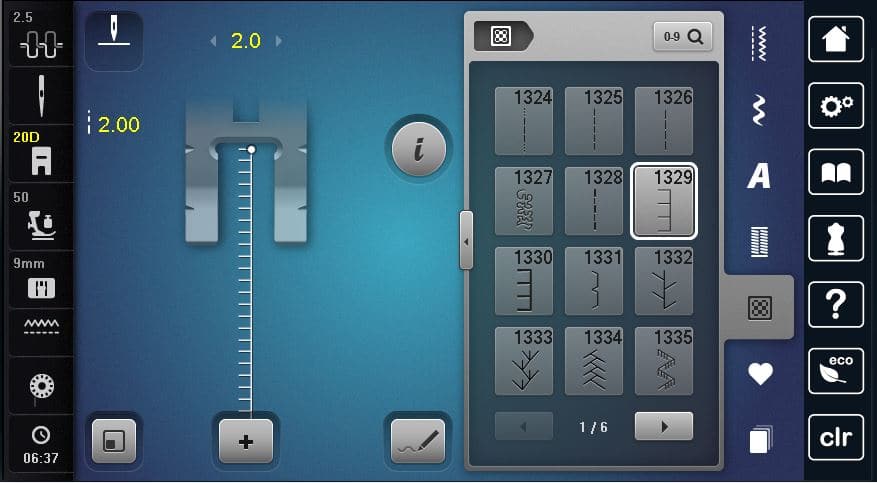
Install an open embroidery foot on your machine, I used foot #20D.
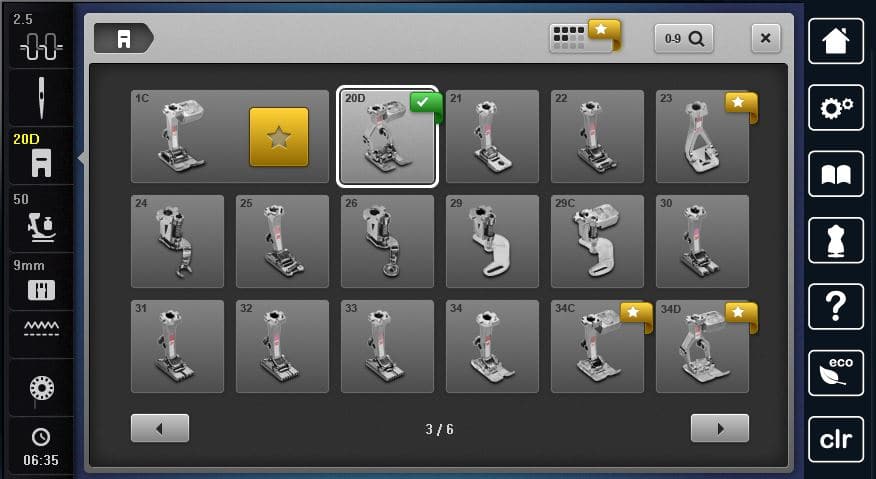
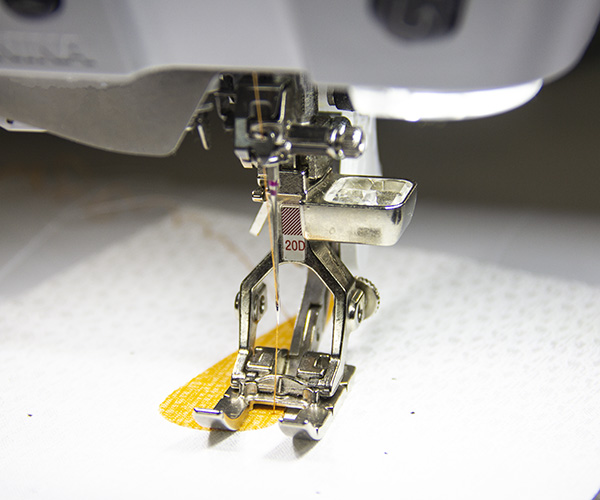
Choose a simple blanket stitch, #1329 on my B880, reduce the stitch length to a 2.00 and the stitch width to a 2.0.
Stitch around the carrot applique with the blanket stitch and orange thread to match the fabric.

Step 3: Piecing
Use a pencil or marking pen to draw diagonal lines on the wrong side of the (2) aqua 1 ½” x 1 ½” B squares.
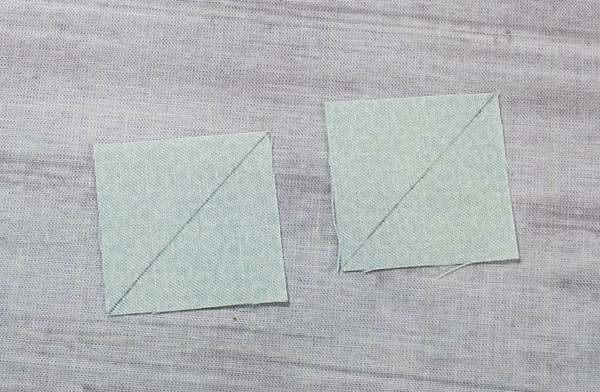
Pin the squares onto the left and right bottom corners of the appliqued fabric and stitch on the drawn line.

Trim the excess fabric leaving a 1/4″ seam allowance and press the triangles out.
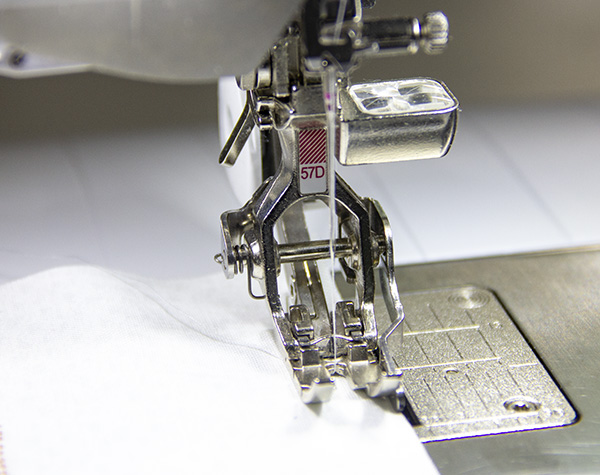
Install a patchwork foot on your machine; I’m using foor #57D,
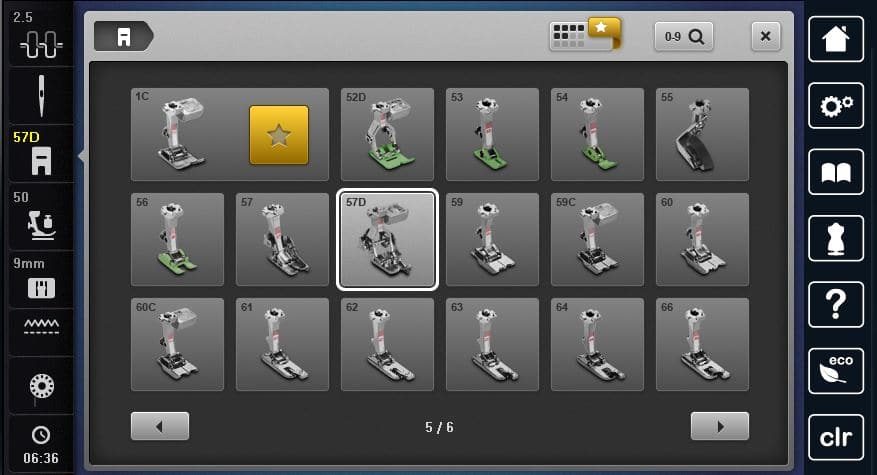
… and load a coordinating piecing thread on your machine.
Sew the red 7″ x 2″ C strip to the bottom edge of the appliqued A fabric using a 1/4″ seam allowance; press to the red fabric.
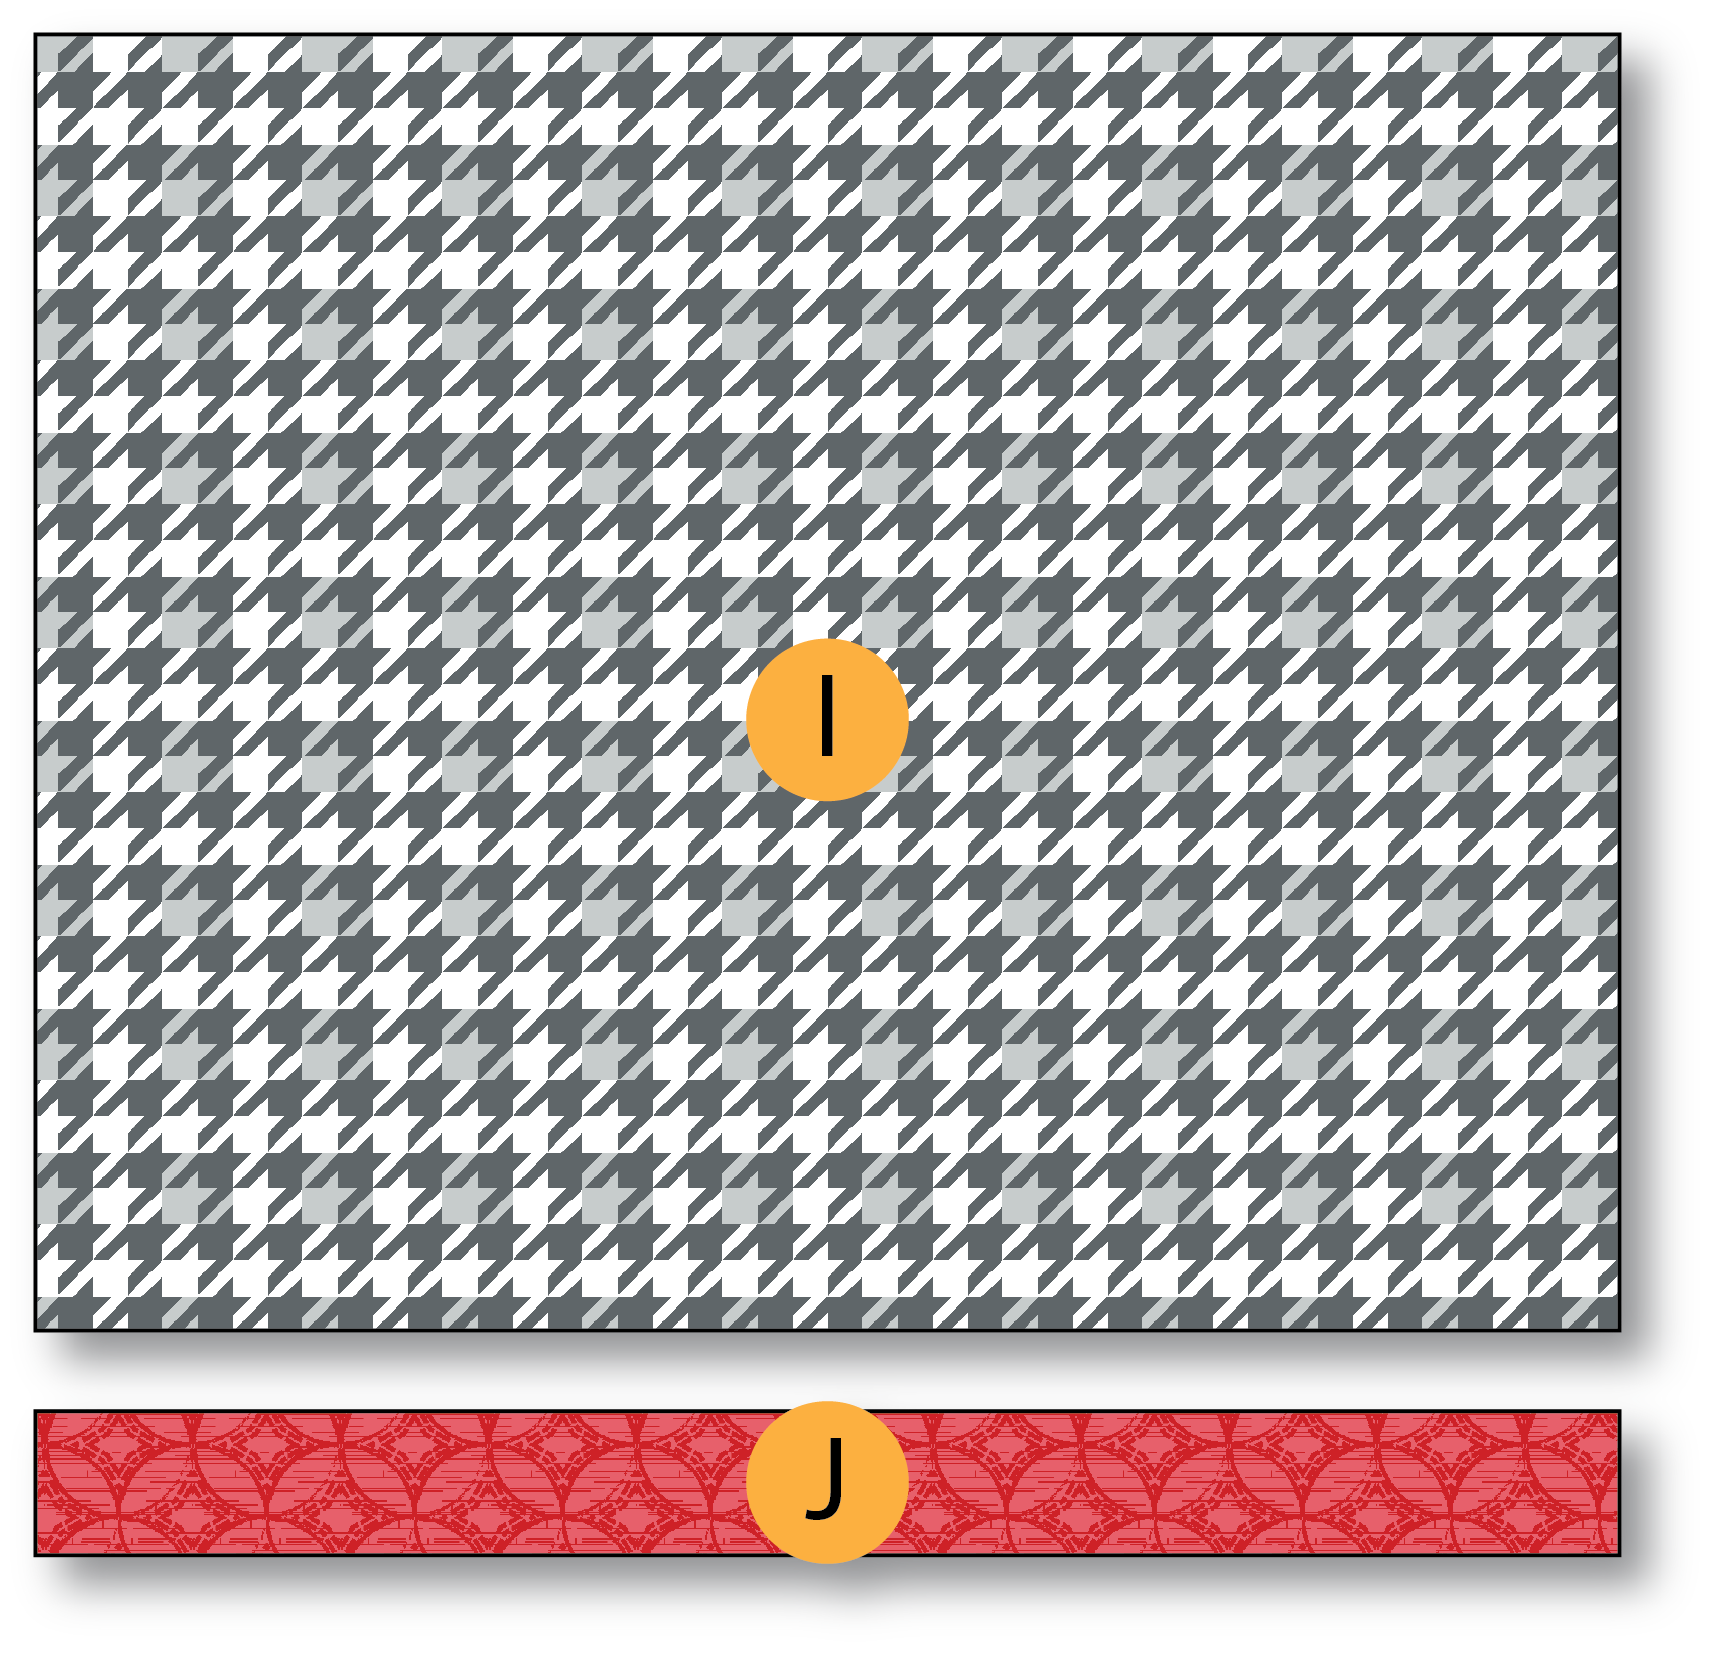
Sew the red 6″ x 1″ J strip to the bottom edge of the black 6″ x 5″ I fabric; press to the red.
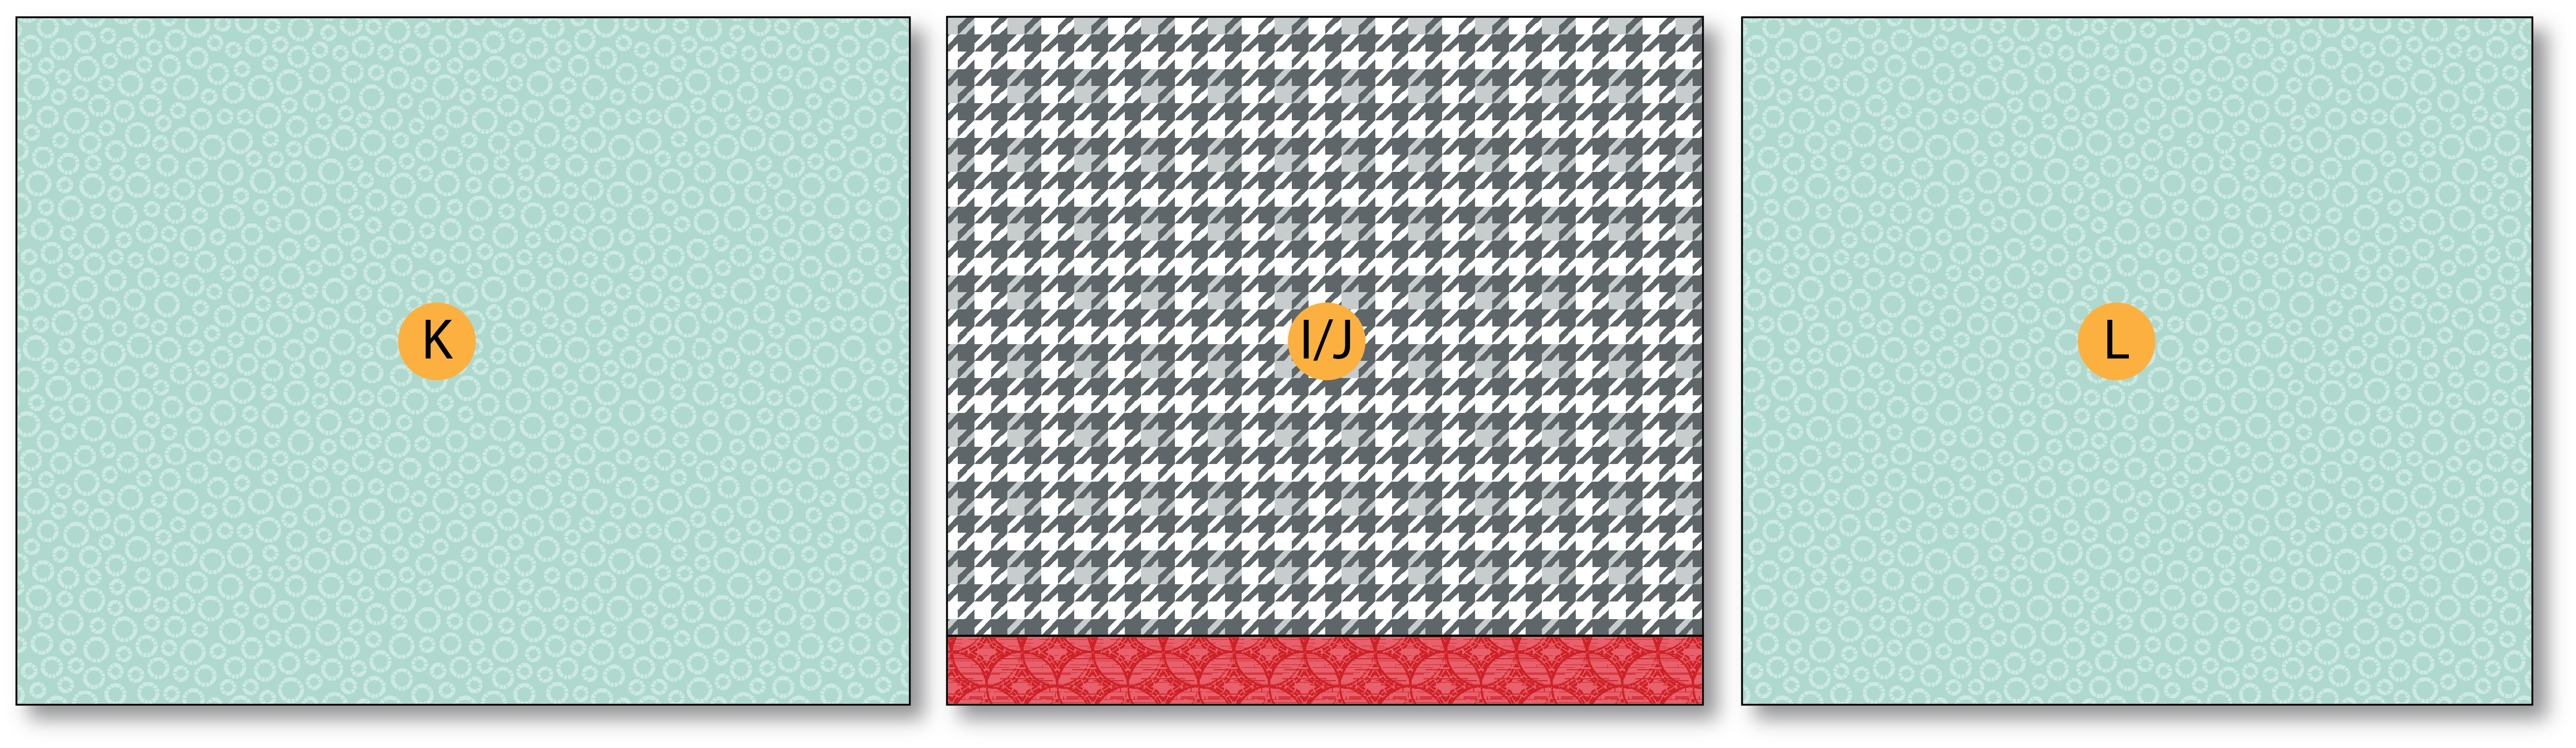
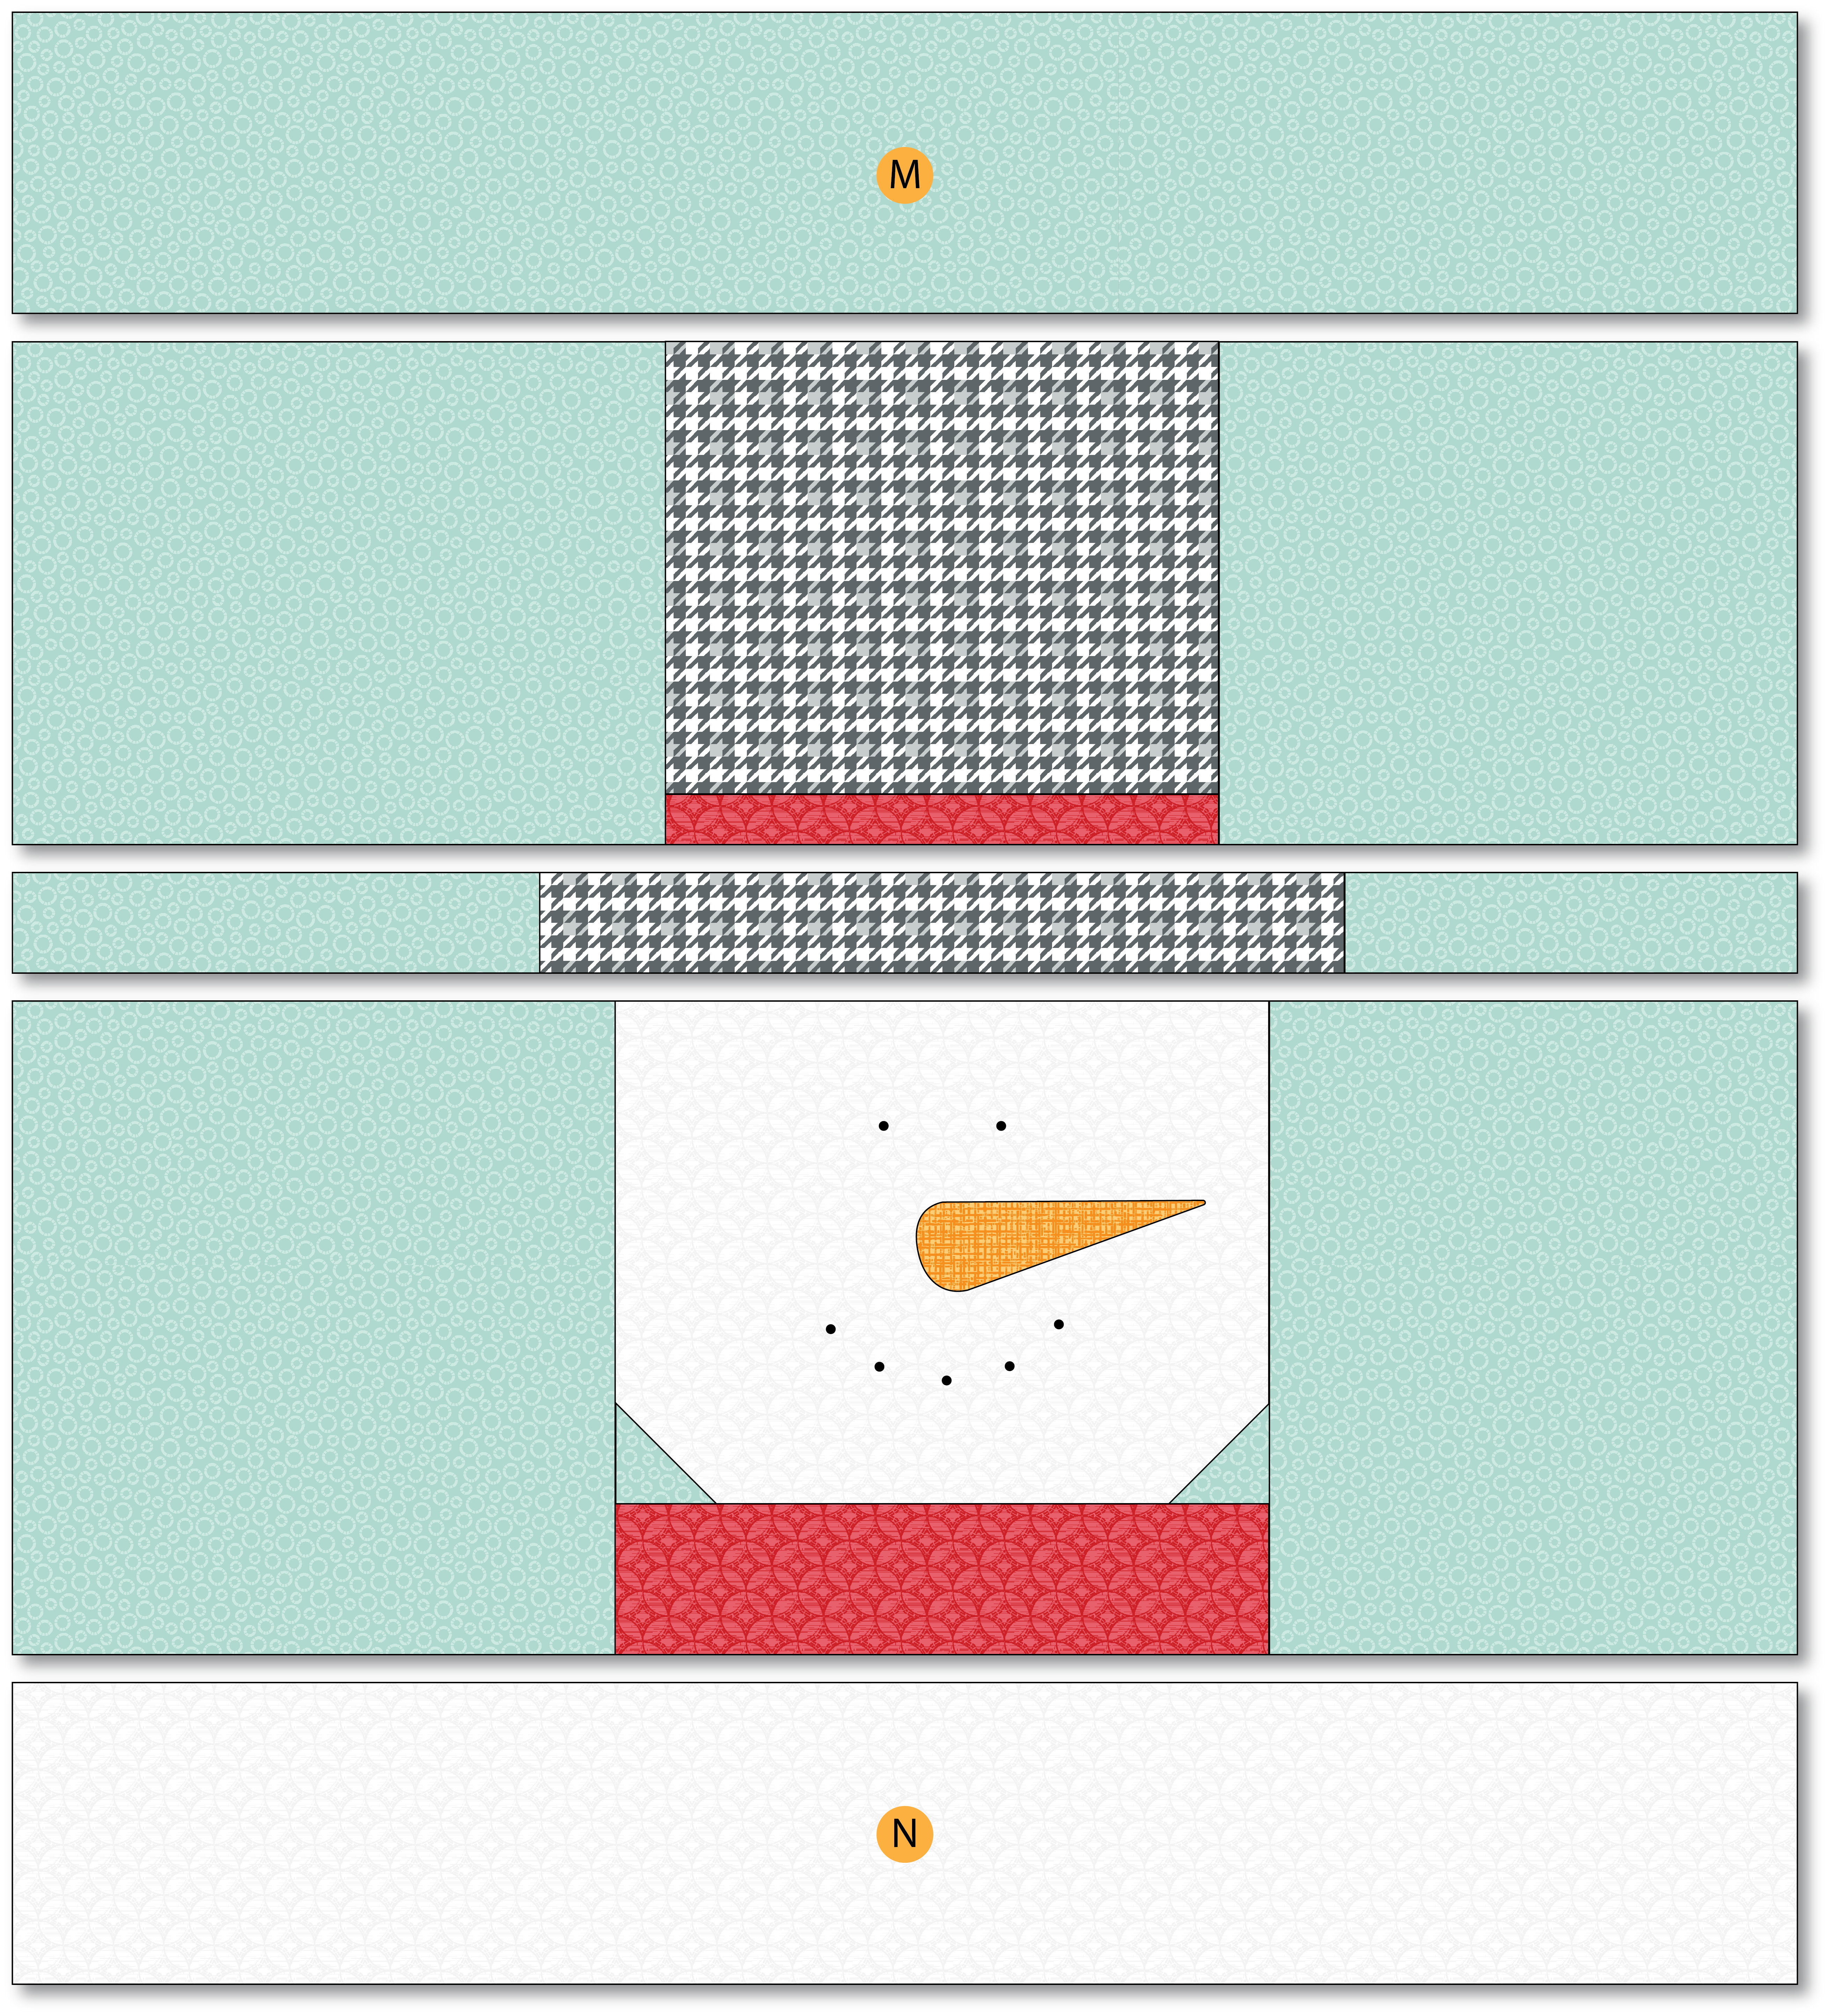
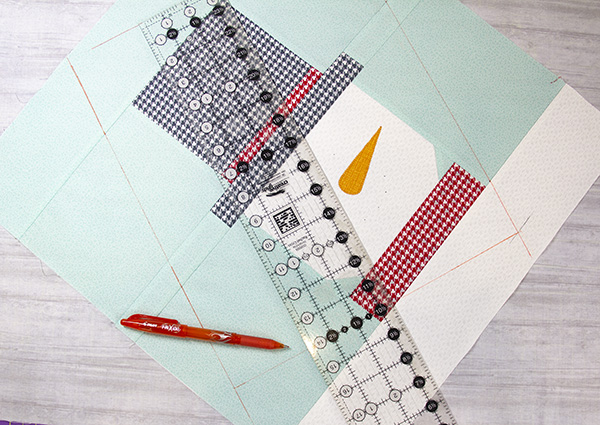
Sew the aqua 7″ x 5 ½” K fabric to the left edge of the I/J unit and the aqua 6 ¼” x 5 ½” L fabric to the right edge of the I/J unit; press to the aqua fabric.
Sew the aqua 5 ¾” x 1 ½” G strip to the left edge of the black 8 ½” x 1 ½” F strip and the aqua 5″ x 1 ½” H strip to the right edge of F; press to the aqua.
![]()
Sew the aqua 6 ½” x 7″ D fabric to the left edge of the A/C unit and the aqua 5 ¾” x 7″ E fabric to the right.
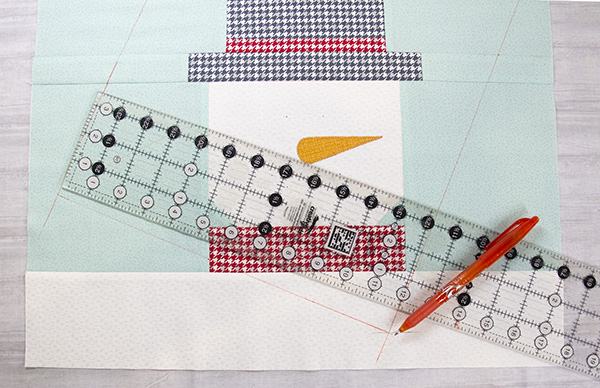
Follow the diagram below to piece the sewn units together, with the aqua 18 ¼” x 3 ½” M strip on the top and the white 18 ¼” x 3 ½” N strip on the bottom edge.
Step 4: Trim the quilt top
Trim the quilt top to measure 12″ wide by 14″ high. Use a water erasable marking pen to add cutting points to the finished quilt top and place marking dots as follows:
- 2 3/4″ from the top right corner of the hat’s brim
- 1/4″ to the right of the bottom corner of the scarf
- 2″ down from the bottom right corner of the scarf
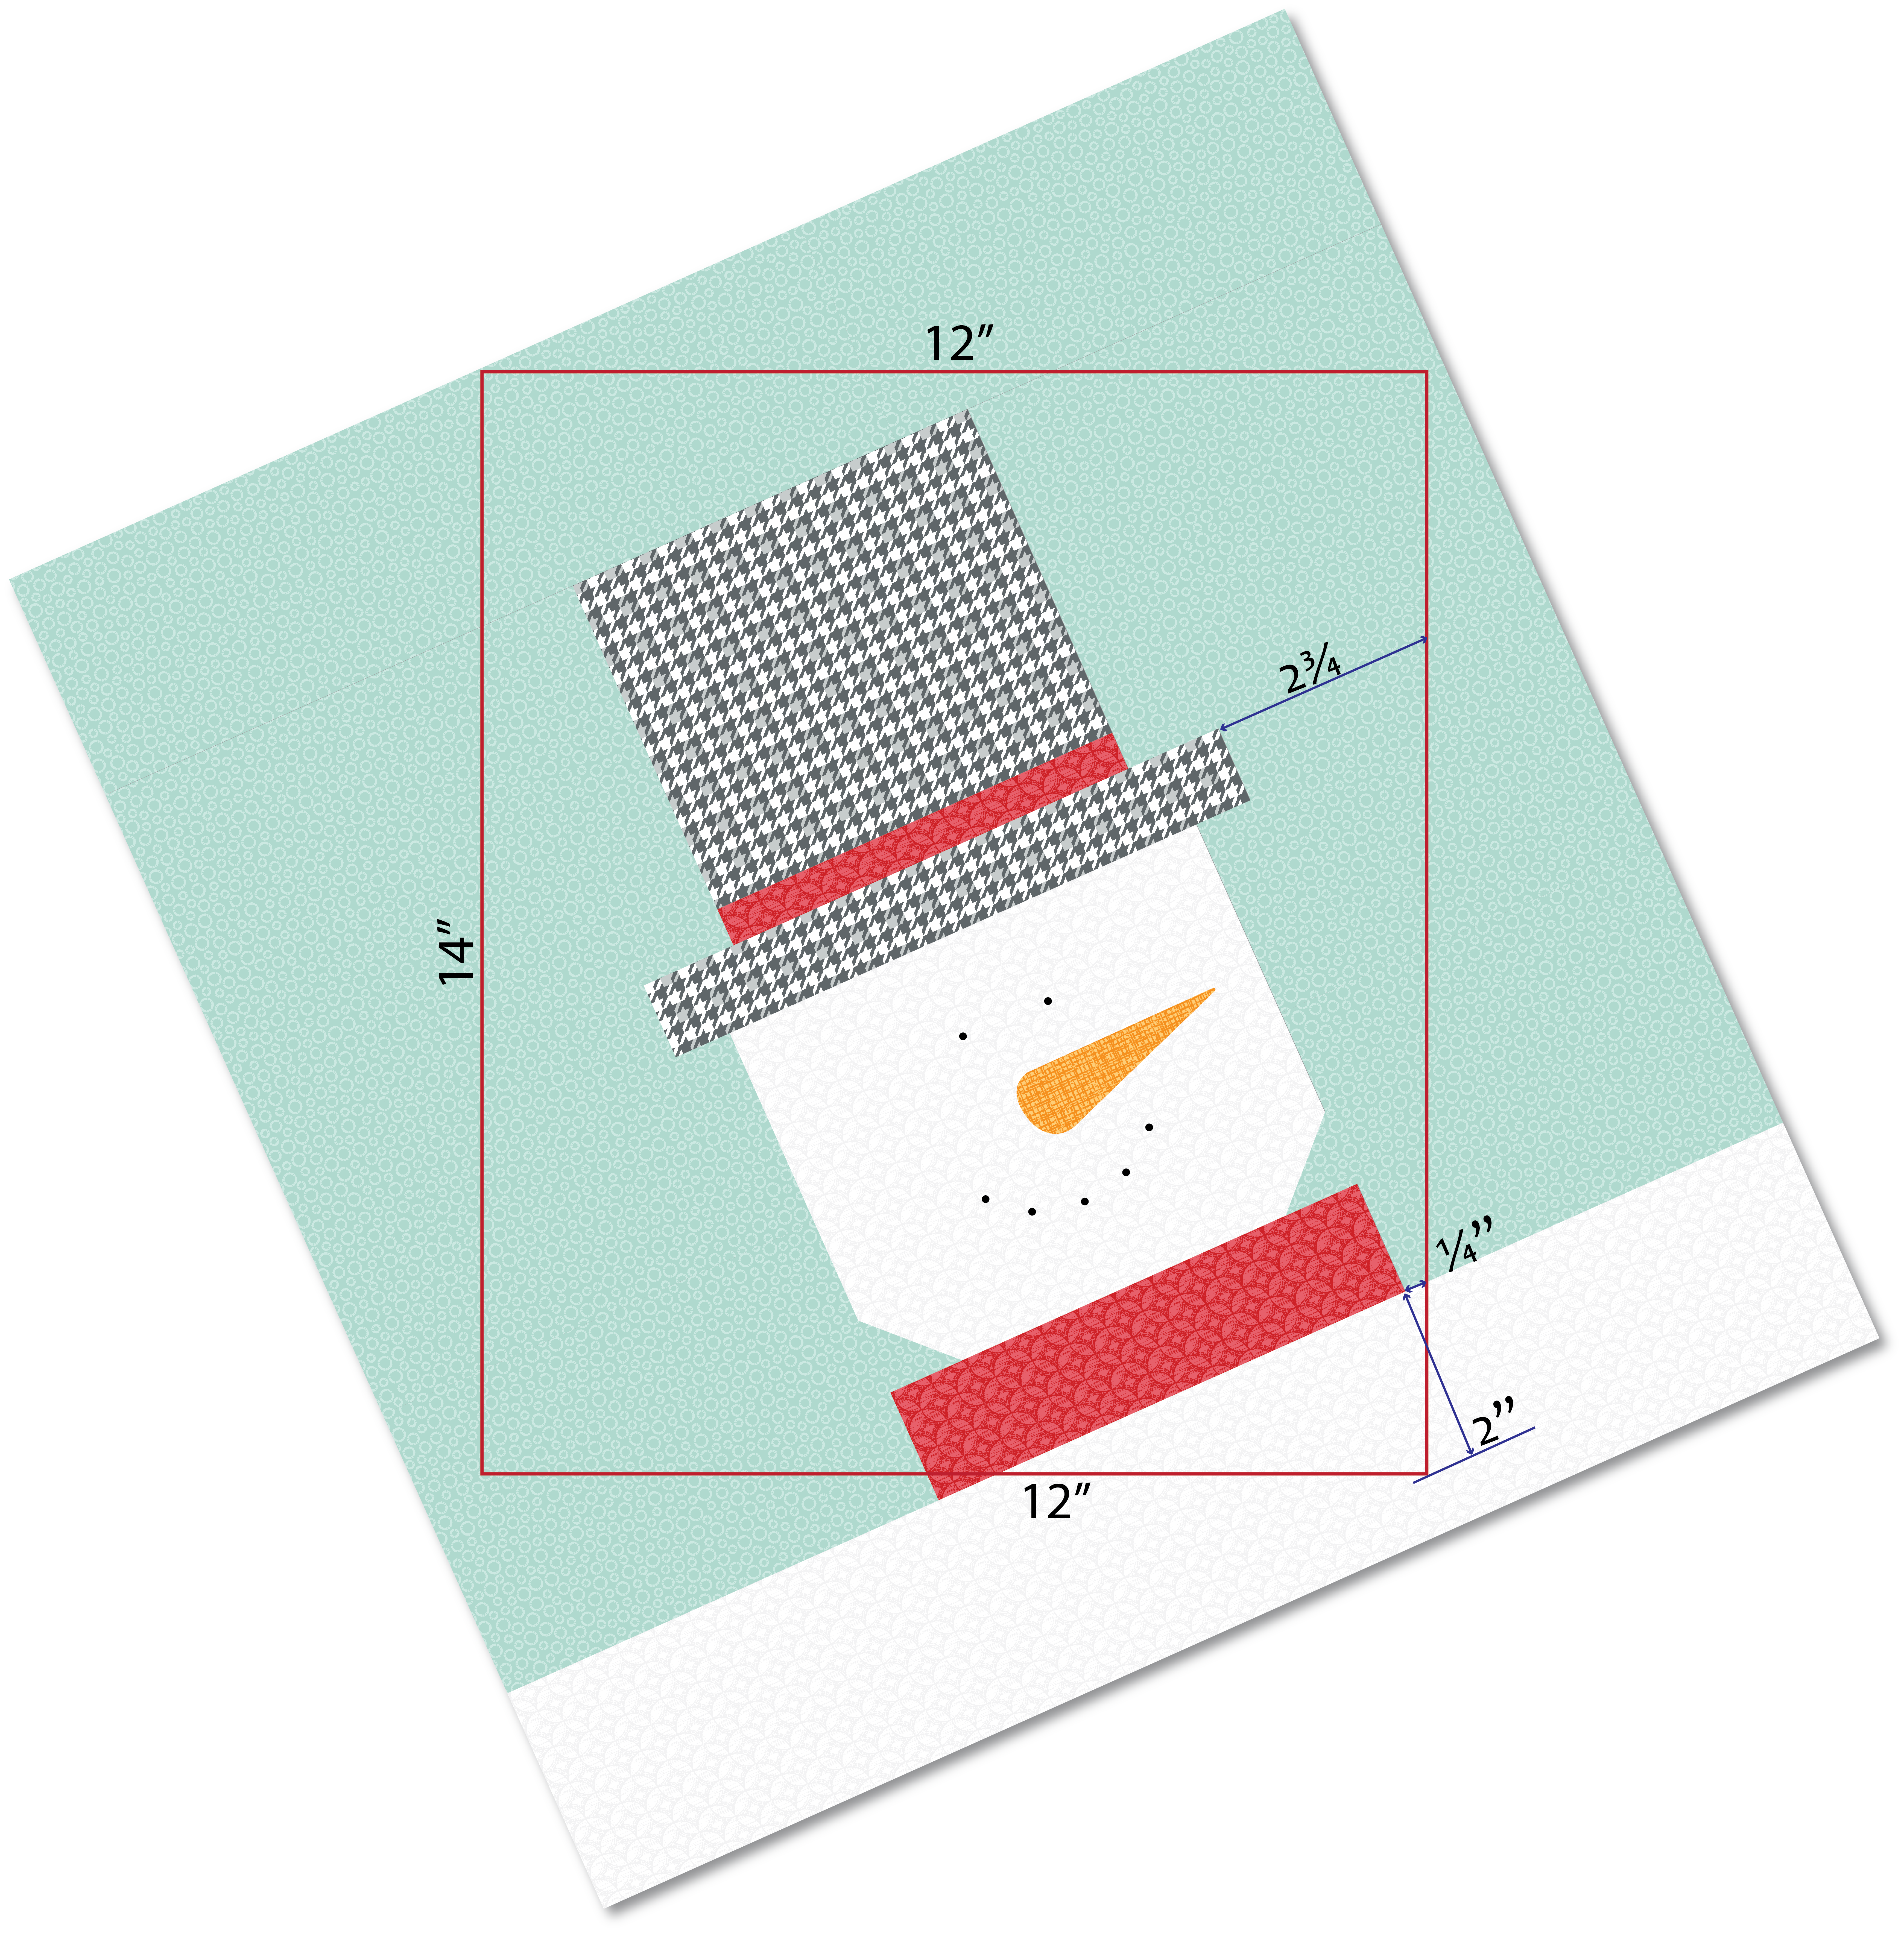
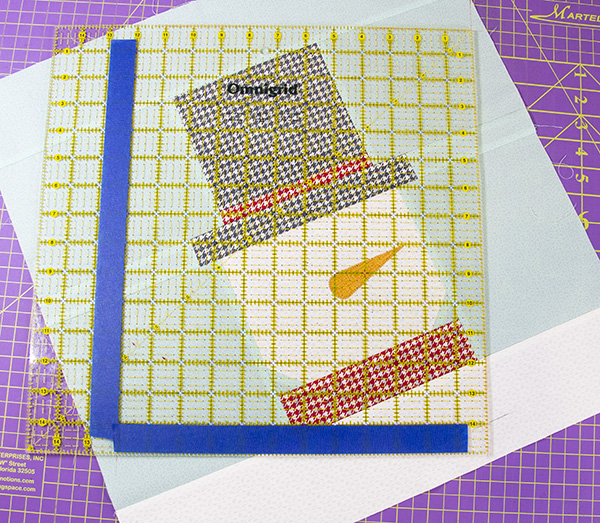
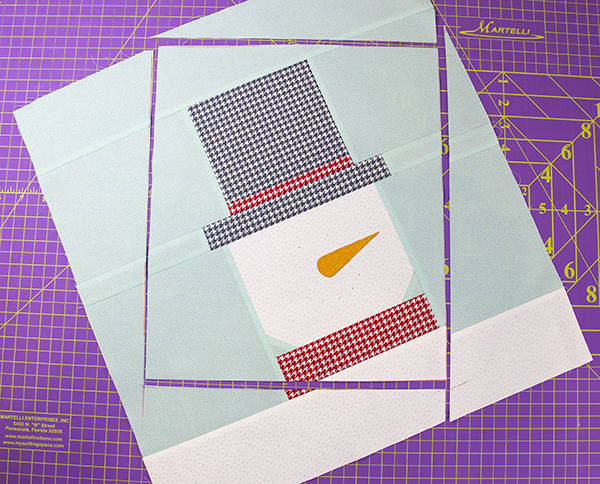
If you have a large square ruler, mark the 12″ and 14″ lines with painters tape. Align the right edge of the ruler with the marked points, with the bottom 14″ line on the 2″ mark below the scarf.
Trim the quilt top to measure 12″ x 14.”

If you don’t have a large square ruler, draw cutting lines with a marking pen,
… begin by drawing a straight line connecting the three marked points on the right side, then align the 12″ mark of a ruler on the first line to draw the 12″ width cutting line.
Connect the two lines at the 2″ point below the scarf.
Mark the 14″ cut line above that, then trim the block on the cutting lines.
Step 5: Quilting
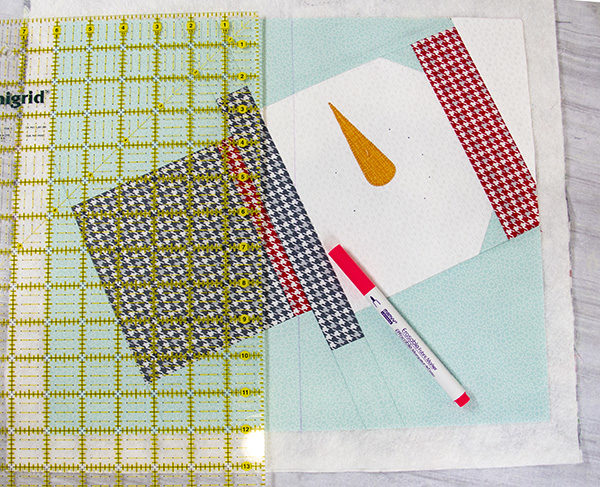
Make a quilt sandwich with the 14″ x 16″ backing, batting and quilt top, and baste with the temporary spray adhesive or quilting pins.

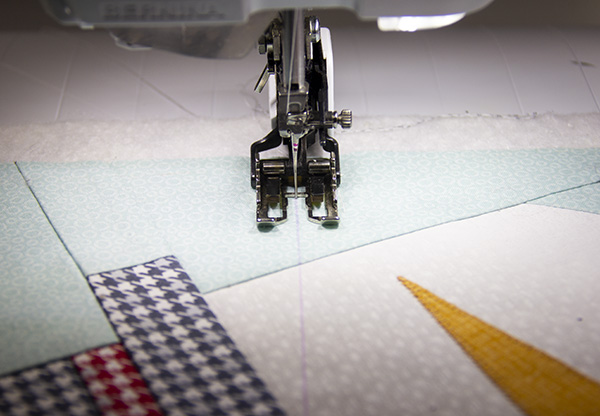
With a water erasable marking pen, mark a horizontal quilting line on the center of the quilt top, 7″ from the top.
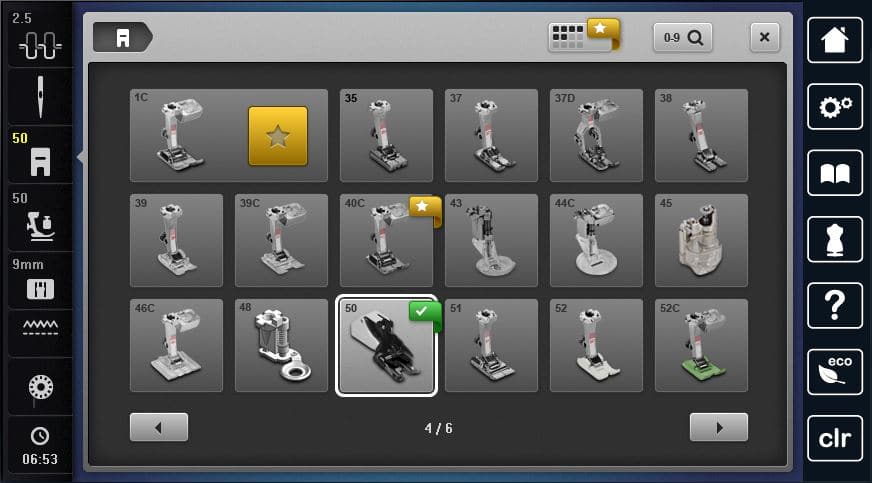
Install walking foot #50 and load a coordinating quilting thread on sewing machine.
Stitch on the marked center line.
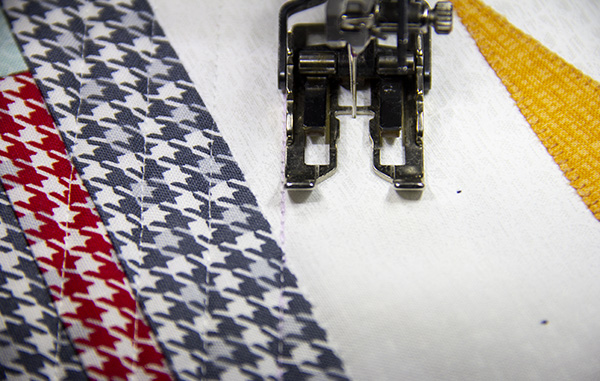
Then continue adding straight-quilting lines by aligning the edge of the presser foot with the previously stitched lines.
Trim the excess batting and backing fabric.
Step 6: Finishing
To hang the finished Jolly table topper on an Ackfeld 12″ x 14″ wire table stand, fold the 10″ x 4″ strip cut from the backing fabric fat-quarter and fold in half, right sides together; stitch the ends closed.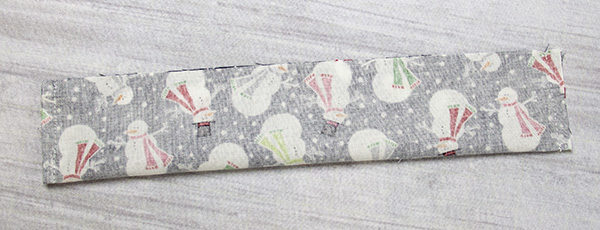
Turn the sewn strip right-side out and press.
Place the hanging sleeve on the top back side of the quilt, centering the sleeve and aligning the raw edges; stitch the top edge down with an 1/8″ seam allowance and hand stitch the bottom edge of the sleeve onto the quilt backing.
Bind the quilt with the (2) red 2 ¼” x WOF binding strips and sew the black buttons on.
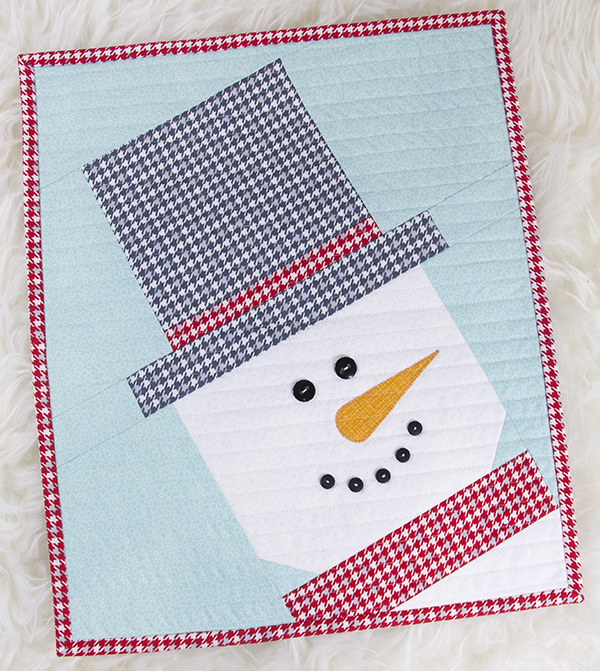
That’s it, easy as pie! I hope you have a wonderful Christmas!
Cherry
Used Products


What you might also like


16 comments on “Winter Table Topper”
-
-
You’re welcome! I hope you’ll make one and post a picture in the WeAllSew community!
-
-
such a cute idea using scraps. sure wish there was a printable version….
-
Hello guyer, you can certainly print the directions from your computer at home. Our WeAllSew blog content is posted in an open format. If you wish to print the post, you can easily print your tutorials from the WeAllSew blog. If you attempt to print directly from the screen a pdf will be generated for your convenience. Please give it a try.
-
-
How do you print from the post?
There is no icon for a printer.
Right clicking doesn’t help.
I have seen before that we can print from this site but cannot do it.
Help!-
control P
-
-
Also loving the red and white tree behind the snowman. Where do we find THAT? Thank you
-
I’ve been looking for a project for my great-niece, a new sewer. I think this would be perfect! May I ask where you got the little frame it hangs on? ….or, what is it called? I never saw anything like that before. Thank you.
-
Can this be printed from an iPad?
-
I also can’t print. I thought you might have to be signed in but that doesn’t seem to matter. Any other suggestions?
-
Where is the template? It is not included – it should be a PDF.
-
Is there a way to download this pattern so I don’t have to print out 35 pages ??
-
Why can’t we download this pattern?
-
Hi, Sandi! The pattern can be downloaded here: https://weallsew.com/wp-content/uploads/sites/4/2018/12/Jolly-Layout-and-Template.pdf
Happy stitching!
-
-
I loved this project and have used it on my front door each of the past few winters…
-
I really enjoyed this project and have hung it in my front door for the last several winter seasons. I can’t seem to attach a photo…🤔
Leave a Reply
You must be logged in to post a comment.

What a cute idea. It does look pretty easy. Thank you