BERNINA L 890 Garment Sew Along with Grainline Studio, Part 3: Sizing
It’s time for Day 3 of the L 890 Airy Top & Comfy Dress Garment Sew-Along! Previously we downloaded, printed, and assembled our patterns, so if you’re just joining us now, you can find that post here.
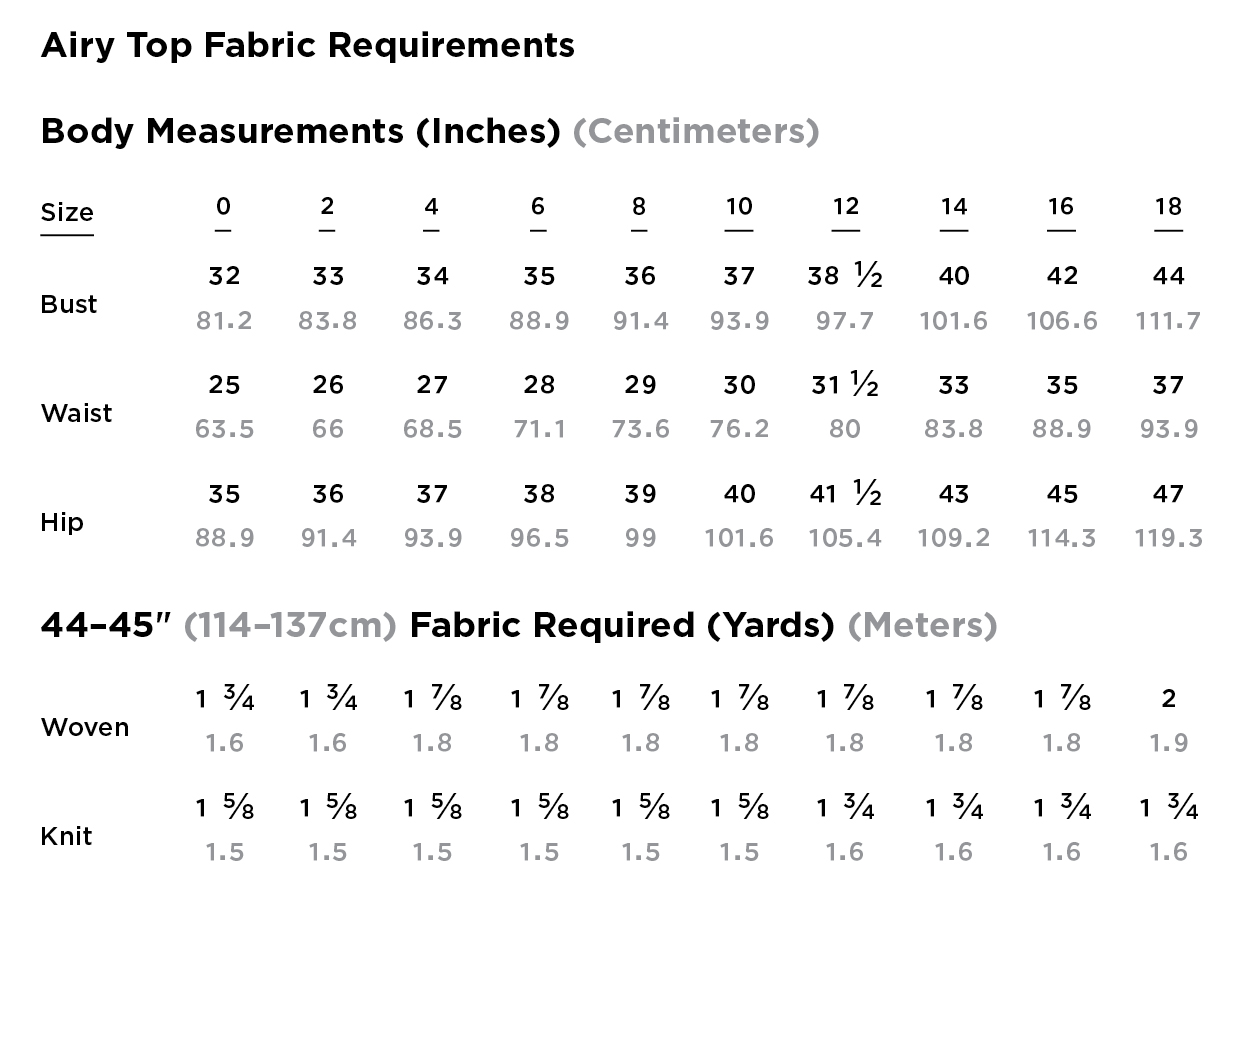
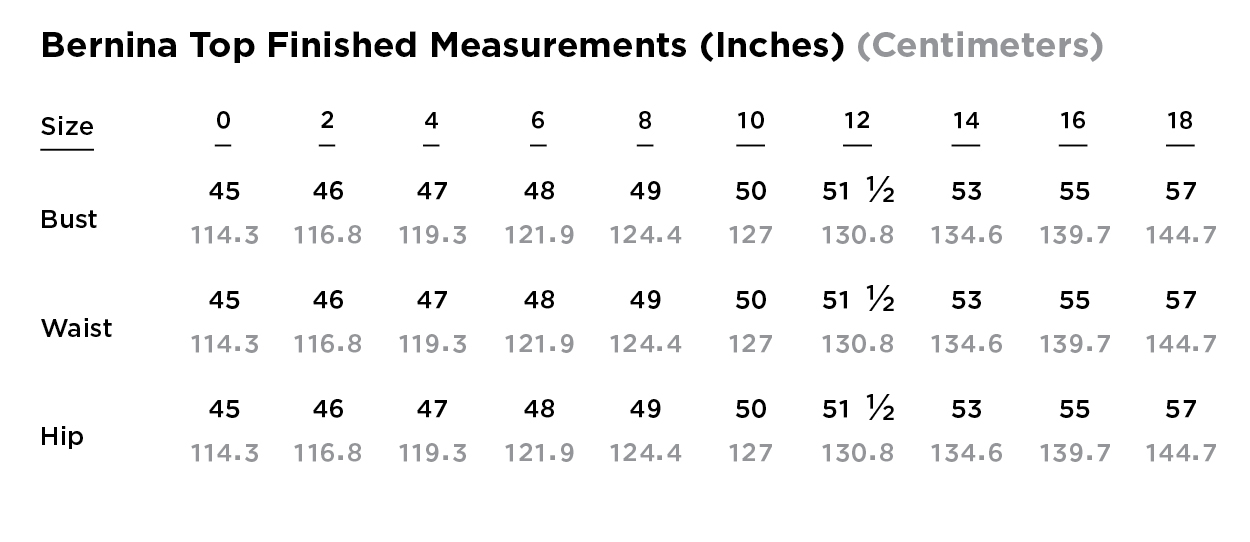
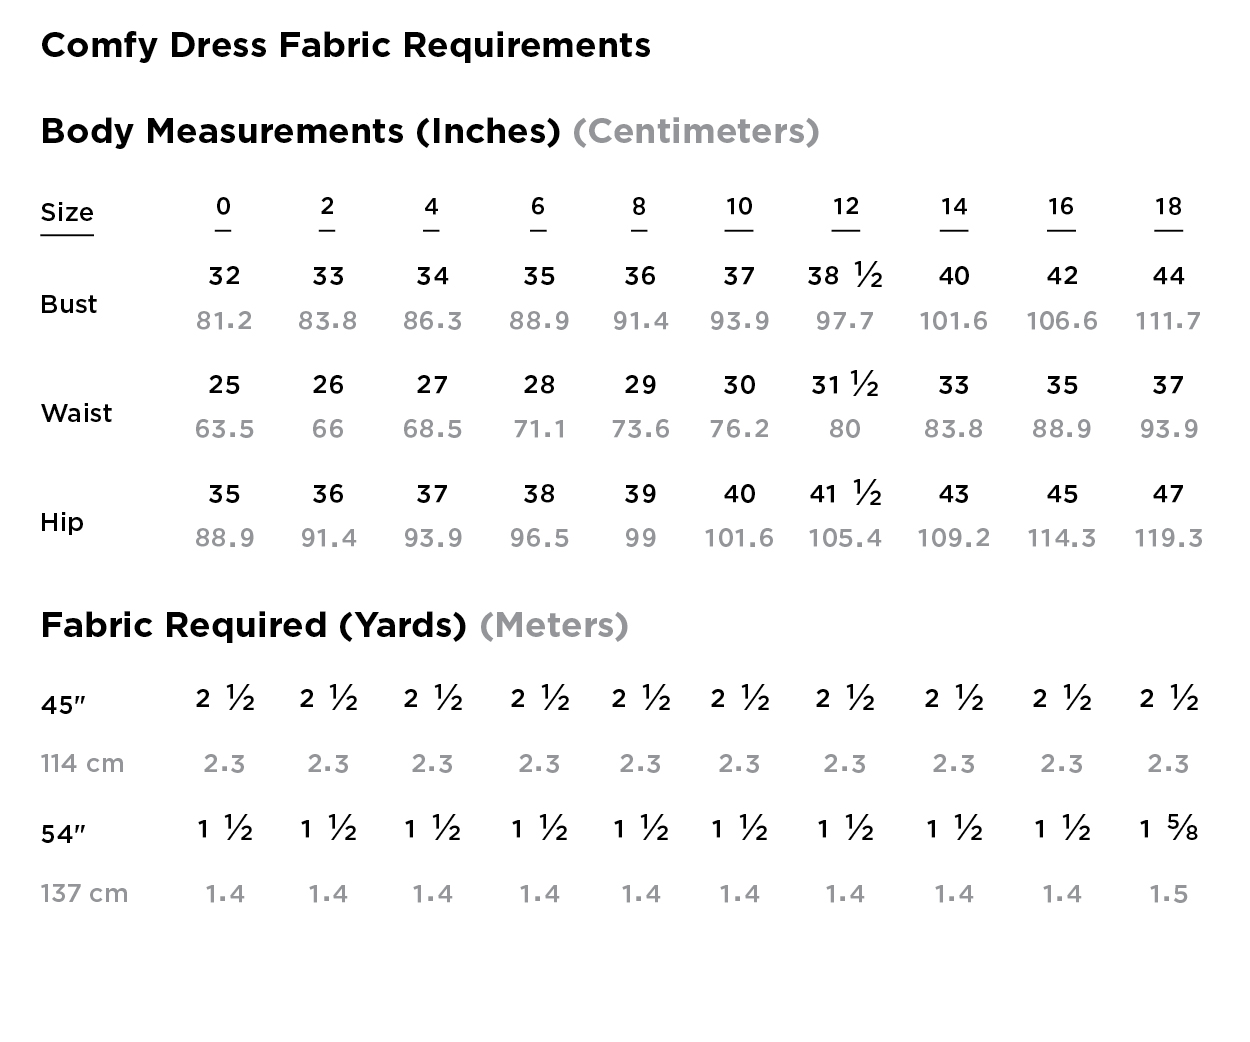
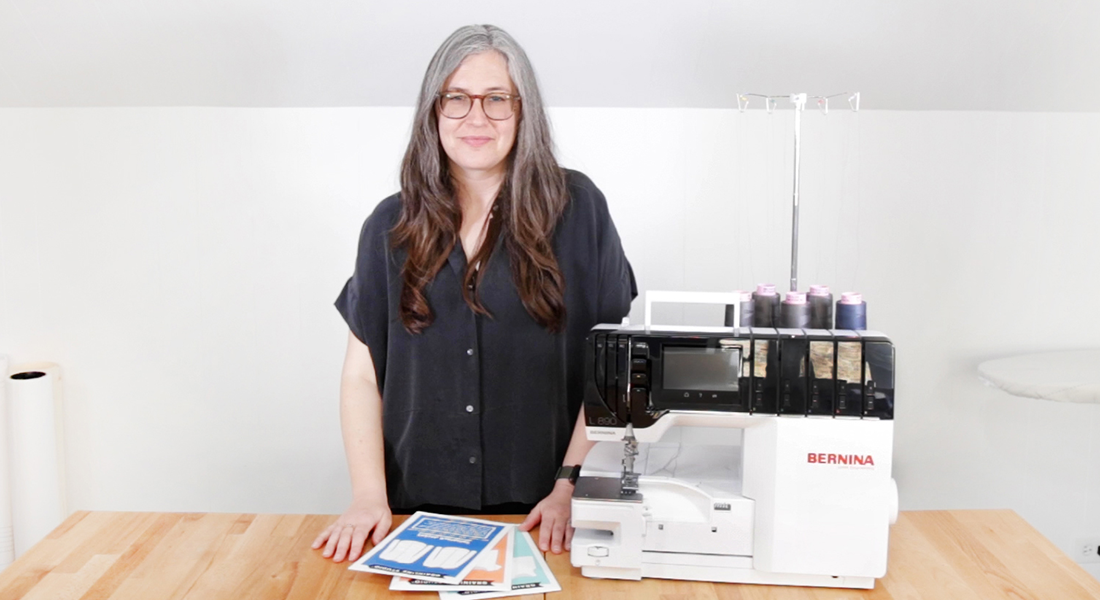
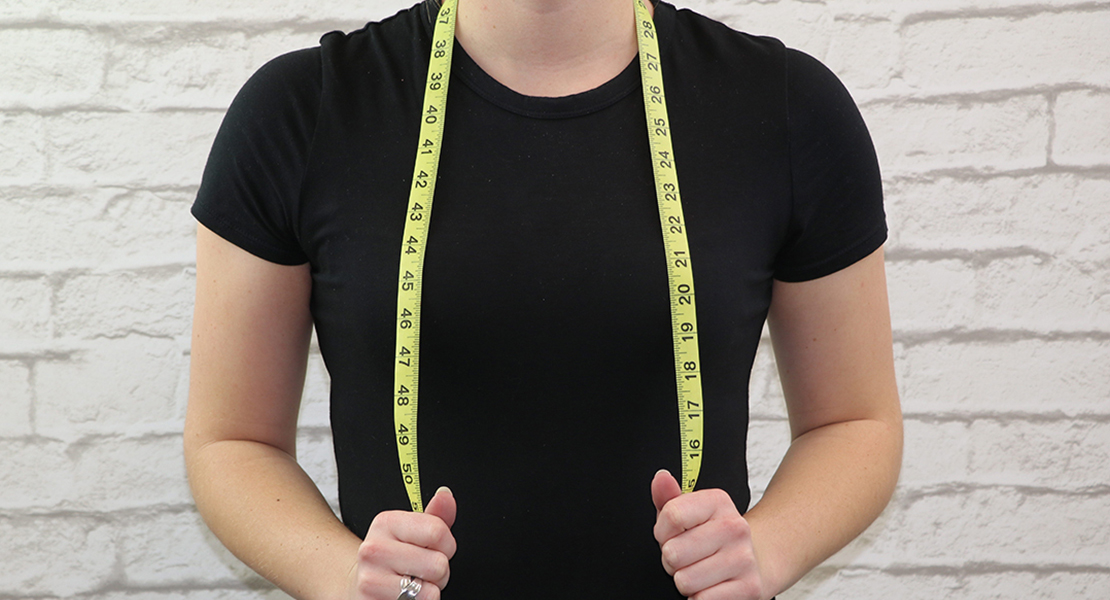
In today’s lesson first I’ll be walking you through choosing a size. This is one of the most important parts of the garment sewing process. If you don’t take accurate measurements, or measure in the wrong places, you won’t end up with a garment that fits! After we’ve picked out our size, I’ll be giving you my top 5 tips for making pattern adjustments, and showing you how to blend between sizes and lengthen and shorten your patterns.
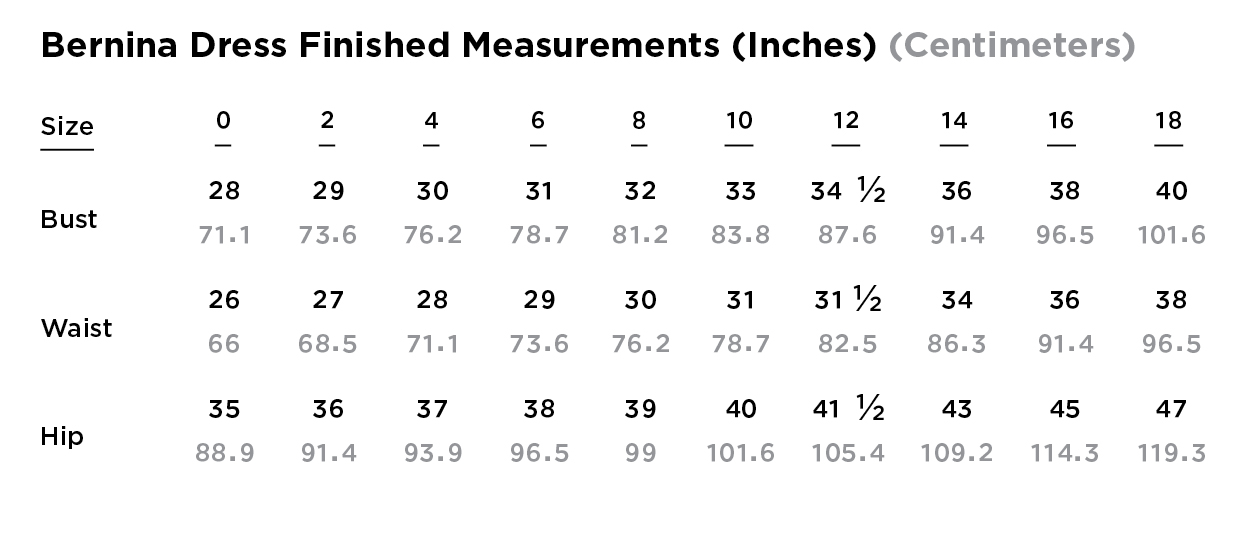
I’ve included the measurement charts below since you’ll want to reference them when picking your size. You’ll want to choose the size that corresponds with your measurements. Most of us are going to fall in between sizes or into multiple sizes, and that’s totally normal. I’ll walk you through what to do in this situation with ease!
So that’s it for today’s lesson! In our next video, we’ll be cutting our garments and then we finally start sewing!
If you’re sewing along with us, we’d love to have you tag us on social media! Use the tags #L890SewAlong #BerninaAirytop or #BerninaComfyDress and tag @berninausa and @grainlinestudio so we can see what you’re up to!
BERNINA L 890 Garment Sew Along with Grainline Studio
- BERNINA L 890 Garment Sew Along with Grainline Studio, Part 1: Introduction
- BERNINA L 890 Garment Sew Along with Grainline Studio, Part 2: Pattern Prep
- BERNINA L 890 Garment Sew Along with Grainline Studio, Part 3: Sizing
- BERNINA L 890 Garment Sew Along with Grainline Studio, Part 4: Cutting
- BERNINA L 890 Garment Sew Along with Grainline Studio, Part 5: Woven Airy Top
- BERNINA L 890 Garment Sew Along with Grainline Studio, Part 6: Knit Airy Top
- BERNINA L 890 Garment Sew Along with Grainline Studion, Part 7: Comfy Dress


What you might also like


10 comments on “BERNINA L 890 Garment Sew Along with Grainline Studio, Part 3: Sizing”
-
-
We just use actual muslin for our wovens, and for knits you’ll want something with a similar stretch to the final garments. So either a cheaper version of your final fabrics, or if you have enough of the final fabric to make two you can also just use that.
-
-
Looked for Kaufman Point Knit fabric online. So many choices. Fabric.com has a lot of choices of medium weights. What do I need to purchase?
-
Any of the RK Pontes would be great, just grab the amount listed for the size you’re going to make!
-
-
I’m short waisted, petite. I’m going to make the dress. How do I adjust the upper part of my pattern, from the waist to the bustline? And, is it to the bottom of my bustline, where my bra rests or at my fullest point? Thanks Robin
-
Hi Robin- You can simply draw a line midway between the bust and waist, then shorten the pattern along that line. You’ll want to re-blend the side seam and you should be good to go! You can typically relocate the lengthen/shorten line anywhere where you need to lengthen or shorten the pattern.
-
-
I have difficulty getting a classic blouse pattern to fit properly. My back is broad (somewhat) but the measurement across my front is narrow. As a result, the seam for my armhole is not sitting where it should be- it rests too close to my arm. I realize I can shorten across the shoulder seam, but not sure how to decrease across my front and have the bottom of the armhole in the correct place for comfort. Basically, there is too much fabric from the armhole to the middle of my chest! Appreciate any advice you can provide for a fitted blouse. Thanks!
-
Unfortunately I’m only able to answer questions about patterns I’m familiar with, but I’d recommend googling broad back pattern adjustments. I think you’ll find something helpful there.
-
-
Did you have a minute to look at these questions? Thanks Robin Brown
-
Hi Robin – Just did, sorry for the delay. I wasn’t getting my email notifications of comments from the site for some reason.
-
Leave a Reply
You must be logged in to post a comment.

What material should I select for my muslin?