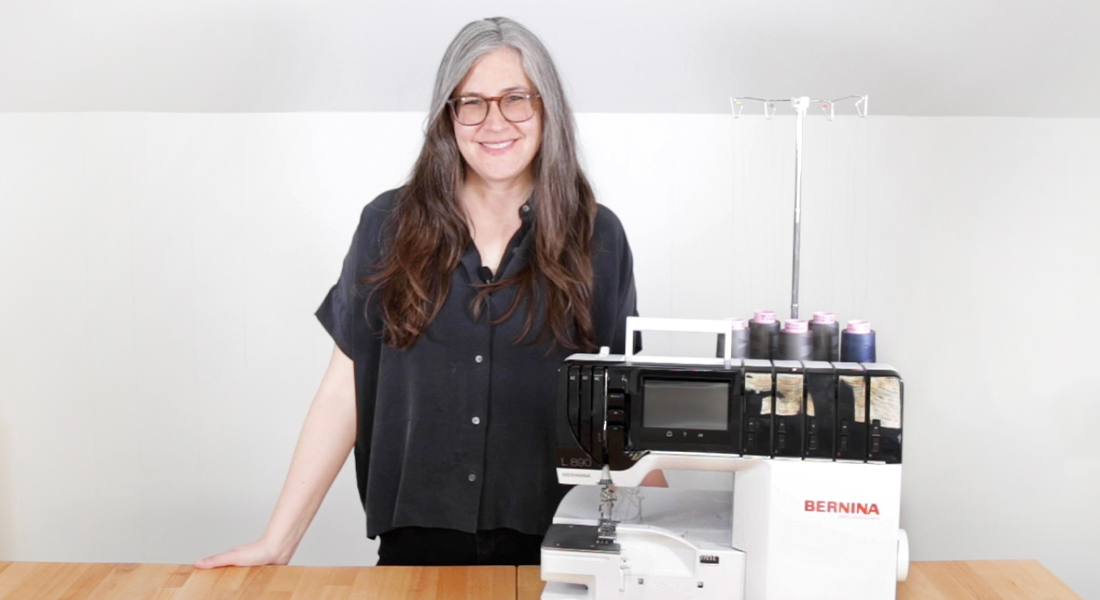
Garment Sew Along Part 6: Collars
After the last post in this garment sew along series, we are one step closer to having this top completed. By now, the front button bands should be stitched down on both sides, the yokes and the front pieces should be sewn together, the sleeves should be set in, and the side seams should be stitched up. Again, I would advise you to go back and view the previous posts to get caught up to this point.
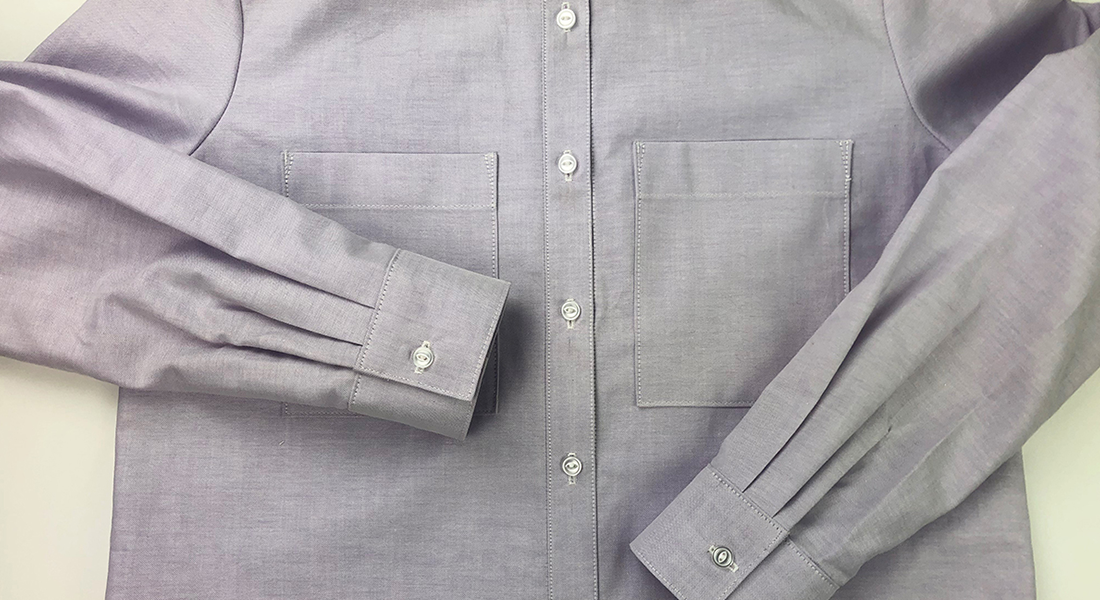
Besides the pockets, which I skipped over to talk about in more detail later, the cuffs and the collar are the final pieces that have to be sewn onto the constructed garment shell. These pieces are often the most difficult to attach because the garment itself is almost complete, and these pieces must fit into the sections that already exist. Sometimes when creating garments, seam allowances get skewed early on, which only makes aligning harder to do later in the construction. Have no fear, because today I will walk you through how to perfectly align, attach, and finish the collar for this button up.
First, I will briefly touch on interfacing and what pieces need it, then we will move into sewing the above mentioned components onto the garment, and I will be sure to include some tips on stitch settings and my preferences when I am at this stage of the construction process.
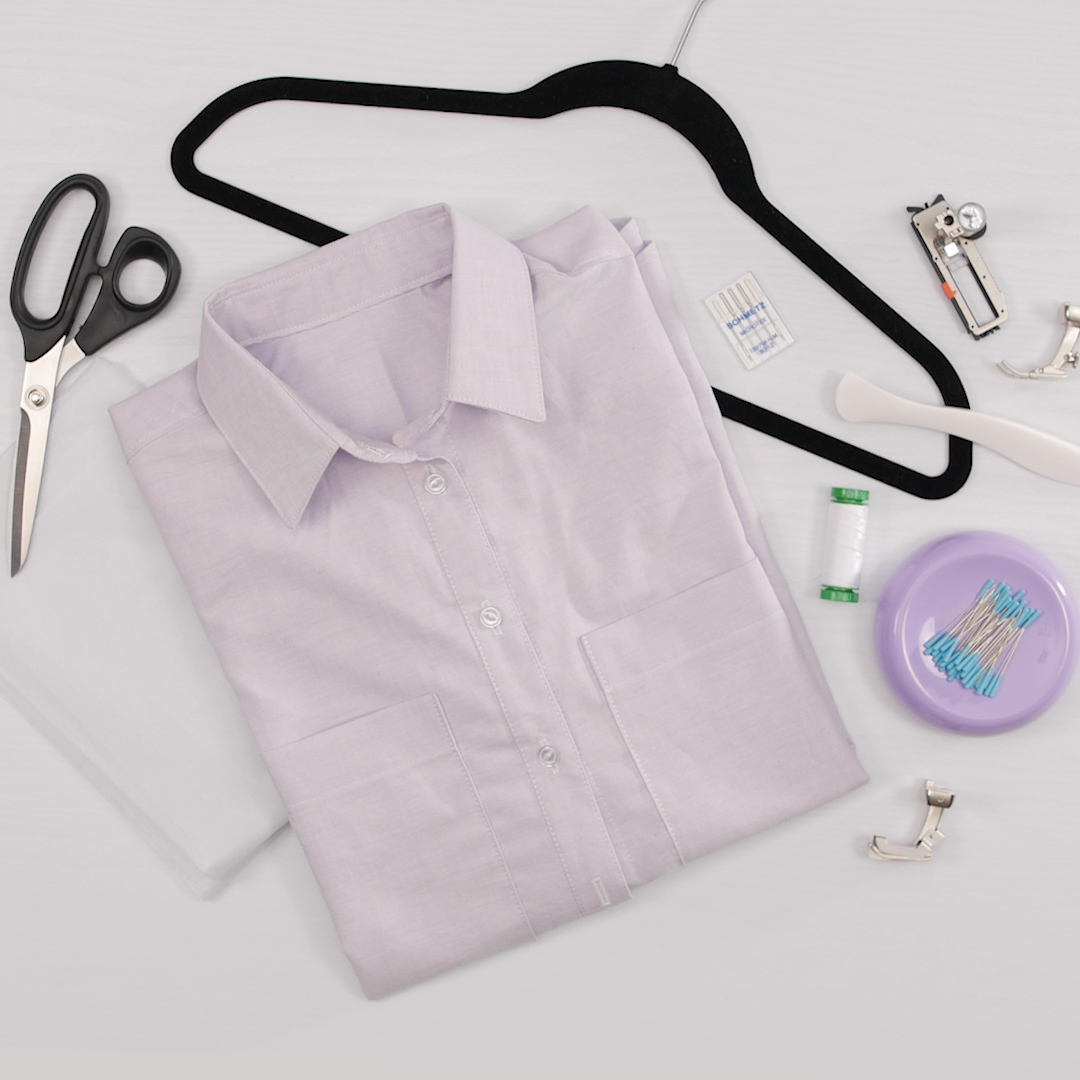
Materials and Supplies to Sew Collars
- Reference back to Post 1 and Post 2 for other supplies needed for garment construction, in additional to those listed below
- Point 2 Point turner
- Best Press spray
- Pieces 11, 12, & 13 for the collar
Collars
Following along with the pattern, after last time the next step is to attach the collar, followed by the cuffs. The top we are creating calls for the use of three pattern pieces, resulting in five fabric pieces begin cut. There are several different types and styles of collars for garments, some that require more pieces, and some that require less. Each can completely change the look or style of the garment you are creating. Let me quickly discuss a few collar types before getting into the construction for the Grainline Studios top.
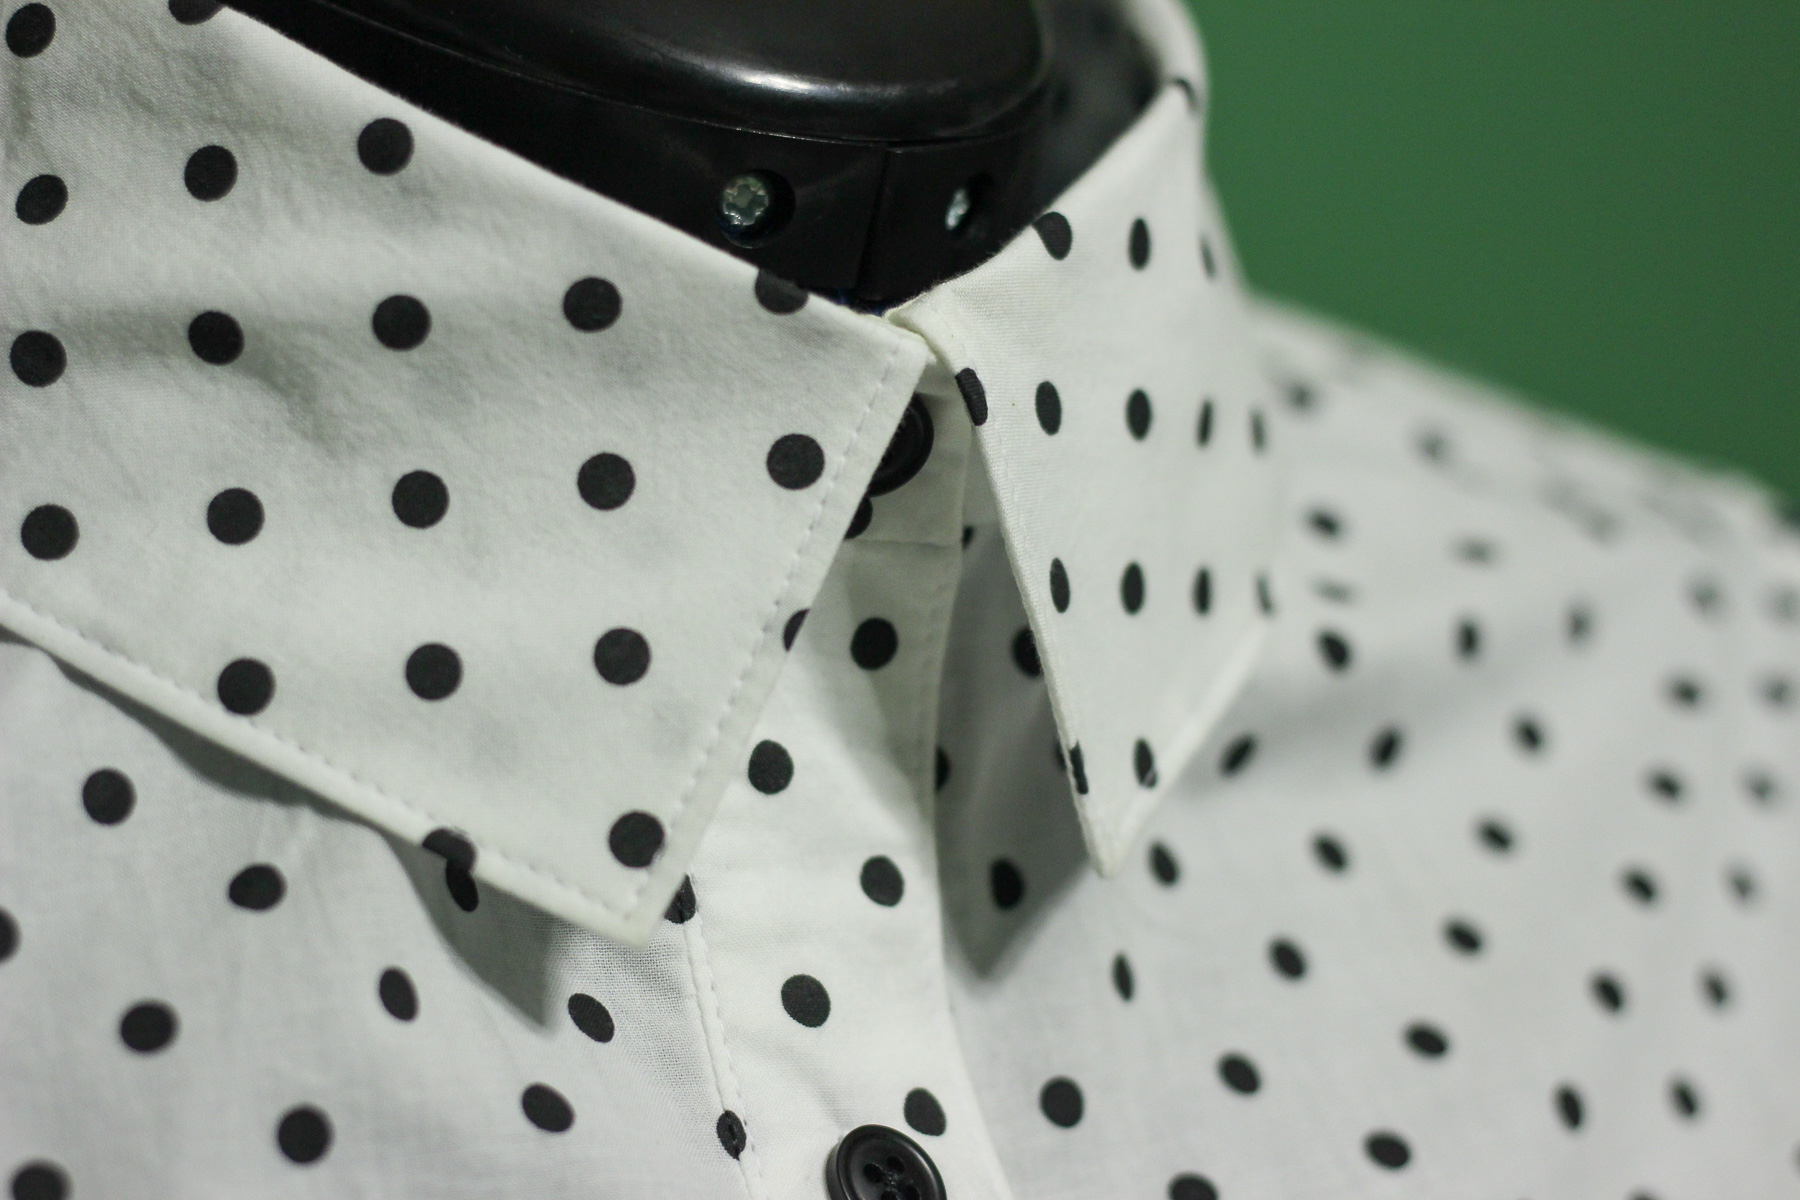
- Tailored shirt collar – This is the type of collar that will be used with our top. There is a collar stand between the neckline and the collar that raises the collar off the garment, giving it height, and allows the finished edge to lay smoothly over the neck edge. This type of collar can be buttoned all the way when wearing a tie, or left unbuttoned for a more relaxed look. The collar ends are pointed.
- Convertible collar – A convertible collar is more commonly seen because it is suitable for almost every type of garment. The difference between this type and the tailored shirt is the exclusion of the collar stand. This collar is sewn directly to the neckline of the garment, reducing the amount of height it has, but still allowing it to roll back nicely and lay flat against the garment. Again, the collar ends are traditionally pointed.
- Peter Pan collar – Being able to open in the front or the back is a major benefit to this style of collar. Like the convertible collar, this type is sewn directly to the neckline, making it lay flat against the garment when finished. The shape of the Peter Pan collar is actually rounded, and can be constructed with one or two fabric pieces.
- Mandarin collar – Classified as a stand collar, the mandarin collar is narrow and stands up from the neckline. It is cut as a straight strip on the bias, allowing it to curve smoothly around the neckline. The ends are typically rounded.
- Tie collar – You can probably guess this one by the name! This is a collar that has a straight piece sewn to the neckline with long, loose ends that can then be tied in a knot or a bow. The ends are usually separate pieces sewn to the collar. The benefit of this collar is it can be styled more formally or casual.
- Notched collar – This is a type of collar that usually has quite a few pieces. There is typically a collar and collar stand sewn to the neckline. Towards the ends points of the collar, there is a notch, or indentation, where lapels join the collar on both sides. The notched collar is often seen on jackets, coats, and vests.
- Turtleneck collar – I am sure we have all owned a ‘turtleneck’ in our lifetimes. Traditionally seen on more casual garments and long-sleeved shirts, the turtleneck collar is cut very wide on the bias, giving it the capability to be folded down back over itself to the neckline.
- Shawl collar – The final collar I would like to discuss is the shawl collar. It is a rolled collar, like the tailored shirt and convertible collars. It is cut in one piece with the front of the garment. The under collar is cut in one piece with the front facing sections. The seam for the collar and under collar is usually in the center-back, which could align with a pleat. The shawl collar can be applied to dresses, blouses, and coats.
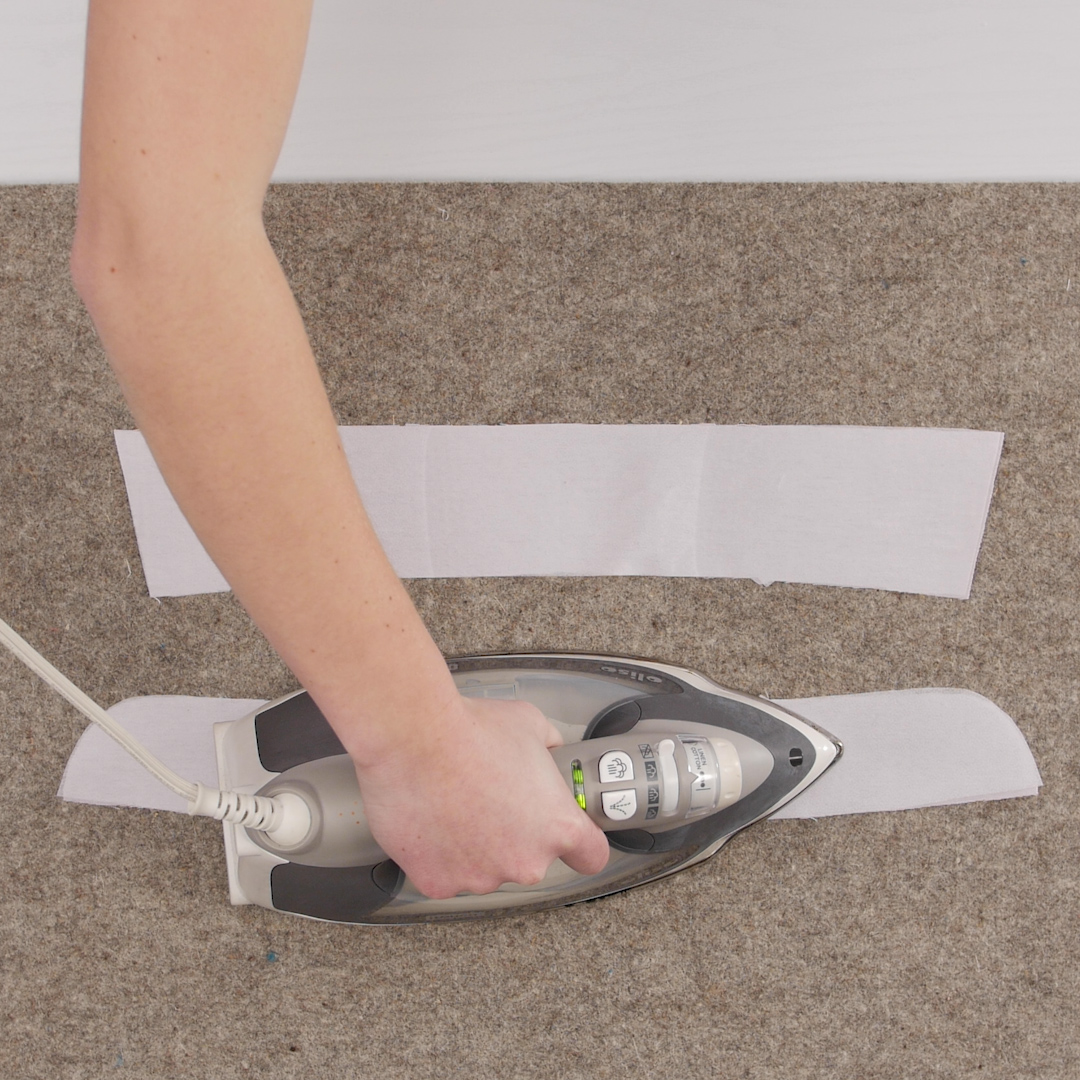
Fusing the Interfacing
Types and weights of interfacings were first discussed in back at the beginning of this series in Post #1. The heavier the interfacing, the stiffer and crisper that piece of the garment will be. Interfacing is usually one of the biggest differences between a garment that is mass produced and a garment that is constructed like this, with precision and quality. Most companies do not go the extra mile to adding interfacing for a crisp look, but we are! Think about a shirt that you wash that you purchased from a big retailer. The collar usually comes out pretty wrinkled. This may be because there is not interfacing at all, or it is too lightweight.
More formal clothing uses heavier interfacing. Stiff cuffs are needed to hold cuff links and to look firm under suit jackets. Collars need to be sharp and crisp under a jacket, as well. For this shirt, which is a bit more casual, it is okay to use a lighter weight interfacing. As I have mentioned before, the weight of interfacing should match the weight of the fabric being used. Another factor to consider is personal preference when deciding what weight to use. For my top, I am using a mid-weight fusible interfacing, as to show how the collar and cuffs should sit.
Fusing on the interfacing is the first step with today’s post. Always fuse interfacing to the wrong side of the fabric. The interfacing should have been cut from the same pattern pieces as the fabric was for the collar. Iron interfacing onto the upper collar (piece 11) and one of the collar stand pieces (piece 13). When the garment is complete, the interfacing should be on the outermost part of the garment. The reasoning for this is so that piece has sharp, clean lines when the garment is being worn. We want a firm collar stand for the collar to be folded on, as well as a solid collar with sharp points.
Constructing the Collar
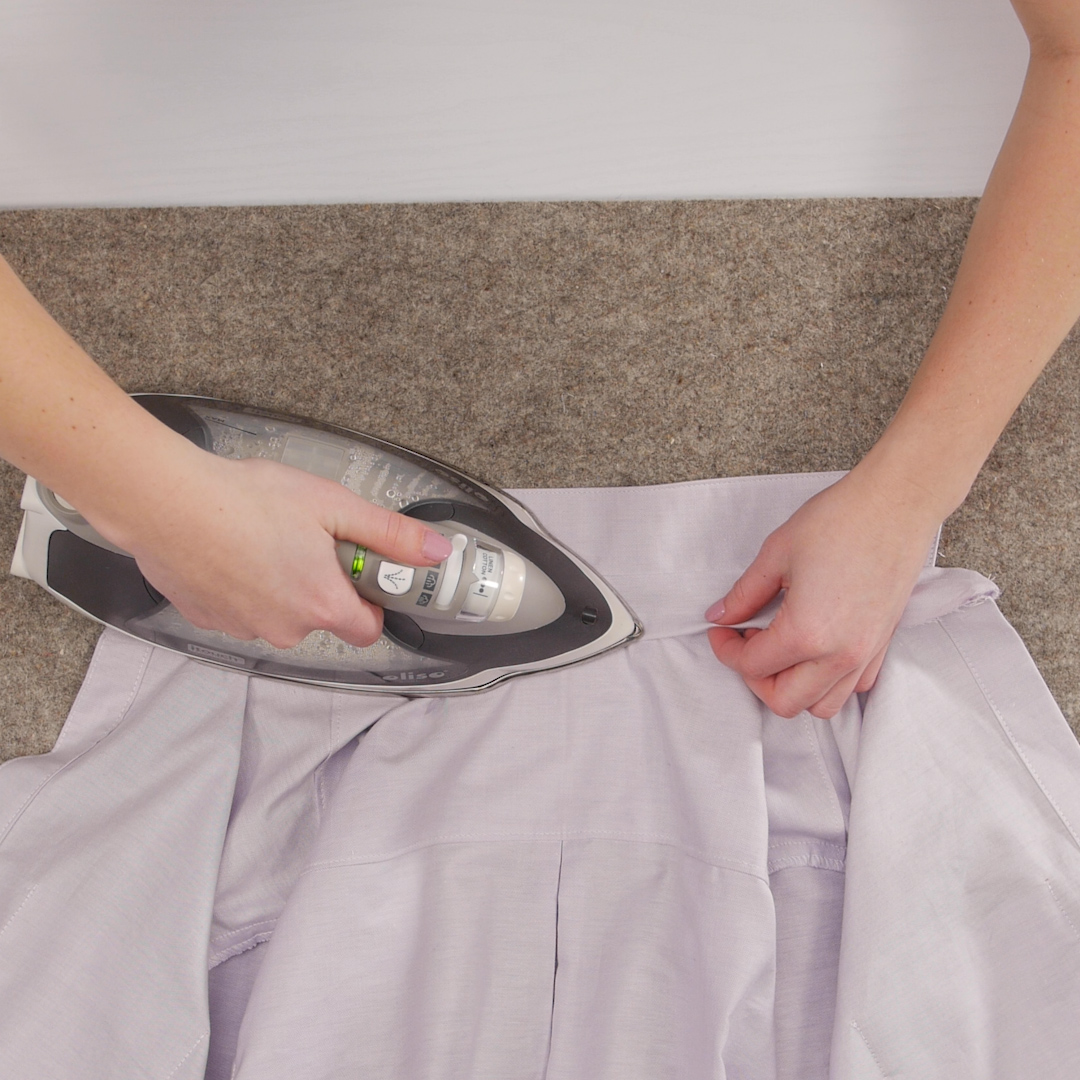
The first step is to sew the two pieces of the under collar together, then press the seam open. When I am setting this seam with the iron, I use Best Press starch to stiffen it.
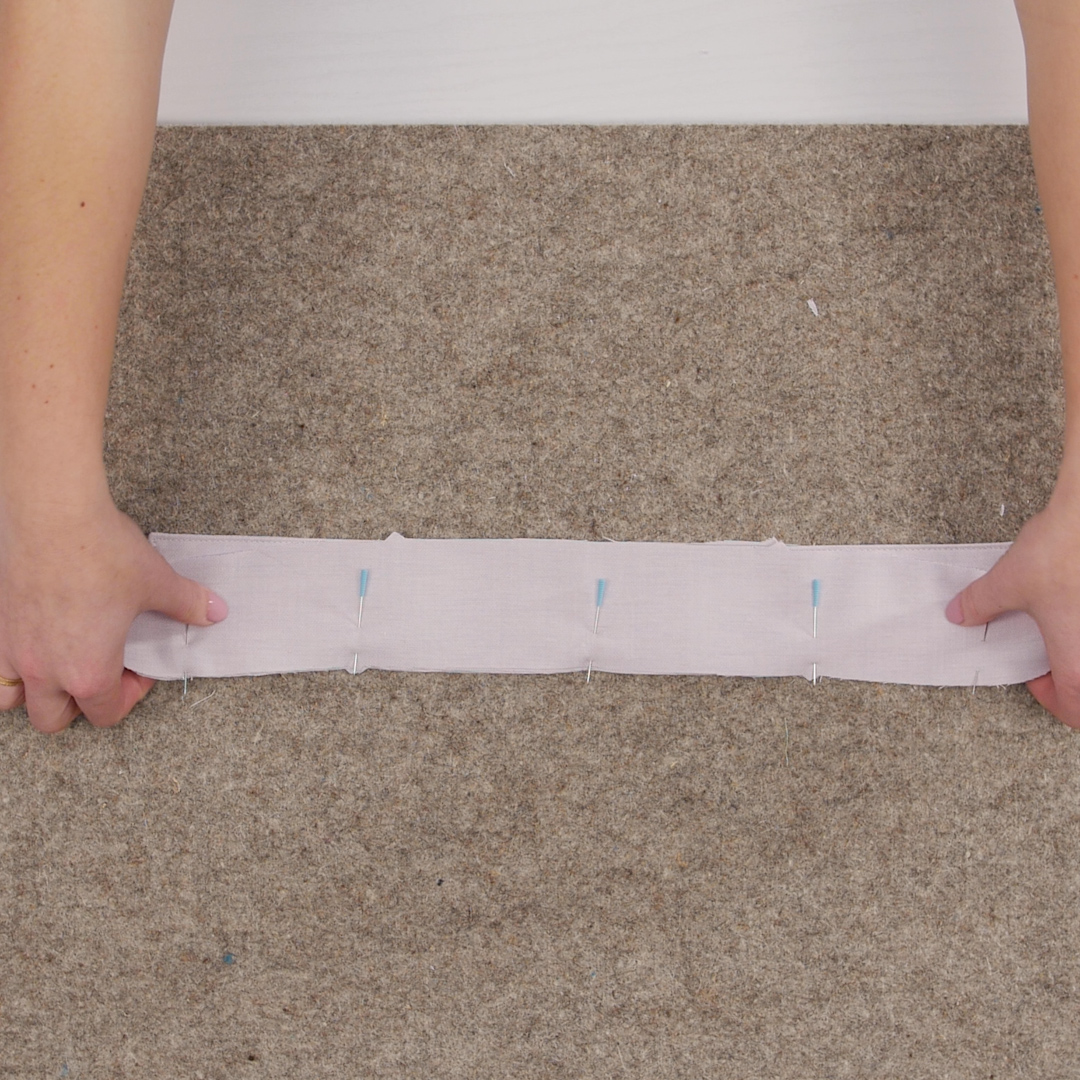
Pin the under collar just sewn to the upper collar piece with right sides together. The interfacing that was fused to the upper collar should be on the outside. You will stitch around the two sides and the longer top edge with a ½” seam allowance. Leave the bottom open. However, I still match and pin the notches at the bottom.
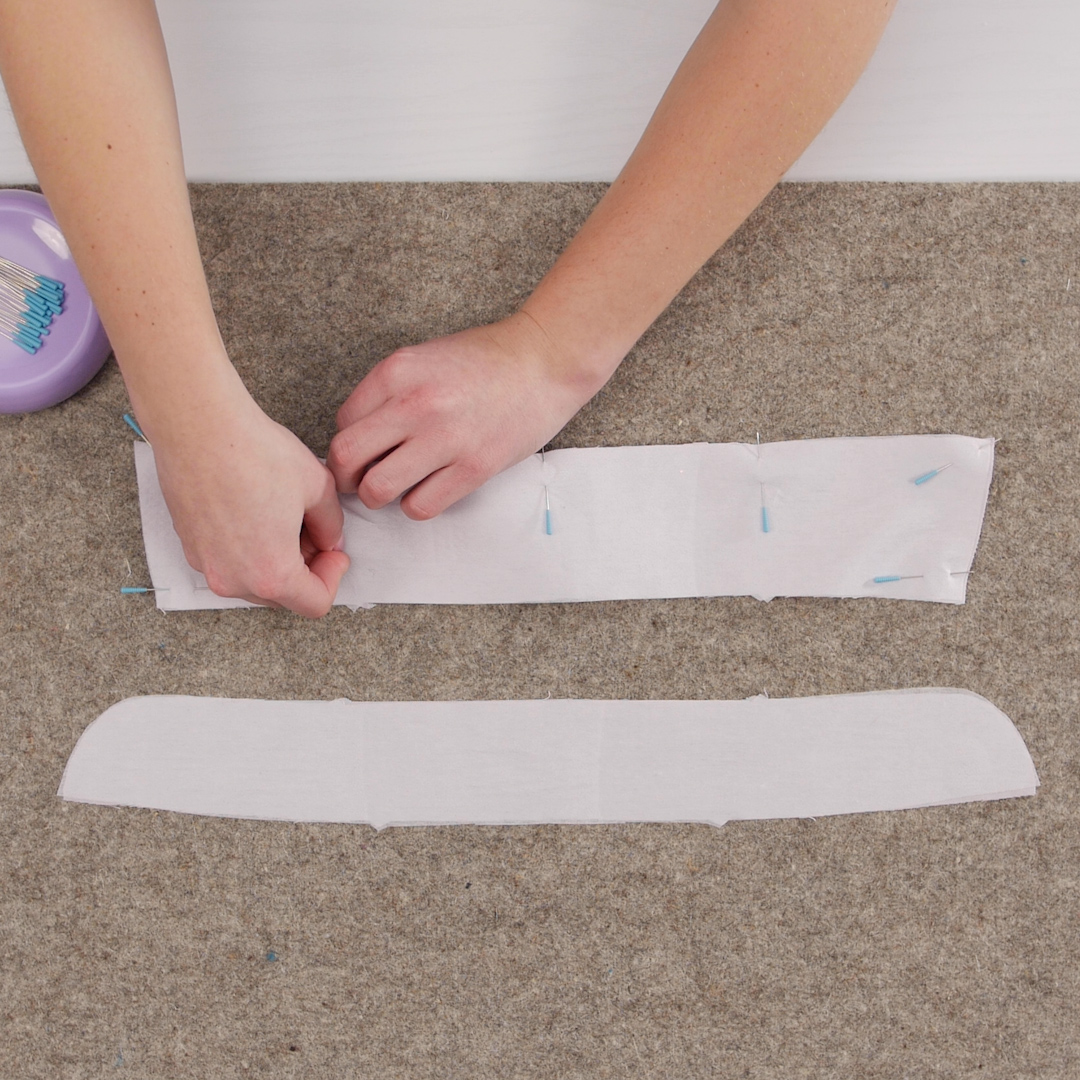
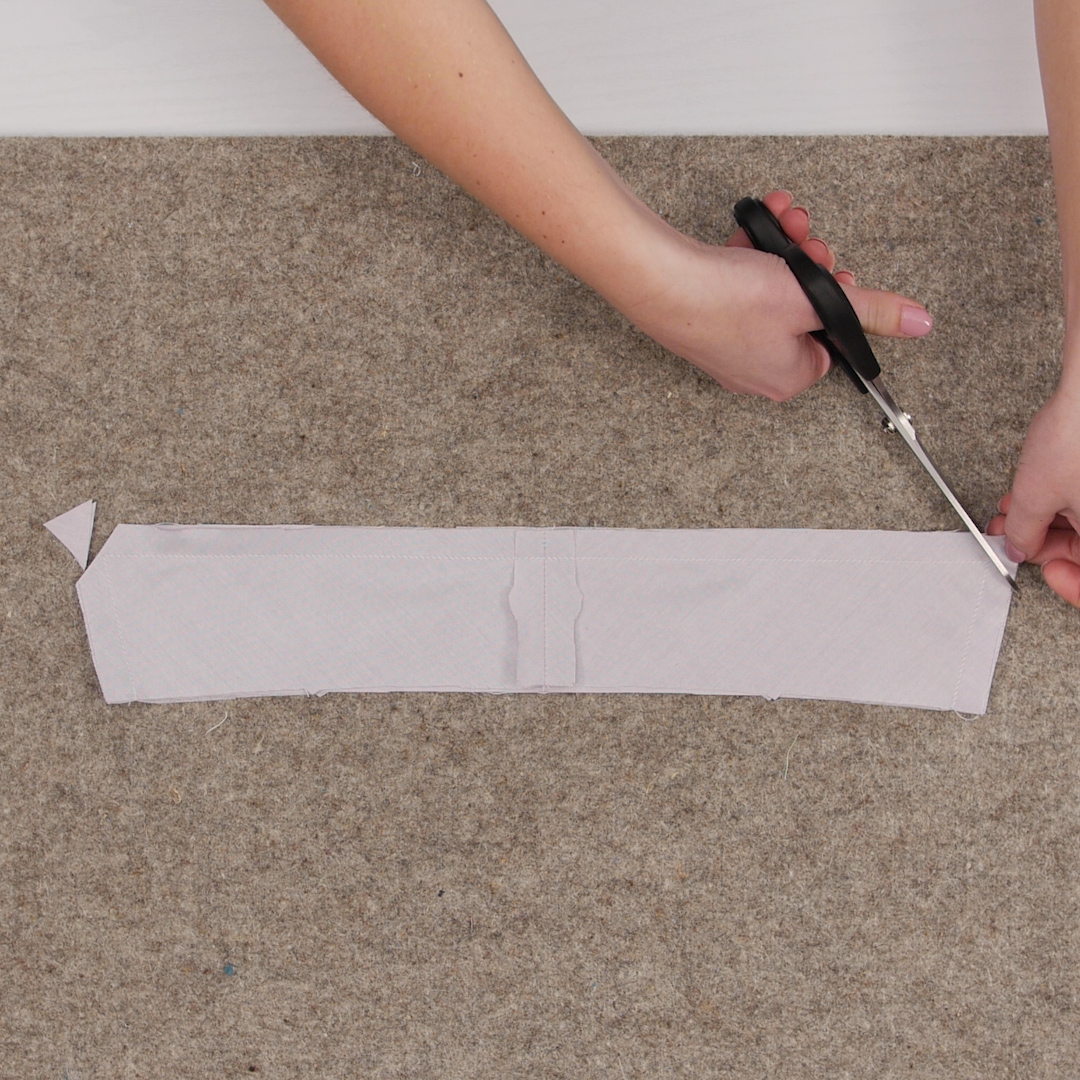
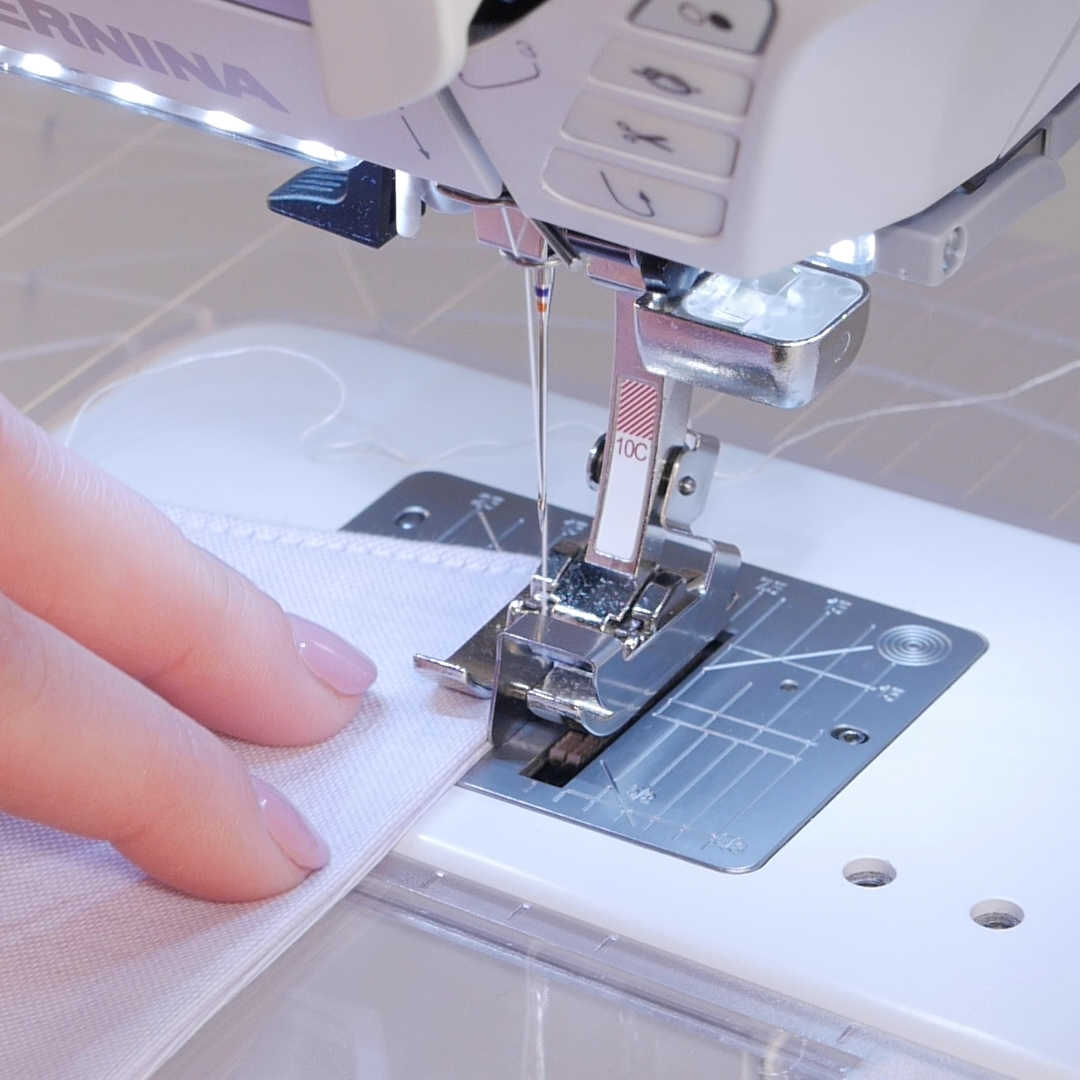
This stitching will determine the points on the collar. To get sharp points, start sewing on one of the short ends and stop ½” away from the long end. Leave the needle down in the fabric, and use the BERNINA Free Hand System to rotate the fabric 90°. Continue stitching along the top edge, and repeat when at the next corner.
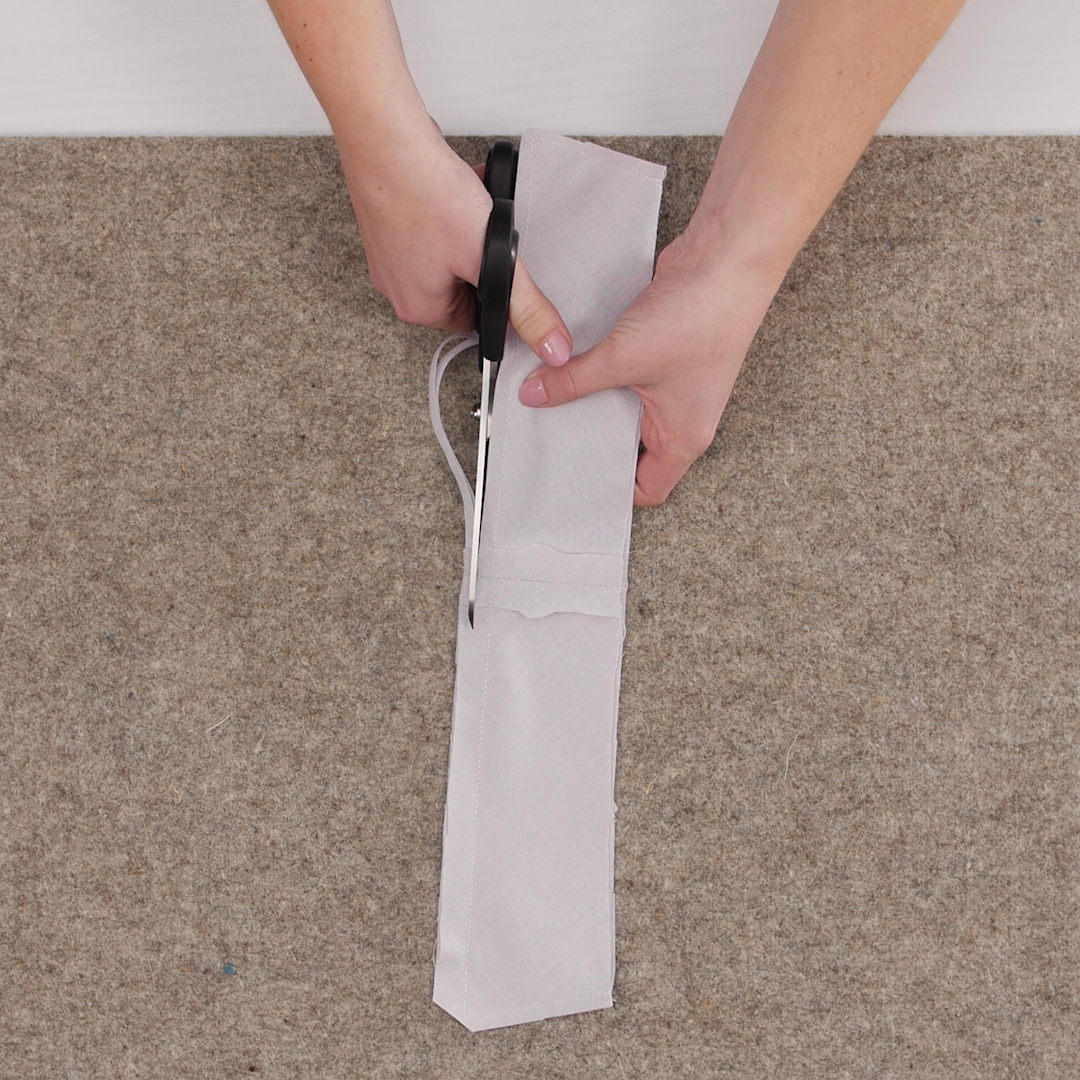
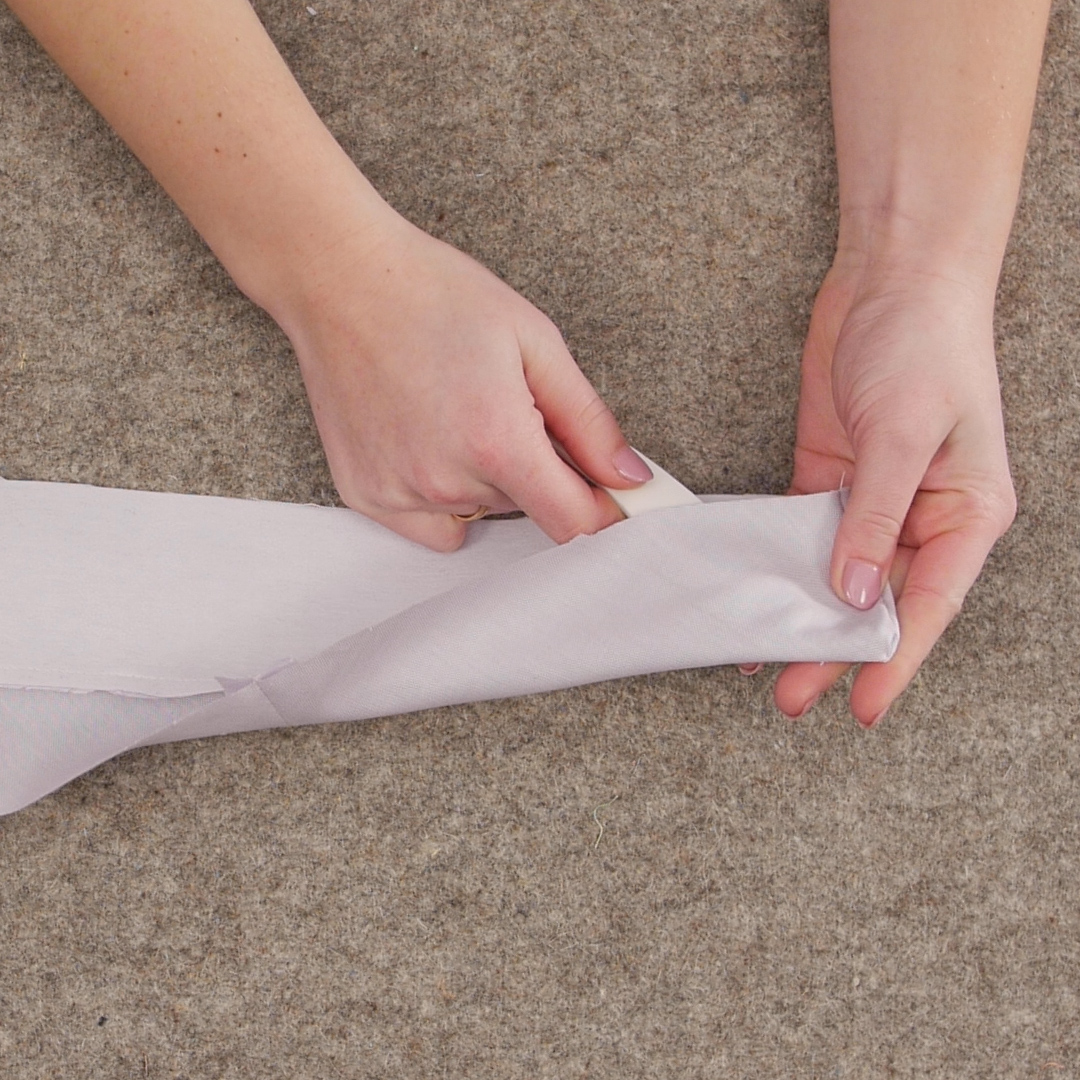
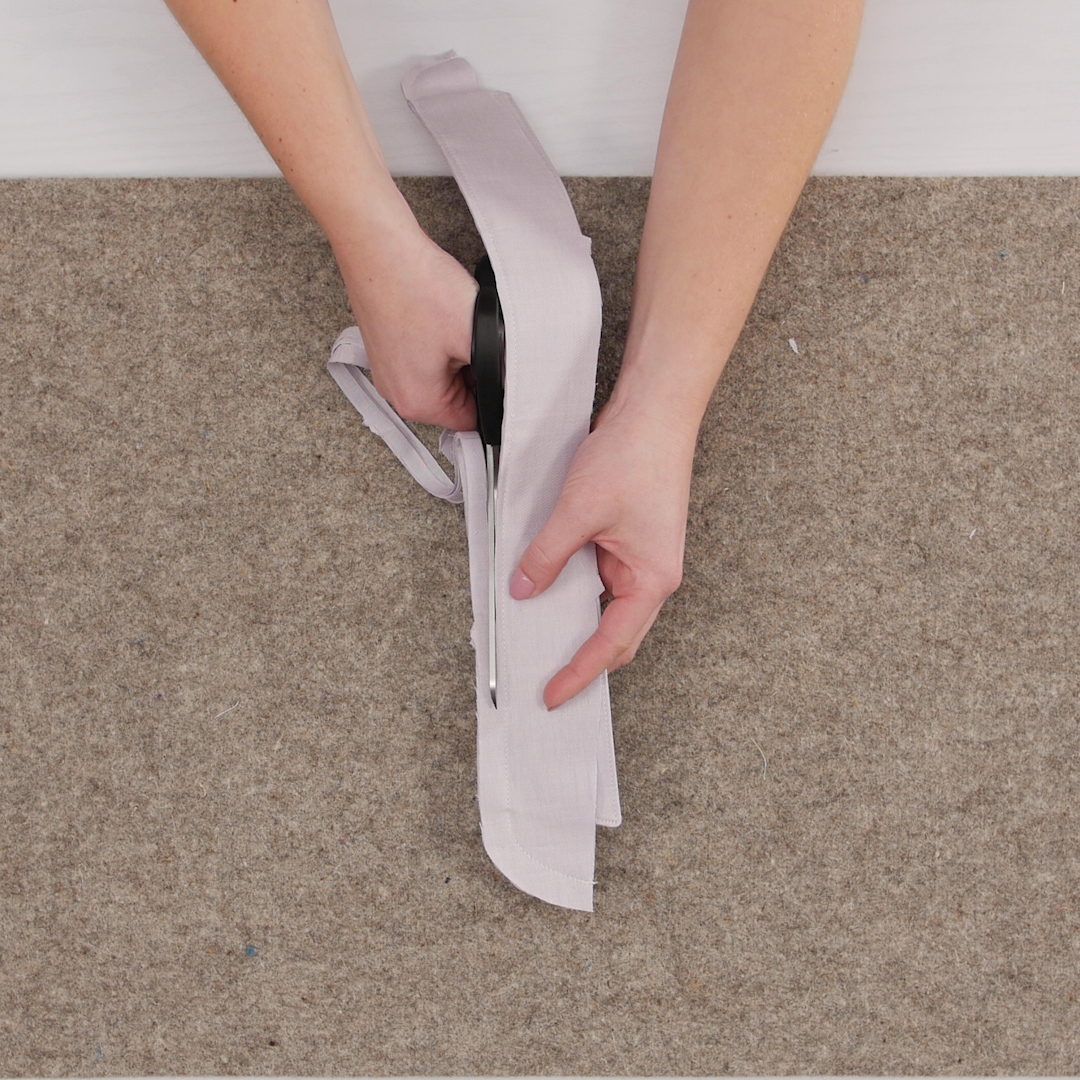
Turning the collar and getting crisp points can be one of the most daunting tasks. Giving this step a bit of extra time and attention will only help the finished product on the garment. To get the pointiest points on the collar, it is essential to clip the corners and trim down the bulk of seam allowance. Clip the corners close to the stitching. Trim the seam allowance in half, then trim the under collar in half again. Consider grading the seam allowance even more around to the corners. It may be hard to see below, but I trimmed mine at an angle. After all the trimming, flip the collar right side out and use a point turner to gently push out the corners.
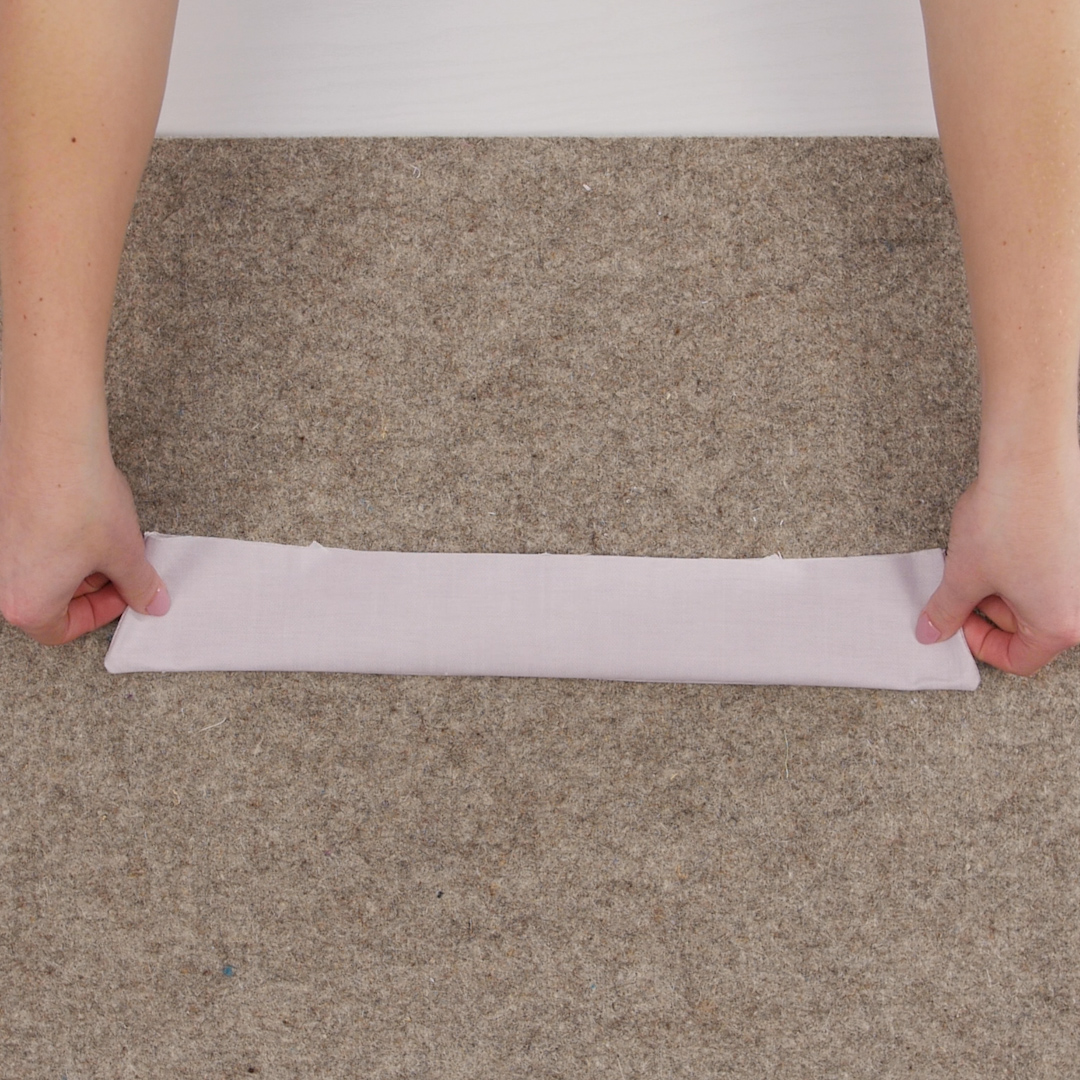
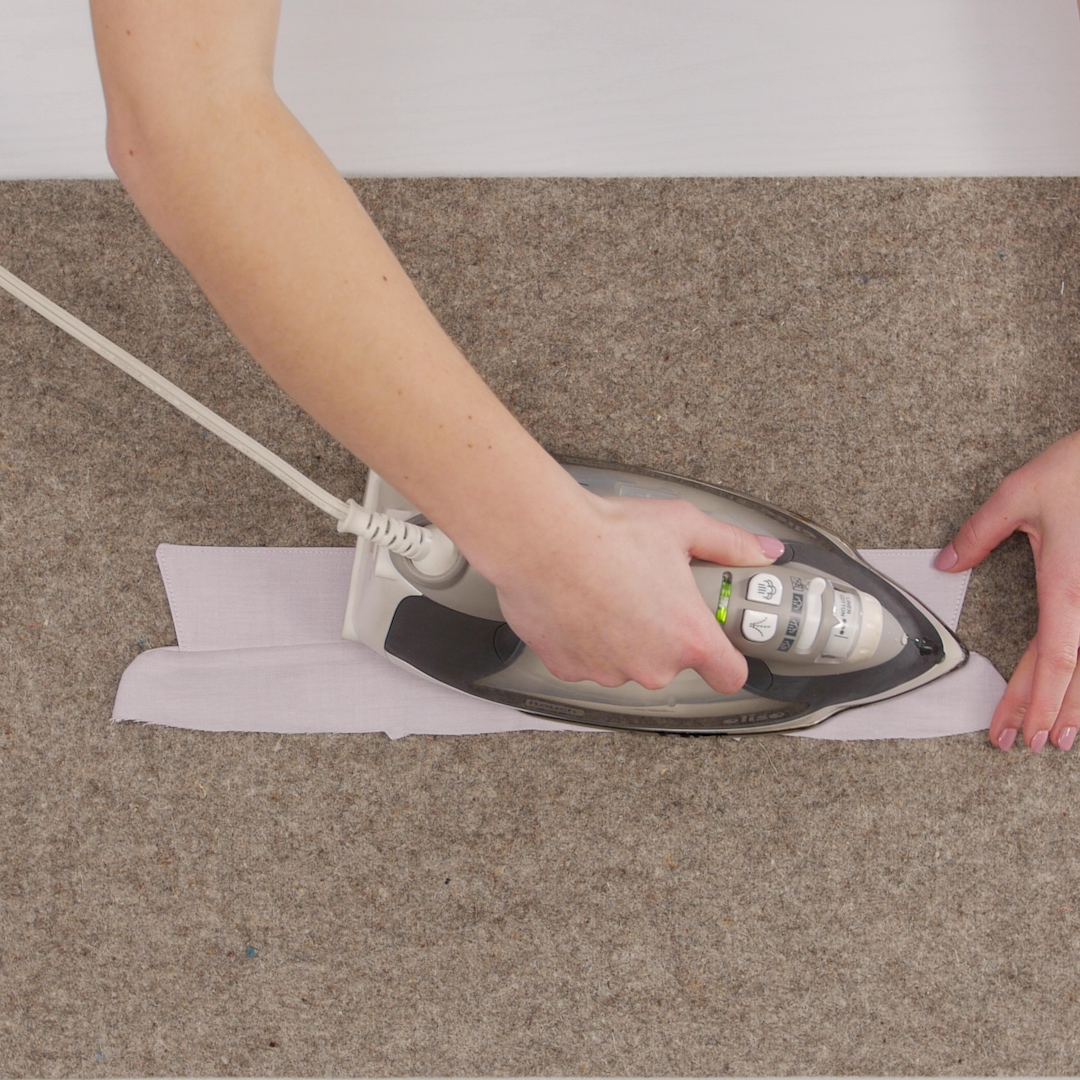
Give the collar a good press before proceeding. Make sure the edges are even all the way around.
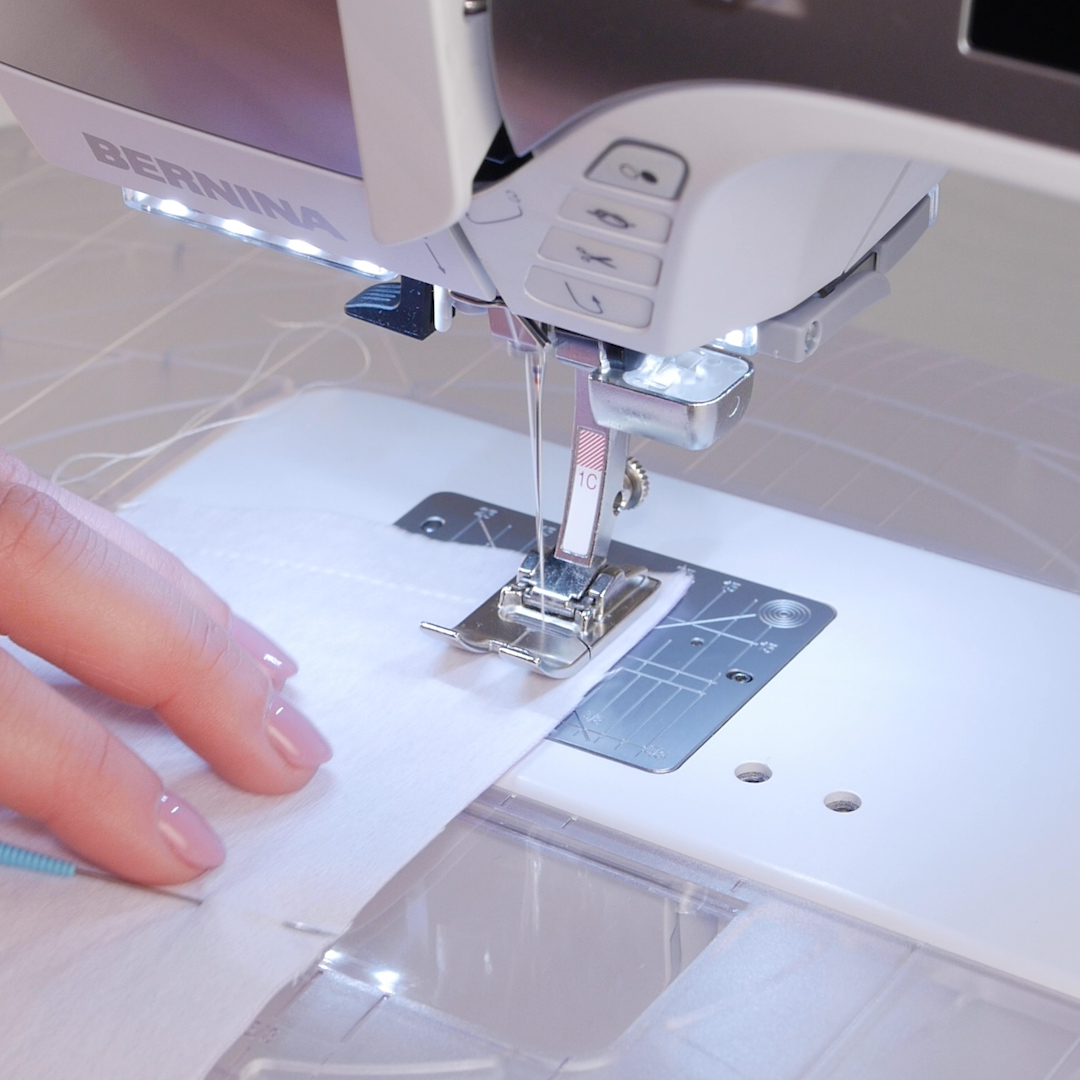
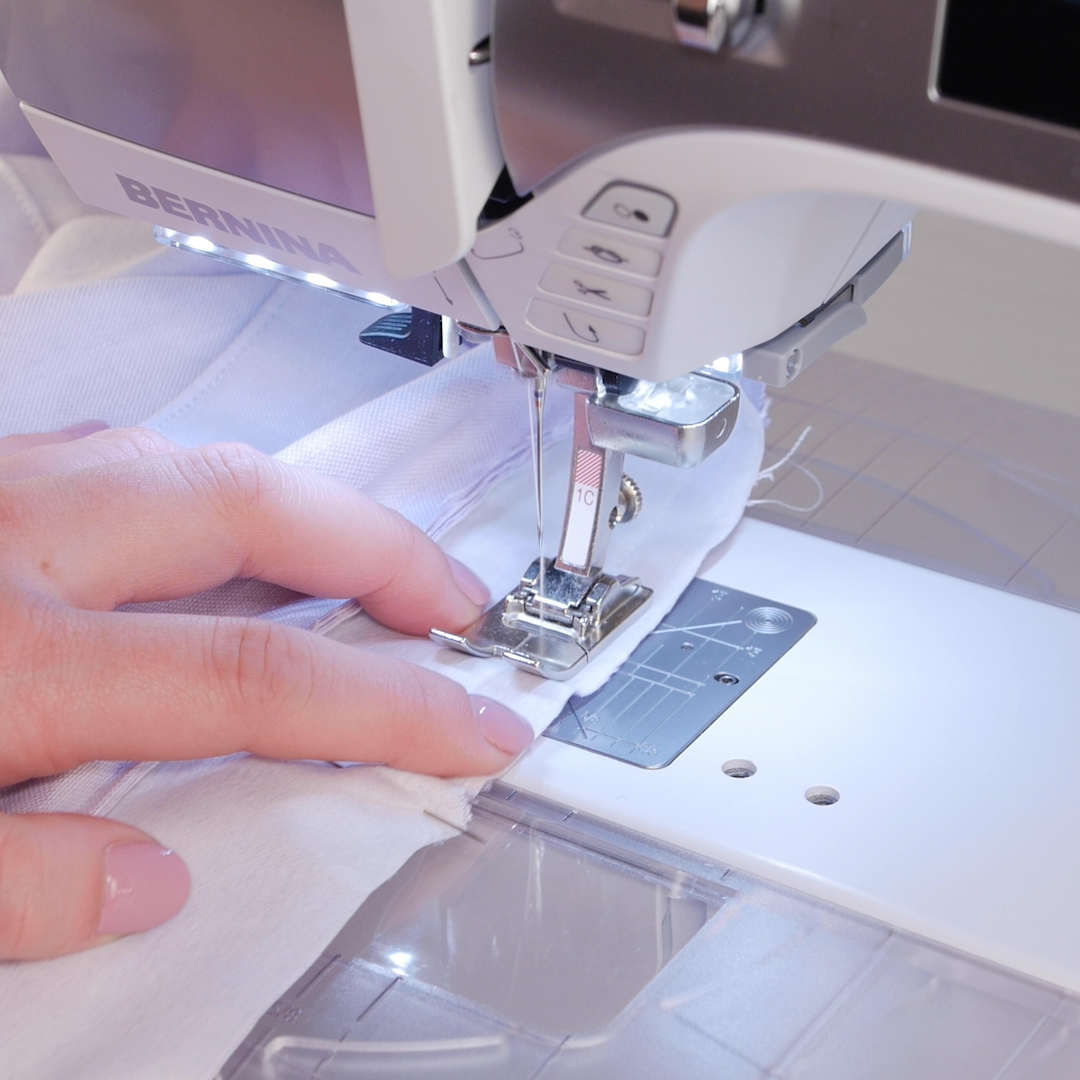
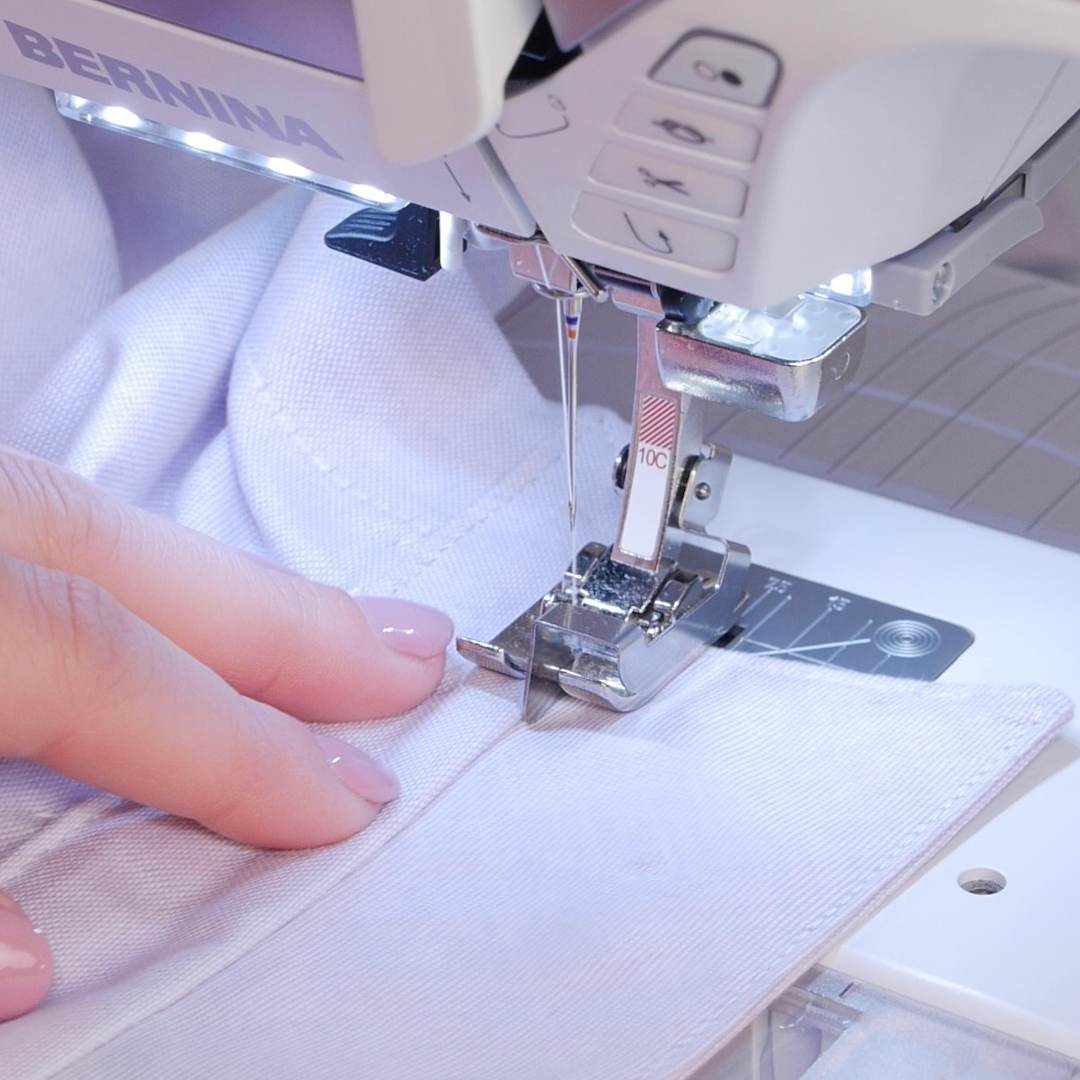
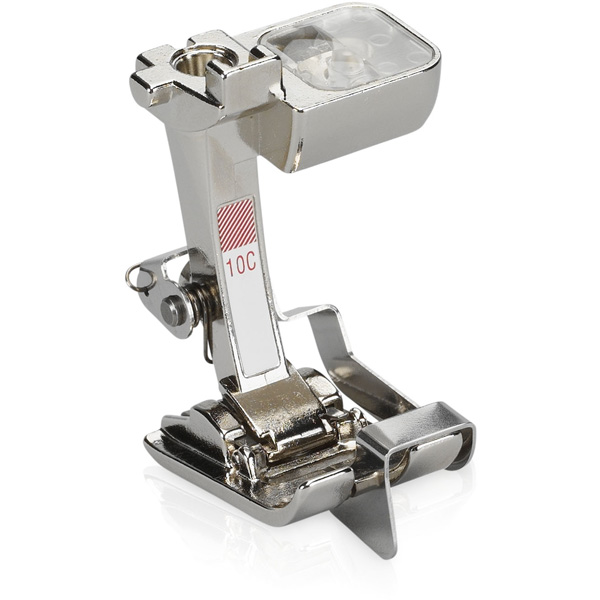
The next step is to edgestitch around the collar and baste the bottom edge shut. The edgestitching is all up to your preferences. I typically increase my stitching length slightly to 2.90 mm and attach Edgestitch Foot #10C. Once I am read to sew, I then lower the presser foot and adjust my needle position to the left or right of center 3 positions. I will be changing the machine settings to these for the remainder of the edgestitching in this post. Increase the stitch length to 5.0 mm for basting.
We are now ready to attach the collar stand to the completed collar piece. The pattern says to baste one side on first, then attach the other and sew all the layers together. I skip the basting and simply pin the sides on separately, but keep all the pin heads going the same direction for easy removal. I know that my BERNINA 480 will feed the fabric through the machine very evenly. The interfaced collar stand piece should go on the under collar side, while the un-interfaced piece will match with the upper collar. Match and pin the notches first, then continue pinning all the way down the curves. Sew from curved edge to curved edge using a 1/2″ seam allowance.

Again, the seam allowance just created with need to be trimmed down generously. On the curved ends, I trimmed down all the layers to 1/8”, and graded the straight part according to the pattern. After doing this, flip the collar stand right side out and press. It may be helpful to use the curved end of the point turner to smooth out the curves. Press the collar stand down, away from the collar.
Now for the fun part – sewing the completed collar and collar stand to the neckline of the shirt. The collar stand will be pinned directly to the neckline. The right sides of the collar stand (the piece with the interfacing) and the garment shell should be together. Match up the notches and ends together first. The ends of the collar stand may curl up slightly. When you go to sew this, you want the seam of the collar stand to be even with the edge of the button band.
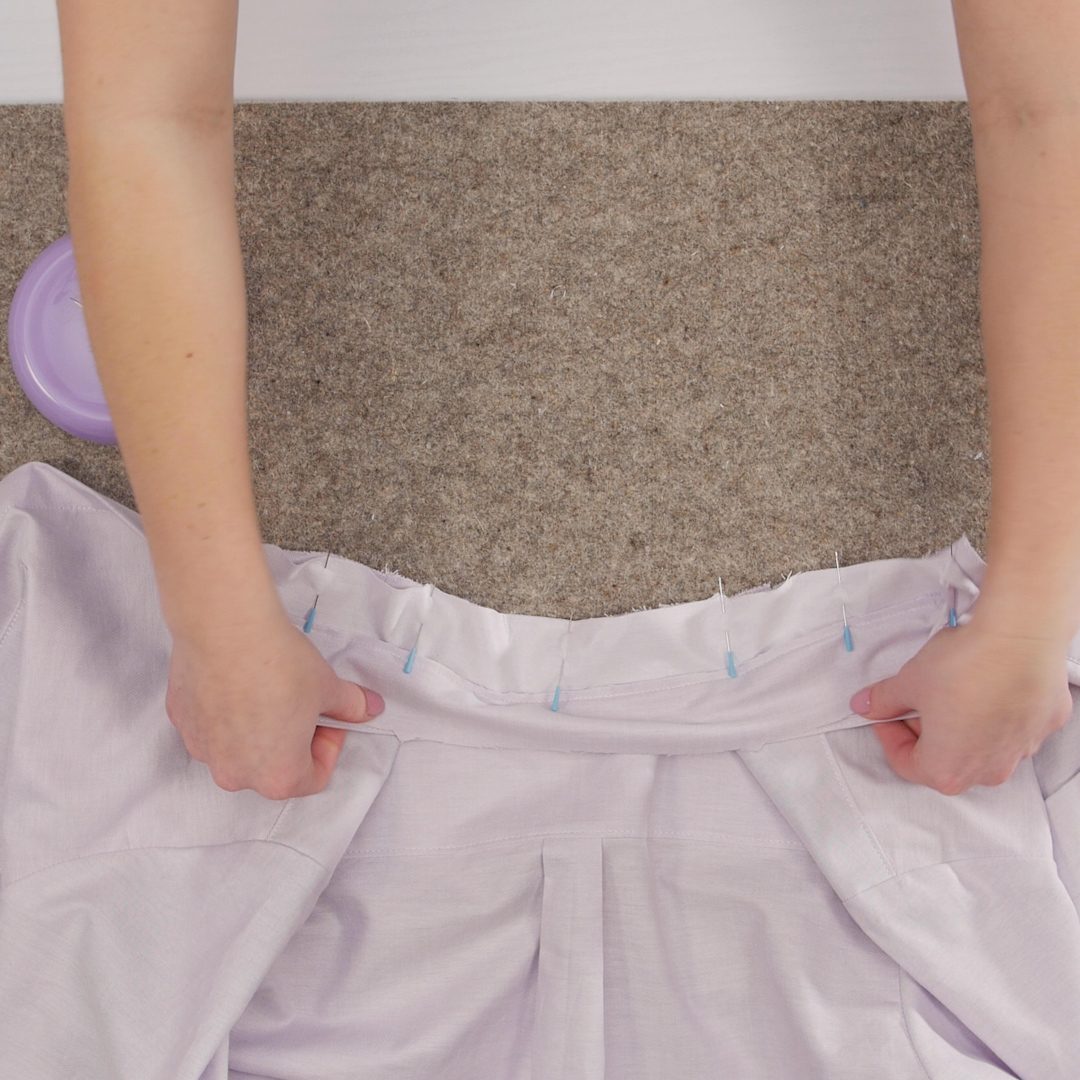
Sew the pinned seam with a 1/2” seam allowance.
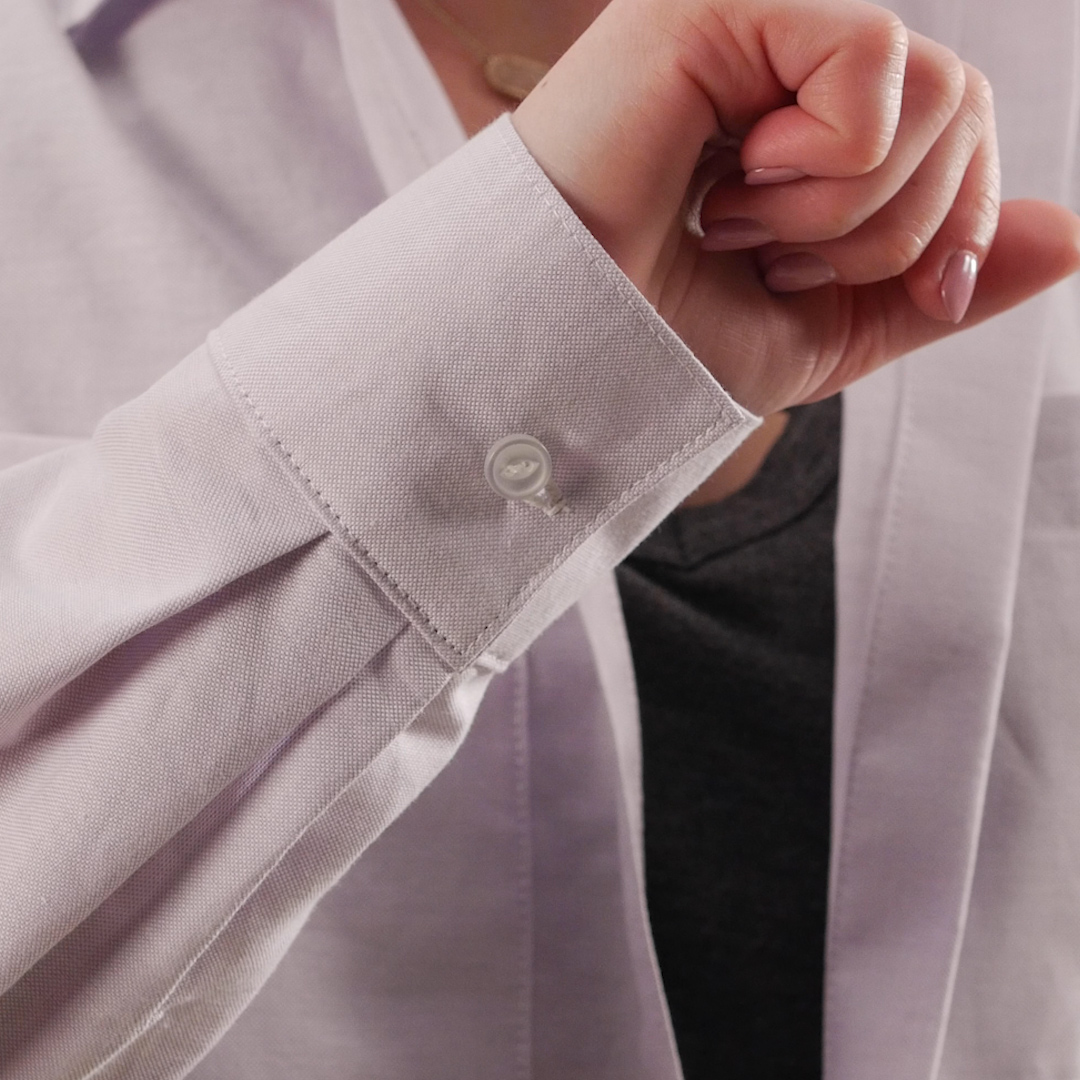
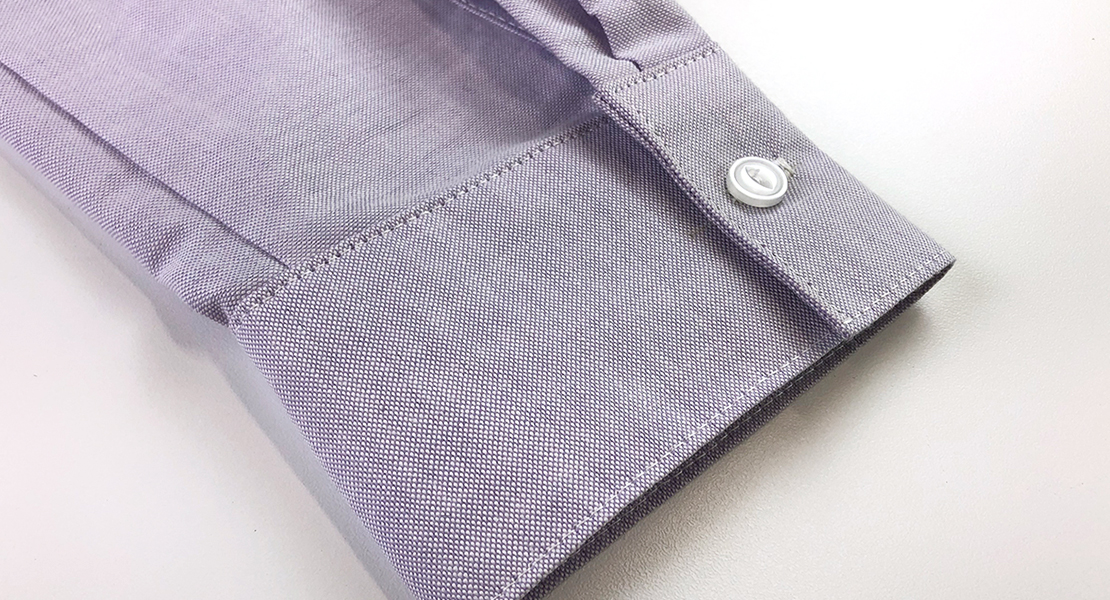
After sewing, clip into the fabric right up to the seam approximately every 1/2”. This will help the collar to curve around the neckline. After clipping, press the seam allowance up, towards the collar. Iron up the raw edge of the other side of the collar stand ½” and pin down to cover the previous line of stitching. This is where I use the blind stitch (discussed in Part 3) to tack down the collar stand before I edgestitch.

Hand tacking is not necessary, but I prefer to do this because I know if provides a clean finish to all the seams and hides seam allowances. The final step is to edgestitch around the collar stand, and you have a completed collar!

More tips for creating the perfect collar can be found in this WeAllSew Blog Post “The Secrets of Sewing Perfect Collars”.
Used Products


What you might also like


2 comments on “Garment Sew Along Part 6: Collars”
-
-
The key to collars is patience! With the collar stands, be sure that your notches are lined up and pinned well. Sew slowly, easing in the fabric as needed. I have never used water soluble thread in my garments. I usually just remove basting as needed. I would not advise using a wash away thread for your blind stitching, as those stitches are still need for holding hems in place most often.
-
Leave a Reply
You must be logged in to post a comment.

Now for the fun part – is that sarcasm? Collar stands to shirts have always been problematic for me. Next time I will try smaller gauge shirting pins. Would you use water soluble (wash away) thread in any of the basting or blind stitching?