Garment Sew Along Part 8: Pockets
Megann here, back again with another post for the garment sew-along! If you are just joining us, we are using the Grainline Studio pattern for the Archer Button Up. This shirt is a staple piece for any wardrobe and can be made several times, each with a different aspect to it.
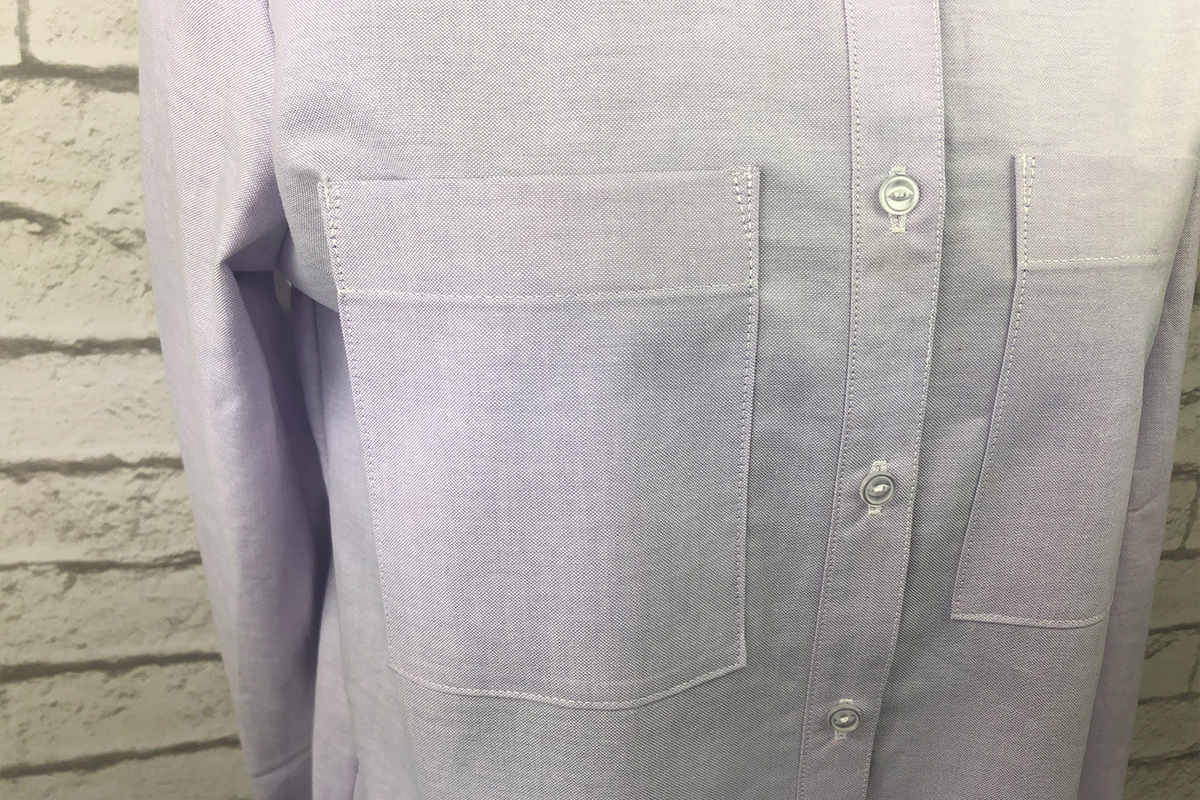
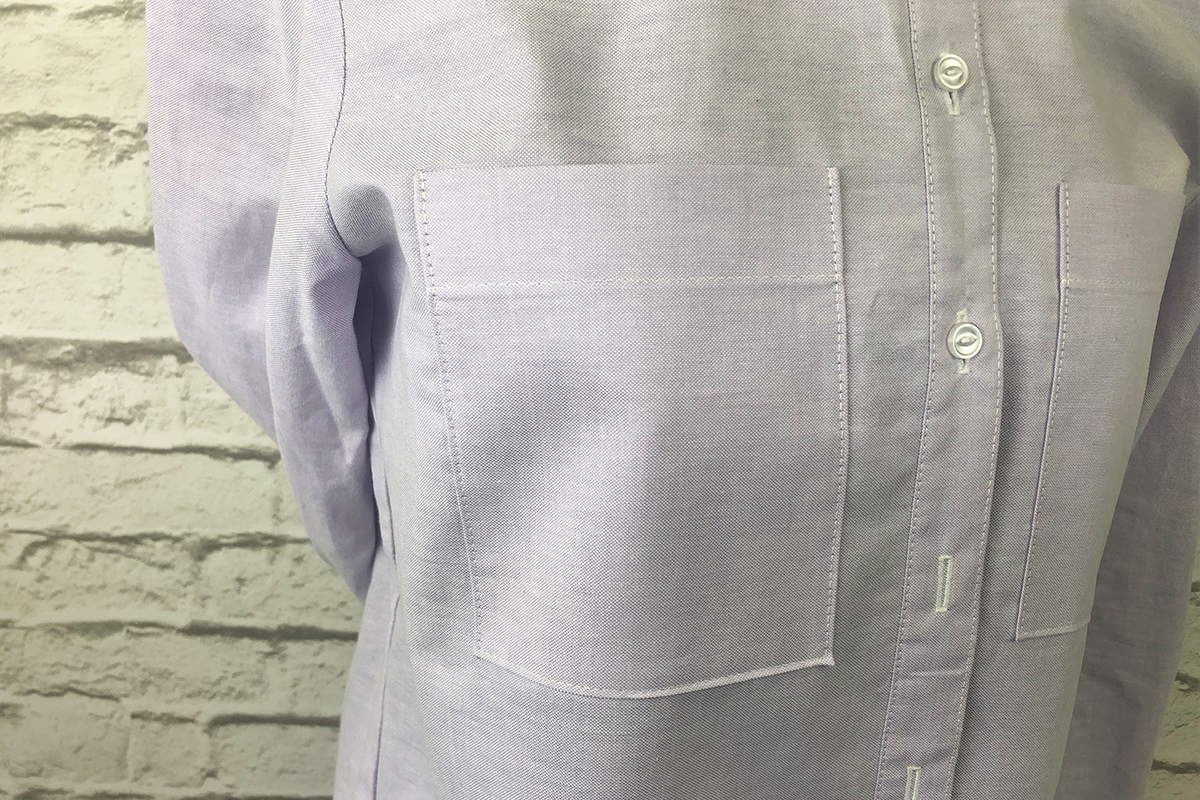
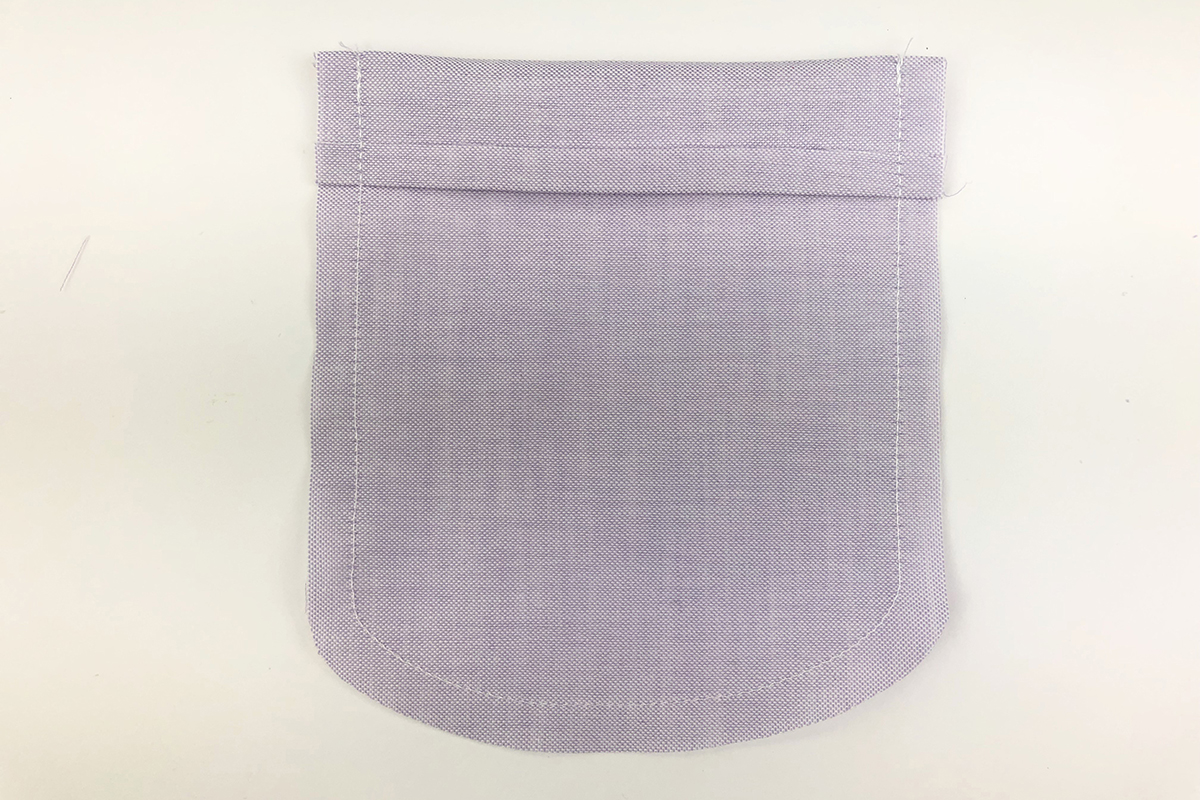
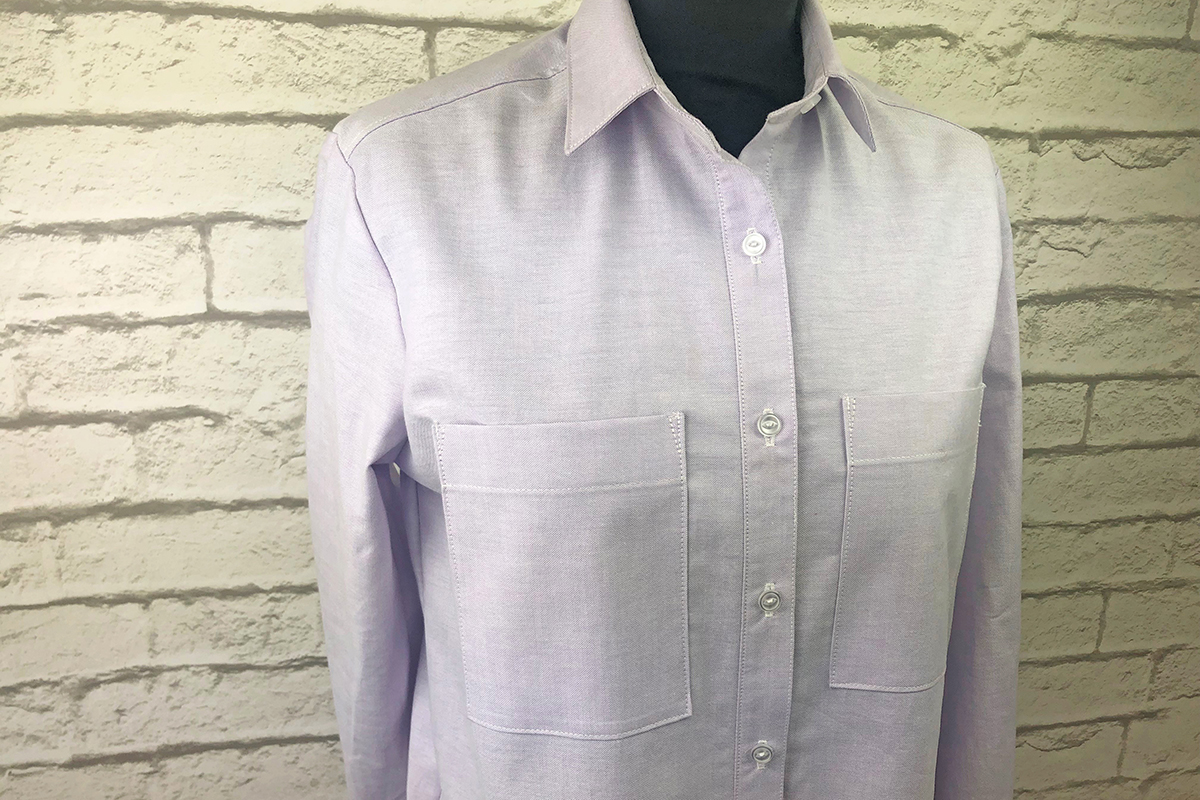
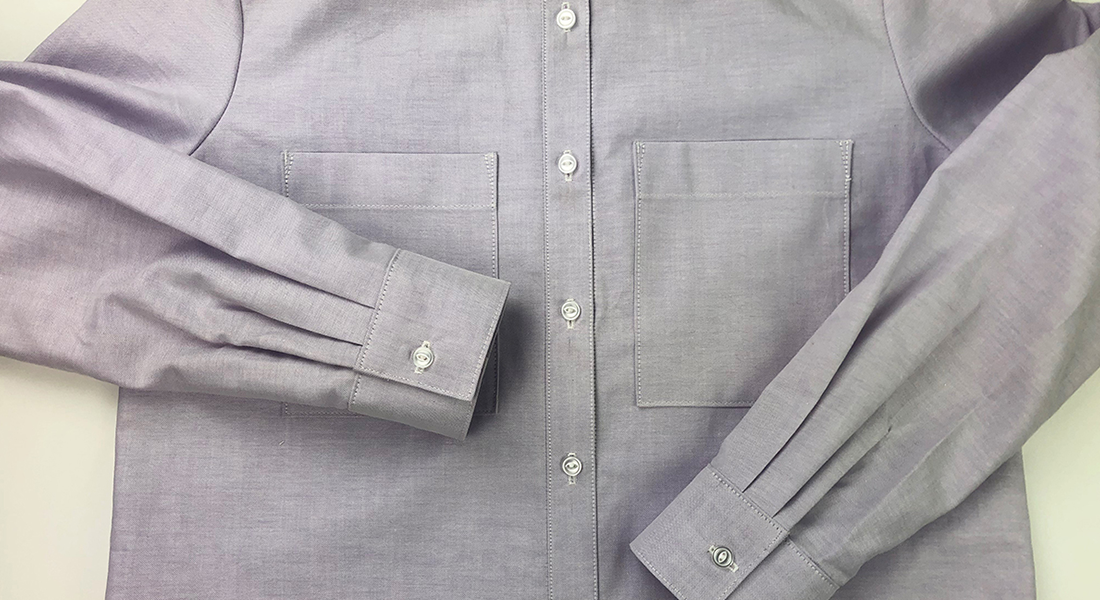
One way to add a fun twist to this classic shirt is by adding decorative elements to the called-for pockets or transforming them into a completely different shape. Pockets can be both decorative and functional. They can be structural within the garment, or add details of craftsmanship. This pattern calls for two very simple square edge patch pockets, located on the left and right fronts, with a stitched hem that falls approximately 1 1/8” from the top edge. This is what is called an exposed pocket – the entire pocket is on the outside of the garment, and nothing is sewn into a seam.
Note that in the instructions, attaching the pockets was one of the first steps after making the front button bands. The reason for doing it that way would be to avoid the excess bulk of the garment. Remember that it is okay to skip steps in patterns if you think they are needed. Those instructions are merely guidelines for your sewing! In this post, I will discuss how to create the pockets and attach them to the shirt, different ways to reinforce the pockets’ edges, and pocket variations to change the look of the garment.
Supplies
Reference back to the previous post for other supplies needed for garment construction, in addition to those listed below.
- Hot Hemmer
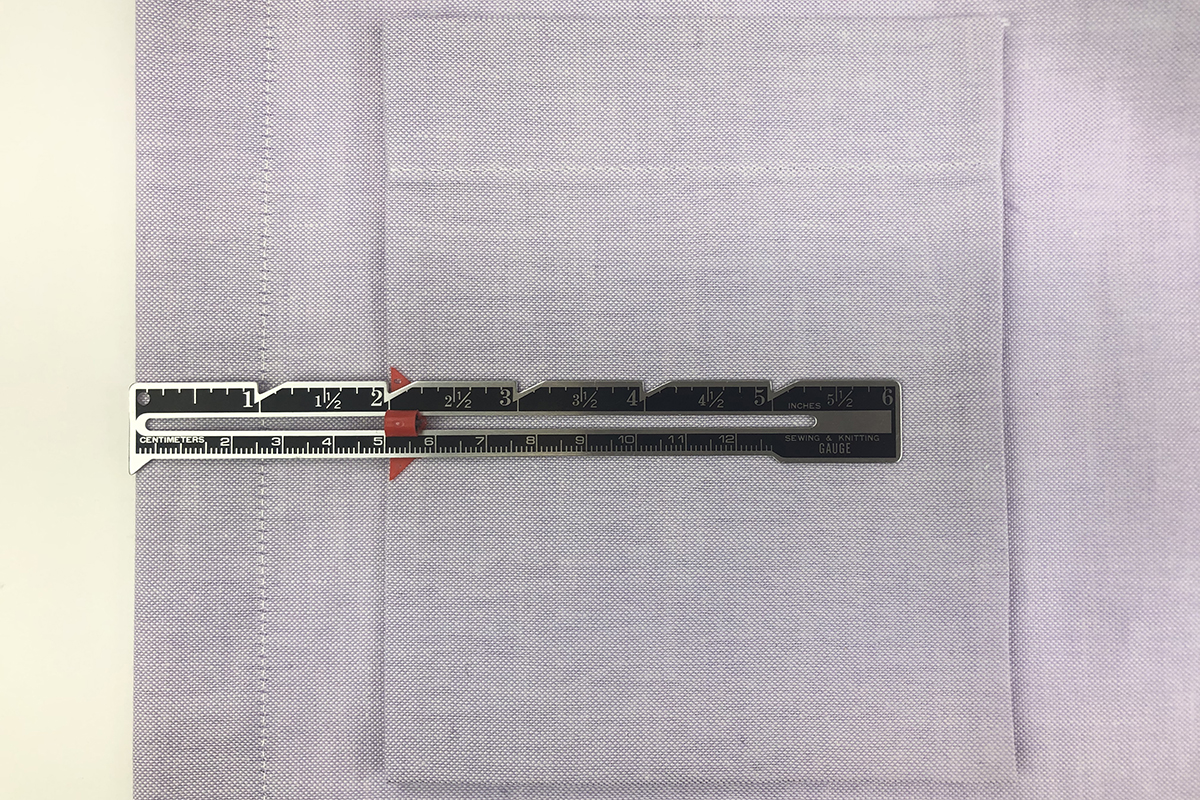
- Seam gauge
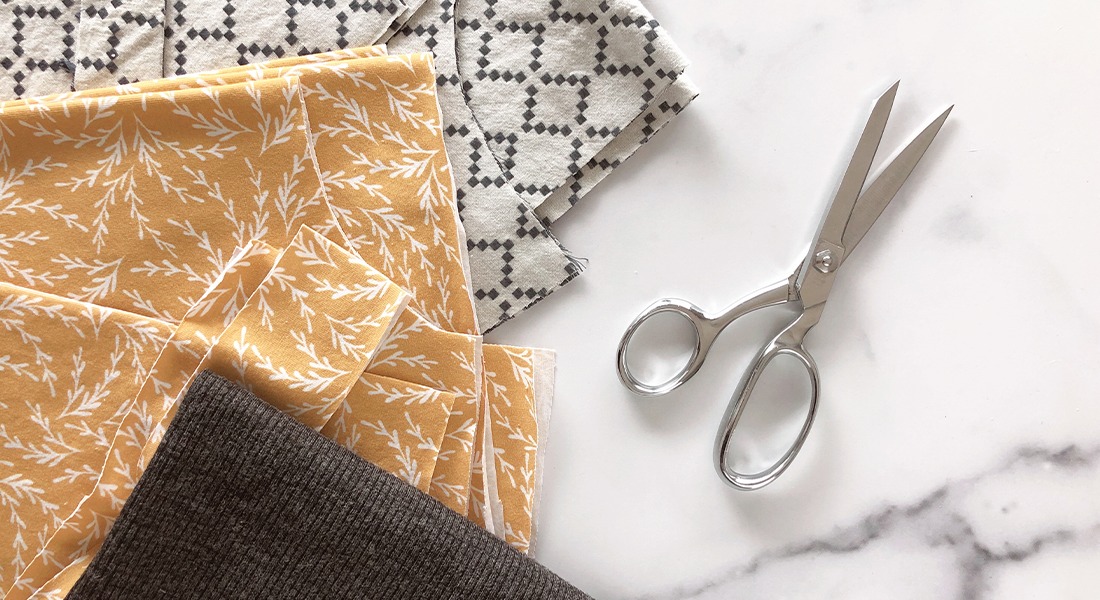
- Pattern piece 19 (2 fabric pieces)
Attaching the Pockets
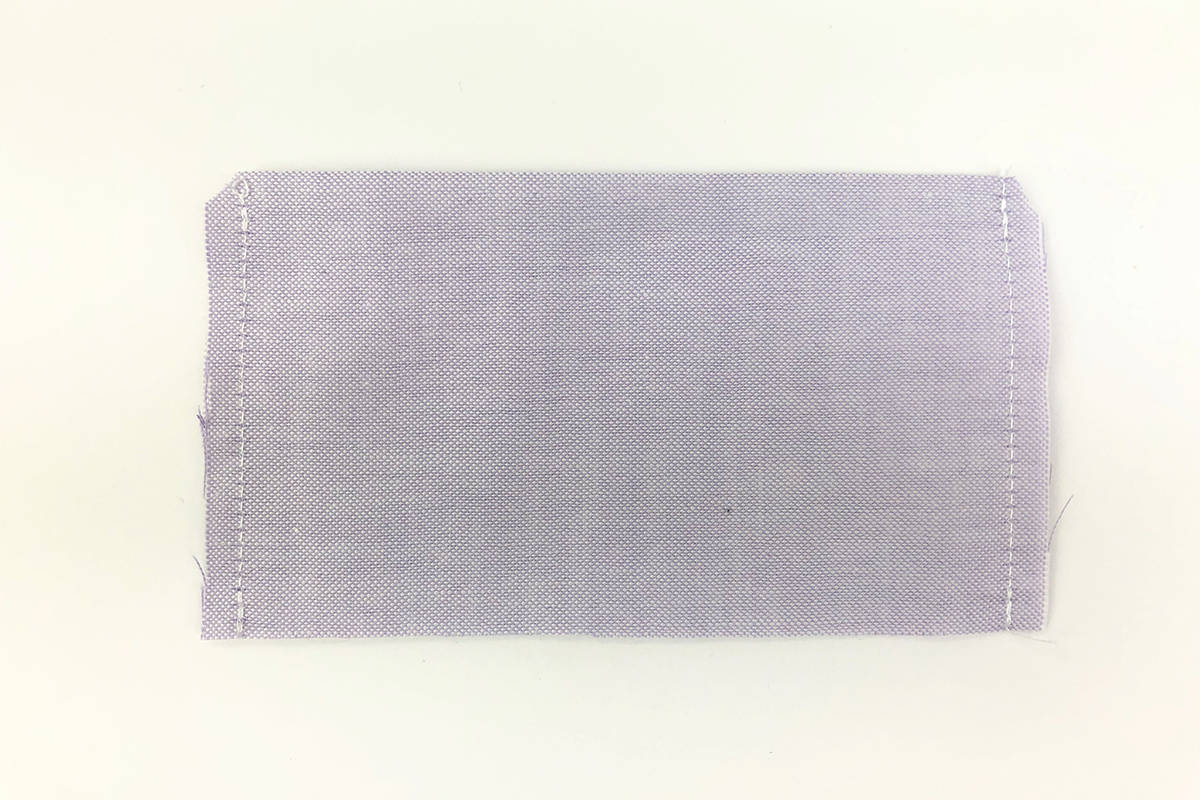
Let’s begin by walking through the steps for creating the pockets and attaching them to the existing garment. I always start by starching my pocket pieces (pattern piece 19) using Best Press starch alternative and ironing the pieces flat. Turn under the top edge along the first set of notches, which should result in a fold that is approximately 1 1/4″ wide. Press the fold, then turn under again along the second set of notches. The second fold should be the same width as the first. Press this in place, using spray starch if desired.
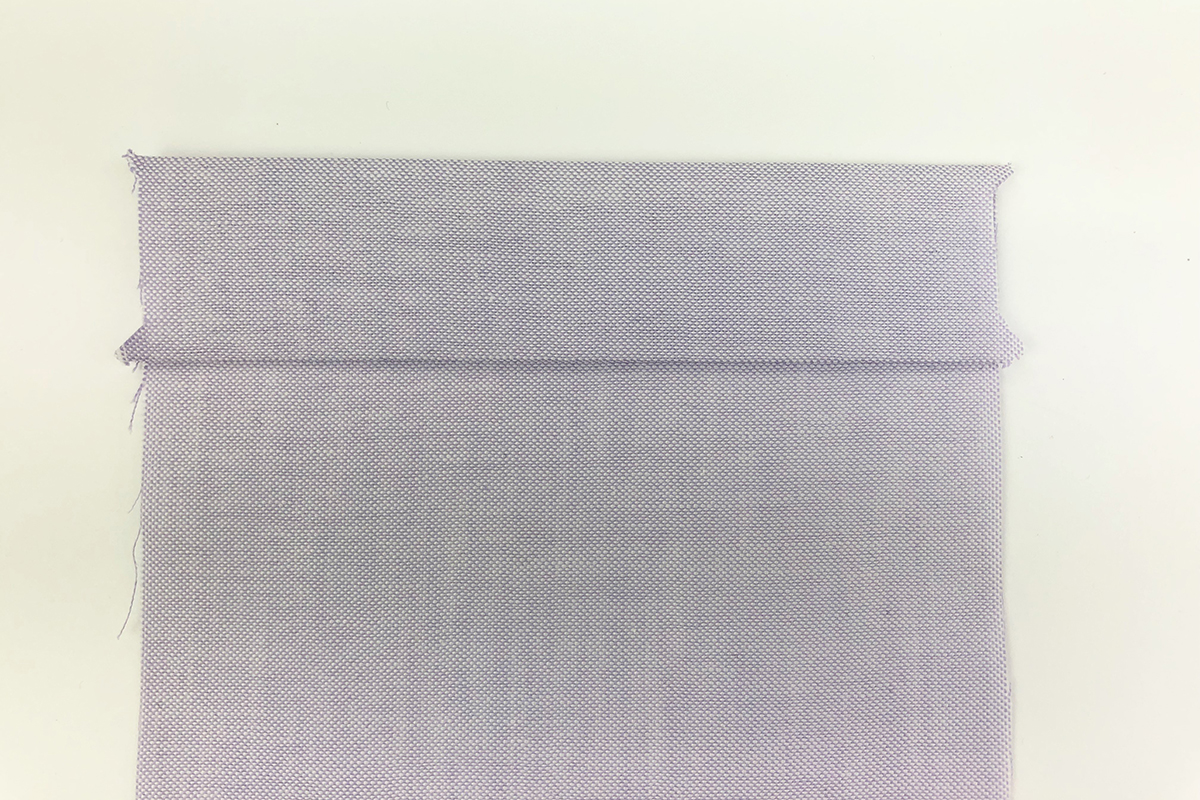
The next step is to stitch the folded edge down. I have found that I get my best results by using the same stitch settings for this step as I do when edgestitching around the entire pocket to attach it to the shirt. Attach Edgestitch Foot #10C, move the needle position 3 positions to the right of center, and increase the stitch length to 2.90 mm. Always test sew the stitch before sewing the actual project. It would help to fold the test fabric several times to imitate the folds pressed into the pockets.

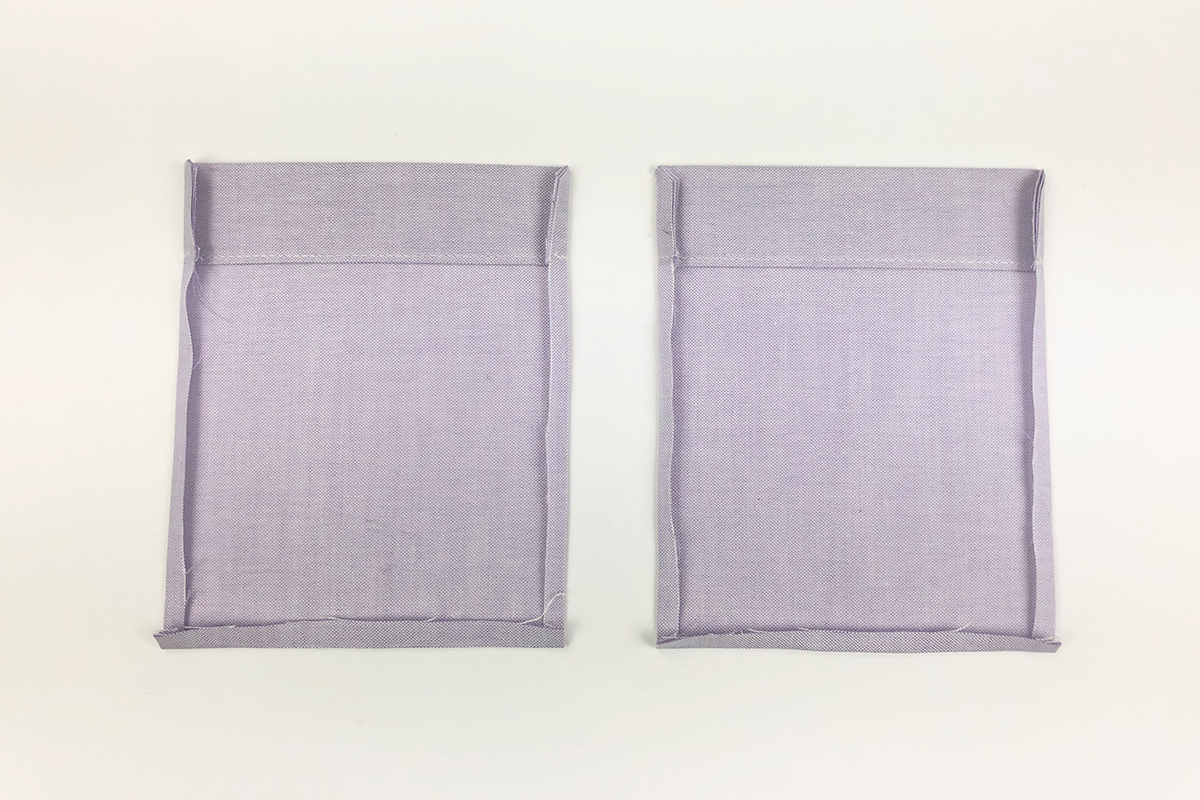
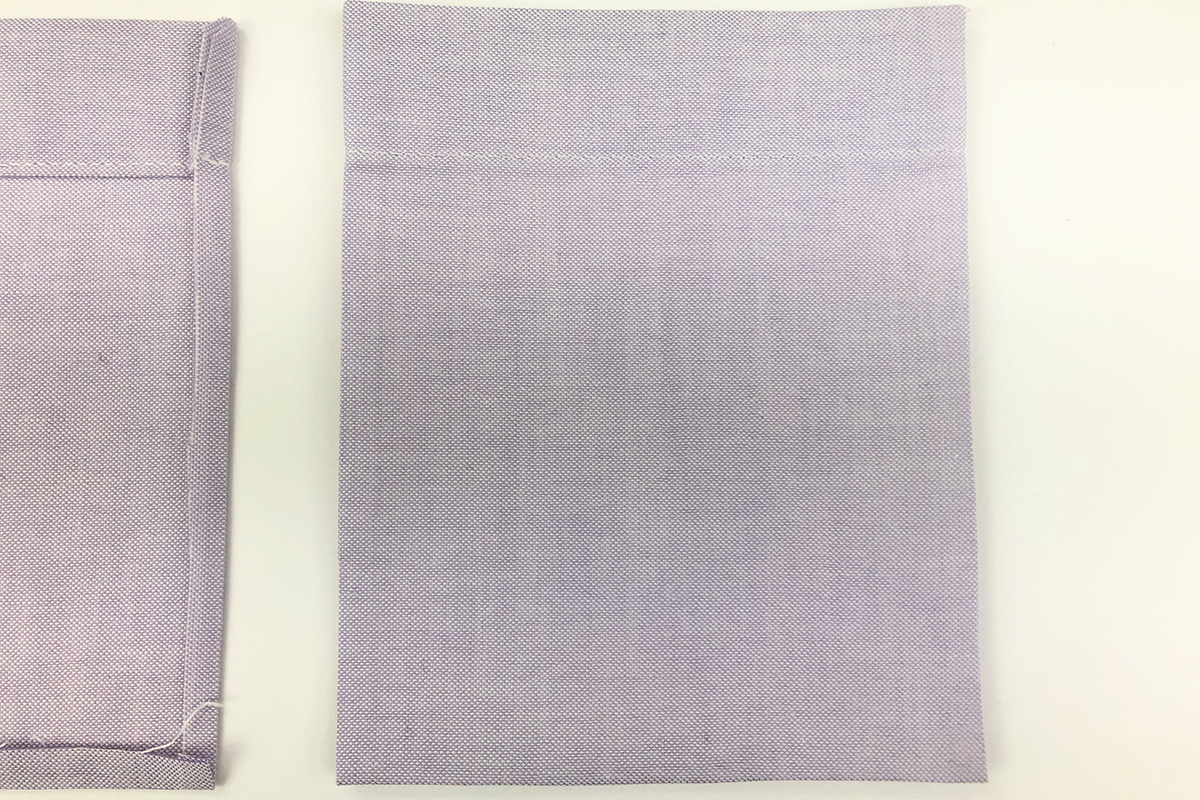
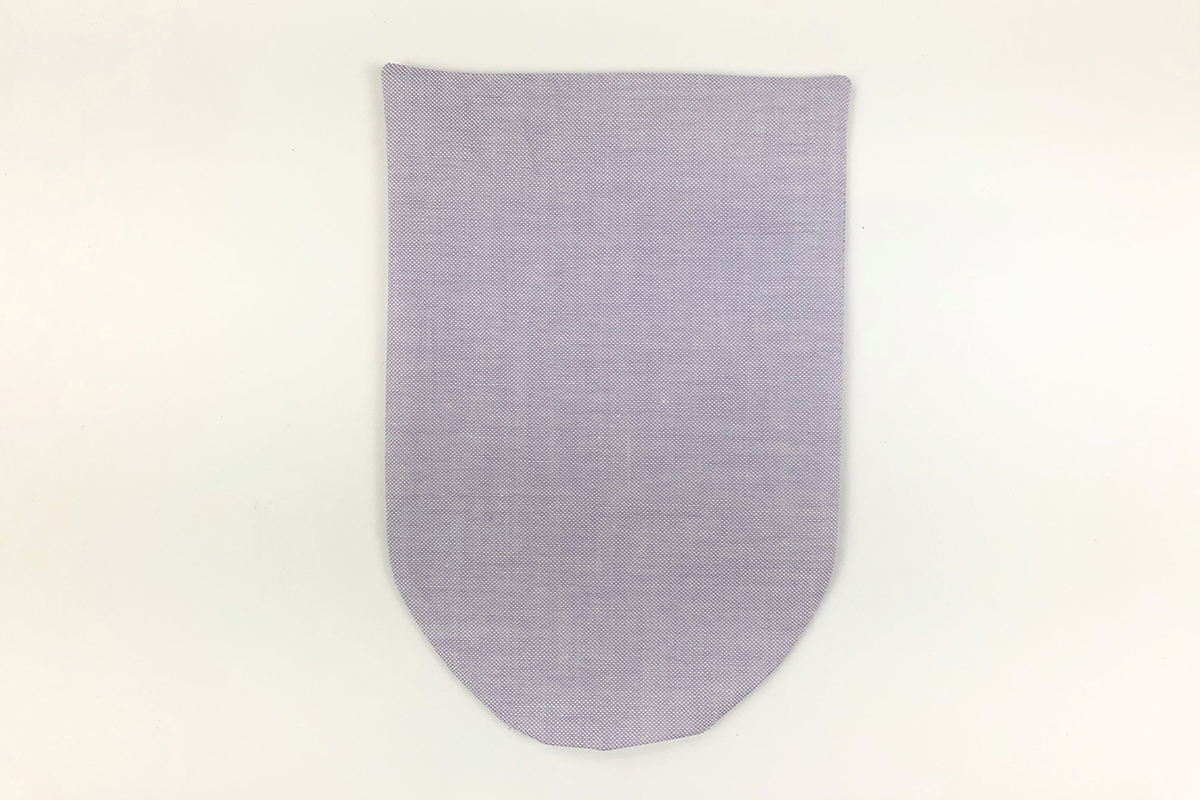
After stitching the top edge down, trim off the notches on the sides of the pocket and fold the edges in 1/4″. Fold the long sides in first, then the bottom. Use the Hot Hemmer to get evenly folded edges all the way around. To reduce bulk, I cut small angles off the top of the pocket. This prevents the edges from sticking out of the top of the pocket.
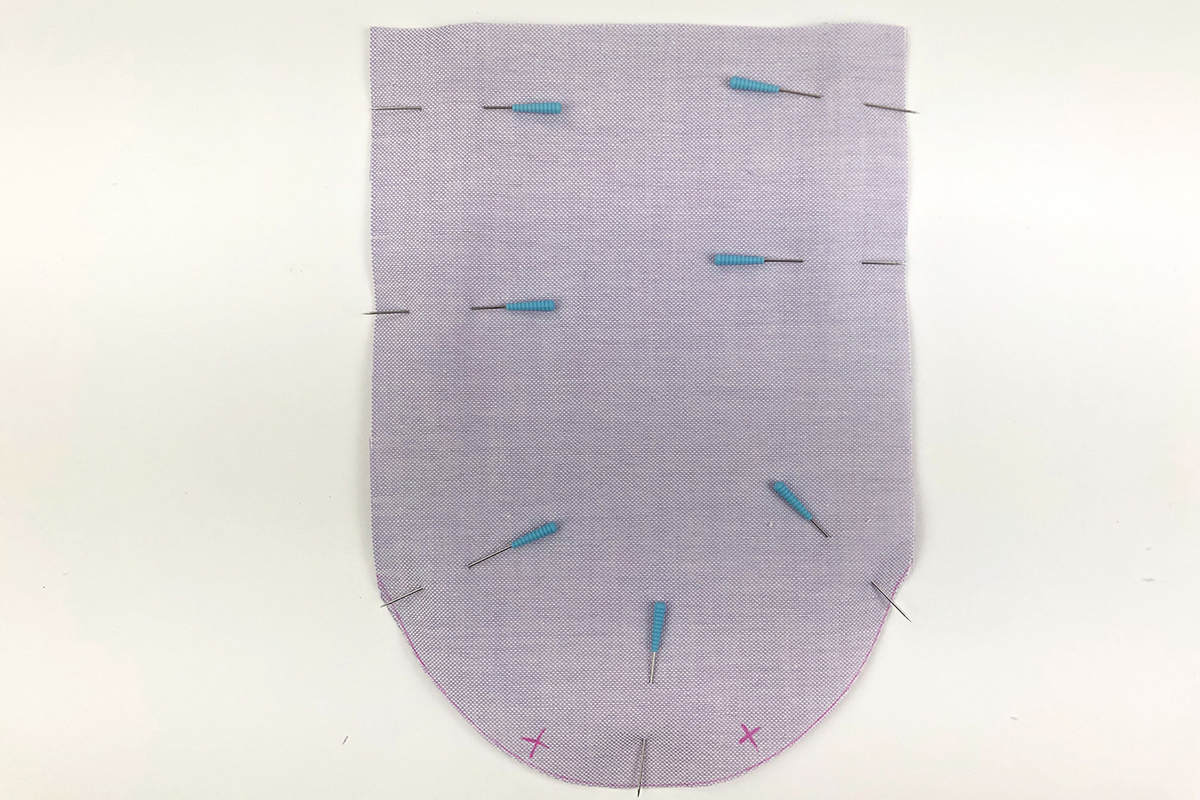
Following along with the pattern, the next step is to pin the pocket onto the shirt. The top edges should align with the pocket alignment points already marked on the garment. Since there are only two alignment points at the top of the pockets, I use a seam gauge to make sure I am keeping the pocket edge parallel to the button band the entire length of the pocket. I pin at the top, and use the pin as an anchor point to rotate the pocket around.
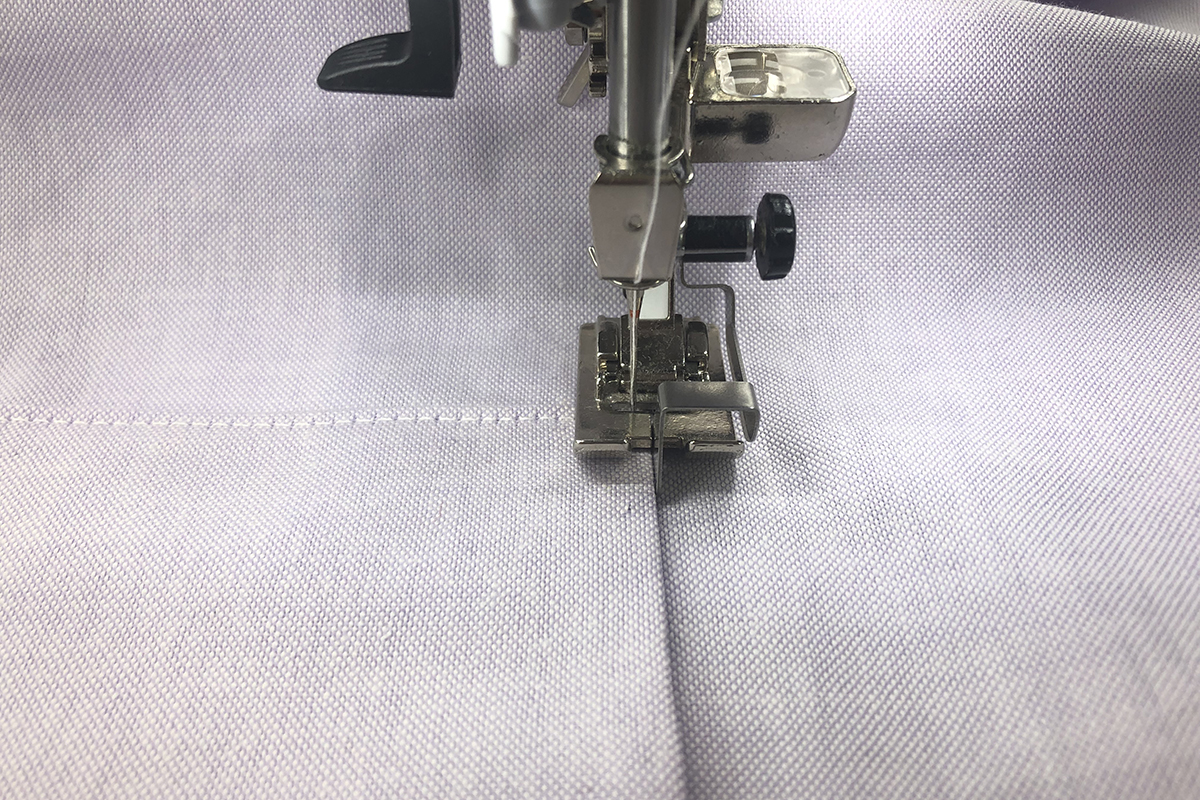
Once both pockets are pinned on all the way around (with an opening at the top, of course), it is time to sew! The sewing machine settings should still be set for edgestitching. Set the needle to stop down. Begin stitching at the top edge, placing the metal guide of the foot against the edge of the pocket. When you get to the corner, leave the needle in the fabric, use the Free Hand System Knee Lifter to rotate the entire shirt underneath the presser foot, and realign the metal guide before you begin to sew again. Sew around the 3 sides of both pockets.
Reinforcing the Pocket
Since these pockets are likely to be used, it is important to reinforce the top edges. The edgestitching you used to attach them could slowly begin to come unraveled or could rip out completely, which could result in a hole on the front of the shirt. The best way to reinforce depends on the application and location of the pocket; however, you should always reinforce pockets, no matter what the case. The information below discusses the following methods: creating a triangle, stitching bartacks, and backstitching.
Creating Triangles
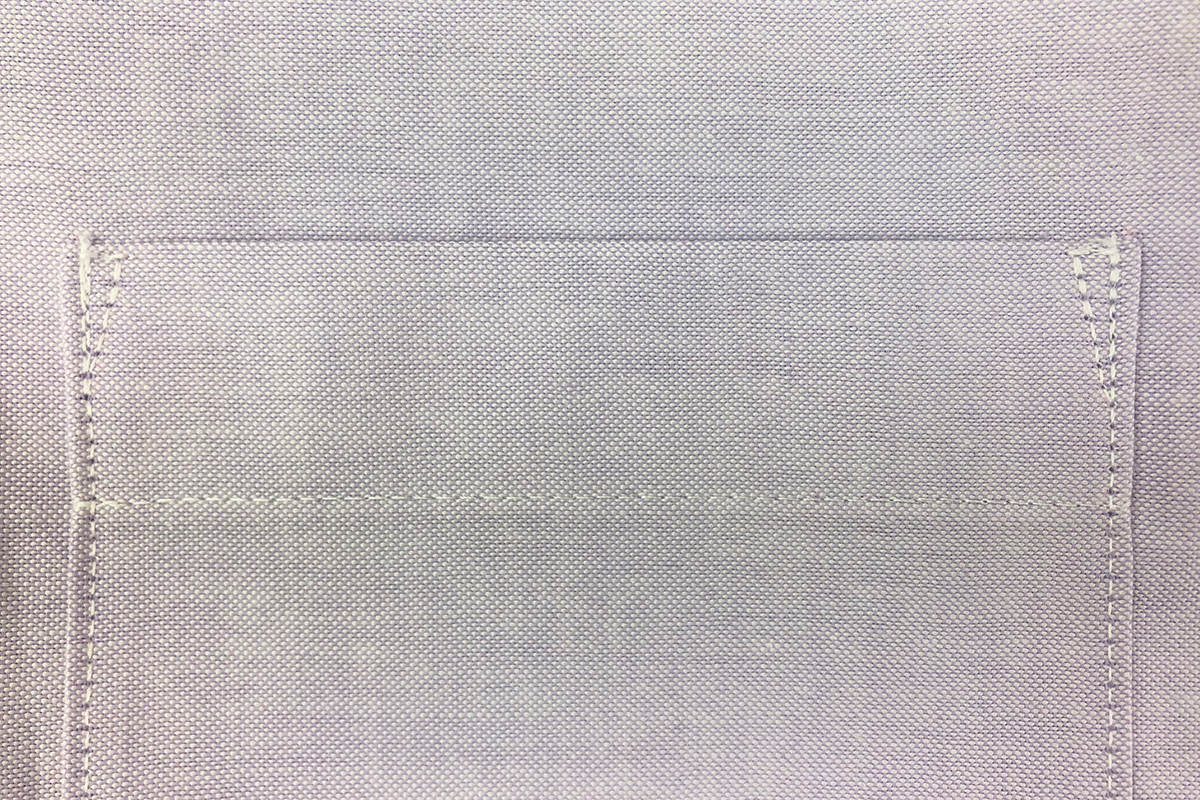
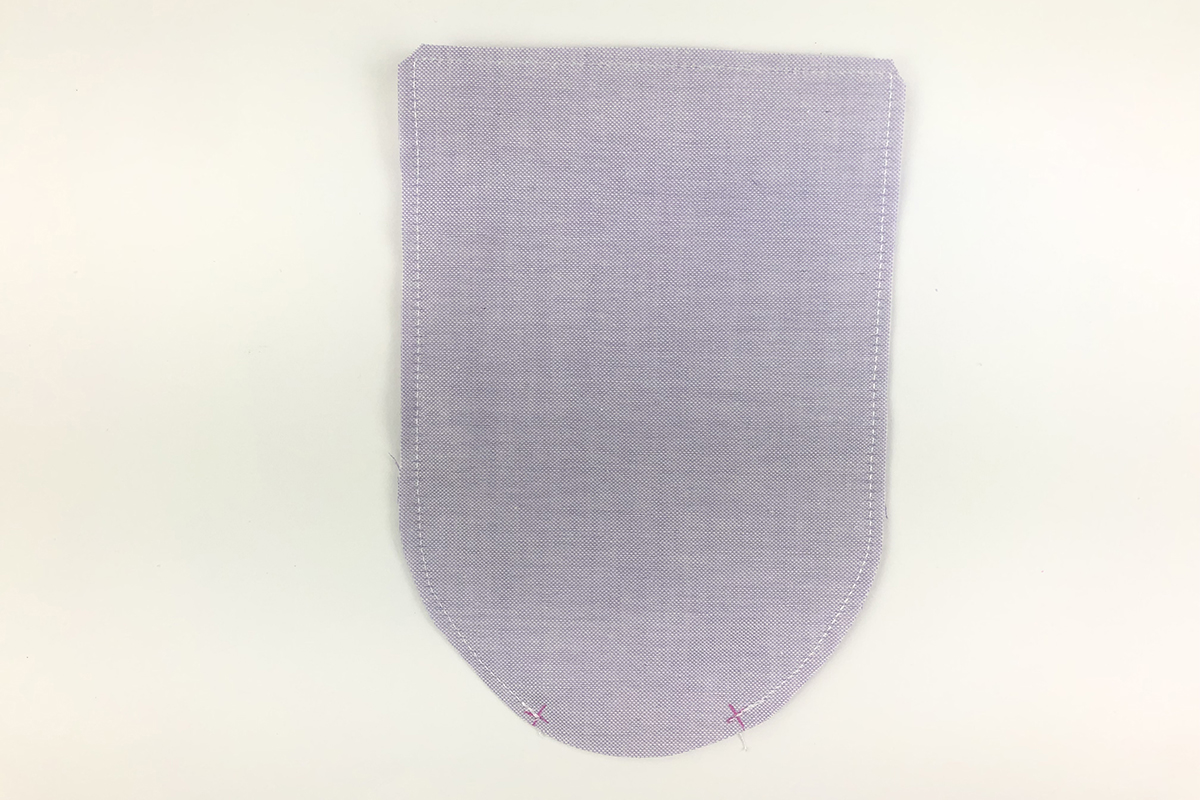
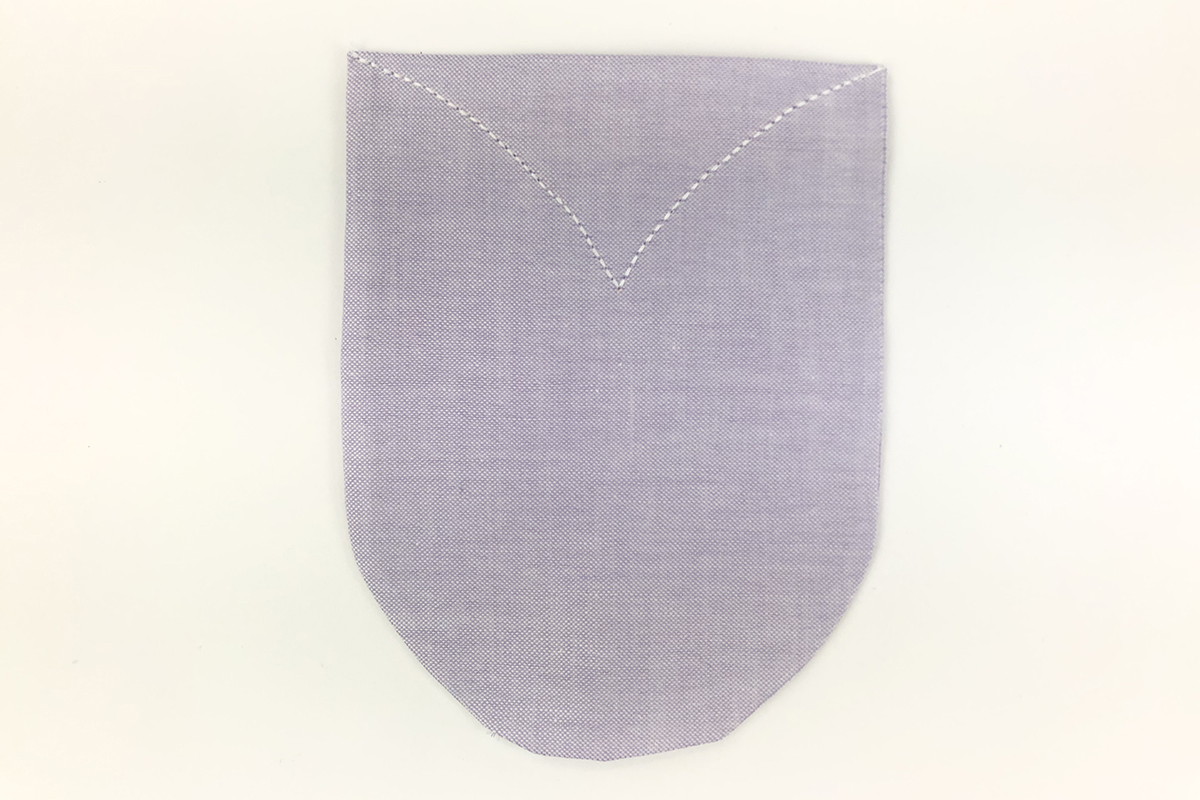
If you have seen exposed pockets on a dress shirt, it is very likely that you saw small triangles on the top corners of the pocket. This is the method that I used on my shirt and the method commonly seen in the fashion and garment industries. Triangles create a very strong hold and they allow the pressure put on the pocket edge to be distributed over a greater area. That same logic is used when architects are designing structures for buildings because triangles hold and distribute weight very well.
To create the triangles, use a FriXion pen or erasable marker to mark out the stitching lines. The more wear and tear that the pocket will go through, the larger the triangle should be. I know that my shirt pockets will not experience too much stress, so I drew a triangle 1/2″ in length on both sides of the top edge. The longest line of the triangle should be along the seam line that is already stitched. Make the triangle as wide or narrow as desired.
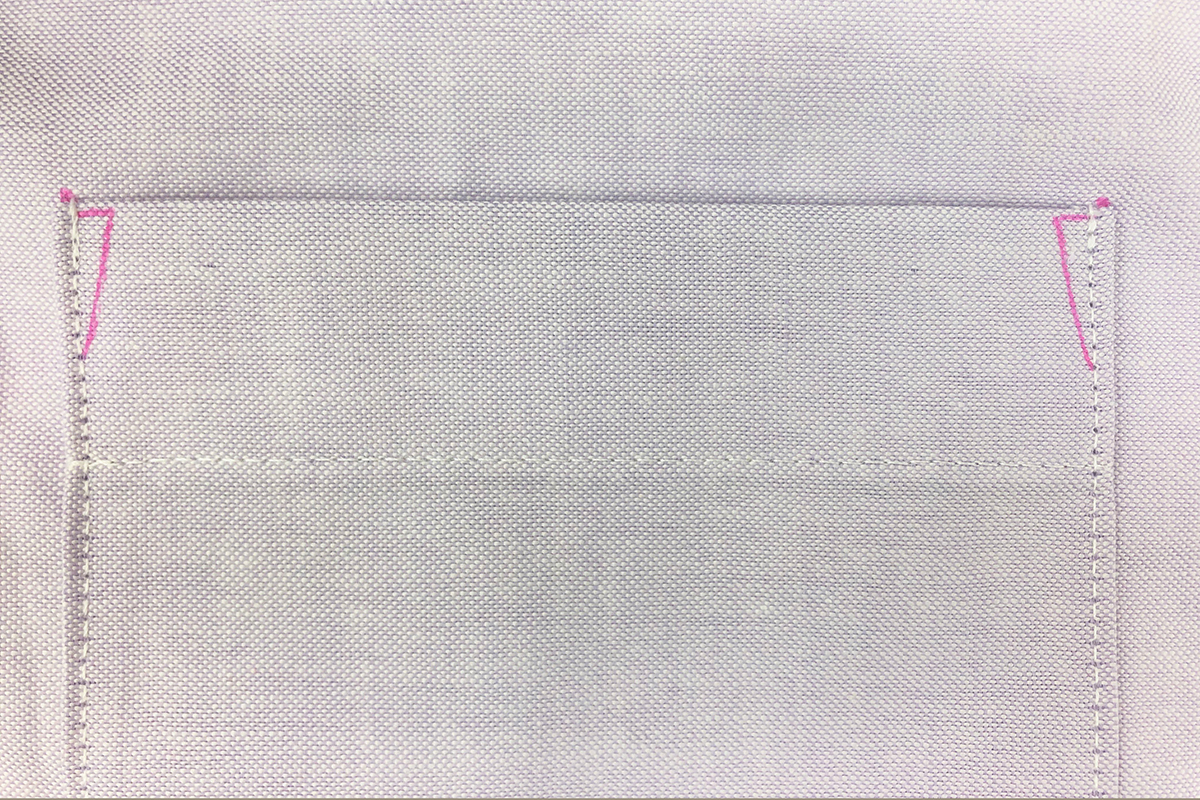
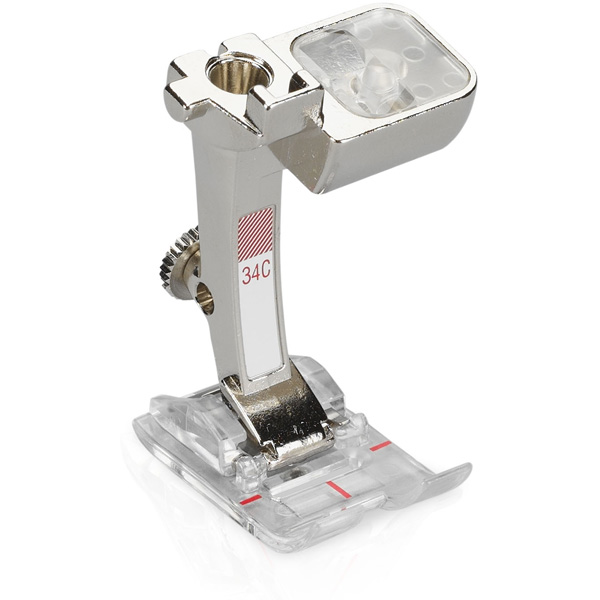
To stitch out these triangles, keep the stitch length set at 2.90 mm, but move the needle back to the center needle position and replace Edgestitch Foot #10 with Reverse-Pattern Foot #1C or even better, Reverse-Pattern Foot with Clear Sole #34C. The clear sole allows for better visibility and has a line in the middle that can be used to follow the line that was traced onto the fabric. Begin stitching at the top of the pocket, starting on the same line of stitching that is already there. Stitch down until you reach where the triangle is traced, make sure the needle is down in the fabric, pivot the shirt around, and stitch back up to the edge of the pocket. Once you get to the next drawn line, stop and pivot, and stitch until you match up to where you began. I backstitch along that very last line for security.
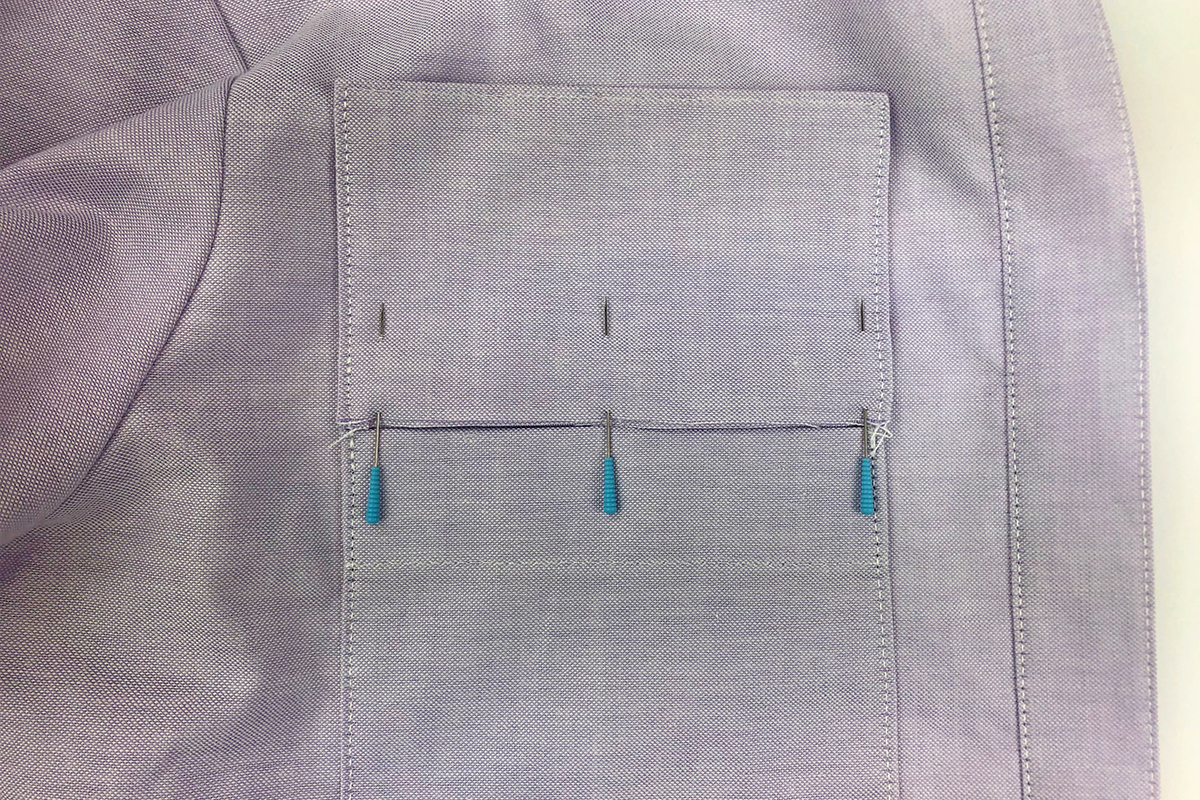
Bartacks
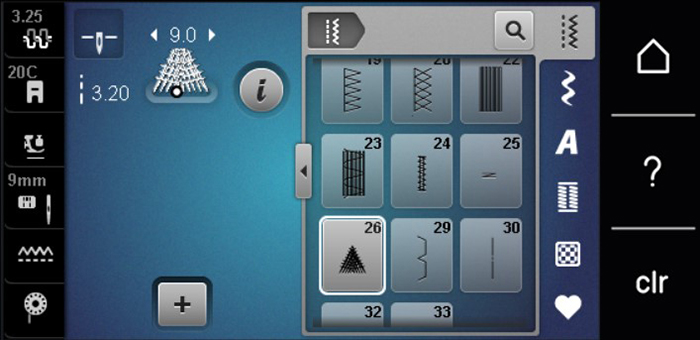
Bartacks are a quick and easy way to reinforce pocket edges, especially with the built-in stitches on the BERNINA 480. This sewing machine has three different bartacks located in the practical stitches menu that can be stitched on in seconds. The three different bartack stitches in the practical stitches menu are #24, #25, and #26.
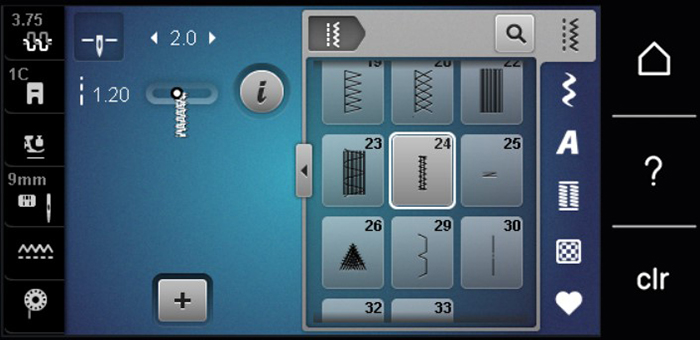
The vertical bartack, Stitch #24, is great for pocket openings and belt loops. You can increase the length of the bartack as needed. The horizontal bartack, which is Stitch #25, is useful for pocket openings, as well as for reinforcing buttonholes. A common application for this bartack would be near buttonholes on denim jeans. The final programmed bartack is Stitch #26, which is a triangle. Note that this stitches backwards, and the fabric or garment will need to be lined up and positioned accordingly.
I have also used the button sew-on stitch in the buttonhole menu as a way of reinforcing my edges, but only when sewing on machines that do not have the other built-in stitches. If none of these options are available to you, select a zigzag stitch and decrease the stitch length to zero. Line the needle up with the edgestitching on the pocket and stitch back and forth several times before cutting the threads.
Backstitching
The last reinforcement method is backstitching. Although I use this frequently when I am at the end of the seams on my garments, I do not always suggest it as the first method for reinforcement. The reason the other two methods are stronger is that the pressure is distributed over a greater area. With backstitching, you are simply stitching back over your previous line of stitching one or two times.
The backstitching method may be best in some cases. An example of this would be a garment that needs to have very little stitching at the top of the pocket for appearance purposes, but there still needs to be some reinforcement for the light strain put on the pockets. I use backstitching as my quick method.
Pocket Variations
Maybe the look of these pockets is just not what you want for your garment. The pocket variations presented below were all created using the original pocket pieces cut from the pattern. As I said, the pattern and its instructions are just guidelines for what you want to create.
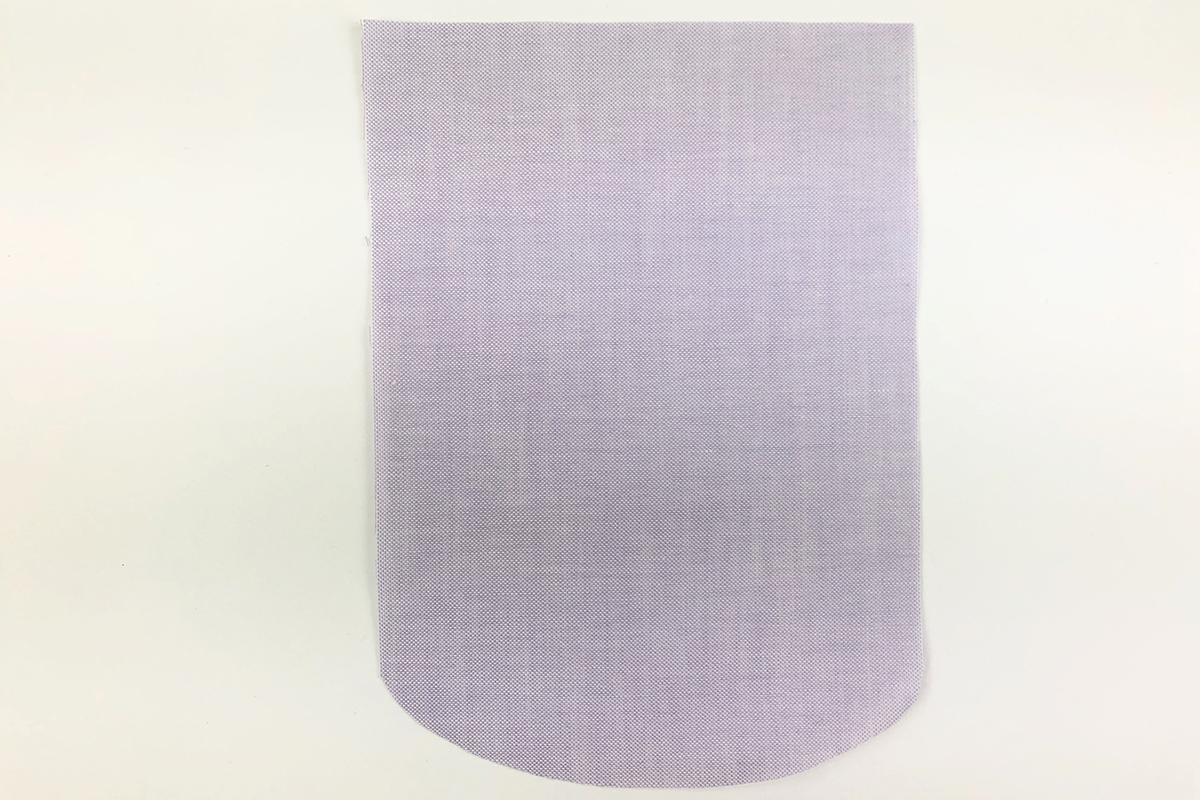
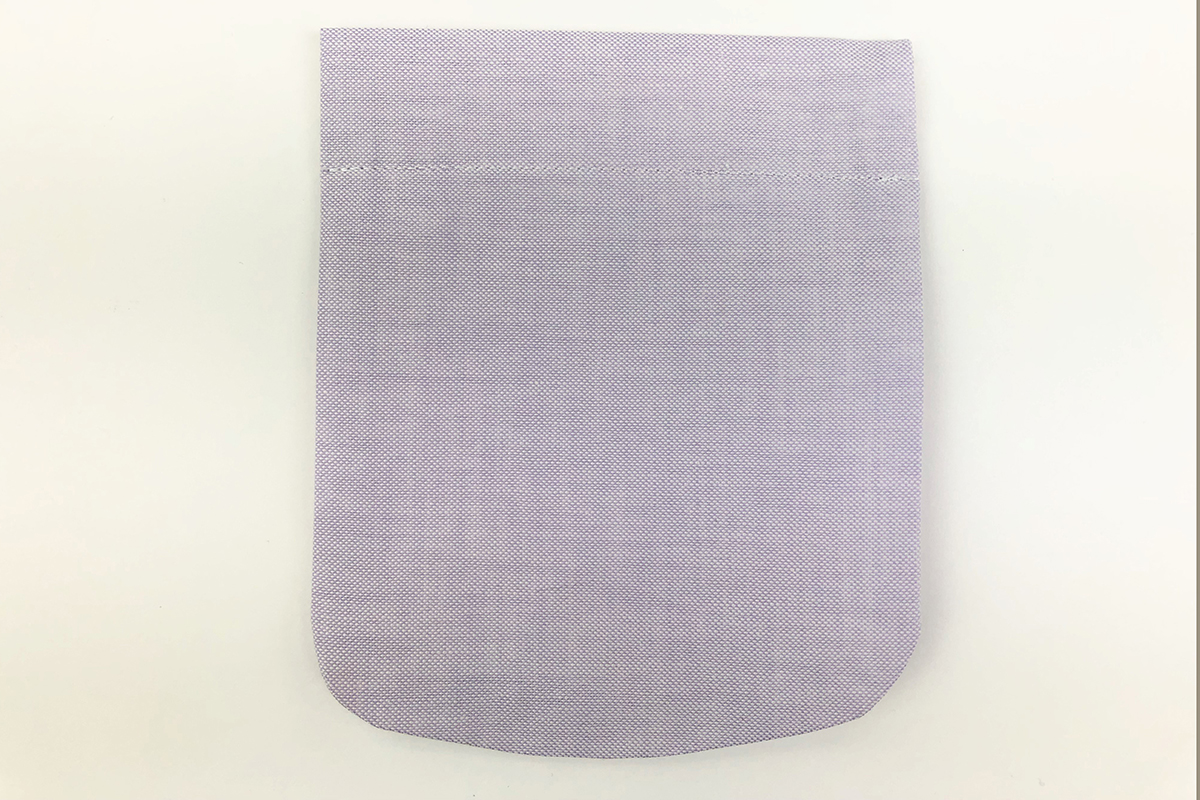
Rounded Patch Pocket
This style of pocket is like the pockets originally designed for the garment – it is ‘patched’ onto the shirt and not sewn into a seam. The only difference is that the bottom edge of the pocket is rounded.
To create the look, start by drawing a curve along the bottom edge of the pocket. When drawing my curve, I traced along the edge of a large bowl. Allow enough fabric for the edges to be folded up 3/8”. When you are satisfied with the curve and have checked that you have allowed enough for the edges to be turned under, use scissors or a rotary cutter to cut it out.
To finish the top edge of the pocket, create two folds along the notches like that of original pockets and edgestitch. You could also trim the top of the pocket 1 1/4″, then press a 1/4″ fold, then a 1” fold. If using the second method, fold back the 1” fold and pin the 1/4″ fold in place to prepare for the next step. Follow the instructions of this How to Add a Hemstitched Pocket to a T-shirt post for more details on finishing the pocket this way.

Encase the raw edges of the top of the pocket by keeping the 1/4” fold folded up and sewing around the entire pocket with a 3/8” seam allowance.
After stitching, clip into the curve at the bottom edge of the pocket. I recommend clipping every 1/2″ to help the curve lay flat. Flip the top edge of the pocket right side out. Use a point turner to completely push out the corners. Iron the raw edges of pocket sides to the back using the 3/8” stitch line as the measurement tool. Edgestitch the top edge before attaching the pocket to the shirt.
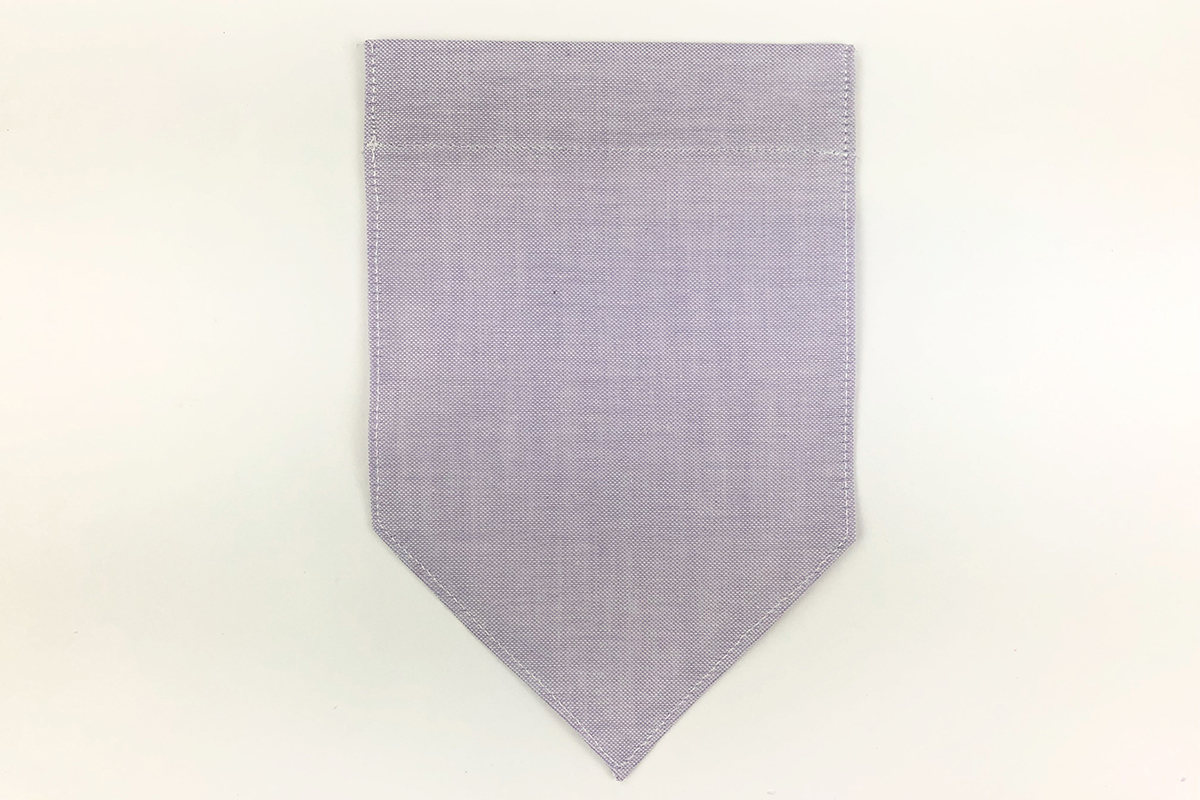
Angled Bottom
To create a pocket with an angled bottom, start by finishing the top edge using one of the methods listed above. After that, trim the bottom of the pocket at the desired angle. I trimmed mine at a 45° angle, then folded the raw edges under 1/2″ and attached the pocket to the shirt using edgestitching.
Lined Pocket
Instead of pressing the raw edges to the wrong side of the pocket, try creating lined pockets to enclose them instead. For this style of pocket, two identical pieces are needed for each pocket. In my example, I cut two pieces with curved bottoms. Pin the two pieces with right sides together, leaving an opening wide enough to turn the pocket right side out after it has been stitched.
Stitch around the pocket at a 1/4” seam allowance. Begin at one end of the marked opening and end at the other mark, while backstitching in both spots. I chose to leave the curved part of my pocket open, but feel free to set the opening at any spot on the pocket. Before turning right side out, trim down the seam allowance, clip into the curved bottom if needed, and clip the upper corners at an angle.
A fusible bonding web, such as Stitch Witchery, will temporarily hold the opening shut until the pocket is stitched to the garment.
For an added effect of a double row of stitching, topstitch around the pocket 1/4” away from the edge before edgestitching it to the shirt.
Pocket Flaps
Perhaps you want the pocket to have a flap, or cover. Start by cutting a rectangular piece of fabric that is 4 3/4″ x 6”. Fold the fabric right sides together to make a rectangle that is 4 3/4″ x 3”. Stitch up the two shorter sides of the rectangle at a 1/4″ seam allowance. Clip the corners near the folded edge, then turn right side out.
The actual pocket should already be attached unless a button closure is desired for the pocket. If so, attach the button to the pocket approximately two inches down from the upper edge before stitching the pocket to the garment.
Edgestitch up one of the short sides of the flap, pivot along the fold and stitch, then pivot again to stitch down the opposite short side. If a button was attached to the pocket, be sure to stitch the buttonhole onto the flap near the edge before attaching it to the shirt.
Continue by matching the raw edge of the flap up against the upper edge of the pocket. Stitch the flap to the garment with a 1/4″ seam allowance.

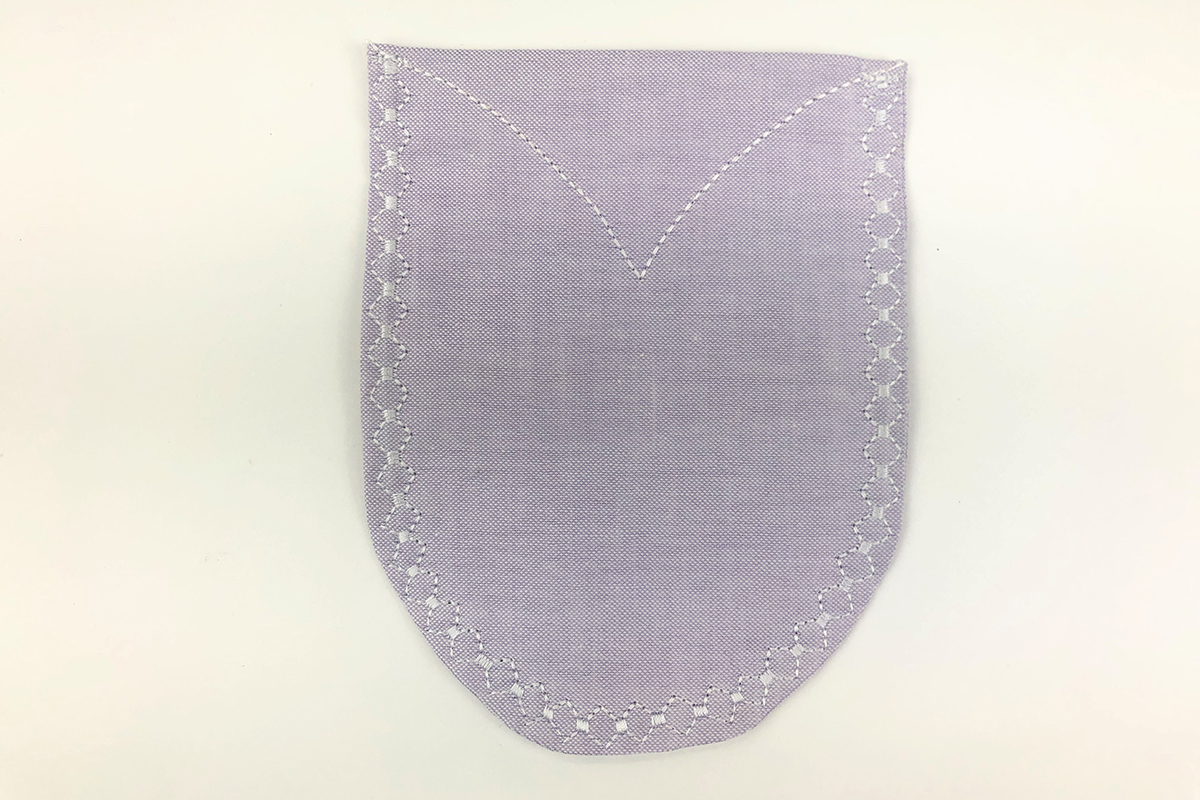
Decorative Stitching
Give the illusion of a pocket flap by adding decorative stitching near the upper edge of the pocket. Keep the square bottom, or add a curve before the decorative stitching is sewn on. My examples are shown on a lined pocket I created from the pattern pieces for this button-up. The image below shows how a curved line was drawn near the upper edge of the pocket, then was stitched overusing the triple stitch.

You can also stitch out a decorative stitch all the way around the pocket to add more detail and a unique touch. I would pin the pocket to the shirt and edgestitch it on after the decorative stitching was sewn.
Until Next Time
Make the button up unique with you own spin on the pockets! In the next post, we will sew on the buttons to the front button band and the cuffs, and stitch out buttonholes to complete the closures. To prepare for next time, be sure to have your buttons picked out, whether they are a similar color to the garment fabric, or contrasting for a flare!
Garment Sew-along
Part 1: Garment Sizing and Fabric Selection
Part 2: Pattern Cutting, Markings and Fitting
Part 3: Different Stitches in Garment Sewing
Part 4: Fronts, Yokes and Seams
Part 5: Sleeves and Side Seams
Part 8: Pockets
Used Products


What you might also like


2 comments on “Garment Sew Along Part 8: Pockets”
-
-
Thank you for the suggestion!
-
Leave a Reply
You must be logged in to post a comment.

Would love it if you could do lessons on altering patterns to fit your body. Thanks