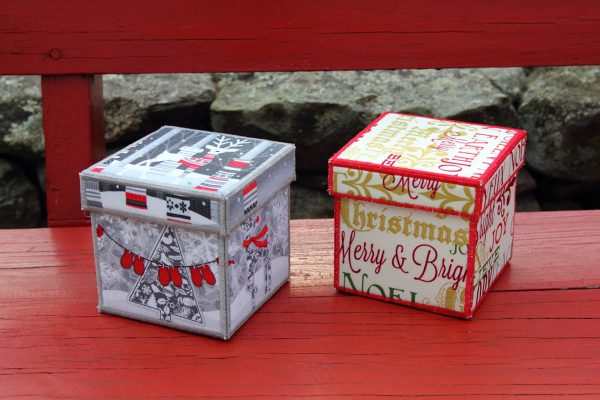
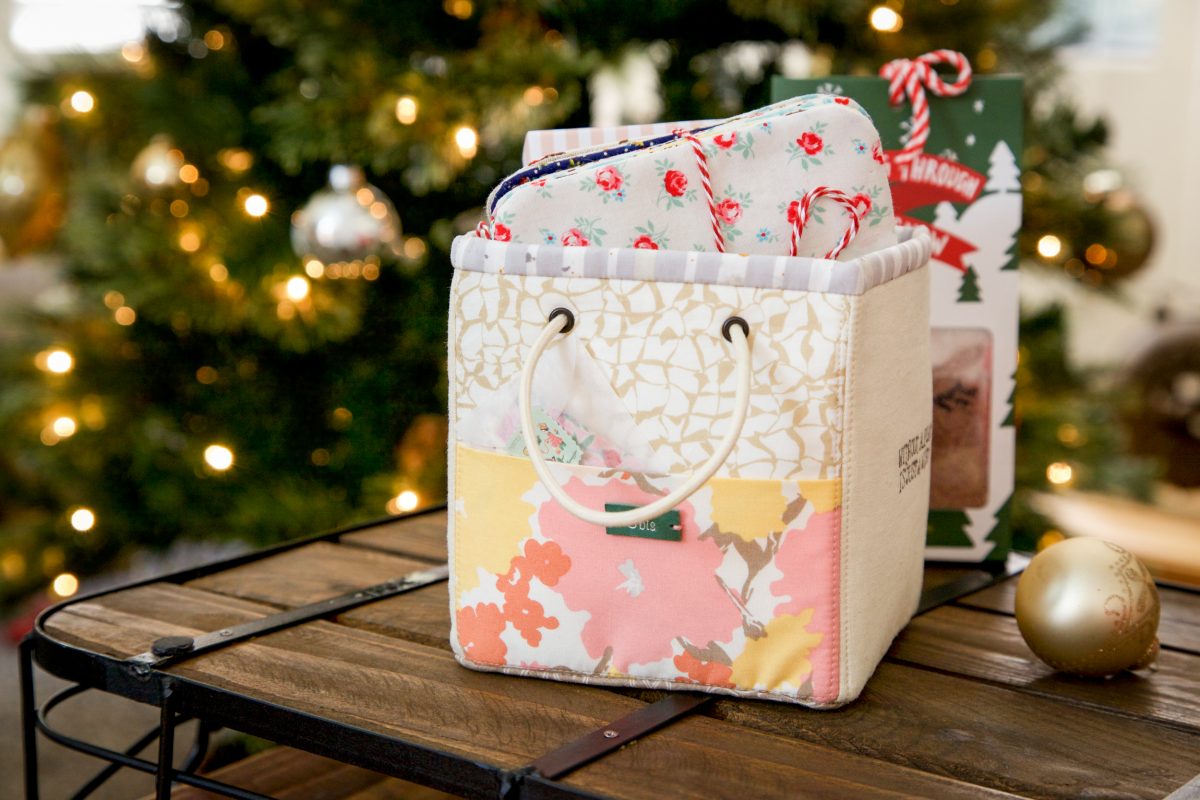
Holiday Fabric Boxes
You can whip up a bunch of these holiday gift boxes in no time at all. Filled with candy or homemade cookies they make a great holiday gift.
Supplies needed to create holiday fabric boxes
- Timtex —one piece 9″ x 18″
- Fabric for the outside of the box—one piece 9″ x 18″
- Fabric for the inside of the box—one piece 9″ x 18″
- Mistyfuse
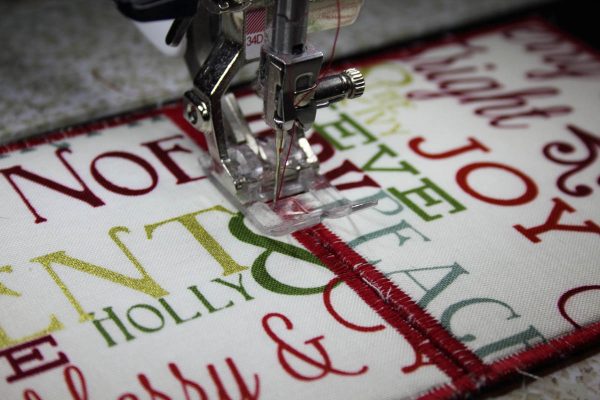
- Sewing machine, I sew on a BERNINA 750 QE
- I used my favorite foot for this project, the BERNINA Reverse pattern foot # 34D
Step 1
Apply a layer of Mistyfuse to each side of the Timtex. On one side fuse your outside fabric and on the other fuse your lining fabric.
Step 2
Cut the following pieces from the Timtex:
- For the box bottom cut
- Five pieces 4″ x 4″
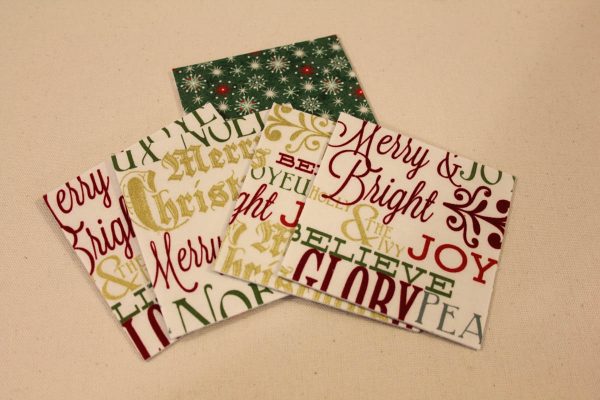
For the box top cut
- One piece 4 1/4″ x 4 1/4″
- Four pieces 4 1/4″ x 1″
Step 3
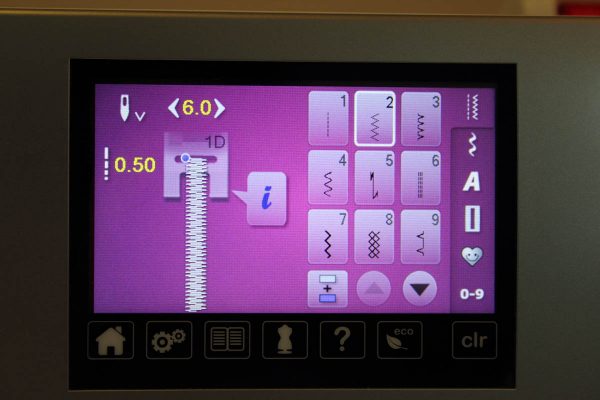
Set your machine up for a zigzag stitch. I set my machine with a .45 length and 4.0 width.

Zigzag stitch all the way around the edge of each piece. When I do this, I stitch so that the needle falls just to the outside edge of the piece so that the thread sort of wraps around the edge.
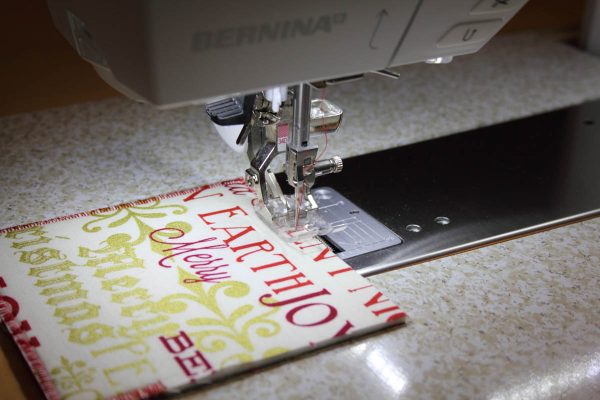
I always stitch around twice because I like the way it looks but you can stitch once if you prefer.
Video Tip On How to Stitch the Edge of the Box
Step 4
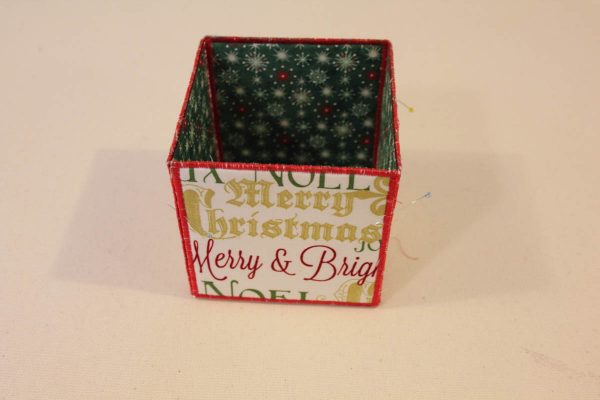
Once you have finished stitching all the edges it’s time to assemble the box. To assemble the box bottom, you’ll want to lay out your 4″ x 4″ pieces in this configuration:
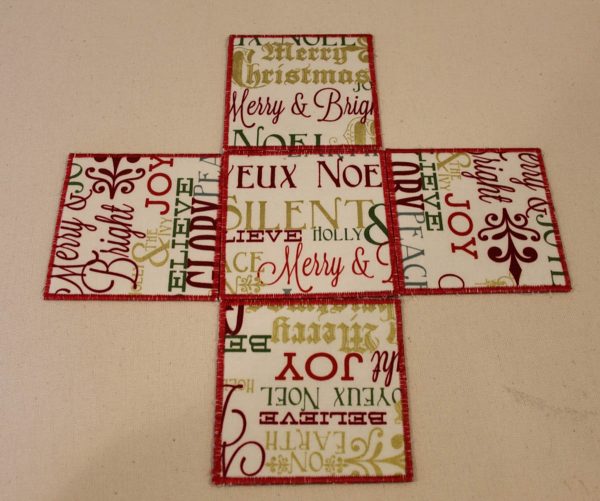
Set your machine up for a wider zigzag stitch. I set mine with a .45 length and 6.0 width on my BERNINA 7 Series sewing machine.
To attach each piece together about the edges of each side piece against the one you have chosen for the bottom and run a line of zigzag stitching down along the edge catching both edges of each piece.
The top of the box is assembled in the same way.
Now all that’s left to do is flip up the edges of both the sides of the box base and the lid and whipstitch them closed by hand.
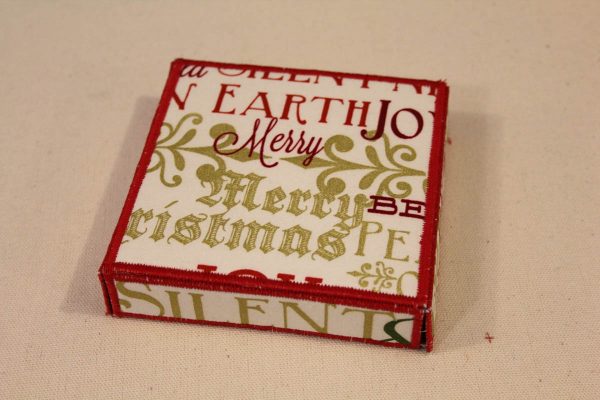
Alternatively if you didn’t want to hand stitch them together you can just pin the box together and run a bead of hot glue or fabric glue along the seams on the inside of the box.
Now you just need to fill the box with some holiday goodies! Enjoy!
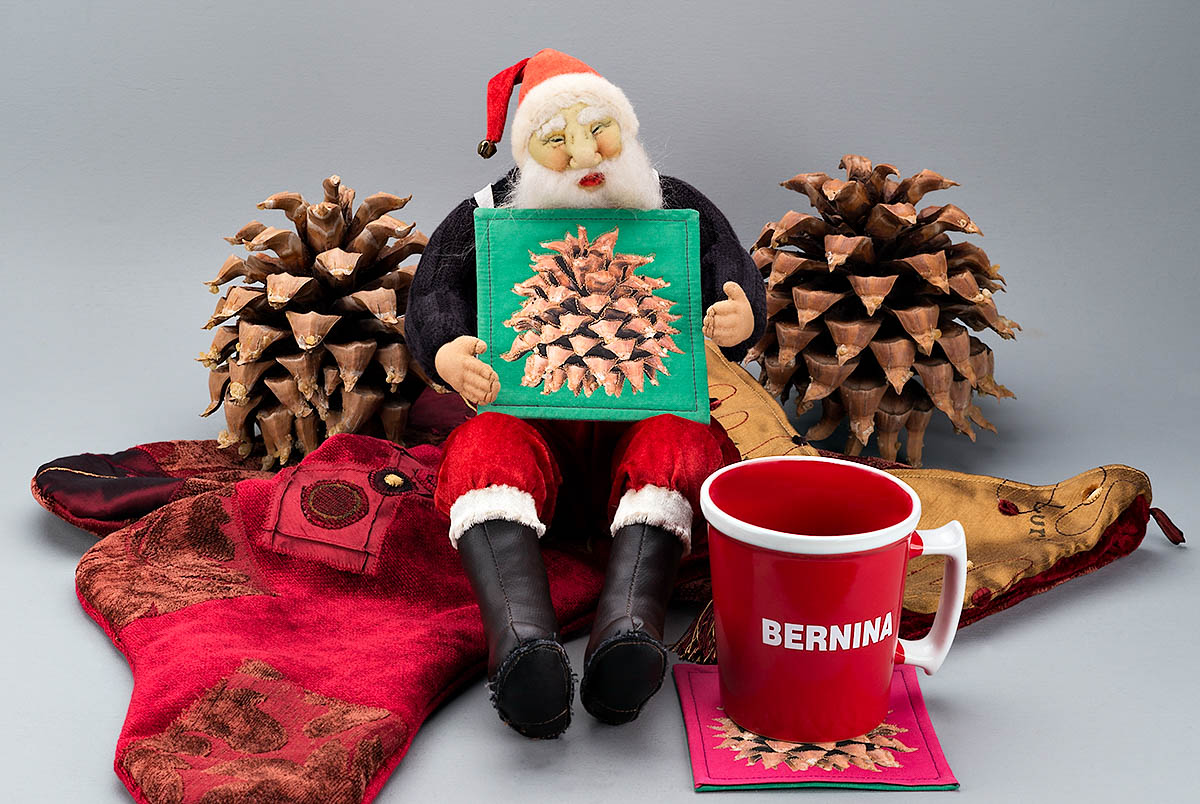
Our December 9 Gift For You
Today’s gift is a BERNINA red mason jar travel mug to one awesome WeAllSew fan. All you have to do is post a comment below answering the following question:
What would you fill the fabric boxes with?
A winner will be chosen at random on December 10, 2015 and announced later this week!
Good luck!
Congratulations to our WeAllSew reader “kkh0911”, the winner of the December 9 gift. Enjoy!


What you might also like


112 comments on “Holiday Fabric Boxes”
-
-
Lots of things would go into boxes like this: home made cookies, candies, Party mix, and more! Sewing notions, such as seam bindings, laces, elastic, etc.
-
I would fill this box and a few more with small presents such as gift cards, homemade mittens or socks and give them out. A wonderful gift idea. This way I can spread the joy of the season.
-
-
I am going to fill the boxes with gifts that are unique to the recepient…..such as homemade chocolates for my friend who thinks chocolate is to die for, cookies for my Cookie Monster friend, sewing notions for my quilting friend, gourmet coffee for my coffee friend, and assorted teas for my “it’s always a good time for tea” friend.
I am excited to get started on the boxes thanks for the inspiration! -
I think I would put a bag of Christmas cookies in each one & then the recipient has a nice box in which to store knick-knacks or a special ornament.
-
I would love to make these boxes and put baggies of caramel corn or fudge in them to give to neighbors/friends.
-
sewing supplies
-
-
Something that the family could put together…… a jigsaw puzzle made from a favorite holiday photograph.
-
If I made these fabric boxes, I would use them for Christmas gifts, and reuse them year after year! They would look gorgeous under the tree!
-
The list of possible things to put into these boxes is endless. However, my granddaughter and I have a long standing “Christmas contest” to disguise the gifting back- and- forth of a bag of confetti she made and gave to me for Christmas, when she was a little girl. Now, married and an attorney, we still continue his tradition.This year is my turn to “re-gift it back to her and one of these home-made beautiful boxes will carry on this tradition of love.
-
What would I fill the fabric boxes with? If I was giving them away to a fellow crafter…threads, zippers and other crafting notions. They would be the PERFECT size 🙂
-
Cute!
-
Perfect for disguising a gift card in! Or including some free standing lace ornaments along with it.
-
I love to bake and give cookies to my neighbors and I’m always looking for creative containers.
-
Perfect for small gifts
-
I’d put extra Bernina feet that don’t fit in the case in my fabric box that I might do some fmq on.
-
I think I would put some homemade treats in a cello bag inside this sweet little box! Thanks for this great tutorial : )
-
I have a prolific hazelnut tree and always make biscotti with them during the holidays. The boxes would be perfect to hold them for gifting.
Peggy -
Perfect container for a loaf of homemade Christmas pannetone!
-
I would put little trinkets in it.
-
cookies, and make the box of fabric that reflects the recipient
-
These are great! I would be sure to make one with Christmas fabric to give to my husband Jim filled with his favorite Christmas Cherry Cordials candy. He would be so surprised cause I have always just wrapped them in their regular box & he always knows what he is opening! He would be surprised!
-
perfect for gifts to family and friends. Also make for other holidays.
-
Each box would be specialized for each recipient. My daughter, sachet, lingerie and a small bottle of relaxing oil. My daughter in law-bangles for her bracelet collection, Now for the boys=my fisherman- spinner, hooks and weights, my reader- would be book marks and a snack. The grandchildren the size is perfect for those little, quick block sets for the new Star Wars. Now for me- a box to keep my ornaments that I am making from Day one (I am on the bells). My stash of Christmas fabric is disappearing……….
-
Wow, great project! Thanks for the tutorial.
-
I forgot to say that I would fill them with craft supplies for my grandchildren.
-
-
I would fill these boxes with some homemade gifts I am making this year. I can’t give away much more than that. Never know who might see my comment. 😉
-
I would use the boxes for stocking stuffers and difficult to wrap objects.
-
I make chocolate bark every Christmas, these boxes will make the perfect container to give the bark away in. I am planning on making several for friends and family.
-
I think they would make great gift boxes because they could be passed along from gift giver to gift giver. You can make them to fit those odd sized gifts.
-
Oh what fun! I can see my friends enjoy some cookies or candy. My sewing friends would see sewing notions in them. A what fun for my grandchild to find MONEY inside.
-
I love this idea. Good for all kinds of things. And also, easy to adapt to larger sizes. Thanks so much. I like the idea of baking homemade and putting in a box homemade. Coasters too would work.
-
Love the boxes and would be ideal for holiday gift treats. Also, can make boxes decorated with other fabrics to hold sewing items too. So many ideas!
-
Just in time to make up for the various Christmas luncheons and parties. I’ll fill them with some
Holiday goodies. -
We would use them for sewing odds and ends coordinating with the season theme of the fabrics and designs used.
-
I think they would look especially good with some jewelry inside! lisajcowell(at)cs(dot)com
-
Frangos For Friends!
-
What a great idea. I would use some boxes to organize my fat quarters by seasons. These boxes would be great to put threads, scissors, small rulers, etc. for a beginner sewer too.
-
A beautiful ornament to give away as a gift. Thanks for another great idea.
-
Gift Box filled with homemade Party Mix!
-
These crafty boxes would be great for storing buttons. Color code the boxes to represent the button colors.
-
The ideas are limitless! You could match up the contents and fabric to match the recipient!
-
I would make one to fit my home made jam jar
-
I would put in krumkake, a Swedish Christmas cookie.
-
Never used timtex before. Great project for starters.
-
I would make a decorative fabric box to store an extra roll of toilet paper on top of the commode.
-
Where are last week’s winners posted?
-
Cookies, cookies and cookies!
-
So cute!! I would use these as gift boxes. I am thinking they could be adjusted a bit for different sized gifts. 🙂
-
these are really easy to size up and down – just make the lid a 1/4″ larger than the box.
-
-
candy or small gifts
-
I would fill it with a bag of homemade nut mix.
-
I would keep thread in these boxes.
-
Cookies, of course. I do embroidery work so I could also put my little gifts in them.
-
I would fill them with M & M’s and give as a gift!
-
This is such a neat project! I would do a lot with these. We have games that would fit nicely
In these boxes, also, fun to put sewing notions in like buttons. I have gifts this year that would be a great fit. The boxes themselves I personally would love as a gift. Thanks so much for the project idea -
I’d fill them with motivational words and sayings.
-
Depending on the recipient, candy, cookies, fingernail polish, flash drive, earphone set, sewing notions, etc.
-
That depends on who’s getting the box. It could be an assortment of sewing tools for a beginning sewist, a special home made goodie (well wrapped!), a piece of jewelry.
-
I would put in bags of homemade Carmel corn.
-
I would love to fill the box with colorful threads for my Bernina 880 embroidery
-
For gifts I think I would put home-baked goodies. For me I could put literally anything! I am a boxaholic. lol
-
I might gift some photos that I want to pass along to a child.
-
These boxes look perfect for storing sewing notions.
-
How cool? 2 presents – dark chocolate of course! and they get to keep the box, or they never get another gift.
-
Packaged hot chocolate and cookies!
-
Another great idea from y’all! I would fill one box with bandaids and cotton balls and q-tips for the bathroom, and one with sewing notions, threads, needles, buttons, zipper repair pieces, fuseable hem tape, iron on patches, and tiny scissors for my daughter’s desk- she is always looking for sewing tools to fix an office outfit mishap in a hurry! I cannot wait to try to make these!
-
I would fill my beautiful fabric boxes with vintage lace and tools that I collect. They would look so wonderful in these boxes. Thank you for the directions.
-
These would be perfect for sweet treats, nuts, hot cocoa mixes or anything that is good to give at Christmas. Why give just the gift when you can make the box a gift too.
-
These directions are so complete and I really want to sew these. I have some gift cards to put in them along with a small trinket and candies. Red hots for SIL, sour gummy worms for one grand, chocolates for another. I’m excited!
-
I *love* these!!!!!
-
I would put my buttons in the boxes.
-
-
I would use the box for small gifts or edible Christmas treats! (YUM).
-
Love this! I will fill these boxes with my son’s legos. Thanks for the giveaway btw
Ally -
Line it with parchment paper and fill with Christmas candy.
-
I would put homemade candy in them and give as gifts
-
Love the boxes there’s so many things you could use them for.
I would make one for my great niece and fill it with crayons, scissors and other
art supplies for a kid.
They would be great for free standing lace ornaments.
Great directions. Thanks Happy Holiday’s -
That’s easy! I’m making lounging pants for my teen grandchildren and these boxes are the perfect way package them making it two gifts in one!
-
Lindt truffles. My family loves them!
-
I would fill them with more boxes to open and a present would be in the last one.
-
I think they would be perfect for the rug mug/coasters or some of the handmade ornaments that I have made following the instructions from We All Sew.
-
I think I will make a few with the recipients initials embroidered on one side, or maybe monograms hmmm So many possibilities!
-
Sewing notions for my sewing friends!
-
For a holiday one I’d put little treats in and make a sewing one for trinkets / notions.
-
I would fill them with chocolates. I would choose the fabric based on the recipient, so that they could use it year round for whatever they wanted.
-
I think I would use them as table center pieces.
-
There would be all kinds of things that I would put in one of these boxes! Candies, quilting supplies, pictures, a Christmas ornament, coasters, candy canes, napkins….
-
I would fill them with Christmas M & M’s to share with the grandkids.
-
I would fill them with Hannukah gelt (chocolate coins) or sewing or knitting supplies. I have made a fabric box in a different format (it has an attached lid which opens) to hold an etrog. I used heavy Fast-2-fuse for it which is a Timtex type product with fusible web on both sides.
-
I would fill them with a little tea cake and a tea bag.
-
I think those boxes would be perfect to fill with chocolate truffles for Christmas!
-
Chocolate! Chocolate!! Chocolate!!!
-
Chocolates!!!
-
I would put the zipper pouches I made in the fabric boxes along with some candy and small trinkets.
-
Homemade Goodies & Christmas bows!
-
I would like to make out of Valentine fabric and fill with Hershey kisses and birthday fabric and fill with candy or fill with special small gift for a special birthday gift.
-
I love boxes and I love fabric so a fabric box is a double treat for me❗ I would fill my boxes with tiny treasures.
-
I would make loads of boxes and fill them with little gifts for all my quilting buddies.
-
I would make boxes and fill them with homemade cinnamon roasted almonds for all my friends and family!
-
Fabric boxes need treats for fabric lovers – needles, pins, cutter blades – all kinds of little notions.
-
Awesome holiday project! Would love to lake these for my family whom I visit over the holidays.
-
Pecan Pralines
-
I spend most of my time embroidering these days, I think I would fill it full of embroidery needles. So I always know where to find them.
-
These are very practical! I would fill it with the holiday coasters I might make from the Craftsy blog.
-
What would I fill these cute fabrics boxes with? Everything and anything. They can be made with any fabric. Right now I’m remembering some upholstery fabric that would make some very attractive boxes for holding special jewelry pieces
-
I would put loose buttons in the boxes.
-
I think these would be amazing with Holiday candies in then.
-
I will put clover clips in one for my best friend. I will put a pretty note pad and a small pen for another friend. Some fingernail polish and other nail grooming items for my sister, some shopkins for my granddaughter (made from shopkins fabrics of course), Teenaged Mutant Ninja turtle “stuff” in one for my grandson (made from TMN turtlefabric also) and for my husband, his favorite candy! They are soooo cute and handy!!!
-
I would fill it with homemade goodies like Mom used to make!
-
I would fill these lovely boxes with essential oils for my massage therapist daughter.
-
I would fill them with Little IOU’s and I LOVE YOU notes to my loved ones for Christmas.
-
I would use these as gift boxes. Very cute!
Leave a Reply
You must be logged in to post a comment.

What wouldn’t I keep in those boxes?! Home organization to the max! I’d start in my sewing room and make perfectly sized boxes for all my scissors 🙂