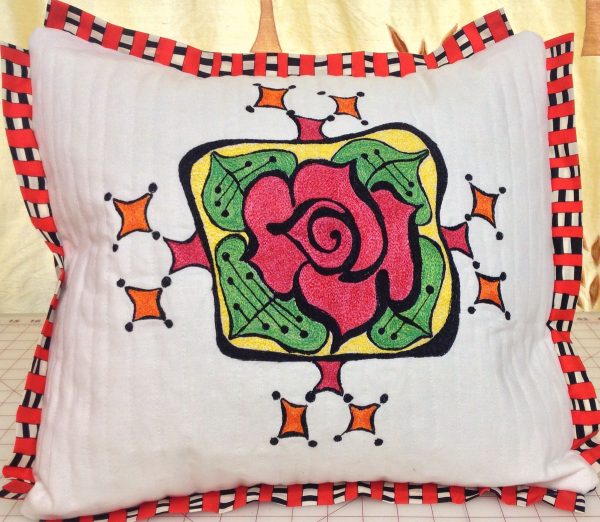
How to Make a Rose Tile Pillow
This Thread Painted Rose Tile Pillow project comes from our BERNINA Ambassador Terry White, and is reminiscent of early 20th Century Arts and Crafts designs.
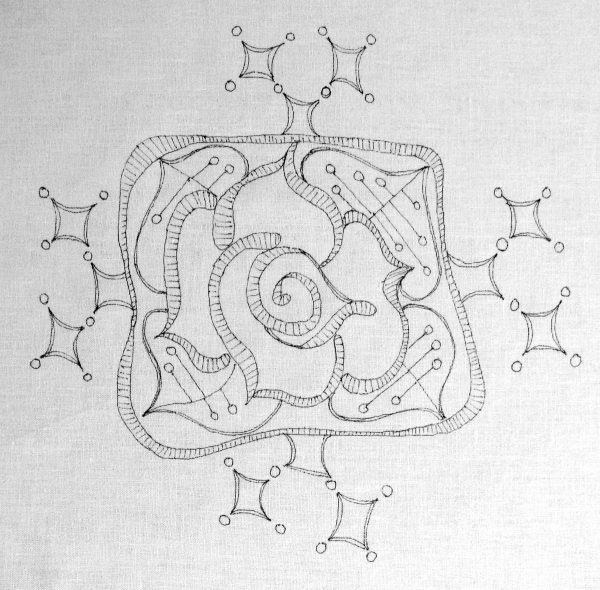
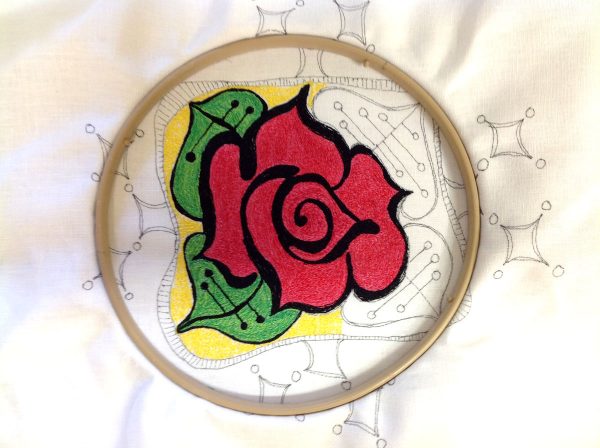
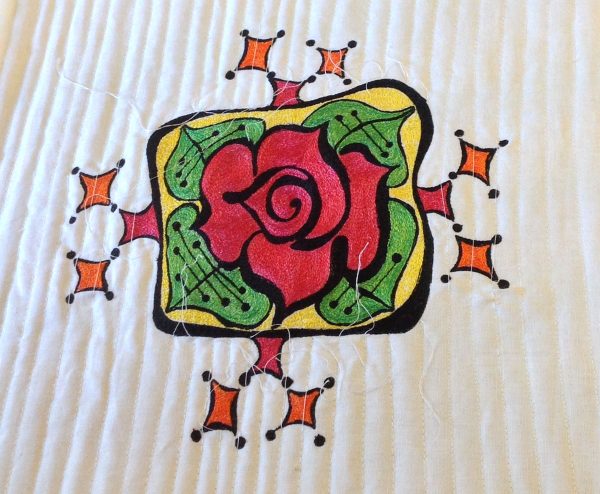
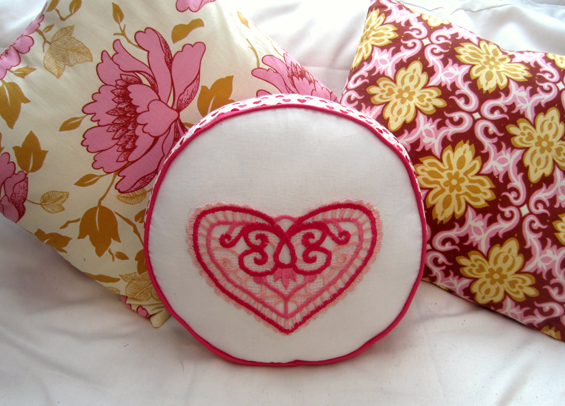
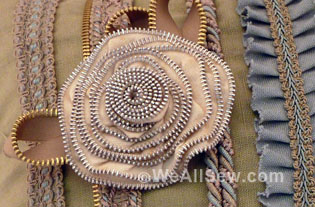
Here is my “Rose Tile” design. It is my version of a design popular in the American Arts and Crafts Movement. I enjoy using historical embroidery design ideas and draw them in a new way for my thread painting work. I love to study historical and world embroidery forms. I learn so much about how the design ideas work with the materials and techniques. The Arts and Crafts movement, which began in England and then came to America at the turn of the last century (not this one), was a creative movement born out of the desire to keep the artists hand in the work…a reaction to the Industrial Revolution.
This is a fairly simple thread painting project. The threads I used for this design are Trilobal Polyester threads. I love this type of thread…you get a clean hard edge and sheen…and they behave very well when thread painting.
For this design, I used two threads through the eye of the needle. This is a technique I have been using for many years. By using two threads you create an almost iridescent effect…a very rich look. Also, it bulks up the stitch which creates a fuller raised texture to the work.
So, I used two different colors of red together…a rose red and an orange red….to get the rich color tones. For the leaves I used two different greens. The idea is to use two shades of the same color with the same depth of color to create a subtle color mix.
Basic thread painting skills are needed for this project.
The design is stitched on white linen and then quilted with white machine quilting cotton thread. The quilting is done with white cotton thread in lines which are not perfectly parallel.
Materials:
- 20″ square White 100% Linen (Press the linen and use a spray finish while pressing to keep linen nice and crisp. I use Magic Sizing)
- 20″ square of Stabilizer (I use two layers of medium weight interfacing for the stabilizer instead of heavy weight stabilizer – this provides the thickness of stabilizer I want without the stiffness of a heavy weight stabilizer.)
- 20″ square of Thin Cotton Batting
- 20″ square of Muslin (for the backing)
- 9″ Morgan No-Slip Hoop.
- Bobbin Thread in the Bobbin (Use red when stitching with the red threads, green when stitching with the green thread, yellow when stitching with yellow thread and black when stitching with the black thread. The stitching is very dense in this design, so there is a tendency for the bobbin thread to show a little…matching the bobbin thread to the top thread will just make things look better.)
- 90/14 Machine Embroidery Needle
- Micron Pigma Pen (or any other archival quality fine line pen)
- Coats & Clark Trilobal Polyester Thread in the following colors:
- Rose 128
- Green 63 A
- Lt. Green 222
- Pink 32 C
- Red 33A
- Yellow 321 A
- Orange 135
- Lt Orange 324 A
- C&C White 100% Cotton Machine Quilting Thread for Quilting
Instructions
Trace pillow design
Trace the design onto prepared linen with a black archival quality pen. I use a light box. I have used dash marks in the areas of the design that will be stitched in black. This helps me to see the design better.
Hoop design
Hoop the fabric and the stabilizer together. Use the small hoop on top and the large hoop on the bottom so that the fabric is against the machine bed. Be sure to hoop it tight.
Thread Painting
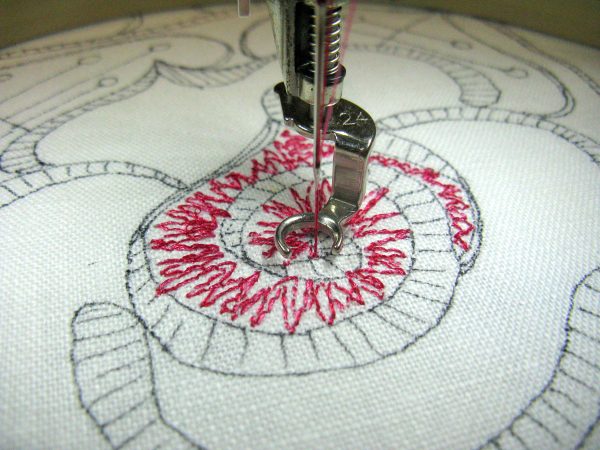
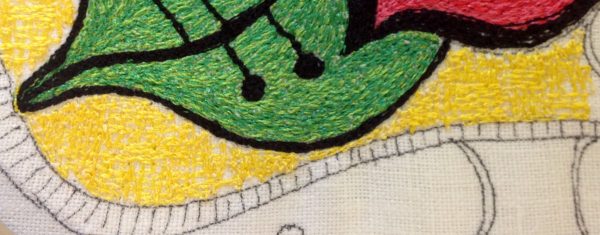
I am using two threads through the eye of the needle. Thread them through the machine as if you were using a twin needle (check your sewing machine manual for threading sequence). Then, thread them both through the eye of the 90/14 machine embroidery needle. The large eye of the needle will handle both threads. Start with Red and Pink threads together. There is not a high contrast between these threads, so they will blend well. In the photo, you can see that I’m using an underlay stitch. This does two things: it pads the stitch; more importantly, it helps to prevent distortion of the fabric. Without the underlay stitches, when stitching densely in one direction, the fabric will distort and the design will undulate.
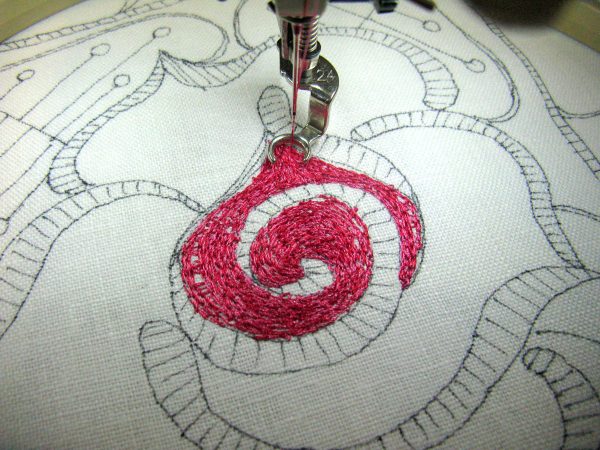
Stitch with long stitches to fill the areas by stitching along the contours of the shape. The design is made interesting by the direction of the stitches. The threads are solid colors, so the directions of the stitches create texture (as in all textile work). The way light hits the work enhances the design by the shading caused by the intense reflectivity of the threads.
Then, overstitch with the Pink thread ….a single thread for shading. In this photo, look at the subtle shading of color. The overstitching with the pink is done with long, swooping stitches, just enough to add areas of shading…not a lot of stitching.
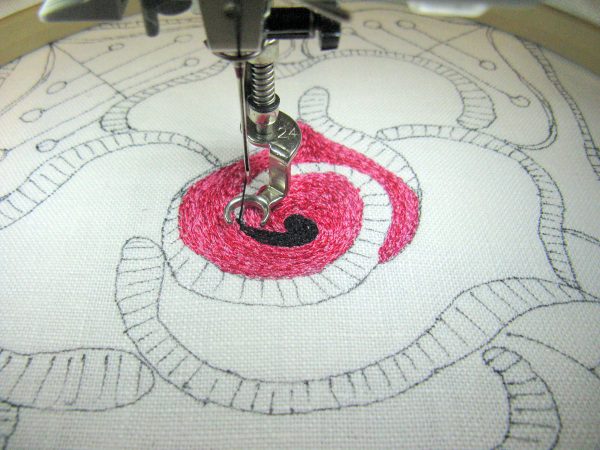
Black bobbin thread is used with the black thread. Stitch with two black threads…you can wind thread on a bobbin and use it as a regular spool of thread. Smooth contour stitching….stitch small sections at a time to help prevent curling of the work. One of the nice aspects of this design is that the black lines flow thick and thin….so, if you “go out of the lines” it won’t matter and the fix is easy….just stitch some more and make it a thicker line!
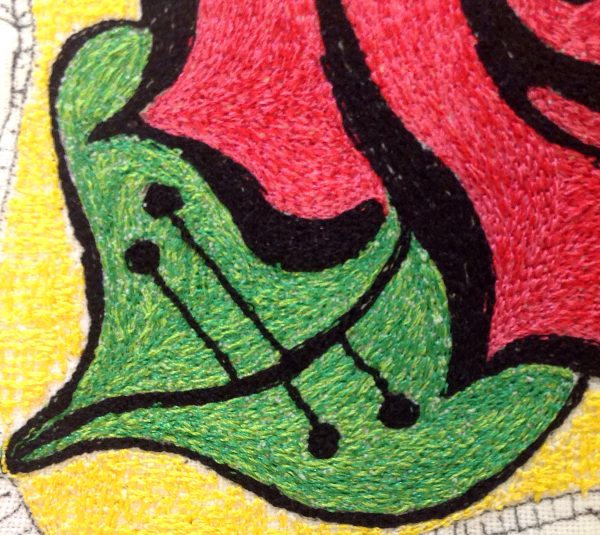
Use two greens for leaves. Overstitch with one green for shading. Look at the black dots in the leaf. This is a French knot. It is made by spiraling in and spiraling out like a very tight spiral.

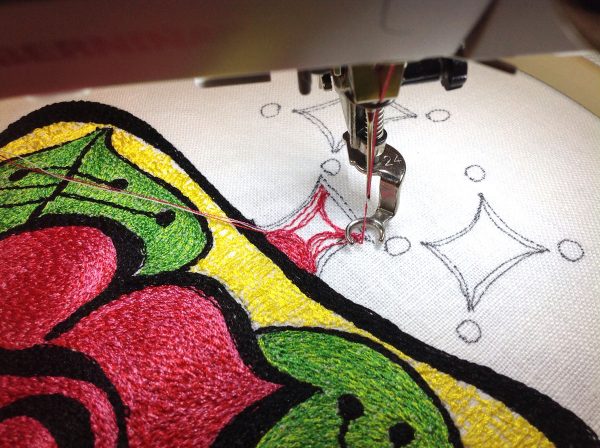
The drawing shows the sequence of the Cross Hatch stitch.
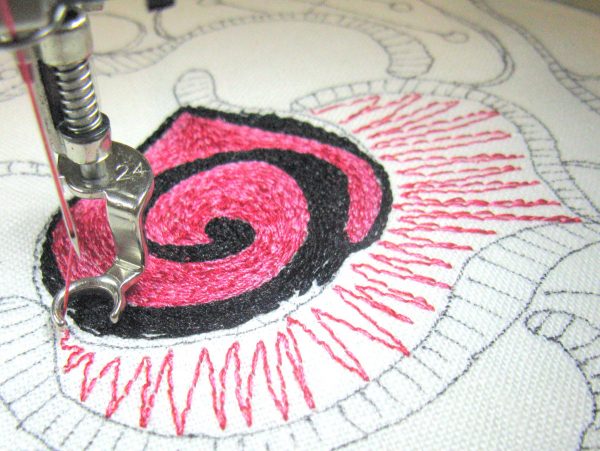
Crosshatch Stitch with a cross hatch stitch. I used two threads of the same yellow color. The cross hatch stitching does not completely cover the linen, so the white fabric is my second color.
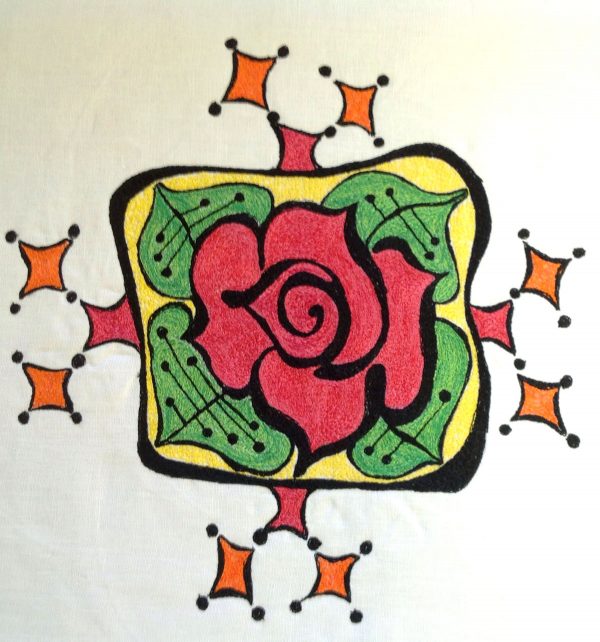
It’s time to re-hoop…I like to stitch the design in the hoop, re-hoop, and stitch another section of design. I iron the hoop dents out before re-hooping.
Okay, so they aren’t exactly squares, you could say that they are lively square-like shapes. The dots are French knots.
Press the panel when the thread painting is done.
I quilted in straight rows with the cotton thread. I like the contrast between the plastic look of the polyesters and the natural look of the linen and cotton quilting lines. For quilting straight lines, I like to use a BERNINA Differential Feed Foot such as Patchwork Foot #97D. It keeps all the layers moving together. You may prefer using the BERNINA Walking Foot which is what I always used before I had a BERNINA Sewing Machine with Differential Feed…which I love, love.
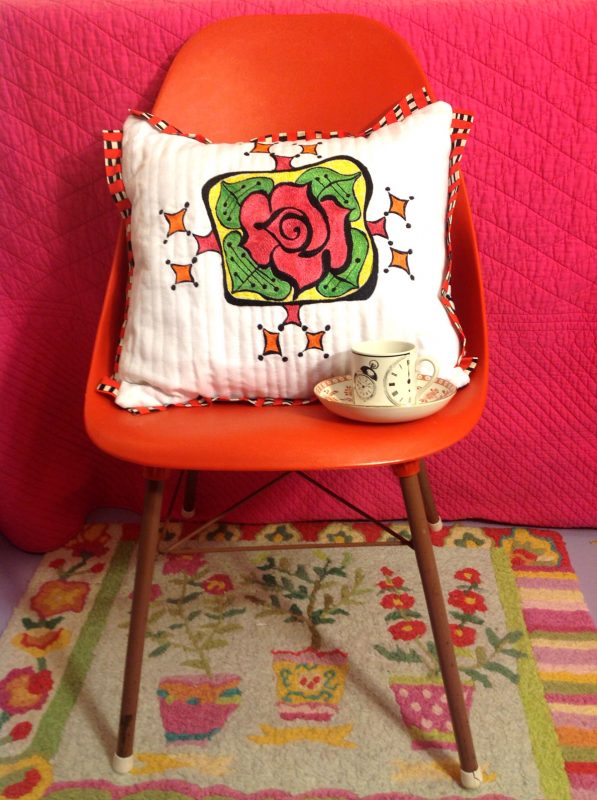
This is finished into a pillow. For the edge trim, I cut four 3 inch strips of a print, folded and pressed them each in half long ways. I finished the ends with fusible web strips.
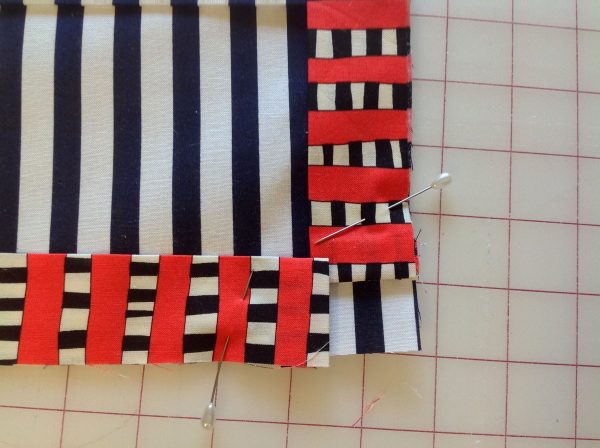
Then, I stitched each edge trim to the four edges of the pillow back…right sides together.
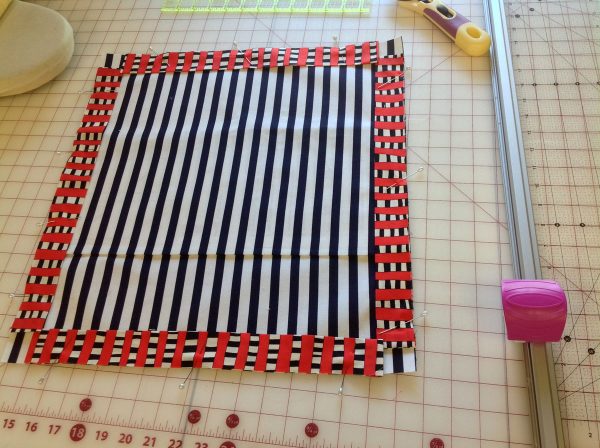
Note the corner treatment. Stitch the back to the front…right sides together, turn and stuff with a pillow form.


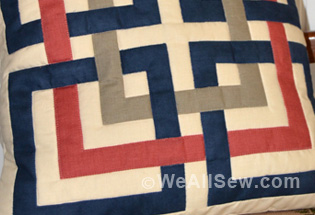

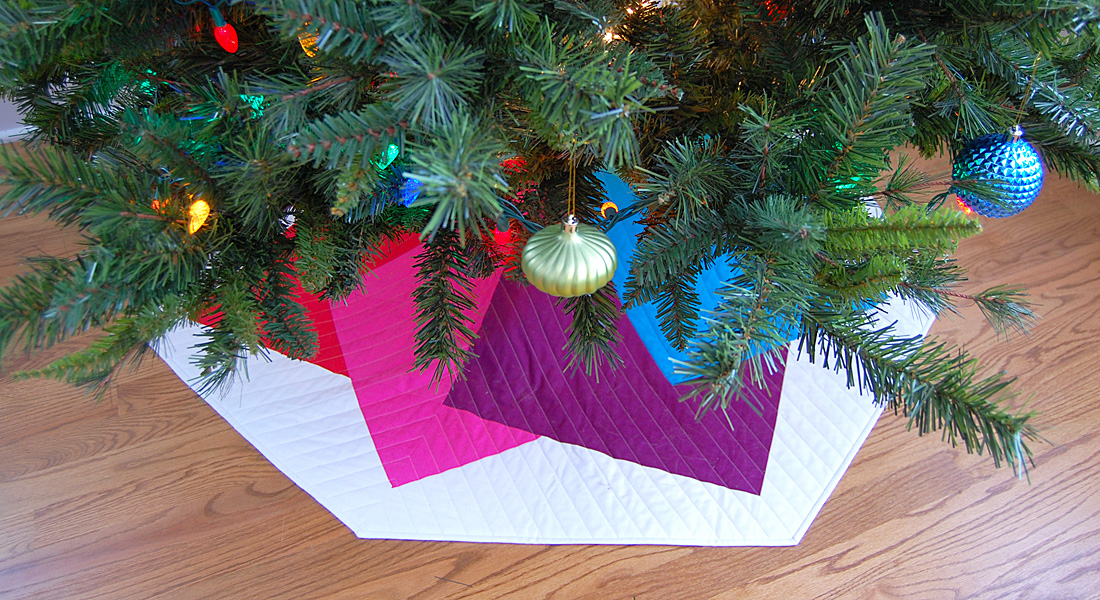
![Is that big, bold scrap of fabric staring at you? This quilt square is designed to let a large print fabric shine. This simple block is quick to make and easily stitched into a pillow. With a bit more fabric you can turn it into a placemat or table runner. The perfect project for turning fabric scraps into something bold and beautiful. Geometric Quilt Block Pillow Supplies Large scraps or fat quarters of 100% cotton quilter's fabrics: One large print One light solid or small print One medium solid or small print One dark solid or small print 1/2 yard of white cotton fabric for the pillow lining 1/2 yard of fabric for the pillow back Coordinating thread 14" square pillow form Universal or Sharp needle, size 75/11 1/4" foot (BERNINA Patchwork Foot with Guide #57) Straight stitch foot (BERNINA Straight Stitch Foot #13) Zigzag foot (BERNINA Reverse Pattern Foot #1) or overlock foot (BERNINA Overlock Foot #2) Rotary cutter and self-healing cutting mat Clear acrylic gridded ruler Download and print the Geometric Quilt Block Pillow Cutting and Piecing Diagrams: [download id="90"] Step 1) Cut the fabric pieces. Accurate cutting helps avoid crooked, puffy, or uneven seams in your quilt block. Use a self-healing mat, a clear acrylic gridded ruler, and a rotary cutter to cut the pieces for your quilt block. Rotary cutters Rotary Cutting Tips Self-healing mats come in different sizes. 24" x 36" is a good size to have, but if you don't have a dedicated sewing space or don't plan to use it often, try an 18" x 24" mat instead. Acrylic rulers also come in many shapes and sizes. A standard 6" x 24" ruler is a good start, and I've also found a 12-1/2" x 12-1/2" square ruler to come in very handy. Rotary cutters are measured by the size of the circular blade in millimeters. A 45 mm rotary cutter is perfect for making the kind of straight cuts needed for this project. Use the grid on your cutting mat to help square up fabric pieces when needed, but when measuring to cut the pieces be sure to use the gridlines on the acrylic ruler. Hold the ruler firmly on top of the fabric, and use a steady, firm, pressing motion when cutting with the rotary cutter. Cut one of each pattern piece from the corresponding fabrics (also see downloaded Cutting Diagram): Piece #1 - Light solid or small print, 4" x 3" Piece #2 - Dark solid or small print, 4" x 5" Piece #3 - Light solid or small print, 4" x 2-1/2" Piece #4 - Large print, 9-1/2" x 9-1/2" Piece #5 - Light solid or small print, 2-1/2" x 9-1/2" Piece #6 - Dark solid or small print, 14-1/2" x 2-1/2" Piece #7 - Medium solid or small print, 14-1/2" x 3-1/2" Step 2) Piece the block. Set your sewing machine for a straight stitch about 2.5 mm long. Attach a quarter-inch foot, such as BERNINA Patchwork Foot with Guide #57, to your sewing machine. The blocks will be sewn together using a 1/4"-wide seam allowance. Stitching an accurate 1/4"-wide seam will help your block come together with nice, straight seams and avoid pieces not fitting together as you sew on. Geometric Quilt Block Pillow Patchwork Piecing Tips Us a quarter-inch foot to help you keep the correct seam allowance width. The BERNINA Patchwork Foot #37 is designed specifically so that following the edge of the foot will create a 1/4"-wide seam allowance. BERNINA Patchwork Foot with Guide #57 is similar to foot #37, but adds a metal guide at the side of the foot to help you like up your fabric piece exactly at the edge of the foot. Attach a seam guide to the bed of your sewing machine along the 1/4" seam allowance mark on your stitch plate, then place the edges of your fabric pieces against the guide as you sew. Alternatively, place a piece of blue low-tack painter's tape along the 1/4" seam allowance mark on your stitch plate as a guide for your fabric. Piecing Diagram Geometric Quilt Block Pillow Start by stitching Piece #1 to Piece #2 along one 4" edge. Press the seam allowances to one side. Next, sew Piece #3 to Piece #2 along one 4" edge as shown in the diagram; press after stitching. Geometric Quilt Block Pillow Continue adding pieces to the block as shown in the diagram, pressing each seam as you go. Tip: When pressing seams, be sure to press DOWN with the iron as opposed to "ironing," or pushing the iron back and forth over the seam. Ironing (back and forth motion) can cause straight seams to go crooked. Pressing straight up and down with the iron will help your seams stay nice and straight. Press all seams again from the back of the block when finished. Geometric Quilt Block Pillow The finished block should measure 14-1/2" x 14-1/2". Geometric Quilt Block Pillow Step 3) Construct the pillow cover. Cut one 14-1/2" x 14-1/2" square of fabric for the pillow lining. Cut two 11" x 14-1/2" rectangles of fabric for the pillow back. Create a 2" hem along one edge of each 11" x 14-1/2" pillow pocket piece: Turn under 1" along one long edge; press. Turn under an additional 1"; press. Geometric Quilt Block Pillow Topstitch close to the inner edge of the folded hem with a straight stitch, using either a multi-purpose foot or a straight stitch foot. Geometric Quilt Block Pillow Layer and pin the pieces of the pillow together: Begin with the 14-1/2" square of white cotton for the lining. Add the finished patchwork block, right side up, matching all edges. Add one pocket pillow back, right side down, matching the raw edges. The finished hem will be about 5" from the other end of the pillow. Add the other pocket pillow back, right side down, on the opposite edge. The hemmed edges will overlap. Geometric Quilt Block Pillow Pin around all four edges of the pillow. Set your sewing machine for a straight stitch of 2.5 mm long. Stitch around all four sides of the pillow using a 1/2"-wide seam allowance. Trim all seam allowances to 1/4". Attach an overlock or zigzag stitch foot to your sewing machine. Set your machine for a zigzag or overlock stitch and sew over the raw edges to keep them from unraveling. Geometric Quilt Block Pillow Turn the pillow cover right side out, gently pushing each corner from the inside to turn it. Insert the 14"-square pillow form through the opening in the back of the pillow cover. If needed, use a little fiberfill to help fill out the pillow corners. Geometric Quilt Block Pillow Geometric Quilt Block Pillow](https://weallsew.com/wp-content/uploads/sites/4/2014/01/Geometric-Quilt-Block-Pillow-WeAllSew.jpg)