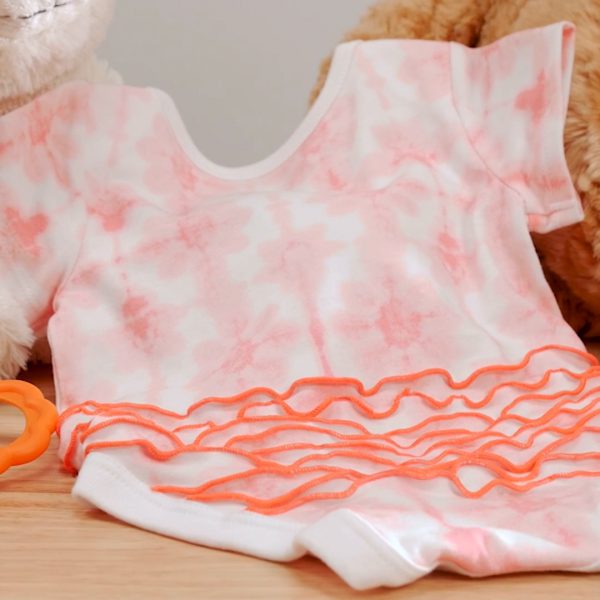
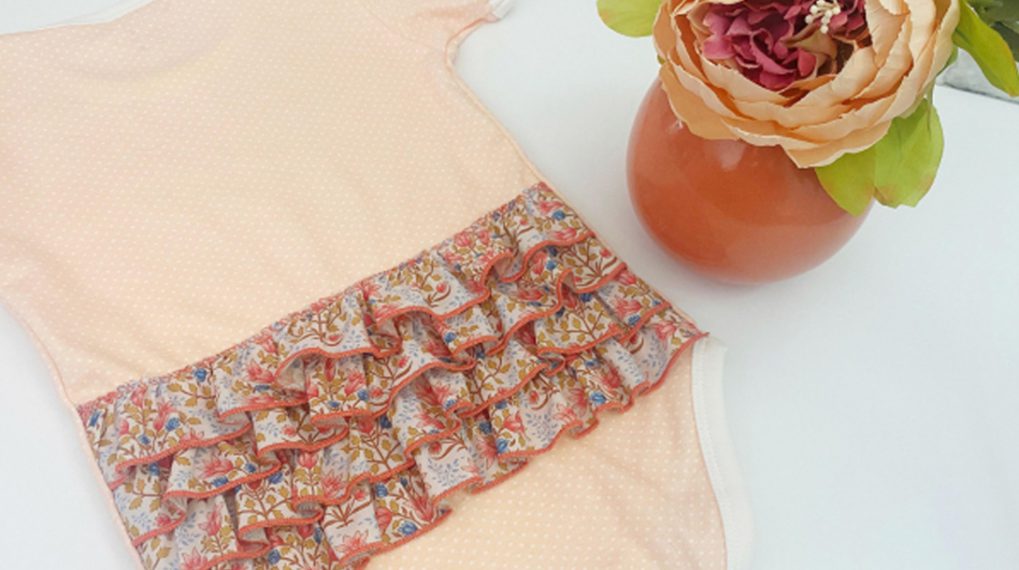
How to Make a Ruffle Bum Baby Bodysuit
Adding rows of ruffles and frills is an easy way to make a simple one-piece baby bodysuit even cuter! This technique is incredibly quick and easy to do with your overlocker and it is a great way to add an extra embellishment to a gift or your own child’s clothes.

This effect is created using a stretched rolled hem pintuck to create rows of lettuce-edge ruffles. The Blindstitch Foot #L19, now available for the BERNINA L 850 and L 860, makes this process easier than ever.
Supplies to Make a Ruffle Bum Baby Bodysuit
- BERNINA L 860 overlocker
- Blindstitch Foot #L19
- One-pieceBaby Bodysuit
- 2 cones serger thread (i.e. Mettler Seracor)
- 1 cone texturized thread (i.e. WonderFil Soft Loc)
- Fabric marking pen
- Ruler
- Wonder Clips
- Snag Magic needle (or large eye needle)

Steps to Make a Ruffle Bum Baby Bodysuit
Step 1. Prepare Baby Bodysuit
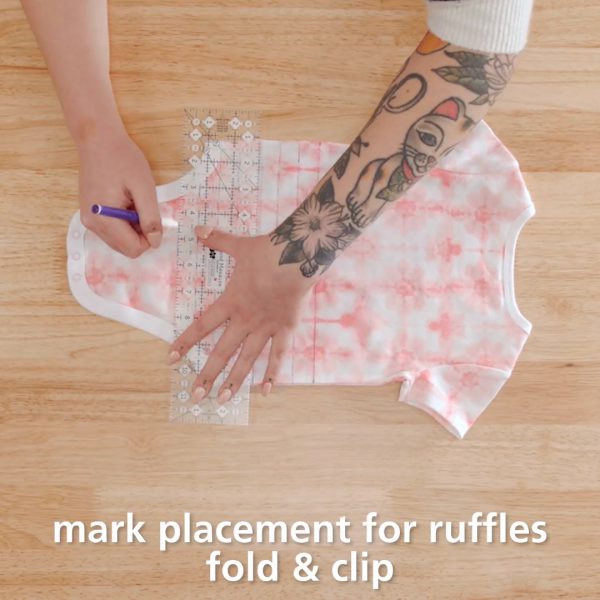
The first step is to mark out all the lines where we will stitch our ruffles. Begin by finding the horizontal center of the outfit. To do that, fold it in half by bringing the top of the leg opening up to the shoulder. Mark the folding point on both the left and right sides at the side seams.

You will want to use a temporary fabric-marking pen to draw out all your lines for ruffles. These lines should ultimately be completely covered by thread and not visible on the finished project but I still suggest choosing something that is easily removable, like chalk or a heat-erase pen.
Using your fabric marking pen, draw a straight line across the back of the outfit, connecting the two points you marked as the center. This will be your first, and highest, ruffle.
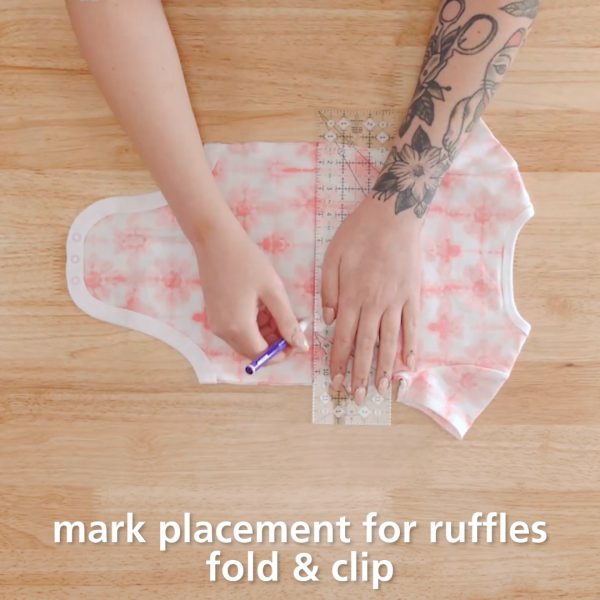
Use a ruler to measure the next ruffle, 3/4″ down (toward the bottom opening of the baby bodysuit) and parallel to your first line.
Continue drawing these lines until the entire seat of the outfit is marked in parallel horizontal lines. This is most easily done with the opening of the bodysuit unbuttoned.
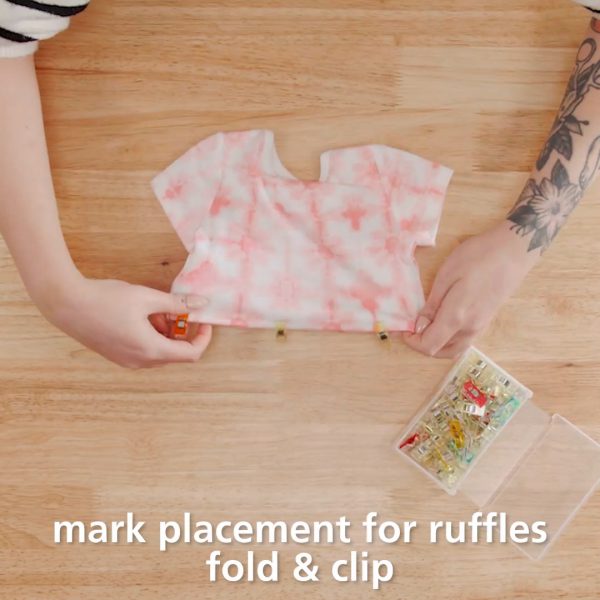
Then, fold the bottom of the baby bodysuit in (with wrong sides together), folding in and up so that the fold is on the very first line you marked. Use Wonder Clips to hold this fold in place all along the drawn line.
Step 2. Setup 3-thread Rolled Hem
At the BERNINA L 860, we will now set up our rolled hem stitch that is used to create these frilly ruffles. The L 860 offers navigation through either Guided Mode or Expert Mode. In Guided Mode, the Stitch Setup Wizard will walk you step-by-step through changing the machine from the last sewn stitch to the next one you have selected. For beginners or anyone who does not use their overlocker often, this process is incredibly helpful!
For the experienced overlocker user, we can work in Expert Mode. This mode gives you all the same information that Guided Mode does, but it is presented in a quicker summary page rather than a thorough walkthrough. Today, I will work in Expert Mode.
Begin by selecting the 3-thread Rolled Hem (stitch 8) from the stitch selection menu.

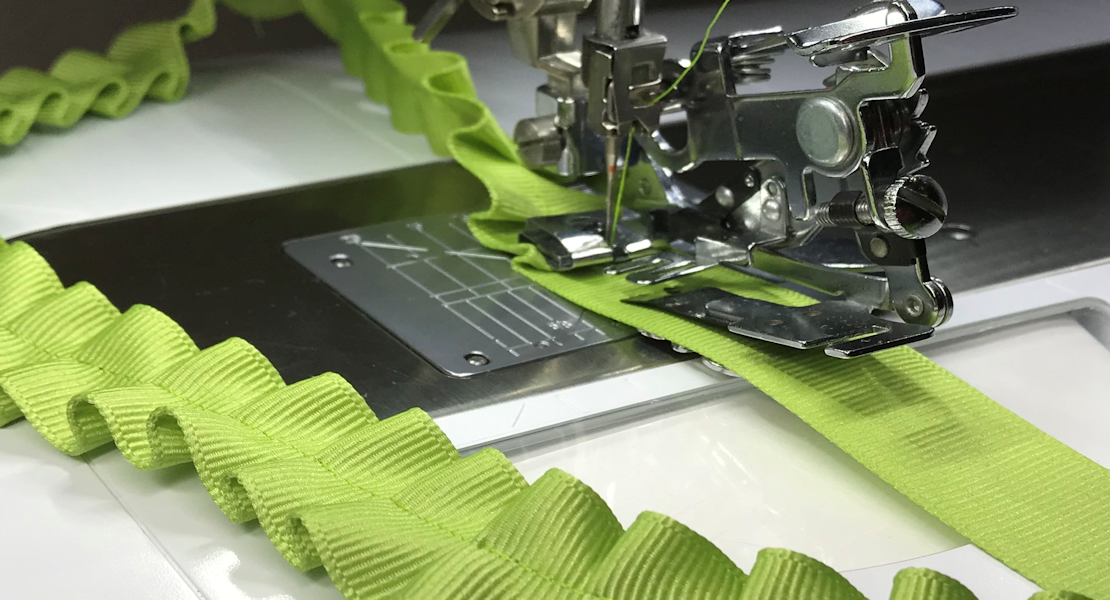
Now there are a few key manual changes I need to make to the machine. First is that I want to use a specialty presser foot for this technique. The Blindstitch Foot #L19 makes this technique incredibly easy. Begin by attaching the presser foot to the machine.

Then we will adjust our Blindstitch Guide. When we loosen the screw on the top of the presser foot, we can easily slide the guide left and right to create the perfect depth for whatever technique we are stitching. For my rolled hem pintucks, I want my guide to sit just to the right of my right needle. This way, when I feed my fabric through and I have my folded edge butted up against the guide on the presser foot, my needle will just catch the edge of the fold and it will do so neatly and evenly down the entire seam.

I will then remove the Freearm Cover from the machine. Working on baby clothes means stitching in a small circumference and the Freearm on the L 8 Series Overlockers makes that incredibly easy to do.

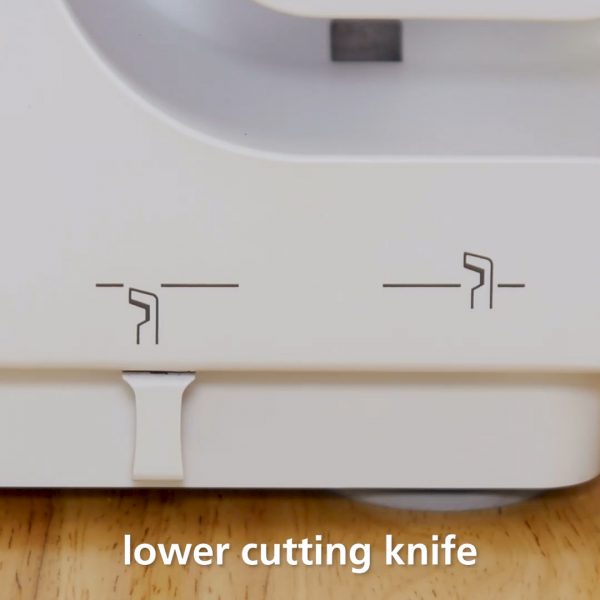
The next manual change is to lower the Cutting Knife. I want the fold in the fabric to remain intact through my rolled hem pintuck, so I will not have the knife trim off the edge.
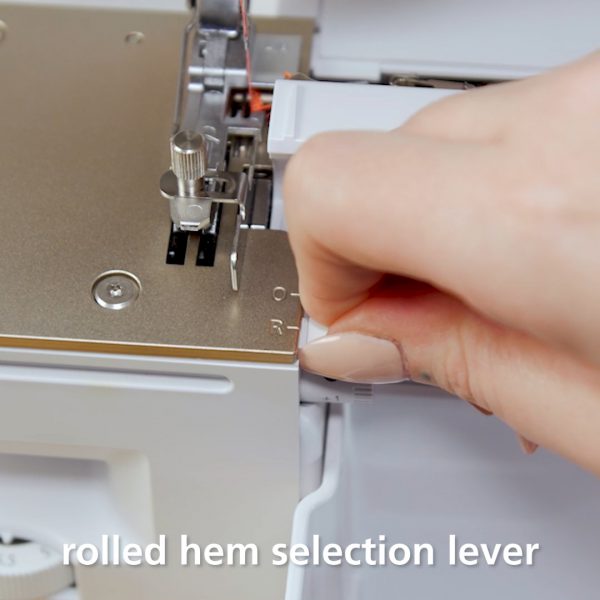
Next, I will move the stitch selection lever from O (for overlock) to R (for rolled hem.)
The last step is to thread the machine! We will use a standard serger thread, such as Mettler Seracor, in the needle and the Lower Looper. But in the Upper Looper, we will use a texturized thread, such as WonderFil Soft Loc or Maxi Lock Stretch. This fluffy, textured thread is what gives the rolled hem its smooth, uniform look. Threading is incredibly easy and quick with the BERNINA One-Step Air Threader!
Finally, I will select the green checkmark to confirm that I have made all the necessary manual changes to the machine.

In order to give my rolled hem this wavy, frilly look, we need to make a few adjustments to the stitch itself.
First, shorten the stitch length. The default setting is 1.2 mm and I prefer to reduce the stitch length to 0.9 or 1.0 mm. This is simply a personal preference and may vary depending on your thread and fabric. The goal is for the rolled hem to have a smooth, plush look. In my experience, this often requires shortening that stitch length just a little bit.

Next, we will change the differential feed. Differential feed controls the rate at which the two sets of feed dogs on your overlocker move in relation to one another.
When the setting is at 1 (the default) that means they are moving at the same speed. If we increase the differential feed to the maximum of 2, that means the front feed dog is moving at 2x the speed of the back feed dog. When the front feed dog is moving faster than the back, that means it is pulling more fabric in than the back is pushing out which results in gathering. Increasing differential feed can also help correct wavy seams or the result of fabric stretching out too much as it is stitched.
But what happens if we decrease differential feed? Decreasing means that the front feed dog is now moving slower than the back feed dog, which causes your fabric to be stretched as it passes under the presser foot. The result of that is a wavy seam. When using a rolled hem, that frilly “lettuce edge” is achieved. This is exactly how we will create the ruffles on our baby bodysuit.
At our L 860, reduce the differential feed all the way down to the minimum, 0.7.

Step 3. Sew Pintucks
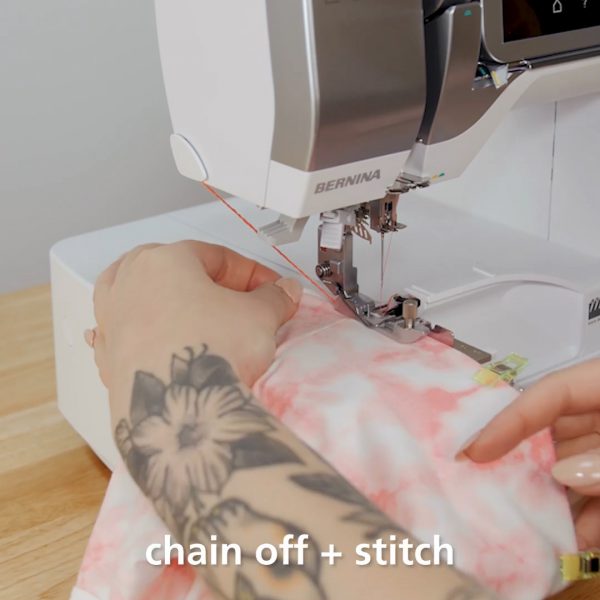
Now the fun part—stitching! Start by chaining off your rolled hem to get the stitch started.
Place the folded edge on the backside of the baby bodysuit underneath the presser foot. (You will be sewing on the back of the garment only.) Line this up so that machine will begin stitching at, or just past, the side seam. Lower the presser foot and begin stitching.
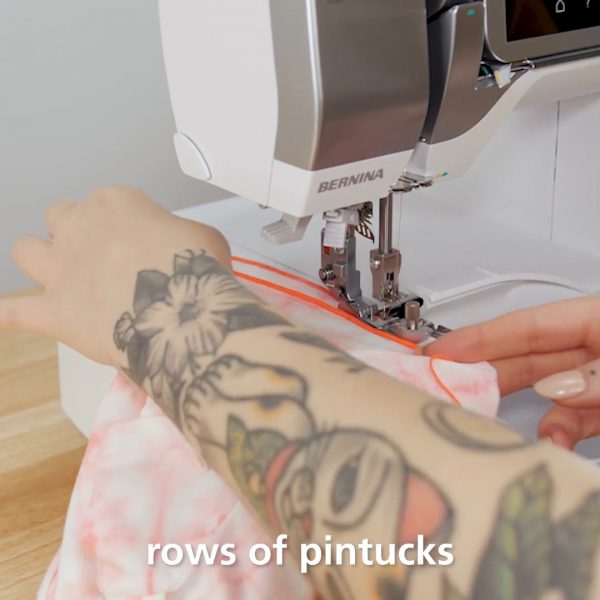
As you sew down your marked line, keep the folded edge lined up against the guide on the Blindstitch Foot #L19. The reduced differential feed will stretch your fabric to create that frilled edge, but you can also stretch the fabric more by hand as it feeds through to give it an even wavier edge.
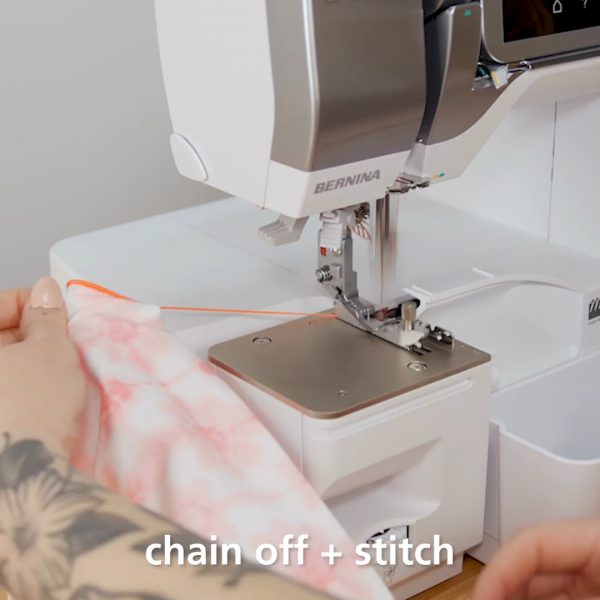
Stop stitching when you reach the opposite side seam. Turn the garment away from the presser foot and continue stitching to chain off. Cut your threads leaving at least 4” of thread chain at the end of your seam.
Next, create the next fold along the next marked line on your outfit. Use Wonder Clips to hold this in place again.
Repeat the process to chain off, stitch down your marked line, chain off, and then move to the next line until all of your pintucks are sewn. Each pintuck should have a generous thread chain at the beginning and end.
Step 4. Secure Stitches
The last step is to make sure our pintuck stitches are secure. I love the Snag Magic needles for this! These sharp needles have a large flexible plastic loop to thread instead of a traditional eye. They are amazing for overlocker projects where you are typically trying to thread three or four threads through the eye of a needle.
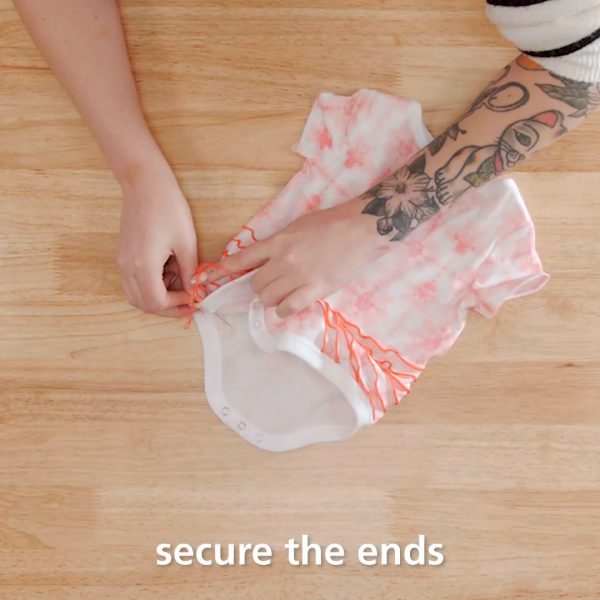
Thread your thread chain through your needle. Use the needle to pierce through to the inside of the outfit at the side seam, pulling the thread chain into the wrong side. Use a small overhand knot to secure the threads as close to the fabric as possible and trim the excess thread.
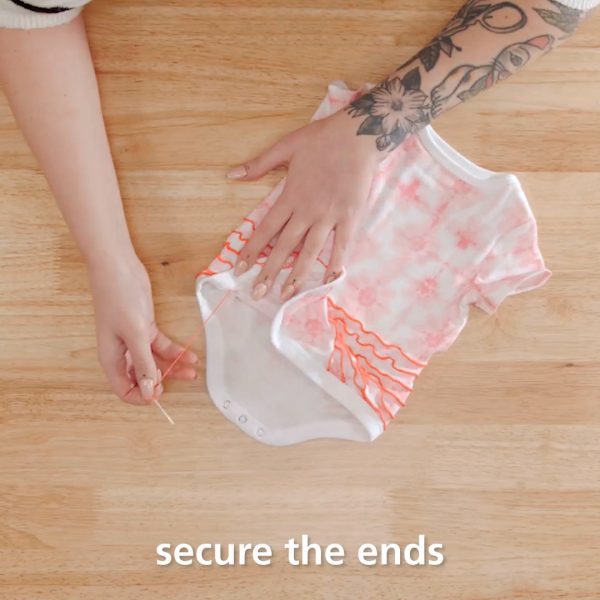
Repeat this process at the beginning and ending of each pintuck.
Your baby bodysuit is now ready to be washed and worn!
Used Products

What you might also like


2 comments on “How to Make a Ruffle Bum Baby Bodysuit”
-
-
I attempted to do this project and ran into a major problem. I was using my L890 overlocker, It was threaded correctly, the practice piece turned out perfect. However on the onsie at the beginning at the seam I got a huge knot. Should I have stated away from the seam and not gone the entire distance of the back. I was not pleased with how the end project looked.
Leave a Reply
You must be logged in to post a comment.

Will this work when using an older model of an overlocker with a rolled hem. i like the idea.