Round Zipper Pouch and Book Giveaway
Hello WeAllSew readers,
It’s Minki Kim, and you can find me at Instagram @zeriano and MinkiKim.com. I also design fabric for Riley Blake Designs and I have my own line of sewing patterns.
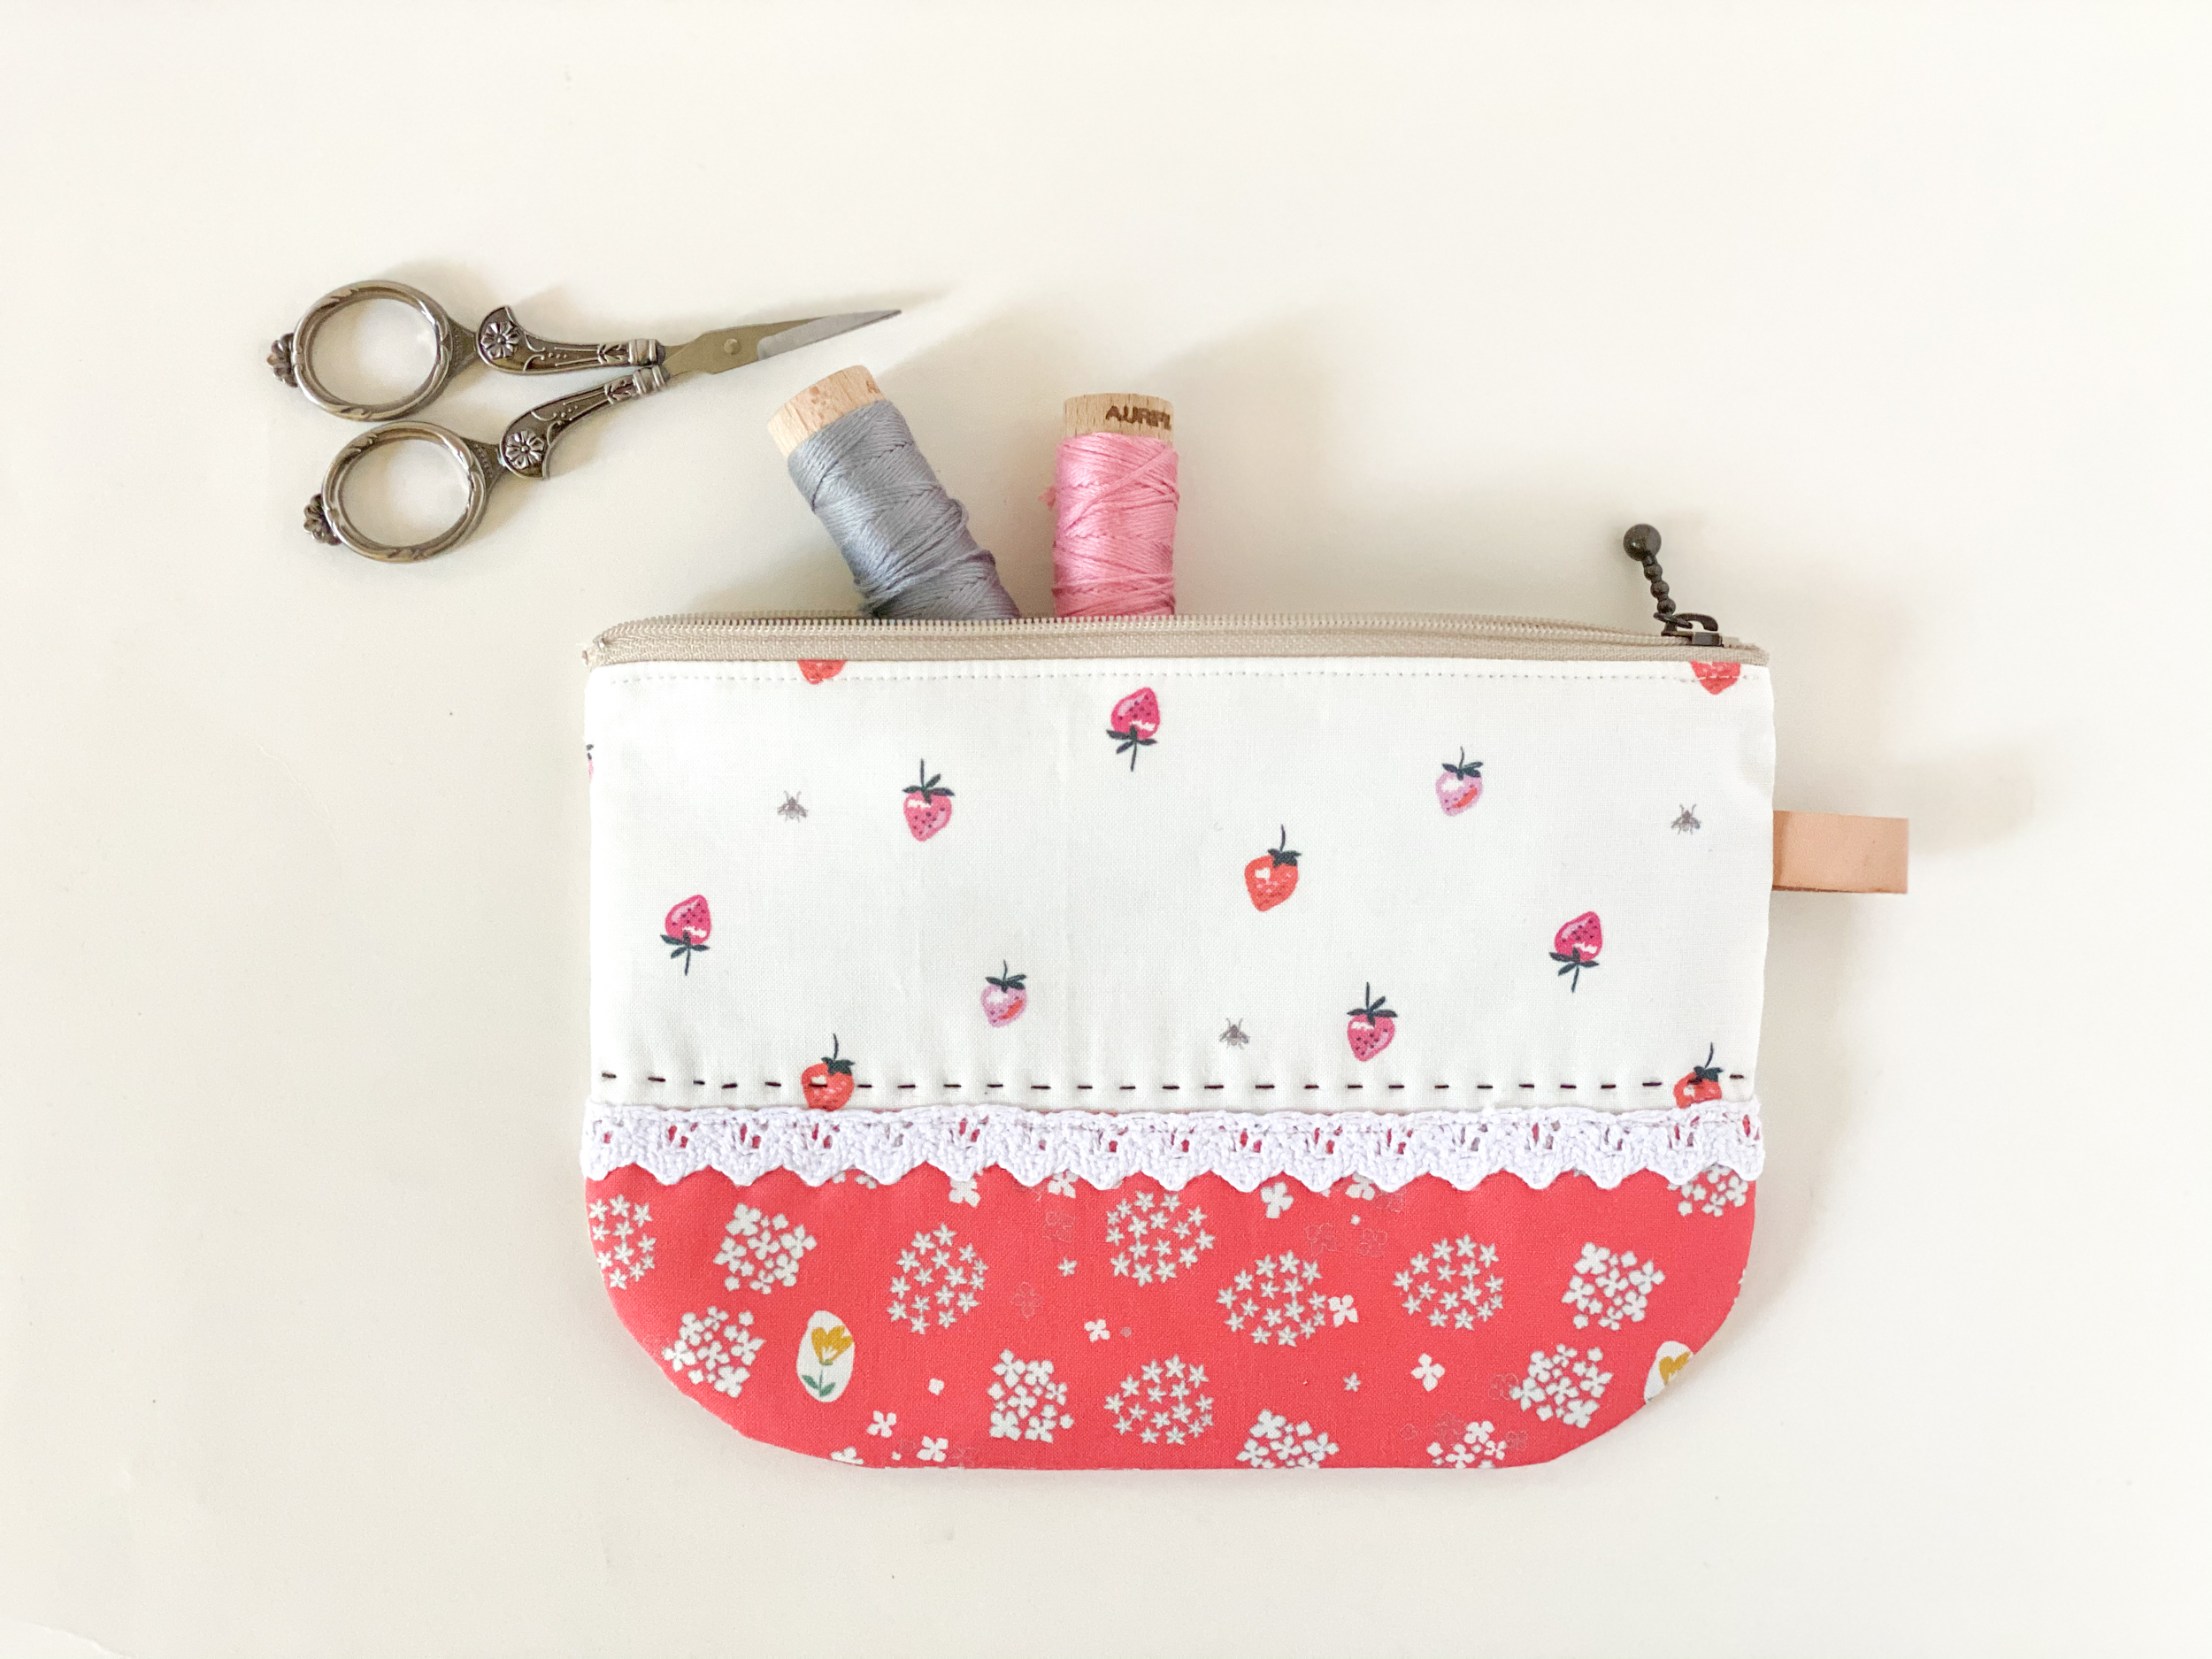
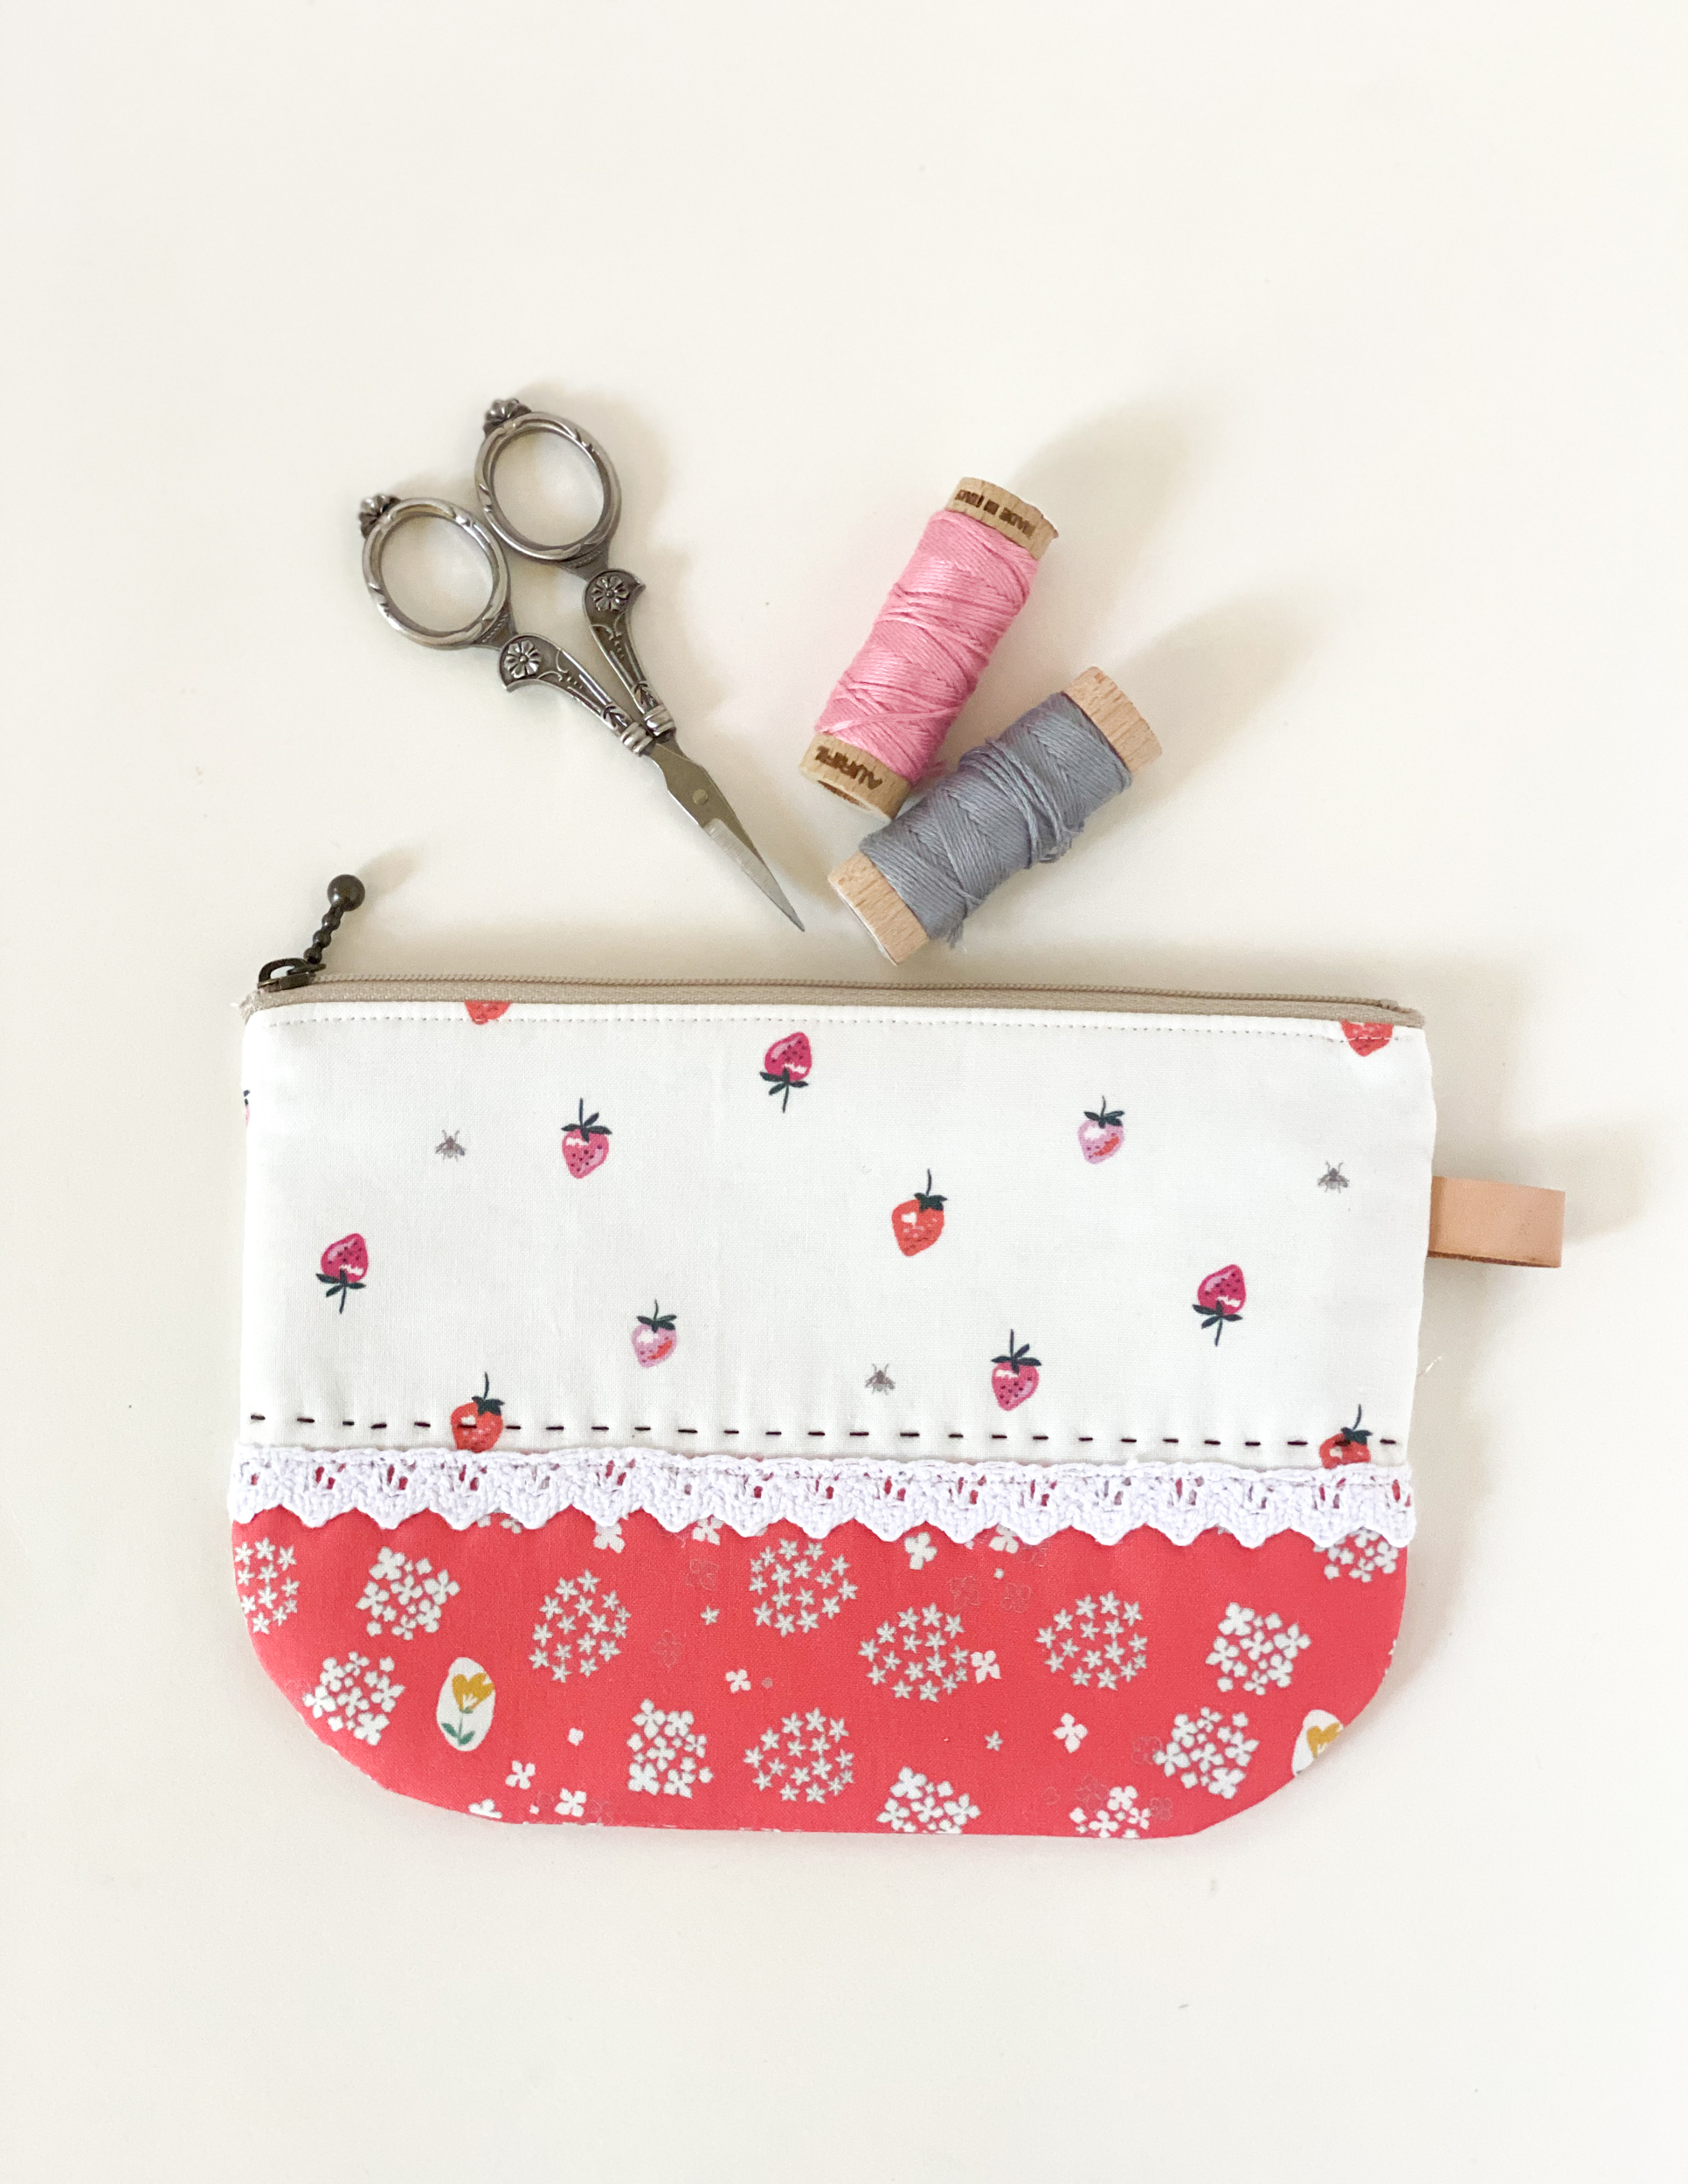
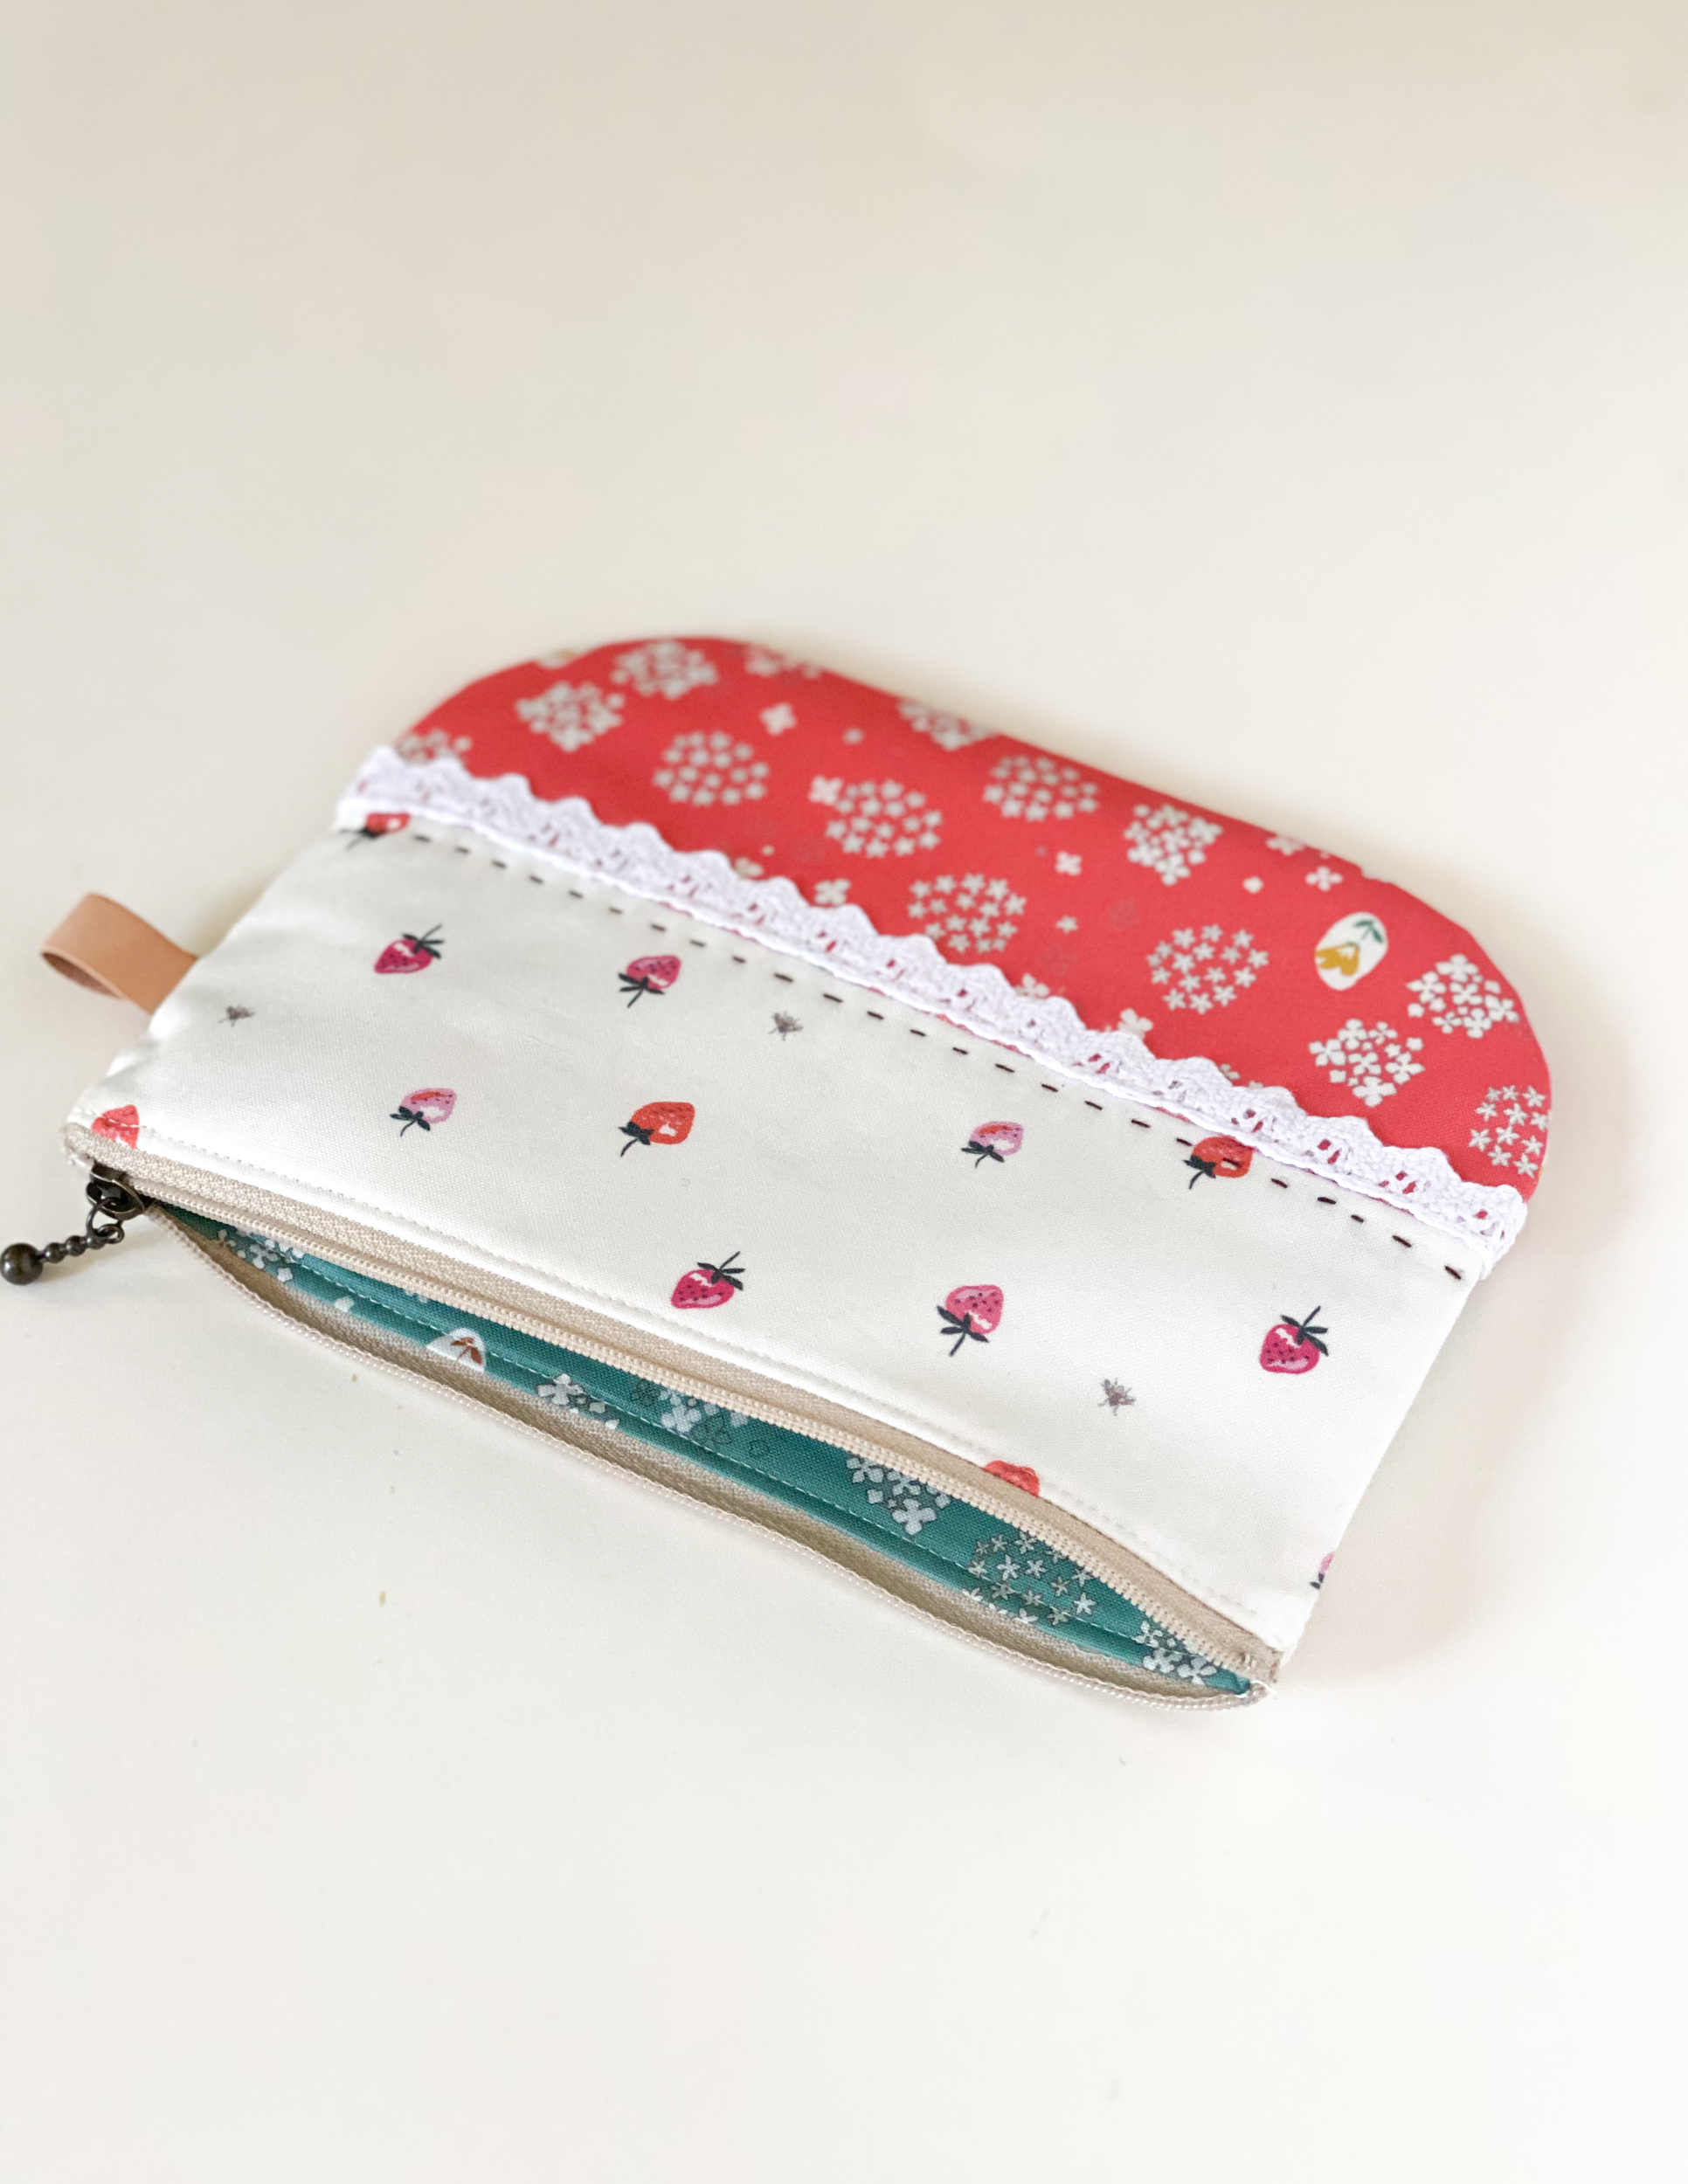
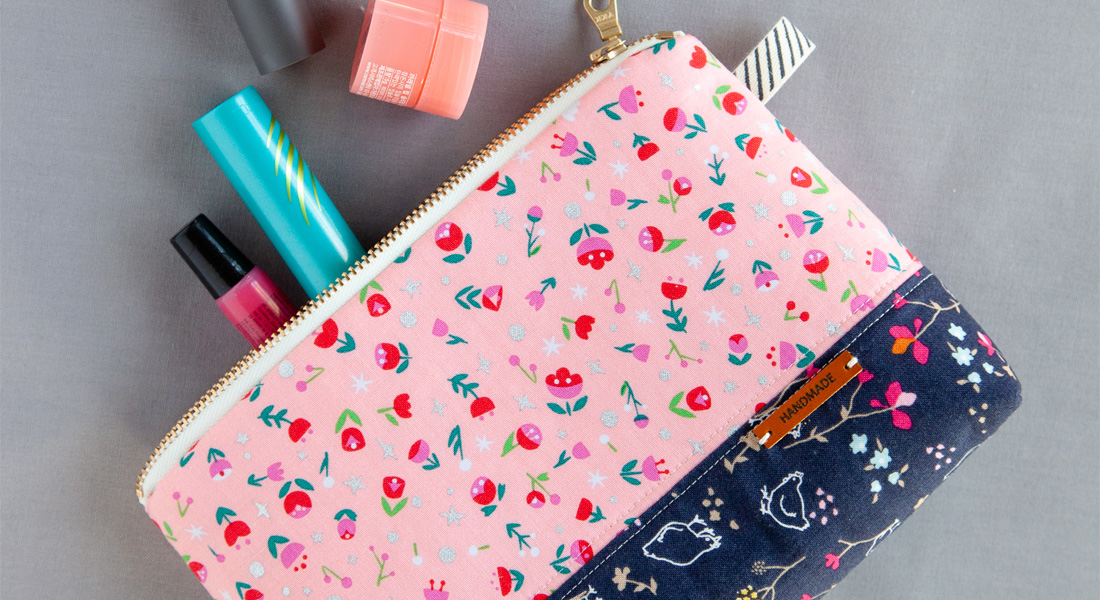
I am excited to share this easy to make Round Zipper Pouch today. Easy to follow sewing instructions will have you finish this little handy bag in one afternoon! Who wouldn’t love a handy little bag? They’re fun to make and handy to have around. This pouch would make a perfect gift too for any occasion!
Materials to Sew Cosmetic Zipper Pouch
Finished size: 8” wide x 5 1/2” height
Fabric used: Bloom collection by CottonVill
- 1 Fat quarter cotton print A for exterior
- 1 Fat quarter cotton print B for exterior
- 1 Fat quarter cotton print C for lining
- 1 Fat quarter medium weight fusible batting
- 1 zipper – 8”
- 2 cotton lace – 8 1/2” x 1/2”
- leather strip for tab and embroidery thread (optional)
- Download the Round Zipper Pouch pattern.
Cutting
- from print A, cut: two (2) 8 1/2” x 3 1/2”
- from print B, cut: two (2) 8 1/2” x 3”
- from print C, cut: one Pouch Body outer line
- from fusible batting, cut: one Pouch Body inner line
Note: All seam allowances are 1/4″ unless otherwise noted.
Prepare the strips
1. Sew print A to print B, matching long edges, with the right sides. Press seams to the dark print side. Repeat for the other side of the pouch.

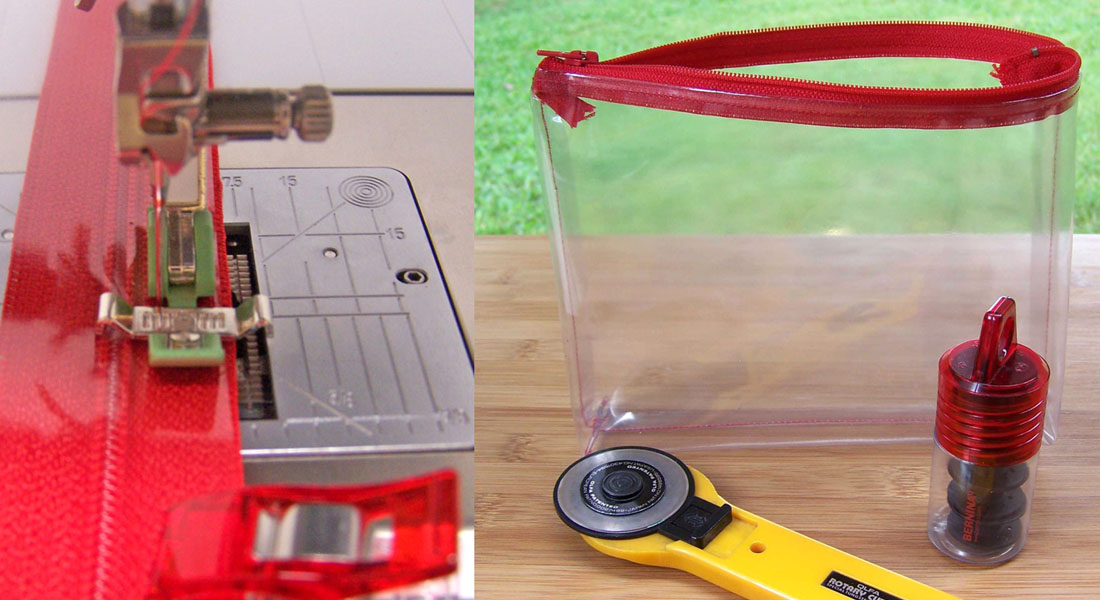
2. Place the lace on top of the dark fabric and sew as shown below.

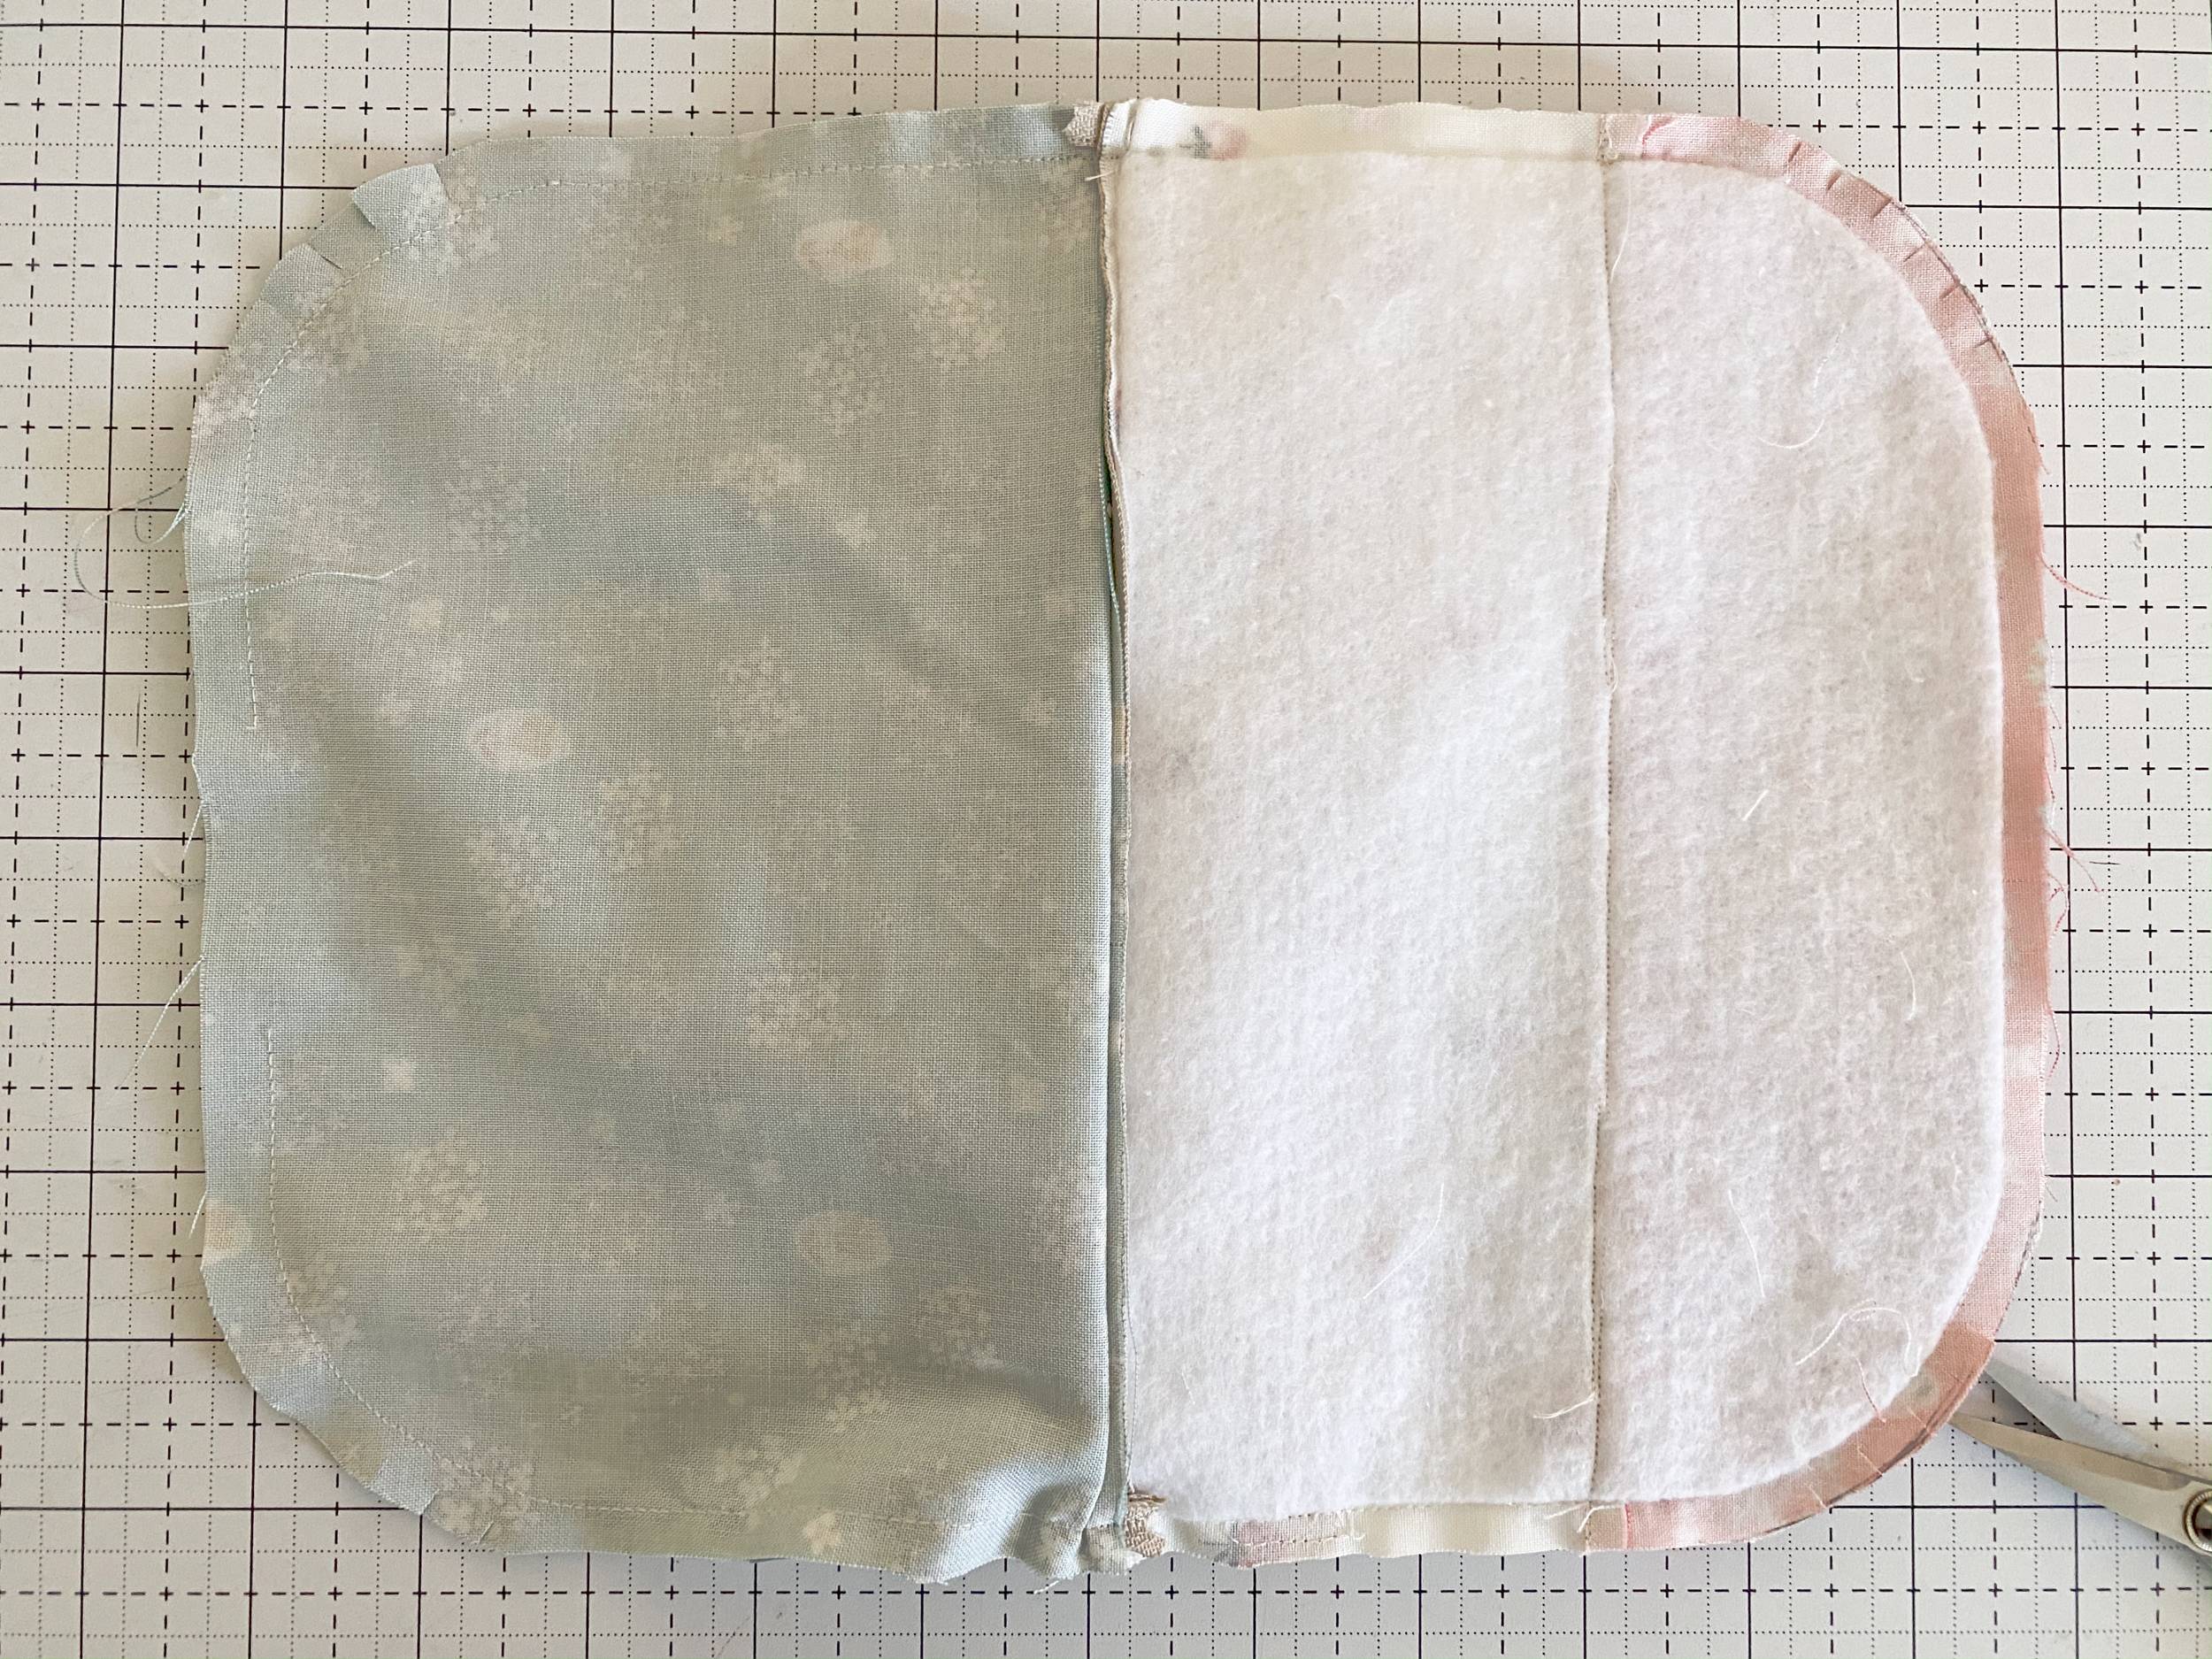
2. Fuse the batting on the wrong side of the pouch exterior. Trace the Pouch Body outer line and trim the excess.
Trace the Pouch Body outer line on the lining.

3. Place the zipper on top of the exterior, right sides together. You will be able to see the wrong side of the zipper. Fold zipper ends as shown. Pin in place and sew using a zipper foot.


4. With the wrong side up, lay pouch lining on the zipper, matching the top edges. Sew through the layer, using the previous stitching line as a guide.
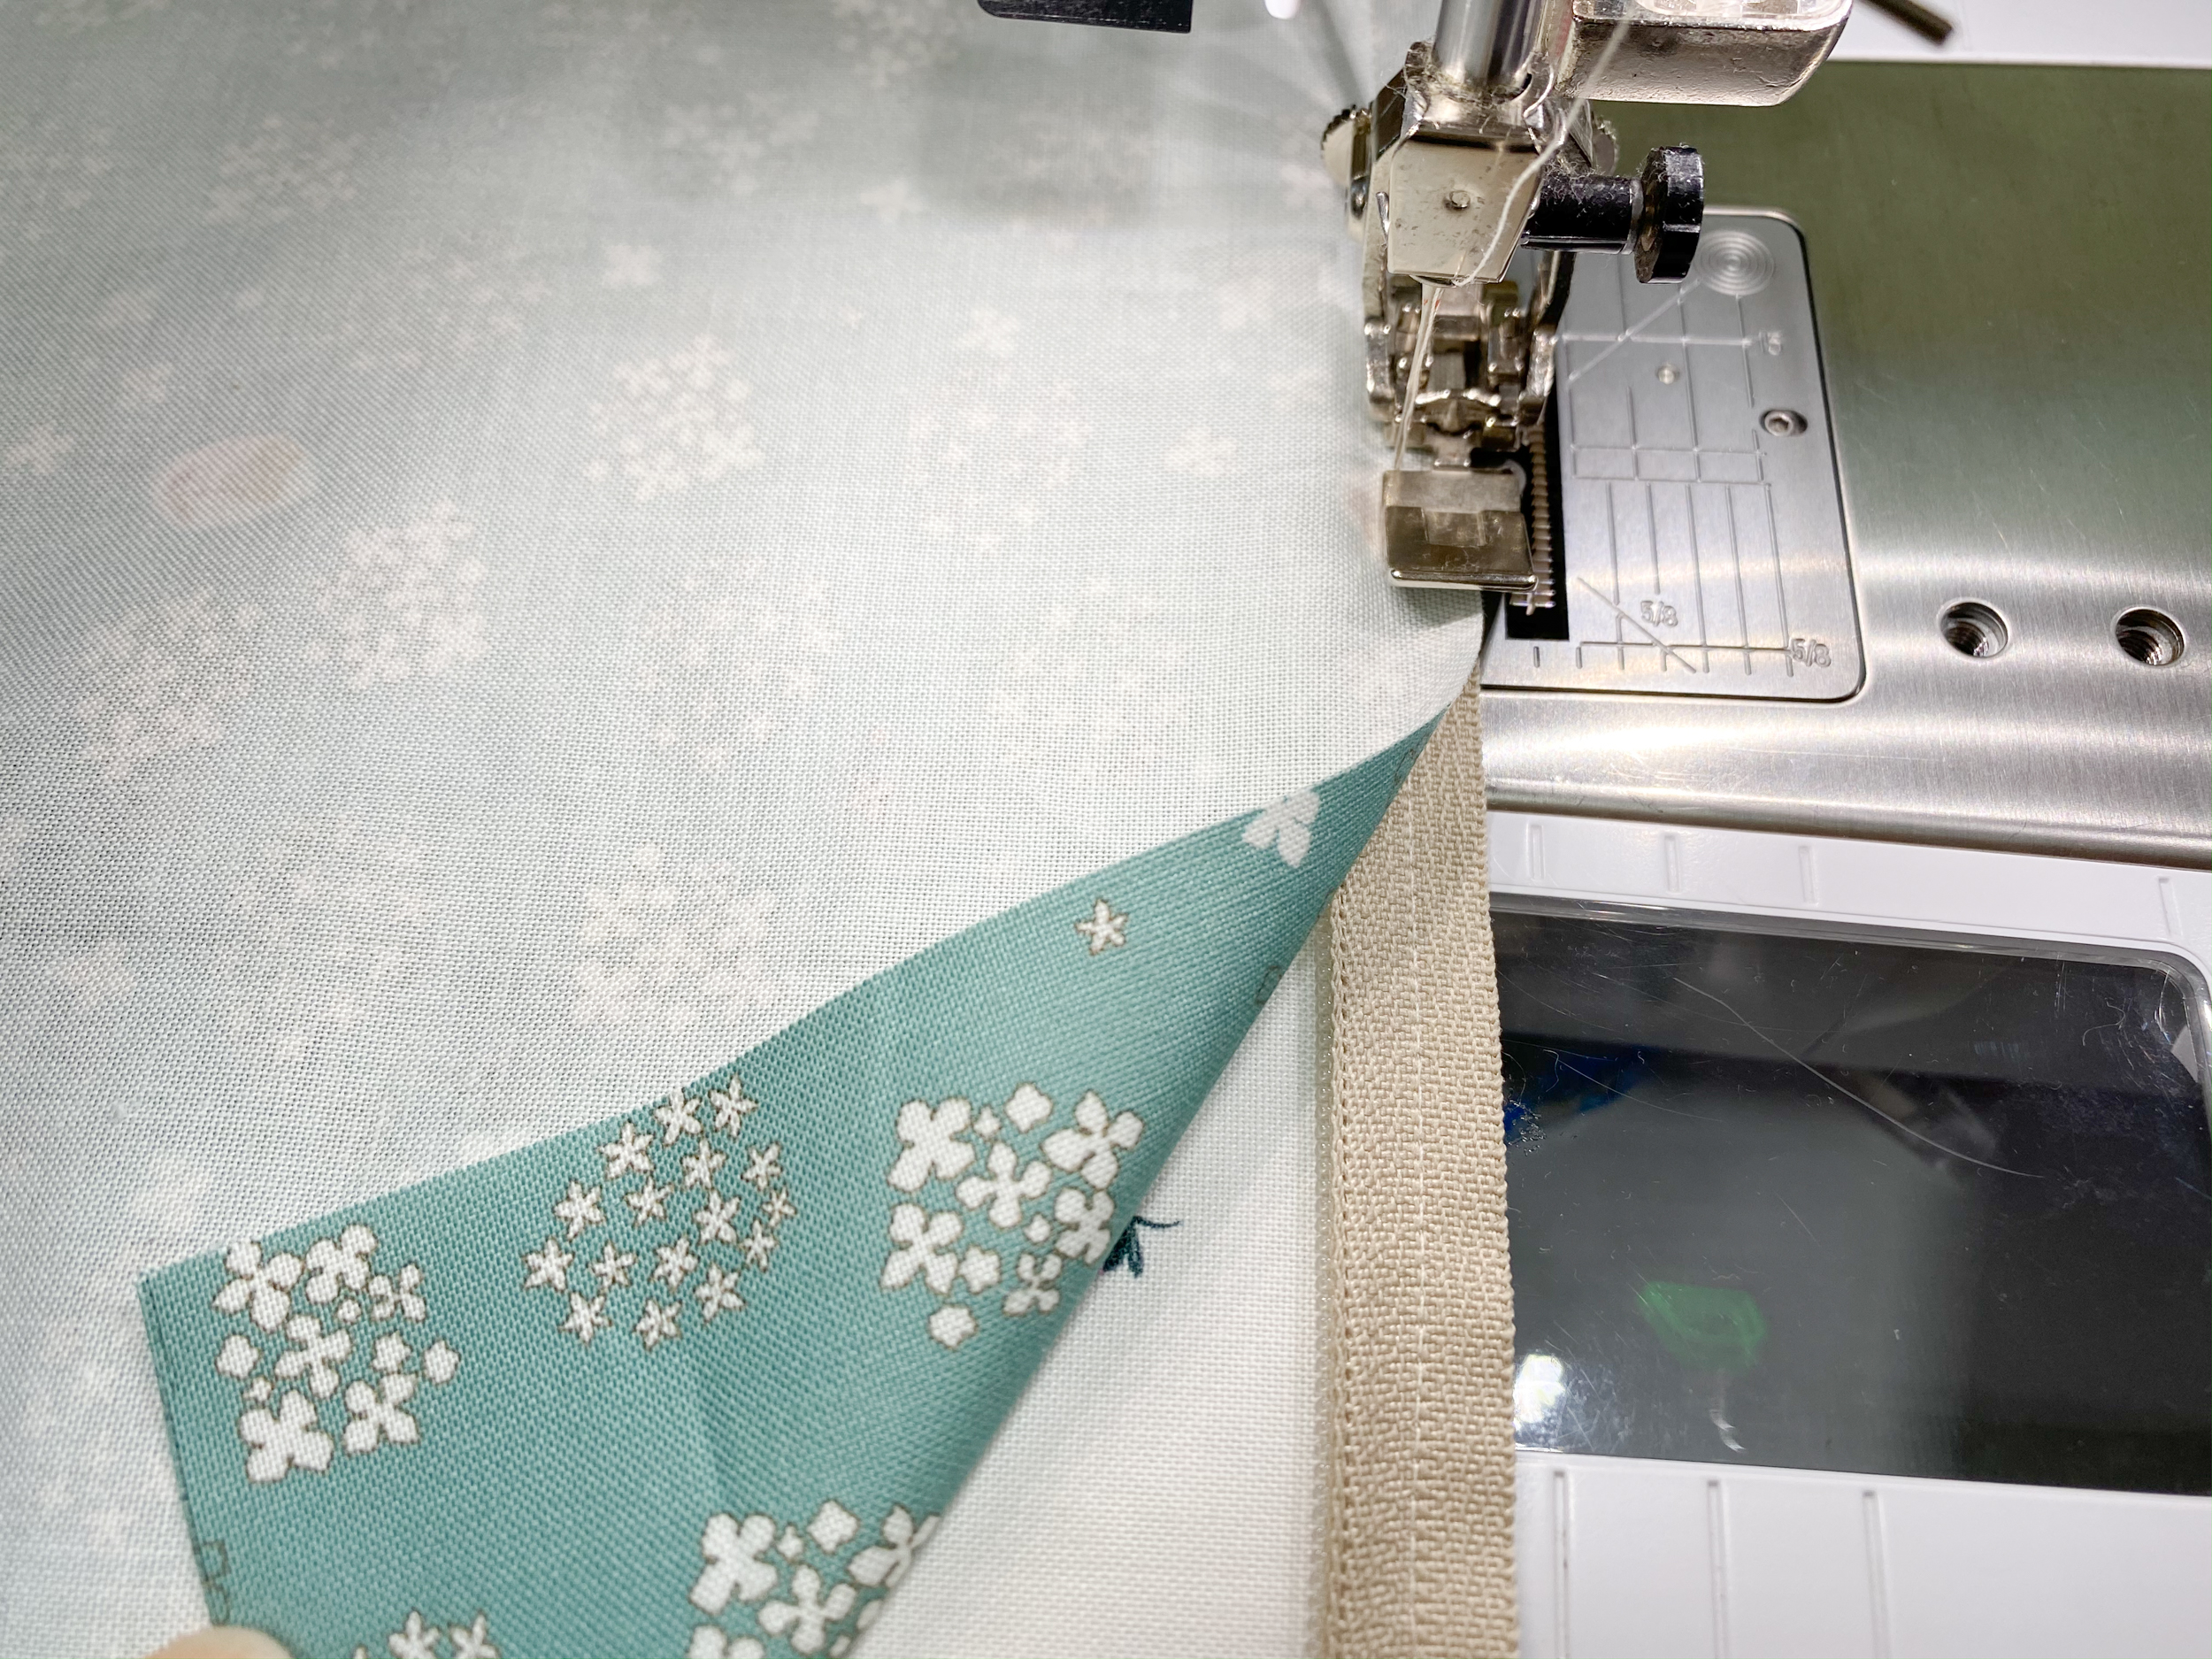
5. Repeat the step 3-4 to attach the other side of the zipper to the exterior and the lining. Topstitch 1/8” from the edge.

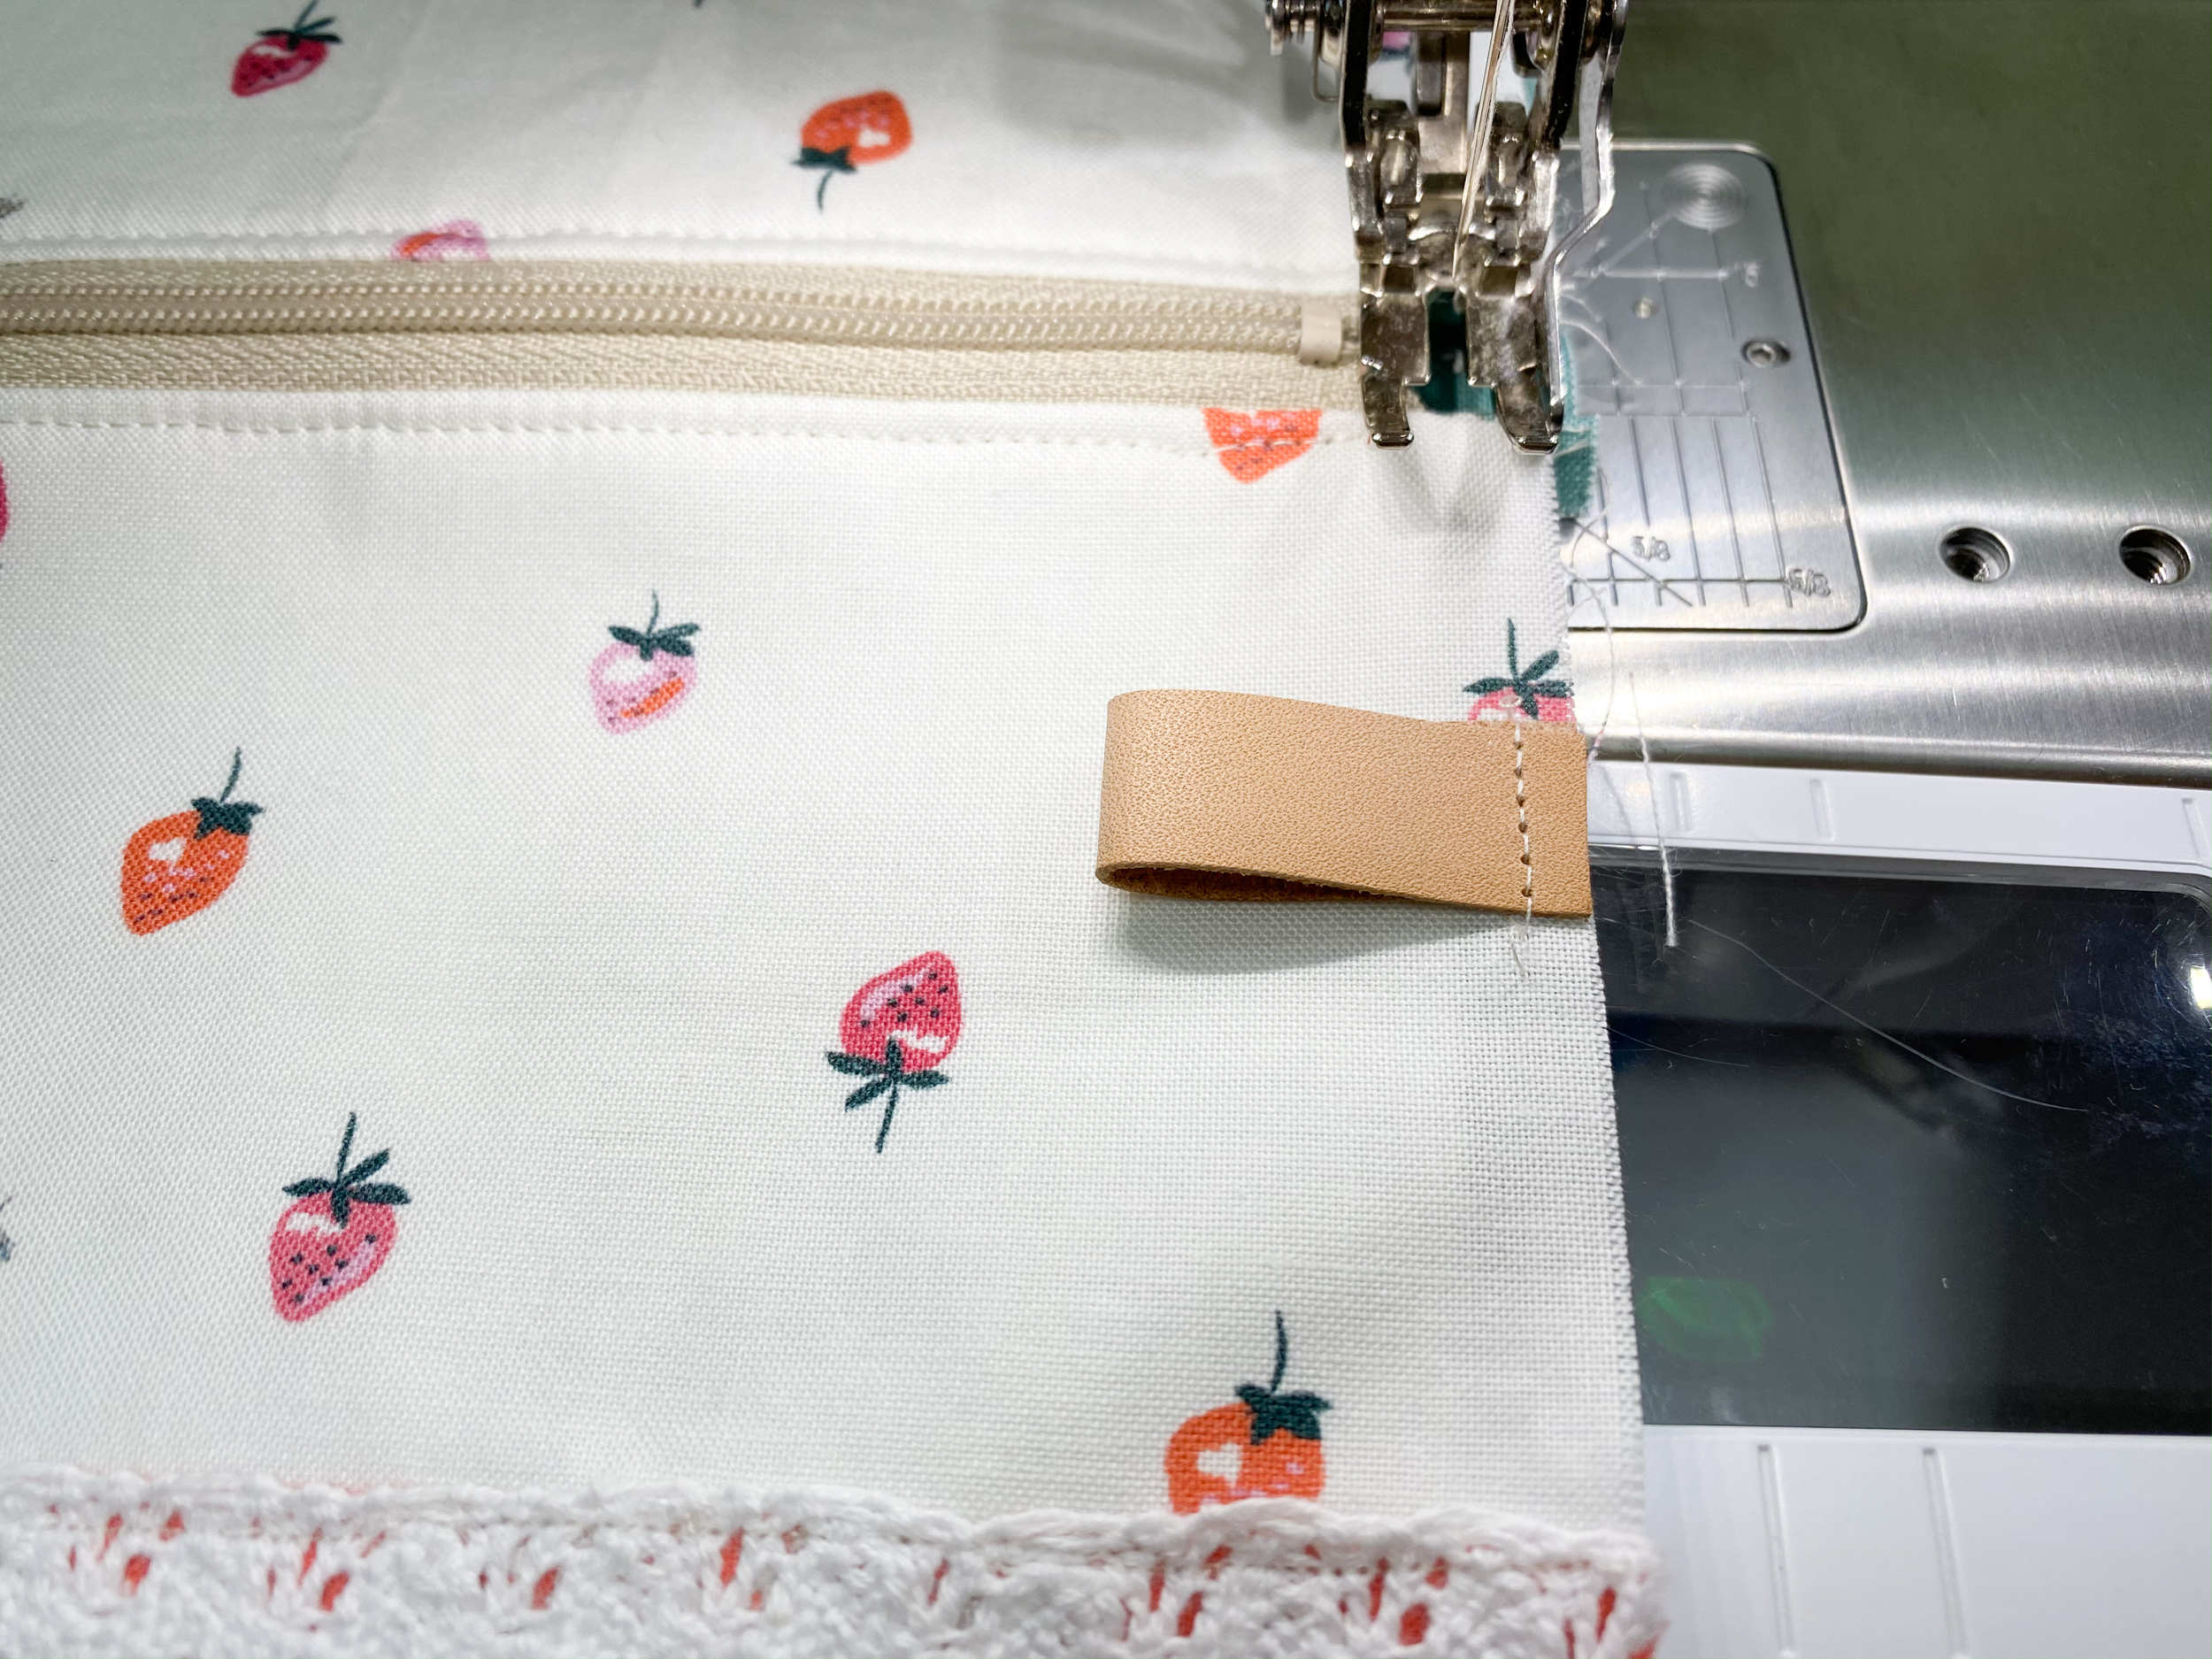
6. Lay flat the pouch as shown. Fold the leather tab in half and slide in one side of the pouch exterior, about 1” down from the zipper.
7. Sew the sides, matching raw edges, leaving an opening on the lining. Use 3/8” – 1/2” seam when sewing the lining sides for the tight fit. Clip the round corners using a pair of scissors. Make sure to leave the zipper half open.
7. Pinch the ends of an opening together to flatten the material. Match up seams and pin well. Sew together along this edge. Make sure to backstitch at the beginning and end of the seam for strength. Repeat on the 3 remaining sides.
Using a seam ripper, make an opening on one lining side.
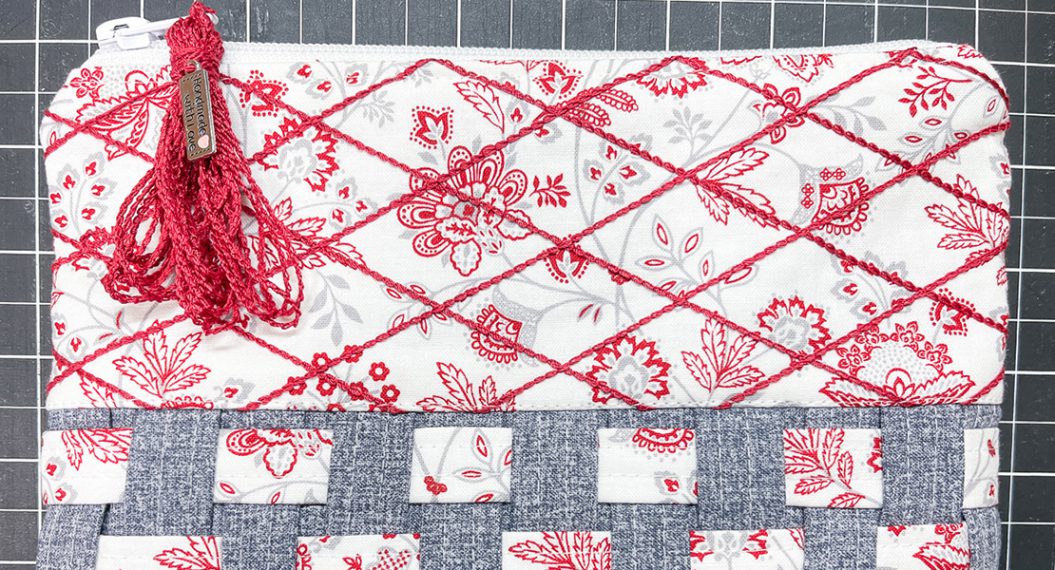
8. Turn right side out through the opening and hand stitch or machine sew the gap closed. Then tuck the inner pouch into the outer and press everything nice and neat. If you wish you can add stitching elements to the pouch. I used hand stitching using one strand of Aurifil 12wt thread.
My new book Zakka Wool Appliqué is out from Stash Books.
Zakka Wool Appliqué Book Giveaway
Our contest is now closed, thanks to all who participated. Congratulations to our winner, WeAllSew fan deenyb!
One lucky WeAllSew reader will win a digital copy (e-book) of Minki’s latest book Zakka Wool Appliqué.

All you have to do is post a comment below and answer the question:
“What is your favorite BERNINA presser foot for appliqué?”
The the giveaway is open through Friday, June 5th.
The giveaway is open to residents of the 50 United States and the District of Columbia. One comment per fan. Comment must be submitted to the WeAllSew.com blog by Friday, June 5, 2020 at 11:59 PM Central Time. Winner will be chosen randomly. Winner will be notified by email and will have 48 hours to contact to claim the prize.
Good luck!
Used Products

What you might also like


91 comments on “Round Zipper Pouch and Book Giveaway”
-
-
Thank you for sharing. Can’t wait to try making one
-
I like foot 34D for machine appliqué. This clear foot helps me see the edge of the appliqué better as I anticipate the rate of turning for curves etc. The strong center red line is a great guide for the edge of the appliqué especially when I am using decorative stitches with a swing such as a blanket, hem or zig zag stitch with monofilament thread. Bernina always has the right foot for the task at the needle!!
-
-
The edge stitch #10 is my favorite as I can get even stitching all around. Thank you for the pouch pattern Minki!
-
I love the 20C foot! The open toe allows me to see exactly where the needle is landing. If I am using a blanket stitch, I move my needle all the way to the right, guide the right inside edge of the foot along the applique and the stitches align perfectly! I love my Bernina!
-
I like the open toe appliqué foot
-
My favorite is #23 appliqué foot. It allows me a great view of my stitching and is terrific for those dense areas that can be a challenge. Thank you Bernina for helping me stay sane in these insane times!
-
Definitely the 20D and the blanket stitch with the needle all the way to the right.
-
I’ve never done applique and I don’t know how, I’m curious to learn.
-
I don’t have a Bernina, but I’ve borrowed a friend’s before and I loved it! I would use an open toe applique foot.
-
Open toe applique foot.
-
I enjoy using my edge foot. Love your pouches Minki!
-
I love foot #20 and Minki Kim!!!
-
I have a Patchwork activa 135 and like to use presser foot 1 for appliqué. I make greeting cards for all occasions, mostly birthdays, and do a lot of appliqués for the front of the card.
-
I switch to the open toe appliqué foot to see where I’m going. But I adjust the needle to ride right on the edge of the open part. It’s my sweet spot
-
I adore Monki Kim and I love foot 20
-
-
I use an open-toe foot so I can see where I’m going.
-
I have tried a variety of Bernina presser feet for applique BUT my favorite presser foot for appliqué is foot #39. It is clear and has a red mark in the center. Makes it easy to line up with the edge of the applique I am sewing around. As a visually impaired individual, this works best for me. I would HIGHLY recommend Bernina foot #39 for anyone with a vision problem.
-
I love foot #20 for appliqué. I love that I can see what I’m doing and can move the needle over to the edge so all I have to do is line my appliqué up to the edge of my foot!
-
My favorite foot for stitching applique is #23. Easy to see where I’m stitching and because the foot is shorter than most feet it is easy to turn corners.
-
I don’t know the number of the foot, but I like to use the open toed clear one so that I can see what the heck I’m doing. I’m fairly new at machine applique, so I need all the help I can get! Thanks for the great tutorial and giveaway!
-
The open toe appliqué foot is my go to presser foot for all types of crafting! Thanks so much for the pattern! Now to find some zippers in my stash!
-
I like the clear #34 foot. It’s really good for everything. Love this cute little bag.
-
Open toe
-
10D hands Down It makes it so accurate that I can use a riny stitch and clear monofilament and was down-graded by a judged at my last quilt comp. for not seeing down my appliqués!!! After the show I talked to the director and she agreed it was sewn and that batiks do not stay well stuck with fusibles, so the judge should have looked closer!
-
I do not have a Bernina yet, hoping to get one soon, but I would use an open toe for appliqué.
-
I am a hand-appliquer, but I think an open-toe foot is always a good choice for machine appliqué.
-
I love the #20 open toe embroidery foot for embroidery. I have both the regular and the 9mm #20C and love them both! This bag is darling!
-
I like to keep all the feet employed, so I rotate among #20, #23 and #39, depending on the size of the project. Just started wool applique last year, so would love to have your book.
-
The open toe embroidery foot
-
What a cute little bag, can’t wait to make one. I like #34 for applique, but I have only used that one, I’m going to try some of the other suggestions.
-
This little bag would make a very useful accessory for a school bag for my grandchildren and for my sewing room. My favorite appliqué foot is #20D. I also use #34D.
-
#39 is my go to foot for lots of projects!
-
Thank you for your project! I like to use #34 as I can see better when appliquéing.
-
#20C with the blanket stitch that Ricky Tims uses.
-
I tried appliqué for the first time recently. Used foot 20C. It worked great! And I feel so confident about learning a new skill!
-
I have’t done applique with my new machine yet but i love the edge foot. I am definitely going to make this pouch.
-
The open toe, #20. Love my Bernina and everything it can do! So much more possible.
-
Use 20 c and some of the decorative stitches in addition to the blanket stitch
-
Open toe 20C…nicely holds the applique in place and lets me see where I am going!!!
-
Just got my Bernina and haven’t done any applique, yet. Looking forward to learning how to do it with my machine.
-
I use the open toe applique foot for most project.
-
I haven’t appliqued before but I am ready to learn! I have a 23 and 39!
-
I like the #39 appliqué foot! Thank you for the cute project.
-
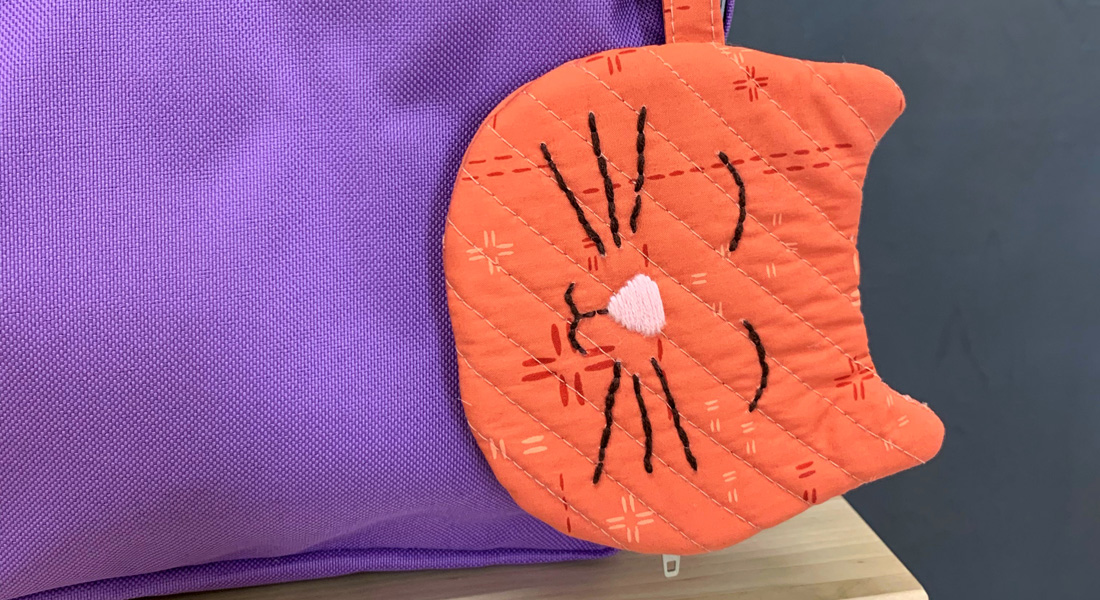
The open toe foot. Thank you for all your great tutorials. I made the cat zipper pouch and gave it to my granddaughter for her back pack. She loved it!
-
Hands down #20 and #23. Each has it’s special use depending on the stitch used. I love doing appliqué with the blanket stitch. <3
-
I have a Bernina 780 plus the accompanying Embroidery unit. I absolutely love my Bernina! I also love to do blanket stitch applique! My favorite foot is #20D. It allows me to see exactly what I’m doing, yet has the correct amount of pressure on my work to allow me to do a good job. Thank you Bernina for making such a wonderful machine! Wish I had more time in my life to do all the wonderful ideas that are bouncing around in my head!
-
I usually just use my 1/4 inch foot when I appliqué. Thank you for the pattern for the adorable zipper pouch.
-
Favorite foot open toe #20C. Great little pouch pattern. Thanks.
-
I Love Appliqué and doing decorative stitches, I use #39 D.
Hands down a favorite! -
I love the 20D foot for applique.
-
Without a doubt, Foot 20D is my go to for applique. Snuggle it to the outside edge of the applique, set the blanket stitch for the length and width I want, and away I go!
-
I love my #39C clear sole embroidery foot. With the red lines and the clear sole, it is super easy to guide the fabric and keep things aligned right where you want them. Thanks for the cute little bag pattern. I love it.
-
I love the BSR open toe and I just “draw” my appliqué on! I learned that from Minki Kim when I made her snack mat! I love Minki Kim!!!
-
20C OR 34C. I lke how easy it is to see with 34C….I’m sure I’l find others I like for applique as well 🙂
-
I like the open toe appliqué foot. Just a beginner, but enjoying everything I’m learning! Thank you!
-
I find that I use my open-toed foot applique that way I can see what I am doing at all times.
-
I like the open toe foot so I can see where my stitches are going.
-
I love doing appliqué & like using my open toe embroidery foot, unfortunately my 1630 machine which it fits possibly cannot be fixed after getting a reconditioned memory board , I have another Bernina which I also like but do not have the feet I have for the other one. My original Bernina I purchased in 1963 & it still sews beautifully & made many garments including one wedding gown & several bridesmaids gowns, why did I ever change it. The best thing about the 1630 is the knee lift, there is one on the machine I now use but works a little different. the old 1963 machine I gave to my daughter.
-
I love the 20C!
Thank you for the bag pattern. -
I love my 20D and 34D for machine applique.
-
I’ve been using the open toe embroidery foot. works for me!
-
I like the #23 applique foot, it gives a clear view while holding everything securely . love my Bernina!
-
I like the 34D foot for appliqué as it holds the fabric in place and I can see where I’m sewing.
-
I use the #20C foot to appliqué. It allows room to move the needle left for edge stitching and gives greater visibility of the stitch.
-
I love 20D if I am satin stitching around the applique, if I am doing another stitch that centers on the edge of the applique I will use foot 34D. I have foot 23 but I haven’t tried it yet. I think I would have to give it a try.
Thank you for an excellent tutorial. -
My favorite BERNINA presser foot for appliqué is the #20C. It has a purposely designed tunnel under the foot to allow for the appliquéd satin stitch to ride through. I also like the clear foot, # 39C, also with a tunnel.
-
I love my #20 foot. Gives good visibility and because to needle positioning I can easily follow the edge of the appliqué as I sew. Love this Bernina.
-
I love my 20/20D feet. I put a fine line on the arrow behind the needle to increase the already great accuracy. (I guess I’m getting old and can’t see as well as I used to. 🙂
-
My favorite foot is 10D. Great for straight sewing and for stitch in the ditch applications. Love this bag!
-
I like the #20 foot. I can always see the stitching clearly.
-
The #20D is my favorite for appliqué stitching. I love all of my Bernina feet.
-
Like so many others 20 C/D are my go-to favorites for appliqué but I often use 39C when I need to control my appliqué a bit. I Adore my BERNINA !!
-
I’ve only hand appliqués but am looking forward to exploring bathe possibilities on my machine.
-
The foot on my machine at the time!!
-
I like the 1/4” foot for appliqué! Love this pattern. Thank you!
-
I like #20-open toe foot but I am going to try the BSR foot!
-
Love the bag pattern. I like the open toe #20 foot. Thanks!
-
I like the Bernina feet 34C or 34D. The clear feet allow me to see where I am going and the line in the center keeps me lined up.
-
I like the Bernina foot #20C because the open area allows me to see clearly where the needle is on my fabric.
-
I like the Bernina foot #20C because the open area allows me to see clearly what the stitch looks like
-
Love this daring little bag…thank you…. my favorite foot would be #20C….it’s my go to foot for most sewing
-
I like the open toe foot so I xan see better. I’m still new with applique and still feel a bit intimidated but there’s so many fun projects to do!
-
I would most often use the open toe #20.
-
I use the open-toe embroidery foot (20D)!
-
I love the open toe foot , as a beginner I am using a borrowed Bernina but definitely thinking seriously of buying my own
-
I have not done wool applique with my machine before but am looking forward to learning how to do that.
-
I use the 34 D for applique when I’m not hand stitching it
-
The pouch is so cute and simple! It would make a nice “I care” gift for friends and family with a matching mask or two inside. My foot: 20C because it’s my widest foot, so I can see what I’m going.
-
I love my quarter inch foot because I am a daily quilt maker. This pouch is super cute! Thank you!
Leave a Reply
You must be logged in to post a comment.

I love the 1/4″ patchwork foot as it makes my stitching as exact as I can get it! Darling pouch pattern…thank you!
duchick at gmail dot com