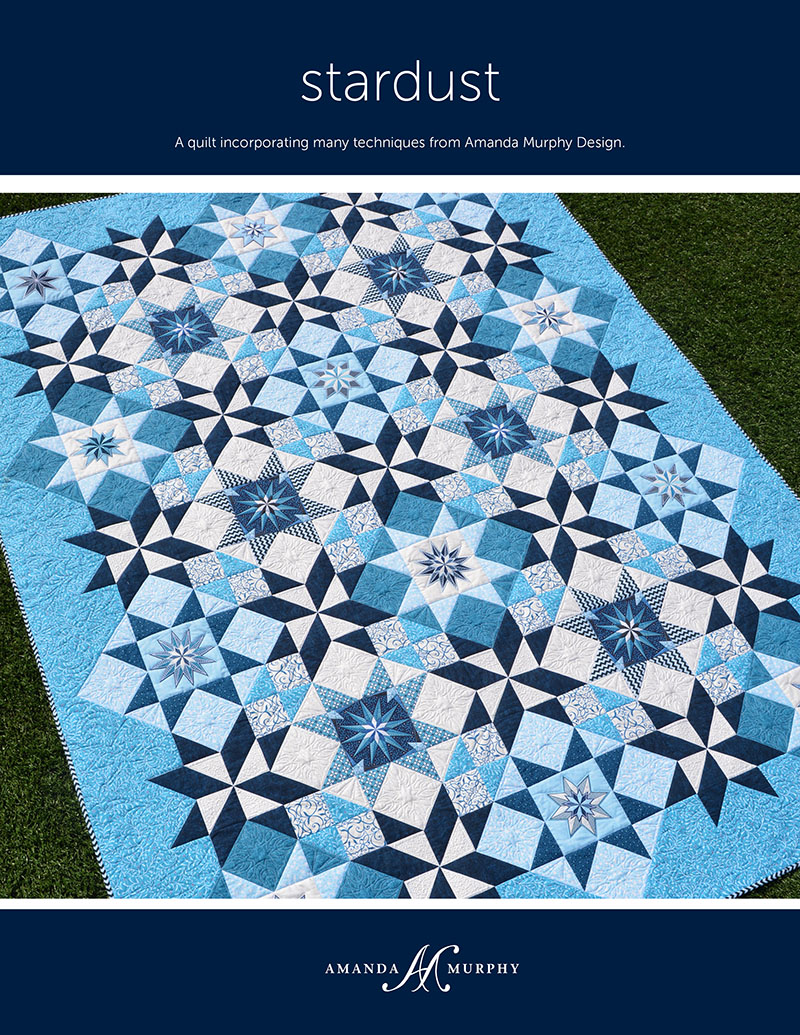
Stardust Quilt-along: Part One
Welcome to the Stardust Quilt-Along here on WeAllSew. In this quilt along, we’ll use my new Stardust pattern in conjunction with the BERNINA-exclusive embroidery collection to make a beautiful twin-sized quilt. Along the way I’ll be sharing tips and techniques both for piecing and for incorporating optional embroidery and quilting motifs in any quilt.
What you will need to participate in the Stardust Quilt-along
- The Stardust pattern (Available to order through your local BERNINA dealer)
- The Celestial Lights Embroidery Collection (Optional; exclusive to BERNINA dealers)
- Fabric and thread to complete the quilt
The Stardust Quilt
PLANNING YOUR FABRICS
If you haven’t yet selected your fabrics yet, here is a coloring page to help you make decisions. Note where I used prints and blenders in this design. If you use too many busy prints they will compete with each other you won’t see the dynamic pattern that the piecing produces. Note in the pattern where I sought to incorporate busy prints and where I elected to use near-solids or blenders. Use the coloring page to help you narrow down your choices.
You can find a list of the first shops to stock the Celestial Lights fabric here.
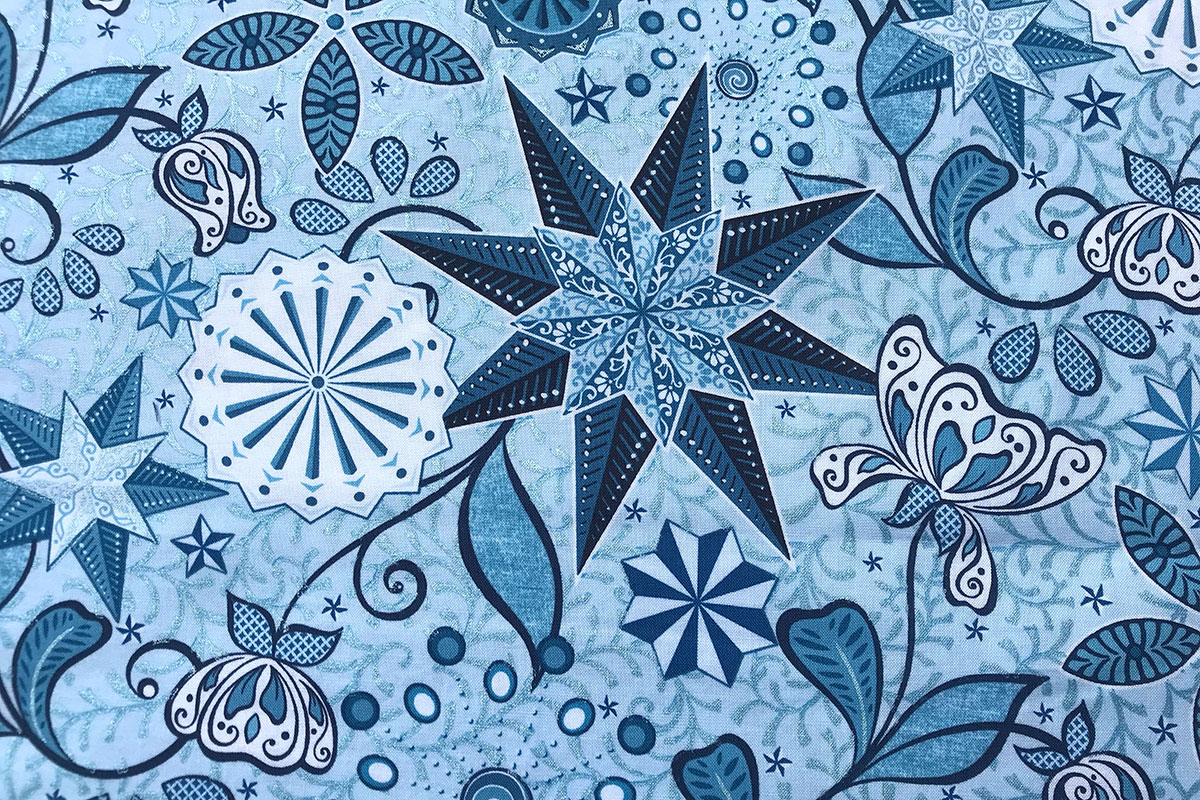
Here are some color ideas to get you started.
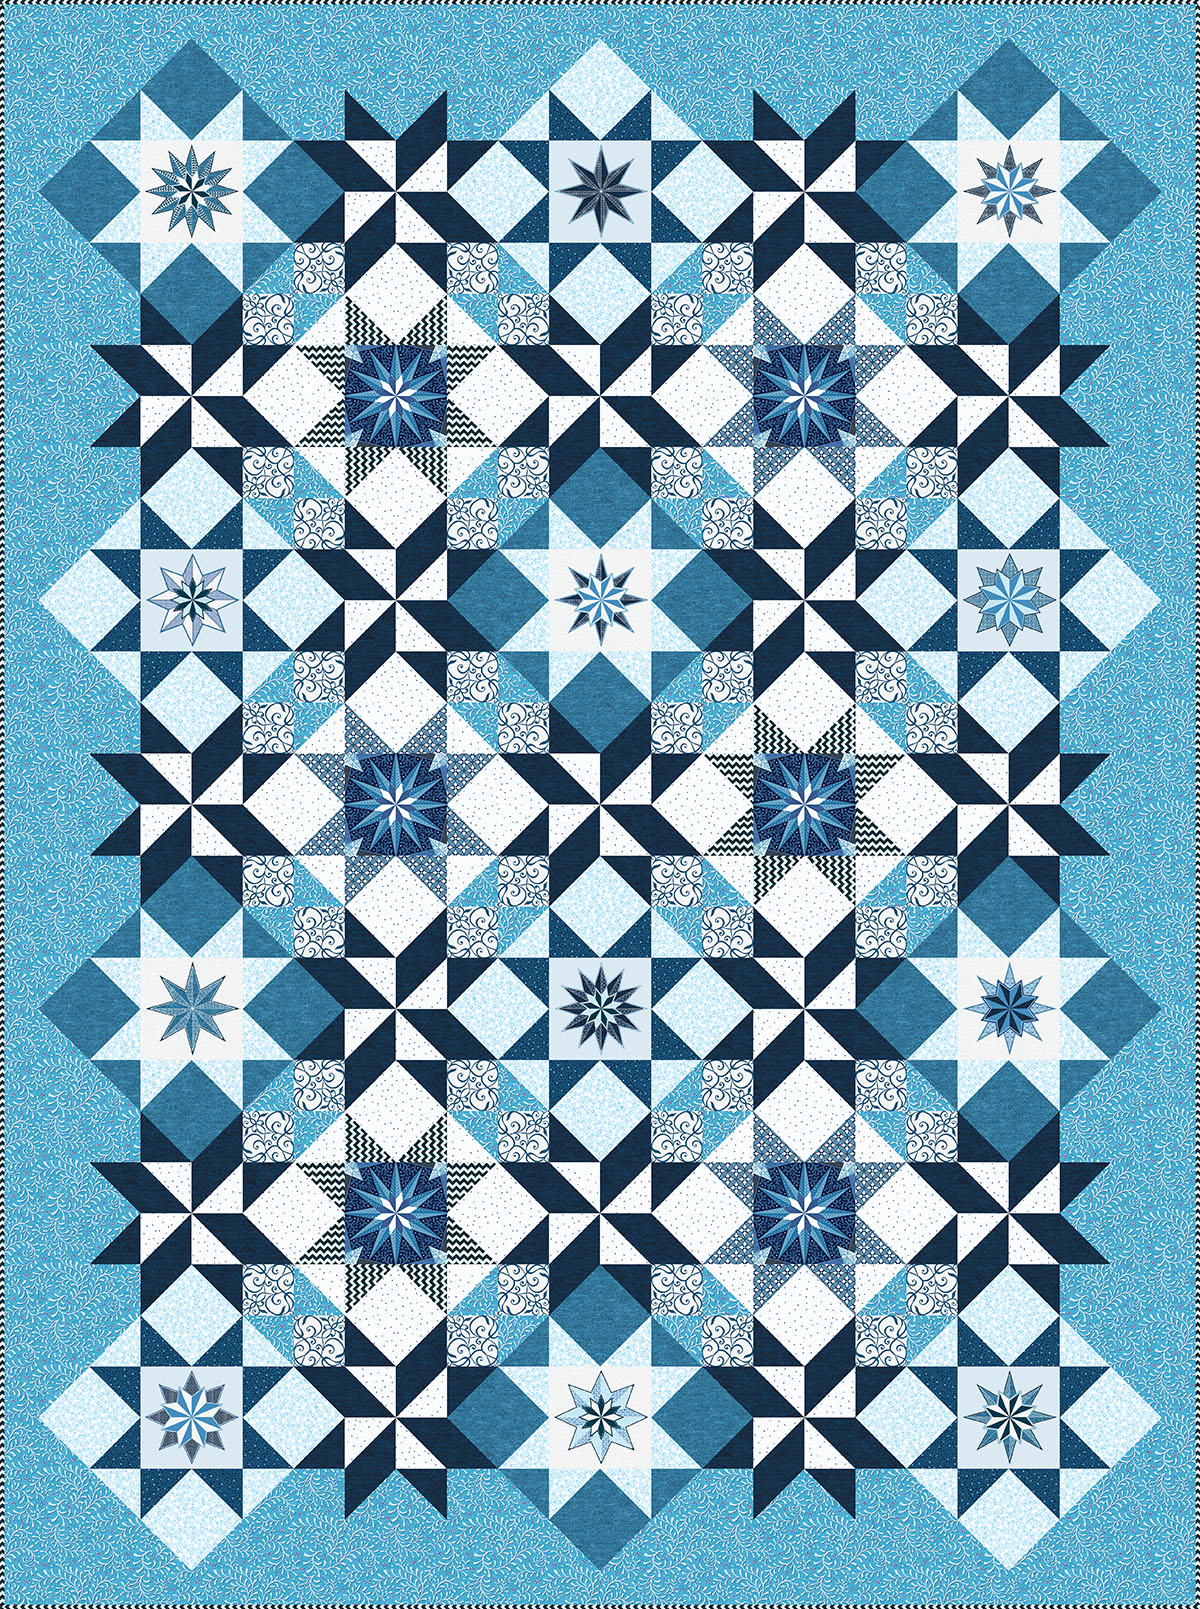
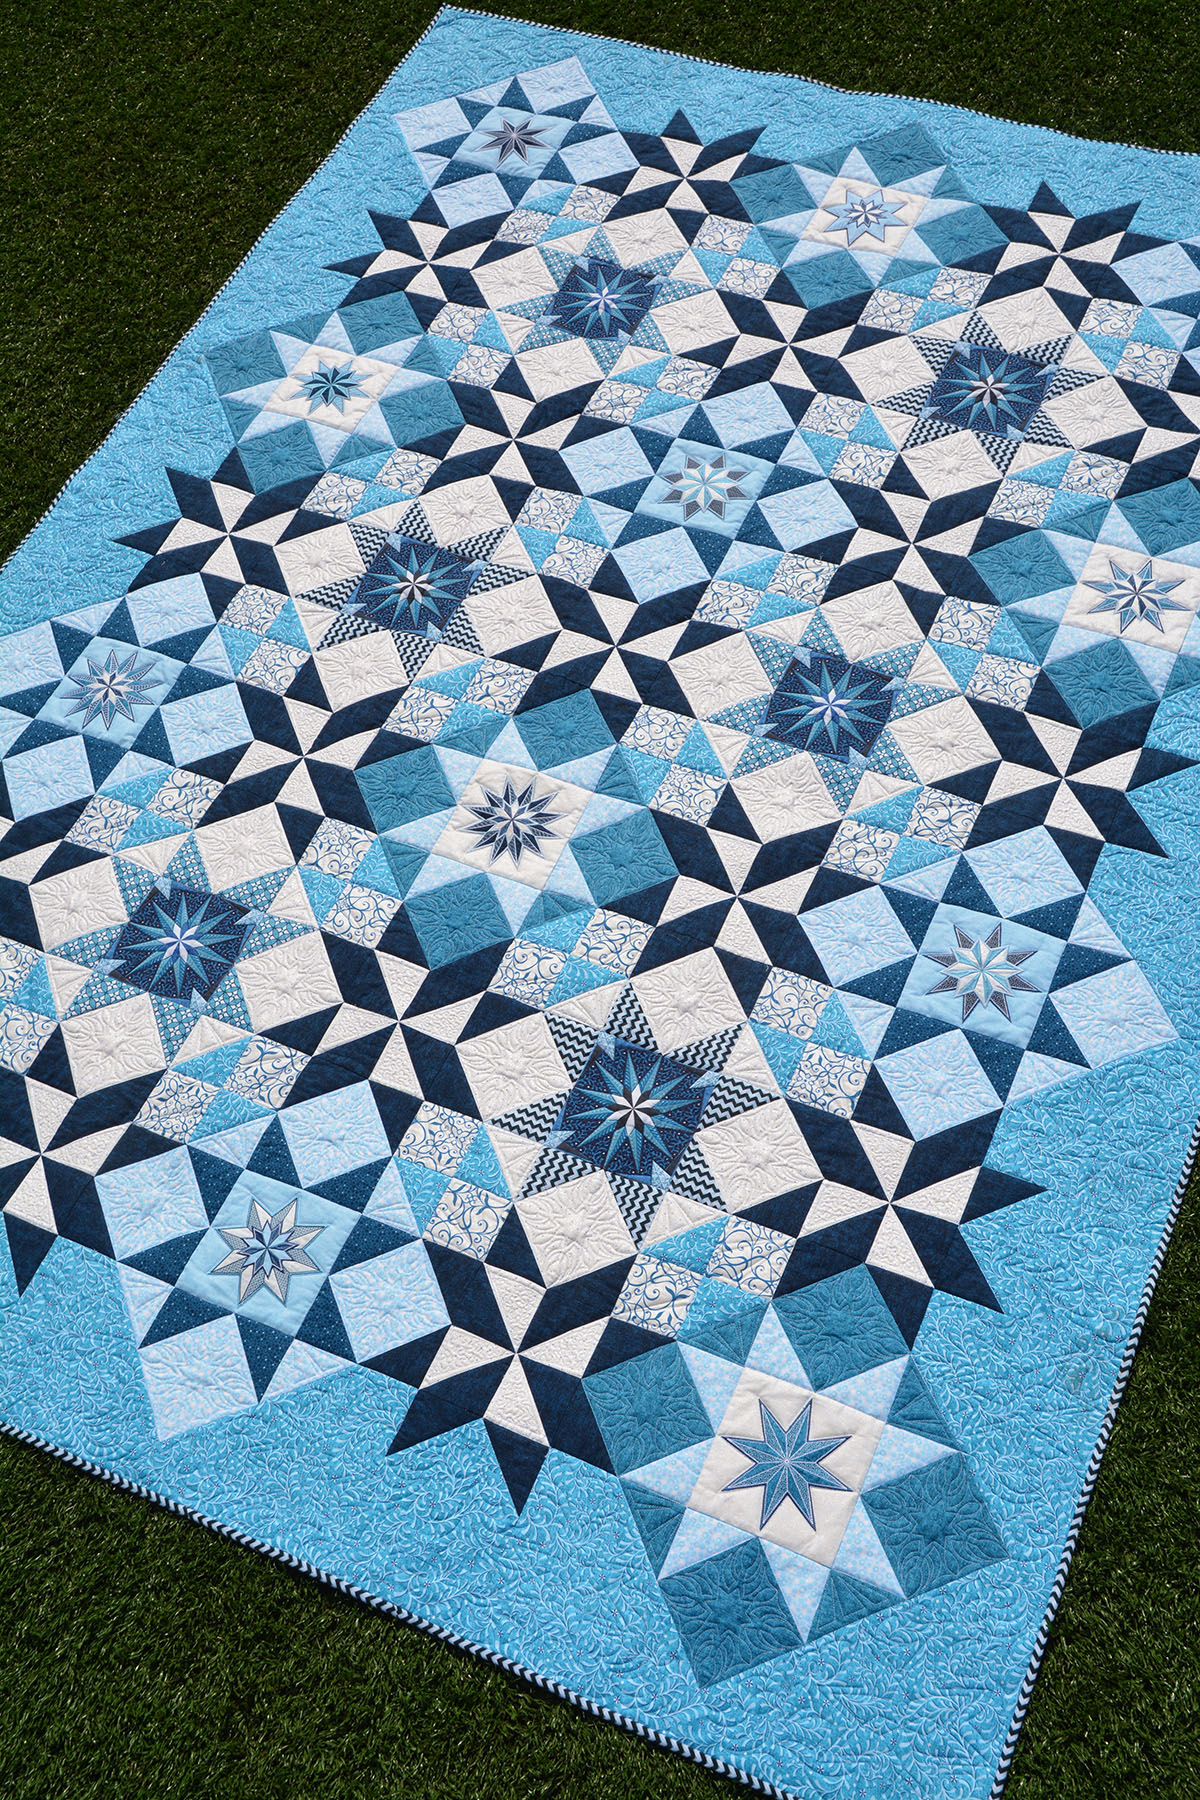
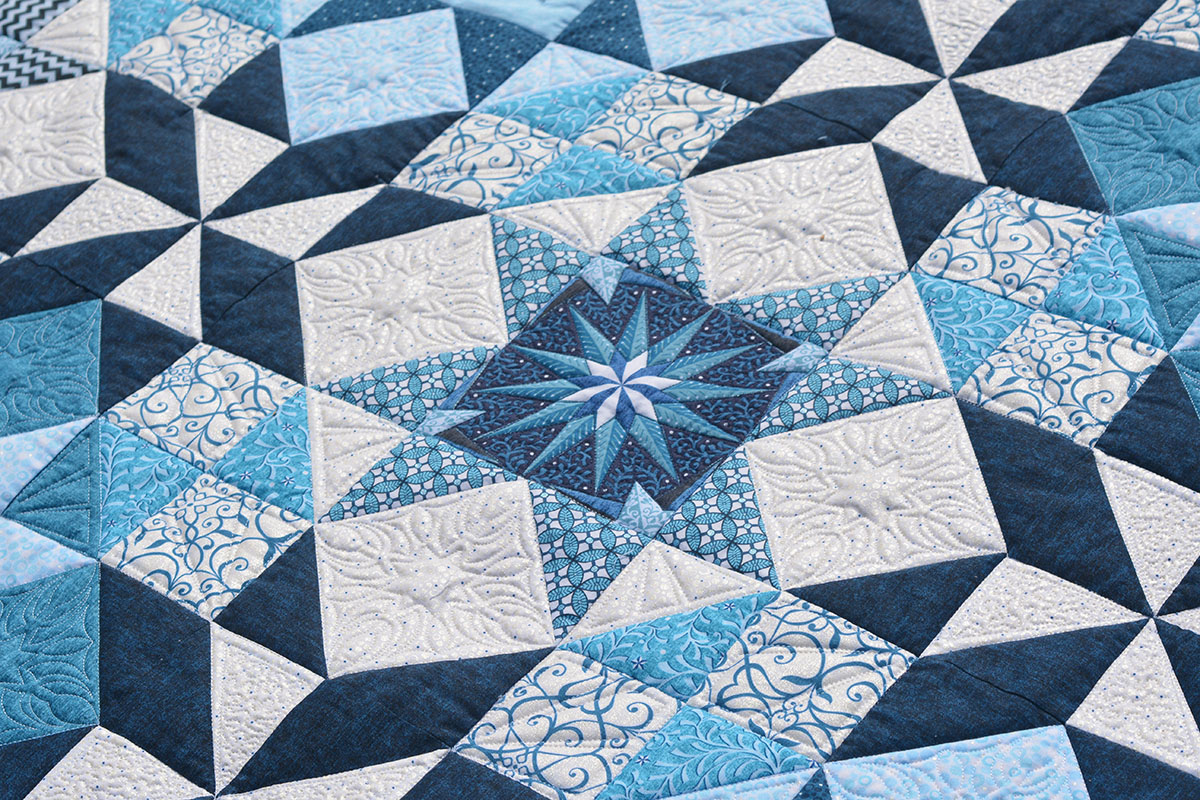
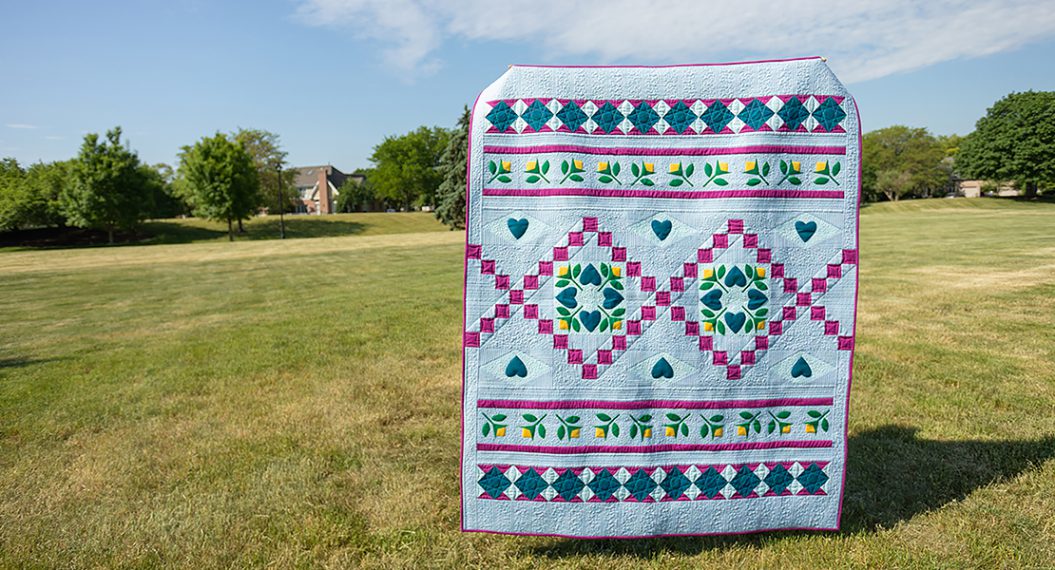
The original Stardust quilt in blue.
You can find the SKUs for this version here.
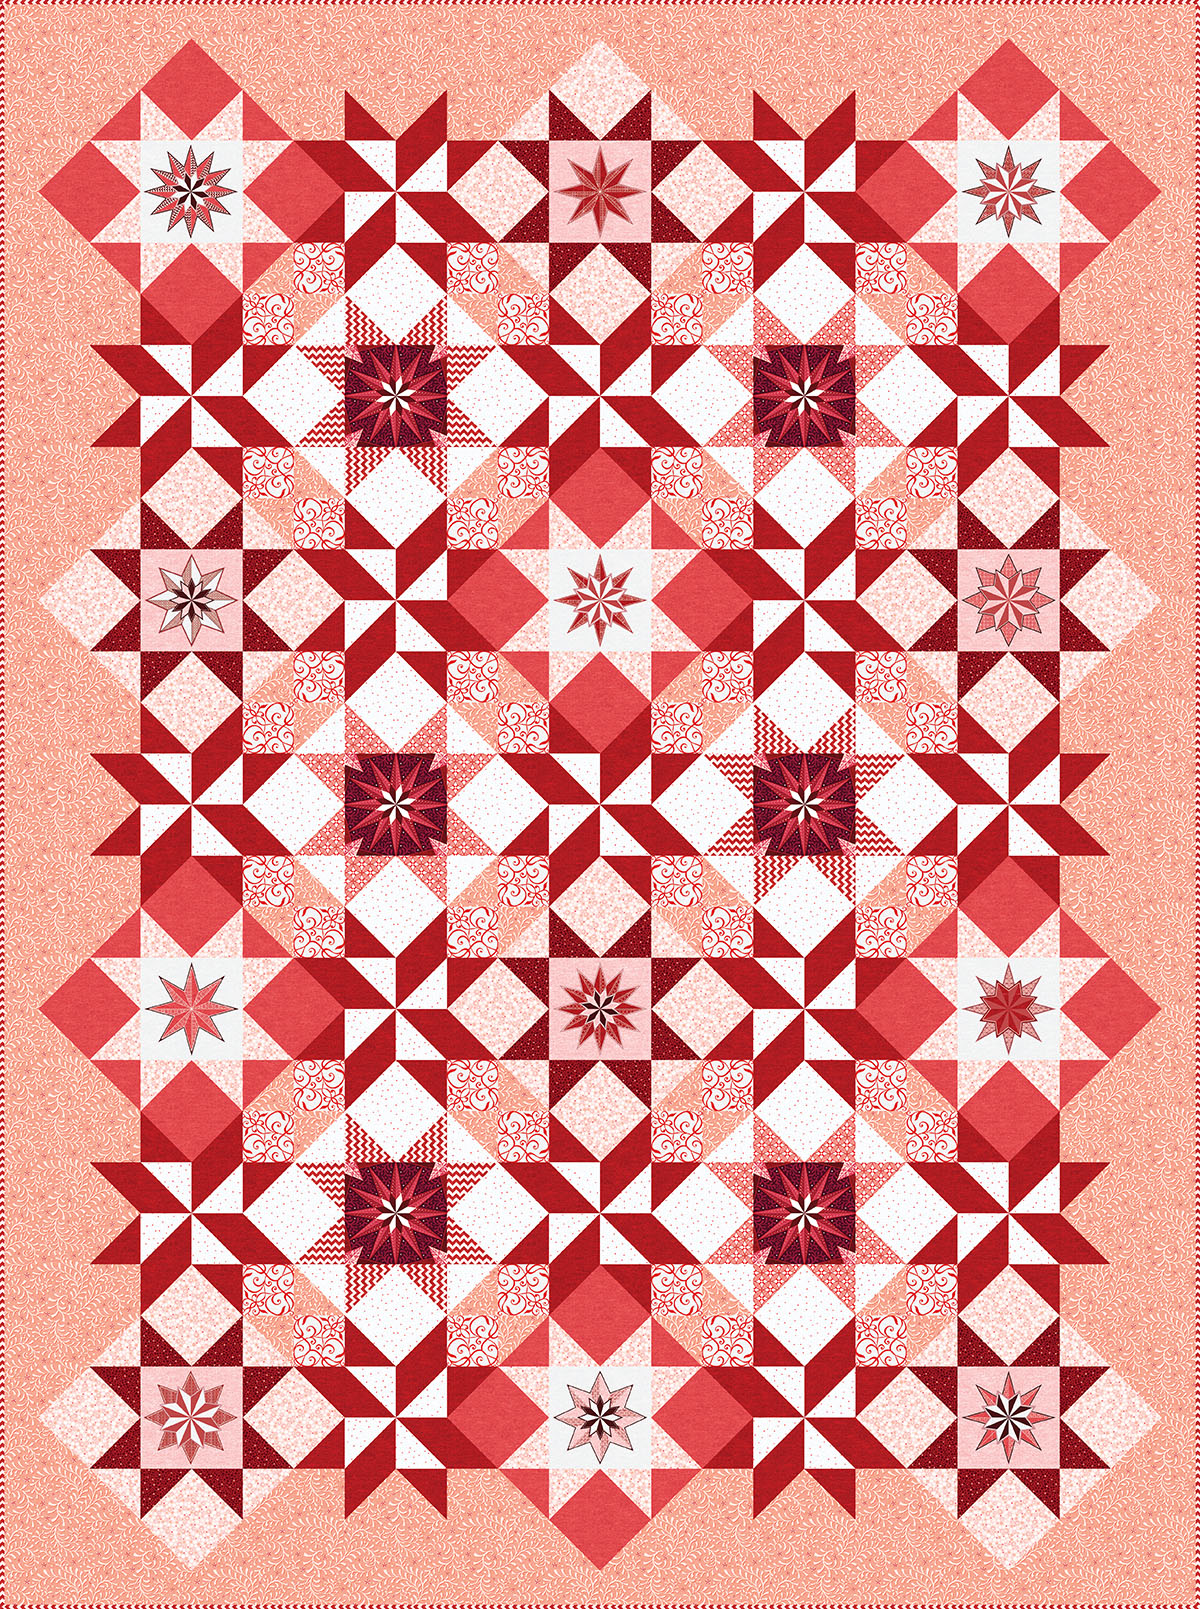
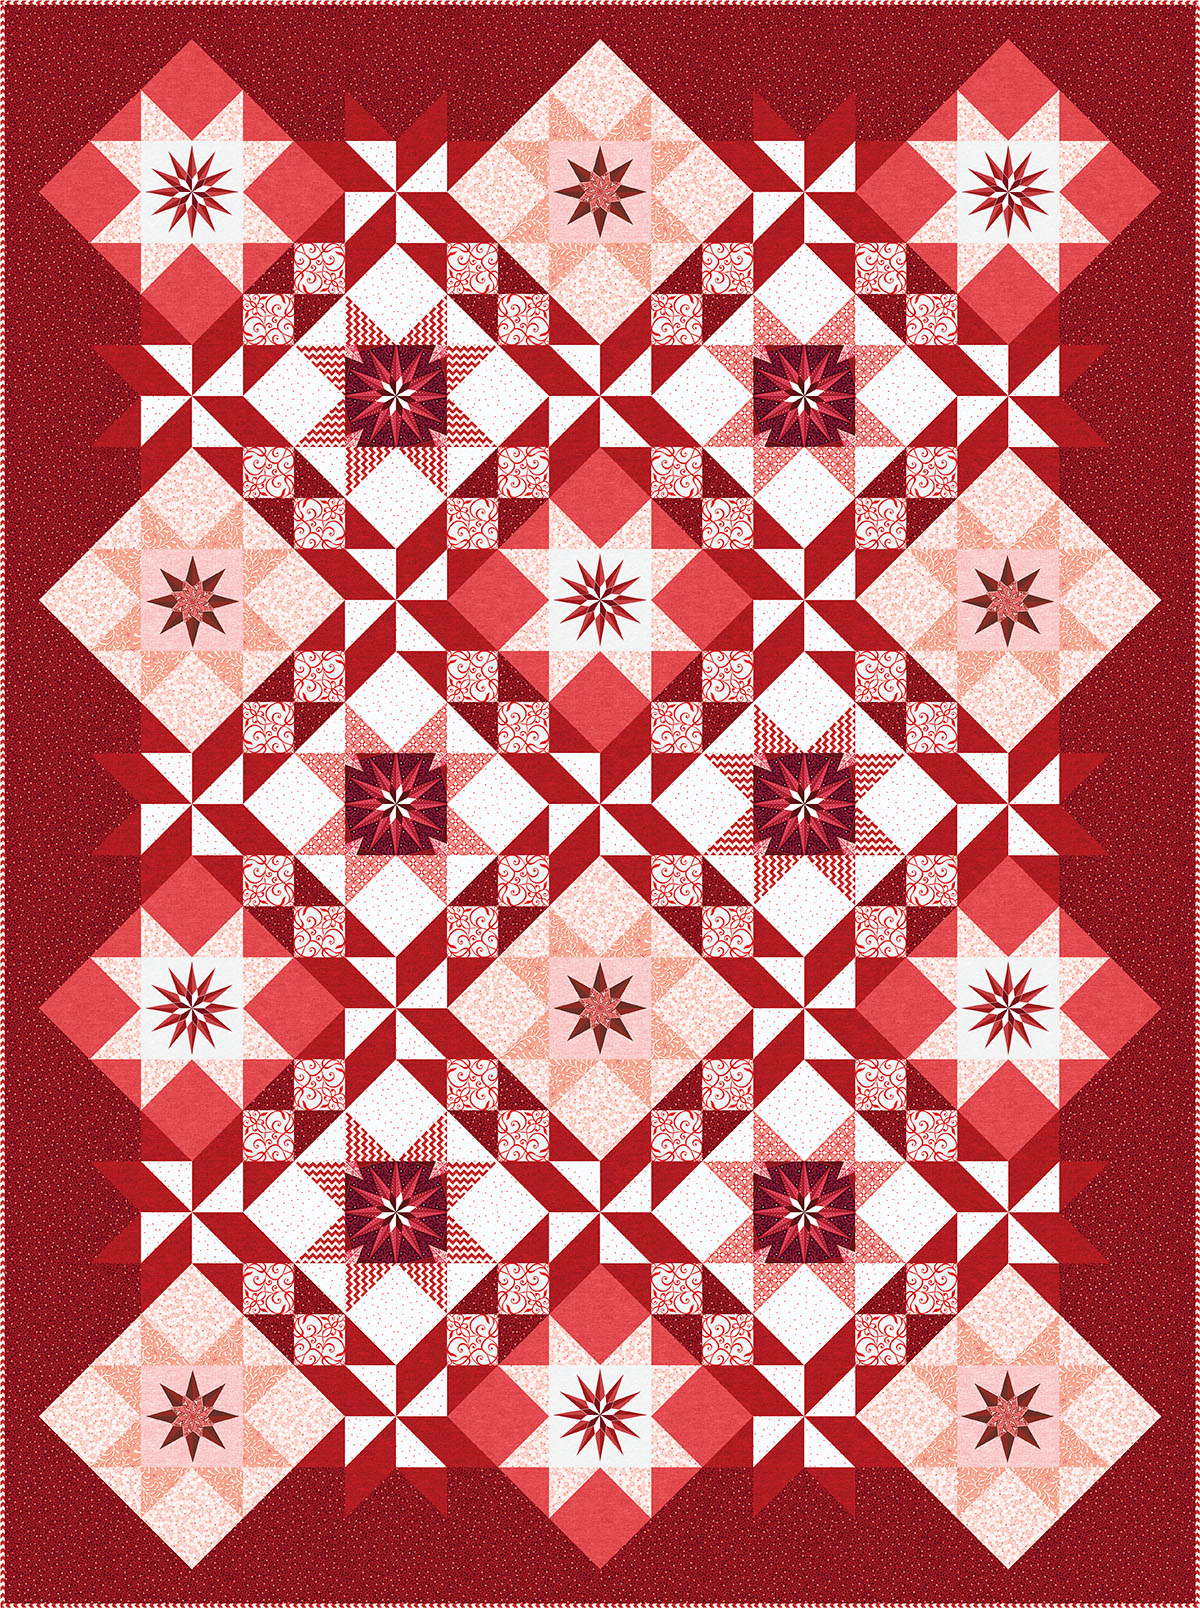
The original Stardust quilt in red.
You can find the SKUs for this version here.
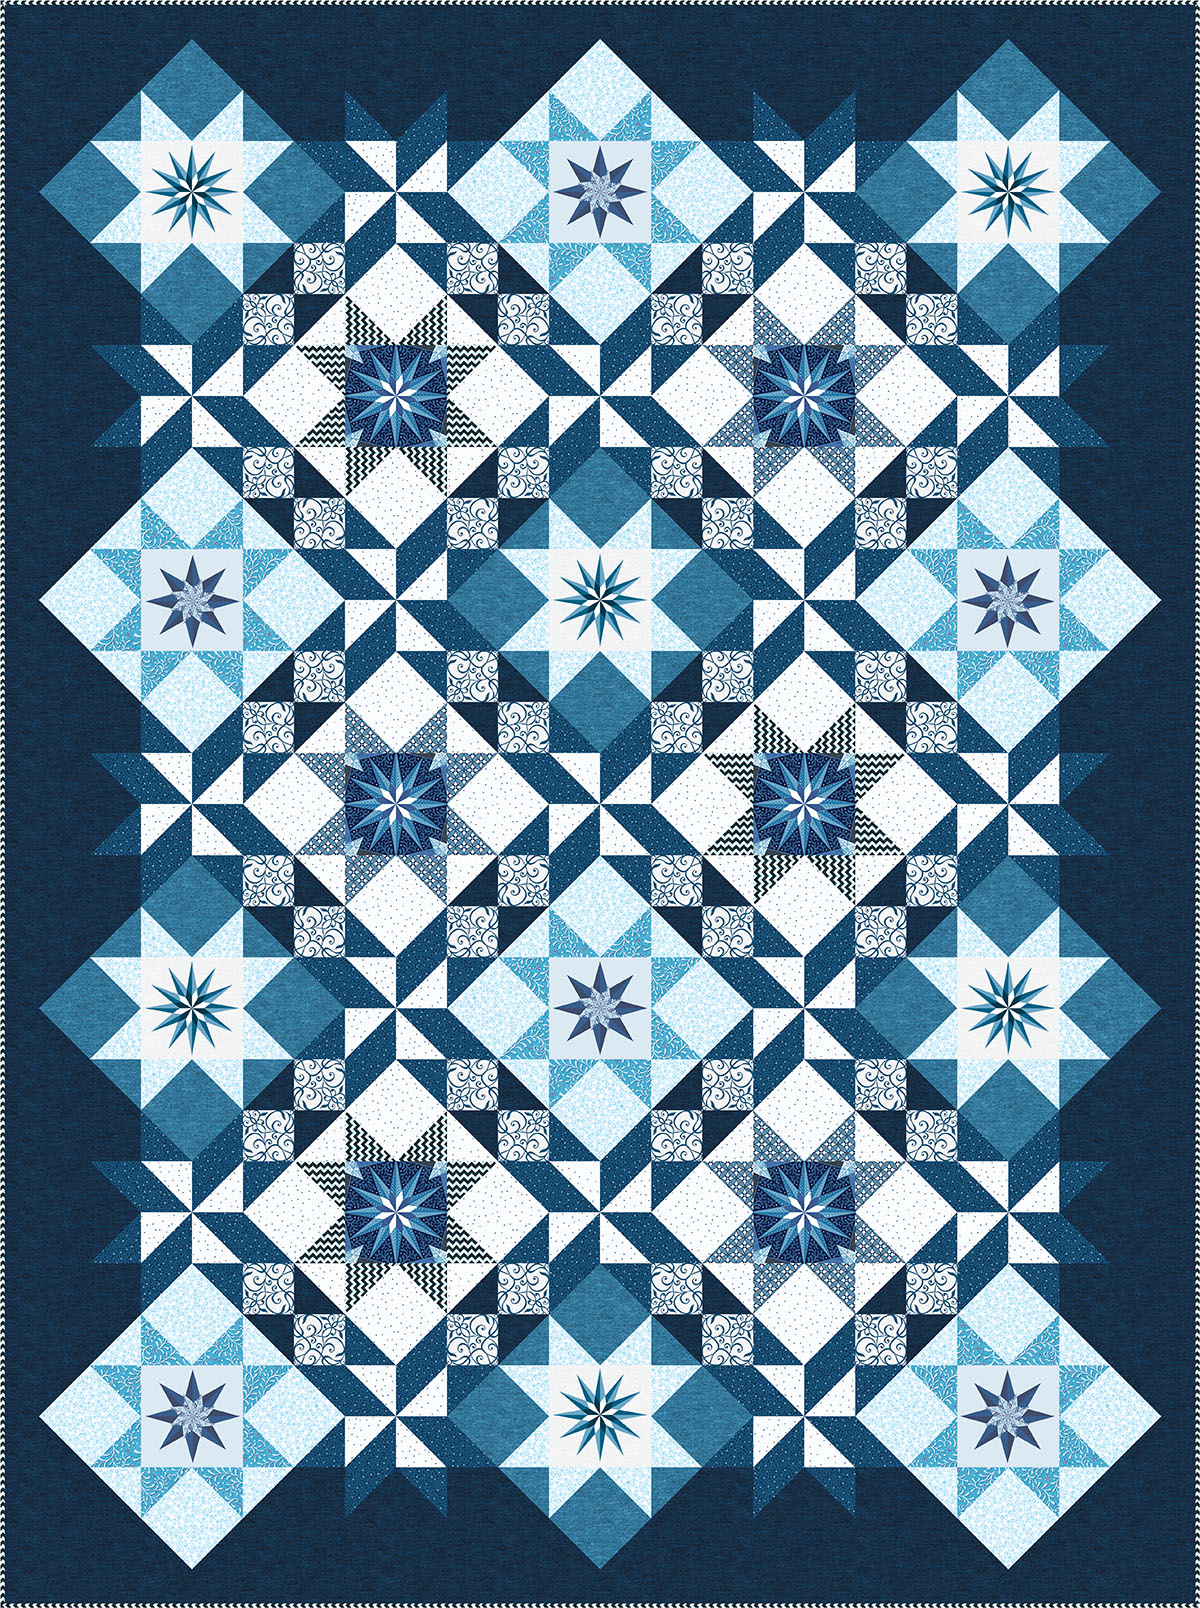
A dark blue version.
A dark red version.
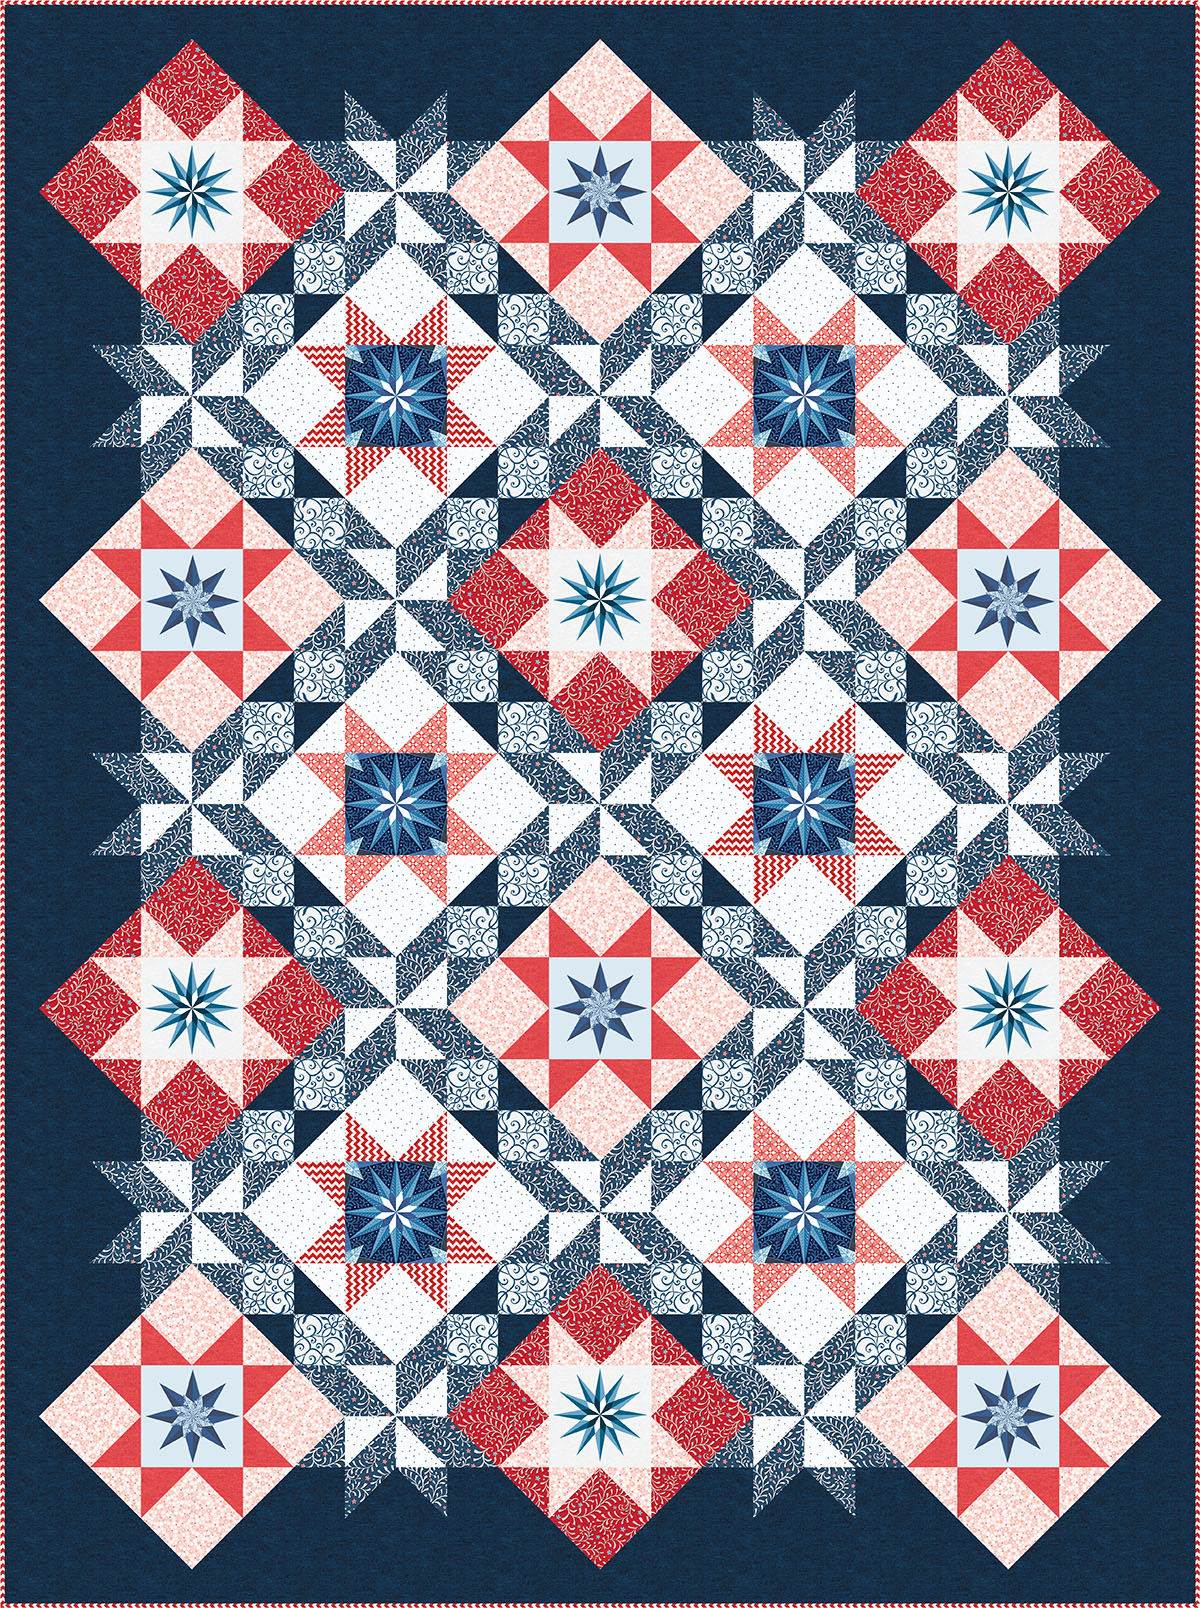
A red and blue version with a dark background.
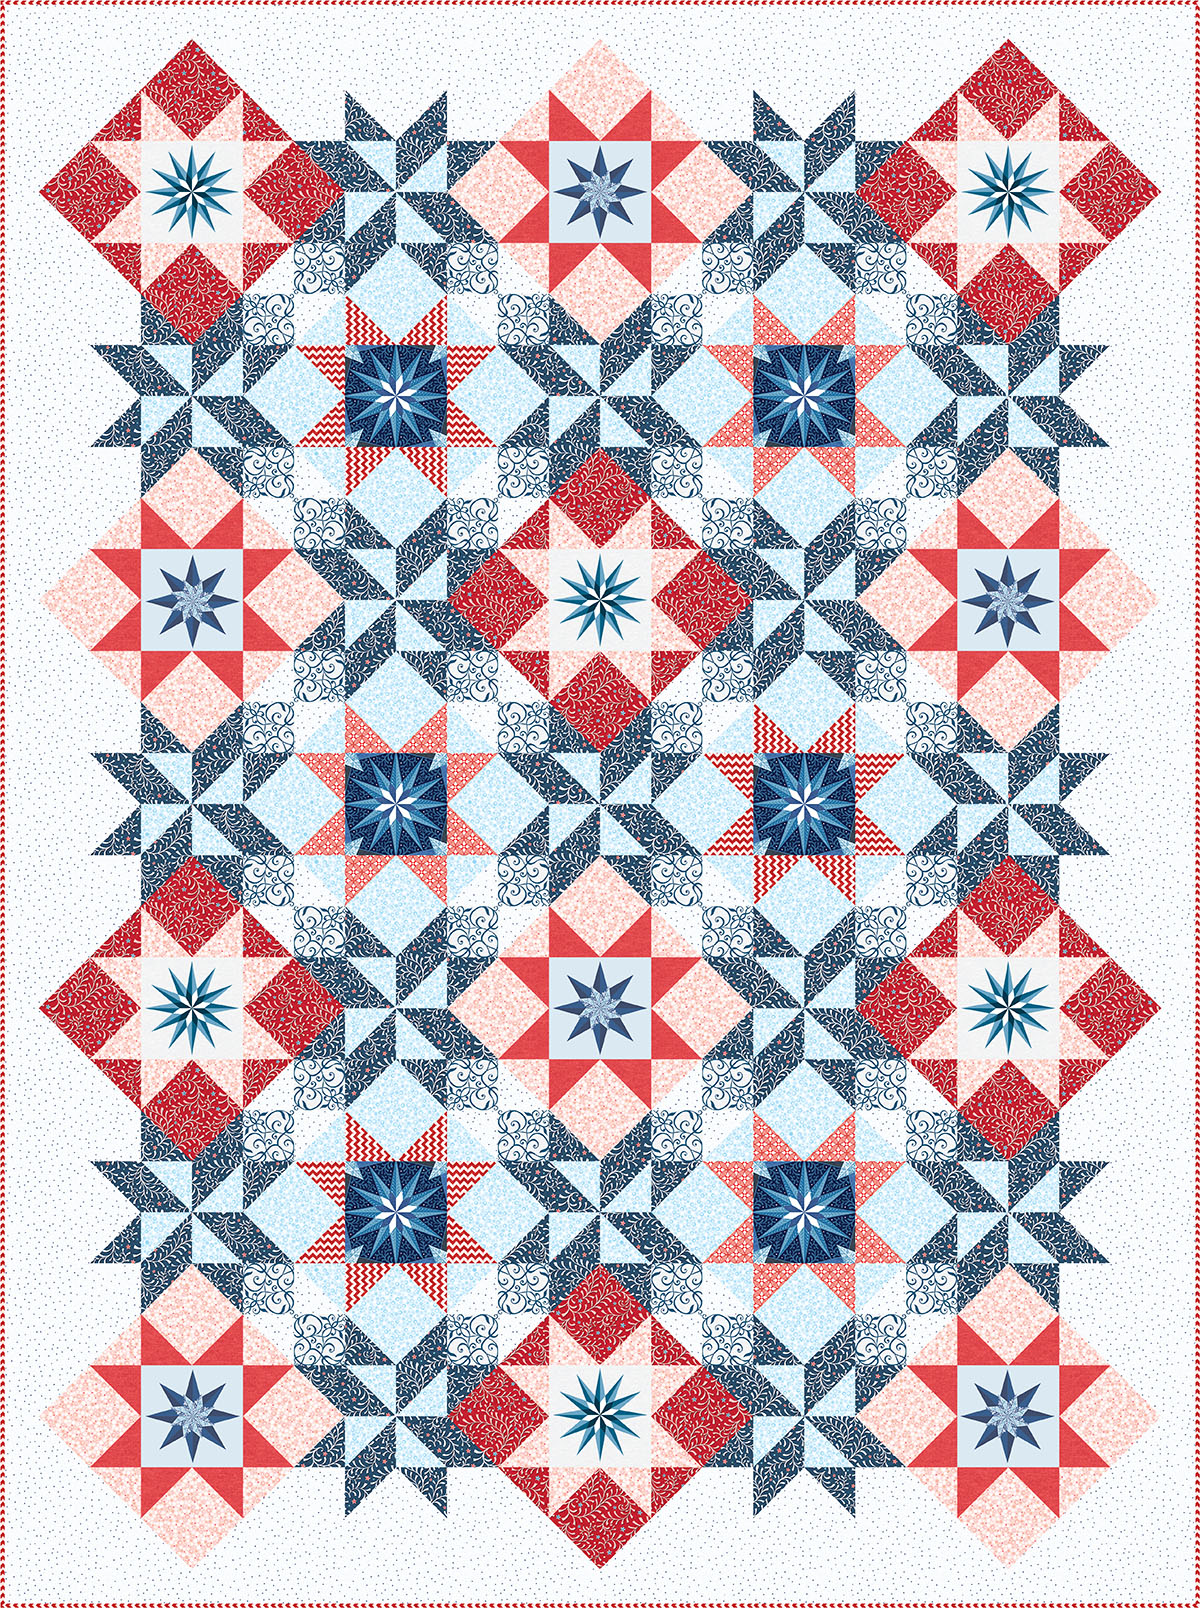
A red and blue version with a light background.
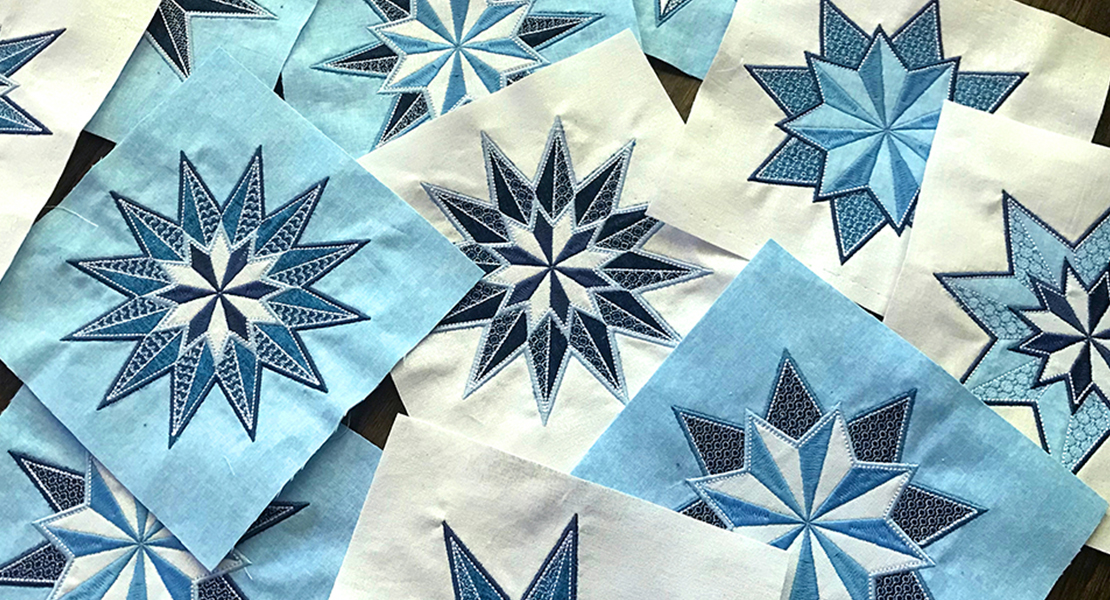
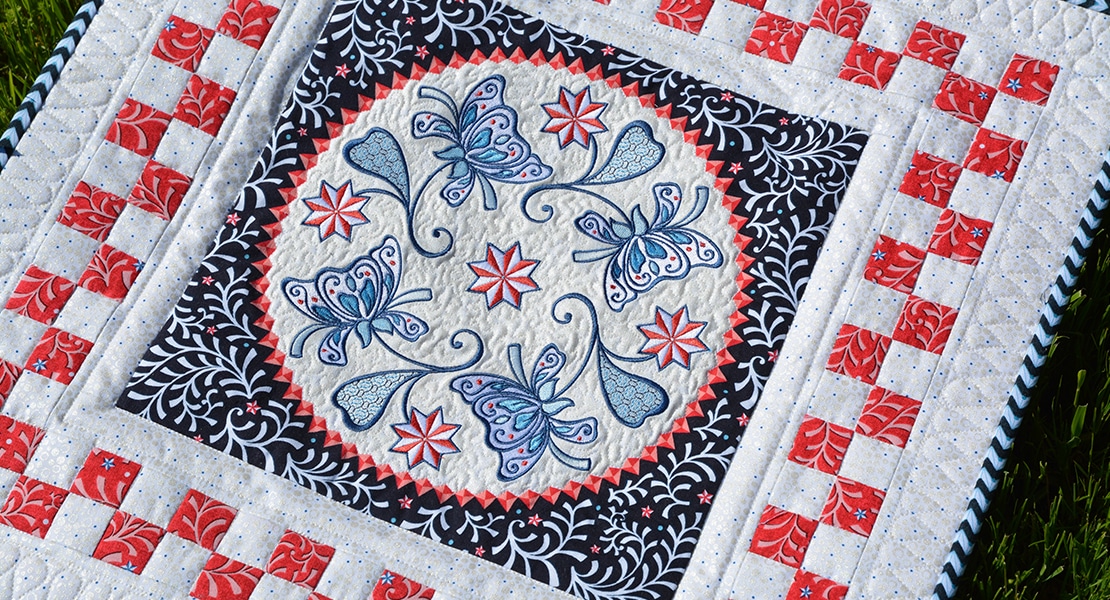
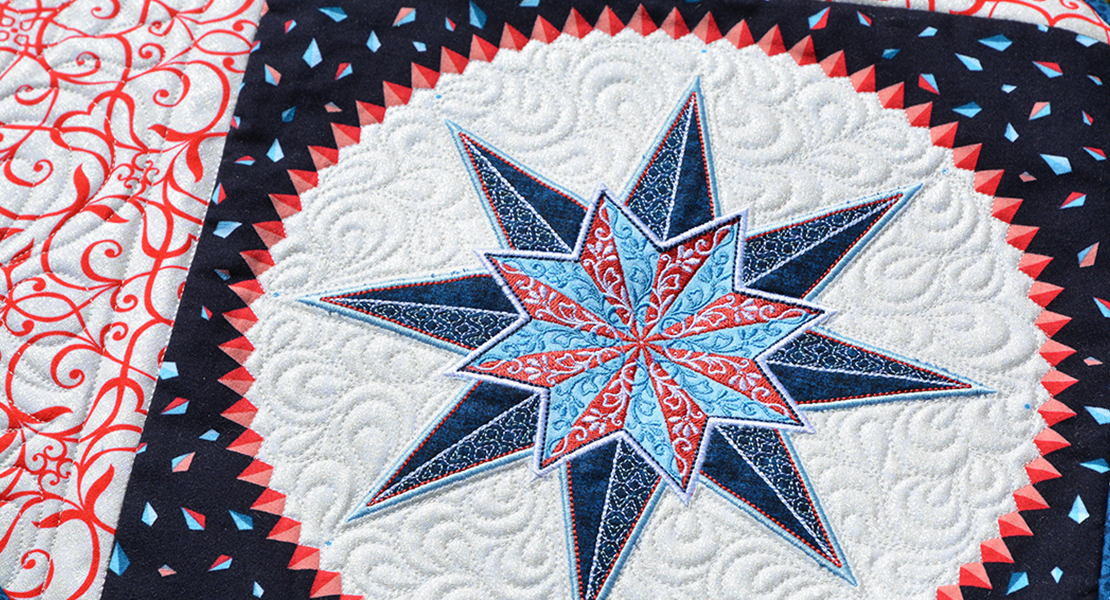
INCORPORATING EMBROIDERY
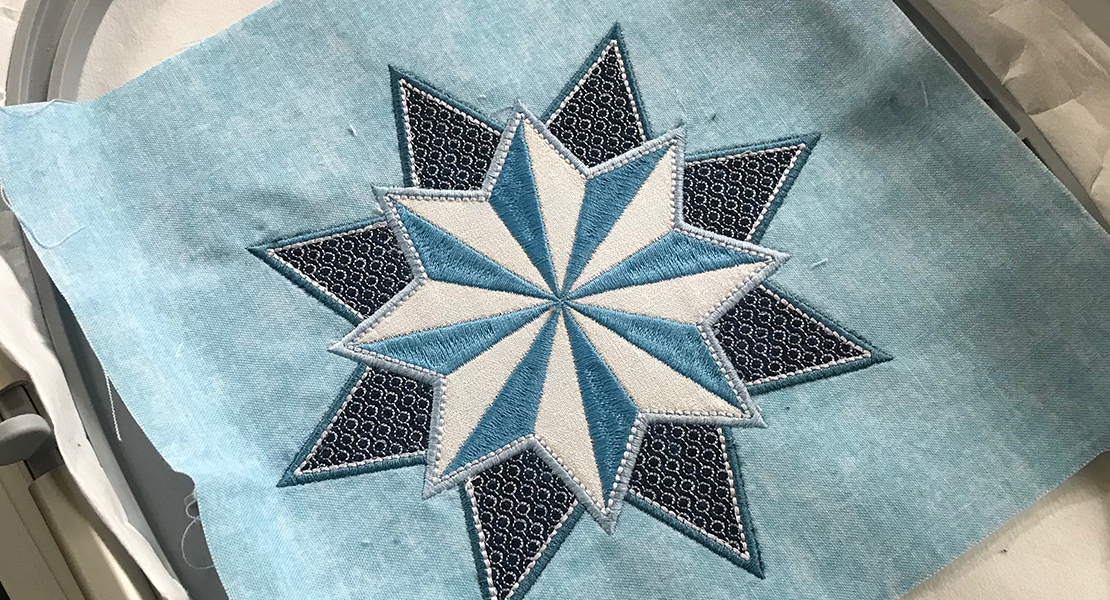
If you are incorporating embroidery, I’d recommend using solids or near-solids for Fabrics K and L to help your embroidery shine. There is a lot going on in these embroidered designs, and you don’t want the background to compete.
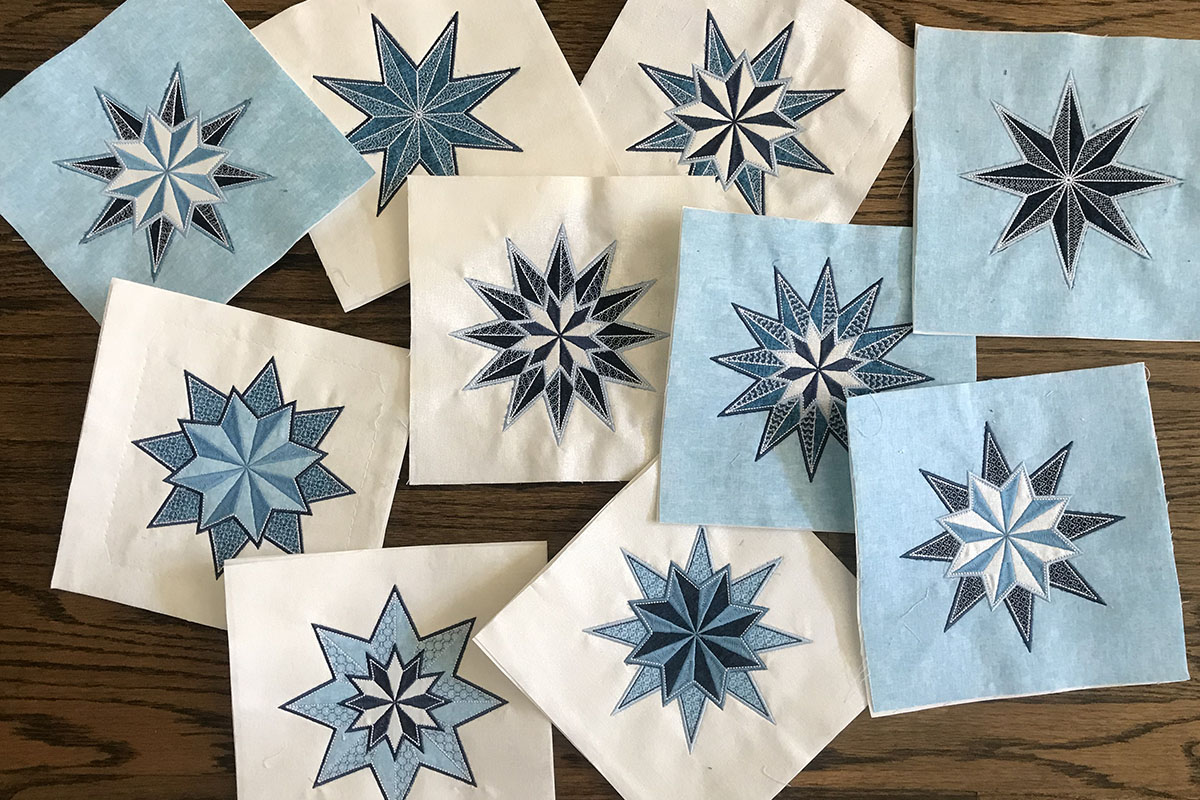
Stardust embroideries from the BERNINA-exclusive Celestial Lights Embroidery Collection
I’d also recommend a simple print for Fabric B, to let the overall design of the quilt shine.
OPTING OUT OF EMBROIDERY
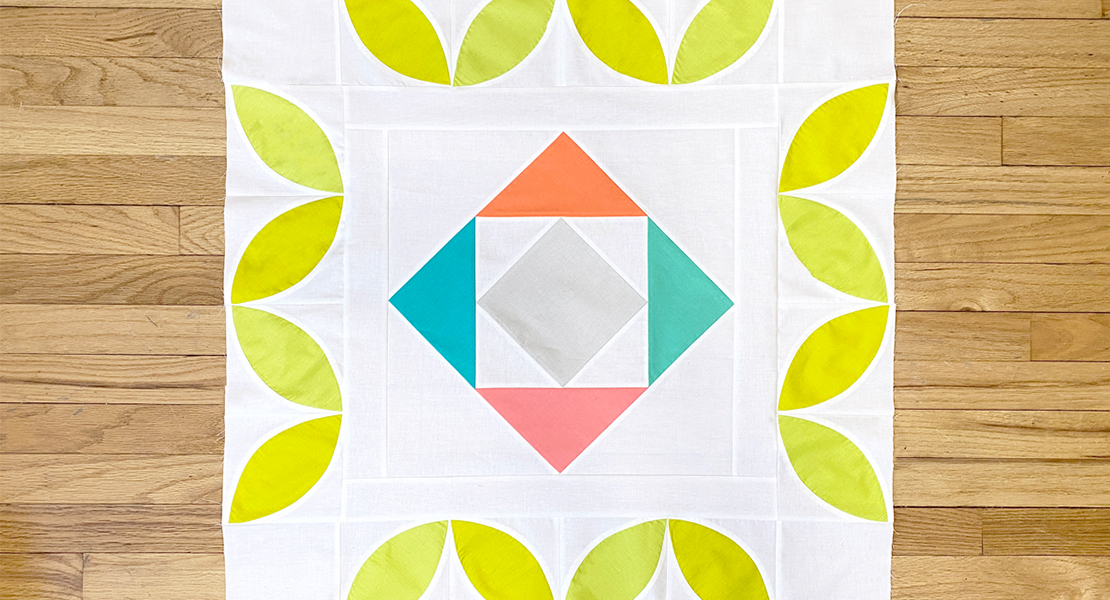
If you aren’t incorporating embroidery, you can elect to use a large feature print for fabric M.
A Celestial Lights “feature print”—look for an eye-catching print as a substitute if not incorporating embroidery
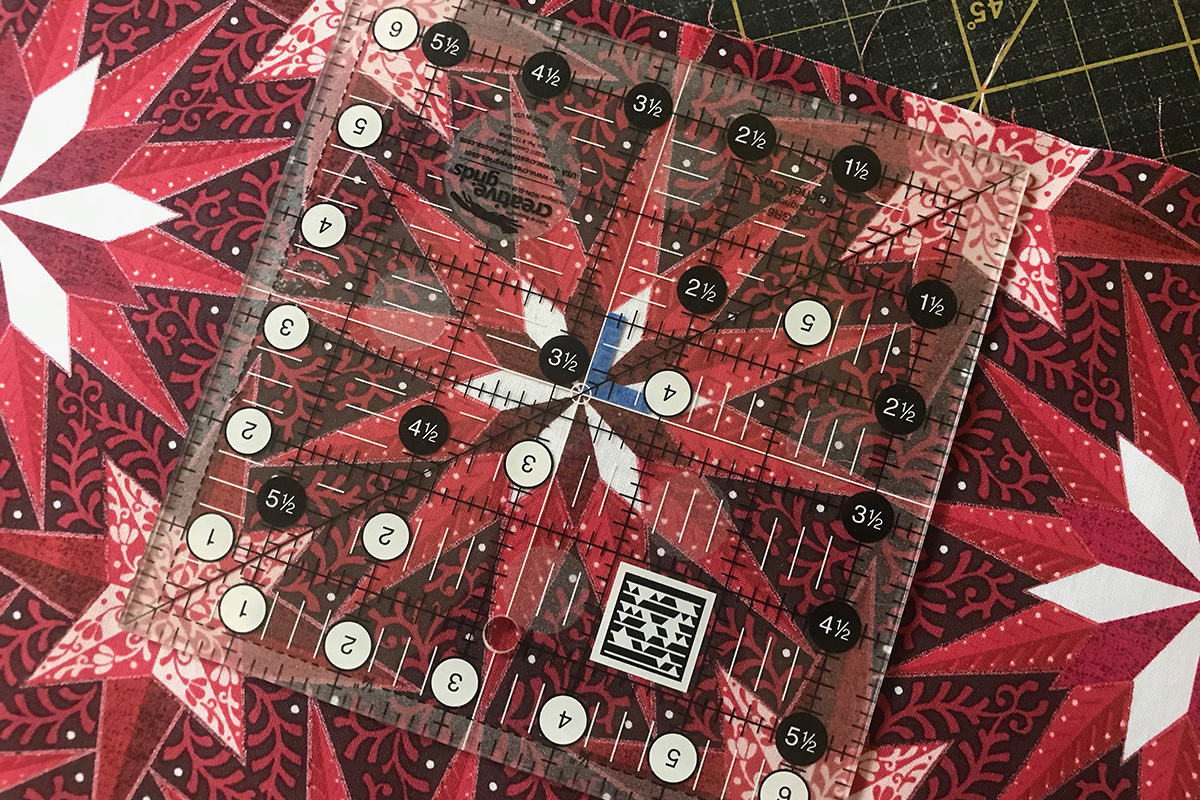
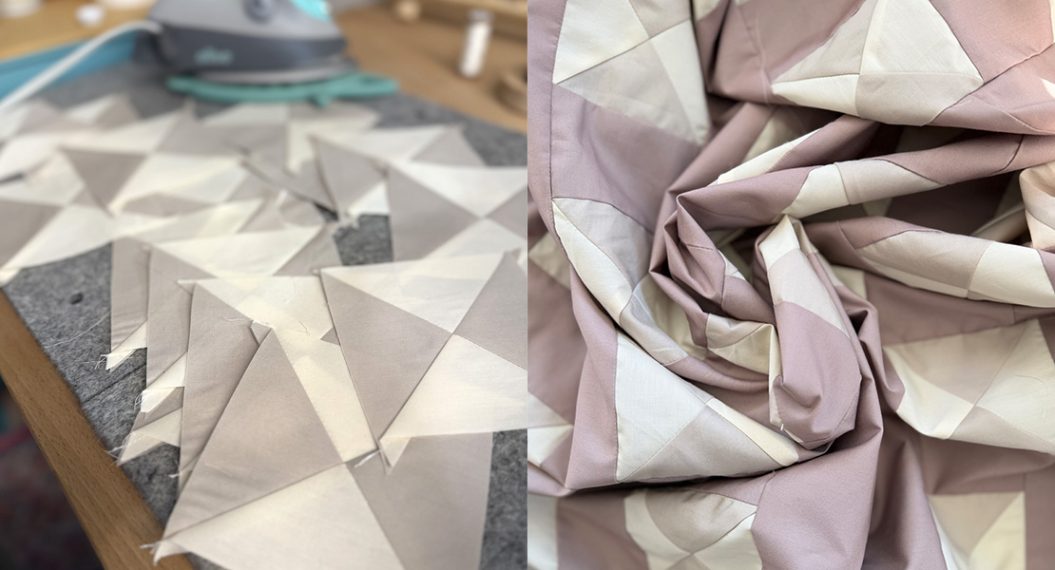
FUSSY-CUTTING TECHNIQUES
I fussy-cut stars from my Celestial Lights Star print from Fabric D.
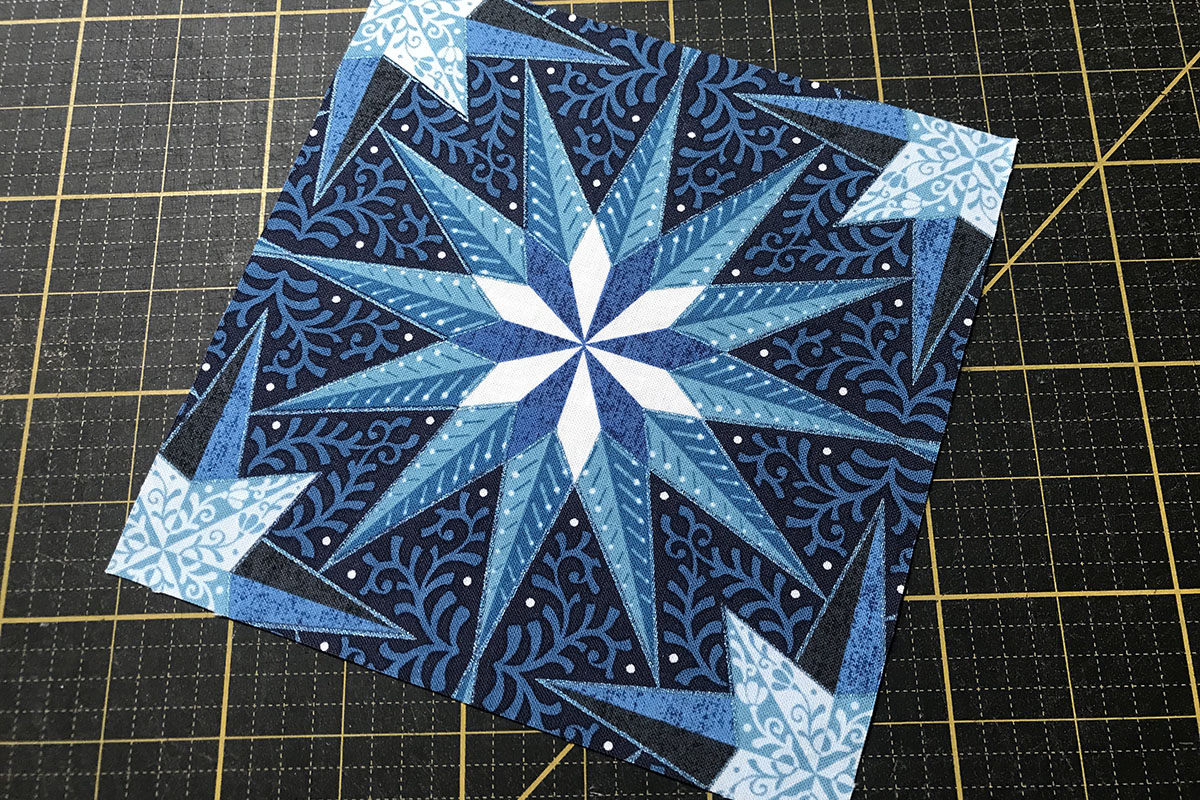
They took on added dimension when I quilted around the stars in the finished quilt.
(You could also fussy-cut motifs Fabric M if you chose not to incorporate embroidery.) In this case I’m fussy-cutting 6-1/2” squares. Since most of us have 6-1/2” square rulers this is easy. When fussy-cutting I like to mark the center of my ruler with tape – this way I don’t use the wrong lines on the ruler by mistake!
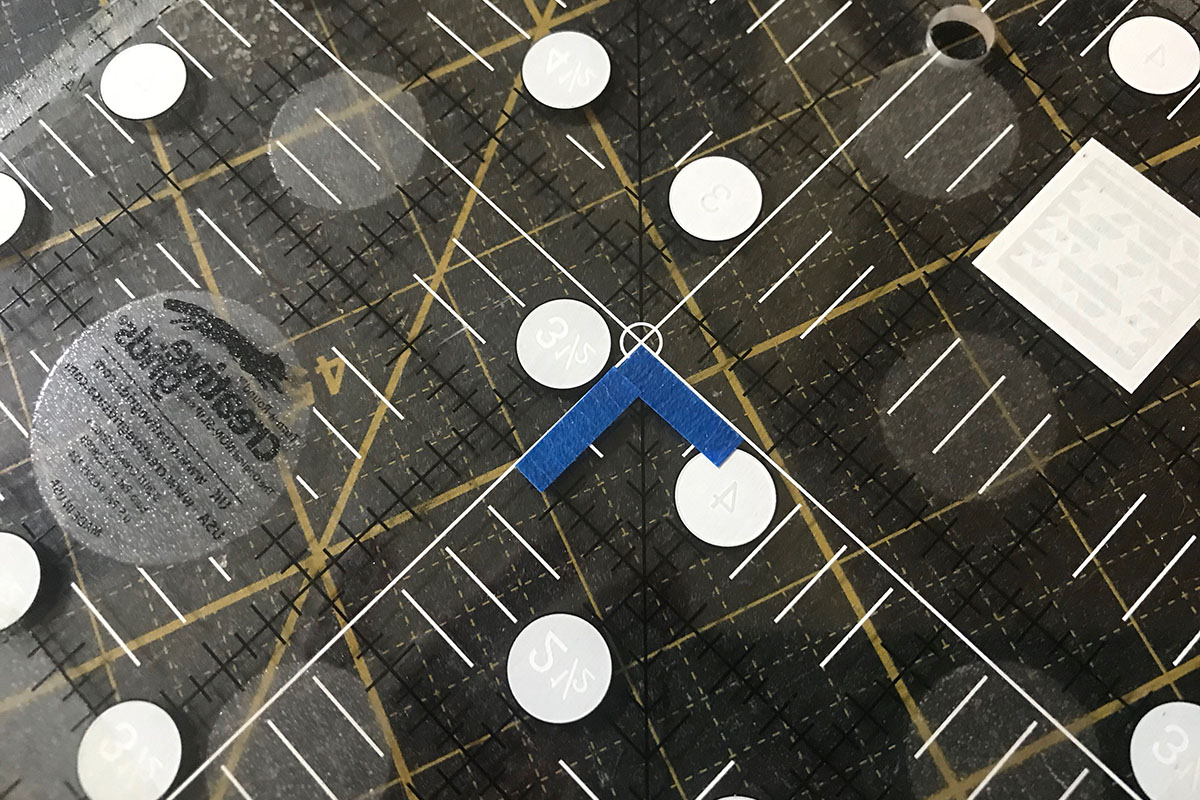
Center the ruler on your fabric to cut the block. Note that in the case of the stars, I can also align the lines on the ruler on the lines that go through the star’s center. That won’t happen with every print, but sure is nice when it does!
So many looks are possible with fussy cutting.
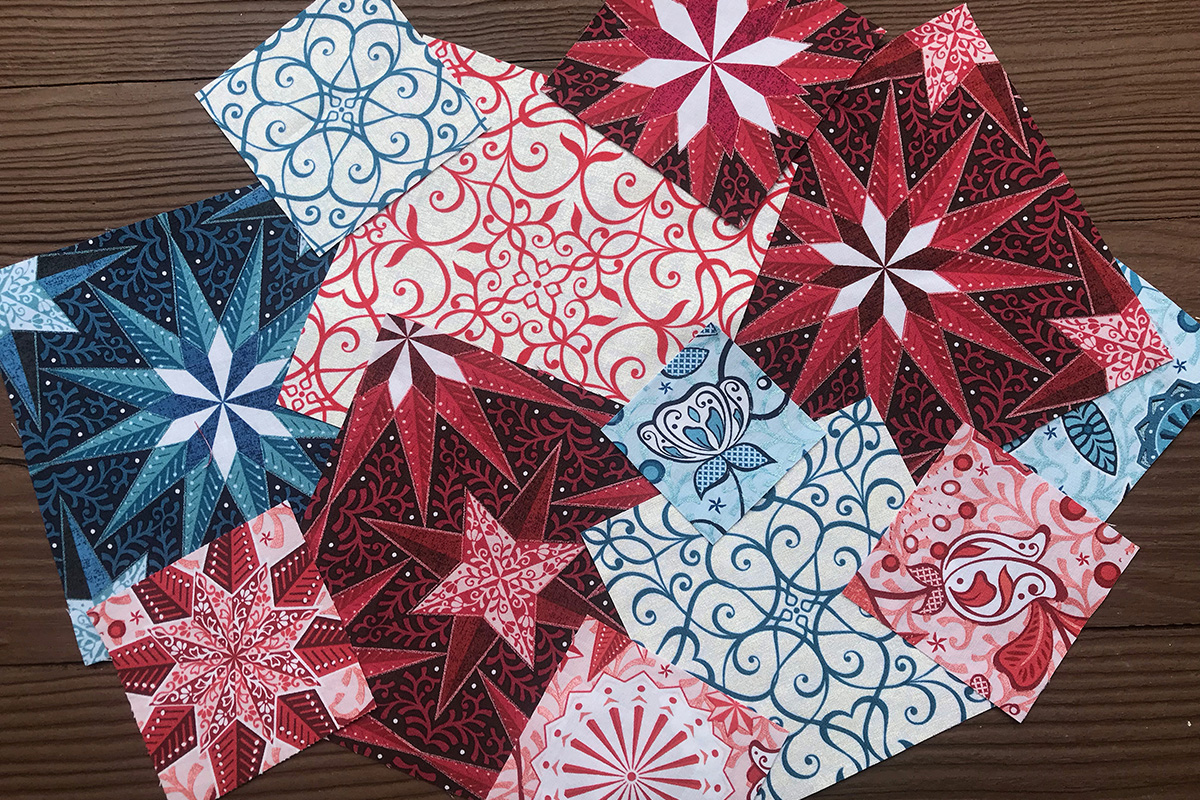
Fussy-cuts from a variety of Celestial Lights prints
As I said, I used the Celestial Lights star fabric to mimic the stars in the piecing, but any feature print or a medallion print would also be an effective choice!
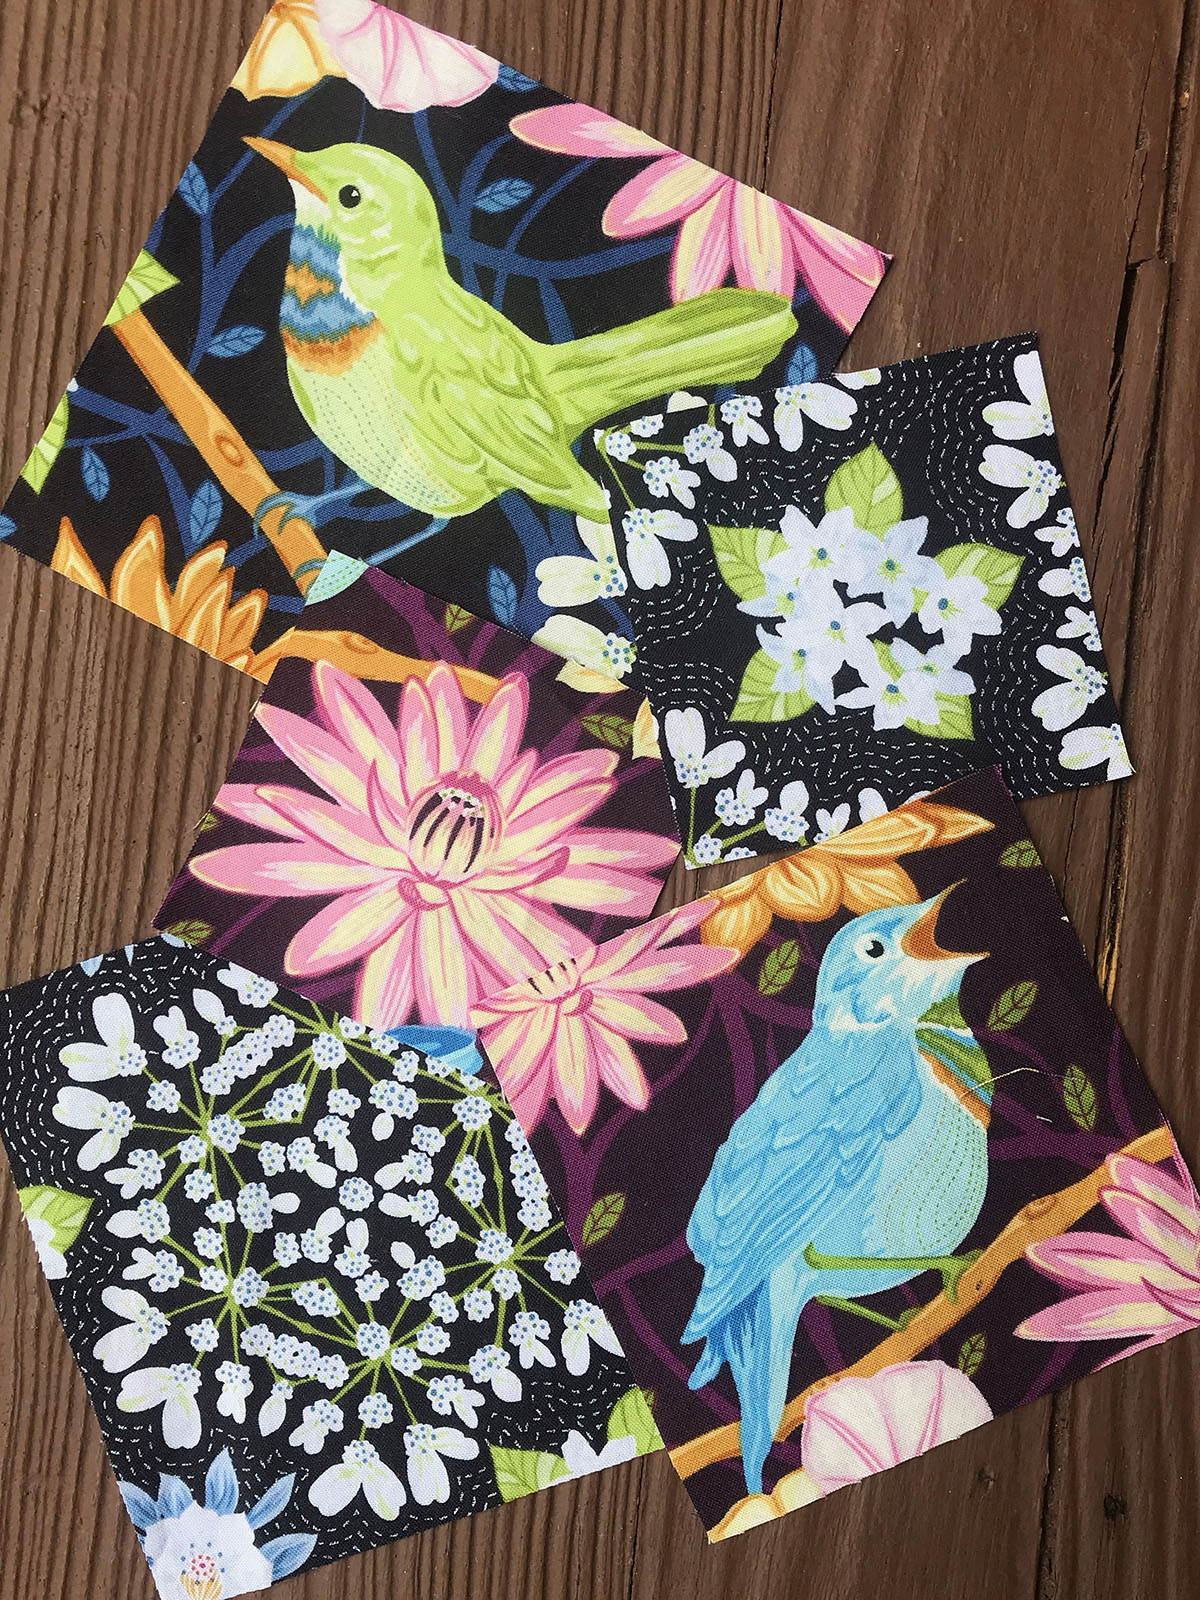
Fussy-cuts from my Nightingale fabric line, shipping to stores later this month.
I hope you have fun gathering your fabrics and planning your quilt this month. In October, I’ll be back to give you some piecing tips!
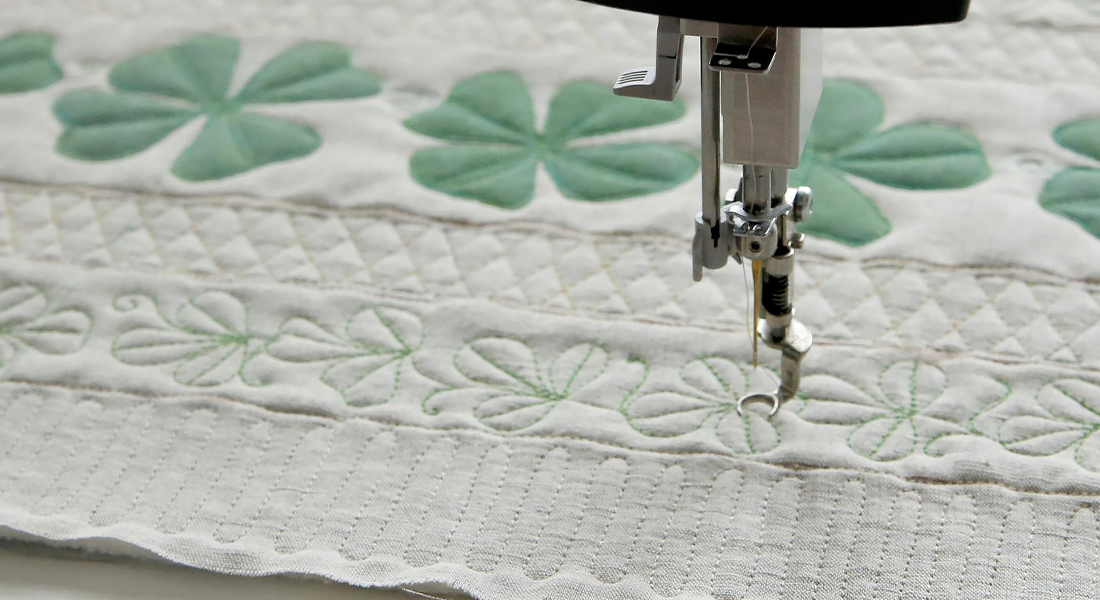
In the meantime, I’ll be back on WeAllSew to give you hints on how to perfect your RIBBON CANDY QUILTING. People struggle with this design but my hints will make it easier—I promise! See you then!
Stardust Quilt-along Schedule
Stardust Quilt-along: Ribbon Candy
Stardust Quilt-along: Piecing Tips and Tricks
Stardust Quilt Pattern Giveaway
One lucky WeAllSew reader will win a one Stardust Quilt Pattern by Amanda Murphy!
All you have to do is post a comment below and answer the question:
“What quilting technique are you interested in learning about?”
The giveaway is open to residents of the 50 United States and the District of Columbia. One comment per fan. Comment must be submitted to the WeAllSew.com blog by Wednesday, September 11, 2019 at 11:59 PM Central Time. Winner will be chosen randomly. Winner will be notified by email and will have 48 hours to contact to claim the prize.
Good luck and happy quilting!
Amanda
Used Products

What you might also like


70 comments on “Stardust Quilt-along: Part One”
-
-
I can’t wait to work on your quilt. You did a beautiful job design it.
-
Beautiful design! I have ordered the pattern from my Bernina dealer. So excited…
-
I am interested in learning fussy cutting and how to stabilize embroidery designs so they don’t pucker
-
I am interested to learn ribbon.
-
-
I would like more ideas for free motion quilting.
-
I would most like to learn more tips about choosing and cutting recycled fabrics for quilts. I love re-using my worn-out jeans, shirts, and more to create a new quilt, but have so far always fought the fabric-cutting stage with many unusual shapes to cut from.
-
I would like to learn how to make sure all my triangle points meet at the right spot when I join the blocks and that the seam allowances are pressed in the right direction so it doesn’t bunch up. I am so anxious to get the pattern and start working on this Stardust quilt. I have to tell you what happened. I had to put my cat, Stardust, to sleep 12 days ago. She was almost 14 years old and named after my husband’s favorite song. That evening I got on my cell phone and clicked on Google, like I do most evenings. I scroll through and click to read some of the items. That’s when I saw the Stardust Quilt-Along! How in the world could there be a quilt named after my cat? Of course, I just have to make it. Instead of shades of blue or shades of pink, I am going to match my couch. Stardust and I would curl up together and watch TV. To me, this quilt is so incredible, coming at just the perfect time.
-
I am excited to make this beautiful quilt. I’d like to learn more about ruler quilting.
-
I would like to learn more about quilting on a domestic machine. I have some of your rulers but still am not comfortable using them.
-
I’m so excited for this quilt along. I’m interested in perfecting my piecing techniques, fuzzzy cutting and incorporating embroidery into my quilts
-
Now I really want to experiment with some fussy-cut blocks.
-
That is beautiful. I need to learn more about machine embroidery. Thank you
-
This is such a lovely pattern. I am always eager to learn more about using rulers with domestic machine.
-
I’d love to make this beautiful quilt!
I’d love to learn all kinds of new techniques. -
I am looking forward to learning how to incorporate embroidery with piecing in a quilt. Waiting for embroidery software to ship.?
-
I would love to learn EVERYTHING about quilting!
To make a quilt like Stardust would be a dream come true. -
should we prewash the dark blue fabrics ?
-
I like to learn more free-motion quilting techniques. I’m ready to branch out from stitching in the ditch!
-
I love this fabric line! I would definitely like to learn how to quilt using rulers and tackle fussy cutting. I’m inspired!
-
Amanda,
Such a lovely line of fabric and colorways really standout nicely.
I would love to learn more about how you tackle fussy cutting fabric when you need certain motifs or designs to take center stage without being cut off. Centering the designs in fabric can be a bit intimidating for the first time user of the technique.
Your embroidered portions are stunning & could audition by themselves but with the rest of the Quilting it really pulls the quilt together. -
Beautiful design! I would like to learn more about machine embroidery and quilting with rulers.
-
I have purchased several of your rulers. I have used some of them on my domestic machine. But, the exciting thing is that I recently purchased a long arm and I’m trying to get as much technique from your videos as possible. I have found your explanations to be very easy to understand and follow. So I guess that’s what I will be most interested in as this process continues. Thank you so much for your inspiration, tips and beautiful designs! Keep ‘em coming!!!
-
I would like to learn applique by machine. I have wanted to do a blue and yellow quilt. Thinking how that might work here.
-
I am interested in learning about ruler and free motion quilting as I work on this beautiful pattern.
-
I would like to learn more about quilting with rulers. And, I am always open to learning new techniques to help refine my quilting.
-
I understand parts of quilting; building the squares and assembly. What I need help with…is the quilt sandwich: how to get the layers to remain together while working on it.
-
I would love to learn more about ruler work, I have been unsuccessful in my attempts. It has been a real struggle, so any help would be greatly appreciated.
-
This is a beautiful quilt. I’d love to learn how to sew perfect triangles… meaning the points will actually live up properly. I’ve also never done fussy cutting and would like to learn that skill.
-
My biggest struggle seems to be deciding what quilting design to use once the quilt top is finished. I would like more instruction on ruler work as well.
-
I’m new to quilting, so how to cut out the pieces accurately.
-
I would love to win this pattern!! I have been wanting to do a fussy cut quilt and use the beautiful blue fabric you used in your quilt. I purchased the embroidery cd designs. Hoping to purchase the fabric in the next month. Beautiful quilts!!
-
The Quilt is very beautiful I look forward on do this quilt
-
I’d like to learn more about organic free motion quilting patterns on a long arm..
-
would love to learn more about machine embroidery, please
-
I would like to learn better how to appliqué quilting. Also how to do the ruler work
-
I’d enjoy video tutorials with audio vs captions. Hard to read the captions and watch the video at the same time.
-
I have just recently purchased 4 of your Good Measure rulers and am interested in finding out more about using them.
-
What a beautiful quilt! I would like to learn more about selecting quilting designs and free motion quilting.
-
I want to use embroidery machine quilting
-
I want to be able to have points and angles come out correctly. And then, work on free motion quilting designs.
-
How delicious to see various ways to fussy
-
I have been quite intimidated with ruler work and I`m looking forward to learning your techniques. I hope to be able to master this technique to be able to make my quilts pop!
-
I am interested in learning more about free motion quilting and ruler work. I am also excited to learn more about incorporating embroidery into a quilt and quilting a quilt with embroidery.
-
I have an older, wonderful Bernina. I’d love some tips on finding a blanket stitch or similar for the fussy-cut appliques
-
Ruler work is my latest quilting passion. The potential seems almost limitless. It is much more difficult than I thought it would be. I love Amanda’s tutorials. Her ruler work sampler was a good introduction, but so much more to learn.
-
I am so excited about making this quilt for my son and his fiancé. I’m choosing to embroider some of the blocks and make it into a queen size. Is there any way I can get the amount of fabric needed for that size? I’m also looking forwarding to the quilting techniques! Fun!!
-
I need to learn more about how to use the fabrics I have on hand and make them play nicely together.
-
I would like to know more about incorporating embroidery with piecing and the quilting designs that will make the quilt pop.! Love the fabrics
-
I would like to learn to free motion quilt on my long arm machine.
-
Just more tips for using the many quilt stitches on my 500 series Bernina to make it look like hand quilting.
Also what is the circle for on face plate?
Luv these tips helps sew much! -
I am interested in choice of threads for different embroidery effects.
-
The Stardust quilt is fabulous! I would like to learn how to use my embroidery module on my Bernina machine to do all-over quilting. Your free-motion quilting lessons are so helpful; I just need an extended day to practice more!
-
Beautiful, inspiring quilt, Amanda! So nice that you include different color ways as well.
-
This looks amazing! Took me a while to break down the blocks to figure out how simple blocks are put together to form a complex, fascinating design! I will definitely be looking into making this quilt!
-
Beautiful quilt! I have just bought a Bernina 770 QEE and I’m excited to learn about doing machine embroidery and combining that with quilting. I’ve been a quilter for many years, but I am also just learning about quilting with rulers. I have several of your sets that I have been practicing with. Looking forward to using the ribbon candy!
-
I am interested in starting this project. I have just finished the Jubilee quilt and love it now that it is done. Was not too interested in at at first…due to the quilt top was just hanging. But working on it and then quilting it brought the quilt to life.
Thanks Amanda -
I absolutely adore following you Amanda and I look forward to starting this project and learning from your expert tutoring.
-
Where do the ribbon rulers come in on the Celestial or Stardust Quilt? I have them and intend to practice…just wondering.
-
What a beautiful pattern. I am liking ruler quilting, but realize you must use an accurate 1/4 inch seam allowance.
-
I really want more tips on which way to press seams particularly related to points and three seams coming together. I love the variety of blocks in the pattern.
-
Fussy cutting a motif to add another and easy dimension to your quilt is a great idea.
-
I’m interested in quilting feathers.
-
I am interested in learning the quilt as you go method for quilt blocks.
-
I am interested in learning Ruler Work; I have bought lots of rulers, but I have not been able to turn on anything that I am satisfied with.
-
I am interested in learning how to embroider on my Bernina. Thanks.
-
I’m a new quilter. I am interested in learning how to do ruler work.
-
Would really like to learn ruler work AND how to do feathers!
Leave a Reply
You must be logged in to post a comment.

Interested in learning about ruler quilting and best ways to cut out fabric