The BERNINA Circular Embroidery Attachment—an Overview
This attachment might look a little odd, but it will give you great results for circular embroidery stitches! Get the best results with these tips and tricks in this overview by Kathy Kansier from Ozark, Missouri.
I recently purchased the BERNINA Circular Embroidery Attachment #83 to use with my BERNINA 880. I love this attachment because it has opened an array of creative possibilities I can use it in my quilt making, home décor projects and clothing construction. The Circular Embroidery Attachment will fit all of the new models of BERNINA sewing machines and most of the older models. It can be purchased at your local BERNINA store.
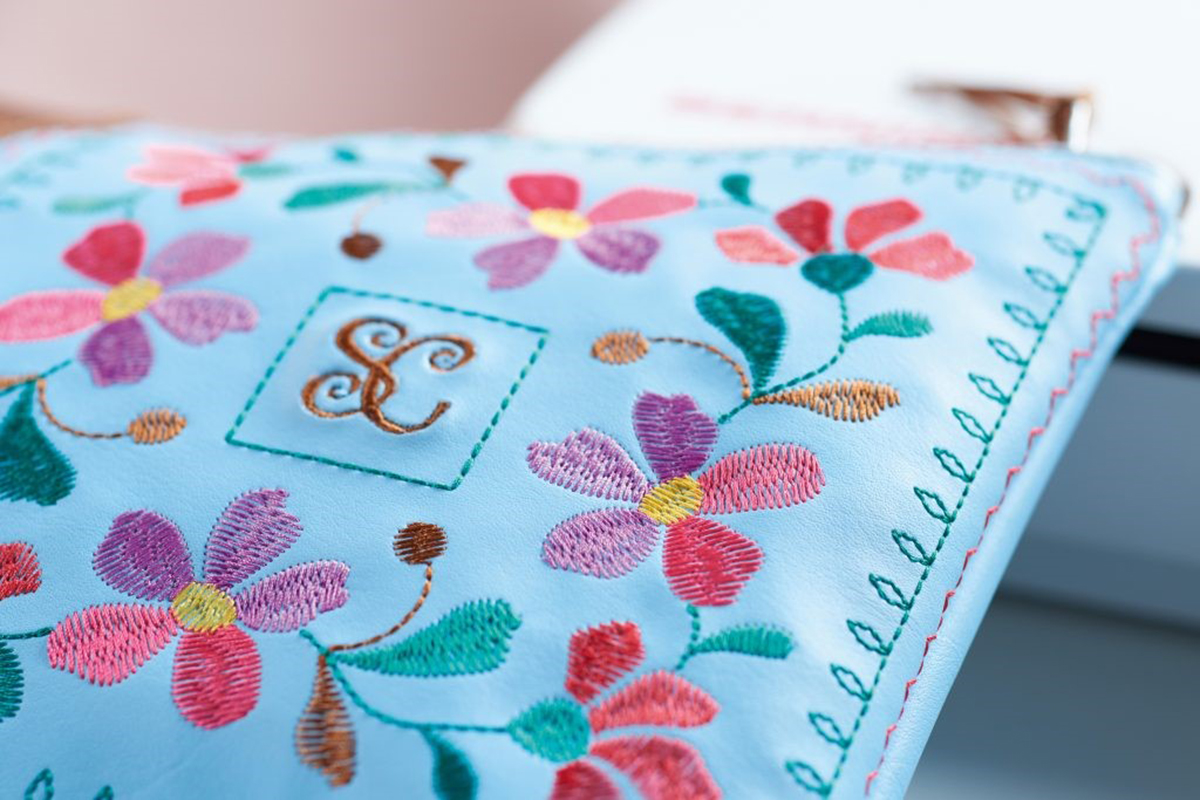
This attachment can be used to sew perfect circles and semicircles ranging in size from 3” to 10”. It can be used with a variety of presser feet. The presser foot you choose will depend on the technique you are using. The circular attachment will work with utility stitches, decorative stitches and even lettering for circular writing. Using embroidery thread will make your stitches shine.
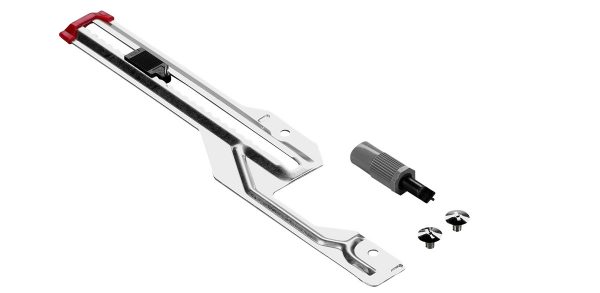
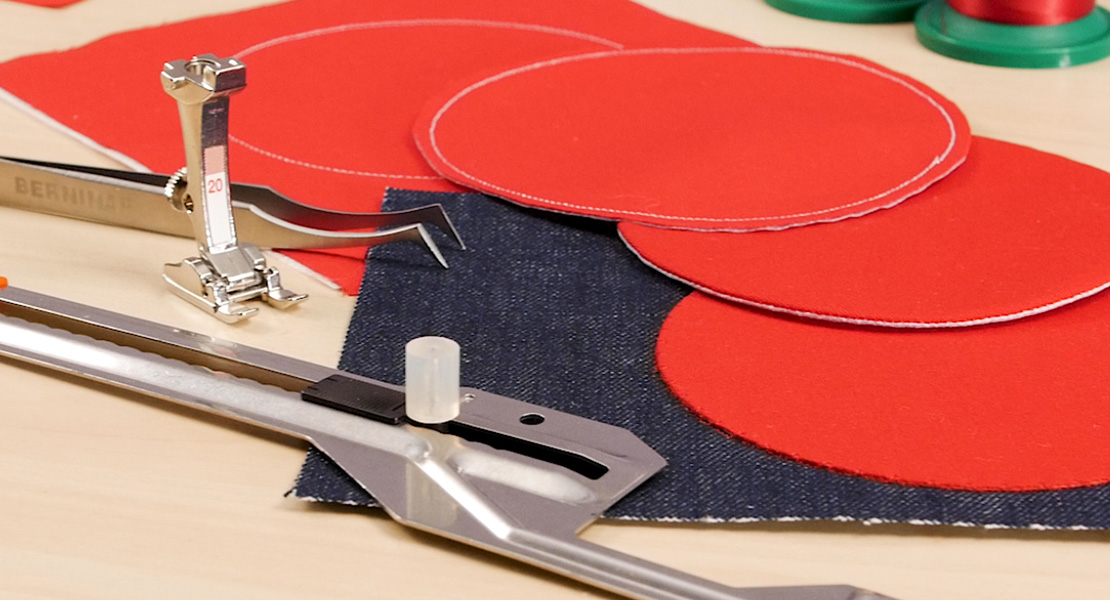
Within the box you will find a booklet of detailed instructions, the flat metal attachment, a special screw driver and two flat head set screws (one is a spare).
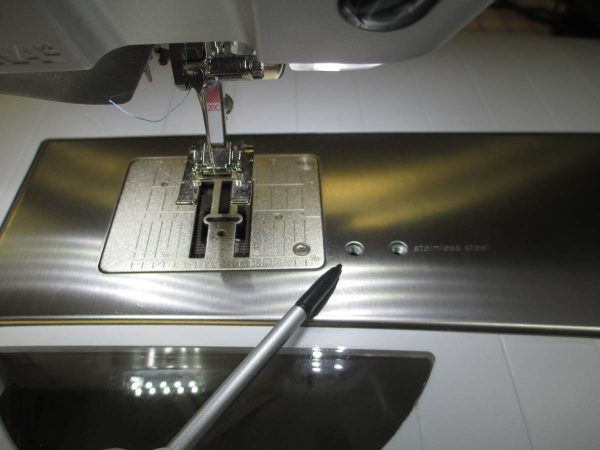
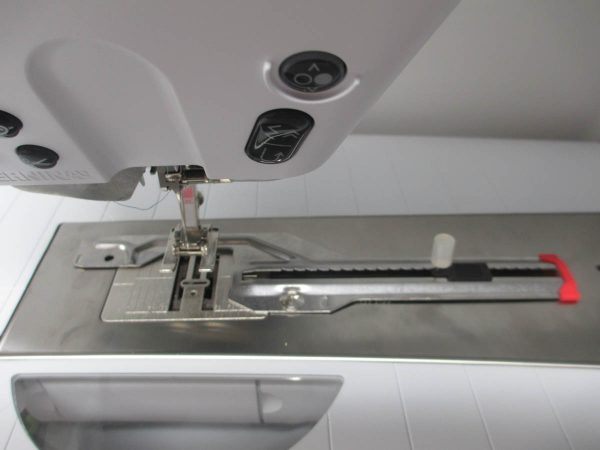
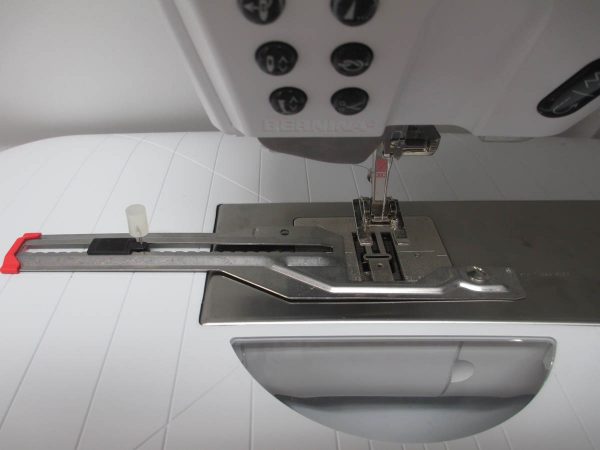
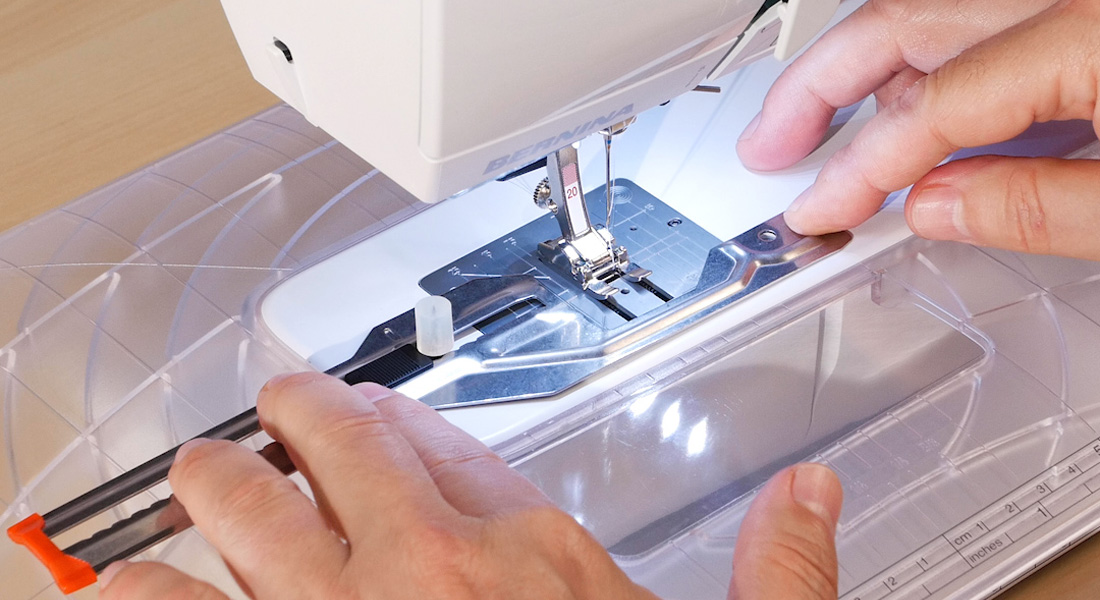
There is a small screw hole on the bed of the machine, close to the throat plate. The metal attachment has a corresponding hole. Line up the holes, place the set screw in these holes and use the special screw driver to fasten the attachment to the machine. Do not over-tighten the screw. The flat head of the screw allows the fabric to smoothly slide over the attachment.
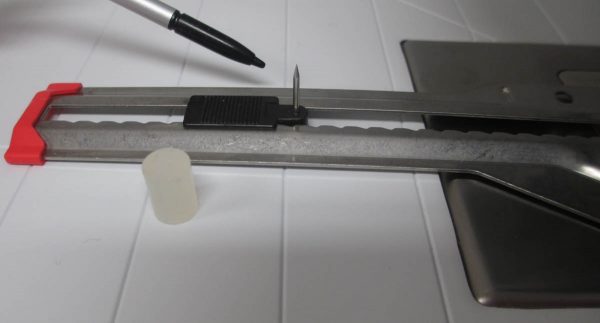
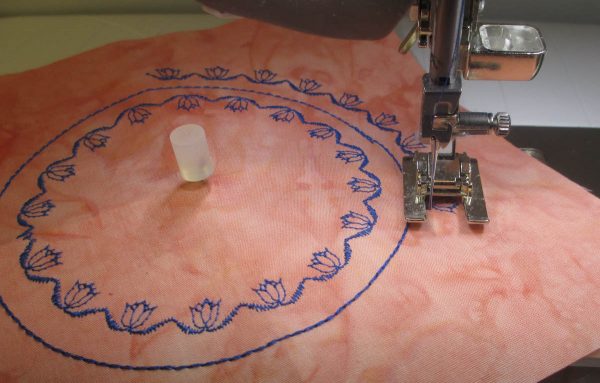
The metal attachment has a sharp, positioning pin with a rubber cap. The cap protects your fingers from the sharp pin and holds the fabric in place on the attachment. The positioning pin is attached to a black tab with grooves. There are notches along the metal bar for locking the pin in place. The open U-shaped area of the attachment fits around the feed dogs.
The positioning pin can be adjusted to the desired size circle you want to sew. Press on the black tab to gently slide the setting pin. Do not push or pull on the pin to make the size adjustment because it can become bent or dislodged.
The diameter of a circle is the distance from one side of the circle to the opposite side. The radius of a circle is half the distance of the diameter. The distance from the setting pin to the sewing machine needle is the radius of the circle. Determine the diameter of the circle you want to stitch. Divide this number in half to get the radius. Adjust the setting pin accordingly.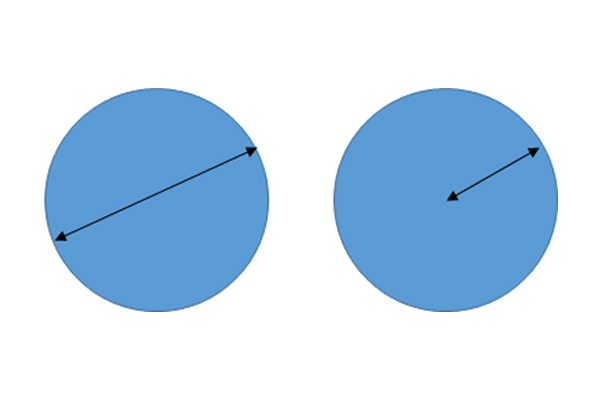
Diameter Radius
Circular stitches can be sewn clockwise or counter-clockwise. Depending on which direction you want to sew, the circular attachment can be placed to the right of the presser foot for counter-clockwise sewing or to the left for clockwise sewing. When sewing counter-clockwise, the stitching will be on the inside of the circle; when sewing clockwise, the stitching will be on the outside of the circle.
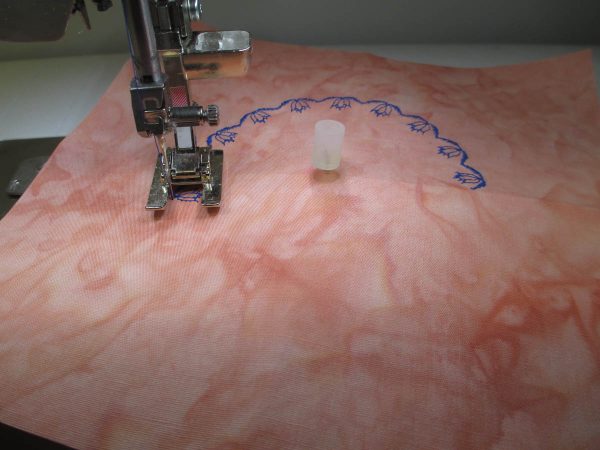
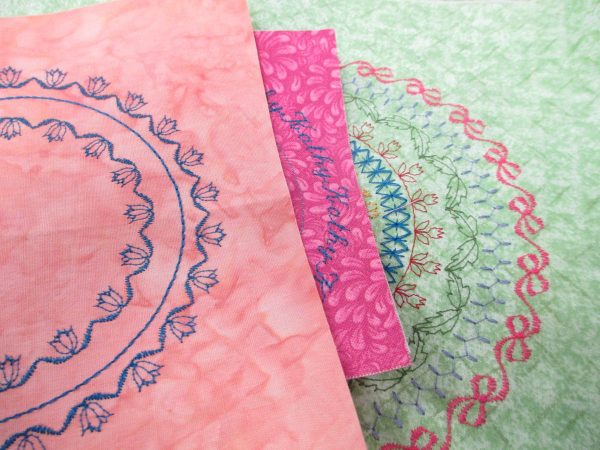
This directional option opens up creative possibilities that can be achieved. You can use a different decorative stitch for the inside and outside stitching or the same stitch on both the inside and outside of a circle. In my sample photos, I used the same decorative stitch.
Counter-Clockwise Sewing
Clockwise Sewing
Kathy’s Top Ten Tips For Creating Embroidered Circles
- Use the extension table with your machine to provide a large, flat, working surface for your project.
- To create a flat circle, use a stabilizer on the back side of your fabric. Use a fusible stabilizer or basting spray to hold the fabric and stabilizer together.
- Cut the stabilized fabric square at least 3” larger than the size of the desired circle. Fold the stabilized fabric square in half vertically and horizontally and finger press the center point. With the fabric face up, attach the center point of the stabilized fabric to the positioning pin. Use the rubber cap to hold the fabric in place.
- Select a utility or decorative stitch. Choose the appropriate presser foot for the stitch. Adjust the length and width settings of the stitch as desired.
- Use an embroidery thread for the upper thread and a matching thread color for the bobbin thread.
- Use a fine needle (Microtex size 70 or Embroidery size 75). These needles are thinner and sharper than a universal needle. They penetrate the fabric precisely and don’t leave noticeable holes in the fabric.
- Always make a sample before stitching the decorative circle on your project. The fabric will rotate around the positioning pin. Do not pull or push the fabric. It will feed itself in the circle.
- As you near the end of the circle, engage the Pattern End function so the ending stitch motif will match up with the beginning stitch motif. Use the Balance function or adjust the stitch length as needed to lengthen or shorten the ending motif. Practice doing this before working on your actual project. When doing lettering in a circle, repeating a short, single word is easiest. Sometimes there is not enough room to repeat a combination of words or a full sentence. A decorative stitch can be used to fill in the space between the beginning and ending of the words and it will look just fine.
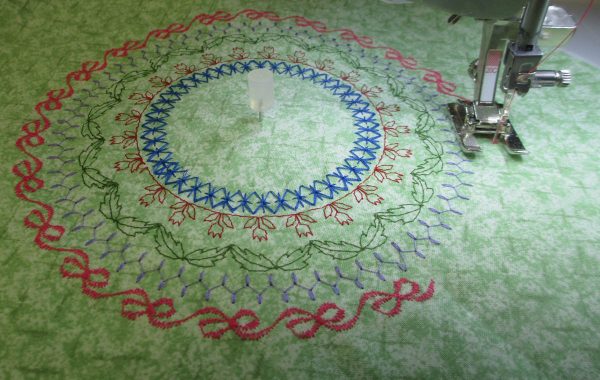
- To make concentric circles, start with the smallest circle & work your way to the largest circle. Place the setting pin in the same center position on the fabric for each circle. Re-set the pin at least two notches apart on the attachment bar for equal spacing of the concentric rings. Change the thread colors & stitches to add interest.
- When you are finished with the circles, place the project face down on a fine towel or pressing mat. Spritz a little water on the project and heat set it from the back side with an iron set on medium heat. The cushion of the towel helps the stitches to remain slightly raised on the front. The center pin hole will disappear during this process and the project will lay nice and smooth.
Enjoy the endless possibilities the Circular Embroidery Attachment #83 provides.
What you might also like
14 comments on “The BERNINA Circular Embroidery Attachment—an Overview”
-
-
Thanks for your comment on my tutorial. This is a fun attachment to use. I have tried quilting circles on a sample of top fabric, batting & backing,. I tried using decorative stitches and utility stitches. When I didn’t use a stabilizer on the back, the fabrics were hard to keep flat while stitching a circle. I was able to control them with a small 3″ circle but when I tried a larger circle (without a smaller circle inside of it), the fabrics tried to bunch up. When I put a piece of stabilizer on the back of the 3 layers, the fabrics fed through the machine better. If your quilt top/blocks are pieced and has multiple seams, the extra fabric layers in the seam lines may cause problems with decorative stitches.
There are tear-away stabilizers and wash-away stabilizers which would work best when using this attachment during the quilting process. Whatever you do, make a few samples before working on your blocks or finished quilt top.
The size of the quilt could pose a problem when trying to use the circular attachment. It is important that the fabrics feed smoothly through the bed of the machine. A large wall hanging or quilt would give you problems. You would need to roll the edges on all sides so the quilt would feed through the bed. Utility stitches would be the easiest choice because decorative stitches have a back and forward motion. The attachment would work best if you were just working on layered blocks and doing a “quilt as you go” method for the quilting.
-
I have just bought this foot. I wanted to use it to attach a piece of Christmas cotton ( a circle) onto a denim (recycled!) Christmas stocking piece which I will then sew to the 2nd foot piece. Do I put stabiliser on the cotton only or on the cotton and on the denim ? I did try it without any stabiliser and the attached circle would not stay flat and moved.
Thank-you, regards, Susie Dutton-
Hi Susie: I would put a tear-away stabilizer under the denim with the cotton placed on top of the denim. If you only put it under the cotton, it will be between the cotton and denim and you won’t be able to remove it after the circle is sewn. I would make a sample using a 5″ square of the denim, the stabilizer and the cotton to make sure this works and the fabrics stay flat. I’ve found that when using this attachment, most fabrics need a stabilizer to help them feed smoothly while sewing a circle.
-
-
-
-
Comment on BERNINA CIRCULAR EMBROIDERY ATTACHMENT: I’ve owned & known how to use one of these instruments for ~ 12 years. I used it once, and it went into the drawer with all the other rarely used accessories I’ve purchased. I sincerely appreciate the tutorial on how to use this, but I’d LOVE it if these tutorials ended with a link that leads us to lots and lots of examples of how this tool was implemented in projects, etc.
-
Thanks so much for your post. I am currently writing more tutorials on how to use this attachment and they will have added examples of how to use this tool in projects. I just got the attachment this year but I can already see lots of possibilities of how I can use it, especially with clothing projects, purses, baby quilts, traditional applique quilts and modern quilts. I’m also hoping that people who read this blog will be inspired to use the attachment and send in photos of their projects so I can post them.
-
-
I’ve had one of these attachments for over a year, but have yet to try it out. You’ve given me new ince3ntive, as I worried about matching the beginning and ending points on the circles. I have a Viking machine, but the attachment works exactly the same way. Thanks for the ideas. Looking forward to more!
-
For a straight stitch, the beginning and ending of the circle line up because the fabric is held in place by the anchoring pin so the stitches are the same distance from the needle to the center of the circle. For lining up decorative stitches, please see the comment below that I wrote on August 3 regarding making decorative stitches line up and be spaced a similar size at the beginning and ending of a circle.
-
-
Great tutorial, thank you. Could you expand it to include details about how to work out how far to use the Balance Function better. There must be a way of working out the length or the Repeat of the stitch and therefore the degree of contraction or extension needed to get the patterns to seamlessly join…. Sigh …. it’s going to need mathematics, isn’t it?
-
Your question regarding how to make decorative stitches line up at the beginning and end of a circle is a good one. My answer is a bit lengthy but hopefully will give you some insights into how to do this. It is important to first stitch out a test circle before working on your finished project. This will help you see what adjustments need to be made.
Sometimes the decorative stitches seem to come out perfectly at the beginning and the end of the circle and other times, they don’t. It all depends upon the length of the pattern and the circumference of the circle. When using the odd number notches on the circular embroidery attachment, the beginning and ending decorative stitches seem to line up best. I’m not sure why.
Here are the steps for making minor adjustments with the stitch length when needed:1. Measure the circumference of the circle. The circumference is the distance around the circle. An easy way to measure this distance is to use a 1″ wide plastic tape measure. Stand the tape measure on it’s bottom edge and it will act like a bendable ruler. You can then easily bend it around the circle to measure the circumference.
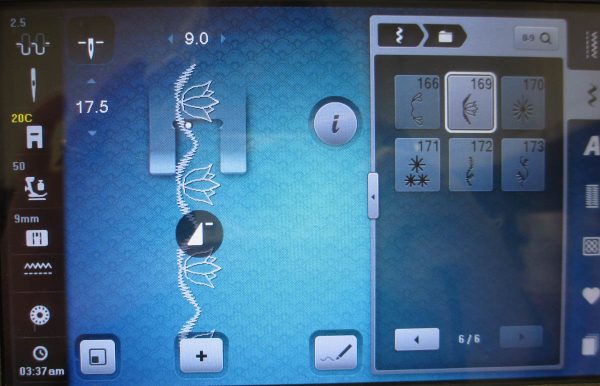
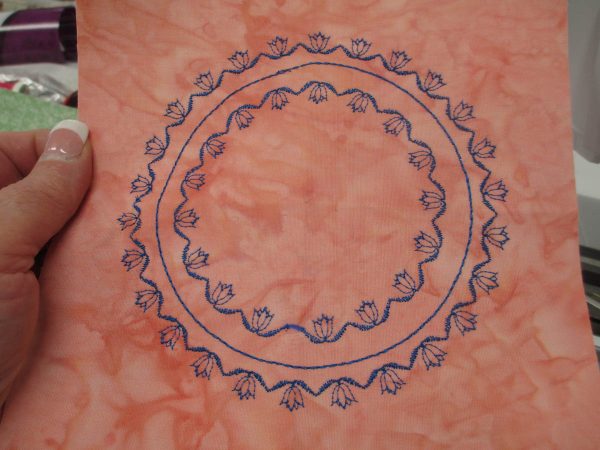
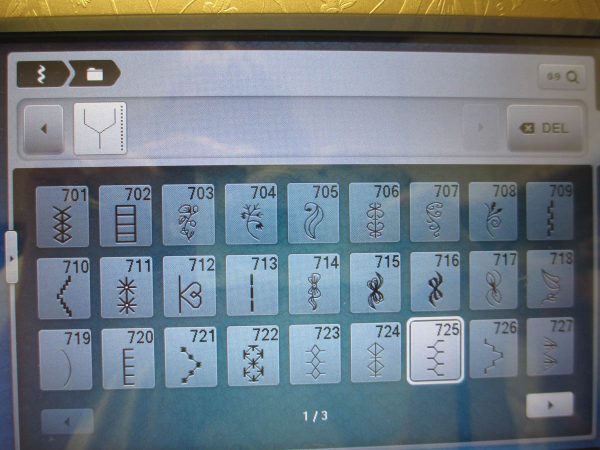
2. You will also need to know the length of the decorative stitch. Each utility and decorative stitch has a length and width that is their default setting. These settings can be changed if desired. If you have the BERNINA Simulator downloaded on your computer, you can use that to practice learning about the features of your machine. It is like sitting at your sewing machine but you are in front of your computer or laptop. It’s a great learning aide that BERNINA has developed. In my tutorial, I chose decorative stitch #169. It’s a tulip with a connecting curve on each side. I stitched it with blue thread on a peach colored fabric (see the tutorial photo.) A nice feature of my B-880 is that the finished length of any decorative stitch is displayed on the screen (see the tutorial photo.) If you have a machine without this feature, you can simply stitch out the tulip and measure it with your plastic tape measure like you measured the circle. The default length of tulip #169 is 17.5. I can change this setting in .1 increments if desired.
3. Divide the circumference of the circle by the length of the decorative stitch. This will tell you how many tulips will be stitched around the circle. I was able to fit 20 tulips around the circle. If the answer doesn’t come out as an even number (e.g. if the answer is 19.5), then the last tulip (or 2-3 tulips) need to be lengthened (or shortened) to make up that last .5 length. You could even figure the math to lengthen or shorten all of the tulips but remember that the adjustments can only be made in .1 increments. It might mean having 18 tulips around the circle rather than 20 but they could all be the same size.
4. On the screen, to the right of the tulip stitch and presser foot display, there is an ” i ” with a circle around it. This is the information button that allows you to make adjustments to the stitch. Click on the ” i ” and the “Functions” will be displayed on the right side of the screen. They include the functions called Pattern Begin, Pattern Repeat, Mirror Image left/right, Mirror Image down/up, Altering Pattern Length/Stitch Density and Balance. I prefer using the icon that is for altering the pattern length. It is an elongated black right angle with a plus and minus sign next to it. The length of the tulip can be adjusted in .1 increments to make the tulip longer or shorter. The other option you could use is the icon that is for balance (it looks like a balance scale.) That function can change either the length and/or height of the tulip. Changing the height of the tulip is not necessary so using the Altering Pattern Length function is the function you will want to use.
5. When working with words, phrases or sentences around a circle, the same math can be applied. The words can be scrunched or lengthened. They can be combined with decorative stitches to help fill the circle.
I hope this helps in your understanding of the math for making perfect designs around a circle. Once you determine the correct pattern length, the real fun is seeing your circle and decorative stitches coming out perfectly at the end of the circle. You will still find yourself holding your breath as you approach the beginning of the circle. It’s part of the amazement of this attachment. Half circles are also an option you can play with.
-
-
Hi will this work on the activa 240 benina machine
-
Hi Maggie:
Yes, the Circular Embroidery Attachment will fit the B 240. It will fit all of the 3-digit BERNINA machine models.
Kathy Kansier
-
-
Hi Kathy. Can you use a twin needle with this attachment please? Thank you. Kim 🙂
-
Anyone know how to use and attach the old style attachment . It has no screws. In red box but was given it with no instructions.
Leave a Reply
You must be logged in to post a comment.




Great tutorial! I recently bought this attachment and have been dying to try it out. I have in mind to use it for quilting decorative circles. Since I’ll be sewing through quilt top, batting, and backing, I’m thinking that I won’t have to use stabilizer per se. Thoughts?