JOY YoYo Count-Down to Christmas Calendar
This JOY YoYo Wall Quilt from Terry White is a celebration of the 24 days leading up to Christmas Day. Twenty-four yoyos create pockets in which you can put tiny treats for your people. Open one each day starting with December and when all the treats are gone it will be Christmas Eve !I had great fun designing and stitching this project. I hope you enjoy it too!
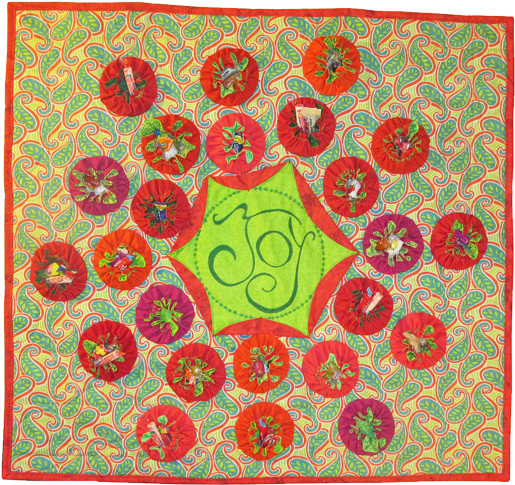
Finished size: 31″ x 30″
Supplies
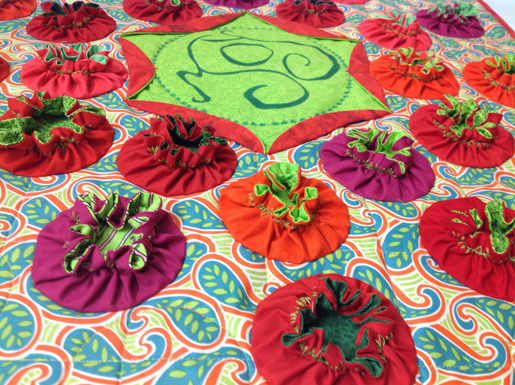
Except for the quilt top and backing fabrics, the rest of the project is made from scrap fabrics of red and green. There is variety in the solid color red fabrics, including purple-y and orange-y ones. Most of these are from CherryWood Fabrics. The green fabrics are a variety of prints. The center JOY yo-yo is made from a green on green print.
- 34″ square of fabric for quilt top
- 36″ square of fabric for backing
- 34″ square of polyester traditional loft batting
- If not using scraps for the yo-yos you will need
- 2 yards of red cotton fabric, cut into twenty-four 8″-diameter circles and one 13″-diameter circle
- 2 yards green cotton fabric, cut into twenty-four 8″-diameter circles and one 13″-diameter circle
- 4 skeins of green embroidery floss cut into twenty-four 25″ lengths
- Very strong thread, green, to draw up the yoyos – I used Coats & Clark Dual Duty XP – two strands through the eye of the needle.
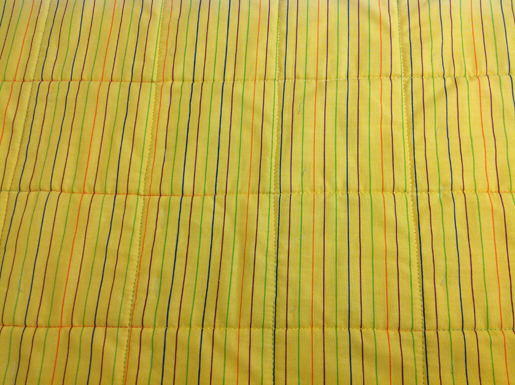
- Quilting thread – I used Star Multi-Color Cotton Thread in Citrus, a mix of bright greens, yellows, and oranges.
- Temporary marking-pen, such as Pilot’s Frixion erasable pen . . . it is so great!
- Permanent fabric-marking pen in green
- Cardstock or template plastic
Download and print the yoyo and JOY templates: JOY_YoYo_Advent_Calendar_circles_121314.pdf
Step One) Make the double yoyos.
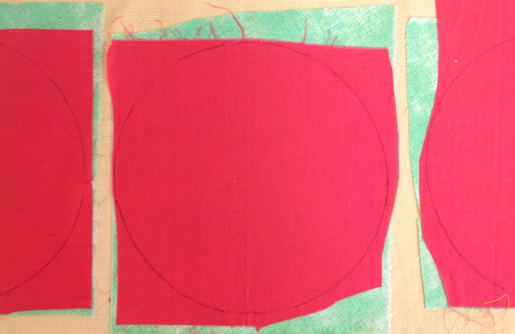
Using cardstock or template plastic, make the yoyo templates by tracing the printed templates. (Or draw a 3-1/2″-diameter circle inside an 8″-diameter circle.) Cut out both circles to make one 3-1/2″-diameter circle template and one 8″-diameter circle template.
Trace and Cut
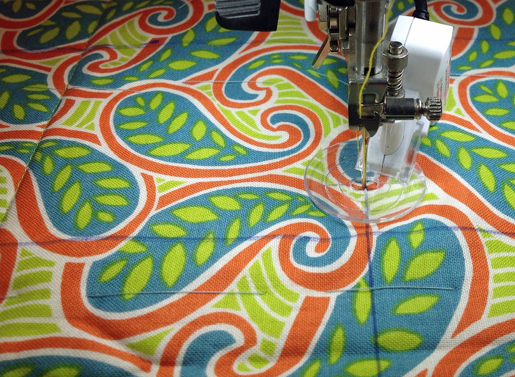
Trace the 8″-diameter circle on the wrong side of the red fabric.
Place the red fabric right sides together on a piece of green fabric cut roughly the same size as the red.
Press together. (I add steam.)
Cut the circle out of both fabrics at the same time. I like doing it this way, as you only cut once to make two circles. I use a large pair of Havel’s serrated scissors; the cutting goes quickly and the serrated blades keep the two fabrics from slipping. It is kind of like differential feed for scissors!
Trace the 3-1/2″-diameter circle on the right side of the center of the green fabric circle.
Stitch and Turn
I set up my BERNINA sewing machine with these settings:
- Stitch length = 3
- Needle position at 5 (far right)
- Reverse Pattern Foot #1D with Dual Feed engaged. (A walking foot would work also.)
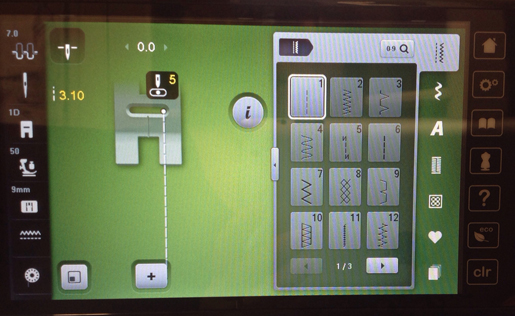
This set up is absolutely amazing! I stitch with the edge of the circle lined up with the outside of the foot for a scant 1/4″-wide seam allowance. I have yet to stitch a pucker into the seam!
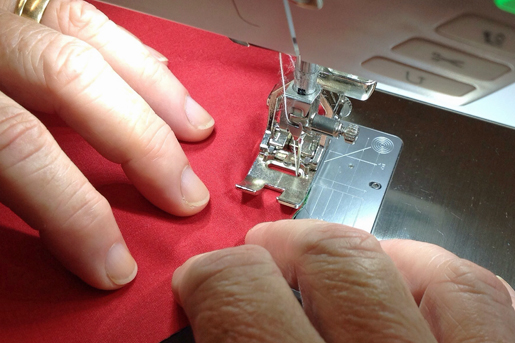
With right sides together, stitch the circles all the way around. Notice in the photo that I am using my fingers to gently feed the fabric under the needle to keep control of the edge.
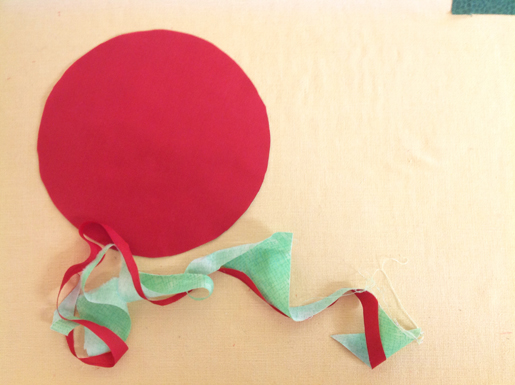
Cut a 1-1/2″-long slit in the middle of the red side. Turn the circle right side out. When I turn, I like to gently pull at the seams all around.
When the yo-yo is slit and turned, there is no puckering at all. Yay!
Press flat.
These are not small things – they are huge to me! To be able to have stitching situations solved by my BERNINA is a really big deal!
Step 2) Create the yoyo drawstrings.
For this step I adjusted my sewing machine for really BIG zigzag stitch and used a cording foot (BERNINA Bulky Overlock Foot #12).
TIP: When using the cording foot, hold the top and bobbin threads to the side and back of the foot with your finger. The cording foot has a channel underneath, so the threads aren’t anchored in the same way as other presser feet. You don’t have to do this with most other presser feet because the foot itself holds down the threads, preventing them from slipping down into the bobbin area.
I set my stitch setting as shown below:
Zigzag stitch with length = 2.3 mm and width = 9 mm (or your widest stitch.
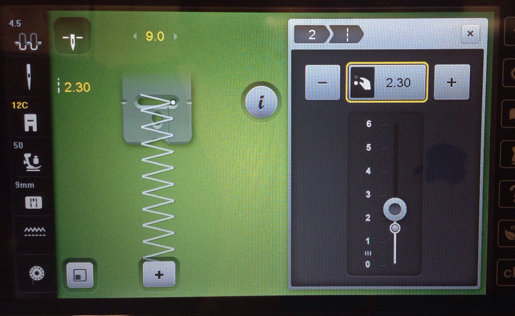
TIP: Engage the securing function (knot icon) to begin and end your zigzag stitching with a knot. This will ensure that the threads are secure so that when you pull the cord to close your yo-yo the stitching won’t pull out.
Couch the piece of embroidery floss around the circle, taking care not to catch the floss in the stitching. You are creating a casing for the floss with the zigzag stitches.
TIP: I use a stiletto to hold the edge of the circle while stitching so that the edge doesn’t bunch up into the zigzag.
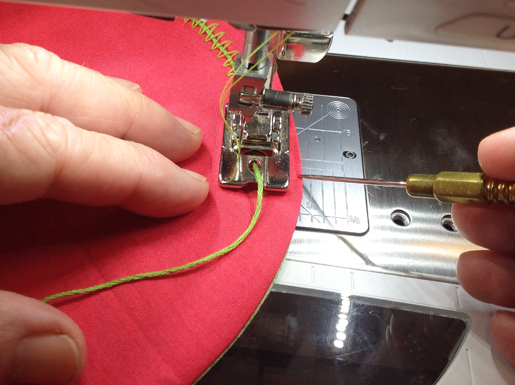
After couching the cord, trim the stitching thread tails. But NOT the cord tails!
You will want to close up all the yoyos to see how they will look, but restrain yourself! You will be stitching them to the quilt with them open, then closing them afterward.
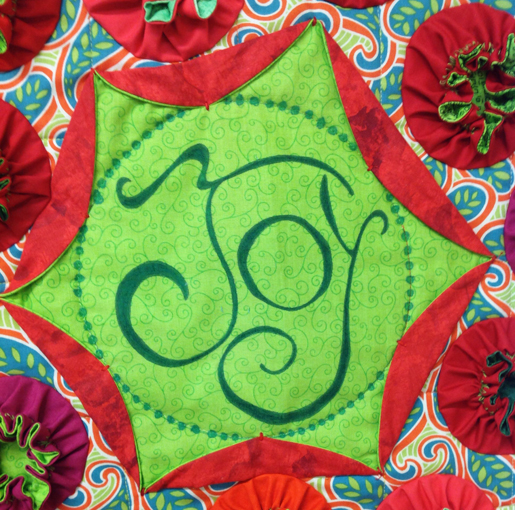
Step 3) Make the JOY center yoyo.
Draw a large circle – 12-1/2″ in diameter – on the green fabric. Mark an 8″-diameter circle inside the large circle.
Using the downloaded and printed page as a guide, draw JOY in the center of the circle with a green permanent fabric pen. I outlined the letters first, then I colored them in lightly. I added several layers to achieve the dark green color. By laying in lightly-drawn layers of color, I avoided the dark green ink bleeding into the fabric.
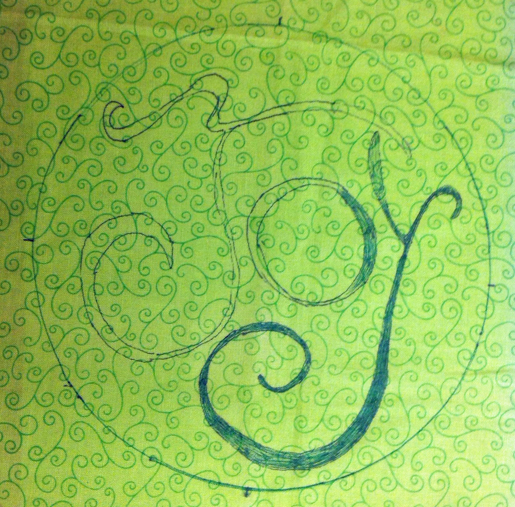
IS THERE A TEM
Place the JOY circle on a piece of red fabric and cut out the two circles at the same time.

Place the green circle right sides together with the red circle. Stitch around the circle with a 1/4″-wide allowance.
Cut a slit in the red circle, turn, and press.
Step 4) Make the quilted base.
Before quilting, draw an 8″-diameter circle in the center of the quilt top with a permanent marking pen. This is the placement for the center JOY circle.
Draw a 3-1/4″ grid on the quilt top.
Layer the backing (face down), batting, and top (face up). Baste the “quilt sandwich” layers together.
Thread the sewing machine with citrus-color thread in the needle and bobbin.
I use my BERNINA Stitch Regulator when I quilt. For this project I set up my BERNINA sewing machine for quilting using the settings shown below (straight stich with length = 2.5 mm), and attached the BERNINA Stitch Regulator.
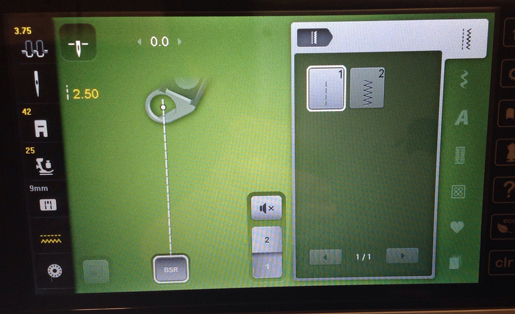
Machine-quilt the grid lines, including through the marked center circle. Stitching this grid helps keep the square shape of the quilt.
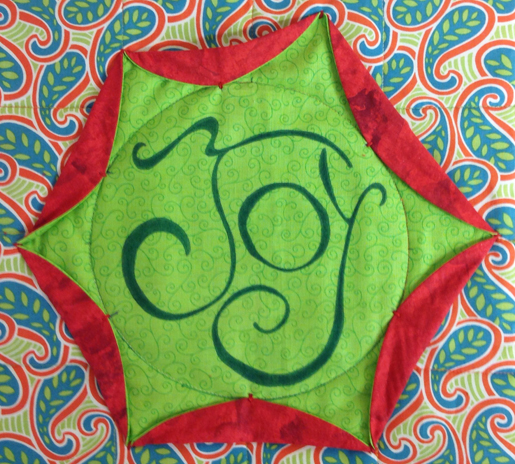
Step 5) Attach the JOY circle.
Place the JOY center circle on the marked center of the quilt. Pin.
Stitch along the outline of the 8”-diameter circle.
Mark six equal sections on circle. I used the disappearing marking pen.
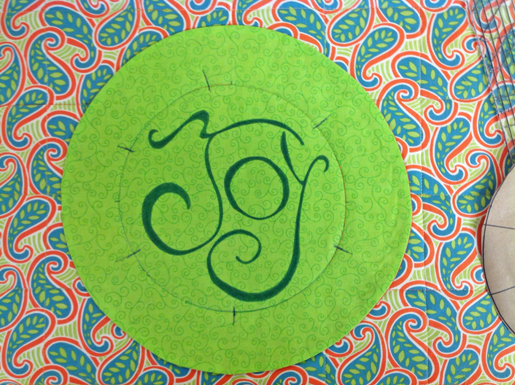
TIP: Each section is 60 degrees. Draw a straight line from side to side through the center of the circle, then use a clear acrylic quilters 30-60-90 ruler to draw lines 60 degrees away from it.
Fold over the edge of the circle between each set of marks and pin. This creates a red scalloped edge around the JOY medallion.
Mark the center point of each red scallop, pull it back, and pin in place. Select a bartack stitch (or a zigzag or universal stitch with a length of 0 mm) and stitch a bartack at each pin.

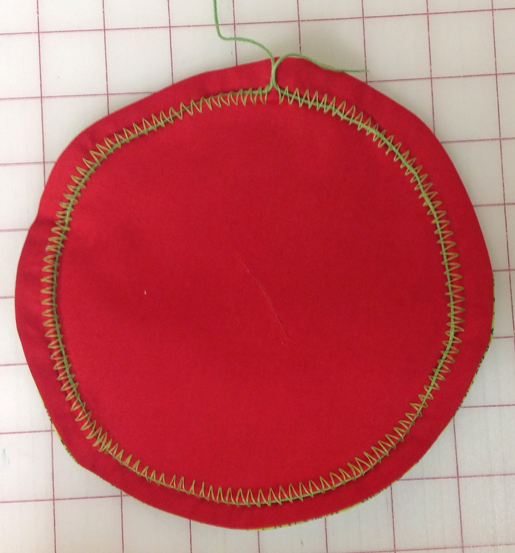
Step 6) Attach the yoyos.
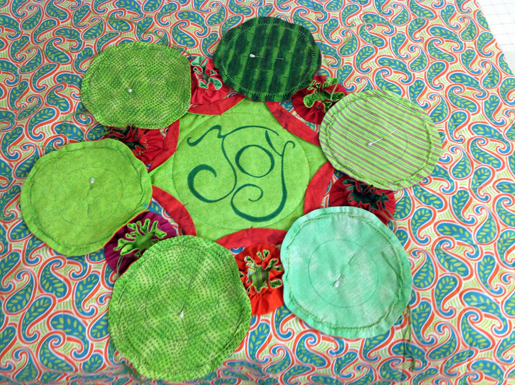
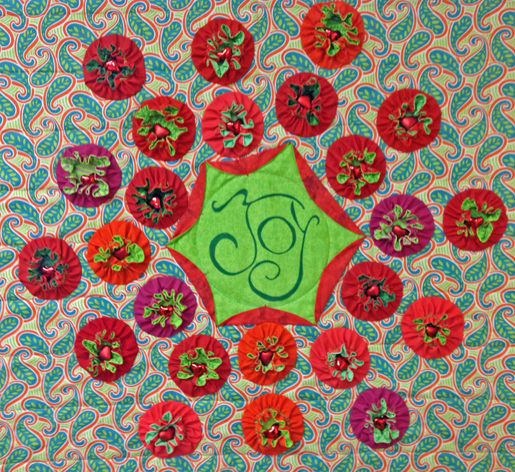
Arrange six of the open yo-yos, red side down, about ¾” from the red scallops of the center circle. Pin in place.
Using the same settings as for quilting, stitch on the marked 3-1/2″-diameter circle lines.

Draw up the yoyos: Cross the floss ends and slowly pull so as not to pull out the zigzag stitches. Knot the floss and thread it through to the inside of the yoyo using a big tapestry needle. Make a knot on the inside. Trim off the excess floss, or you may keep the length to wrap around a little scrolled note or to attach a bead, bells or other little embellishment.
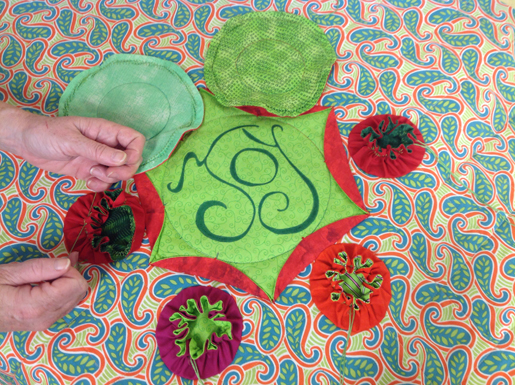

Arrange six more yoyos as shown in the photo. Stitch them to the quilt.
Continue with the next six and then the next six.
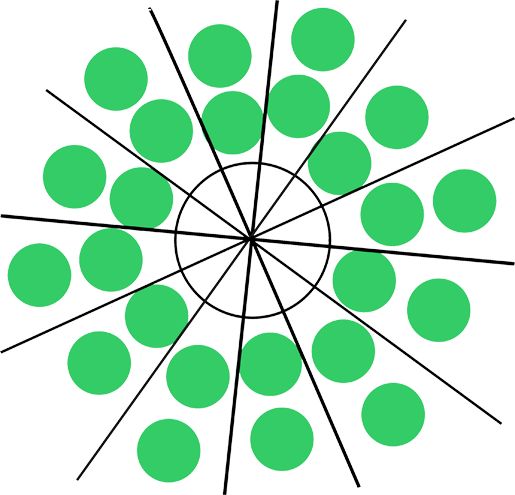
Tip: Divide the circle into twelve section – like a big wheel – and position two yoyos between each set of “spokes.”
I added extra embellishment to the JOY circle with my green fabric marker. A decorative stitch would have been a great idea. Sometimes, when I’m making a pattern and designing as I go, I miss a good idea. The JOY and the trim could have been stitched in the center – it would have been very cool!
Step 7) Finish the quilt.
At this point, I measure and mark the quilt for trimming. First I mark the edge lines on the quilt, and then I use a big zigzag to stitch along the lines. Afterward, I trim the quilt just outside the edge of the zigzag stitching. This gives me a nice finished edge to bind.
I wanted just a little more quilting on the work, so I added some circles. Use the 3-1/2″-diamter circle template to trace circles out to the edge of the quilt as desired. Quilt the circles by stitching along the drawn lines.
Bind the quilt using your favorite method. I added a rod pocket on the back to make it easy to hang.
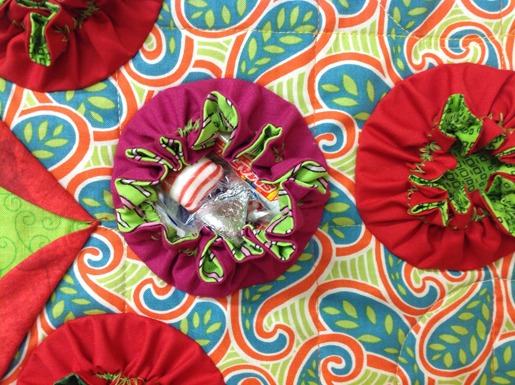
Step 8) Fill the yoyos.
Fill the yoyos with candy or other small items – tiny toys, inspirational verses or quotes, etc. Mine will be filled with candy 🙂
At this time Terry’s Threadpaint.com website is getting an update, but you can still visit her on Facebook and YouTube. She’s also teaching two thread-painting classes at Craftsy: Free-Motion Machine Embroidery and Machine Embroidery Hand-Stitched Looks.