Lettering Fun Pocket Pillow
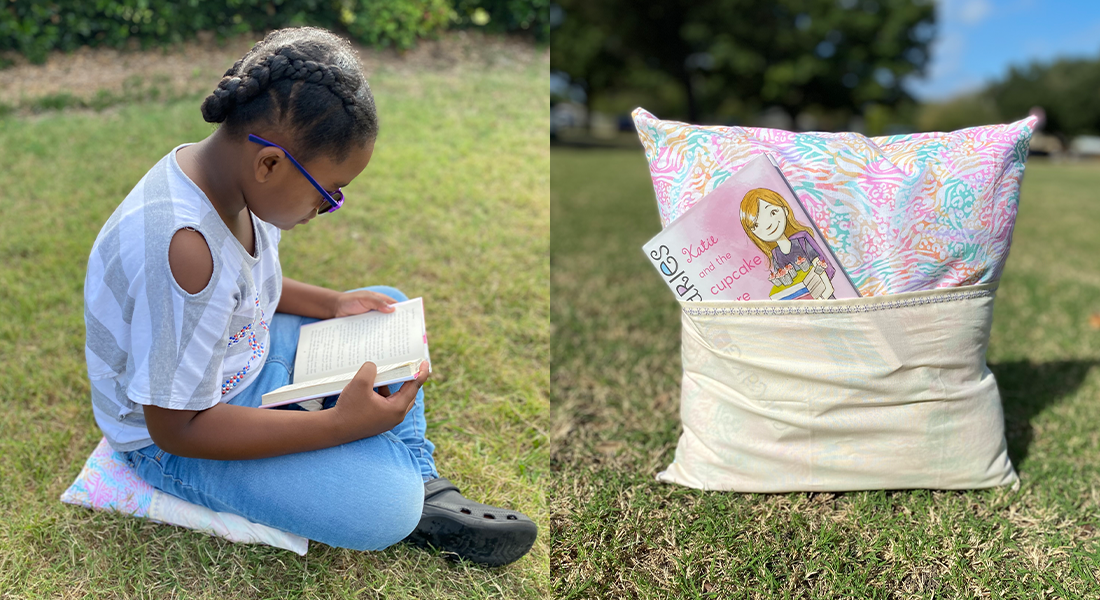
This project lead me on a fun adventure playing with all the changes that I could make to lettering and words sitting in front of the embroidery machine—no embroidery software required! With so many ways to change and manipulate lettering, it really gave me permission to play! Making changes to size, spacing, baseline and rotation were all made easy using the Group function which really let me change things up. Let me guide you through this adventure and you can explore all that possibilities for creating you own reading pillow pocket design.
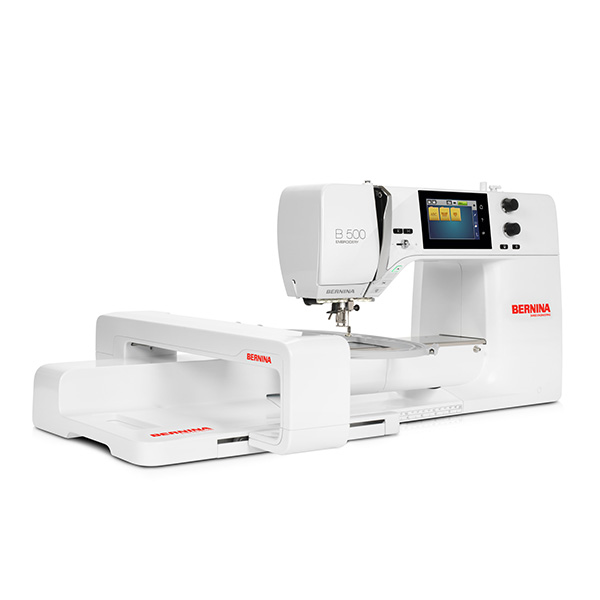
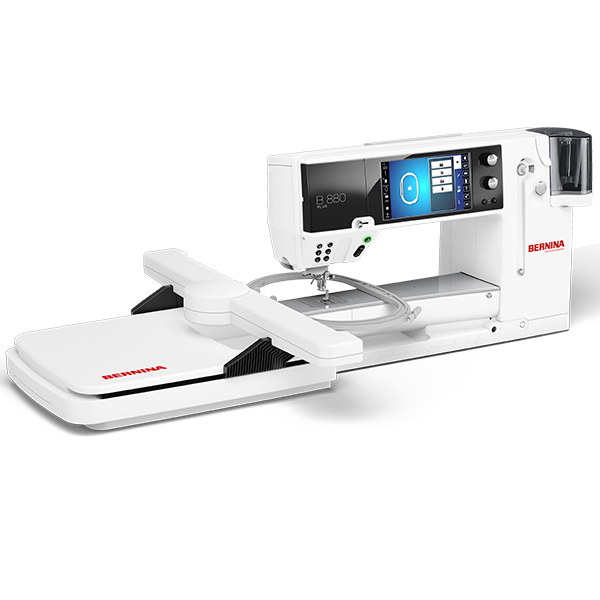
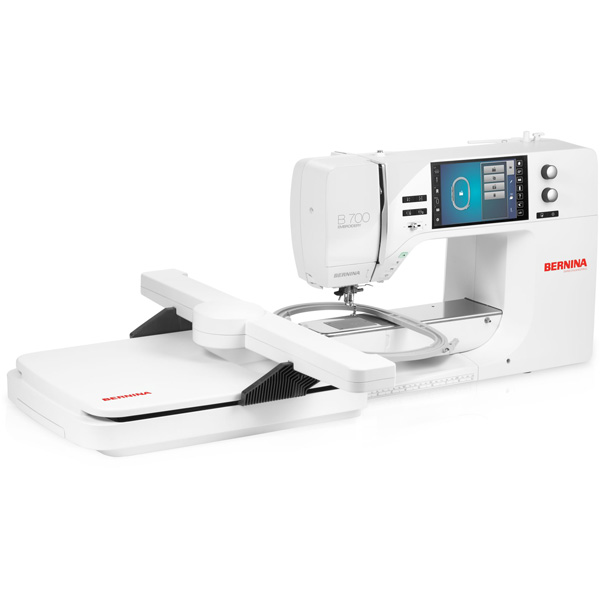
The embroidery features for Lettering, Word Art, Group/Ungroup, Resize and Rotate are included on the B 880 PLUS, B 790 PLUS, B 700, B 590, and B 500.
Materials to Make a Lettering Fun Pocket Pillow
- Fabric for pocket pillow embroidery (duck cloth canvas was used)
- Cut 14″ x 20″ to fit Maxi Hoop
- OESD HeavyWeight CutAway Stabilizer
- Cut 14″ x 20″
- 505 Spray Adhesive
- 60 Wt. Embroidery Thread
- 40 Wt. Embroidery Bobbin Thread
- Drop-Shaped Embroidery Foot #26
- BERNINA Maxi Hoop
- BERNINA 880 PLUS, 790 PLUS, 700, 590 and 500 Embroidery Machine (These BERNINA machines include the Lettering functions shown here)
OESD Design Collection #12662 Animal Friends Collection– Design #12662-10 Dragon Friend Appliqué
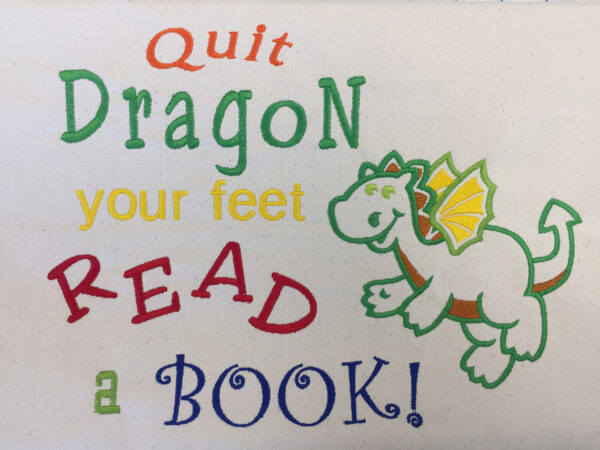
Building the words for this pillow pocket was really fun; it’s a sampler. A variety of lettering styles and editing functions were used to make setting up the lettering layout quite the exploration!
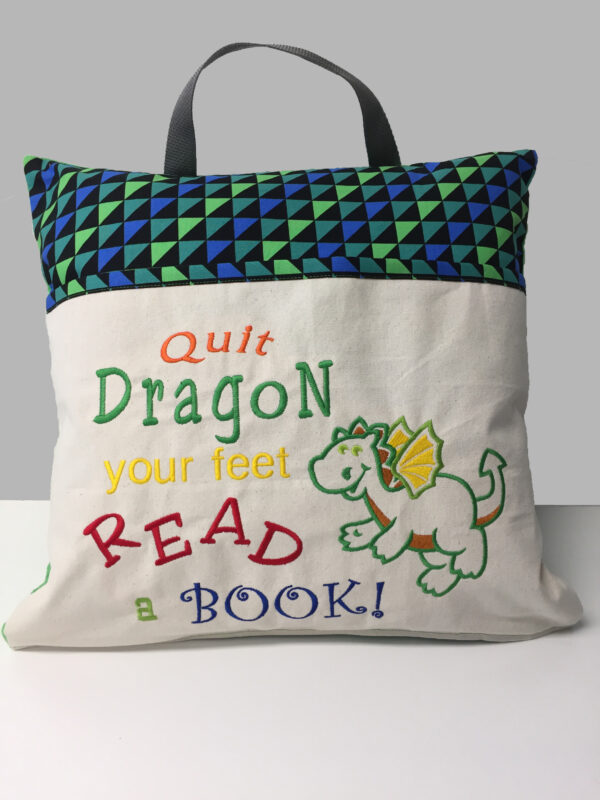
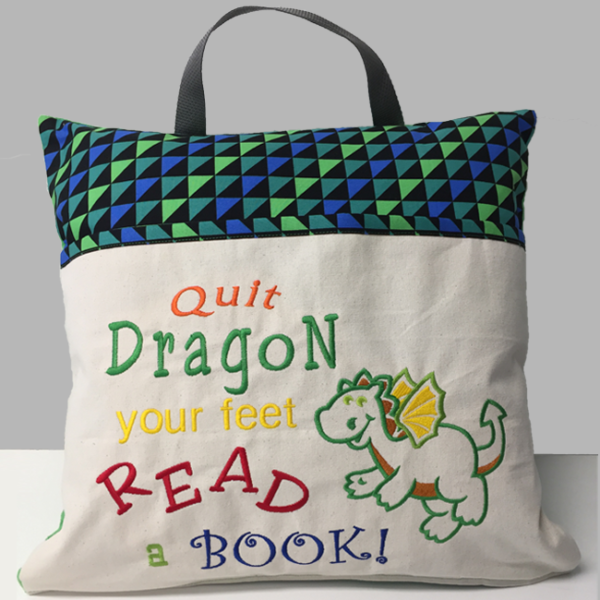
The words that we will be setting up are: Quit DragoN your feet READ a BOOK!
NOTE: I used the B 880 to create my reading pillow pocket design. The alphabet folder numbers are from that machine, but I have also noted the name of the font.
Add the word “Quit”:
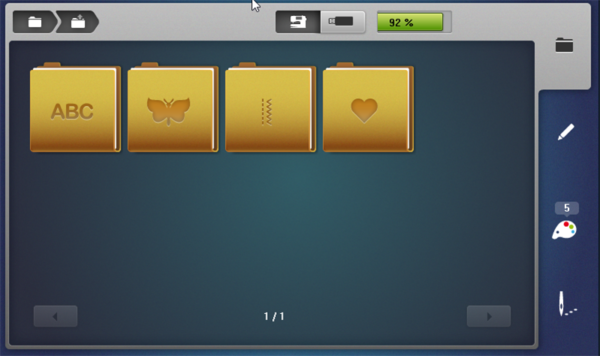
At the machine with the embroidery screen open, touch the Alphabets folder.
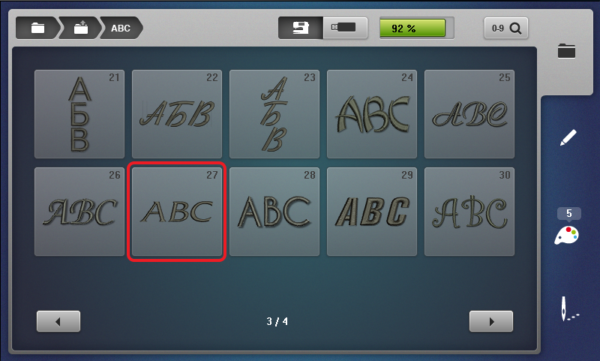
Using the arrows scroll and touch Folder #27 Flare Serif.
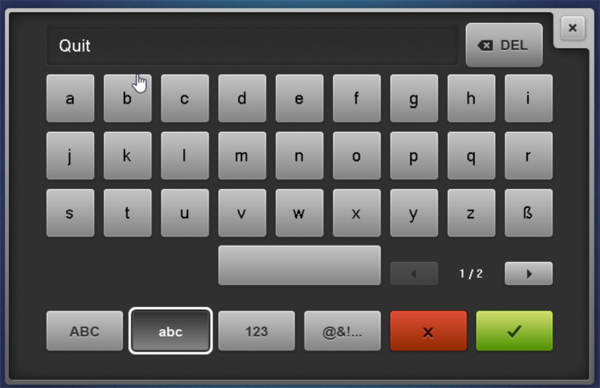
Enter an upper case “Q”; touch lower case letters and enter text “uit”. Touch the green check to Confirm.
The lettering appears on the Editing Screen.
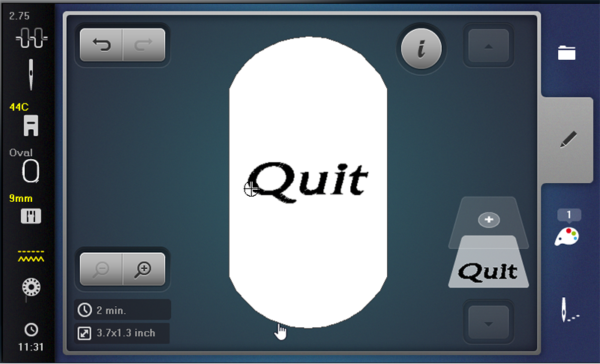
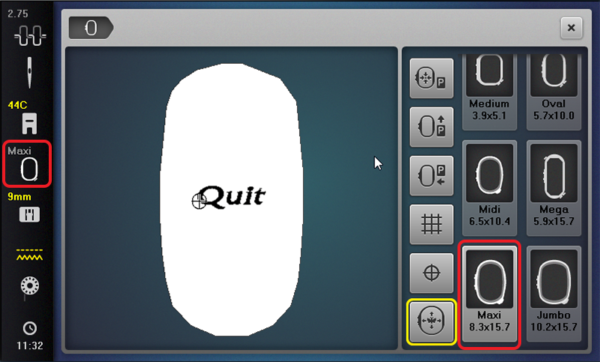
Touch the Hoop Selection/Hoop Display icon and choose the Maxi Hoop from the hoop selection. Close the screen.
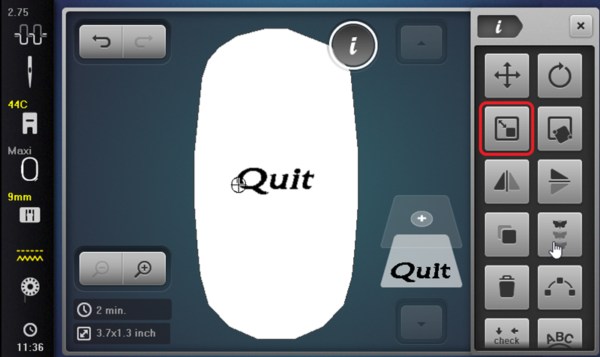
Touch the Information icon; touch Change Motif Size.
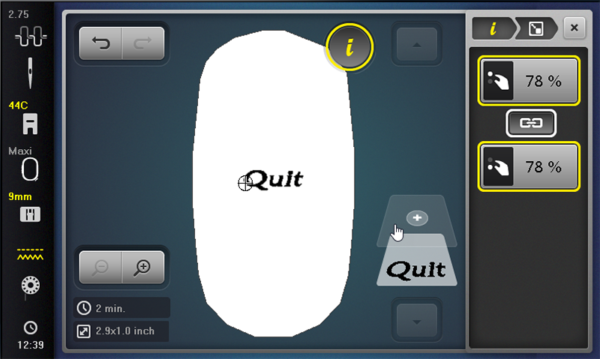
Touch the yellow “i” in the breadcrumb trail (navigation display).
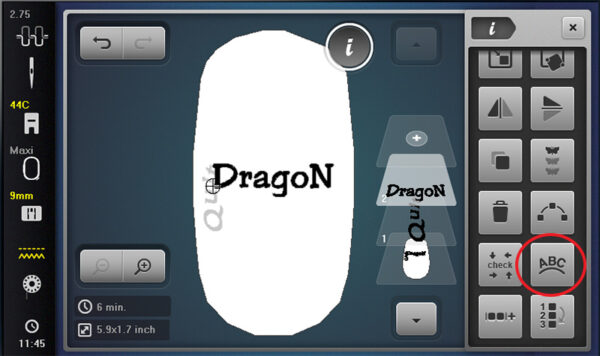
Touch the Word Art icon.
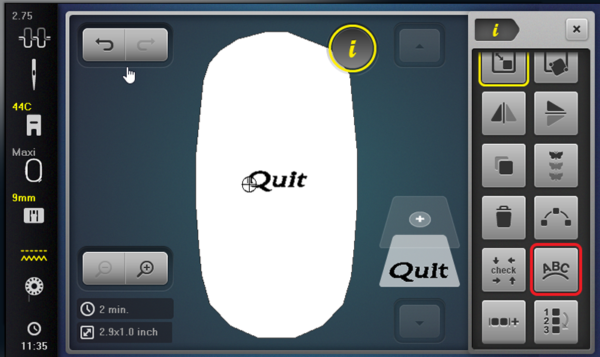
Use the Upper Multifunction Knob to change the spacing between the letters to 19. Turn the Lower Multifunction Knob clockwise to 26 to change the baseline of the word to an arc.
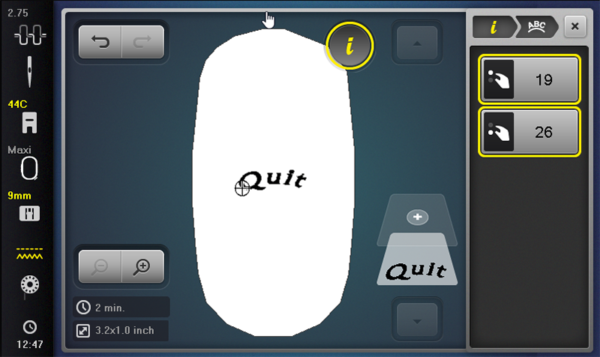
Touch the yellow “i” in the breadcrumb trail.
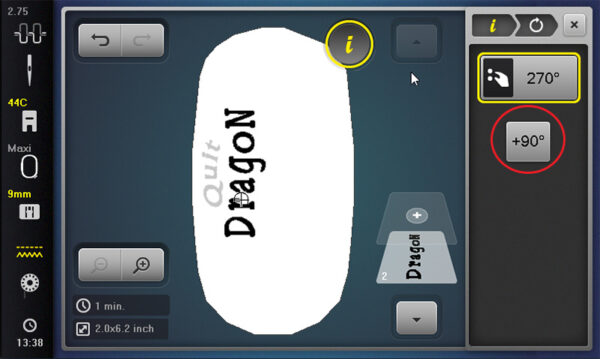
Touch Rotate Motif.
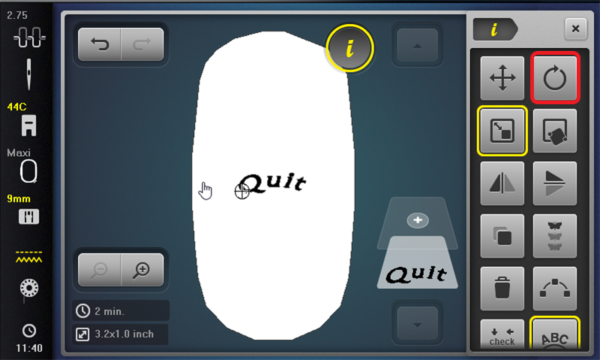
Touch Rotate Quick 90° three times to rotate 270 °. Touch and move the word “Quit” to the far left in the hoop.
Touch the yellow “i” in the breadcrumb trail.
Touch the Add icon (the + above the design) to add the next word
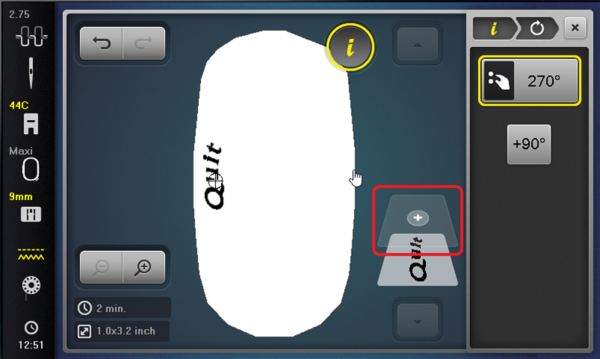
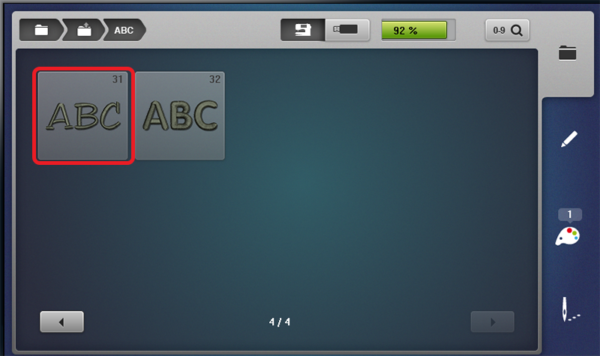
Scroll with the arrow and touch Folder #31 Happy Times.
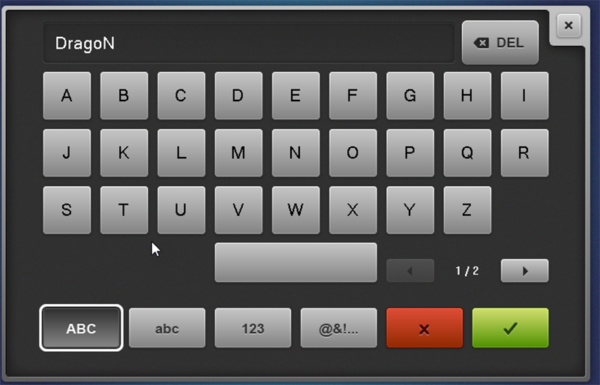
Enter an upper case “D”; touch lower case letters and enter text “rago”; touch upper case letters and enter “N”. Touch the green check to Confirm.
Use the Upper Multifunction Knob to change the spacing between the letters to 27.
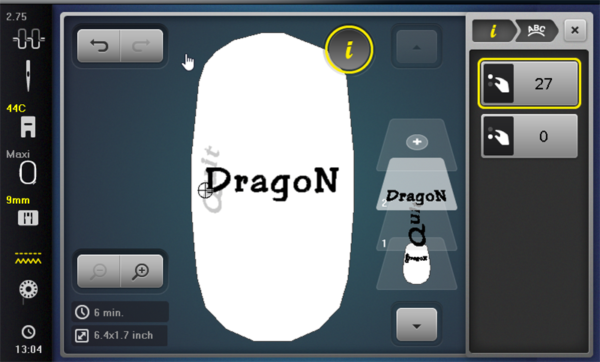
Touch the yellow “i” in the breadcrumb trail.
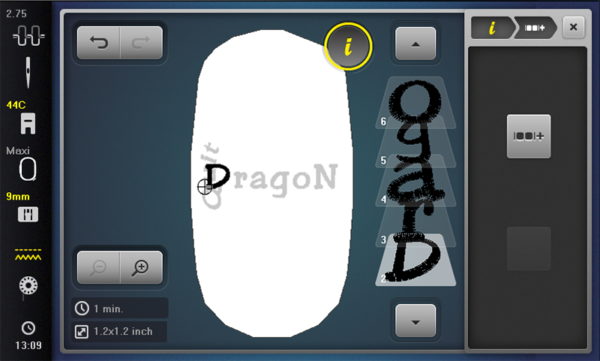
Scroll down and touch the Group icon.
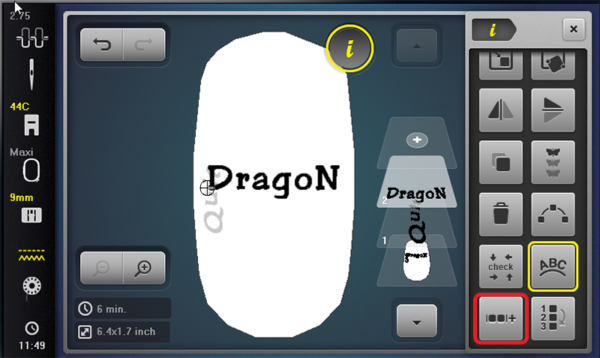
Touch Ungroup (the -), now each letter of the word DragoN is separate and changes can be made to each letter independently. Note that the Ungroup icon becomes greyed out after the word has been ungrouped.
Touch the yellow “i”.
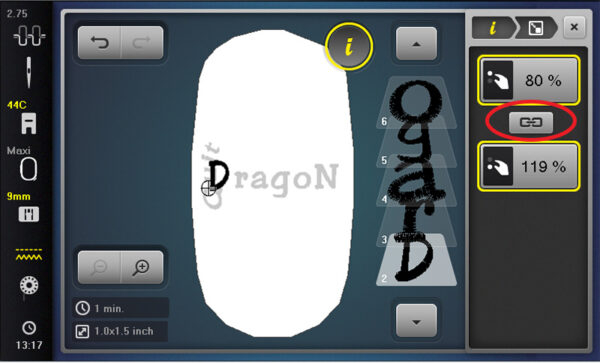
Touch Layer 2 (the capital D) and touch Change Motif Size; deactivate the Maintain proportions by touching the lock so that it does not have a yellow outline. Turn the Upper Multifunction Knob to change the width size of the letter to 80%. Turn the Lower Multifunction Knob to change the height of the letter to 119%.
Make the following changes to the remainder of the letters in the word DragoN:
“r”: Touch Layer 3
• Change width to 90% using Upper Multifunction Knob
• Change height to 152% using Lower Multifunction Knob
“a”: Touch Layer 4
• Change width to 85% using Upper Multifunction Knob
• Change height to 139% using Lower Multifunction Knob
“g”: Touch Layer 5
• Change width to 88% using Upper Multifunction Knob
• Change height to 136% using Lower Multifunction Knob
“o”: Touch Layer 6
• Activate Maintain Proportions
• Change to 123% using the Upper or Lower Multifunction Knob
“N”: Touch Layer 6
• Deactivate Maintain proportions
• Change width to 81% using Upper Multifunction Knob
• Change height to 119% using Lower Multifunction Knob
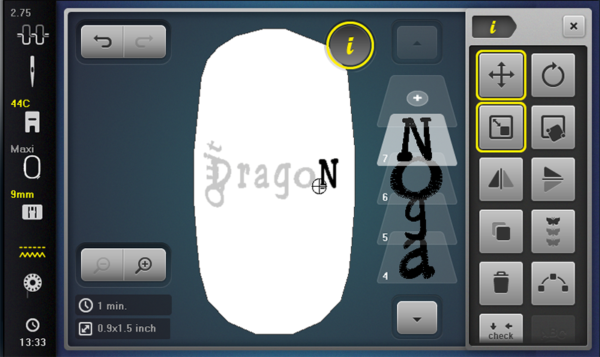
Touch the yellow “i” in the breadcrumb trail.
Scroll and touch Layer 2 “D” and then touch the Group icon (one with the +); continue to touch the Group icon until all layers of the word “DragoN” are grouped in one layer.
Touch the yellow “i” in the breadcrumb trail.
Touch Rotate Motif and touch Rotate Quick 90° three times to rotate 270 °.
Move the word “DragoN” to the left in the hoop so it sits below the word “Quit”.
Add the words “your feet”:
Touch the Add icon (the + above the design) to add the next word.
Scroll with the arrow and touch Folder #15 Swiss Block.
Touch lower case letters and enter text “your”, touch the spacebar, and then enter “feet”.
Touch the green check to Confirm.
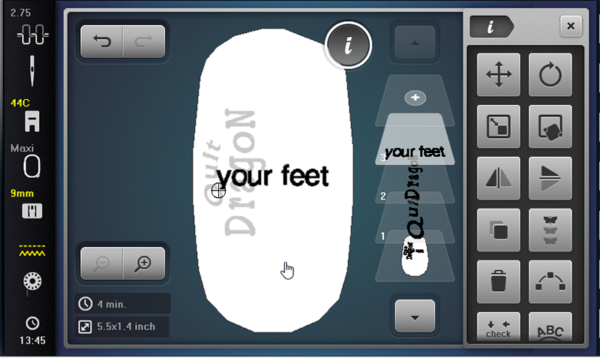
Make the following changes to “your feet”.
• Touch the Word Art icon, use the Upper Multifunction Knob to change the spacing between the letters to 15.
• Touch the yellow “i”.
• Touch Change Motif Size, activate Maintaining Proportions.
• Change to 79% using the Upper or Lower Multifunction Knob.
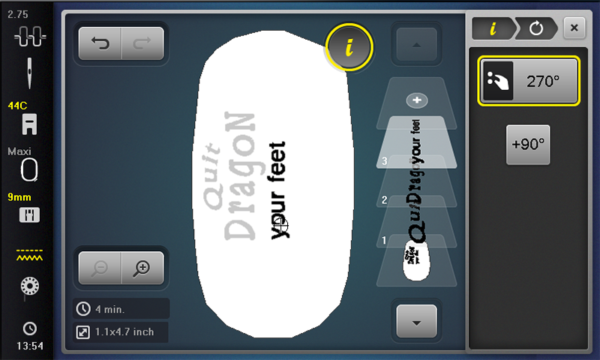
• Touch Rotate Motif and touch Rotate Quick 90° three times to rotate 270°.
• Move the words “your feet” to the left in the hoop below the word “DragoN”.
Touch the Add icon (the + above the design) to add the next word.
Scroll with the arrow and touch Folder #31 Happy Times.
Enter an upper case “READ”.
Touch the green check to Confirm.
Make the following changes to “READ”.
• Touch the Word Art icon, use the Upper Multifunction Knob to change the spacing between the letters to 39.
• Turn the Lower Multifunction Knob clockwise 31% to change the baseline of the word to an arc.
• Touch the yellow “i”.
• Touch Rotate Motif and touch Rotate Quick 90° three times to rotate 270 °.
• Move the word “READ” so that it is not on top of any other word.
• Scroll down and touch the Group icon.
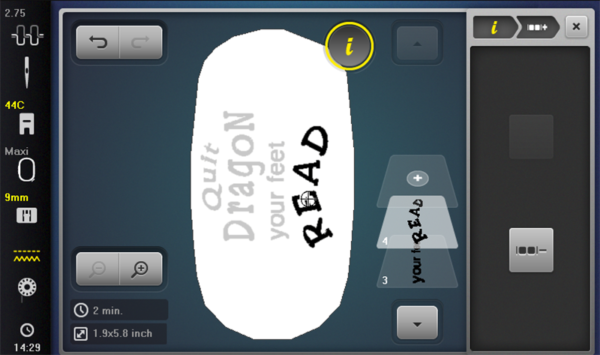
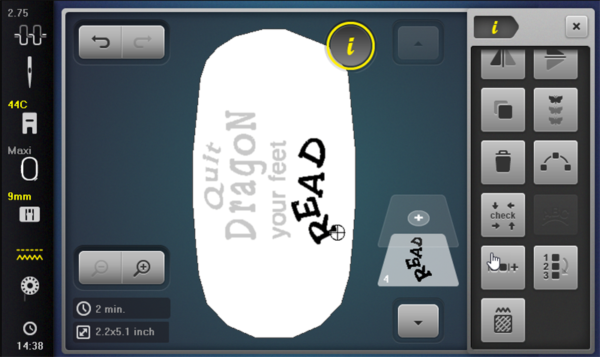
Touch Ungroup, now each letter of the word “READ” is separate and can be moved independently.
Touch the yellow “i”.
Touch each letter on the screen or in the Layer Panel and move them to make a staggered baseline.
Group the letters of READ together:
Touch Layer 4 “R”; scroll and touch the Group icon (one with the +). Continue to touch the Group icon until all layers of the word “READ” are grouped on one layer in the panel.
Touch the Add icon (the + above the design) to add the next word.
Scroll with the arrow and touch Folder #11 Chicago.
Touch lower case letters and enter text “a”. Touch the green check to Confirm.
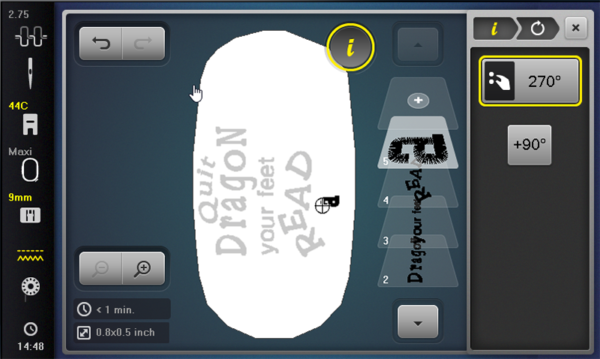
Move the letter “a” away from the other words.
Make the following changes to “a”:
• Touch Change Motif Size; deactivate the Maintain Proportions. Turn the Upper Multifunction Knob to change the width size of the letter to 80%. Turn the Lower Multifunction Knob to change the height of the letter to 122%.
• Touch the yellow “i”.
• Touch Rotate Motif and touch Rotate Quick 90° three times to rotate 270°.
• Move the word “a” below READ.
Add the word “BOOK”
Touch the Add icon (the + above the design) to add the next word
Scroll with the arrow and touch Folder #30 Curly.
Enter an upper case “READ” . Touch the green check to Confirm.
Make the following changes to “READ”.
• Touch Rotate Motif and touch Rotate Quick 90° three times to rotate 270 °.
• Touch the Word Art icon, use the Upper Multifunction Knob to change the spacing between the letters to 18.
• Move the word “BOOK” so that it reads after the “a”.
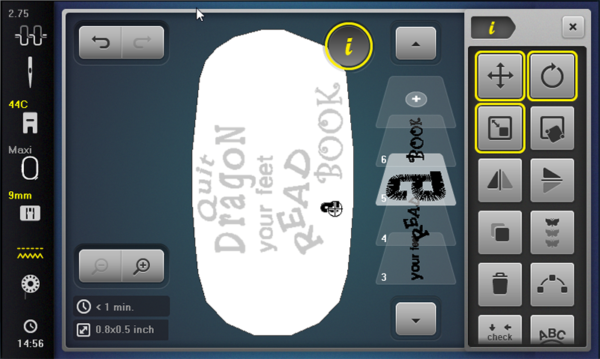
Whew! That was fun and look at all the ways you can change lettering right on the embroidery machine screen.
To complete the design it’s time to add the DRAGON, and we might even play with moving the wording a bit more.
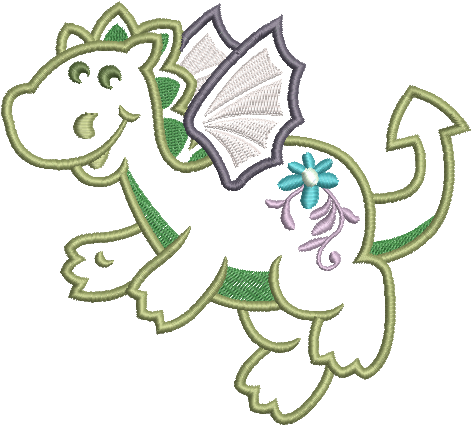
NOTE: The cute dragon design I used had some changes made also at the machine and saved for adding to the lettering group. The design was an appliqué. After ungrouping the design, the placement and tack down stitching lines were deleted along with the cute little flower since my reading pillow is for a boy. The design was then grouped and saved on the machine with the changes before adding to the lettering.
Adding the dragon design
Touch the Add icon.
Navigate to where the design is saved and open the edited design #12662-10 (the dragon friend design).
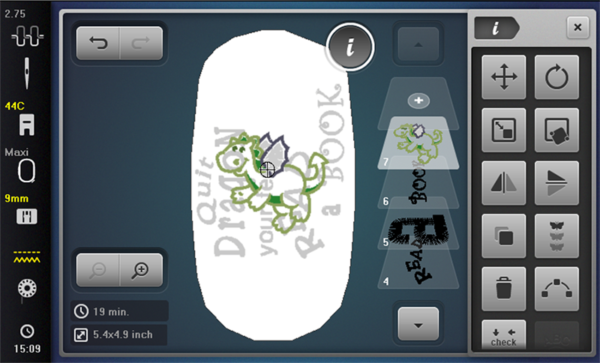
Move the dragon to the top of the hoop.
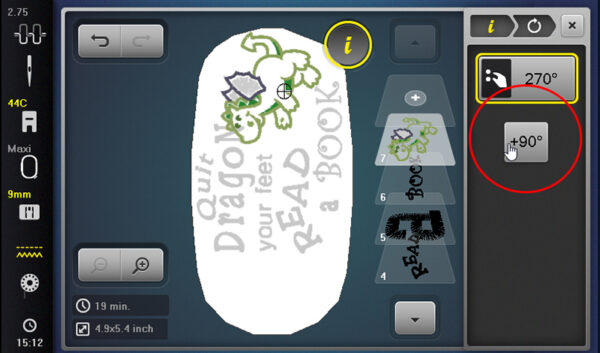
Touch Rotate Motif and touch Rotate Quick 90° three times to rotate 270 °.
NOTE: To move the whole set of words around easily, group them together and then you can fine tune their placement later if needed.
Touch the yellow “i”.
Touch Group; scroll the layers and touch Layer 1 “Quit”.
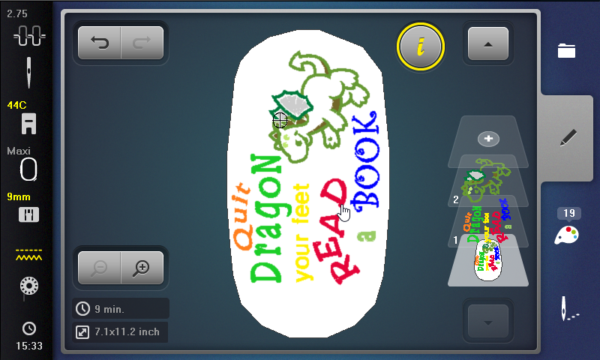
Touch the Group icon (one with the +) and continue to touch the Group icon until all layers with the words Quit, DragoN, your feet, READ, a, BOOK” are grouped into one layer.
Now it’s much easier to move and position the words in the hoop and the dragon friend.
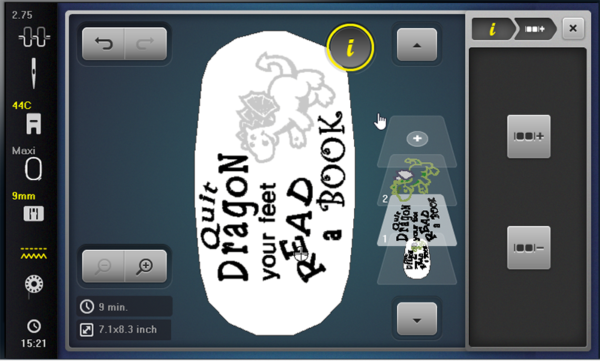
The design layout is complete.
Changing colors:
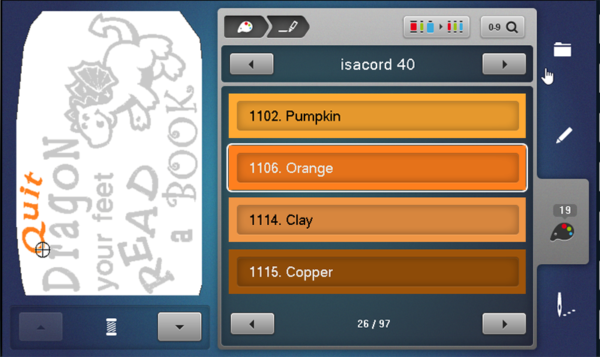
If you desire to change the colors of the lettering, touch the Color Information (paint palette) icon. Select your brand of thread, and you can easily input thread color numbers and change the appearance of the color on the machine screen.
Continue to work through the color sequence to change the elements that you wish to change to a different color.
Stitching the Design:
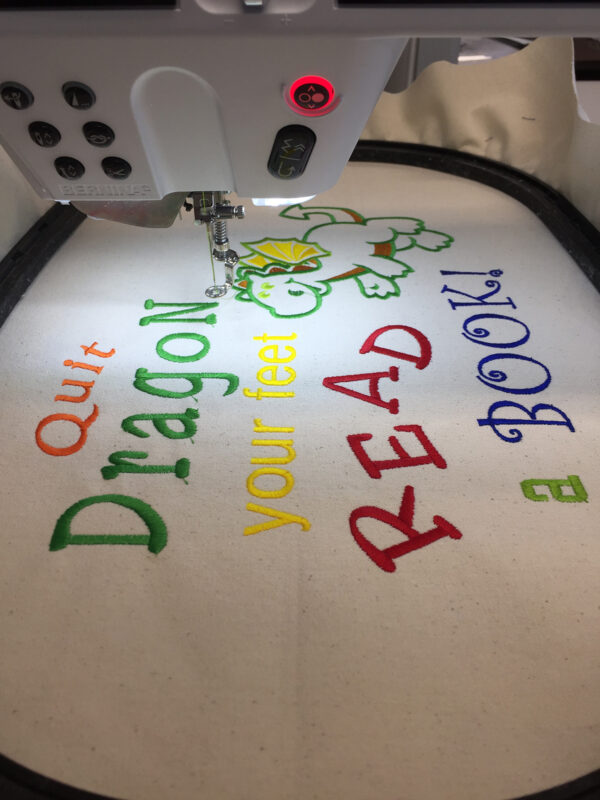
Prepare the pocket fabric for embroidery, spray the stabilizer with temporary spray adhesive and press sprayed stabilizer on the wrong side of the pocket fabric. Hoop the prepared fabric in the Maxi Hoop. Following the prompts on the embroidery machine, attach the hoop and stitch out the design.
The pillow pocket embroidery is complete.
 Reading Pillow Construction Instructions
Materials for construction: Read a Book Lettering Fun Pocket Pillow
Embroidered Pocket fabric
Trim embroidery fabric to 12″ x 17″
Pillow front fabric
Cut 17″ x 17″
Pillow back fabric
Cut 17″ x 17″
Upper pocket trim
Cut 2 1/2″ x 17″
Pillow handle
Cut 12″ length webbing
Pillow form 16″ x 16″
Pillow Assembly:
The construction of the pillow is basic sewing.
Cut the embroidered pocket fabric down to a 12″ x 17″ size, centering the embroidery design. Trim away excess cutaway stabilizer from around the design.
Press the pocket trim in half lengthwise with wrong sides together.
Stitch the trim to the wrong side of the embroidered pillow pocket using a 1/4″ seam allowance.
Press and fold the trim to the right side of the pillow pocket.
Stitch the trim to the pocket right side, stitching close to the folded edge of the trim.
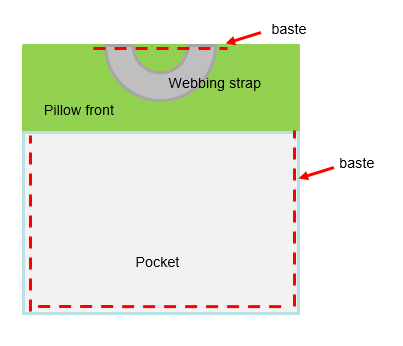
Lay the trimmed pocket right side up on top of the right side of the 17″ x 17″ pillow front. Baste around all three sides of the pocket a 1/4″ away from raw edge. See diagram below.
Position the 12″ webbing strap at the top of the pillow front, positioning the ends of the strap equal distance from the center. Baste strap into place. See diagram.
 Placing right sides together, pin the pillow front unit and pillow back together.
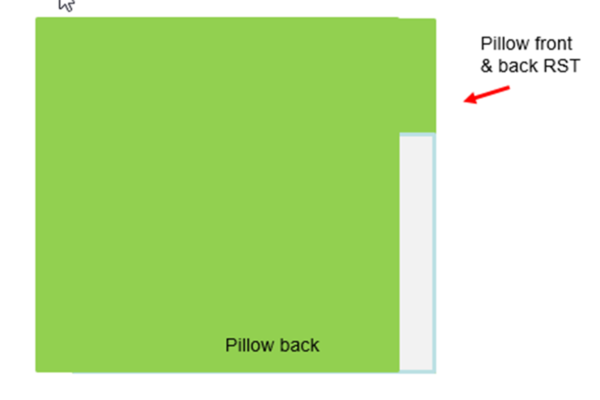 The seam allowance is 1/2″. Start stitching about 1” in on one side of the bottom edge, completely around the next 3 sides, and finish stitching about an inch in at the bottom edge. See diagram.
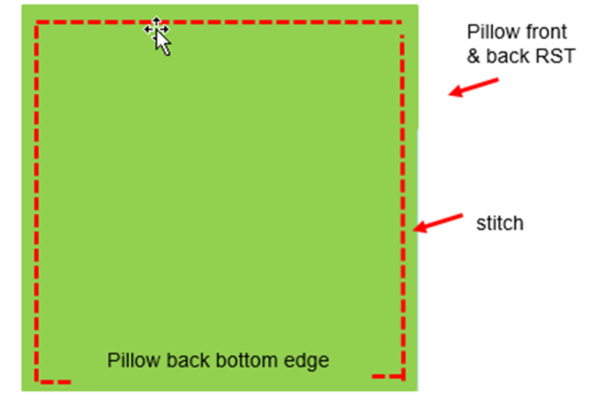
Turn pillow right side out and press. Press in on lower bottom edge 1/2″.
Insert pillow form and use clips or pins to keep edges together until stitched.
Machine or hand stitch across the bottom edge of the pillow to close the open seam.
What you might also like
3 comments on “Lettering Fun Pocket Pillow”
-
-
I love the way you can manipulate and change things right at the embroidery machine. Wish they could change the software on the 770QE’s to allow them to do this also along with pinpoint placement. If I would have known all this I would have bought the 790 or 880 but live and learn I guess. After what I paid for my machine it’s the last one I will be able to buy before I die. Don’t get me wrong I love it but do wish I had those other things available. All of that was not explained to me when I bought it.
-
Sharon don’t let the machine limit your creativity. Try the Embrilliance essentials software and you can create so much by combining patterns and then transfer to your machine. I have a B560 and am so pleased with its capabilities but definitely need the software and honestly it takes less time to combine designs on your computer than on the machine. Good luck!
-
Leave a Reply
You must be logged in to post a comment.



I love this and plan to make it for my Grandson’s May birthday.