Sew a Bridal Hanger Cover
Something old, something new, something borrowed, something blue – that is how the saying goes, right? If you have read my previous blog post, Custom Ring Bearer Pillow, you know that I have been involved in several weddings, and I am someone who likes to put a spin on tradition. On top of making ring bearer pillows for each of the couples whose weddings I am a part of, I love to make these simple bridal hanger covers. It checks off the something new and something blue! This pattern allows you to adjust to any style or size of hanger. And it is a great way to add a custom, and elegant, homemade touch to any wedding.
Supplies to Sew a Bridal Hanger Cover
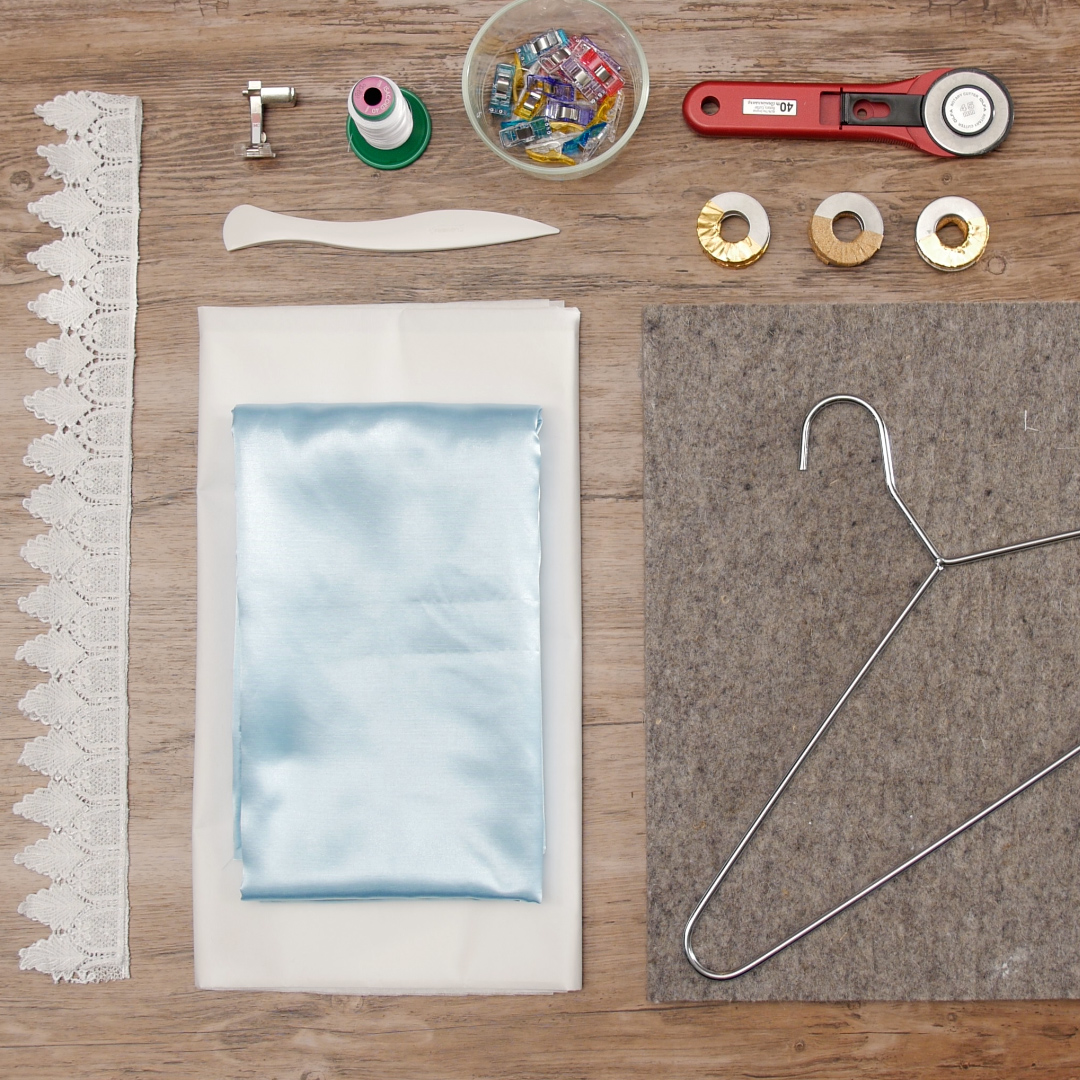
- BERNINA 590 E
- Reverse Pattern Foot with Clear Sole #34D
- Clothing hanger
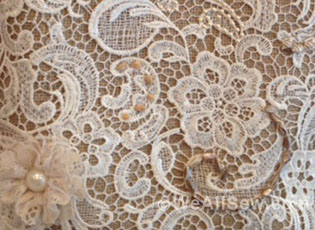
- Satin fabric (I chose flannel back satin)
- Lace trim
- Tracing paper
- Pellon Sew-In Fleece interfacing
- OESD Ultra Clean and Tear stabilizer
- 505 Temporary Adhesive
- BERNINA Midi Embroidery Hoop
- Isacord thread
- Clover Press Perfect
- Wonder Clips
- Point turner
- Pattern weights
- Pencil or pen
- Ruler
- Scissors
- Rotary cutter
- Cutting mat
- LAURASTAR iron
Using the flannel back satin is beneficial for multiple reasons. BERNINA offers several presser feet that help feed difficult fabrics through the machine with ease. Several BERNINA sewing machines also have Dual Feed, which helps evenly feed multiple layers of fabric at a time. I found that I can use these presser feet, and Dual Feed, with a sturdier material like flannel back satin. This combination results in beautiful stitches. This type of satin also has more body, holds its shape and stitches better, and embroiders more easily than regular satin.
Creating the Hanger Pattern
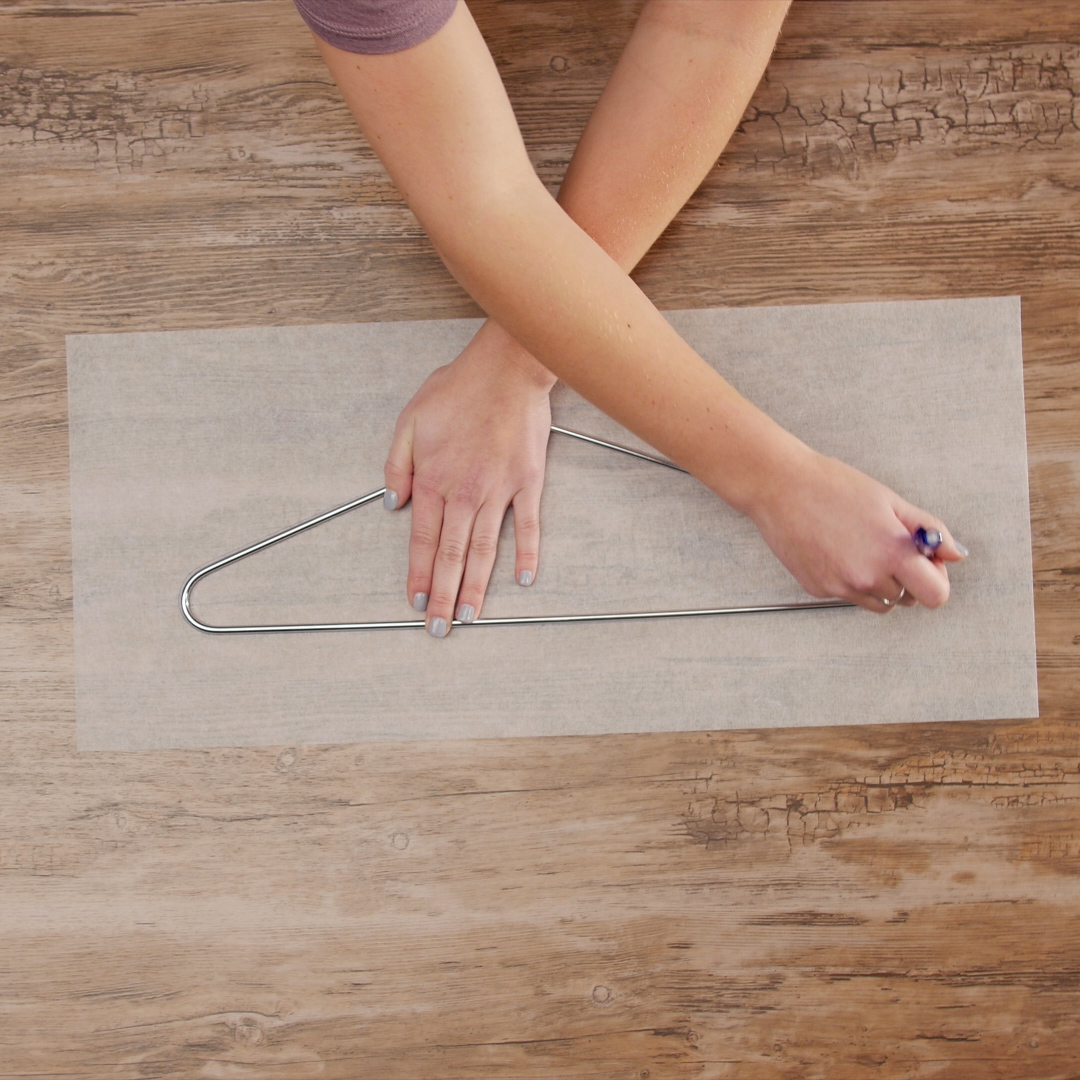
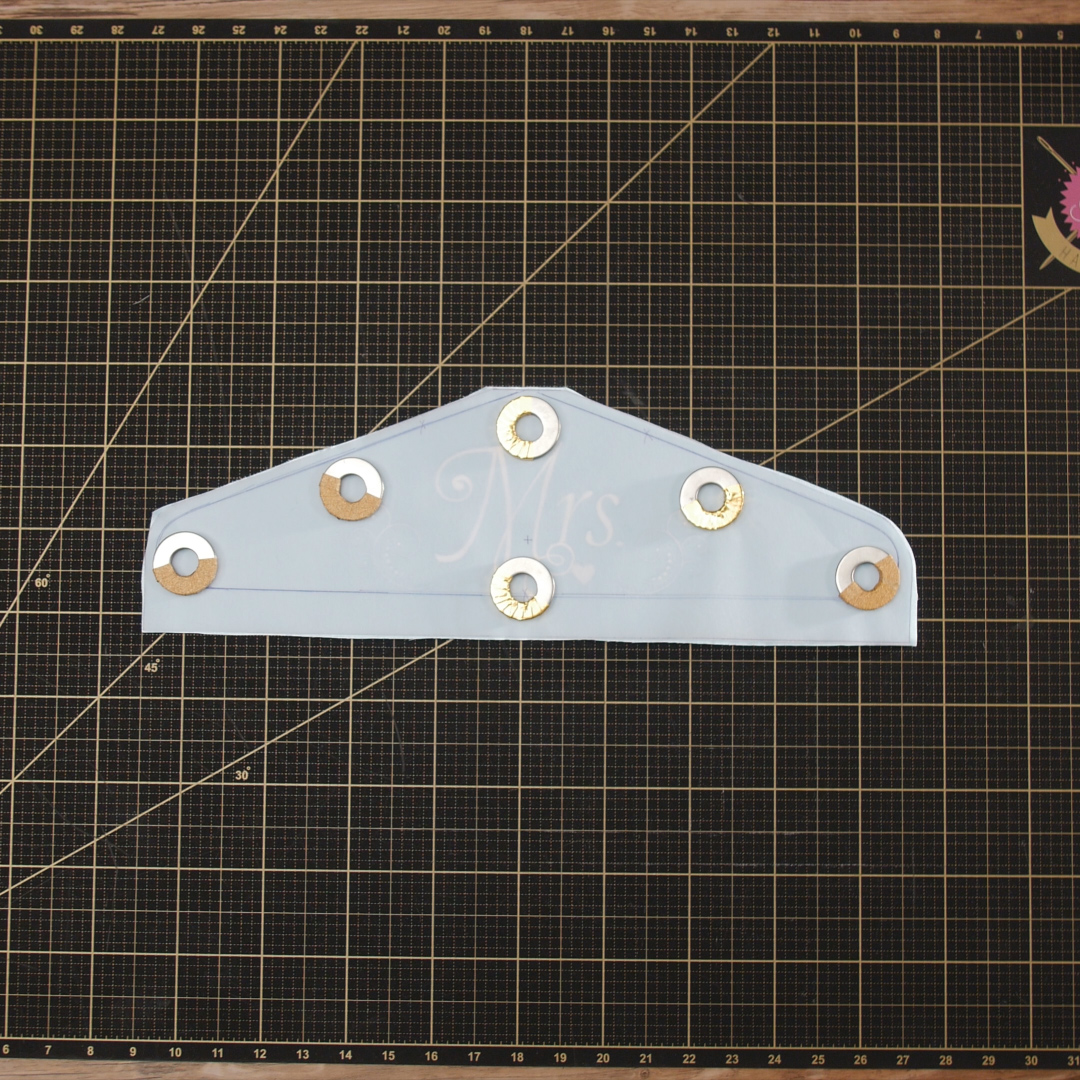
Begin by deciding which hanger to make the pattern for. The wedding party or couple may request that the pattern be made to a specific hanger, it is their big day after all! Once the hanger is determined, gather the tracing paper, pen or pencil, and ruler. Place the clothing hanger on the top of the tracing paper and trace around it, excluding the top hook.
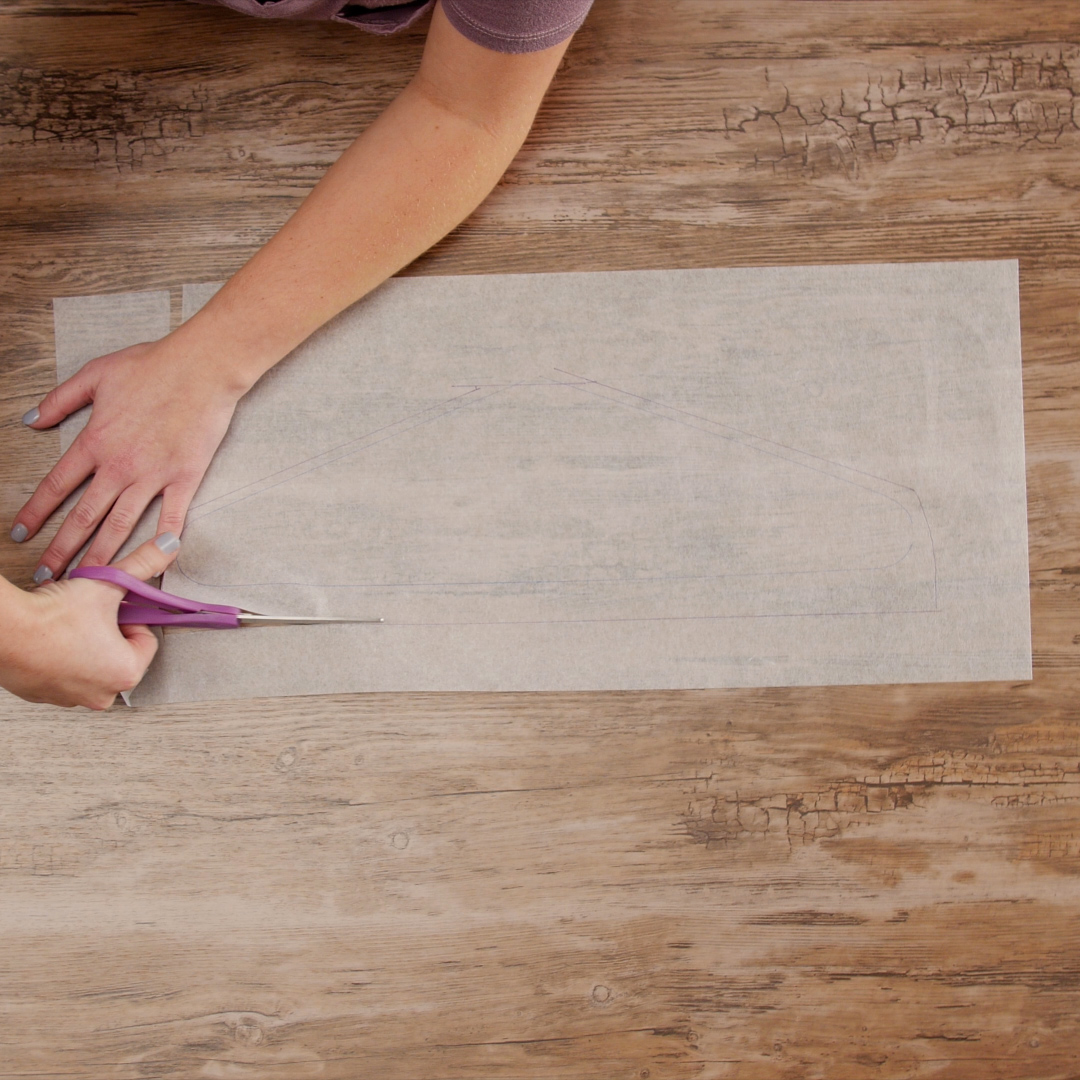
Place the hanger to the side for the time being. We must now extend the tracing to account for seam allowances and hems. You may want to switch to a different pen color or use a thicker marker. First, using a large ruler, extend the sides and curves by ¼”. Then, create the top hem by drawing a 1 ½” line to connect the new top sides. This will be the opening for the hanger hook. Finally, add 1” to the bottom for the hem. ‘X’ out the lines that will no longer be used. Cut out the pattern piece along the newly drawn lines.
Adding Custom Embroidery
Before cutting the hanger pattern piece out of the fabric, determine whether or not to add custom embroidery. When I was creating this project, I found it easiest to start with a large panel of fabric, embroider on it, then cut out the pattern piece. This gave me room to experiment with the size of the design and determine the stitch take-up.
If you have decided that you would like to embroider the hanger cover, start by cutting a panel piece out of the fabric, measuring 22” x 10”. You may choose to use Pellon Fleece Interfacing for added body and stability. Cut a 22” x 10” panel of the interfacing. And finally, cut two pieces of OESD Ultra Clean and Tear, 10” x width of the roll. All of these components should be layered together and hooped, starting with the two layers of Ultra Clean and Tear on the bottom, followed by the interfacing, then satin fabric, right side up. Use a light spraying of 505 Temporary Adhesive between the layers if desired. Hoop the materials so that the entire panel fills the stitching area. I hooped my project in the BERNINA Midi Embroidery Hoop. Being able to use the ratchet system (Ergonomic Twist Lock Mechanism) on this hoop helps me when hooping multiple layers, including those in this project.
Attach the embroidery module to the BERNINA 590 E, or the embroidery machine being used. Insert an embroidery needle, and thread with Isacord thread. I like the sheen of Isacord because it matches that of the satin fabric. Thread the bobbin with Bobbinette, and insert it into the BERNINA High Thread Tension Bobbin Case. This new bobbin case helps to create perfect stitches and tension when embroidering.
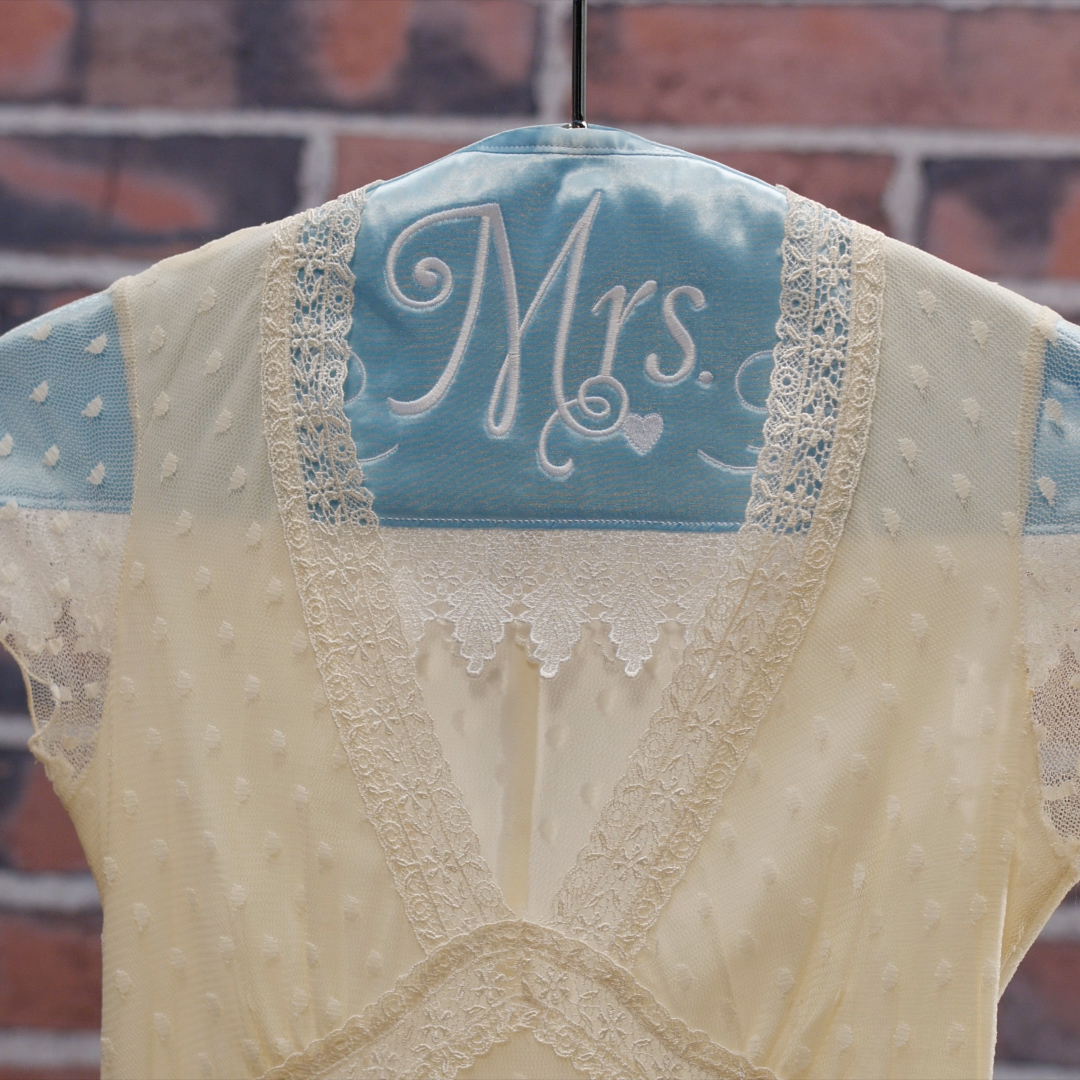
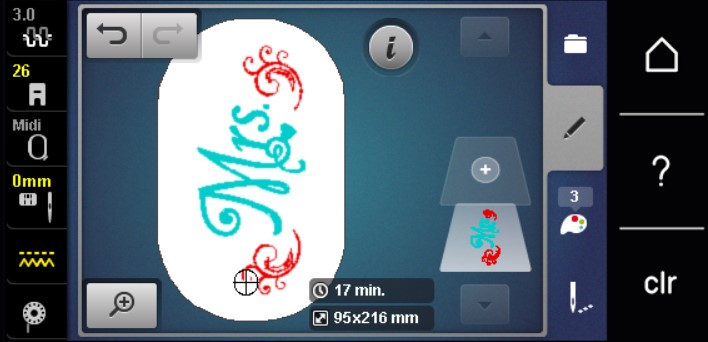
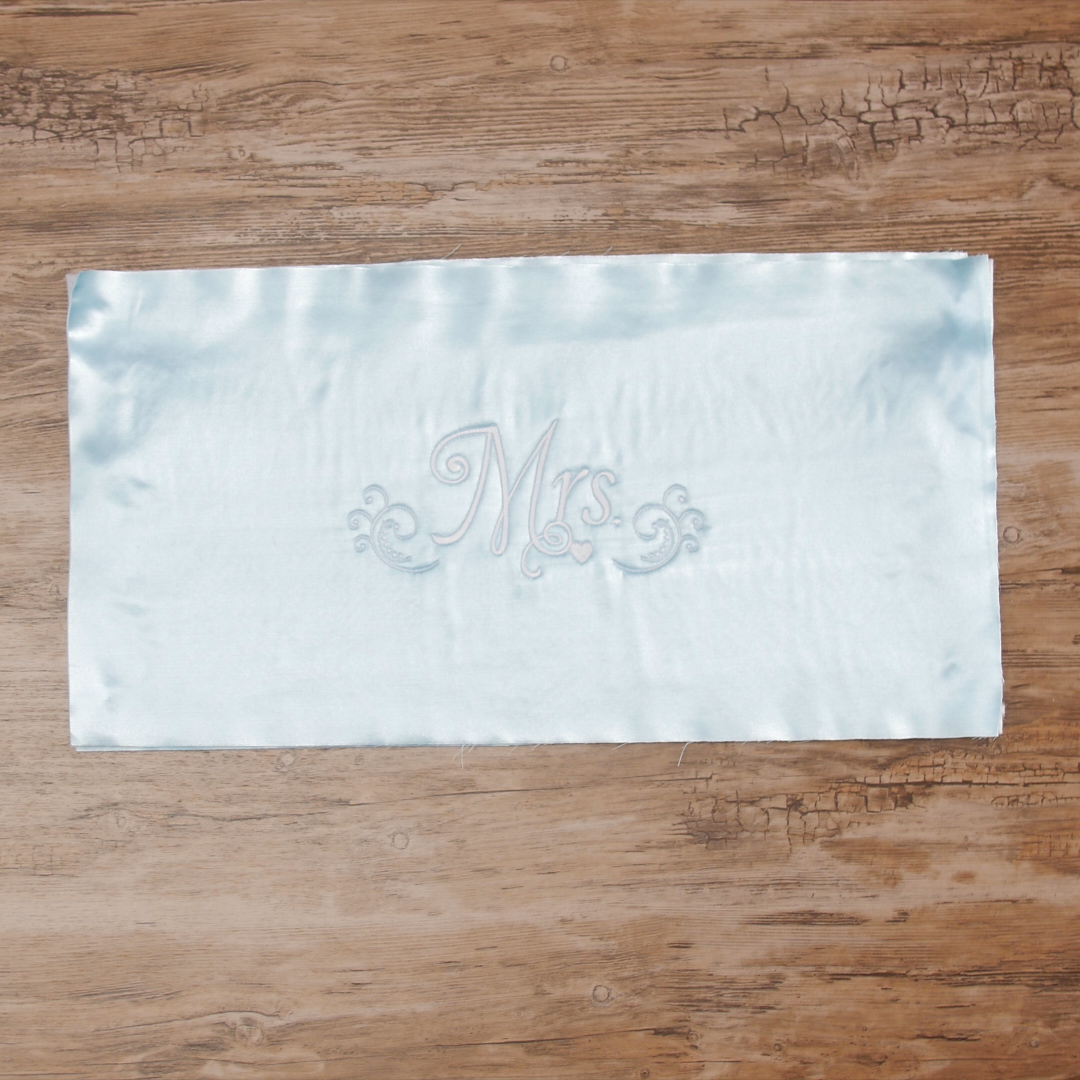
I chose OESD’s ‘Mrs.’ design, #12693-03. When bringing the design on the screen, it immediately drops to the center of the hoop. Since there are no specific markings on the fabric panel, and it is centered in the hoop, the design can be left where it is. Be sure to size up or down in relation to the size of the hanger.
When the design is set to the desired size, it is time to embroider! When the embroidery is finished, remove the project from the hoop. Gently tear away the two layers of Ultra Clean and Tear. I chose not to trim down the fleece interfacing at all. When the project is finished, the interfacing will add more padding between the hanger and the garment being hung, which will prevent the garment from sliding off or getting any hanger bumps.
Bridal Hanger Cover Construction
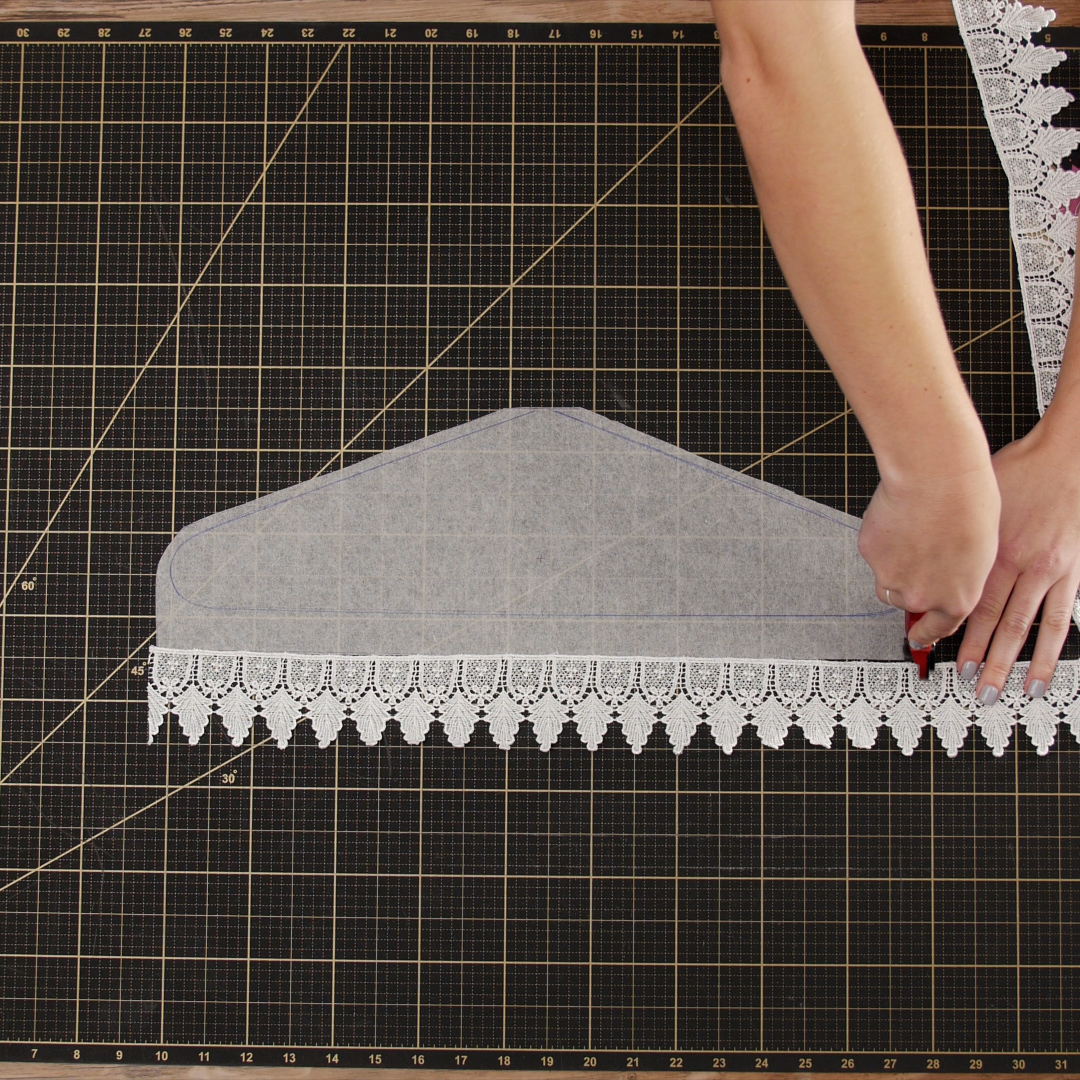
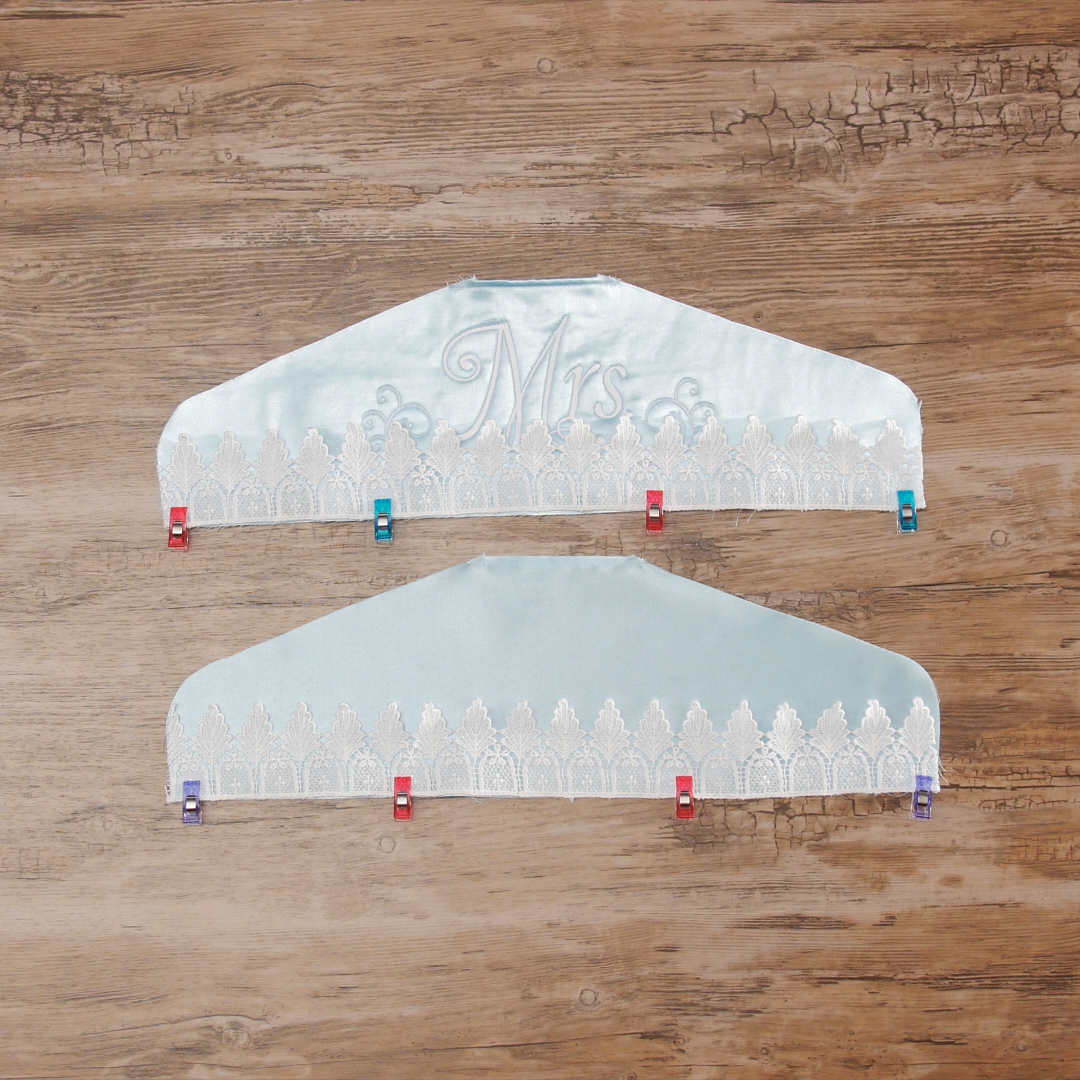
The pattern piece is prepared and the embroidery is complete. Now back to the construction. Center the hanger pattern piece over the embroidery. Use pattern weights to hold the tracing paper pattern in place. Cut out the piece. To get smooth curves, use a rotary cutter instead of scissors. You can use a cutting ruler to assist in the cutting on the straight edges. Cut out a second pattern piece on a non-embroidered area of fabric. This will serve as the back of the cover.
Using the bottom edge of the pattern piece, cut the lace trim to length. Do not forget to cut two pieces, one for the front and back. I chose to create the pattern using two pieces of trim because the hems of both pieces are sewn before the side seams. This results in the raw edges of the trim being encased. Something to consider would be using spare lace from the wedding gown instead of store-bought lace trim (but only if there is extra!).
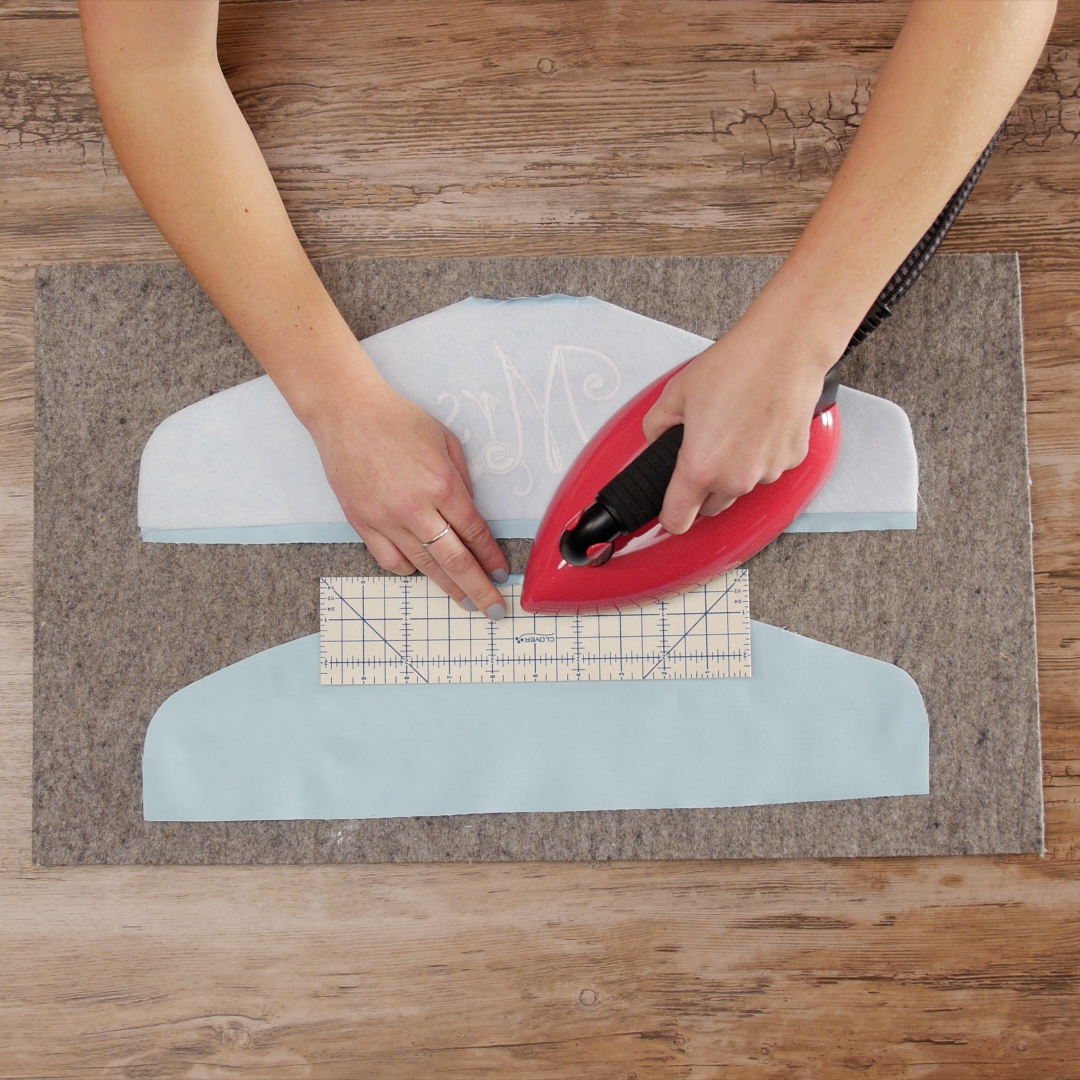
Take both cut pattern pieces of satin and a piece of scrap satin to the ironing station. Test the heat of the iron on a scrap piece first. Press under the top hems on both pieces ¼” using the Press Perfect tool for even hems.
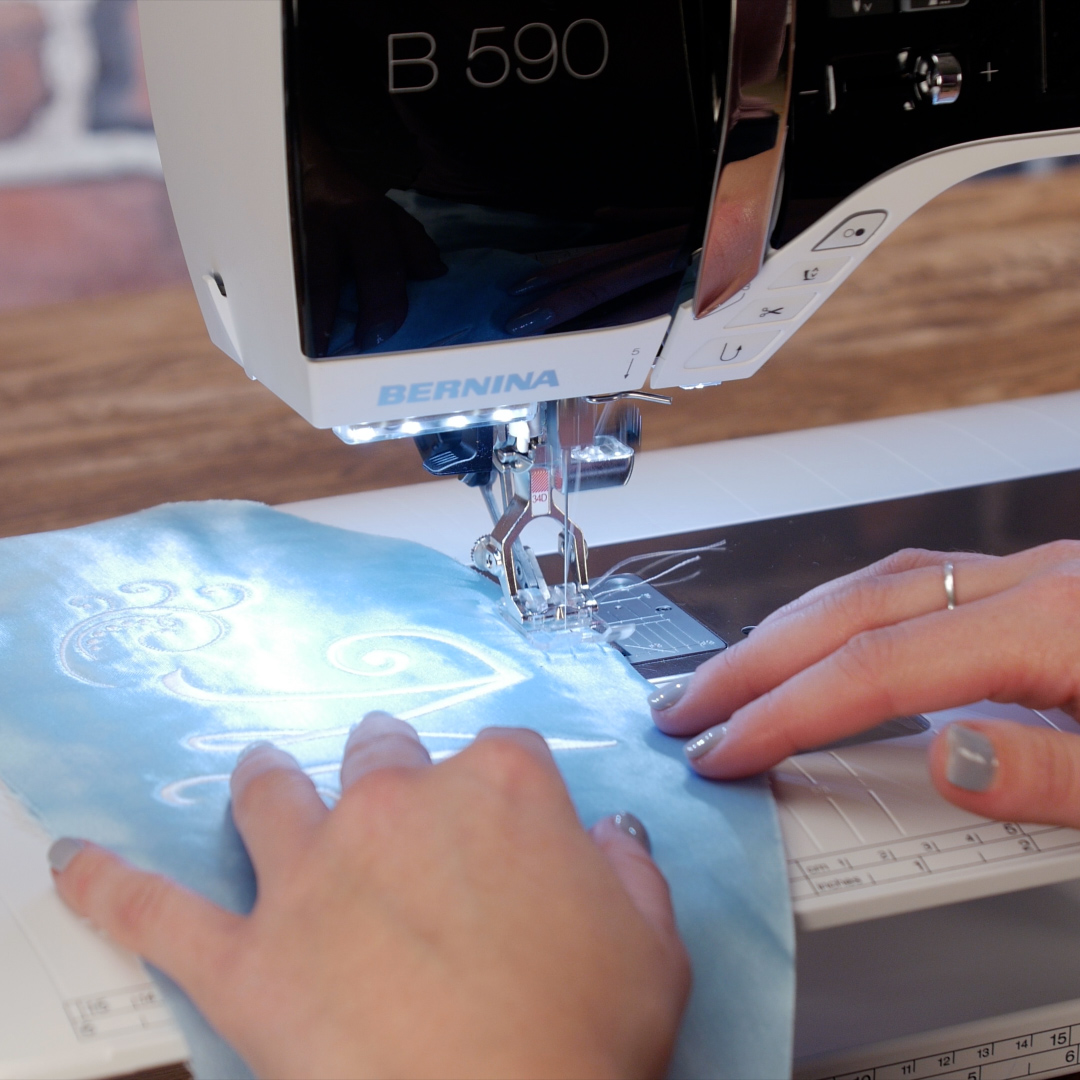
For the sewing portions of this project, I found that I could do and see everything with Reverse Pattern Foot with Clear Sole #34D. Feel free to use whichever presser foot you prefer. I like having the clear sole so I can see exactly where I am stitching on the hems, curves, and lace trim. Along with the embroidery portion, I used the B 590 E to piece the hanger cover together.
The first sewing step is to stitch the top hems in place using a scant ¼” seam allowance.
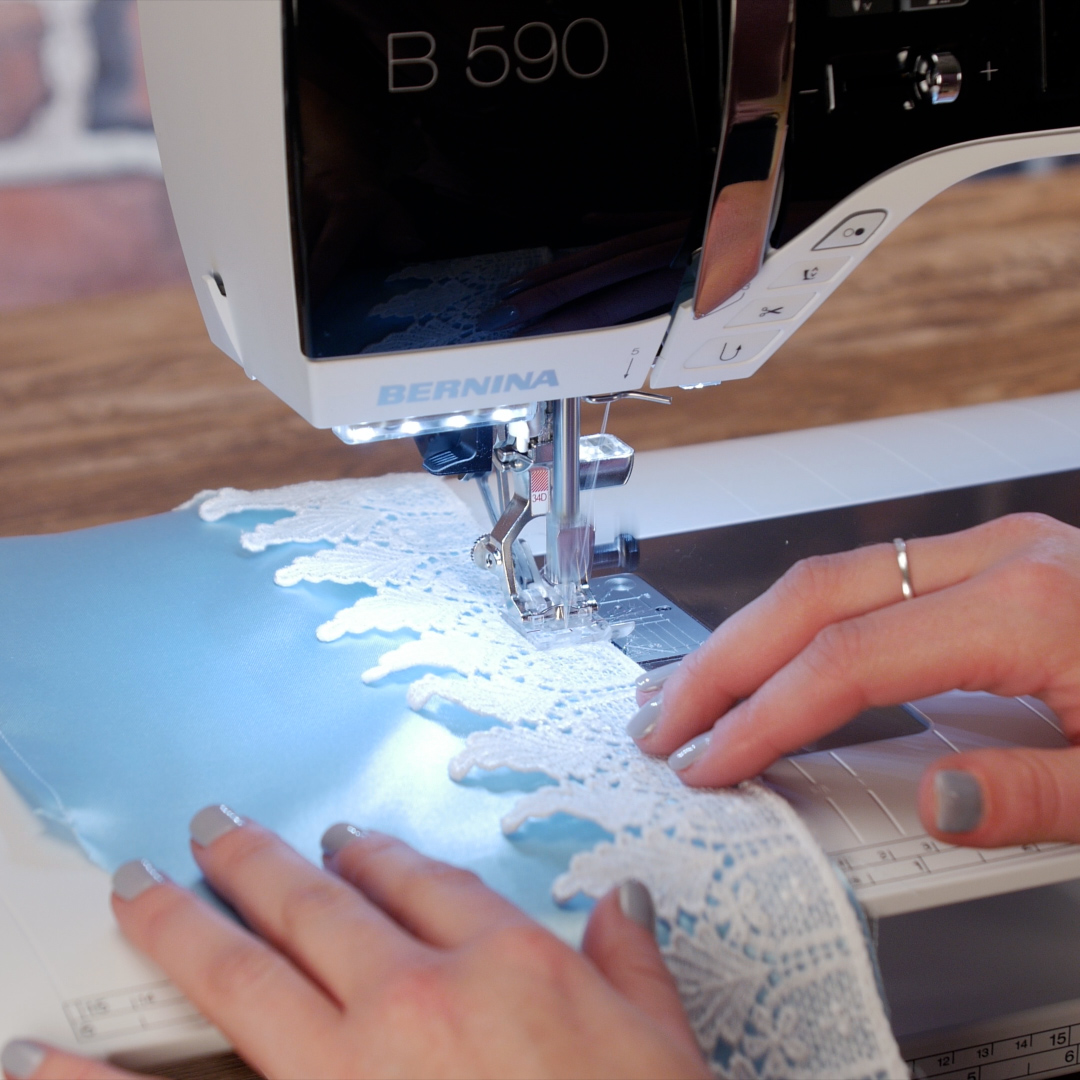
Grab the cut pieces of lace trim. Align the trim to the bottom hems of the pattern pieces, matching right sides together. These pieces will be sewn together like a seam. This will keep the trim even across the whole hem. Hold in place using Wonder Clips
Back at the sewing machine, stitch the lace trim in place using a ¼” seam allowance. Use the markings on the stitch plate as a guide.
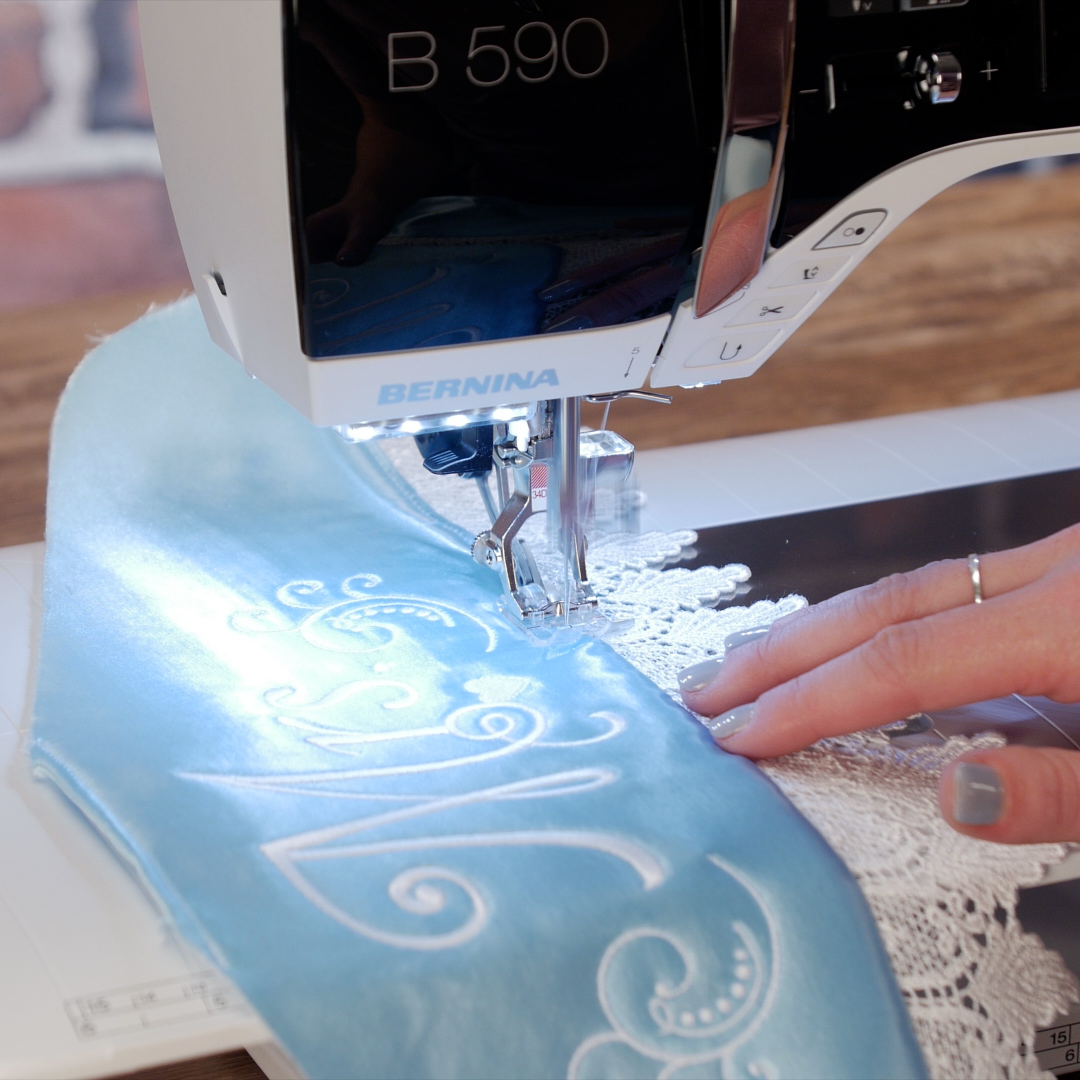
To keep the seams hidden in the cover, topstitch (or edgestitch) in place. Feel free to press the seam allowance away from the trim first. Increase the stitch length to 3.25. Instead of moving the needle position, I used the inside of the right toe of the foot as the guide for this stitch. Keep the previously sewn seam right inside the toe.
Place the fabric pieces right sides together. Clip all the sides together, leaving the top and bottom hems unclipped. Be sure that the curves are matched well.
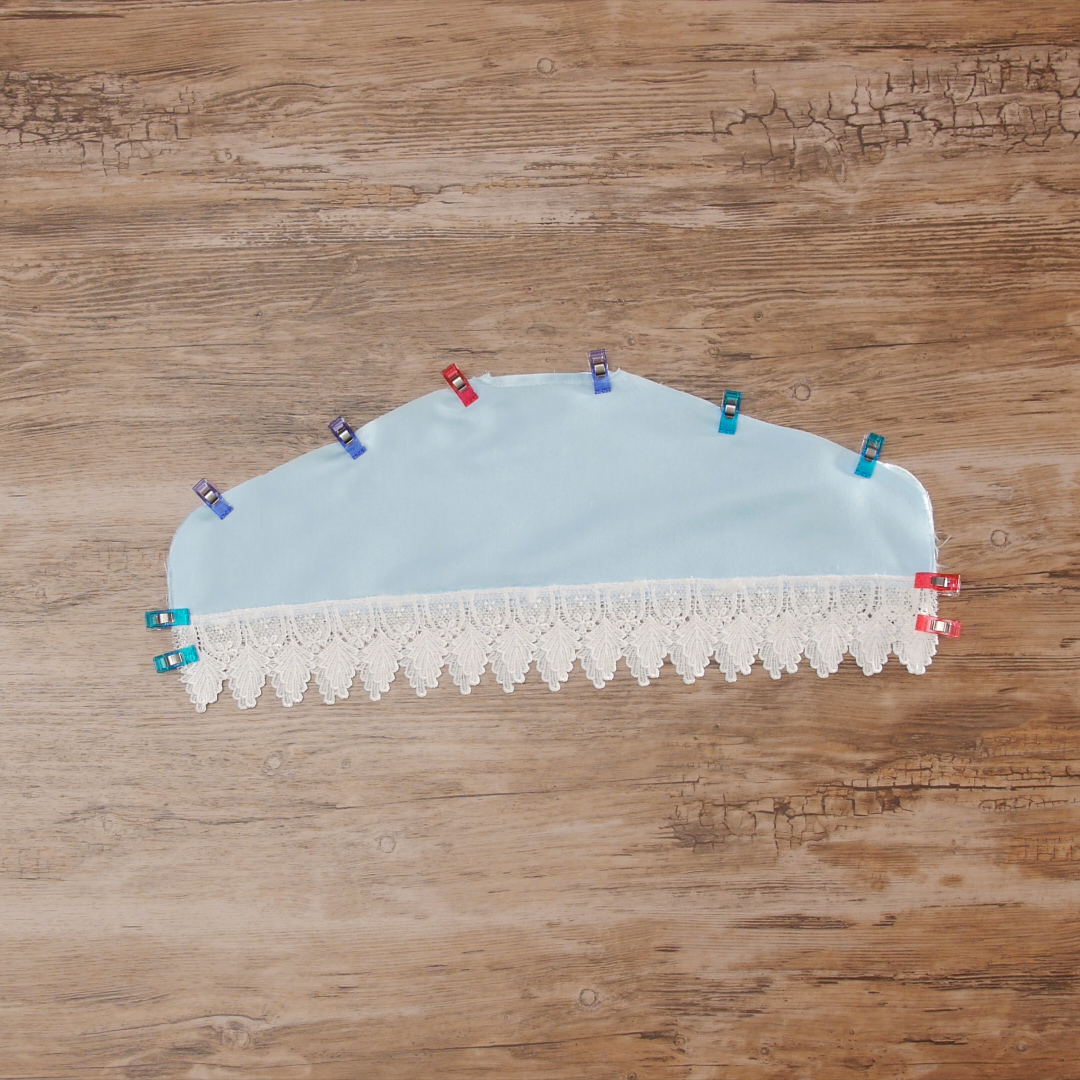
Reduce the stitch length back to 2.50. Stitch around the cover using a ¼” seam allowance. Begin stitching at the bottom of the lace trim, stitch up to the top hem, and cut the threads. Move to the other side of the top hem, begin stitching, and stitch down to the bottom edge of the lace.
The final steps are to clip the curves of the seam allowance. This will allow the seam to lay nicely on the hanger. Flip the cover right side out and press. Use the curved edge of the point turner to make sure the curves are fully extended. All that is left to do place the cover over the hanger!
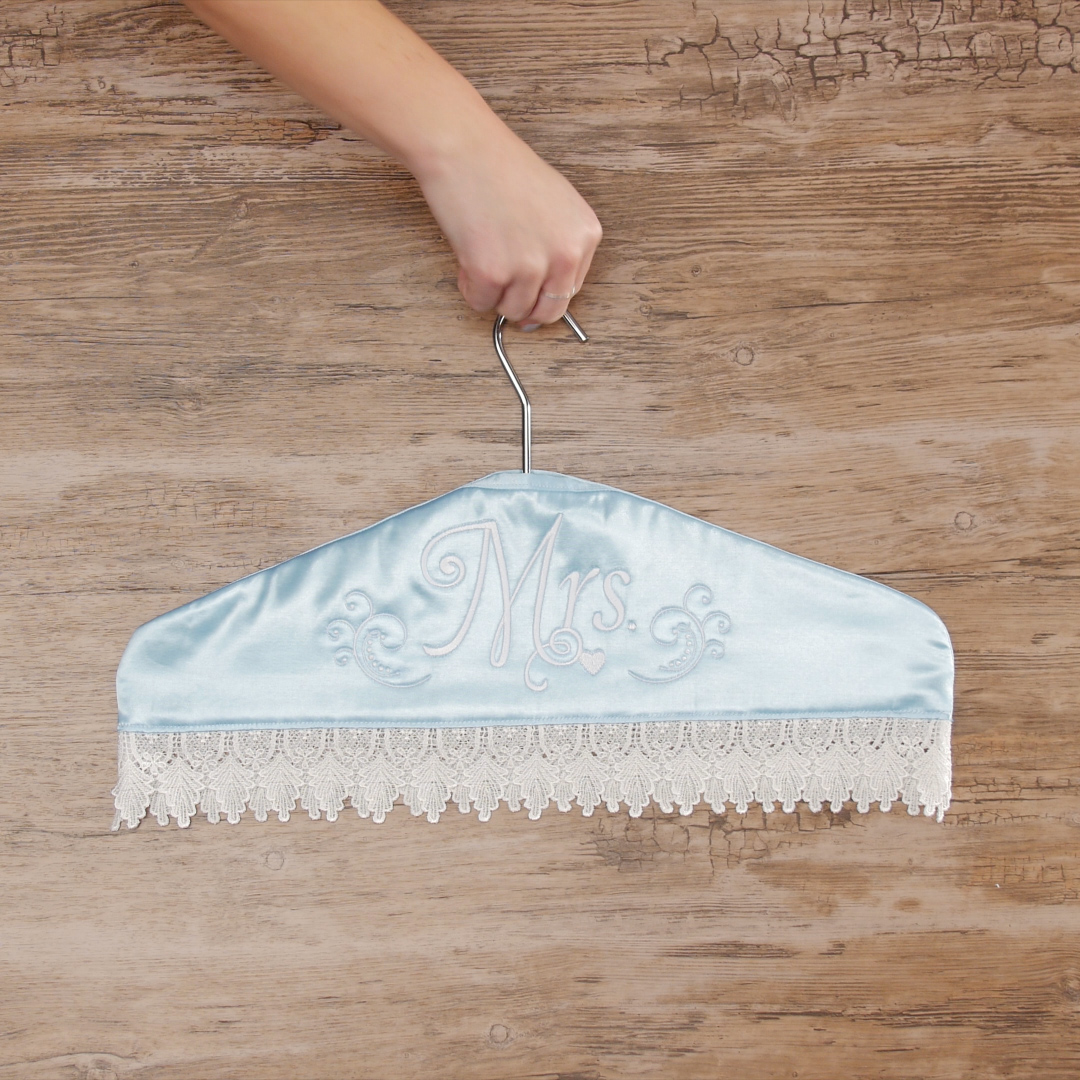
Now the happy couple and wedding party are ready for the big day! This project will certainly be a memorable keepsake for them.