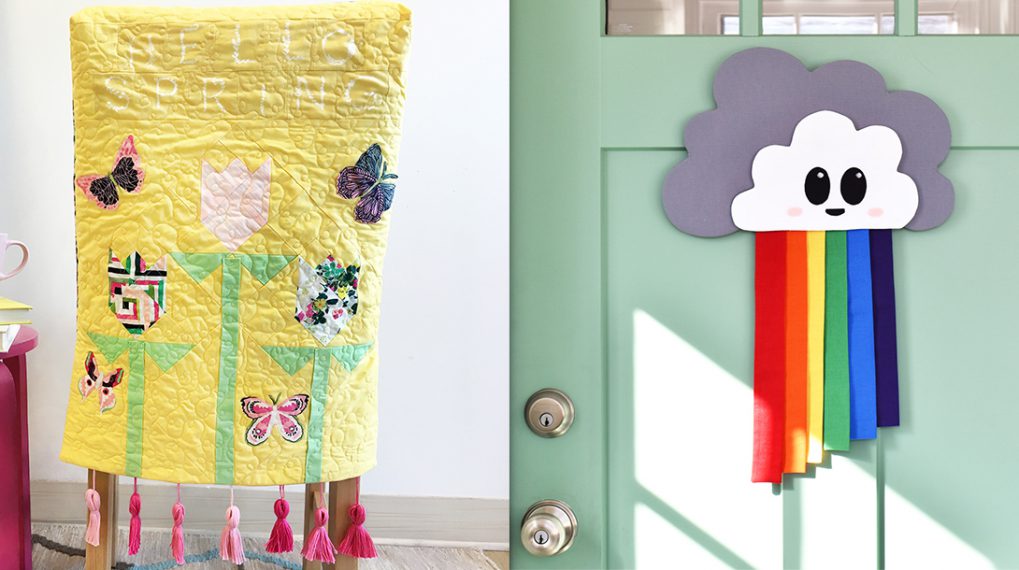
Springtime Chair Cover
Hello Everyone,
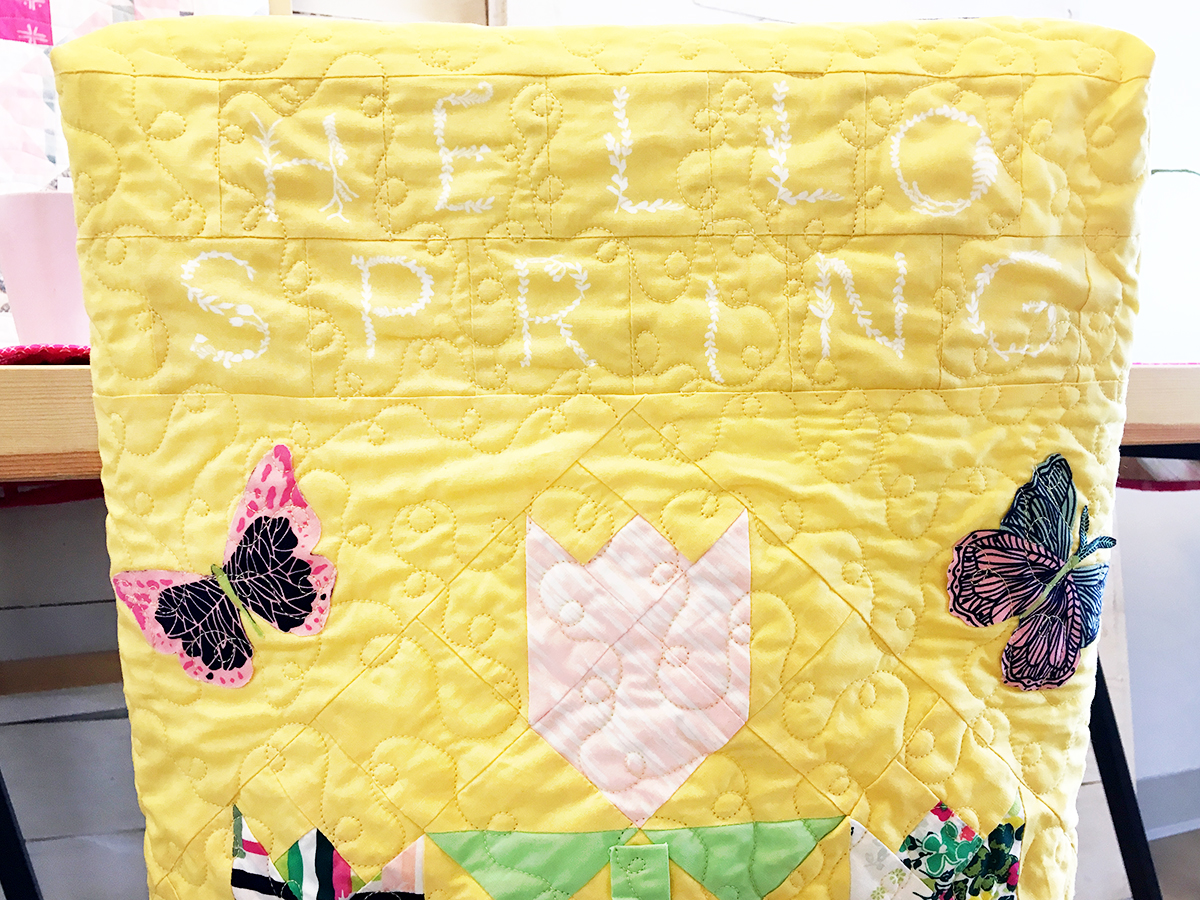
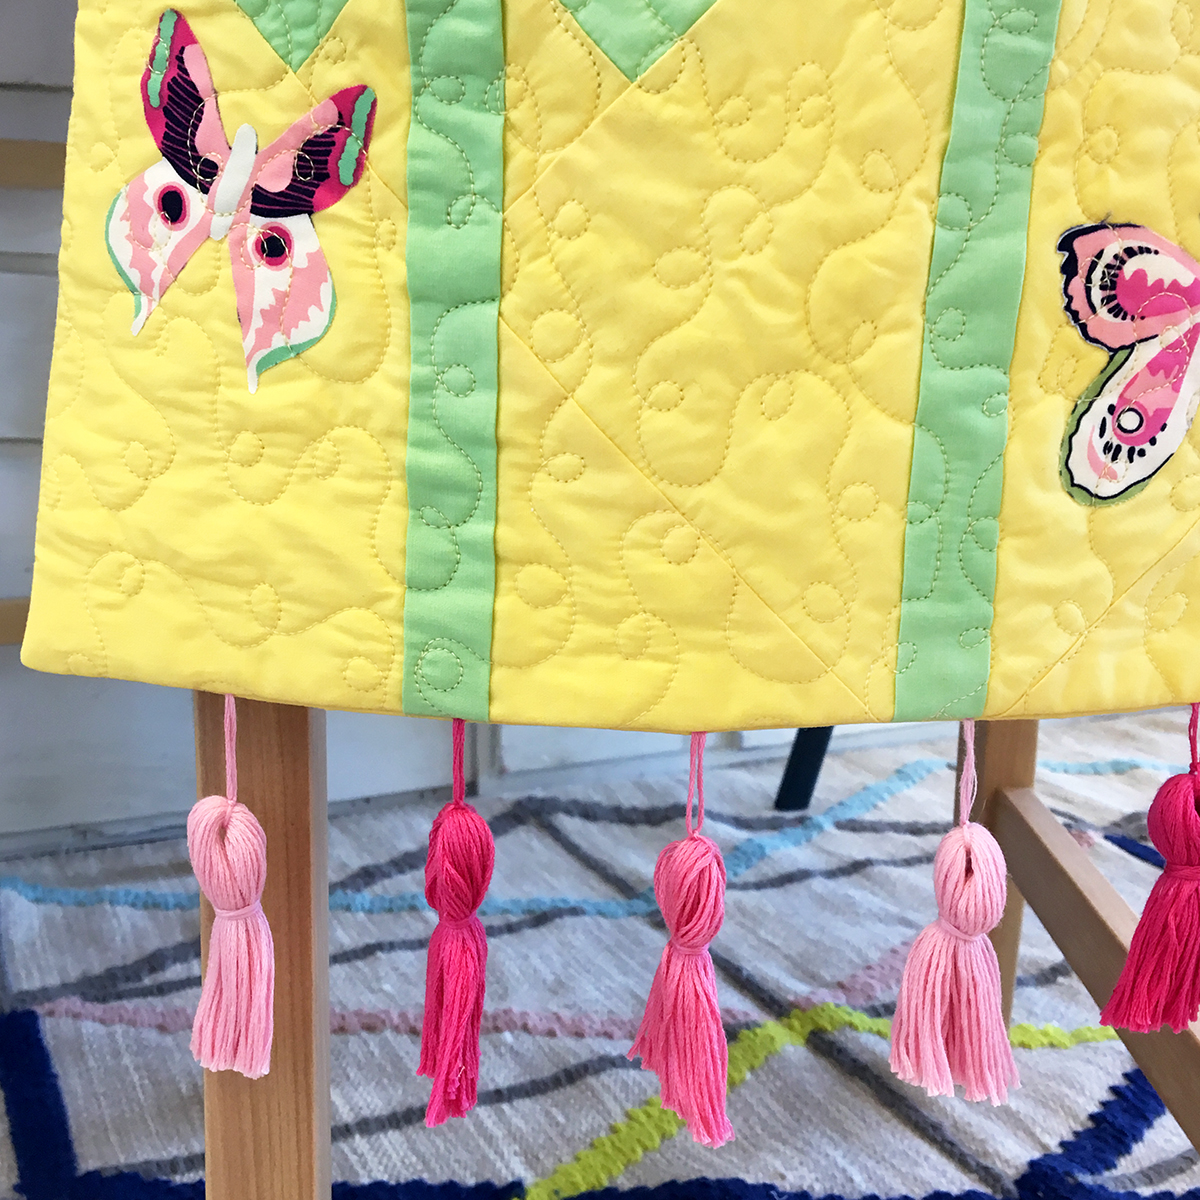
Spring is finally here and it’s time to jazz up your home with lively colors. This got us thinking of how we could dress up our chairs for Springtime get-togethers. Which is how our Conversational Chair Covers came to be. We used the “Arista Oats” print from Lambkin fabrics to fussy cut out our letters and pieced them together to spell out Hello Spring! We added some cute tulip blocks and fussy cut butterflies made from Floralia Fusions fabrics. To brighten things up we used a Banana Cream background, this color is so bright and cheery which is perfect for this time of year. Of course to top it off we had to make a variety of pink tassels for the perfect finishing touch. There is so many things to love about this project but what we love the most is the free-motion meandering swirls we created using the BERNINA Stitch Regulator. Here is a great video for beginner free motion quilters.

Here is what you will need to get started!
Materials to Make a Springtime Chair Cover:
All seams are 1/4″ seam allowance unless otherwise noted.
Fabrics Used:
Fabric A- LMB-28730- Arista Oats
Fabric B-FUS-F-1002- Femme Metale Floralia
Fabric C-FUS-F-1008-FUS-F-1008- Shibori Floralia
Fabric D-FUS-F-1005- Roadside Guides Floralia
Fabric E-FUS-F-1007- Wingspan Floralia
Fabric F- PE-462- Pistachio Creme
Fabric G- PE-435- Banana Cream
Cutting Directions:
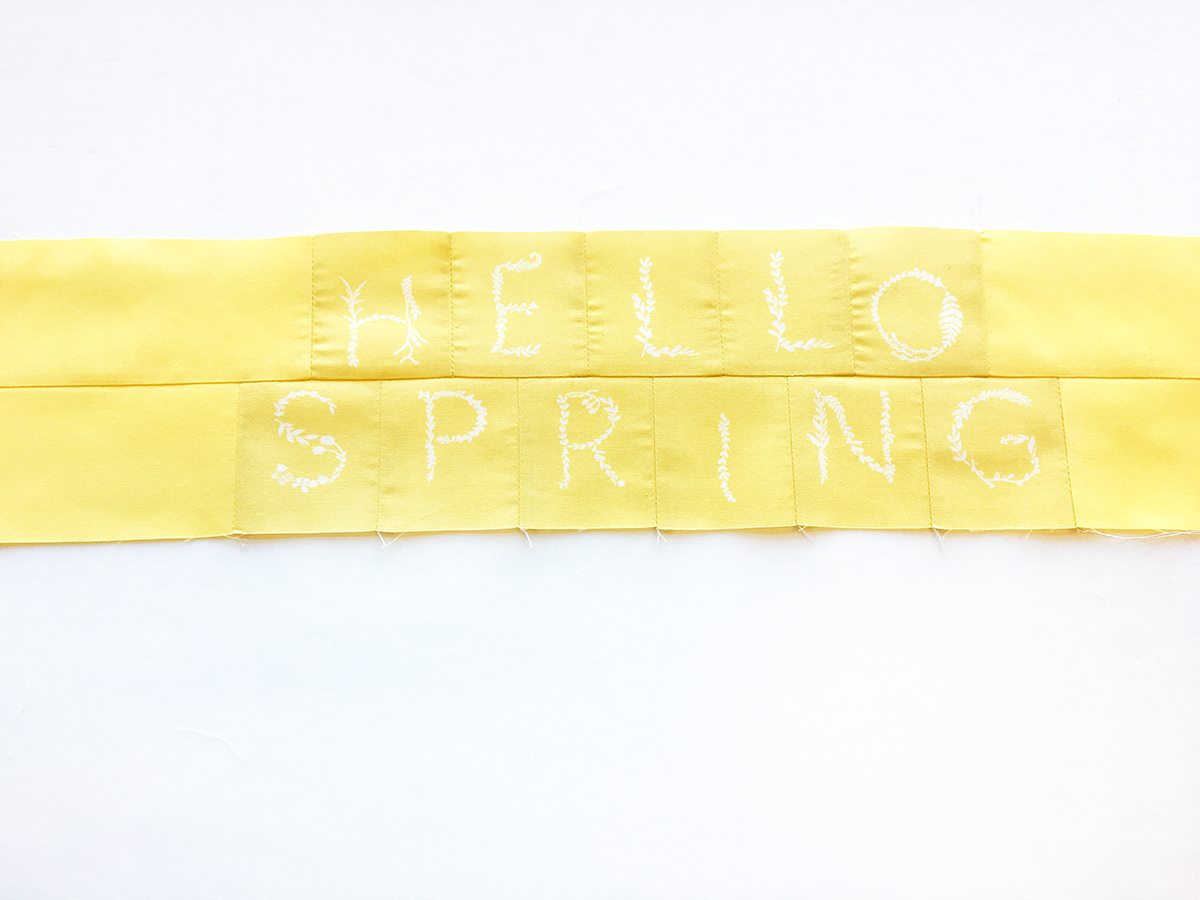
Eleven (11) 2 1/2″ fussy cut letters that spell out “Hello Spring” Fabric A
One (1) 2 1/2″ square Fabric B, C, and D
One (1) 1 1/2″ square Fabric B, C, and D
One (1) 3″ square Fabric B, C, and D
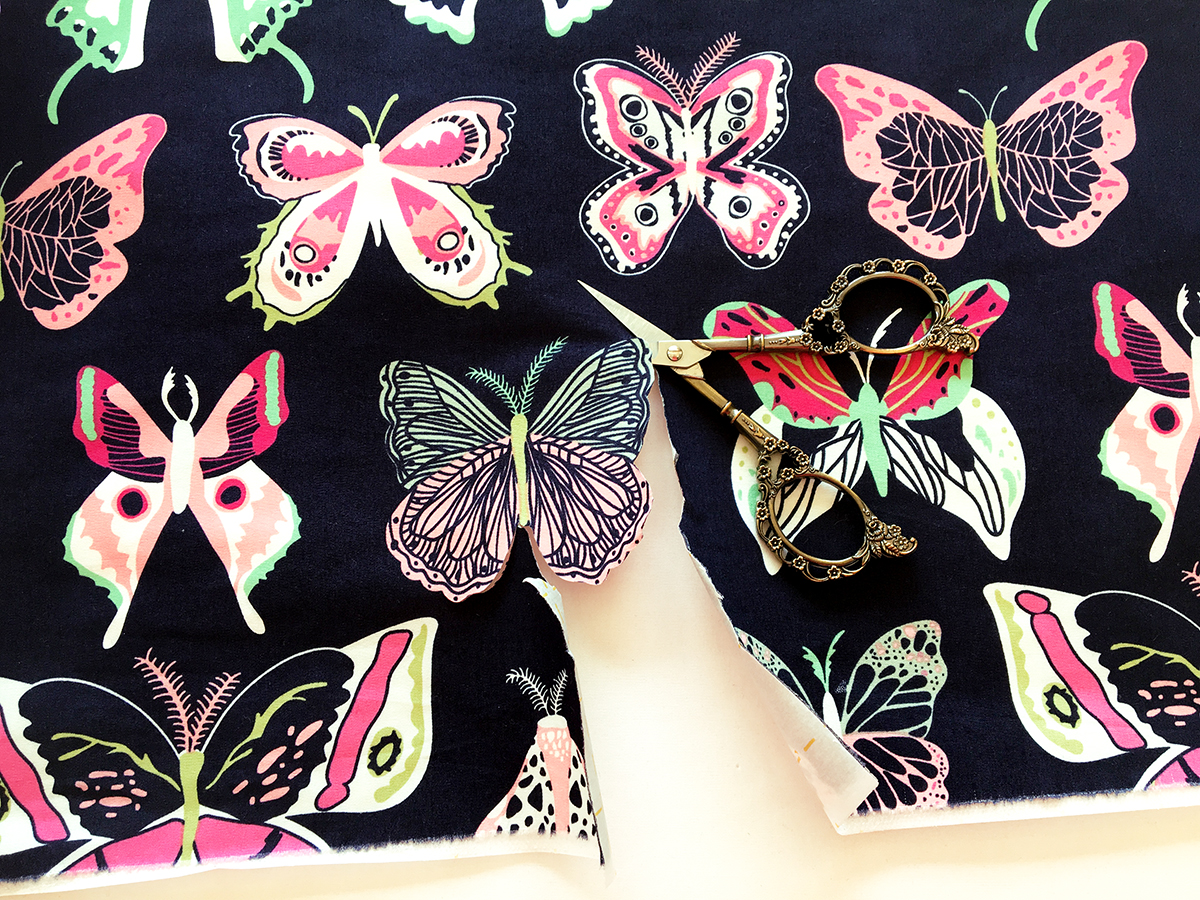
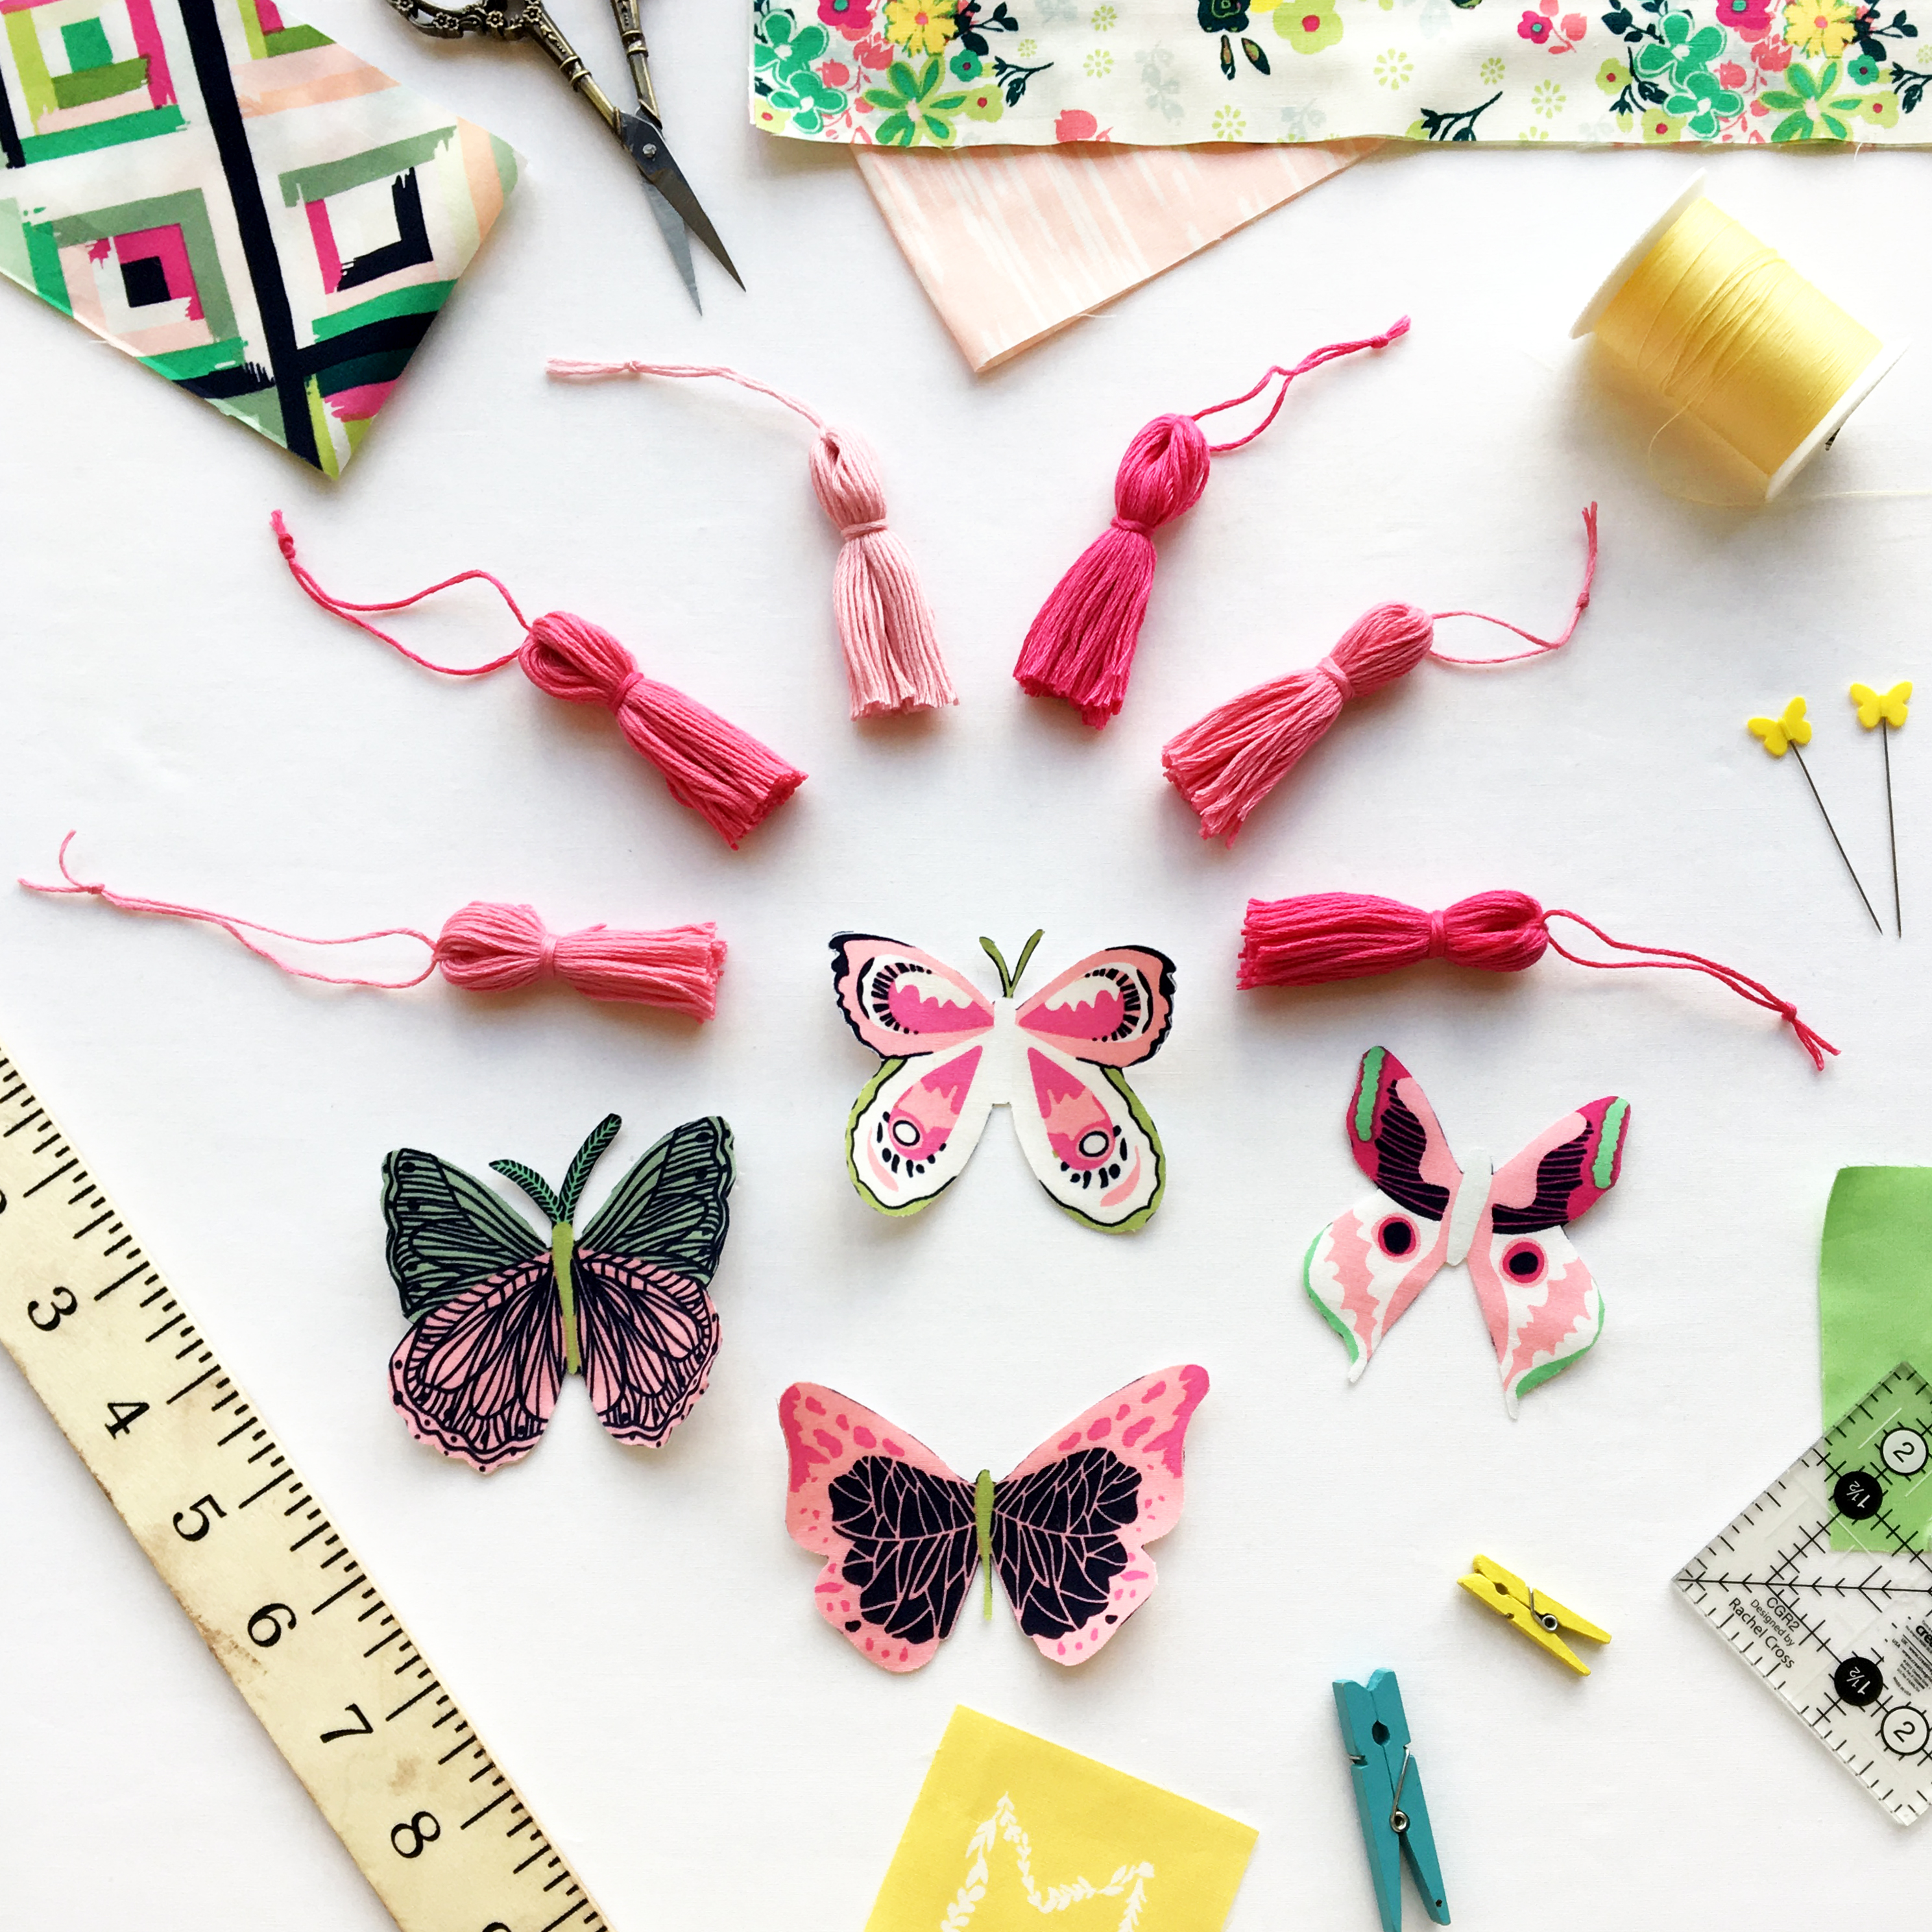
One (1) Fat Quarter from Fabric E (fussy cut butterflies)
One (1) 17 1/2″ x 16 1/2″ rectangle from Fabric E (Backing Front)
Three (3) 3″ squares from Fabric F
One (1) 1 1/2″ x 12″ strip from Fabric F (long stem)
Two (2) 1 1/2″ x 8″ strips from Fabric F (short stems)
Four (4) 2 1/2 x 12″ strips from Fabric G
One (1) 2 1/2″ x 20″ strip from Fabric G
Three (3) 1 1/2″ x 2 1/2″ strips from Fabric G
Nine (9) 2 1/2″ squares from Fabric G
Six (6) 3″ squares from Fabric G
Three (3) 1 1/2″ squares from Fabric G
One (1) 6 1/2″ square from Fabric G
Two 9 1/2″ squares from Fabric G (cut in half diagonally)
Lining Pieces
(Note: Lining pieces are 1/2″ shorter then the exterior pieces to help your lining fit nicely inside your exterior)
One (1) 17 1/2″ x 16″ rectangle from Fabric G
One (1) 17 1/2″ x 23″ rectangle from Fabric G
Additional Materials
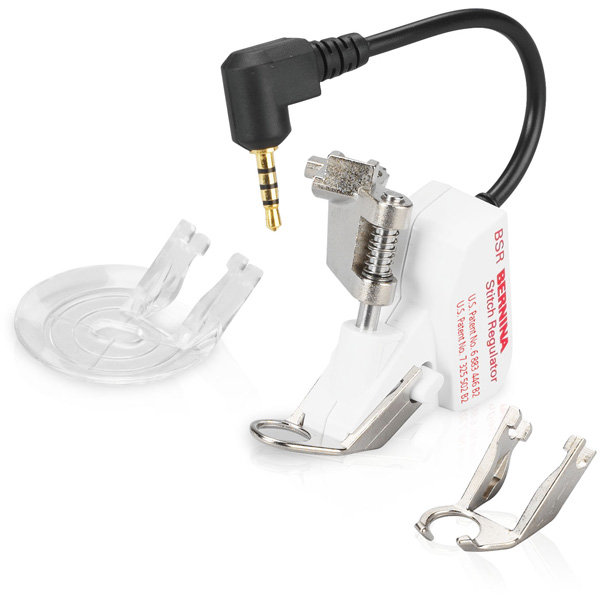
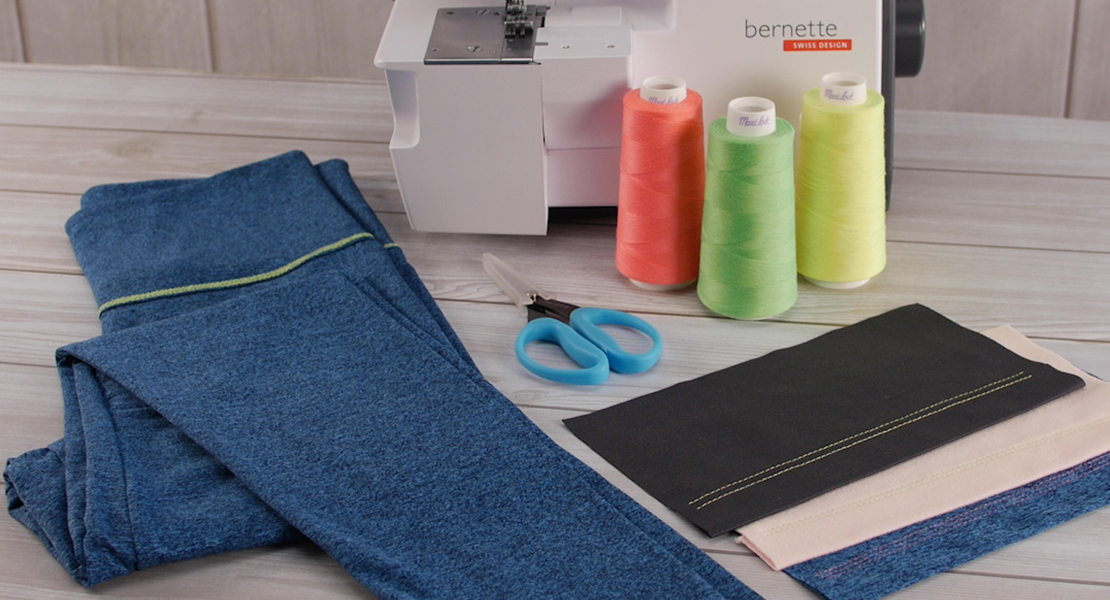
- Sewing machine (we use a BERNINA 570 QE)
- Patchwork foot #37
- Free-motion quilting with regular stitch length (BERNINA Stitch Regulator or foot of choice)
- Reverse pattern foot #1/#1C/#1D
- Fabric Marking Pen
- Steam-A-Seam
- Wonder Tape
- Embroidery Thread
- A Chair
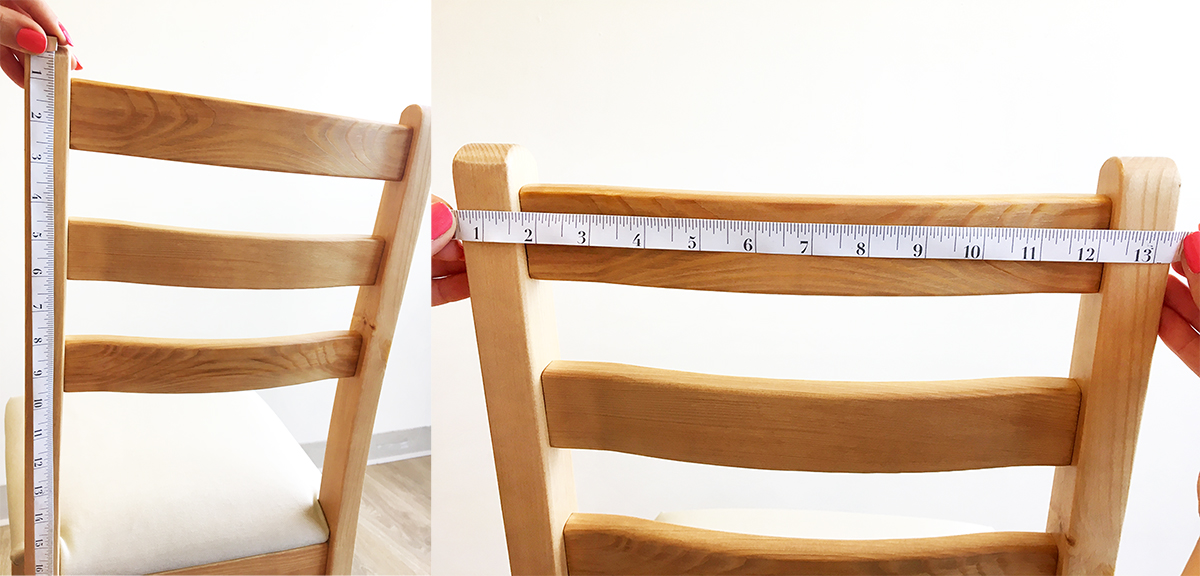
First step is to measure your chair. Our chair is from IKEA and measures about 14″ x 17″. We measured the chair back to the seat and the top of the chair. This particular chair cover is for chairs with no arms. We made our outer piece (the back of our chair) longer (23″ long). Our inner piece (the part of the chair your back touches) finish at 14″ long. We left a little wiggle room on each side to slide the cover over and off the chair easily. We also added 1 1/2″ boxed corners to help it form to the top of the chair.
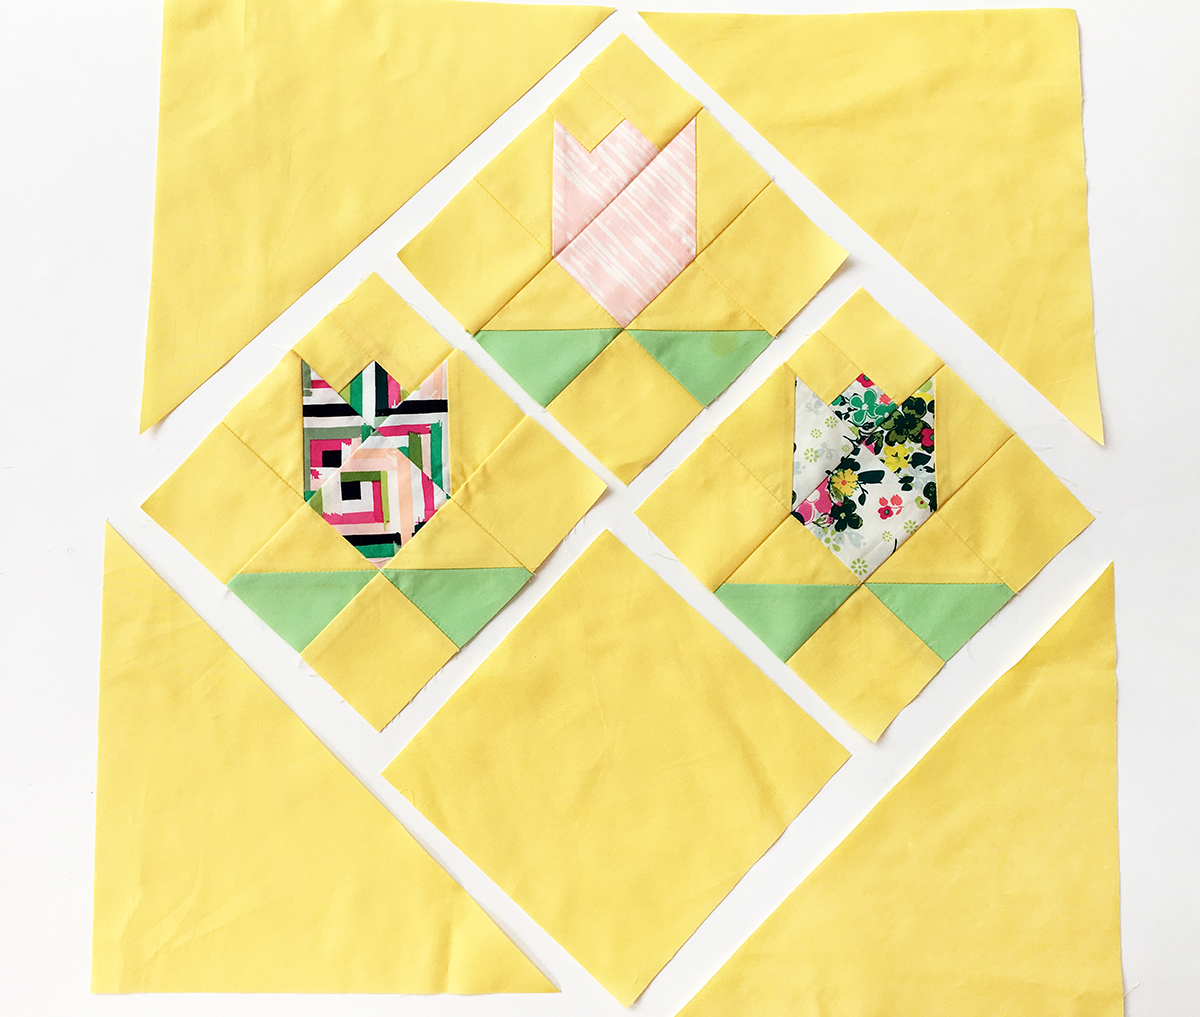
Step 1: Tulip Block Construction
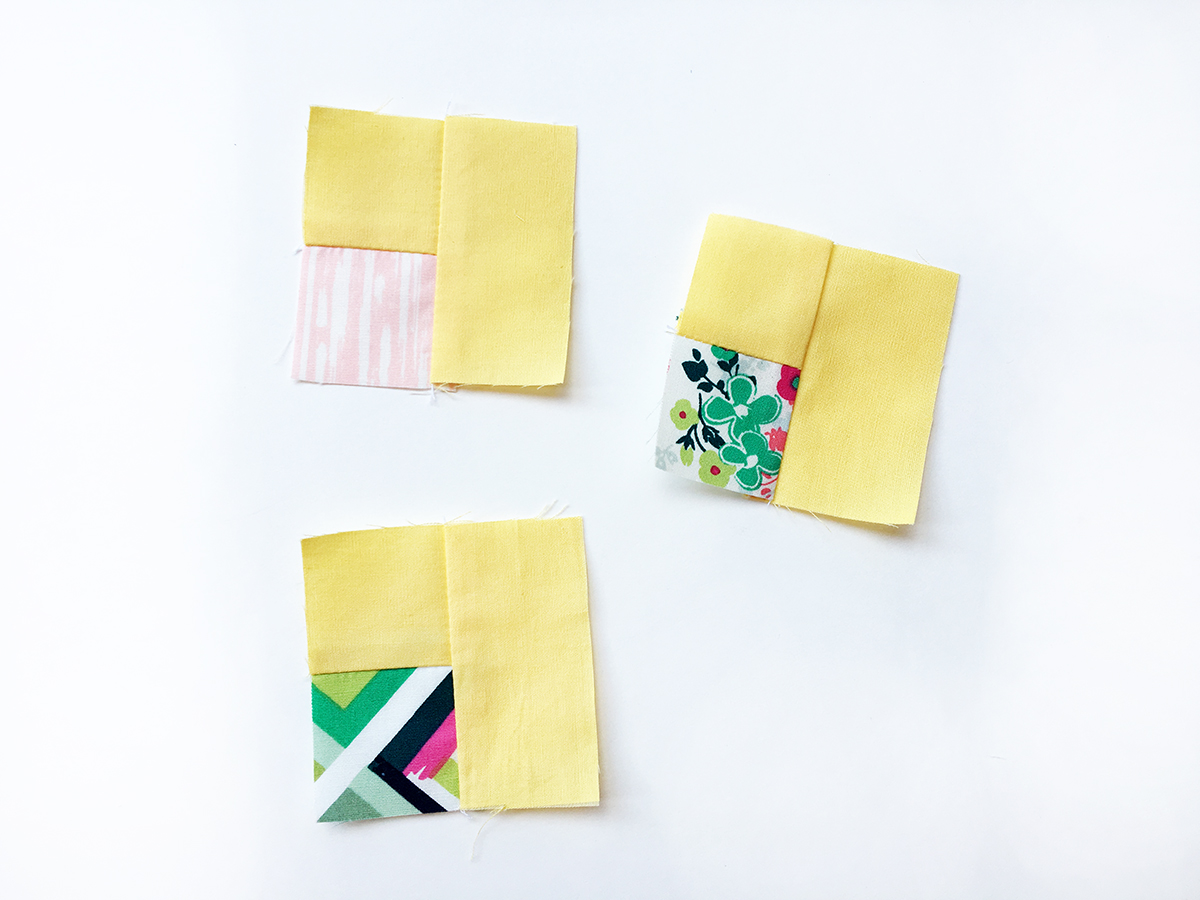
Sew a 1 1/2″ square from Fabric G to a 1 1/2″ square from Fabric B. Press your seams to one side and then sew your piece to a 1 1/2″ x 2 1/2″ strip from Fabric G. Repeat this process with your remaining 1 1/2″ squares and 1 1/2″ x 2 1/2″ strips to get three units that look like the picture below.
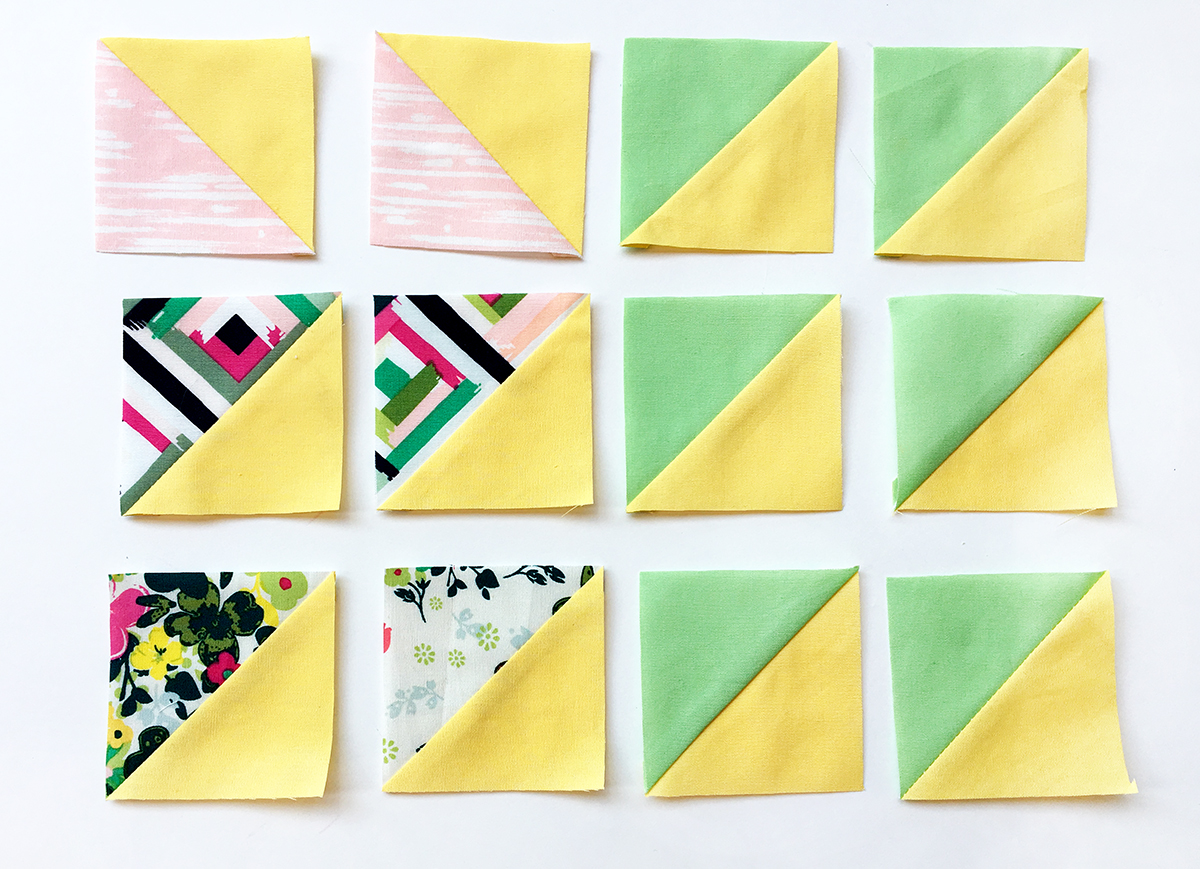
Make your HST’s using the two at a time method. Draw a diagonal line with a fabric making pen and straight edge on all of your 3″ squares from Fabric G and place them right sides together to six 3″ squares from Fabric F and one from fabric B, C, and D. Sew on each side of the line you drew at 1/4″ and cut piece on the line you drew to reveal two HST’s. Square your HST’s up to 2 1/2″.
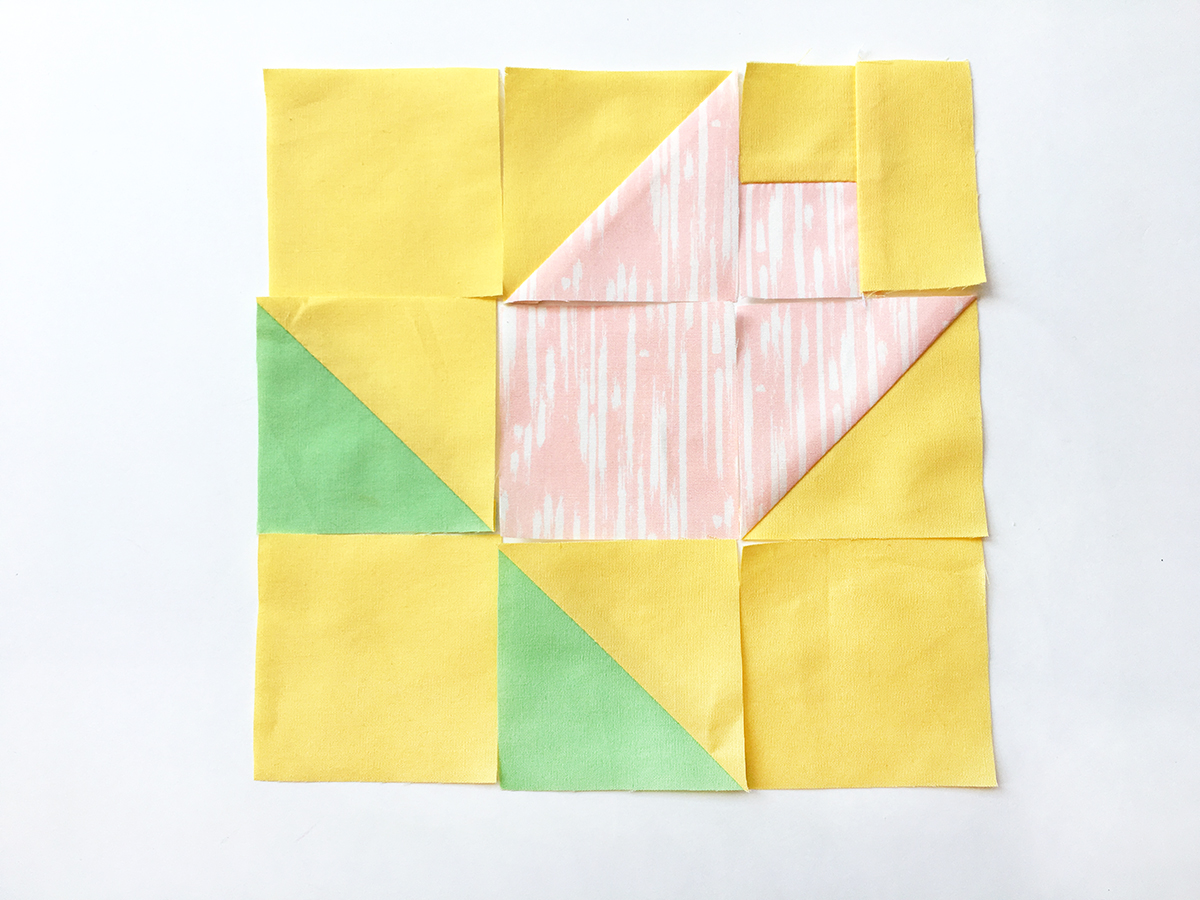
Place your blocks out following the block design below and sew into a nine patch block. Repeat this process with your remaining block pieces to create a total of three blocks. Your tulip blocks should measure 6 1/2″ unfinished.
Sew two blocks together on point and sew the other tulip block to a 6 1/2″ square from Fabric G. Sew these rows on point together. Take your triangle pieces and sew to each corner of your tulip block unit.
Step 2: Creating the Stems
Take all of your 1 1/2″ stem pieces, fold and press raw edges into the center of the strip. Fold under about a 1/2″ and trim corners on the top end of your strips. Use Steam-A-Steam or wonder tape to stick stems into place. Place the folded top edge right under the tulip, lining it up with the leaves. Once you have your stems in place trim the excess stems at the bottom of your piece.

Step 3: Creating to the Top
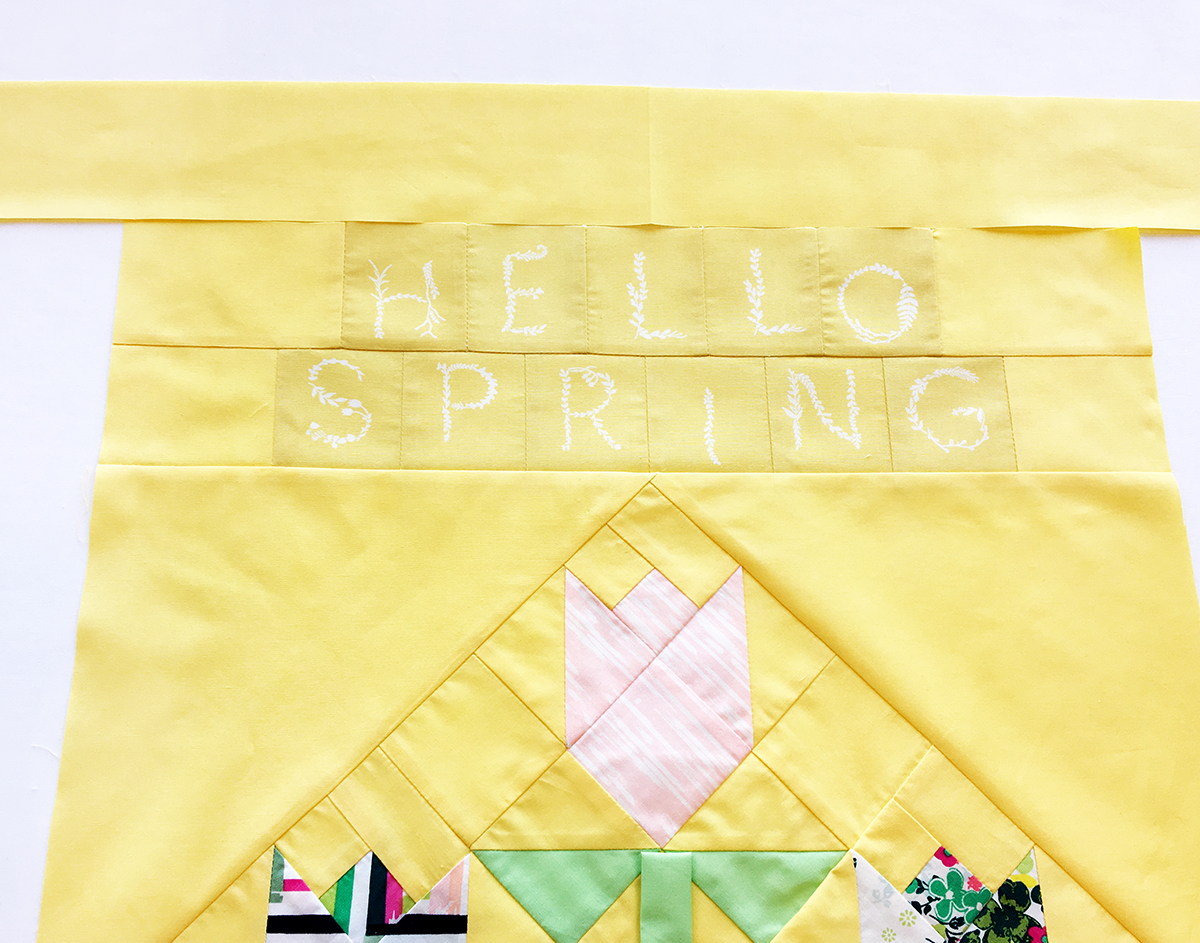
To finish off the top of your front chair cover sew together your 2 1/2″ fussy cut letters at 1/4″ seam allowance. Sew a 2 1/2 ” x 12″ strip from Fabric G to each side of hello and spring units. Center the word hello on top of the word string and sew together. Sew this top unit to the top of your tulip unit. Trim excess strip ends.
Center and sew a 2 1/2″ x 20″ strip from Fabric G to the top of your piece. Trim excess strips and your top is complete.
Last step before quilting is to place your fussy cut butterflies with Steam-A-Seam following the manufacturer’s instructions.
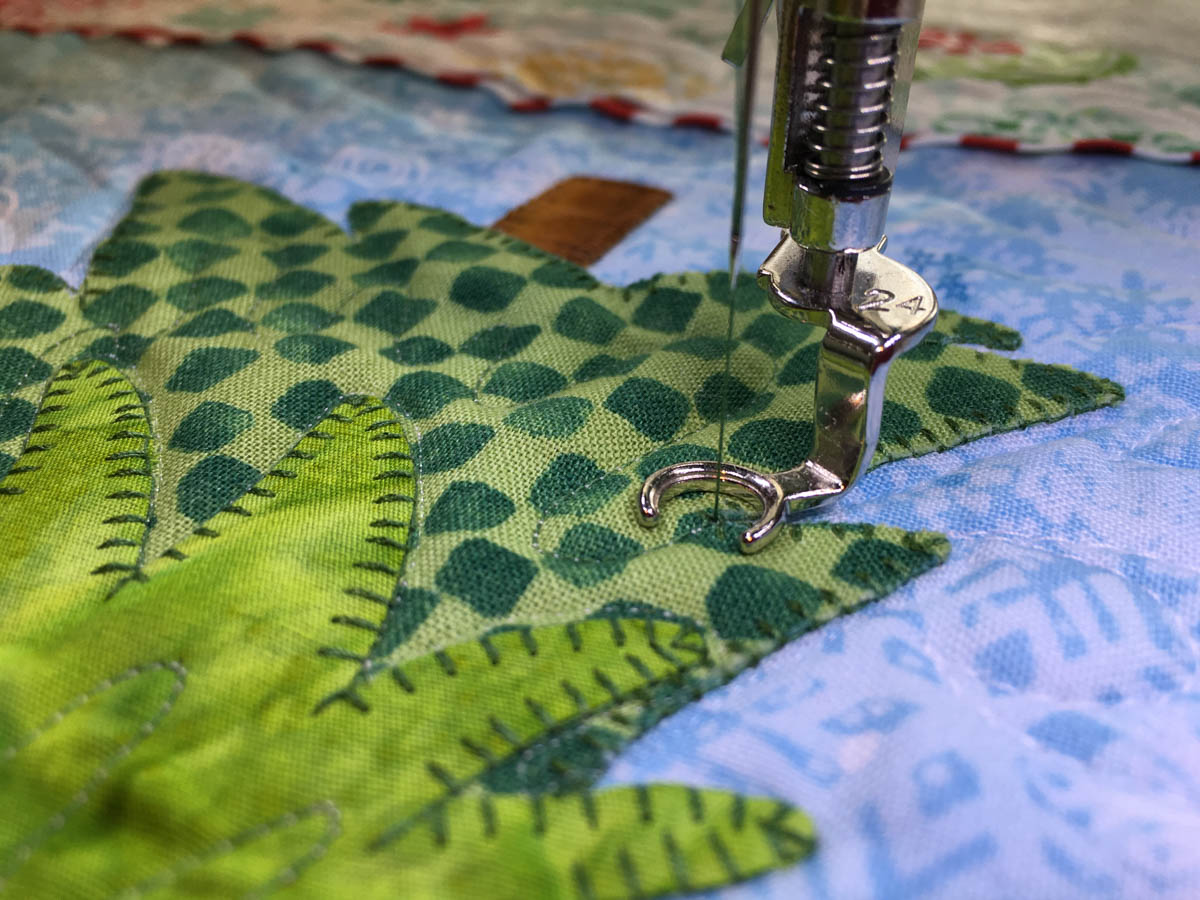
Place your outer chair cover piece on a piece of batting and quilt as desired. We used the BERNINA Stitch Regulator to create free-motion meandering swirls to add a romantic, feminine look.
Attach your BERNINA Stitch Regulator to assist you in whatever free-motion quilting you choose.
Step 4: Assembling the Lining
Take a 17 1/2″ x 16″ rectangle from Fabric G and place it right sides together to a 17 1/2″ x 23″ rectangle from Fabric G. Stitch the sides and top.
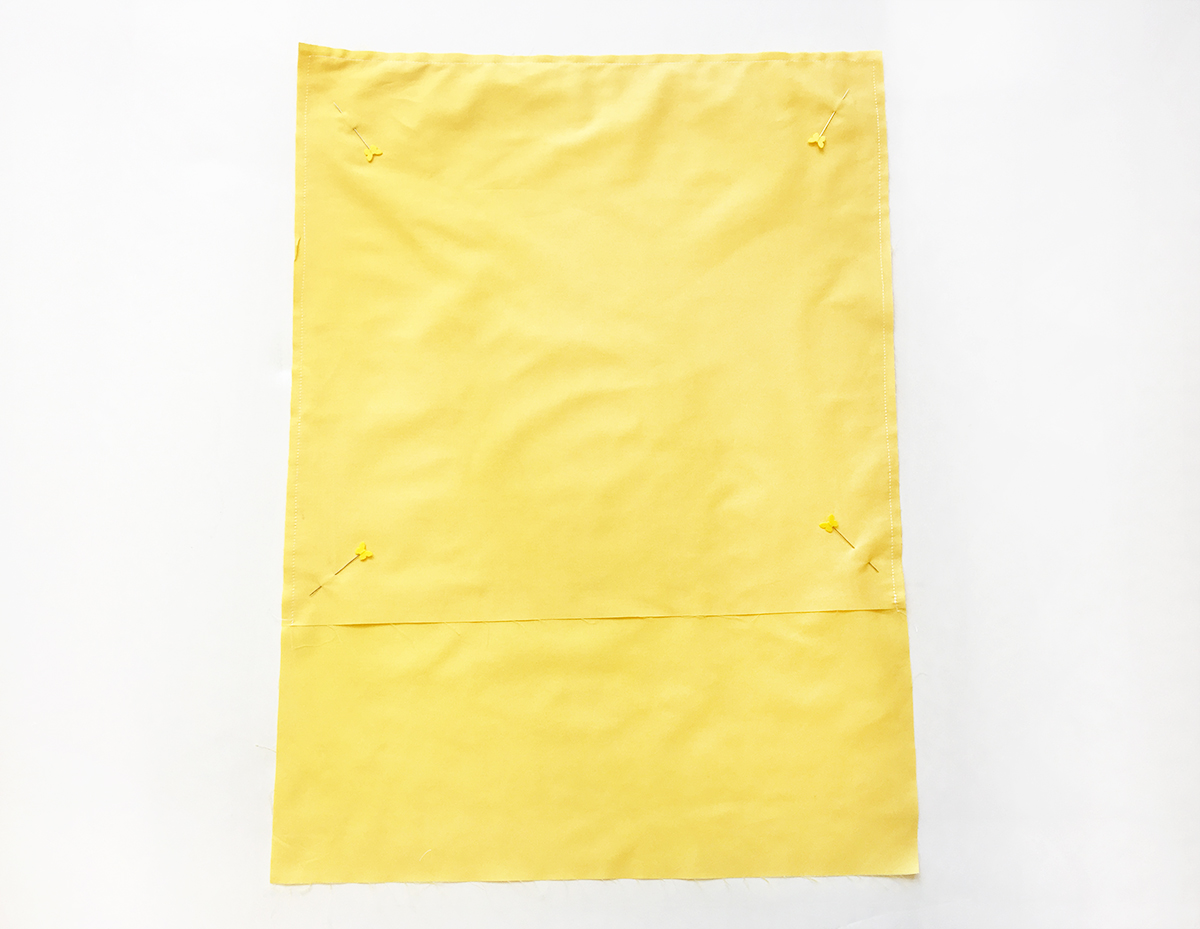
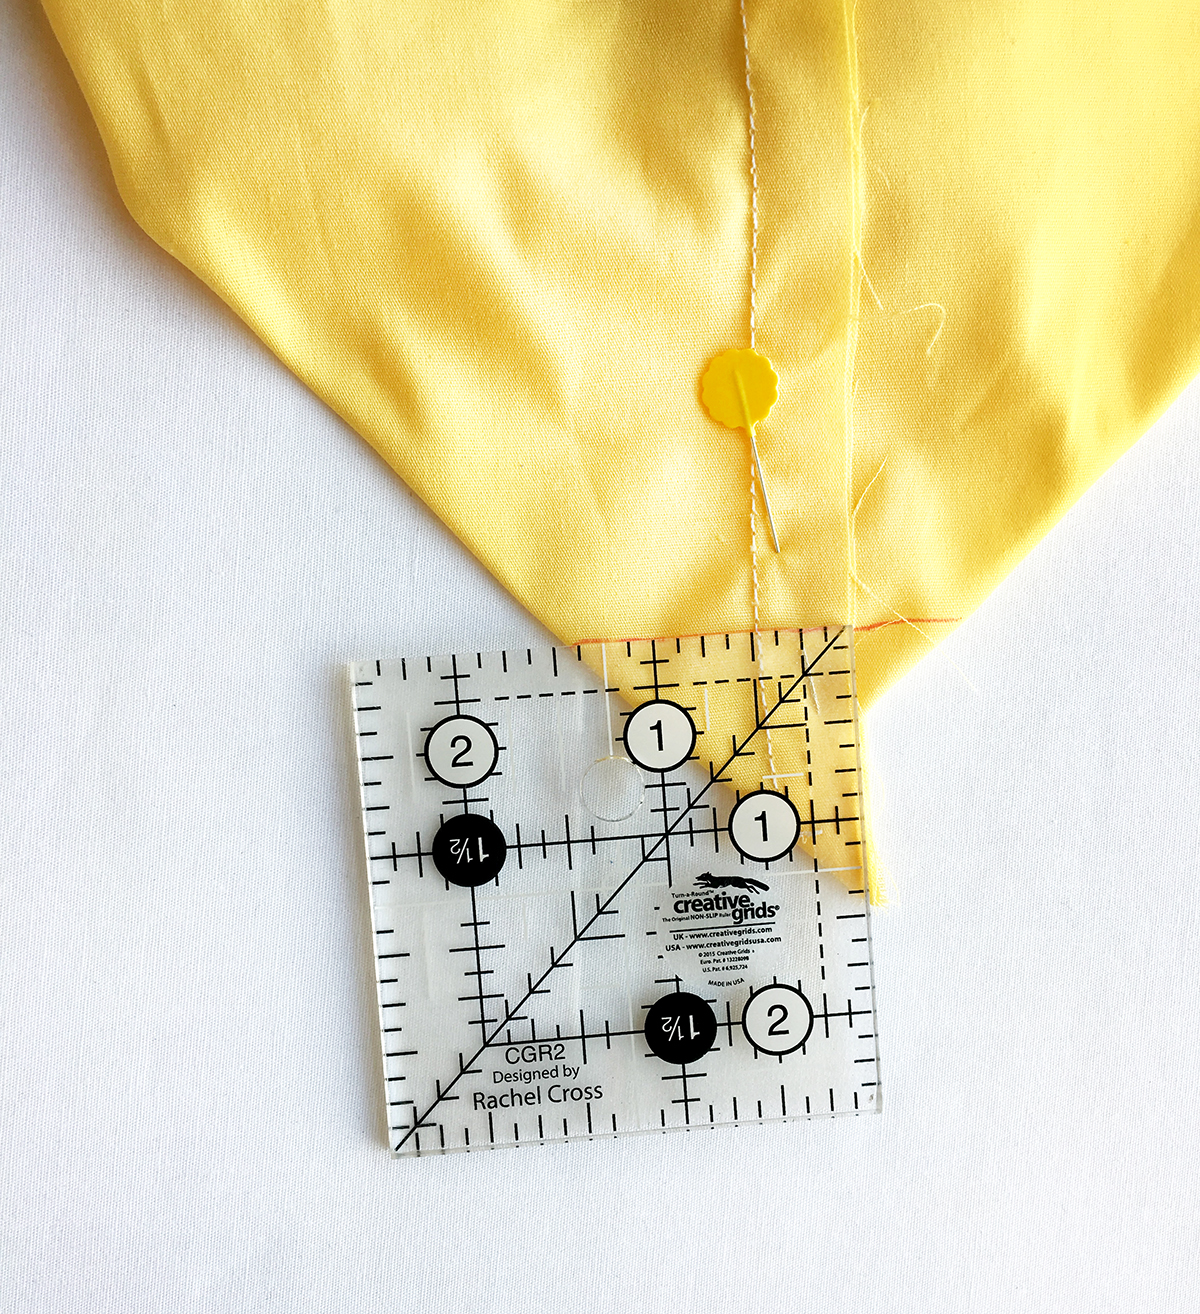
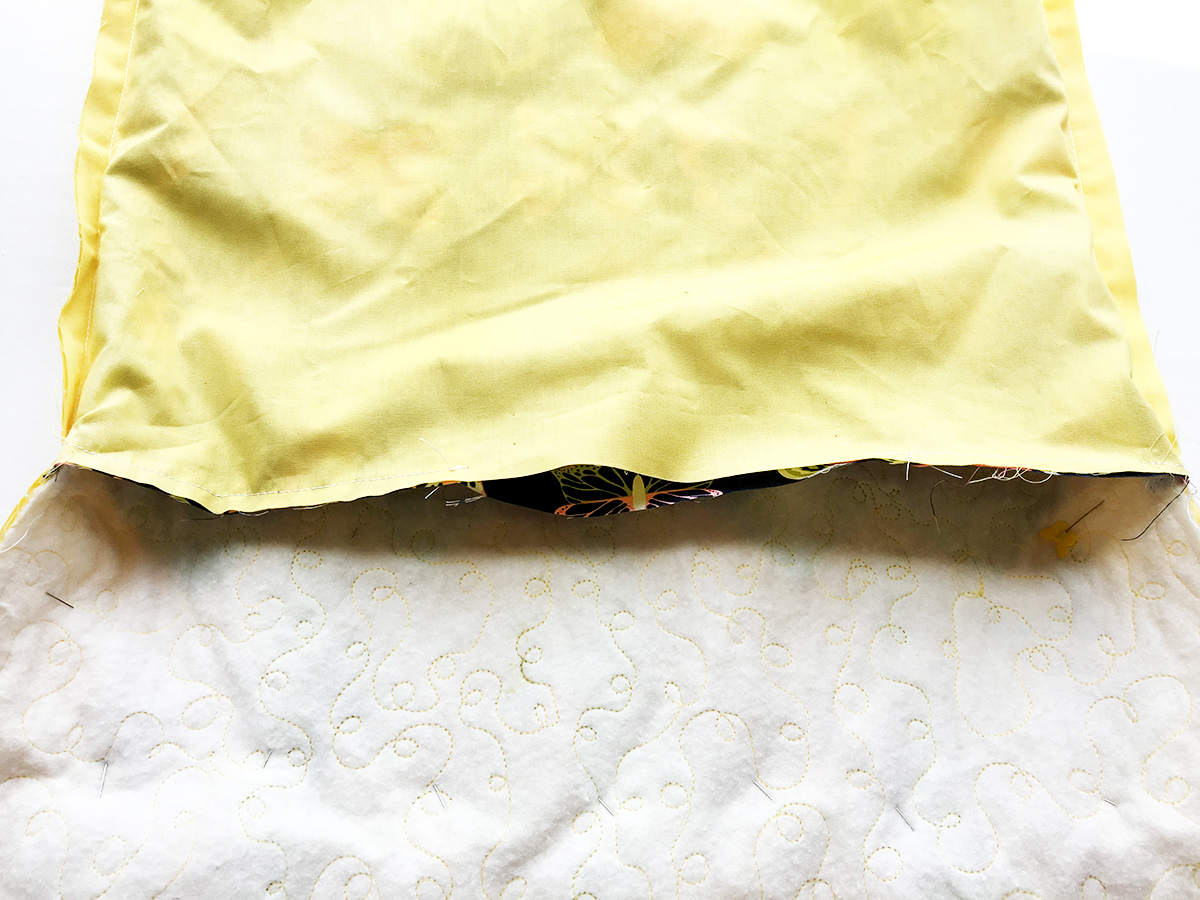
Take the lining (wrong side out) and pinch apart the two layers to get a little triangle on one corner. Flatten it down a little bit and make sure the top and bottom seams are lined up. Hold it tight. Place lining flat on the table. Measure 1 1/2″ from the corner of the lining and mark a straight line. Repeat this process for the other corner of your lining. In the same manner sew your outer chair cover to your 17 1/2″ x 16 1/2″ rectangle from Fabric E. Create boxed corners in the same manner as we did the lining.
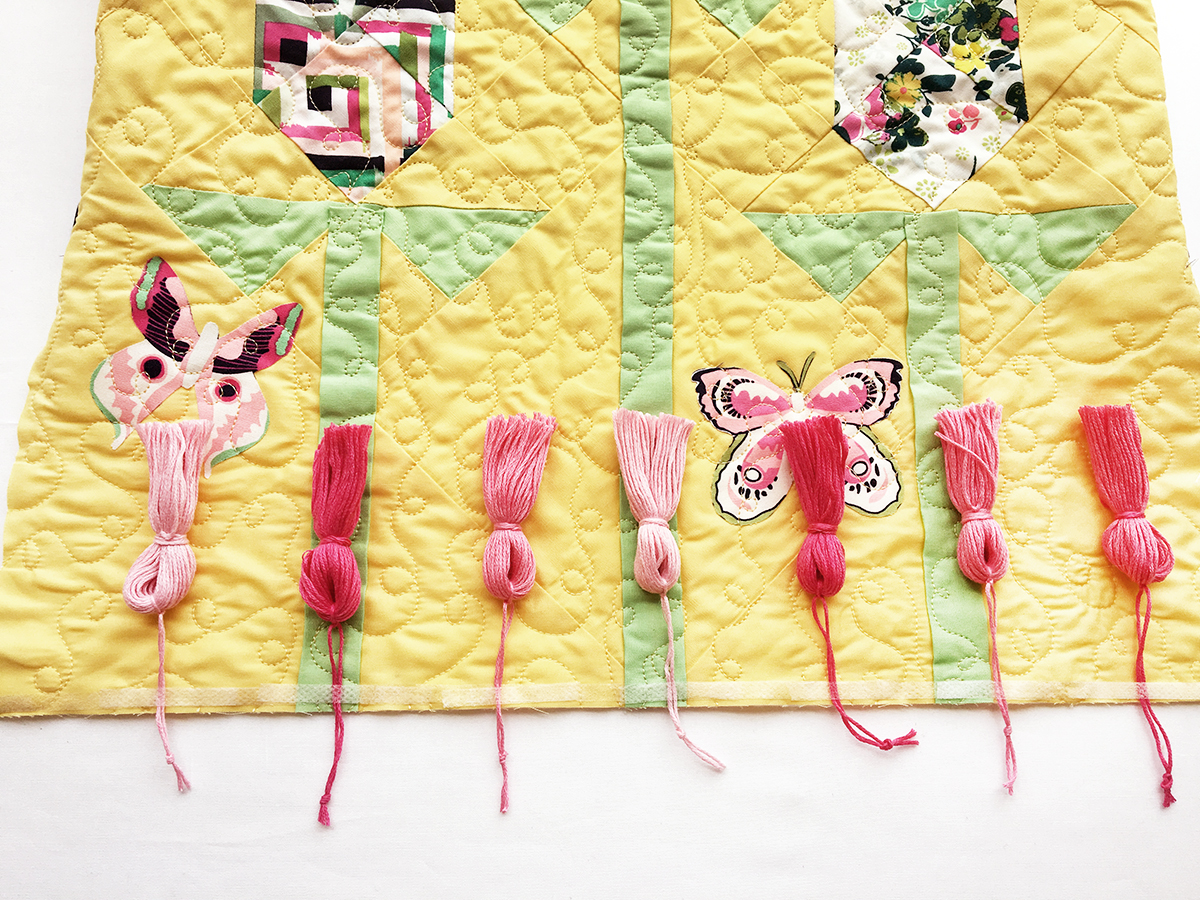
Step 5: Creating the Tassels
To create one tassel you will need two 12″ long threads and one skein of embroidery thread. Take a 12″ thread, find the center of your skein of embroidery thread, and tie a knot. Then tie a hanging knot to create a loop for your tassel. Take your other 12″ long thread and about a 1/2″ down wrap your thread around a few times and tie a knot. Trim the ends of your tassel to be about 1 1/2″ long or as long as you desire.
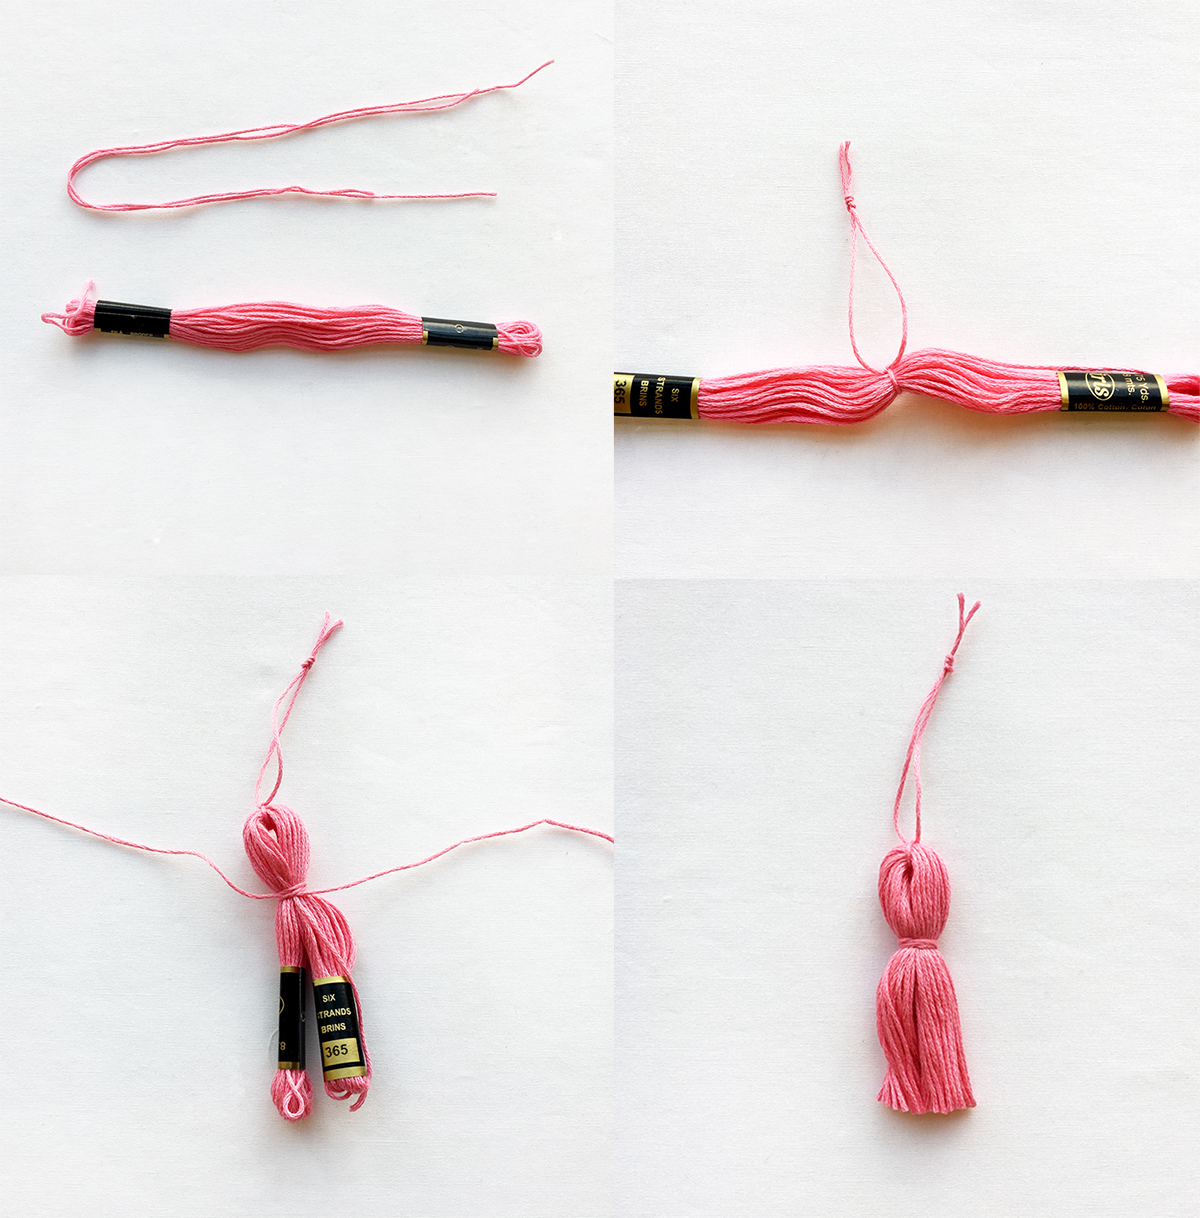
Repeat this process to make about 7 tassels.
To help your tassels stay in place we used wonder tape to space our tassels about 2″ apart.
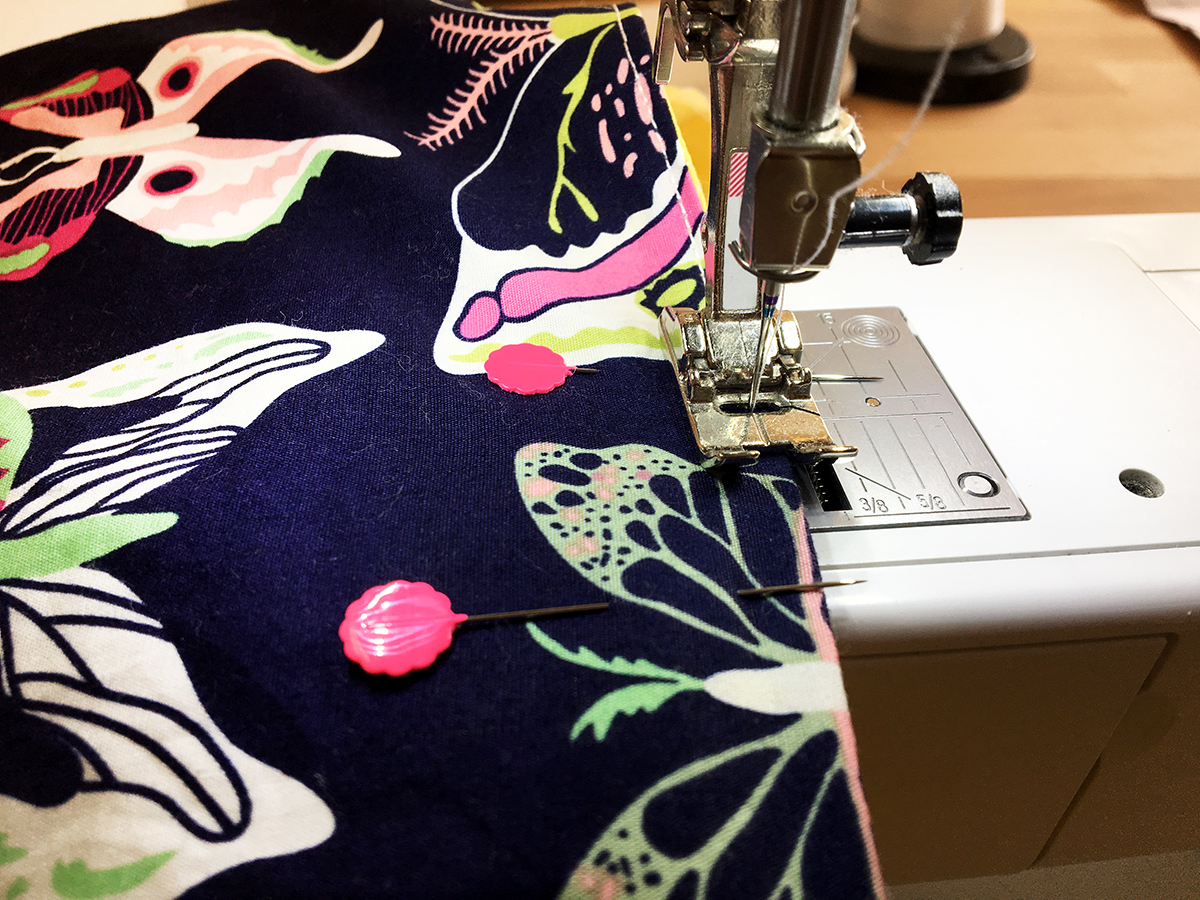
Place your lining pieces right sides together to your exterior chair cover and stitch at 1/2″ seam allowance making sure tassels are tucked out of the way. If your machine allows it take off the quilting slide on table, it makes it easier to sew the sharp corners.
Leave a small unsewn portion to flip piece right side out. Clip corners and flip piece through and use a point turner at the corners of your piece to create perfect points.
Give your project a good press and sew your unsewn portion closed.
Place your finished chair cover onto your chair and watch your room instantly brighten! I hope you had fun following along with the tutorial, it was definitely a fun process for us and we plan on make these chair covers for other holidays and festive gatherings in the future.
Happy Spring from the AGF Team
Used Products


What you might also like


6 comments on “Springtime Chair Cover”
-
-
You are so right! Changing it up for the different seasons and Holidays would be absolutely lovely!
-
I love the idea but all my chairs have rounded backs and I haven’t figured out how to measure for fabric and seams, etc.
-
-
-
Great idea. Am going to try for sure next year.
-
Thank you! It’s so good to hear you will be giving this project a try. Have a Happy Spring! 🙂
-
-
Looks like a really fun project for spring! Where are the beautiful scissors from?
Leave a Reply
You must be logged in to post a comment.

When I first saw this post, I thought, “Eh!” But as I looked through it I changed my mind. This looks like a lot of fun and would be really cheerful. Also easy enough to change out in a patriotic or Fall or Christmas theme. Thanks for the idea!!