The Story of Chantal: Impressions d’une Âme Soeur
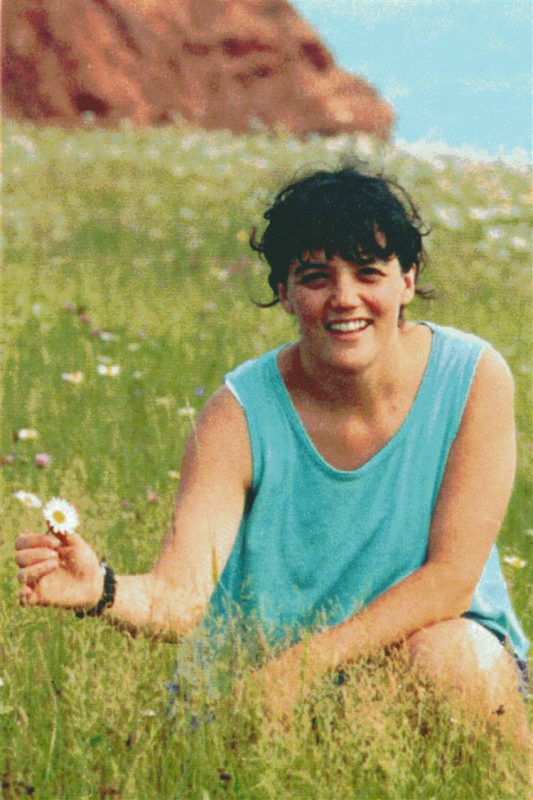
My best friend and soul sister Chantal died of breast cancer in 2000. I wasn’t able to travel back to Canada for her funeral to be with her family and friends, and that left an untethered thread in my heart and soul. A couple of weeks after her funeral, Marcelle, her mother, mailed me a copy of her funeral picture.
The caption for this image should be Totally Chantal. If you knew her, this IS her. Smiling, happy kneeling in a field, holding a daisy. Chantal was well traveled, had bicycled her way alone in Northern Europe and Scandinavia, was an avid skier. That picture stayed with me.
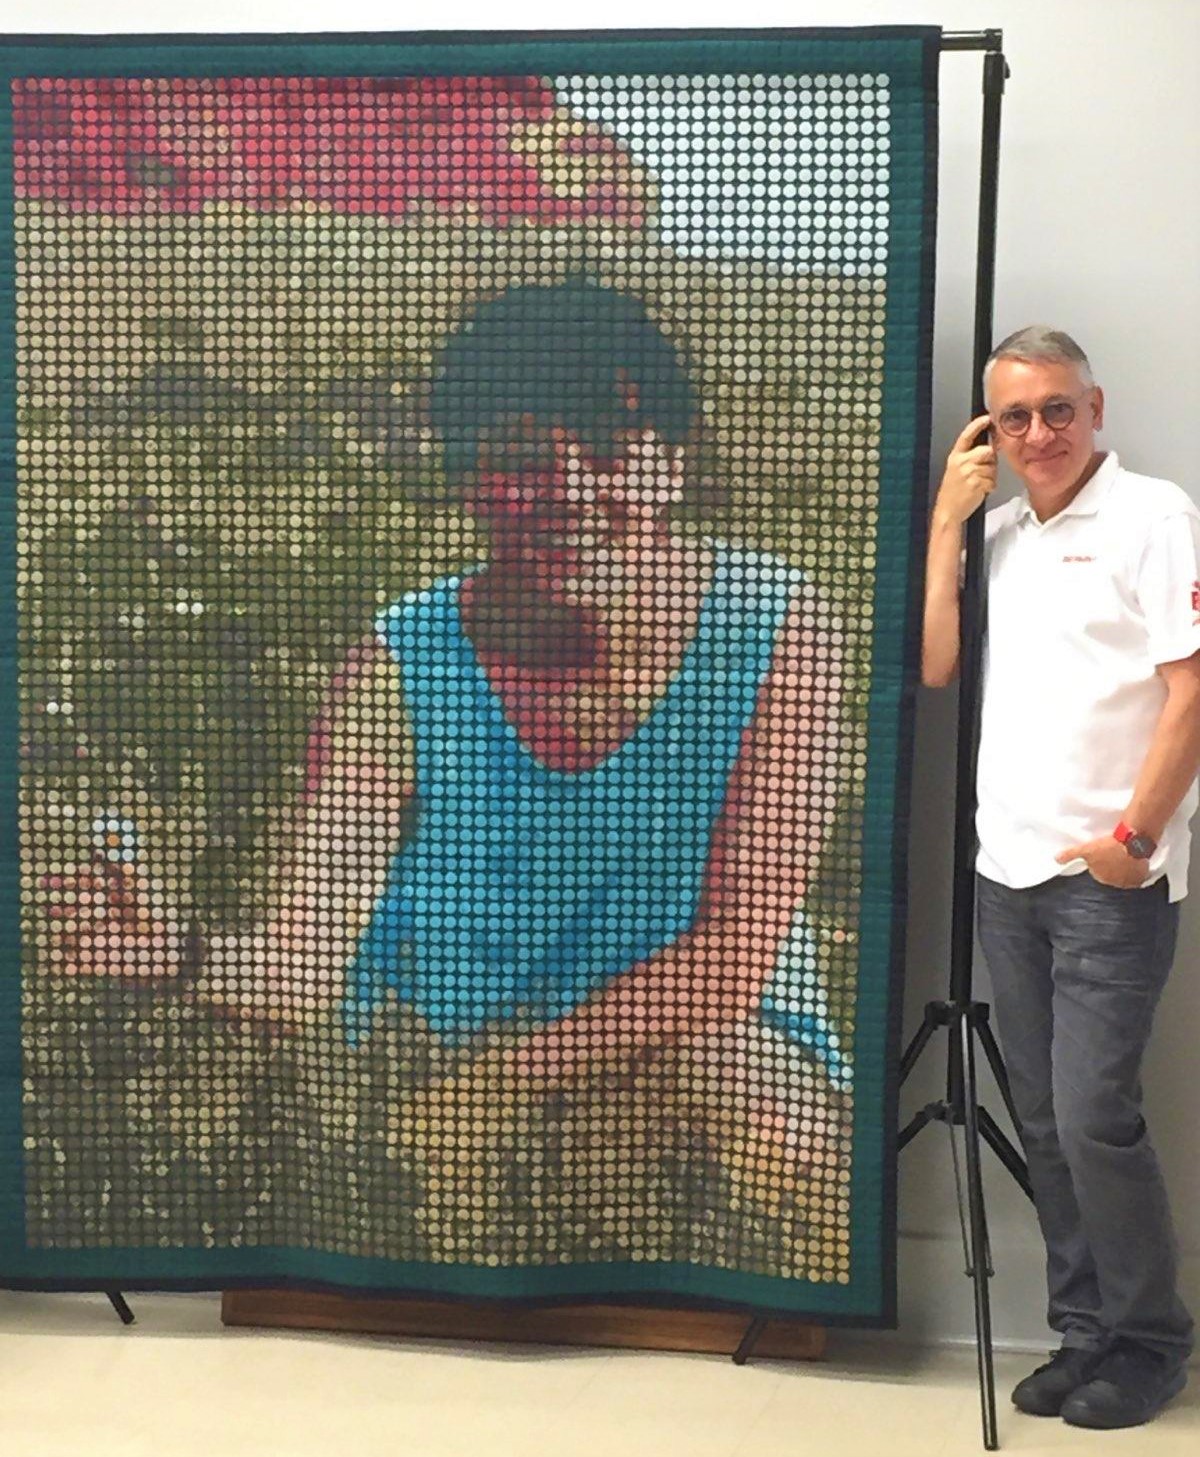
In 2005, I began making art quilts, with the motifs composed entirely of abstract embroidery. Along the way I developed a process to break down a large motif into manageable blocks I could embroider and piece back together. In 2010, I decided to pull out Chantal’s picture and attempt to turn it into a photo quilt. The challenge was to turn a 5×7 inch image into a 5×7 foot embroidery design. Oh yes…and in cross-stitch. Why not?!
Here’s a high-level summary of how I went about converting the image into a giant cross stitch design. For more details and the full story of the quilt, see my companion post in the community section of WeAllSew.com.
CONVERTING THE IMAGE TO STITCHES

STEP 1: Scanning the Image
NOTE: The photo was laser-printed, which fortunately flattens the pixels and reduces the fine grain of the image. That would make life easier when it came to converting pixels to crosses.
• After several tests, I determined that a high-resolution scan saved as a bitmap file with 64 colors yielded the best quality in a still manageable size. The resulting file was 290 MB!
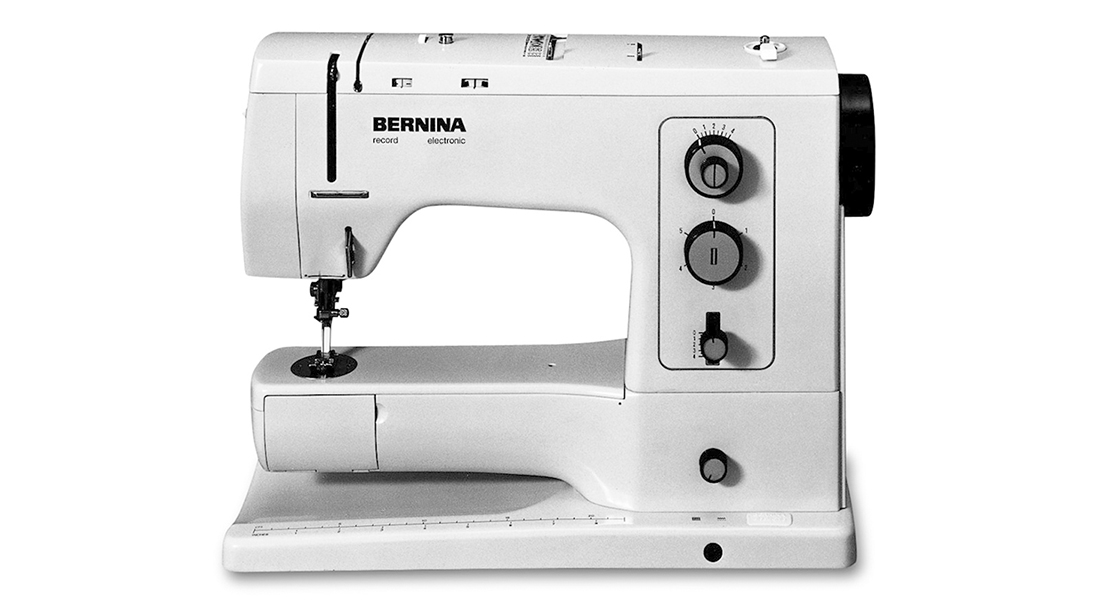
STEP 2: Importing the Image into the BERNINA Cross Stitch Program (included with the BERNINA Embroidery Software)
• I inserted the image in the Cross Stitch program.
• I resized the image so that it would match the grid.
• The final dimensions were 59 inches wide by 80 inches tall (almost 5×7 feet).
• I saved the .ARX file with just the image in it.
TIPS:
• Save your files! Save them early… and often!
• If you want to tackle large-scale projects like this, make sure your computer has a generous amount of memory. By today’s standards that would be 16GB of RAM.
STEP 3: Converting the Image to Crosses in the BERNINA Cross Stitch Program
• I used the Auto Stitch tool to convert the image (pixels) into crosses.
• First, I selected the 2 Threads setting in the status bar so I would end up with double strand crosses (a good setting for image density).
• I clicked on Auto Stitch.
• I clicked on the image.
• In the Auto Stitch Image dialog box:
o I selected to Map Image To: a Specific Thread Chart / Isacord 40.
o Maximum Number of Colors: Restricted to 48
Note: This stage was done iteratively, starting with 64 colors (same as the image), then 32… then 48 as I saw no significant difference in the resulting image. So 48 colors it was.
o The software automatically remapped the image colors to 48 colors of Isacord 40 thread and added these 48 colors to the default palette already in the file.
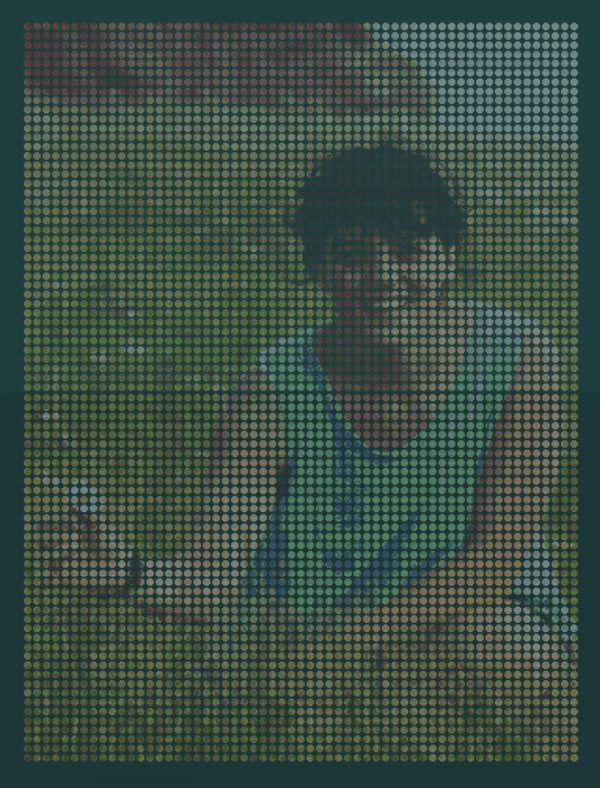
At this point, I had one monster slab of crosses. Unfortunately, while my B 830 had the largest embroidery field in a single hooping without rotating the hoop, but my design was still MUCH bigger than the hoop! So, I would have to break it down into a manageable embroidery block size, to be pieced back together later.
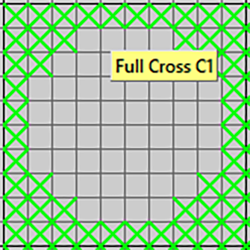
This is the generated slab of cross stitches. Note a large hoop representation (6×8 inches) in the center of the slab.
ADAPTING THE GENERATED CROSSES TO MAKE THE EMBROIDERY PROCESS POSSIBLE
STEP 4: From A Slab-o-Crosses to A Matrix of Cross Stitch Circles
Note: The Cross Stitch software makes it easy to select a portion of a design, which would allow me to subdivide the slab of cross stitch into hoopable (yes, that’s a word!) rectangles. However, matching the edges of cross stitch rectangles when piecing them back together might be tricky.
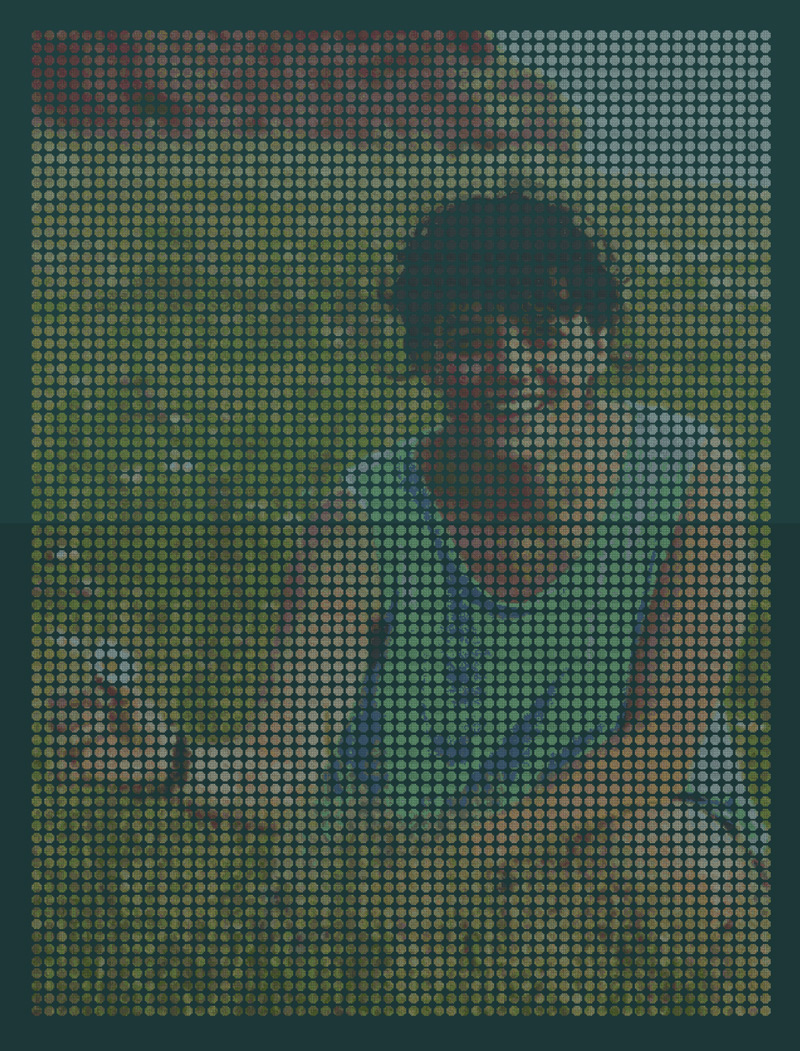
I decided to modify the solid slab of crosses by selectively deleting crosses so I would end up with cross stitch circles. The image would be formed by meta dot matrix. To do so, I worked on every square inch of the slab. With the grid displayed on screen, this was fairly straightforward. I also determined at this stage that I would subdivide the slab into 4 x 4 inch blocks so that I could run the embroidery on all three of my embroidery machines, one of which was limited to a 4×4 inch embroidery field.
Working from a copy of the main file: (I always keep the original file intact when developing a process)
• I replaced a single line of crosses around the perimeter of every square inch of the slab, along with 3 additional crosses in each corner of the square inch with a color not present in the slab (here—neon green). This created a mask that would allow me later to reduce a solid square of crosses to a circle.
• Next, I used the Auto Select tool to select all the green crosses from the first square.
• I then used the Rubber Stamp tool to stamp the same group of green crosses next to the first square.
• From there, I could re-select the double square and rubber stamp it next to the first pair, etc. This would rapidly tile up to a 4 x 4 inch mask of green crosses.
 • I auto selected the entire 4 x 4 inch mask.
• I used the Rubber Stamp tool and stamped the 4 x 4 inch mask along the first row until I reached the width of the slab.
Since I was planning on embroidery blocks of 4 x 4 inches, I now had my First Row deletion mask.

• I auto selected the entire mask.
• I then copied it.
• I pasted it into the main design file.
• Then I adjusted the position to the top left of the slab.
• After that, I reassigned the green Color 1 (C1)
By now, all I had to do was to clone the cropping mask across the slab in the main file:
• I had already created the deletion mask for the first row of 4 x 4 inch blocks.
• Then I created the deletion mask for the next 19 rows of 4 x 4 inch blocks.
• I auto selected the neon green crosses for the entire first row.
• I used the Rubber Stamp tool and stamped the mask on each of the next 19 rows.
I loved that part! It went fast! Operation Shazzam!
To delete all the neon green cross and implement the deletion mask was the easiest thing to do:
• I auto selected the entire mask by pointing at the crosses in neon green.
• I pressed Del on my keyboard.
• That was it!
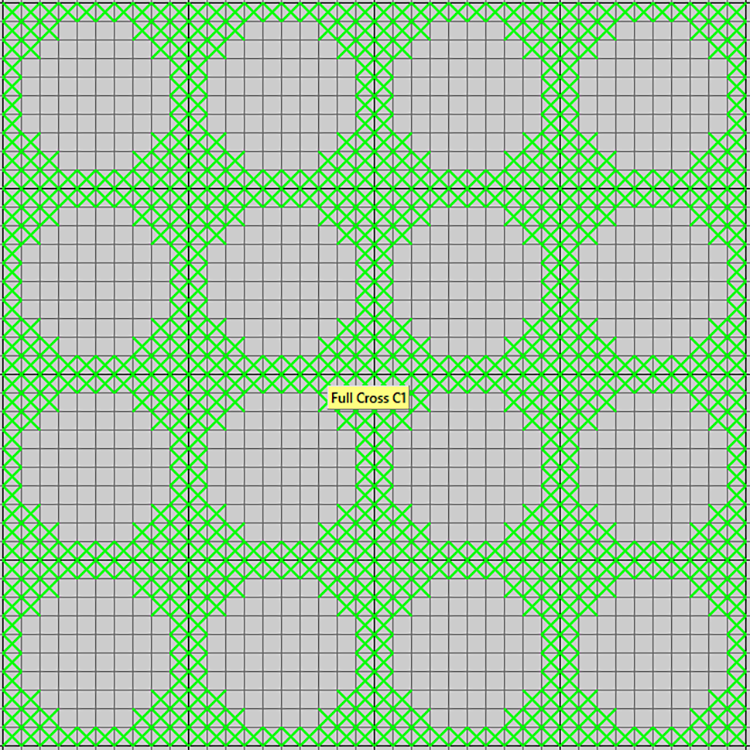
I now had the slab modified to a giant (meta) dot matrix in double cross stitch! Here is a print preview in BERNINA embroidery software of the cross stitch design. The software is so good the preview on screen is what you get on fabric.
STEP 5: Subdividing the Big File.
That was a process of its own…
After a trial run, I came up with a process that would yield:
• Files containing each a 4 x 4 inch block… 300 of them
• Each file saved with a name reflecting its position on the quilt: e.g. Row 01 Block 01
I now had 300 files with the extension ARX. Think of them as cross stitch patterns, which are not ready to send to a machine which requires stitch files.
I next converted the files to the EXP format, which my BERNINA’s could use, and to PES for my old Deco 600.
The rest was simple… about 400 hours of it!
• Run each embroidery file on stabilized fabric.
• Clean and trim each block.
• Piece together the top (with a border).
• Quilt the quilt with a self-binding from the backing fabric.
Along the way, I came to refer to the quilt simply as ‘Chantal’. The piece had gained a familiarity that was akin to the relationship I had with my friend.
When it was all done, I took the quilt with me on a private family tour (mine and Chantal’s), before shipping the quilt to Tokyo where it was awarded the Bronze prize at the 13th Quilt Nihon Exhibition. She toured Japan for a year before coming back to me.
THE QUILT IN NUMBERS
While working on the quilt, I was well aware that I was racking up some numbers. While they didn’t matter while working on the project as Chantal was my only motivation, I still was curious at the end. So, I downloaded a tiny 15 KB program that reports basic stats about an embroidery file, such as number of colors, stitches, jump stitches, etc. I filled a spreadsheet with 300 rows and found out the following:
• 4 Million embroidery stitches on the front
• 3822 Isacord spool changes across 3 machines from a pool of 48 Isacord colors
• 136,000 jump stitches, (that’s only 454 per 4 x 4 inch block), hand trimmed, so…
• 272,000 snips by hand
• 300 blocks pieced together
• I didn’t count the bobbins!
All done in 500 hours over a 5 year period, most of the work done in the 5th year.
While the numbers above imply the need for technique and determination (and on some days stamina… and more coffee!), they really take a second seat to the meaning of the piece. This quilt has a meaning for me that made any other consideration pale in contrast. Those 500 hours just went by, my focus remaining on the end result.


What you might also like


7 comments on “The Story of Chantal: Impressions d’une Âme Soeur”
-
-
I am speechless… I hope I get to see it in person someday!
-
Wow – this is just amazing, Sylvain!
-
Unbelievably talented and what a great tribute to your sister
-
It is very beautiful, treasured memory!
-
Absolutely stunning! The love of a dear friend and the patience to complete this project with a masterful mind. Blessed!
-
Just amazing. Thank you for sharing this tribute for your sister and your method.
Leave a Reply
You must be logged in to post a comment.

This is one of the best posts ever, both for the amazing story of friendship and a wonderful quilt, but also for the wealth of information on the technique. Thank You!