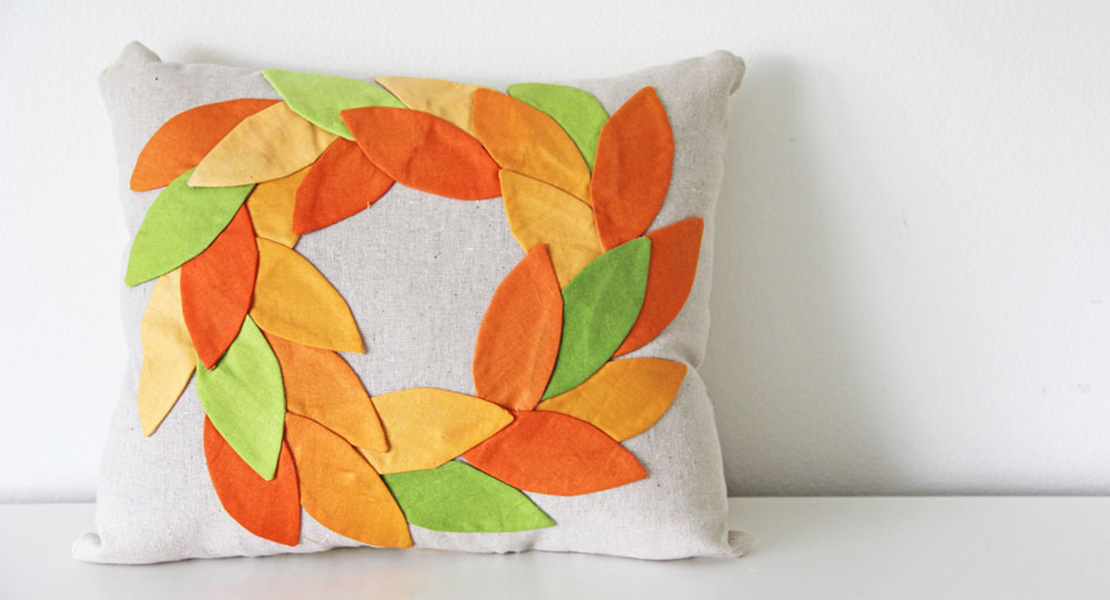
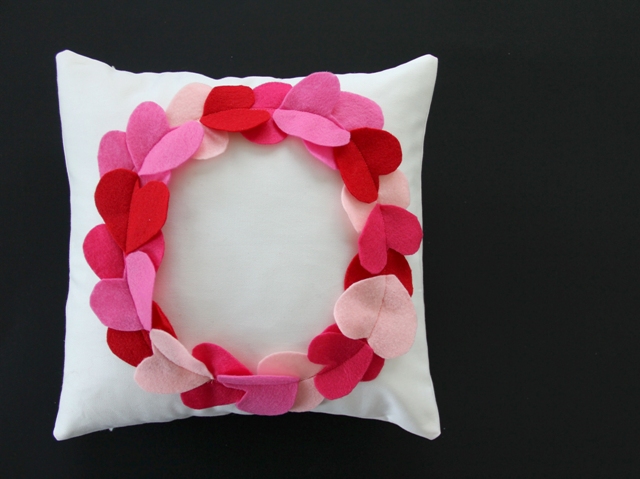
DIY Fall Wreath Pillow
Fall is a magic time of year. Turn its first chill into a warm touch for your home décor. Let the dancing leaves spend the whole year with you, appliquéd on your new pillow.

Materials and Tools
- Approximately ½ yard of linen for pillow
- 3 jelly roll strips (2½ʺ x 42ʺ strips) of Simply Color by Moda in Ombre Orange for 21‒24 leaves (or substitute other orange and yellow solids or prints)
- 1 jelly roll strip (2½ʺ x 42ʺ strips) of Simply Color by Moda in Ombre Green for 7‒8 additional leaves in a contrasting color (or use other green solids or prints)
- Matching thread
- Pellon® Wonder-Web® 807 fusible web
- Polyester stuffing
- Medium-size circular bowl, about 7½ʺ in diameter
- Pilot FriXion ball pen or other erasable marker

Instructions
Fold the linen in half lengthwise and finger press to make a crease.
Unfold the linen and refold in half crosswise; finger press to make a crease.
Place the bowl face down on the linen, in the center of the fabric, using the pressed center lines as guides.
Trace around the mouth of the bowl to create a circle for your wreath.

Download, print, and cut out the leaf template.
Fall_Wreath_Pillow_-_leaf_template_121814.pdf
Trace the leaf template onto the right side of the jelly roll strips with an erasable pen. You should have a total of 30 traced leaves.

Cut strips of fusible web slightly narrower than the jelly roll strips (about 2¼ʺ wide). Place the strips right sides together with the leaf strips.

With the fusible web on top, sew along the drawn leaf lines, starting and stopping with a backstitch. (This interfacing is really see-through, so it makes seeing the lines super easy.)
Tip: Pivot around the curves and points with the needle DOWN in the fabric. If your sewing machine has a needle down function, this is a great place to use it!
Cut out the leaves, leaving a ¼ʺ-wide seam allowance.

Gently pull the webbing from the fabric and cut a slit down the middle (and only in the middle!) of the webbing, just large enough so you can turn the leaf right side out.

Turn the leaves right side out, and with a pin or stiletto gently pull out the corners. Remember to be gentle! Try not to rip the webbing.

After all the leaves have been turned right side out, arrange them on your drawn circle. I positioned my leaves in groups of three and overlapped them a little. Play with the placement, using my picture as your guide.
Using a dry iron (turn off the steam), firmly press the leaves until they are adhered to the linen.

If you would like to hand-stitch around the leaves, you can tack them down with matching thread. (There’s a matching thread in my Simply Color thread collection for Aurifil.) But honestly, you don’t need to stitch down the leaves unless you see yourself washing this pillow.
For more projects visit Vanessa at her blog, V and Co., at http://www.vanessachristenson.com/