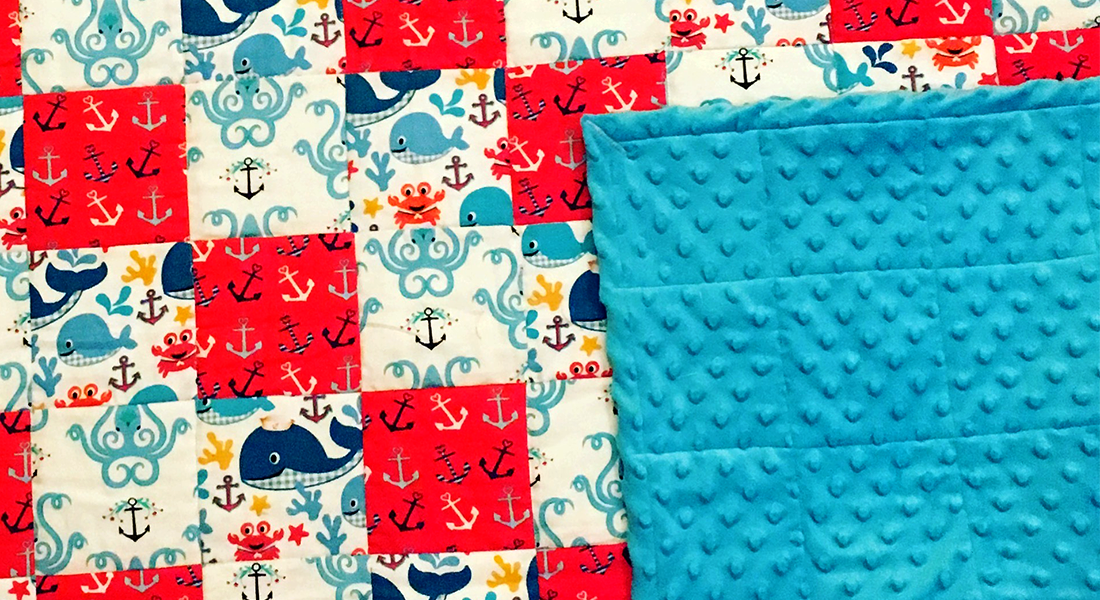
How to Embroider on Minky
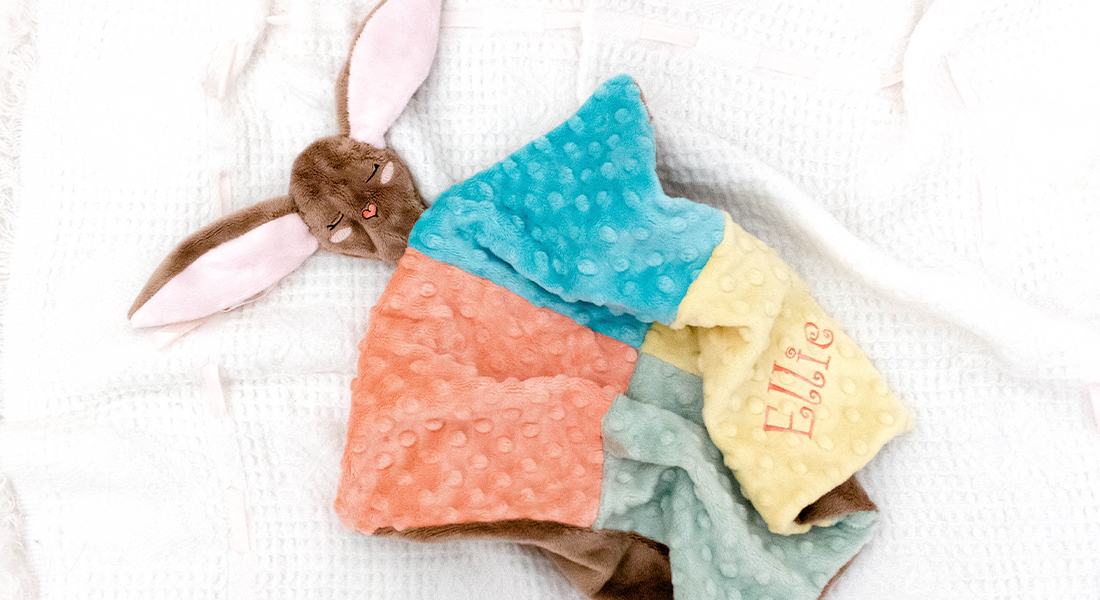
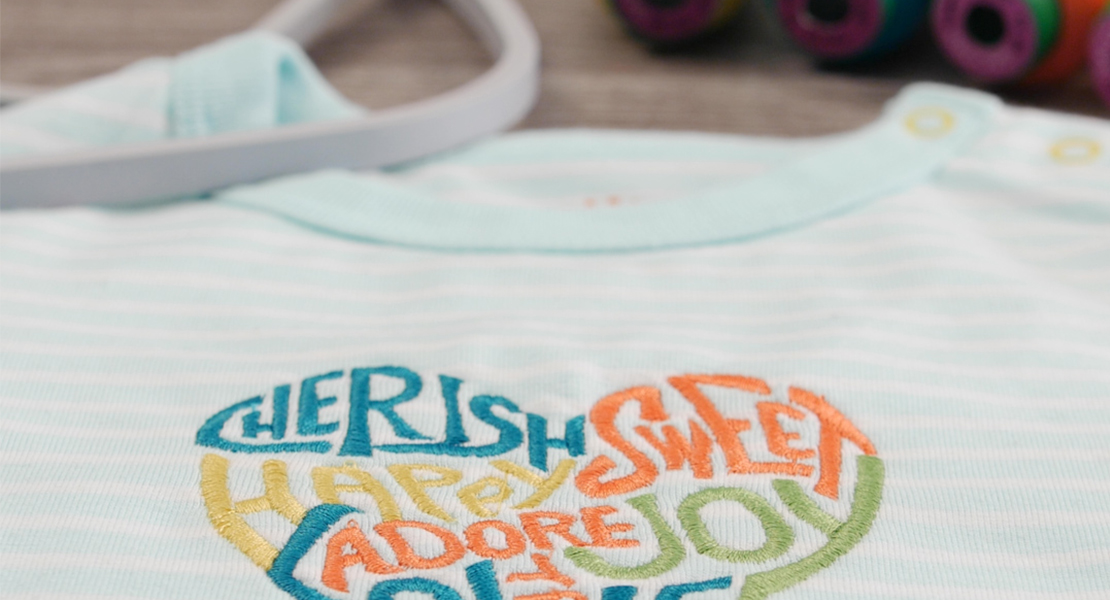
Capture the Memories with This Embroidered Minky Blanket.
Minky: Everyone loves it, but it can be very intimidating to sew or embroider on. Could that be because it is unclear how to prepare and handle the material and the sewing machine? Creating something with Minky is sure to turn out soft and cuddly, and make a great gift. It is even better with the personal touches of embroidery.

This blog explains the “what to do’s” of embroidering on Minky, and leaves you with a cute baby monthly milestone blanket for soon-to-be parents.
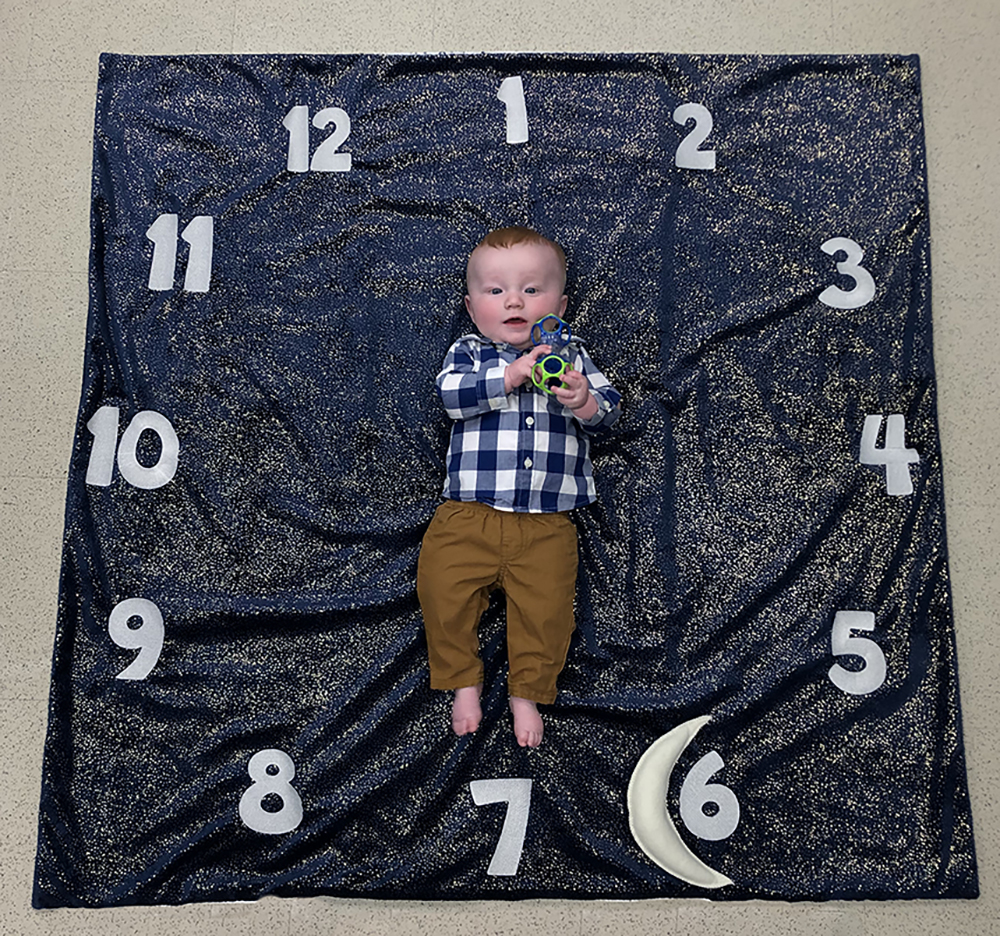
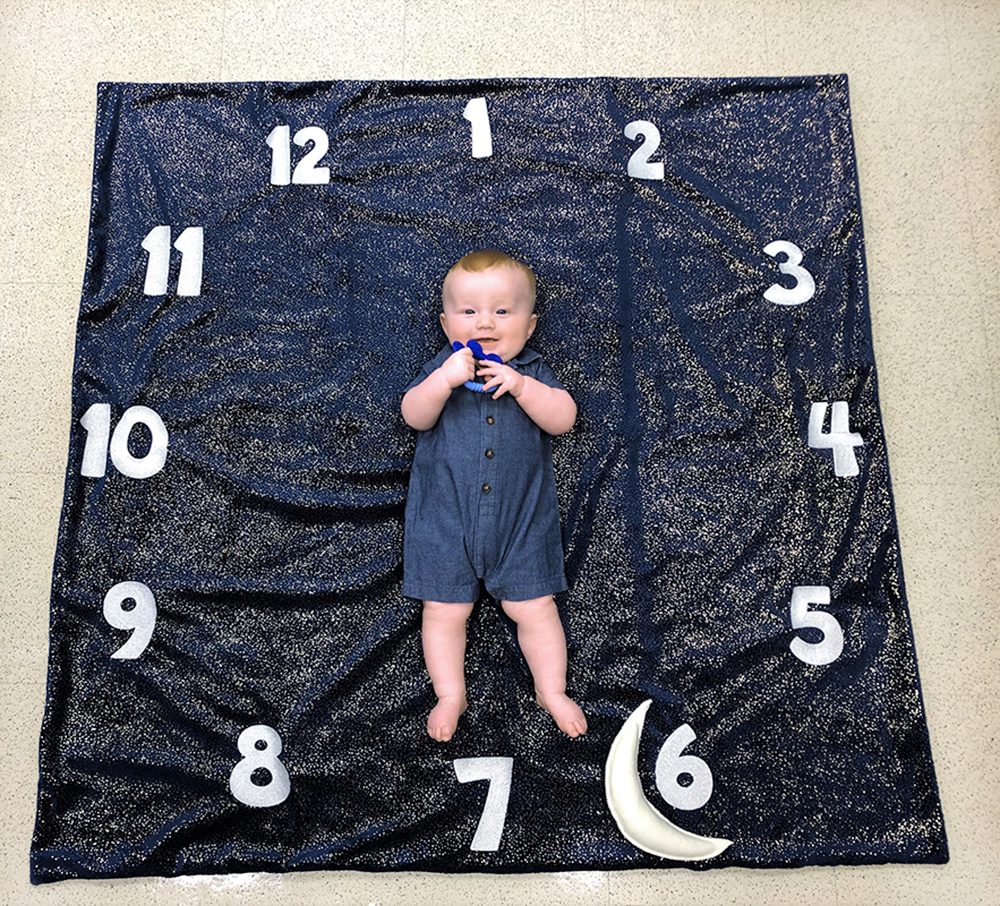
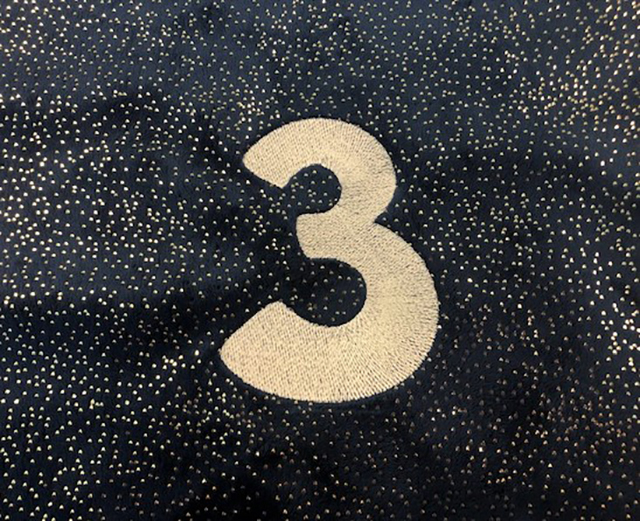
A milestone blanket is THE perfect baby gift. There are a series of numbers from 1 to 12 embroidered on the blanket. So at each “month”, the parents position the baby on the blanket, denote the month (could be by placing a wreath, ribbon, toy, etc. over the number), and snap a picture. This is the PERFECT way to “watch” the baby ‘grow’ in a series of photographs!
Materials to Create a Minky Baby Blanket
- Minky fabric of your choice
- Masking tape
- Water-soluble or air erasable fabric marker
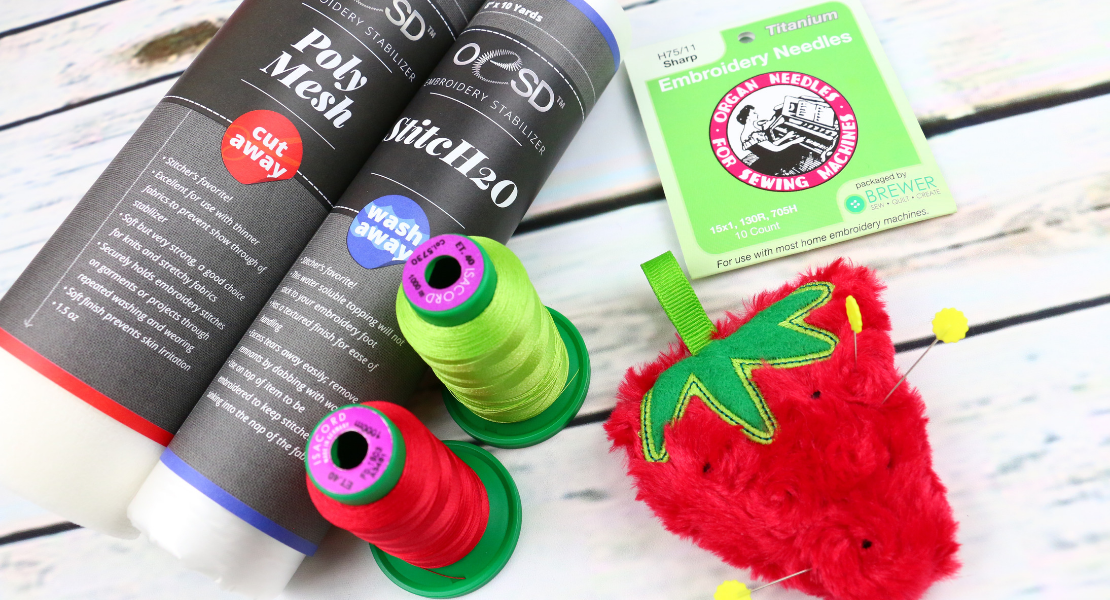
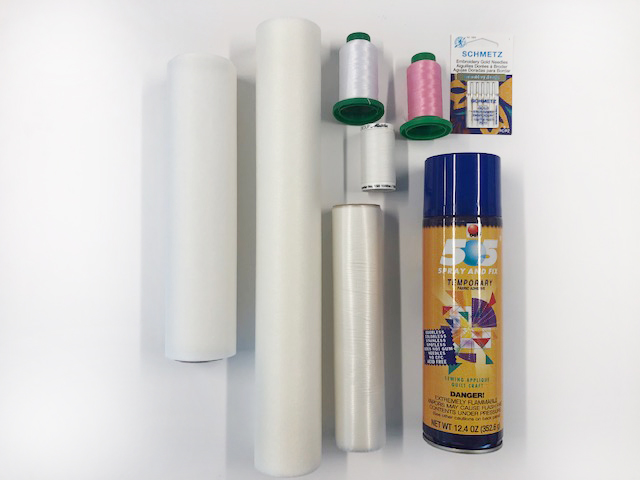
- OESD Heavy Weight TearAway Stabilizer
- OESD Fusible PolyMesh CutAway Stabilizer
- OESD StitcH2O WashAway Stabilizer
- 505 Temporary Adhesive Spray
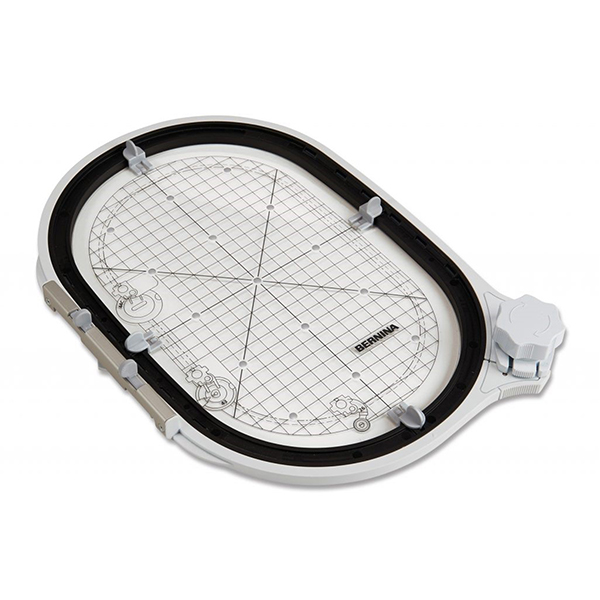
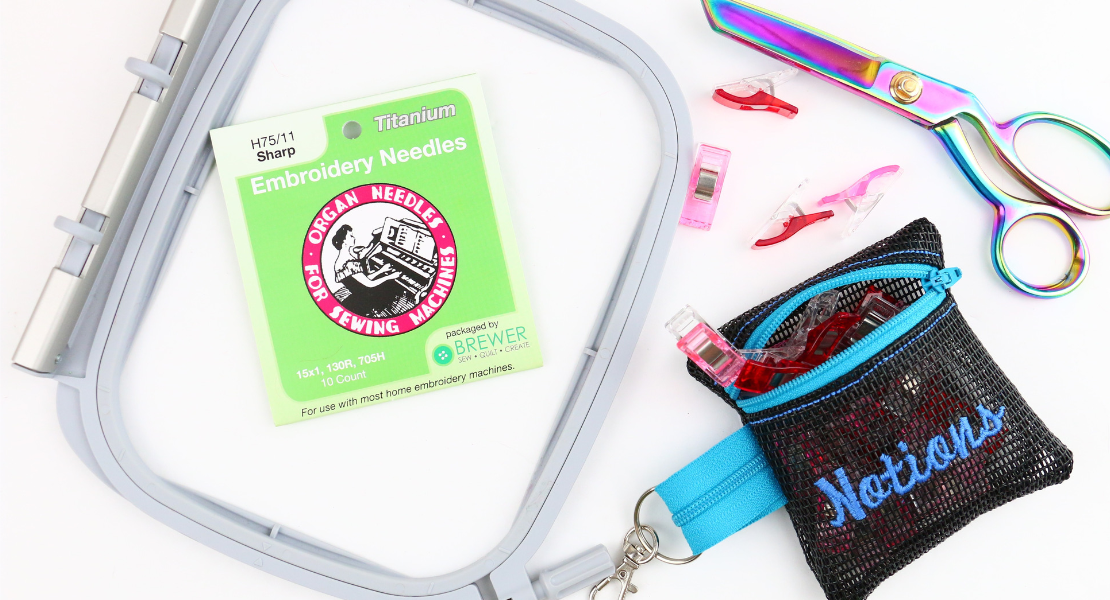
- BERNINA Large Oval Embroidery Hoop
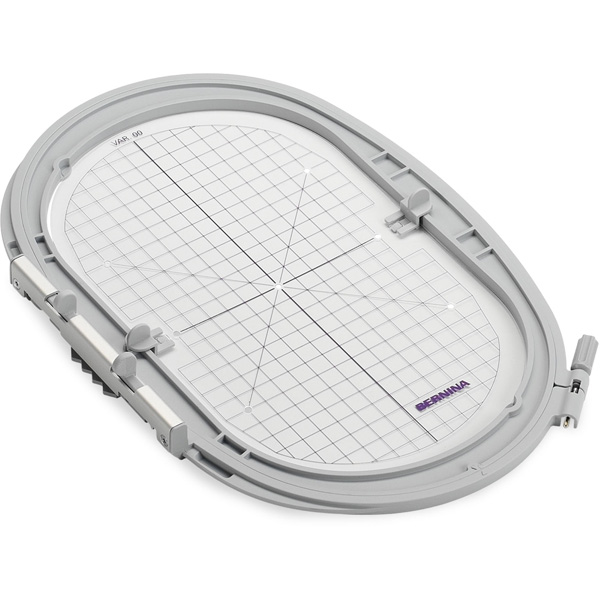
- BERNINA Midi Embroidery Hoop
- Straight pins
- Isacord Embroidery Thread
- Mettler Bobbinette Thread
- Schmetz Embroidery Gold Needle (130/705 H-ET 75/11)
- Drop-Shaped Embroidery foot #26
- BERNINA High Thread Tension Bobbin Case
- Duckbill scissors
- Seam ripper for removing basting
- BERNINA 790 PLUS
Preparing the Project
Begin this project by measuring out the piece of Minky to have dimensions slightly larger than the desired dimensions of the finished product. Doing this will allow room to finish the blanket in any desired way, whether that be a self-binding or sewing two pieces of Minky together. I wanted my blanket to have finished measurements of 48” x 48”, so the unfinished piece was cut at 50” x 50”.
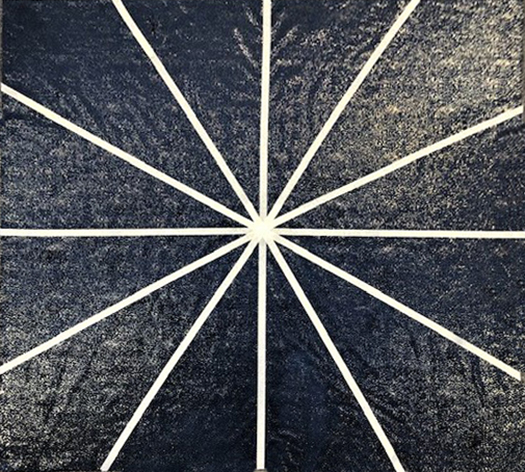
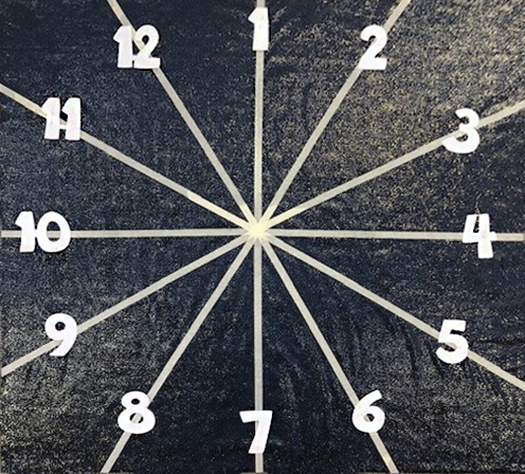
To determine where the numbers go, mark out a clock pattern with the number 1 at the top on the right side of the fabric using masking tape, painter’s tape, water-soluble pen, or a marker of your choosing. Each line should be like the hand on a clock, reaching close to the edge of the unfinished piece and evenly spaced out. I found it easiest to visualize what the final product would look like when I used masking tape to mark it out.
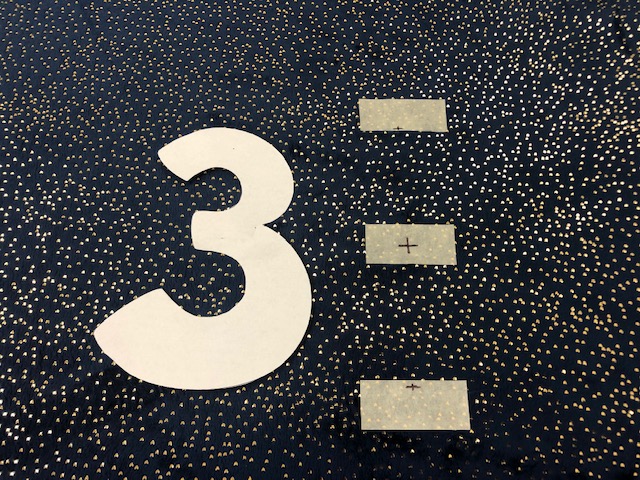
Be sure to clearly mark where the number will go. It may be beneficial to print the design numbers and lay them out on the Minky in the circle pattern. Since I already had chosen my font for the numbers and adjusted them to all be the same height, I printed them and laid them out to mark exactly where each would be embroidered. If it does not work to print out the design, use a seam gauge or small ruler to measure out the size of numbers desired.
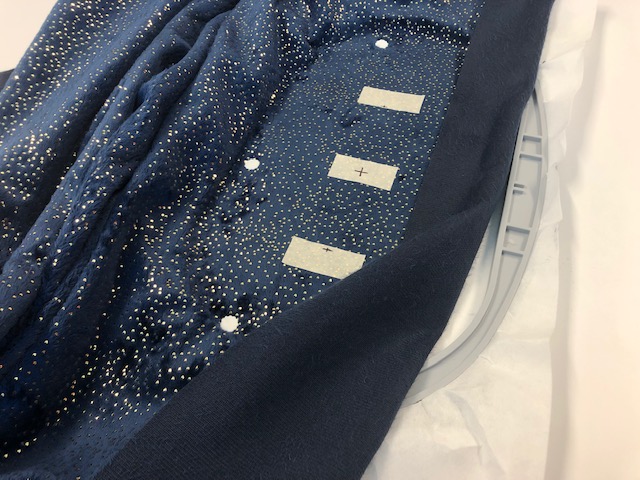
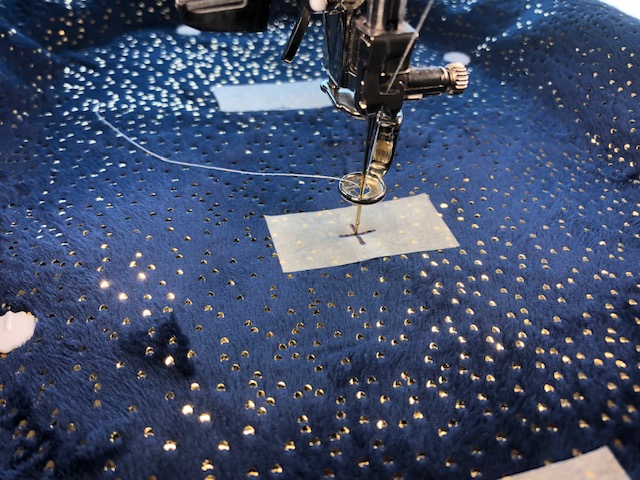
Mark the center point, top, and bottom for each number. These markings will come in handy when aligning the fabric in the hoop and on the machine. It was rather difficult to see the marker on my Minky, so I decided to make the marks on pieces of tape instead. I placed three pieces for each number design: one at the top, one at the bottom, and one in the middle with center crosshairs on it.
Hooping Up
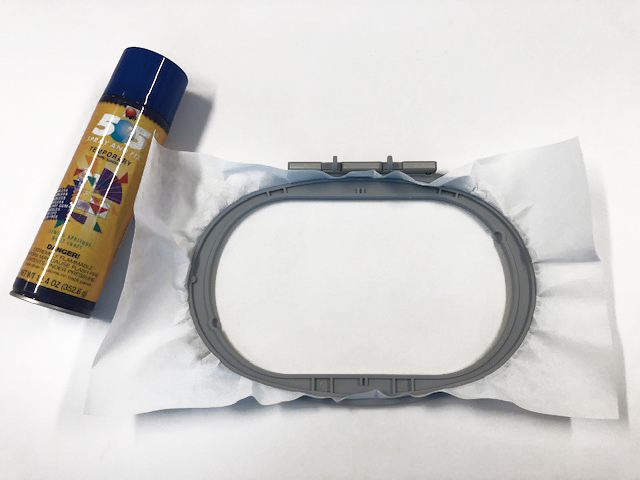
The sewing preparation actually takes place away from the machine with the hooping of the project. Select the smallest hoop that will fit the complete design inside. The smaller the better for providing more stability to the project when it is being stitched out on the machine. Minky fabric is heavy, and likes to move around a lot. Since it is a knit, it has a tendency to stretch out. It also has a cut pile on the surface, which can cause stitches to get lost. All of these problems can be solved by using the right stabilizers. For the bottommost layer, use OESD Heavy Weight TearAway Stabilizer. Cut a piece that hangs over the embroidery hoop by about two inches. Spray the piece of stabilizer with 505 Temporary Adhesive Spray, and then put it in the hoop.
Make sure to push the inner ring slightly past the outer ring before tightening to ensure that the stabilizer will rub against the free arm, rather than the hoop. Using tear-away stabilizer will give the Minky a sturdy foundation once it is basted down, but will easily come off the design afterwards.
For the next layer, cut a piece of OESD Fusible PolyMesh CutAway Stabilizer approximately one inch bigger than the design being embroidered. Fuse that onto the back of the Minky where the design will be stitched.
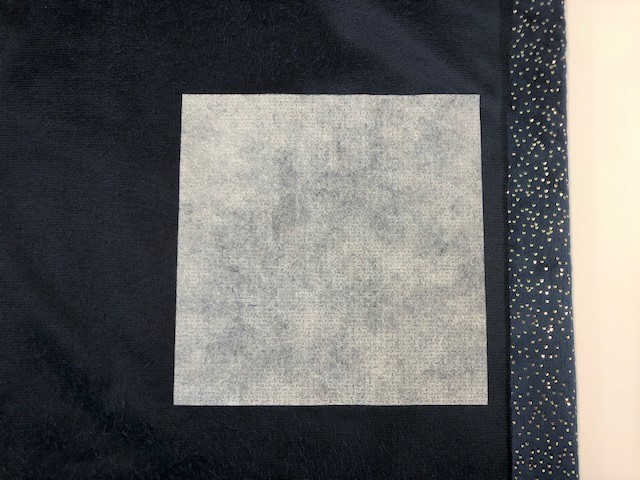
I prefer to use the fusible stabilizer because it is going to adhere to the fibers and hold them in place during the embroidery stitch out and during washing. Since Minky is thick, instead of hooping it, float or drape it over the embroidery hoop. The temporary adhesive will hold it in place, but I find it helpful to add a few pins along the edge of the hoop.
Keep in mind when hooping up the fabric and stabilizer that the bulk of the fabric should be behind the machine or over the embroidery module away from the machine. Avoid putting excess bulk on the free arm.
The final layer of stabilizer will go on top of the fabric. Cut a piece of OESD StitcH2O WashAway Stabilizer that is approximately one inch bigger than the design. Set it aside until the stitching begins. This will keep the stitches from sinking into the nap of the Minky, or getting lost in the plush fabric.
By using these quality stabilizers, the fabric will maintain its shape. This will eliminate the worry of the design cupping up, or the fabric losing its plushness. This preparation will lead to a wonderful finished product.
Preparing the Machine
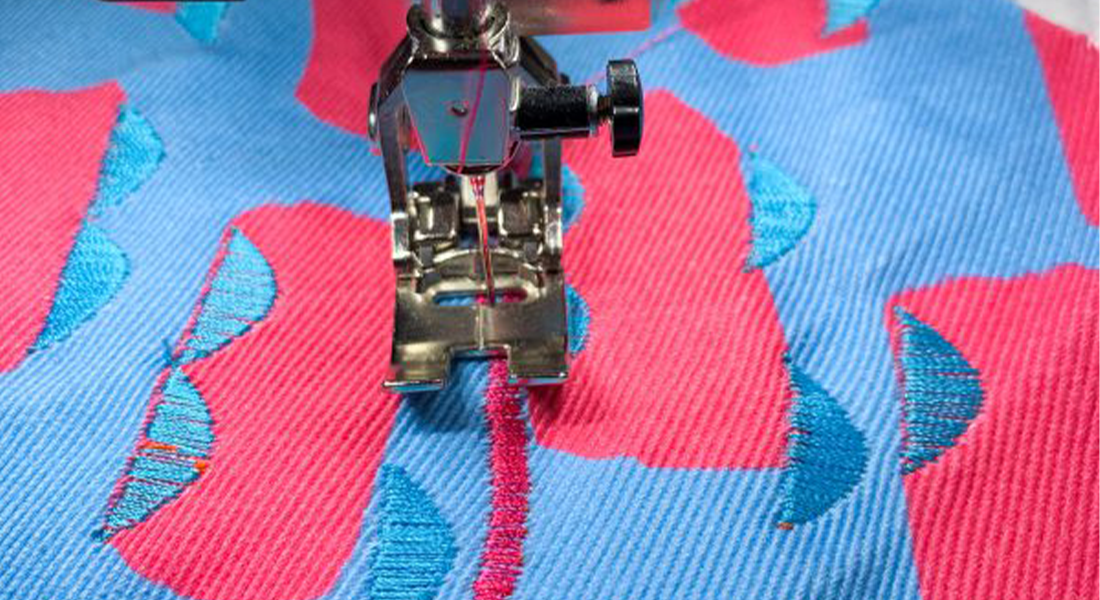
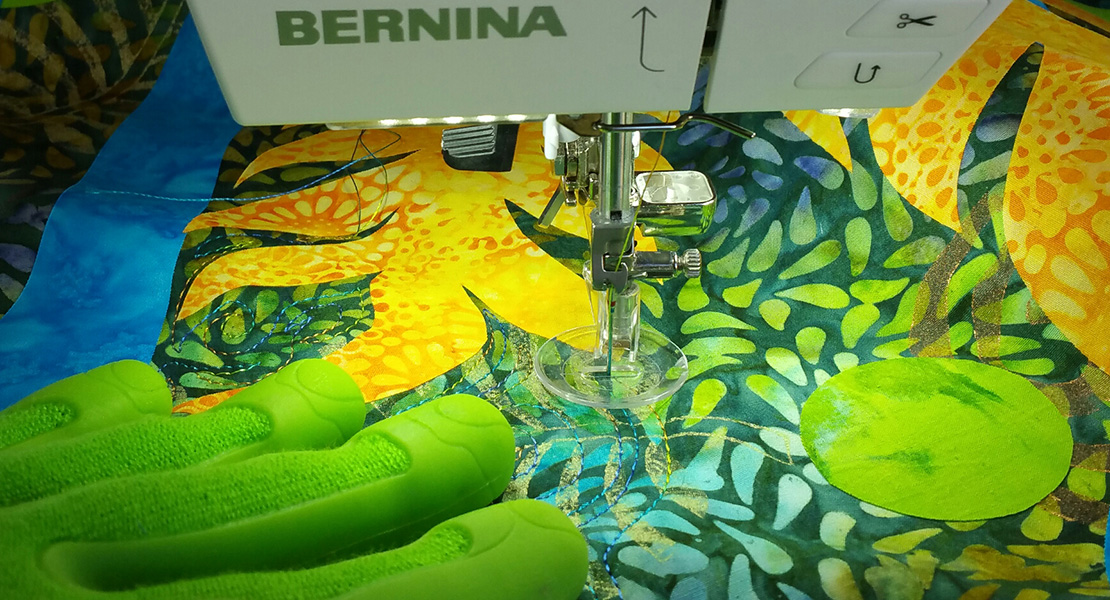
To get the best results, an embroidery needle is a must. I recommend using a Schmetz Gold Embroider Needle. Continue by attaching Drop-Shaped Embroidery foot #26, threading the machine with Isacord Embroidery Thread as the upper thread, and inserting a bobbin with Bobbinette by Mettler. Instead of the traditional bobbin case, I used the new BERNINA High Thread Tension Bobbin Case on my BERNINA 790 PLUS. This new bobbin case does a wonderful job of adding that extra tension to pull the upper thread to the wrong side of the thick fabric, especially on the edges of the numbers.
The next step is to attach the embroidery module to your machine. Attach the slide-on table last.
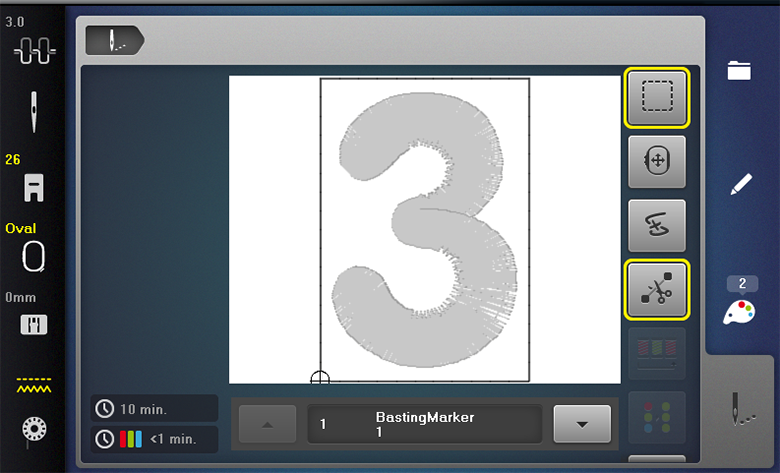
With the designs pre-loaded onto the machine or a USB flash drive, the embroidery is almost ready to begin! Depending on the model of machine being used, there are several ways to align the hoop to get a perfectly placed embroidery design. Start by putting the machine in Embroidery Mode. For a machine with Pinpoint Placement, load the file for the number ready to be stitched. In the Information Menu, select the Pinpoint Placement icon. If using the grid alignment, once a point is selected (center dot in this case).
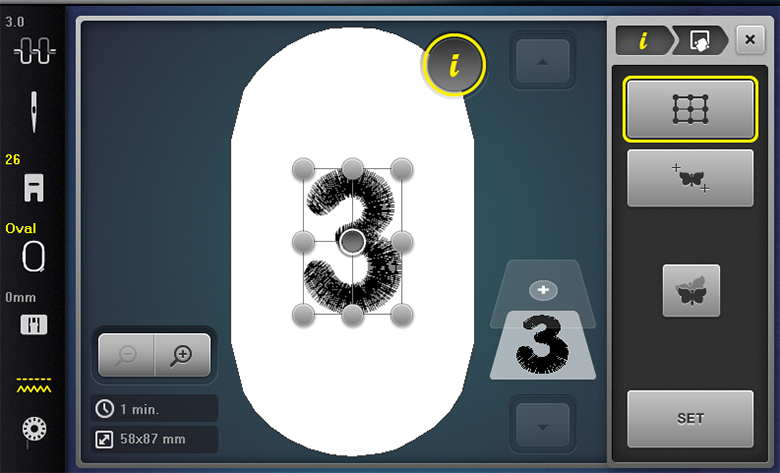
The needle will move to that position on the hooped fabric. If the needle does not line up with the mark on the fabric, adjust the point to match up by using the Multi-function knobs.
Once aligned, select ‘Set’.
Then select another dot to set to (center upper dot in this case).
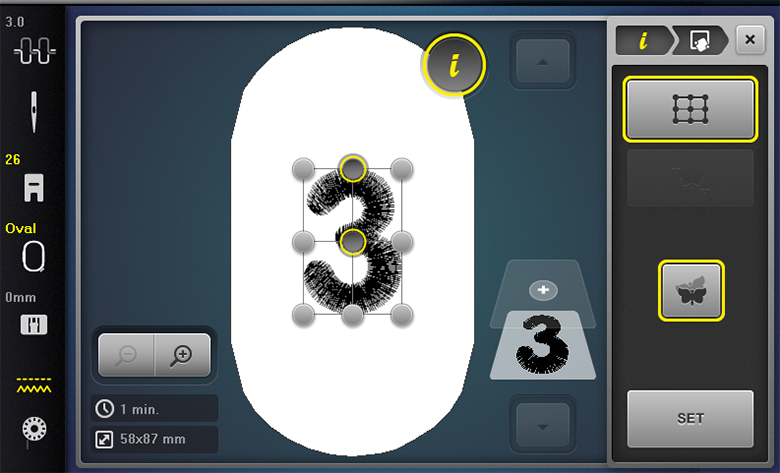
The needle moves to this position on the hooped fabric. Adjust again using the Multi-function knobs.
Select ‘Set’ when satisfied with the positioning.
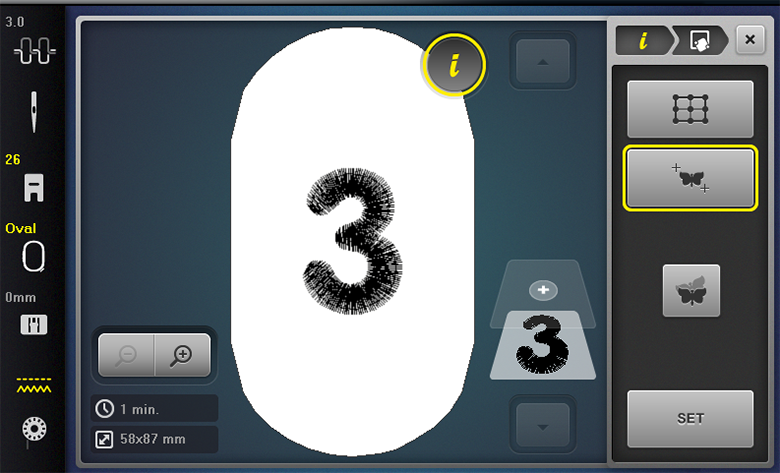
Another way to correctly place the design is by positioning the dots as desired using the butterfly icon with the crosshairs in the corners. This will still require that two points be set.
If the machine being used does not have Pinpoint Placement, use the template for the hoop. Before placing the Minky on the hooped stabilizer, set the template in the grooves of the hoop and mark the stabilizer to create crosshairs through the center. Remove the template, align and center the markings on the Minky with the markings on the stabilizer, and pin into place. After the hoop is attached to the machine, use Absolute Check to make sure that the fabric is centered. The placement of the design can be adjusted slightly using the Multi-function knobs in case the fabric is not perfectly centered.
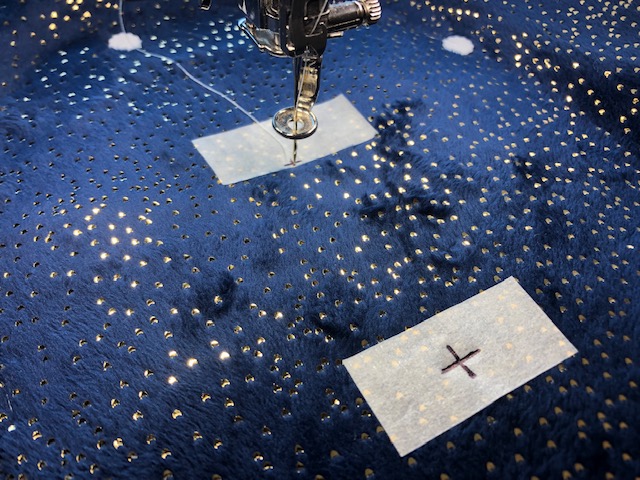
Now it is time to stitch the design out! If using tape, be sure to remove that before stitching. Exit the Information Menu and select the Embroidery Menu, which is the icon of the needle with three dots behind it. Since the fabric is simply floating on top of the hoop, there needs to be basting stitched first to keep the design area firm in place. Set the basting to make a square around the design by touching the Basting icon. By starting with the basting box, the Minky is tacked down to the stabilizer in the hoop, and the StitcH2O can tacked in place on top at the same time.
Lay the StitcH2O over top of the Minky. Press the Start/Stop button on the machine to begin stitching the basting box. Slow the machine down, and keep the StitcH2O as flat as possible as the machine stitches, smoothing it out as the basting box is stitched.
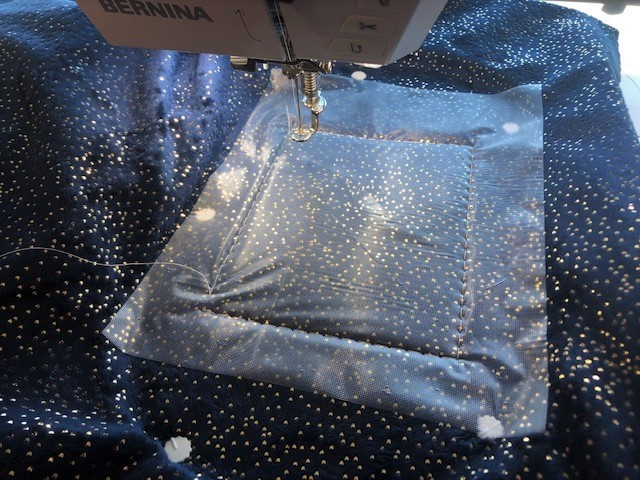
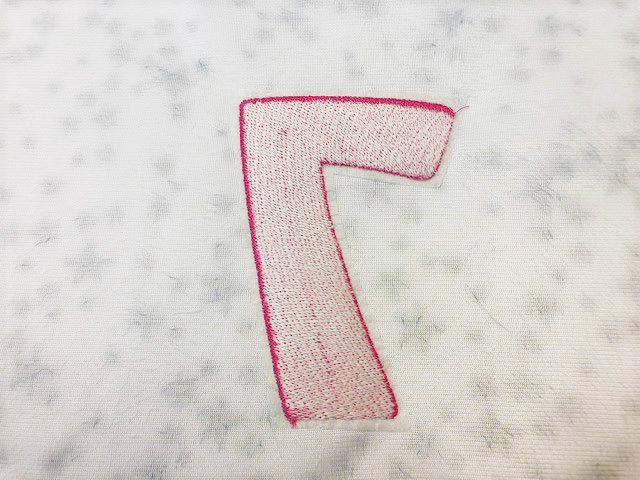
The machine will stop stitching once it gets to the end of the basting box, cut the thread, and move into position to begin stitching out the design. Press the Start/Stop button again and the stitching will begin. Wait until the design is completely stitched out to remove the hoop from the module.
After Stitching is Complete
There are a few finishing touches to complete the project. Loosen the outer ring of the hoop and take out the stabilizer. Remove the basting box. The tear-away stabilizer will then tear right next to the stitching.
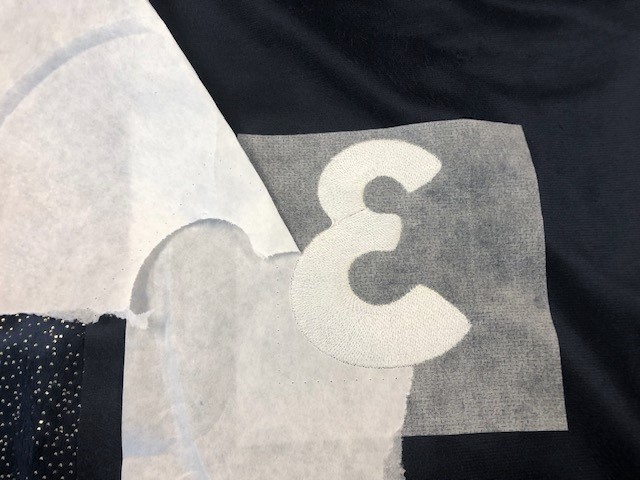
Be sure to remove any tear-away from the inside of the numbers if necessary. The Fusible PolyMesh will peel up a bit if pulled. Trim it down to be 1/8 inch away from the stitching.
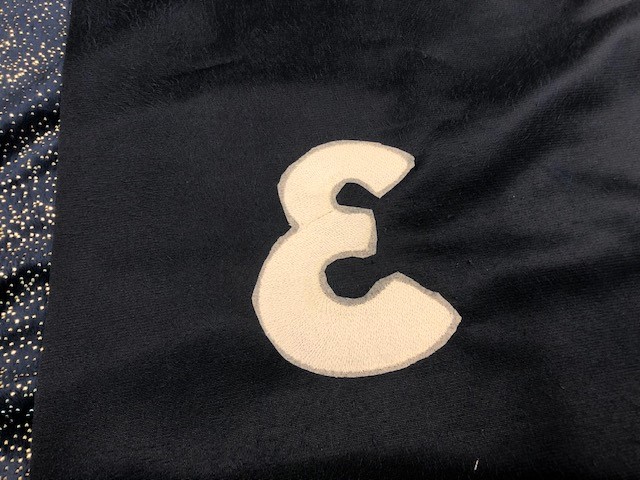
On the right side of the fabric, remove the StitcH2O. A trick to this is to use the iron to steam it first. Do not press the iron to the fabric, but give the stabilizer a good amount of steam and it will usually lift right off. The rest of the StitcH2O underneath the stitching is water-soluble.
I hope you can now enjoy embroidering on Minky. By using the right stabilizers, needles, and machine accessories, any Minky embroidery project can turn out great.
Tricks to Know
- If sewing the two pieces of Minky together to make a finished blanket, use a zigzag stitch along the edges. This will help the fabric stay together when stretched in different directions.
- Always iron on the wrong side of the Minky in order to keep the right side plush.