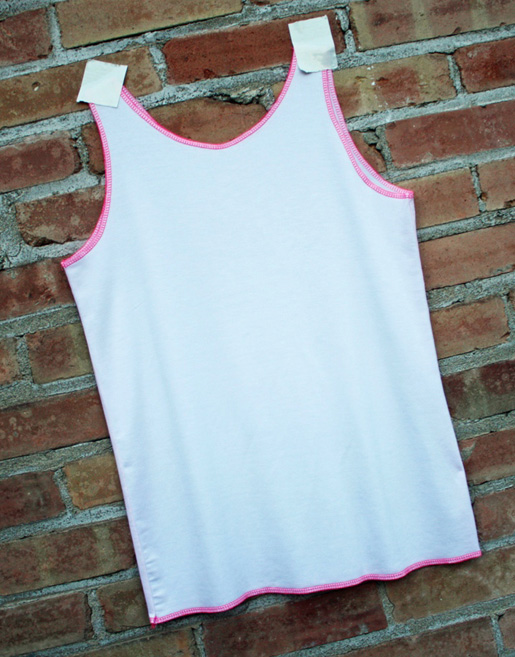
Serged Tank Top
Who said that sewing with knits is scary?
This basic tank top can be your perfect introduction. Made in a flash using an overlocker/serger, it’s so easy you’ll want to make several! Useful for layering or as a stand-alone basic, this tank top will be your go-to garment come the dog days of summer.
Visit Michelle at her blog, With All My Heart, at www.mixiheart.com.

Supplies
- Overlocker/serger
- 1 yard of knit fabric
- 3 spools of contrasting overlocker/serger thread
- Paper scissors
- Tape
- Fabric shears
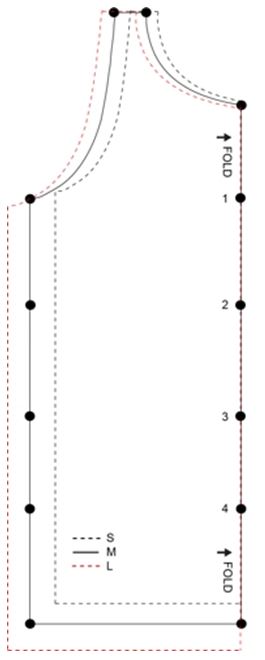
Step one: Construct the pattern.
Download and print the pattern pieces. serged_tank_by_michelle_jensen_122714.pdf
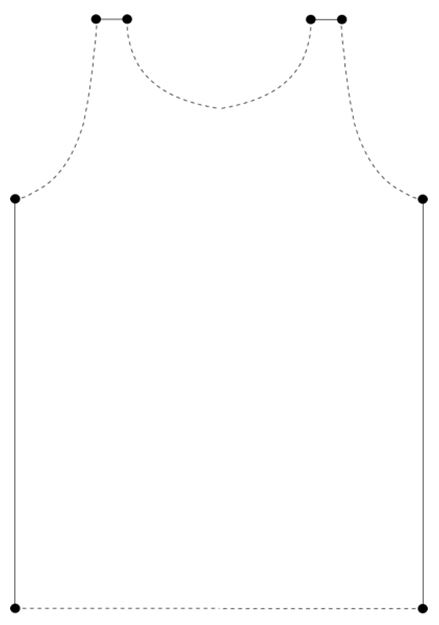
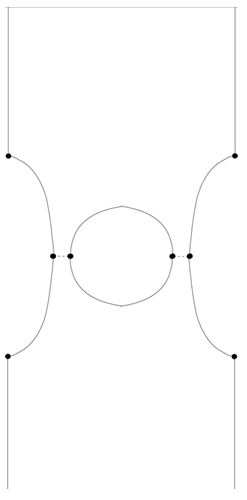
Overlap and tape together the pattern pieces, matching the guide dots, to create the Tank Front/Back pattern piece. The Large Extension page shows the extension of the top and bottom of the left side, but not the middle; simply draw a line to connect them.
Decide which size to make, then cut out your pattern along the appropriate lines: dashed black line for small, solid black line for medium, or dashed red line for large.
Tip: If you have trouble seeing and matching the black dots through the paper, try working on a light-colored surface, using a light box, or placing the sheets on a sunlit windowpane.
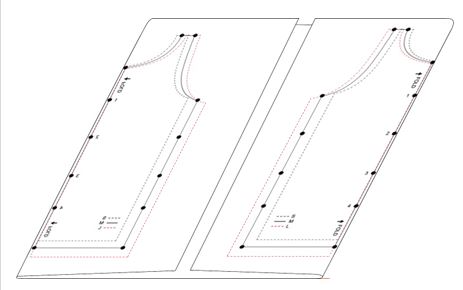
Step two: Cut the fabric.
Fold the selvage edges of the knit fabric to the center; you now have two folded edges.
Place the pattern on one of the folds and cut around the edges.
Repeat on the other fold, with the upper and lower edges of the pattern in the same direction as before.
You now have a front and a back for your tank top.
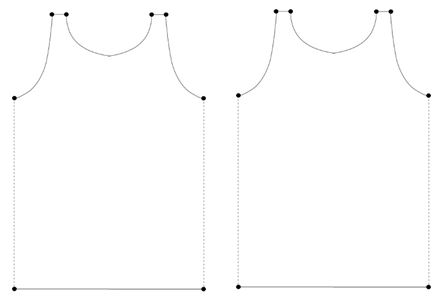
Step three: Finish the edges.
Set your overlocker/serger for a three-thread overlock stitch.
Serge along the neckline, armholes, and lower edge as indicated by the dotted lines in the illustration. This will finish the raw edges.
Tip: If the edges stretch a bit as you overlock them, and your overlocker/serger has a differential feed feature, you can adjust this by turning the differential feed to around 1.5. The amount depends on the knit you are using, as some are stretchier than others.
Step four: Serge the pieces together.
Place the front and back right sides together, matching the shoulder seams.
Overlock/serge the shoulder seams using a ⅝ʺ-wide seam allowance, as indicated by the dotted lines in the illustration.
With the front and back still right sides together, align the raw edges of the sides.
Overlock the side seams as indicated by the dotted lines in the illustration.

Turn the tank top right side out. Your tank top is officially finished!


What you might also like


5 comments on “Serged Tank Top”
-
-
Oh, no! What sort of trouble are you having? Let me know and maybe I can help you figure it out. E-mail me at [email protected] – Jo
-
-
What foot do You use. How does the hemming work out. I have tried to hem store bought knit items on my Bernini and it stretches as I am hemming. What advice can u give me? Tx
-
Hi, Cindy – Michelle made this tank top on her overlocker/serger, and used an overlock stitch to trim and overcast the edges in one step. An overlocker doesn’t doesn’t work the same way a sewing machine does. In addition to using four threads, it has an extra set of feed dogs to help move the fabric under the presser foot, and they can be adjusted to “push” or “pull” the fabric as it goes under the foot. This is wonderful for sewing with knits. Sewing machines don’t have that feature, so the technique for hemming them is a bit different. One of my favorite tips is to fold the hem under and use water-soluble adhesive tape, such as Wonder Under, to hold it in place. Then use a Twin/Double needle and a straight stitch to sew the hem in place. I’ve also used a zigzag stitch with this technique, and it works nicely, too. Be sure to turn under enough fabric that both toes of the presser foot are resting on two layers of fabric, otherwise the hem won’t feed evenly under the foot. There might still be a little bit of stretching as you sew, but this will disappear with laundering or pressing. Made by Rae has some great tips: http://www.made-by-rae.com/2012/02/hemming-knits-6-ways-to-beat-those-pesky-puckers/ I hope this helps! Jo
-
-
Thank you for these instructions! I bought some stretchy material at a local thrift store thinking I could create my own pattern without breaking the bank, and voila, you did it for me! I can’t wait to try this! Looks super simple and a true chance to play with my serger!
Leave a Reply
You must be logged in to post a comment.

This is really cute and super fast if I can get my serger to work.. Is brand new I’ve used it about 4 times. Brand new Bernina 1300, but I have a terrible time using it. It sews really good after figuring it out for about 3 days prior to a project.