Sew a Birdhouse Mini Quilt
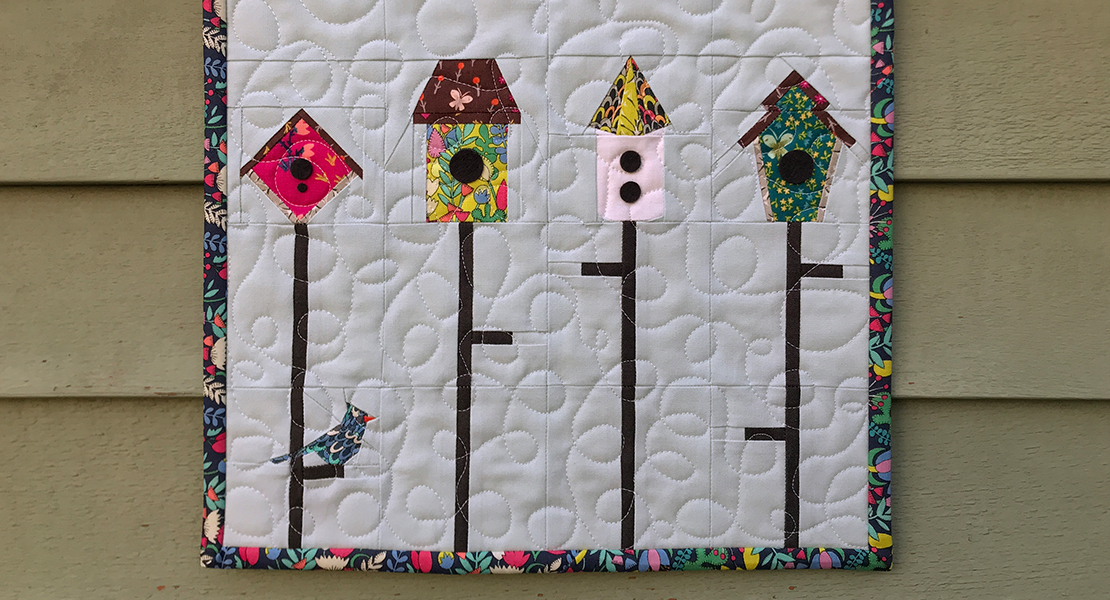
Hello everyone, Kerry Goulder here from Kid Giddy. It’s finally spring, the birds are chirping and many of us are done making masks by the dozens or hundreds. Now what’s left are a lot of scraps and the need to sew something fun and whimsical to take our minds off of everything going on.
As it’s been warm enough up here in Maine after a very long winter, we are opening all the windows and hearing the birds during the day and peepers (tiny frogs) at night. The birds got me thinking about getting or making birdhouses with all this time at home if we can get some wood. Since we can’t get wood just yet, I decided to design some cute little birdhouses out of fabric to make this cute mini quilt for you. It is also a nod to my mom, who raised four kids while also being an art teacher. You can turn this mini pattern into a soft pillow for home decorating or pretty wall art by stretching it onto a canvas.
Materials to create a Birdhouse Mini Quilt
- Download and print the Birdhouse Mini Quilt Paper Pieced Pattern here
- Background 1 print = 1 Fat Quarter
- Various Scraps for all Birdhouses and the Bird
- Poles and Perches = 1 Fat Eighth (same print for consistency)
- Crossgrain Binding 1 print = 1 Fat Quarter
- Backing 1 Fat Quarter
- 50 Wt Thread to match
- 24″ quilting ruler, mat and rotary cutter
- Mini iron
- Washable glue for basting, (starch as desired)
- Straight pins or clips
- Sharp angled tweezers
- Sewing machine
- Thread snips
Cutting Instructions
- Cutting instructions are noted in the pattern file to assist you with making your own mini quilt.
- While some sewists precut fabrics for each patch in a foundation paper piecing pattern, I do not as I prefer to use scraps when possible.
Presser Feet and Accessories
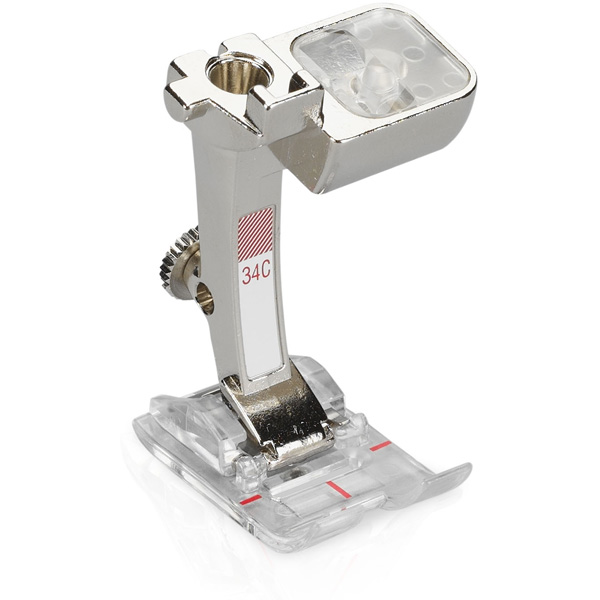
- Reverse pattern foot with clear sole #34C (this is the foot that I use most often as it allows me to see my patch lines and fabric at all times)
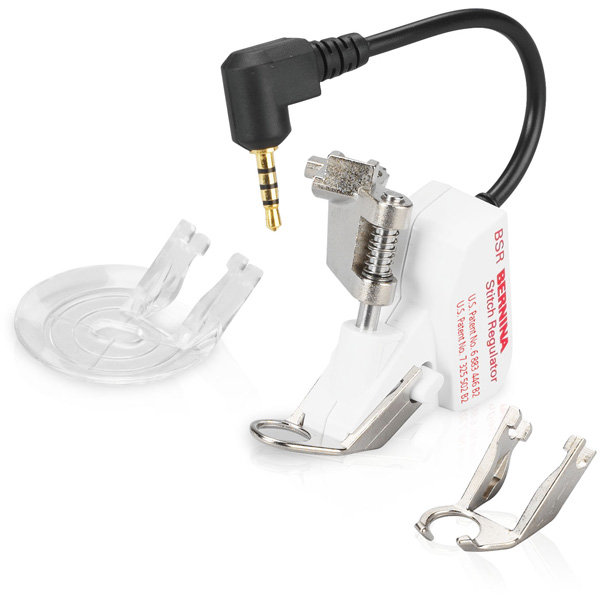
- BERNINA Stitch Regulator #42 (for quilting your birdhouse mini)
- Three-sole walking foot #50 (for attaching binding)
Ready to get started?
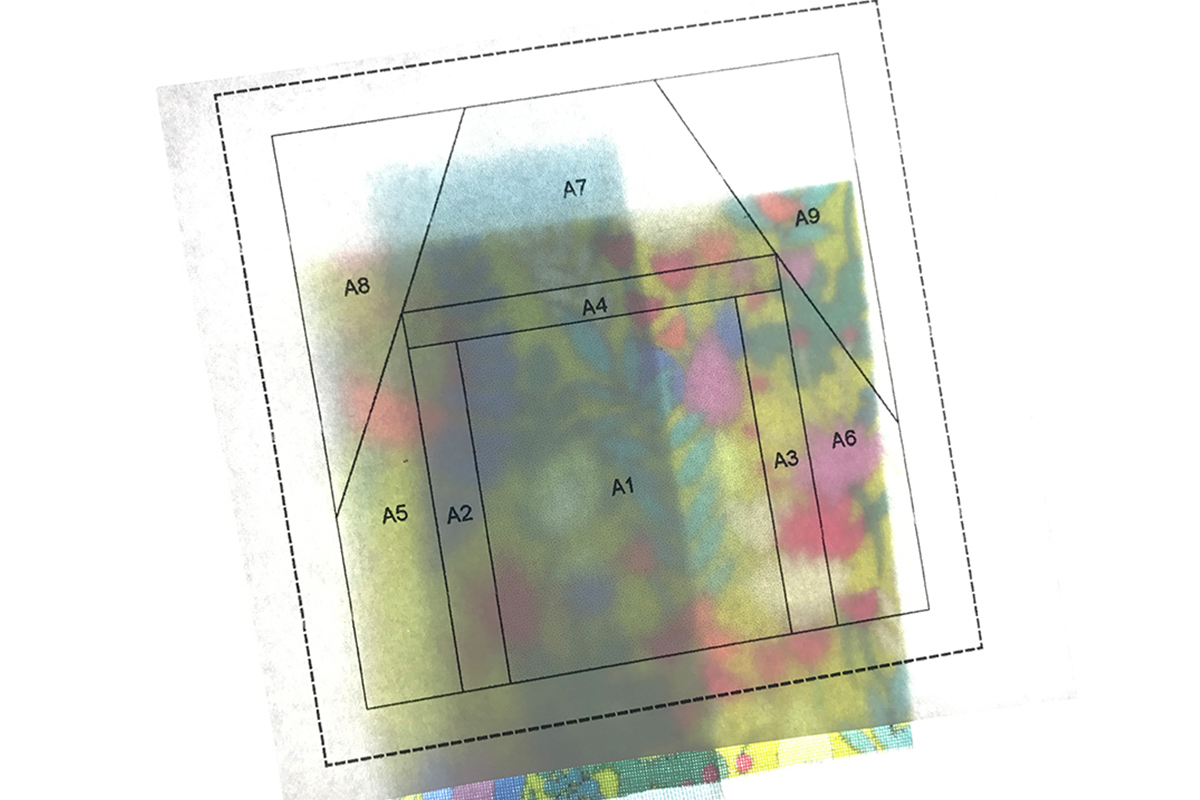
Print out the Birdhouse Mini Quilt PDF and read through all of my instructions. You can find my additional tips and tricks for paper piecing by checking out my Fall Folliage Placemat tutorial. If you are new to paper piecing, you can start with all of the pole (H) blocks as those are the easiest blocks in this mini quilt. The photos below will show one of the birdhouses. The step by step process is the same for all blocks even if they are multiple sections.
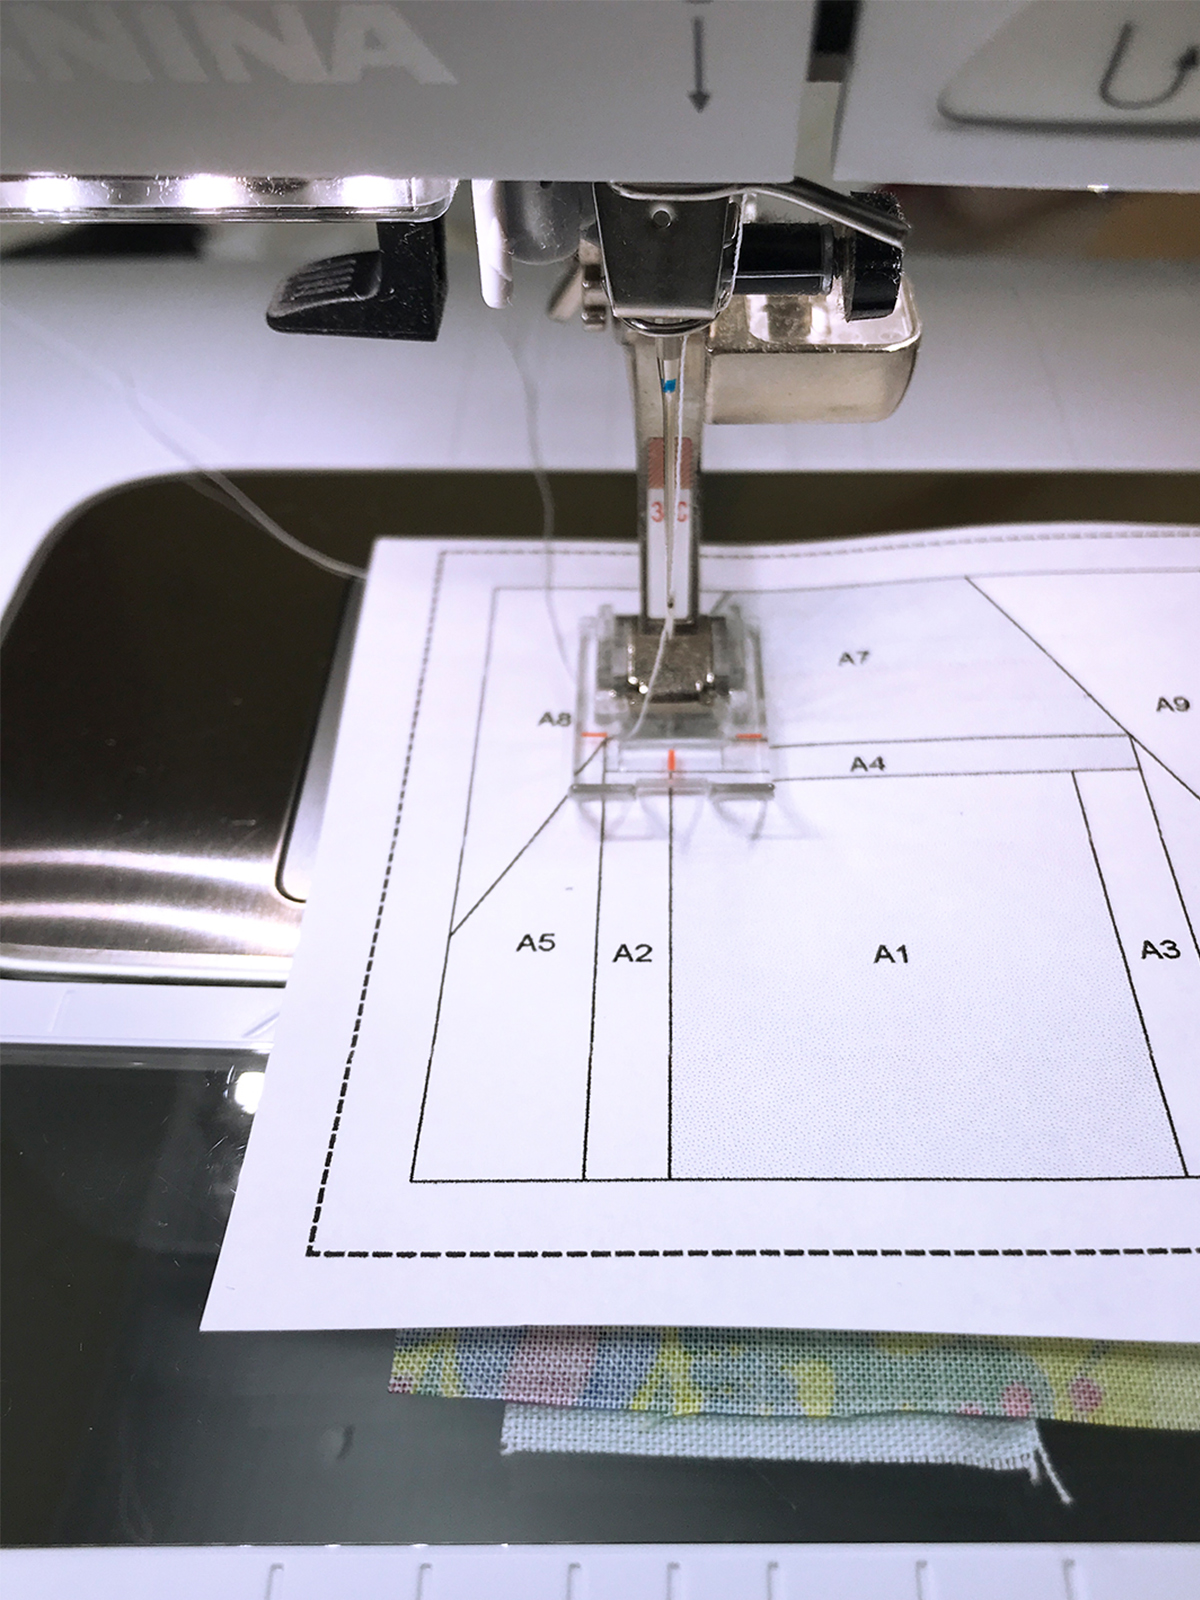
Set your stitch length to 1.80. Sewing with a shorter stitch length allows you to carefully rip out the paper without ripping out the stitches. If you paper piece a lot, set this stitch as a favorite.
New to Paper Piecing
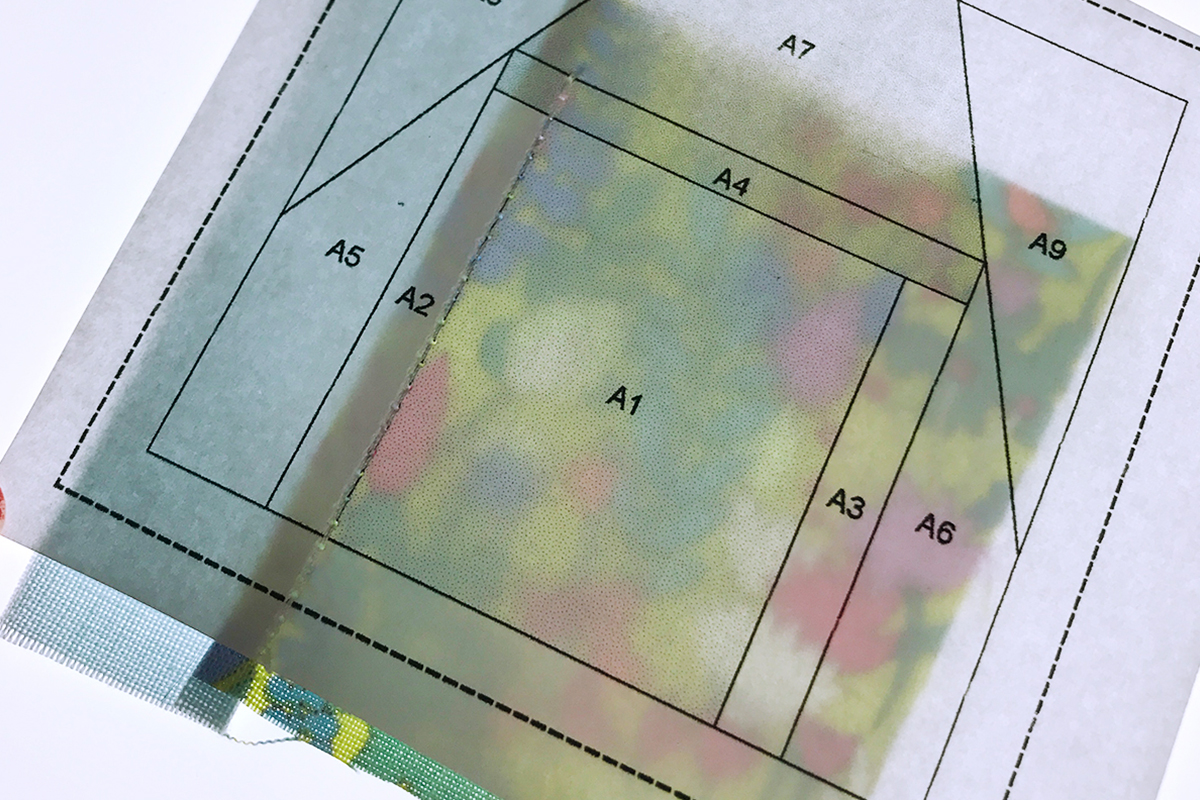
When paper piecing, always sew with the pattern paper right side up. The first two fabrics will be underneath with right sides facing. The larger citron print fabric is large enough to cover the full size of the A1 pattern patch (and seam allowance), while the blue background fabric is big enough to cover the long skinny “A2” patch (and seam allowance).
With the pattern piece right side up, place two fabric pieces underneath, right sides together.
Begin by sewing the line between A1 and A2. (TIP: Use the Reverse pattern foot with clear sole #34C for foundation paper piecing. Precision is key when paper piecing, to get points to line up properly, It’s important to sew directly on the line, so I prefer using this foot as it helps me to see everything clearly.)
After every seam, trim the excess fabric away from the seam allowance. Be sure to fold back the pattern paper to prevent cutting it off. Using a clear ruler will allow you to see where the seam edge is and where to cut.
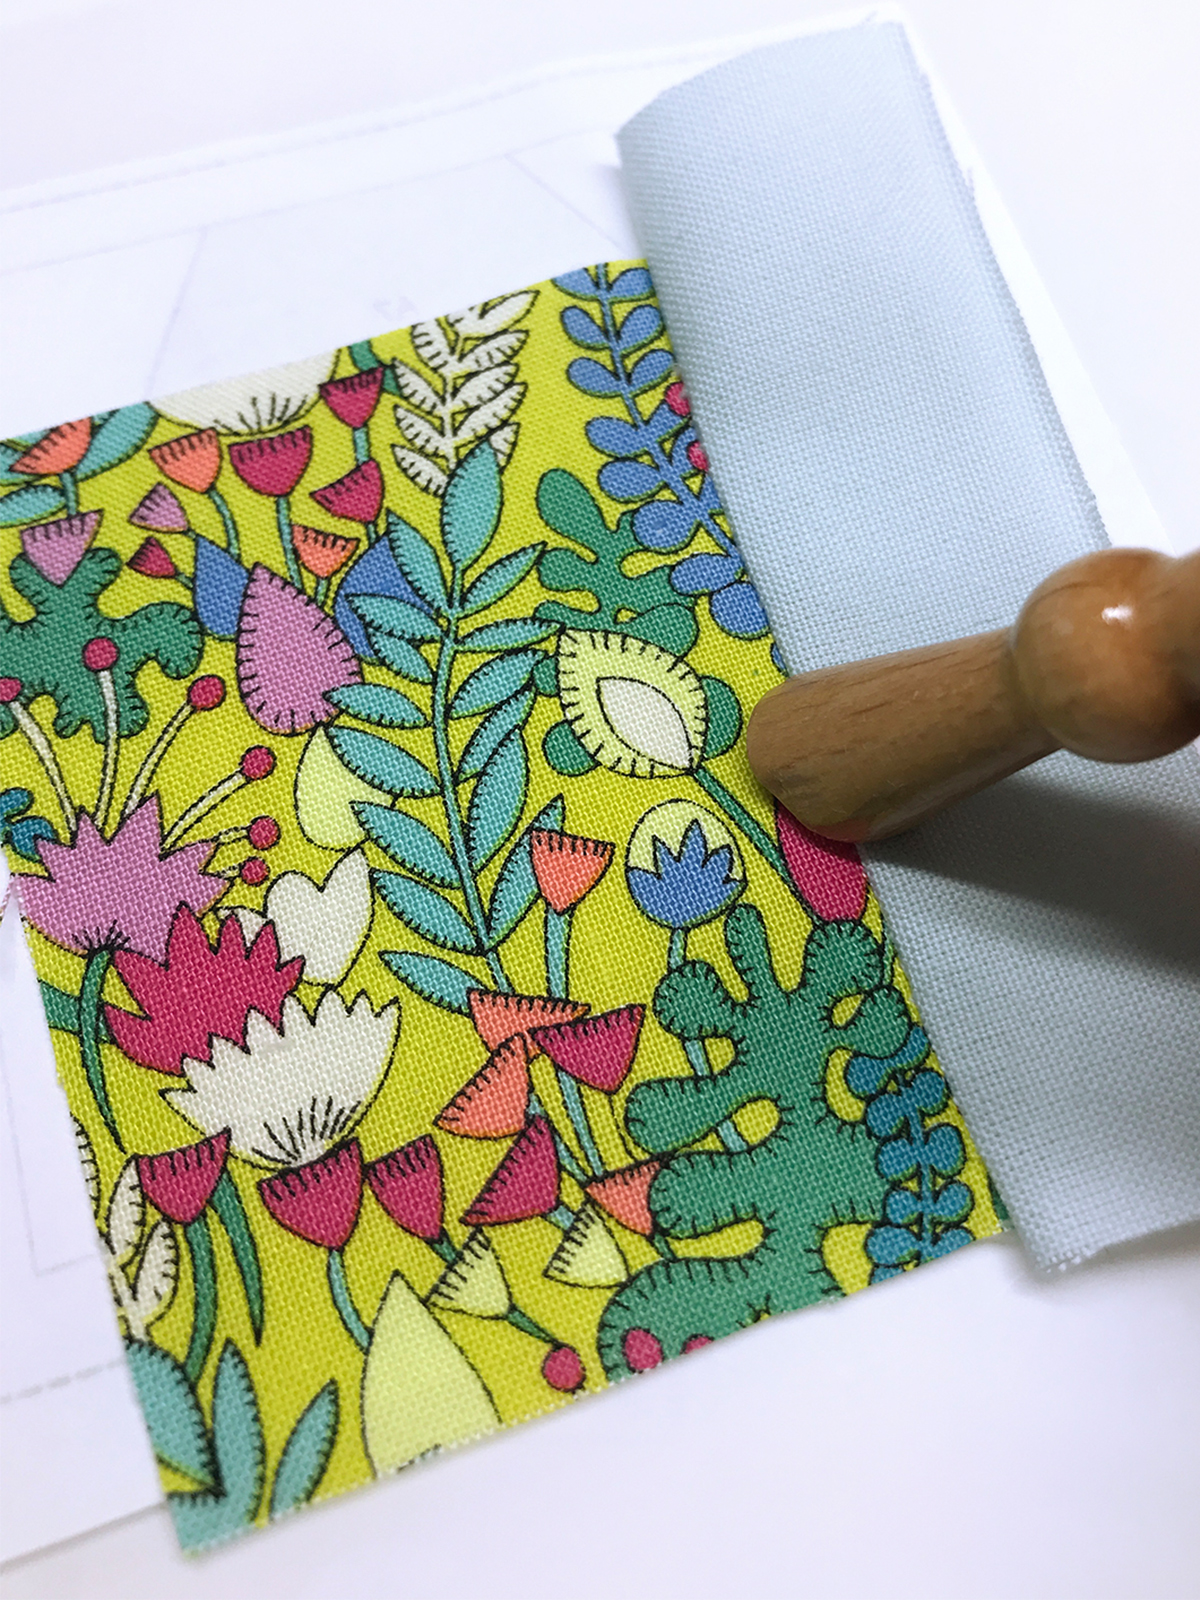
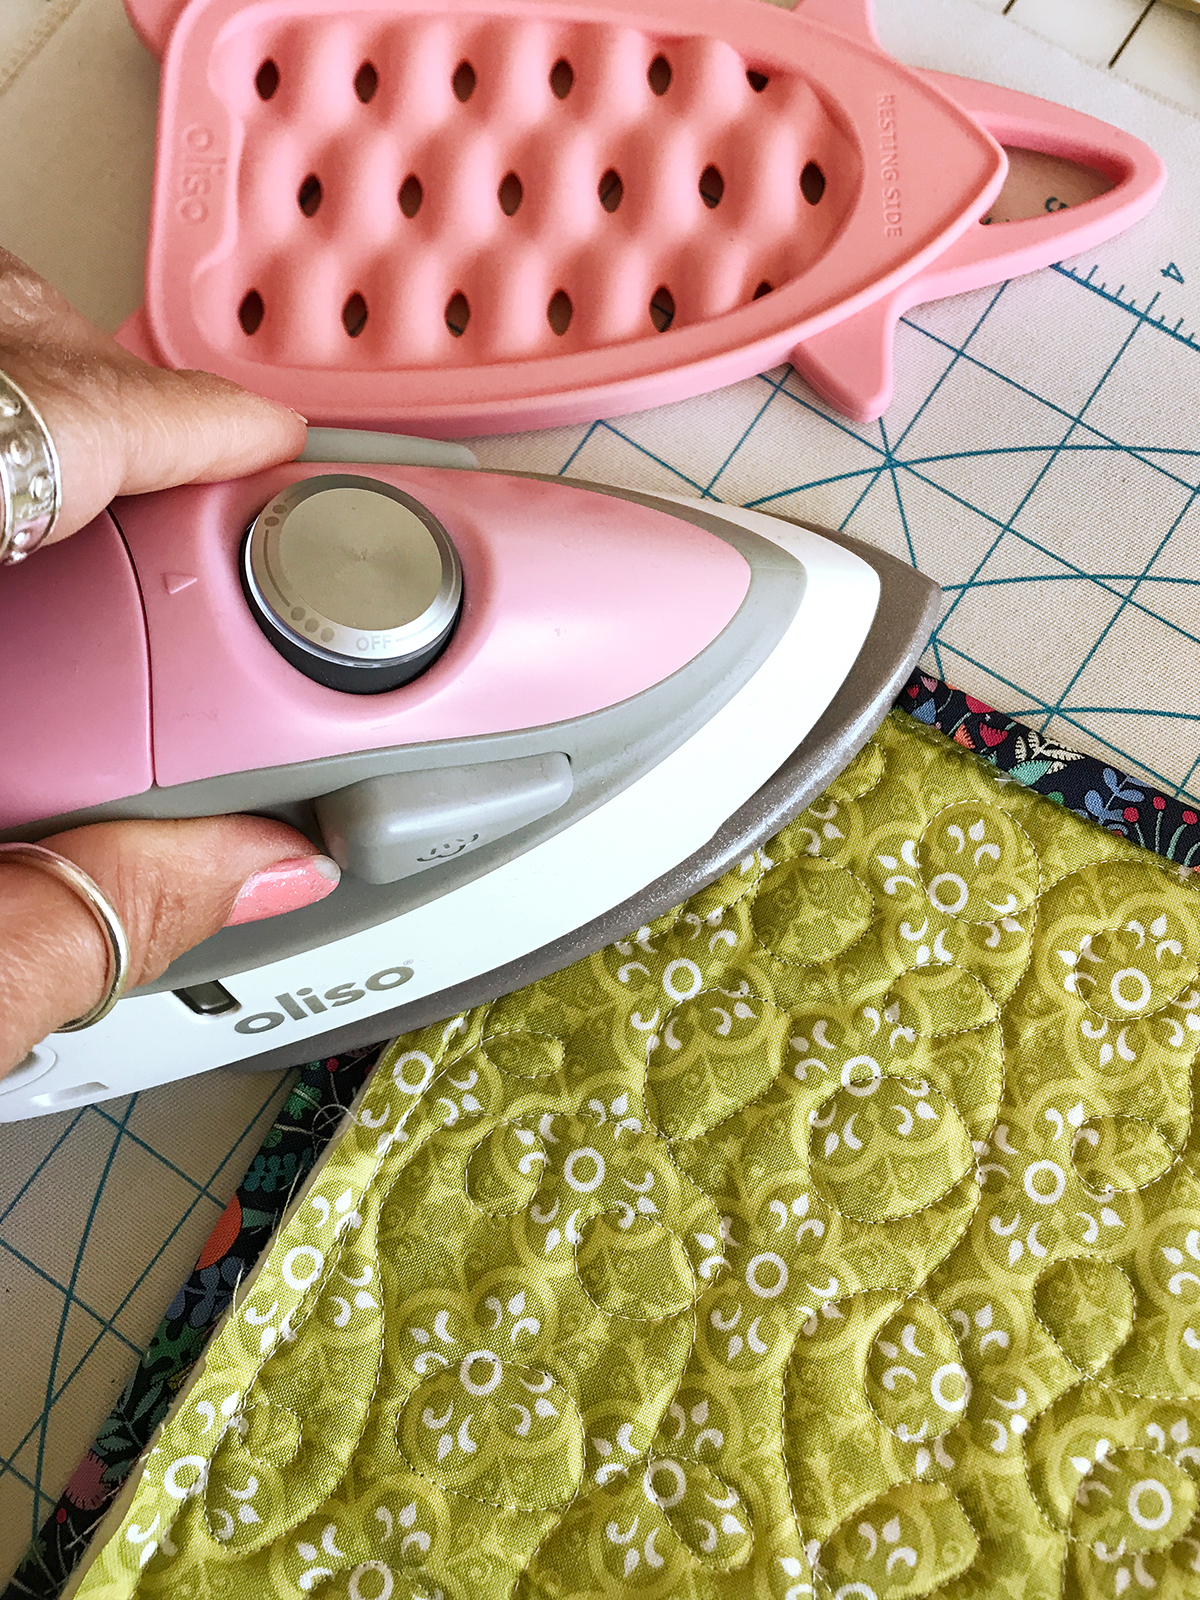
Use a seam pressing tool to press open the smaller seams. You can also use a mini iron to press open the larger or bulkier seams. If you don’t regularly press open the fabrics, it can result in excess fabric in the block.
Here is how it looks from the pattern side once pressed open. (My seam is double stitched because I forgot to change my stitch length. If you forget too, adjust your stitch length and go right back over the initial stitches).

Add the next piece of fabric for A3 and sew the seam between A1 and A3.
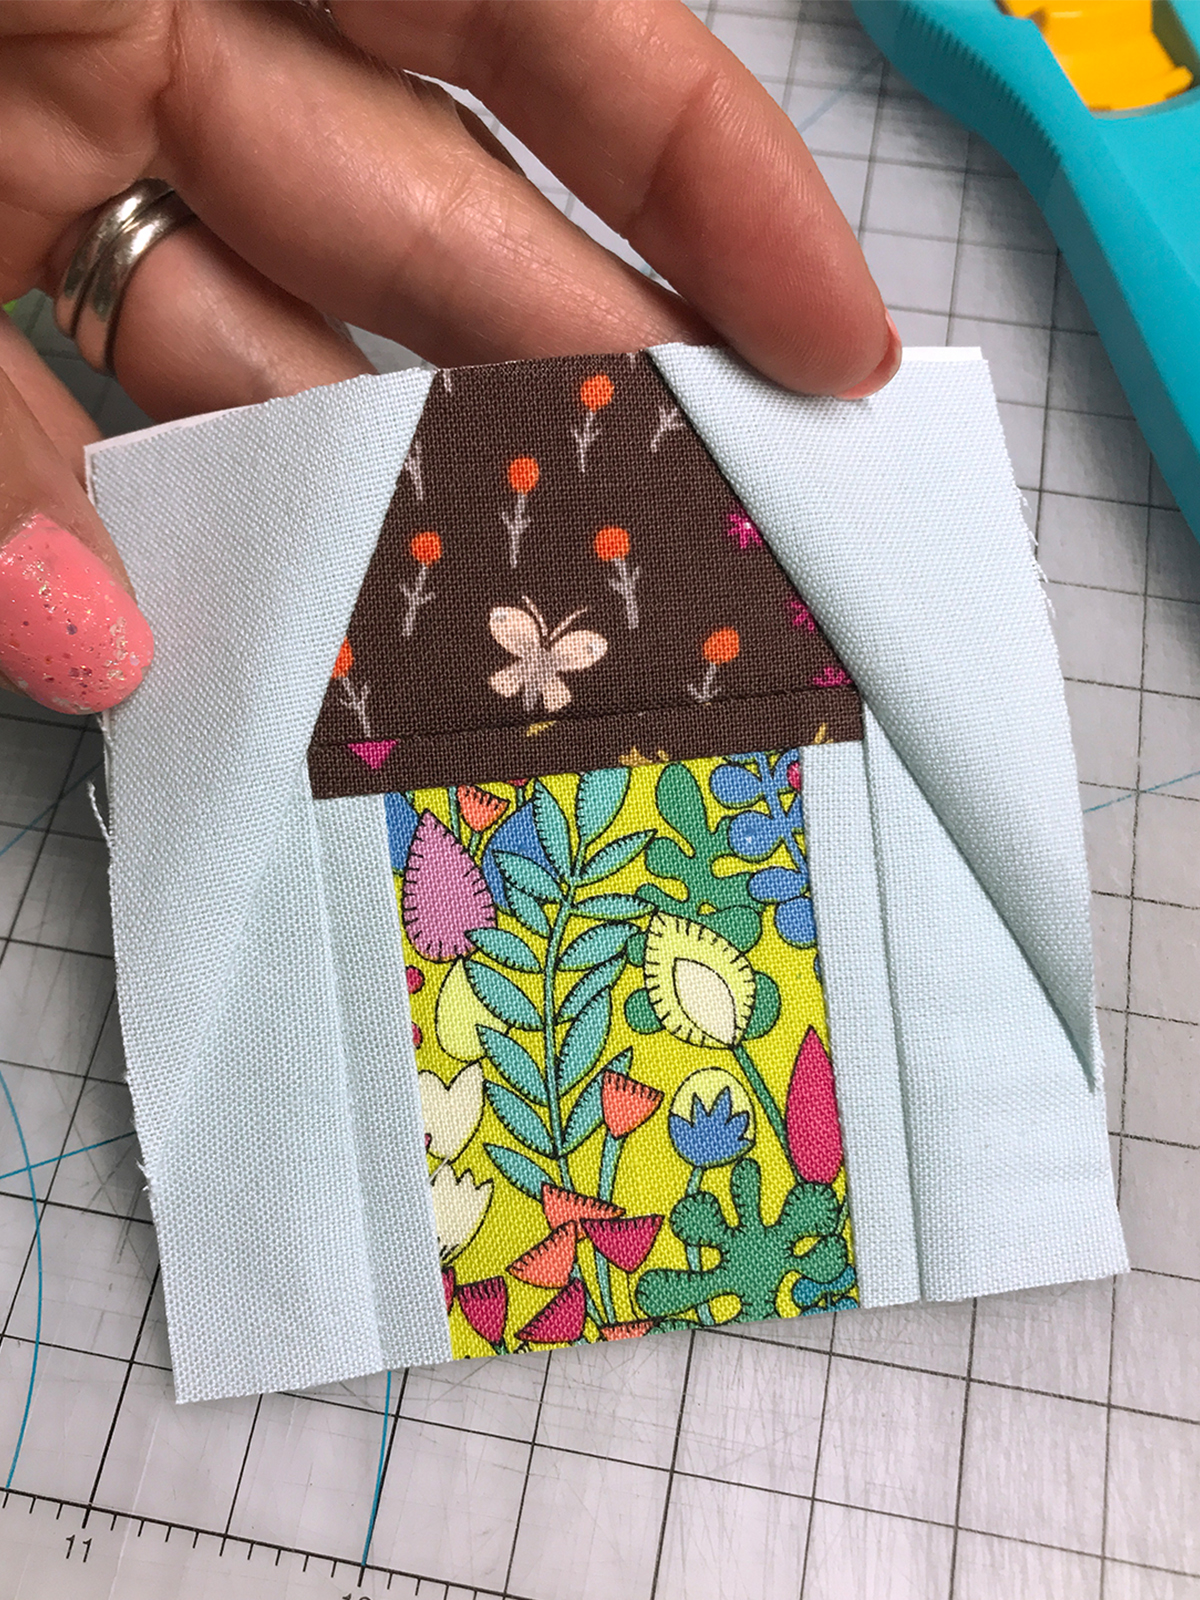
Continue to add the next fabric piece for each patch, sew the seam, trim the seam allowance, and press each seam open until the block is finished. If you have multiple sections for a block, sew each section, press and trim, and then sew the sections together.

When you have all of your blocks sewn, lay them out and begin sewing them together row by row.

You will need to remove some of the paper pieces from the bird section prior to sewing the last row so it will be removed and less bulky. Some paper pieces in the bird block will not be accessible once sewn unless you remove them first. The pointed tweezers are a life saver for your finger tips and make it easy to grab those tiniest pieces.

Sew all of the blocks together and carefully remove all of the paper from the back side. Press to finish the top.
Use a large piece of batting (14″ x 14″) and an even larger piece of backing fabric (16″ x 16″) to protect the edge on the front of the mini quilt. Glue or spray baste the layers and set with a mini iron to prevent shifting while quilting. Use the BERNINA Stitch Regulator #42 in order to quilt the birdhouse with a basic loop design.
Prep and press your binding fabric. Sew your binding on to the front of the mini quilt with the Three-sole walking foot #50 to prevent any one fabric layer from puckering. Glue baste and press the binding on the back side to prep it for hand stitching. You can machine bind the quilt too whatever you prefer.

Finish the Birdhouse Mini Quilt by adding little black circles to represent the birdhouse openings.Use quilters cotton (needle turn appliqued or raw edge appliqued), precut wool pieces or even buttons.
I hope you have enjoyed this project and using up some of your scraps. Please feel free to ask me any questions below and tag me (@kidgiddy) on IG with #kidgiddy and #birdhouseminiquilt with your finished mini quilt.
If you want to learn more about designing and sewing foundation paper piecing patterns, download a copy of my Learn to Design and Sew Foundation Paper Piecing ebook and join me on social media IG @kidgiddy, FB @kidgiddy and on my website kidgiddy.com. – Kerry
Used Products


What you might also like


16 comments on “Sew a Birdhouse Mini Quilt”
-
-
Thank you so much, I look forward to seeing your version. – kg
-
-
absolutely adorable– will make this one for sure!
-
Thank you! I hope you’ll share a pic of your finished mini or pillow with me. Have fun! -kg
-
-
I had another customer reach out to me via Etsy to confirm which fabrics to use in the Bird section A as they are so tiny, so I want to share that info here in case others would like clarity as well…
A1 is bird fabric (there really aren’t eyes because I would have had to put another one in there somewhere),
A2 is background fabric
A3 is the beak
A4 is bird fabric
A5 is backgroundHope that helps are you birders out there. Thank you, kg
-
I like this pattern. And I really like the bright buttonhole stitch fabric used in the second birdhouse. Would you please give me information about it? Thank you!
-
Hi slmuras,
Thanks so much for asking. It’s a great print. It’s print #51288-3 in Chartreuse, from Sally Kelly’s “Fantasy” fabric line by Windham Fabrics. The two prints in the white bird house are also from that same collection, and the two other houses (as well as the brown print used for the roof) are from Amy Gibson “Bungalow” collection, also by Windham Fabrics. Hope that helps. -kg-
Thank you for your response!
sm
-
-
-
I am working on this quilt now. I have all the birdhouses complete and about to start on the bird. Are the pieces A,B,C,D printed backyard, or am I just not looking at this correctly. I really like my little birdhouses.
Betty-
Hi Betty, Thank you for reaching out with your question. I think I know what you are asking, but forgive me if I’ve read your question the wrong way. In the Bird block, Sections A, B, C and D they all have either bird fabric patches, or background (or “backyard”) fabric patches. A3 is actually the bird beak – super tiny, but worth the effort. In Section E, there is a background fabric patch, and a perch/pole fabric patch. In Section F there are two pole fabric patches and 1 bird fabric patch. In Section G there is only 1 bird fabric patch and the other 4 are background fabric patches. I hope that helps, if not, please let me know with a little more detail.
-
Thank you for answering my question. I did complete the project. Made a pretty pillow out if it. I am really proud of it….this was my first paper piecing. I am now working on a beautiful, paper pieced quilt for my queen size bed.
Betty
-
-
-
How big is the I block along the top of the quilt? I don’t see it in the pattern.
-
Hi TwinMary – The four blocks along the top row are all 3 1/2″ blocks. I chose not to add one long row (12 1/2″ x 3 1/2″) although you can if you’d like. Thank you. -kg
-
-
Love this design! So creative. Would you share what this means
“Set your stitch length to 1.80.
Thank you!-
Hi RiverRunner, most machines will automatically have a stitch length set to 2.40 or 2.50. When you are paper piecing you need a shorter stitch length (I set mine to 1.80). This shorter stitch length will allow you to more easily tear out the paper when you’ve finished sewing the block without ripping out any stitches. A longer stitch length can come undone or make some stitches super tight while others become super loose while tearing out the paper. Hope that helps. Thanks for the love, kg
-
-
Just too tiny for me. I will increase the pattern pieces by 100% to make a bigger quilt. Any problems with doing that?
Leave a Reply
You must be logged in to post a comment.

Absolutely adorable! I’ll be making this.