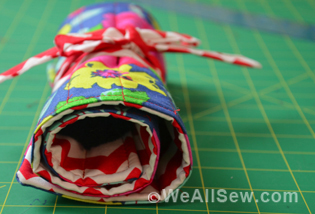
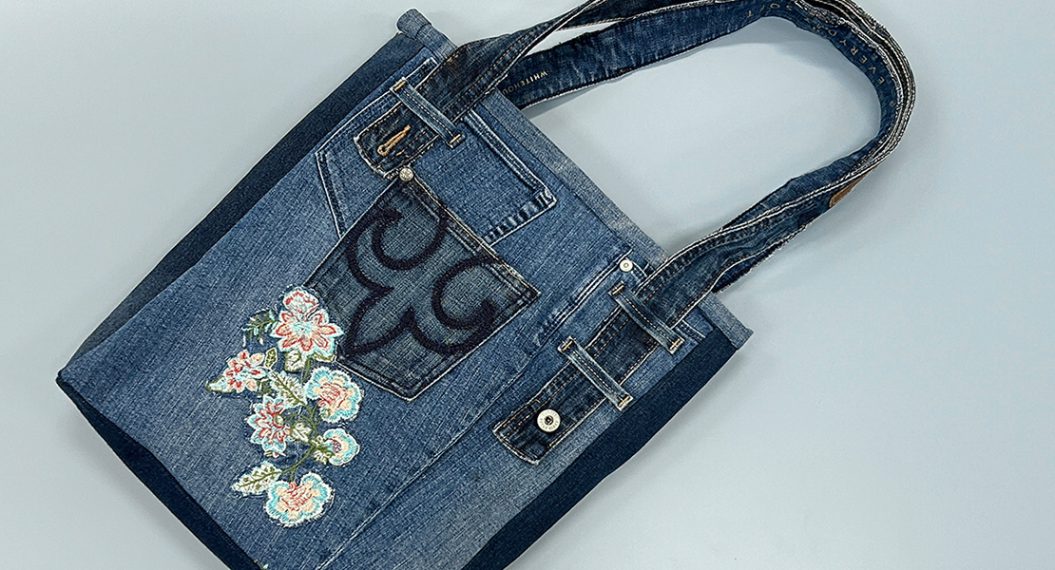
Joy by Robin’s Paintbrush Roll-Up
Robin Buscemi needed a paintbrush holder – she has one SERIOUS set of brushes! – and whipped up this tidy waterproof roll-up to carry them. She took them to a Painted Tapestry class at Create NJ, and the instructor – mixed media artist Joanne Sharpe – liked Robin’s blue roll-up so much she asked Robin to make one for her, too. (Check out Joanne’s work and you’ll know it’s the one with the bright flowers on it.) Then Robin showed them to me, and, well… here they are. Robin has graciously provided instructions so we can all make our own paintbrush holders. I don’t know about you, but I’ve been looking for an excuse to buy some Tula Pink laminated prints. (Yeah, yeah, I haven’t painted in years. So? I might start again and I need to be prepared!) Substitute a cotton print for the laminate and this makes a terrific knitting needle organizer. I think I need one of those, too 😉 Jo


Finished size: 13-1/2″ x 19-1/2″
Supplies and Cutting Instructions
Cotton print (exterior)
- Cut one 14″ x 20″ rectangle
- Cut one 4″ x 20″ rectangle
Laminated cotton print (interior)
- Cut one 14″ x 20″ rectangle
- Cut one 4″ x 20″ rectangle
- Cut one 3-3/4″ x 20″ strip
Fat quarter (binding and ties)
- Cut enough 2-1/2″ wide bias strips to bind the edges plus about 50″ for the ties AMOUNT?
- (If using a bias binder, cut strips the width of your binder.
Batting: Cut one 14″ x 20″ rectangle
Lightweight cut-away stabilizer: Cut one 14″ x 20″ rectangle
Coordinating thread
Wonder Clips or paper clips
Overlock foot (BERNINA Vari-Overlock Foot #2/2A)
Topstitching foot (BERNINA Cordonnet Foot #11/11D)
Quarter-inch foot (BERNINA Patchwork Foot #37/37D or Patchwork Foot with Guide #57/57D)
Non-stick foot (BERNINA Non-Stick Zigzag Foot #52/52D)
Walking foot, optional (BERNINA Walking Foot #50)
Free-motion foot, optional (BERNINA Freehand Embroidery Foot #24, Teardrop Embroidery Foot #26, or Freehand Quilting Foot #29/29C)
Bias binder, optional (BERNINA Bias Binder Attachment #88 with Foot #95)
Construct the Parts
Quilted Exterior: Place the batting on a flat surface and place the cotton print/exterior fabric wrong side down on top; the right side will be facing up. Lightly quilt as desired using a walking foot or your favorite free-motion foot. Set aside
Laminated Interior: Fuse the lightweight cut-away stabilizer to the wrong side of the laminated cotton following the manufacturer’s instructions. Don’t use a hot iron, as the laminate could get sticky or melt. Set aside.
Inside Pocket: Place the two 4″ x 20″ rectangles (cotton and laminated cotton) right sides together, matching edges. Stitch along one long edge using a 1/4″-wide seam allowance. Flip open and fold wrong sides together. Press from the cotton side so the seam is toward the laminate fabric. Set aside.
Long Paint Brush Holder Guide: Fold the long edges of the 3-3/4″ x 20″ strip of laminated fabric 1/4″ to the wrong side. From the right side, use a non-stick foot to topstitch about 1/8″ from each folded edge.
Binding and Ties: Sew the bias strips together on the diagonal to reduce bulk at the seams. Fold the strip in half lengthwise, wrong sides together, and press. Open and fold the raw edges in to meet at the center/crease. Press.
Cut one 23″ and one 25″ piece from the folded binding. Edgestitch along the open folded edge to create the ties. Tie a knot in one end of each piece; the other end will be attached to the paintbrush holder later.
(If using a bias binder, fold and stitch a 50″ piece of bias binding. Cut into one 23″ and one 25″ piece; tie a knot at one end of each tie.)
Tip: Before assembling the paintbrush holder, use decorative fabrics, quilt squares, modern pieces, etc. to add your personality to the outside and to the inside pockets.


Assemble the Paintbrush Roll-Up
Place the main laminated piece right side up. Place the inside pocket on top, cotton side up (laminated side in), and align the raw edges at the bottom and sides. Baste 1/8″ from sides.
Place the long paint brush holder guide right side up about 1-3/4″ to 2″ above the inside pocket, aligning the sides. Baste 1/8″ from the sides.
Starting at the left, 1-1/2″ from the left side and 1″ above the long paint brush holder guide, sew a straight line all the way to the lower edge of the inside pocket. Continue parallel lines, moving from left to right, spacing them 1″, 1-1/4″, 1-1/2″, and 1-3/4″ apart as desired. Leave a larger pocket at the right side, about 3-1/2″ wide, to accommodate brushes of different sizes. Be sure to use the non-stick foot since you will be sewing on top of the laminated fabric. You will have about 13-15 pockets for brushes depending on the spacing you choose.
Tip: Use a seam guide that attaches to the presser foot rather than the machine bed. Adjust the width as desired, then stitch parallel lines by aligning the guide with the edge of the project or a previous row of stitching.
Place the quilted panel right side down on a flat surface. Place the laminated panel on top, wrong side down, pockets up. Trim if needed to make edges even. Clip together with Wonder Clips or paper clips. (Pins will leave holes in the laminated fabric.)
Using an overlock stitch and the overlock foot, stitch around all layers to secure them together.
Tip: Instead of a sewing machine overlock stitch, use a narrow three-thread overlock on your overlocker/serger.
Place the raw ends of the ties together about halfway down the right side of the roll-up, one on the top layer and one on the bottom layer, just offset from each other. Baste in place.
Bind the edges of the roll-up, taking care not to catch the loose ends of the ties in the stitching. I used a decorative stitch to secure the binding in place.


4 comments on “Joy by Robin’s Paintbrush Roll-Up”
Thanks for the great idea and instructions! I made one of these as a gift for my husband’s upcoming birthday; he paints miniatures for roleplaying and wargaming. I used The Walking Dead fabric, because what else will I use it for? Anyway, I made it at a retreat where we were also making projects from a published book, and your instructions were FAR AND AWAY more complete and more helpful. Thanks again! I wish the site let me share photos!