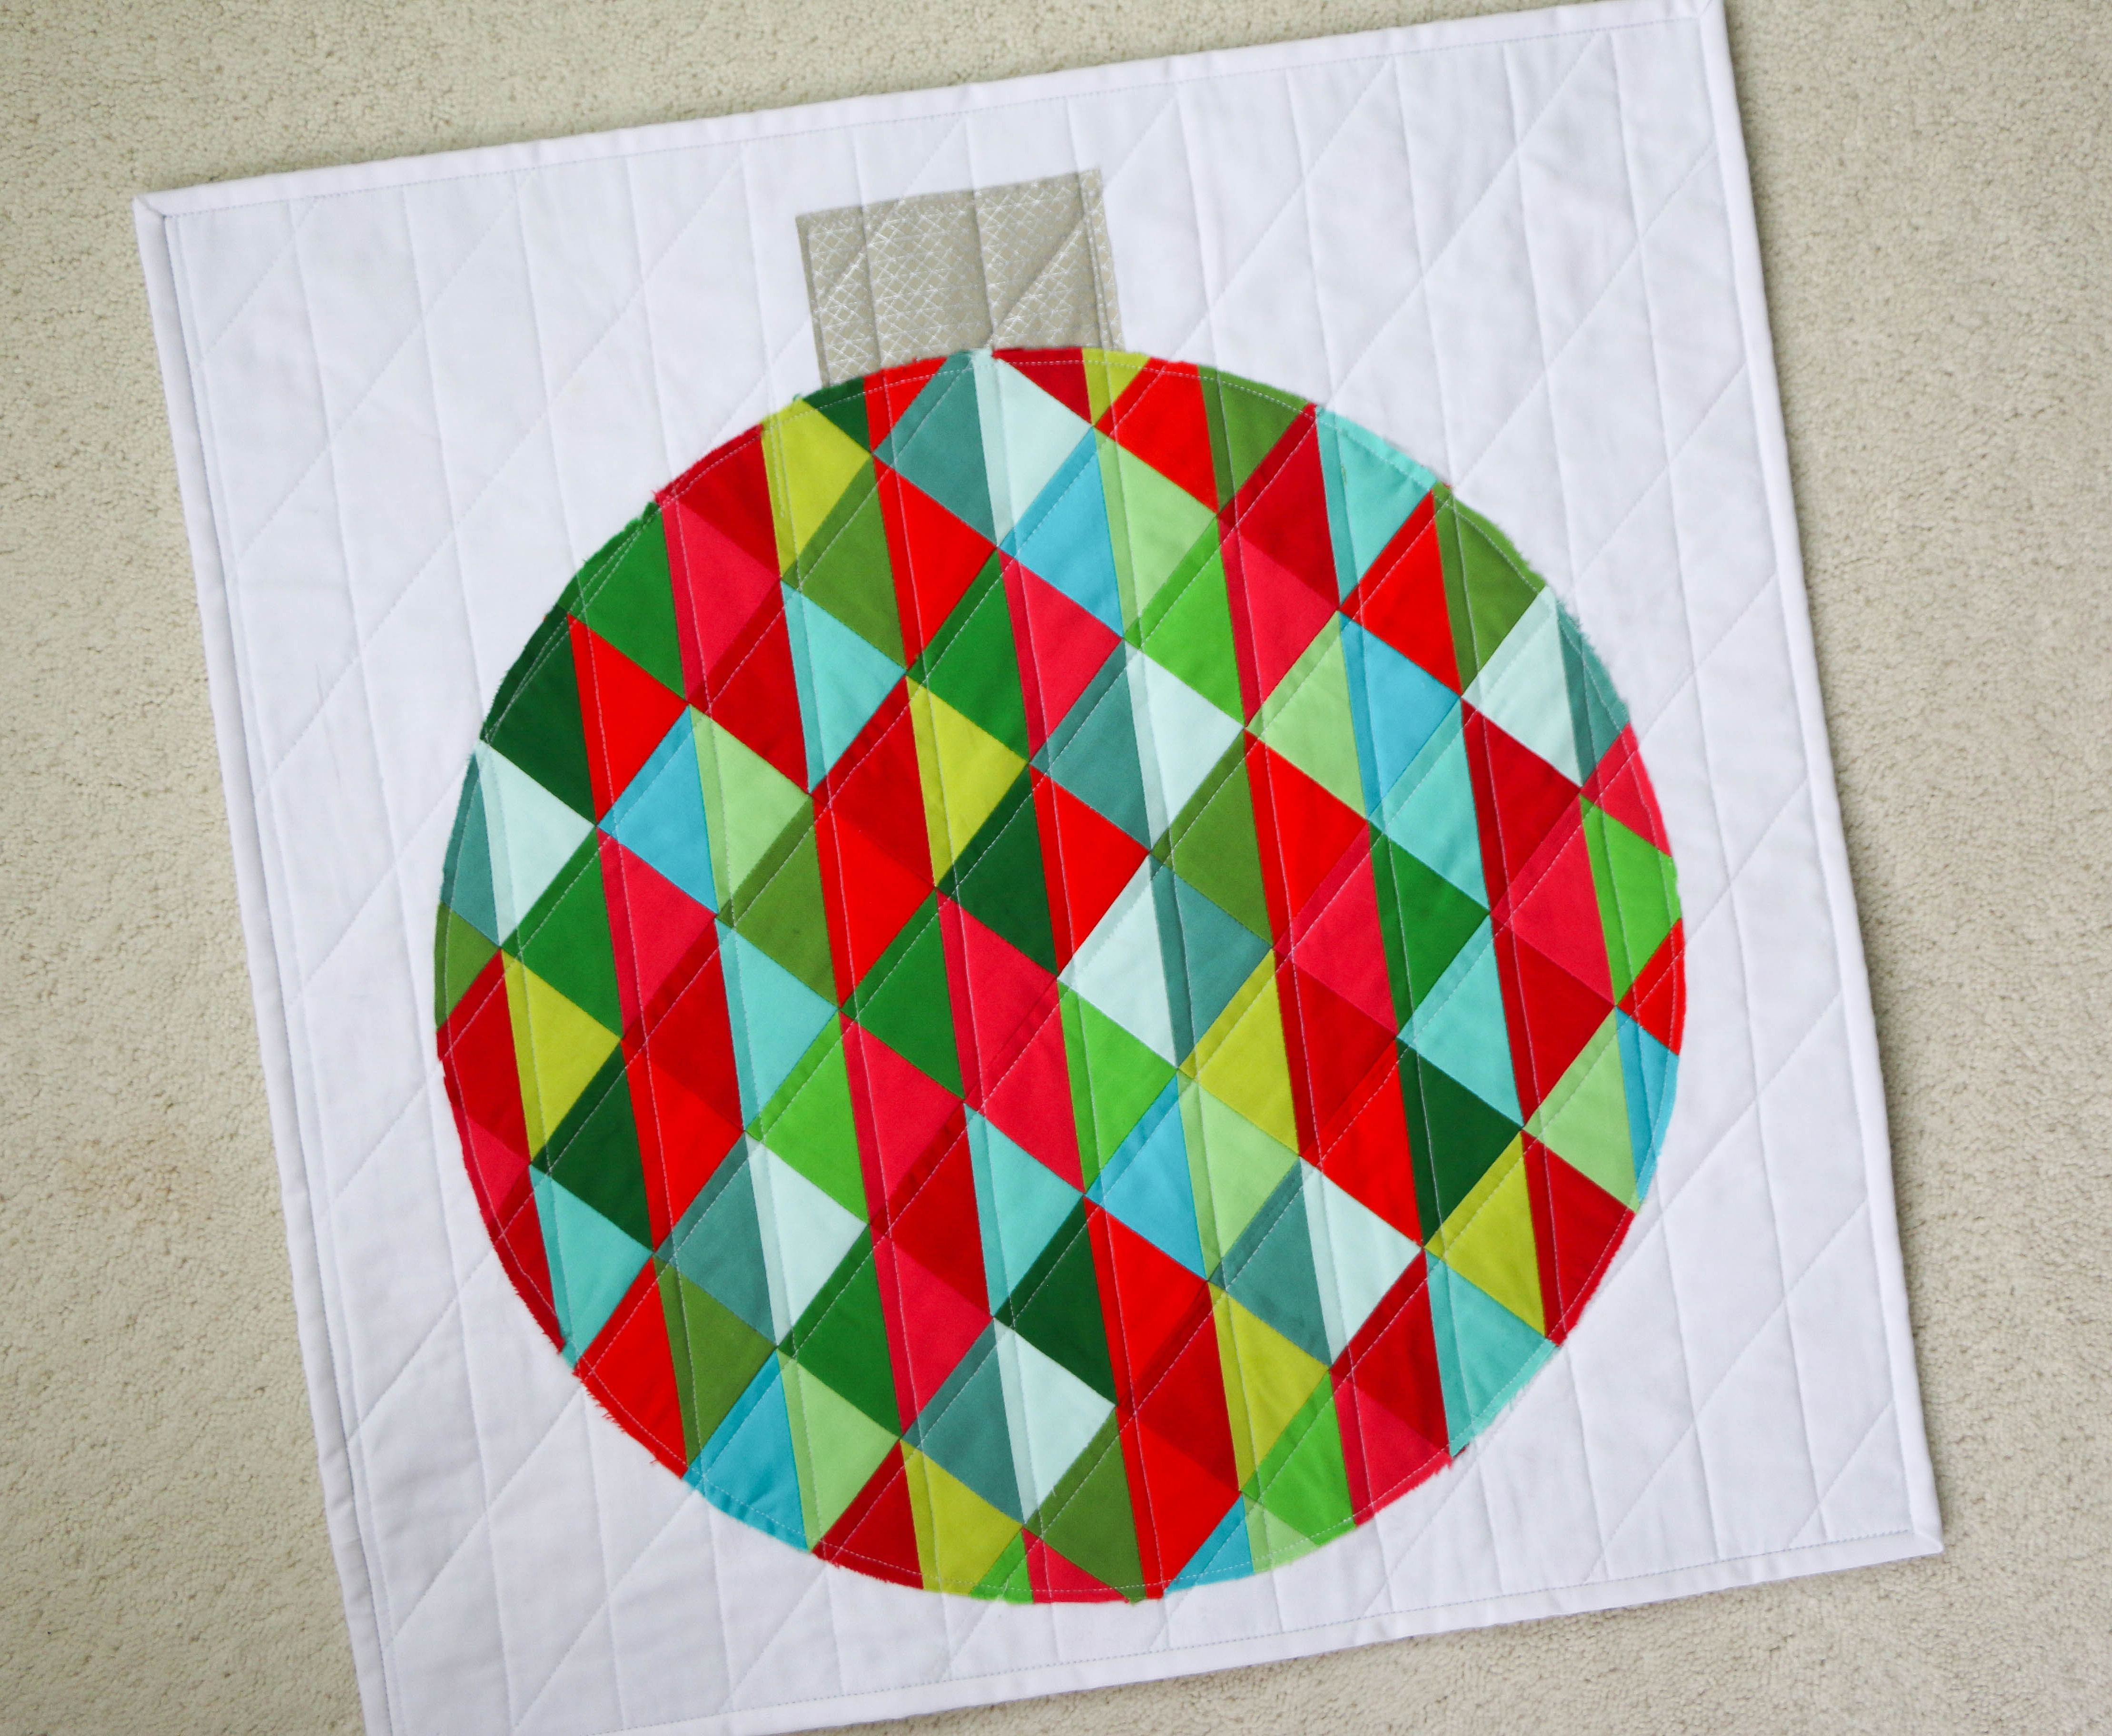
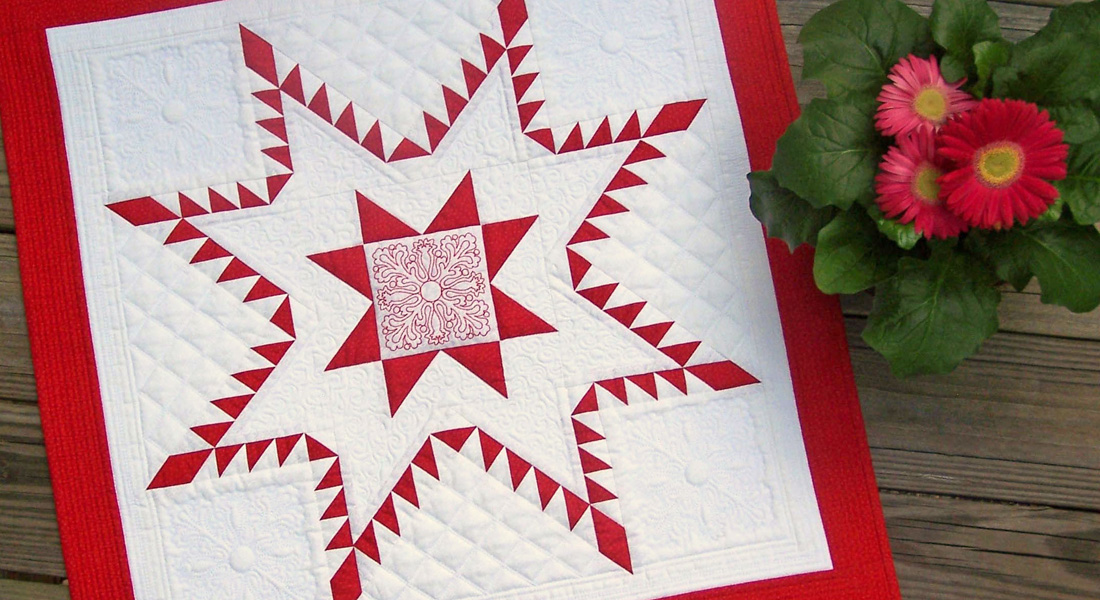
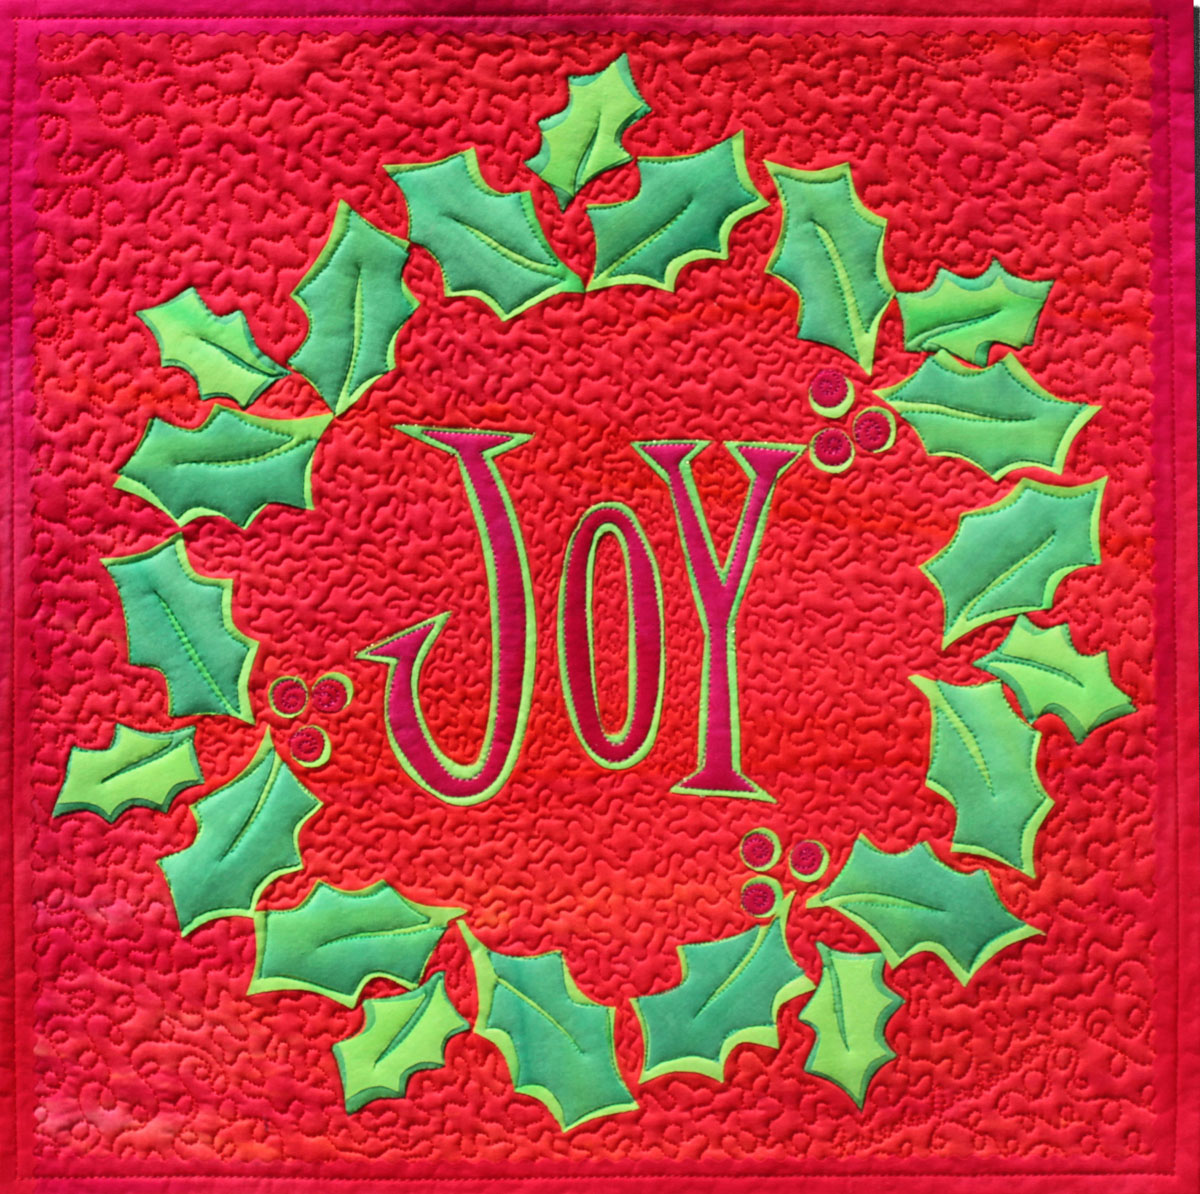
Holiday Ornament Mini Quilt
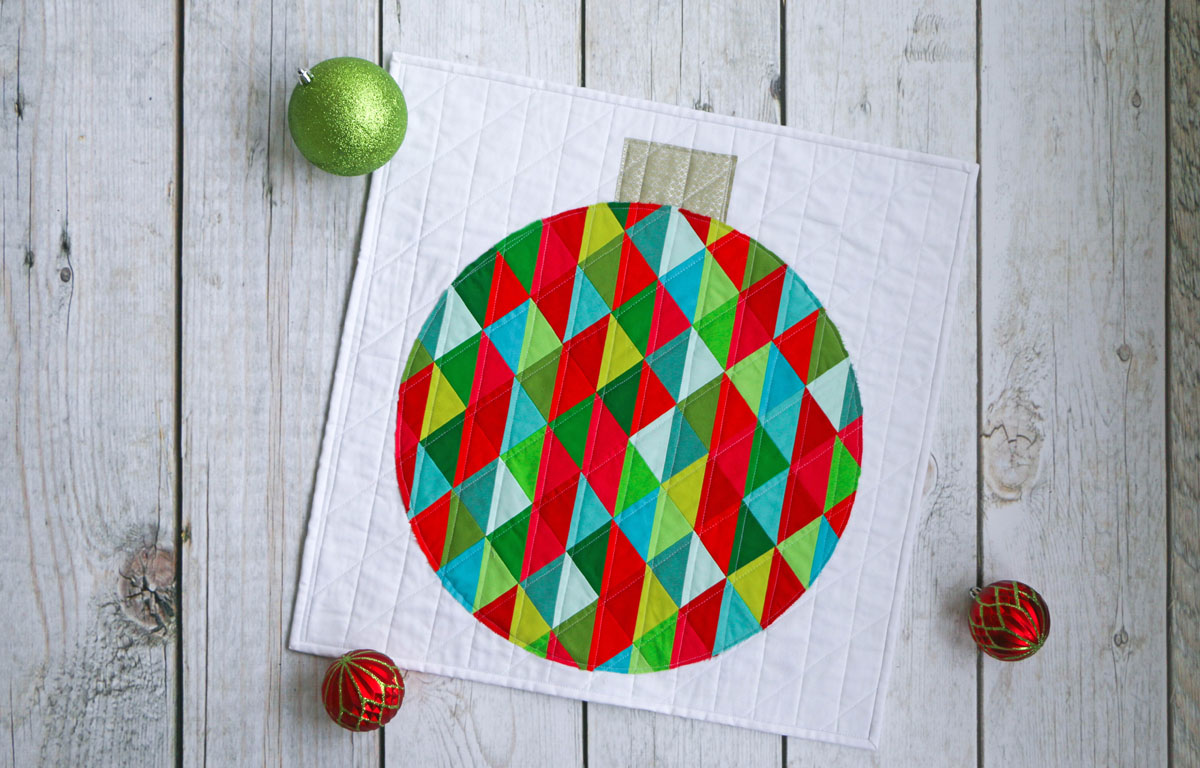
Looking for an easy, quick, modern project this holiday season? This Ornament Mini-Quilt uses the 8-at-a-time method for making half-square triangles quickly and easily—plus simple appliqué allows you to avoid curved piecing entirely!

Materials to make a Holiday Ornament Mini-quilt
• 16 solid-color squares 6″ x 6″ (I used fun holiday brights)
• 1 silver metallic or gray piece 2-3/4″ x 4″ (not shown in the photo above because I didn’t think of adding it until later!)
• 1 solid white piece about 21″ x 21″ for background
• 1 piece for quilt back, about 21″ x 21″
• 1 piece of batting about 21″ x 21″
• 3 strips for binding, 2-1/2″ x width of fabric
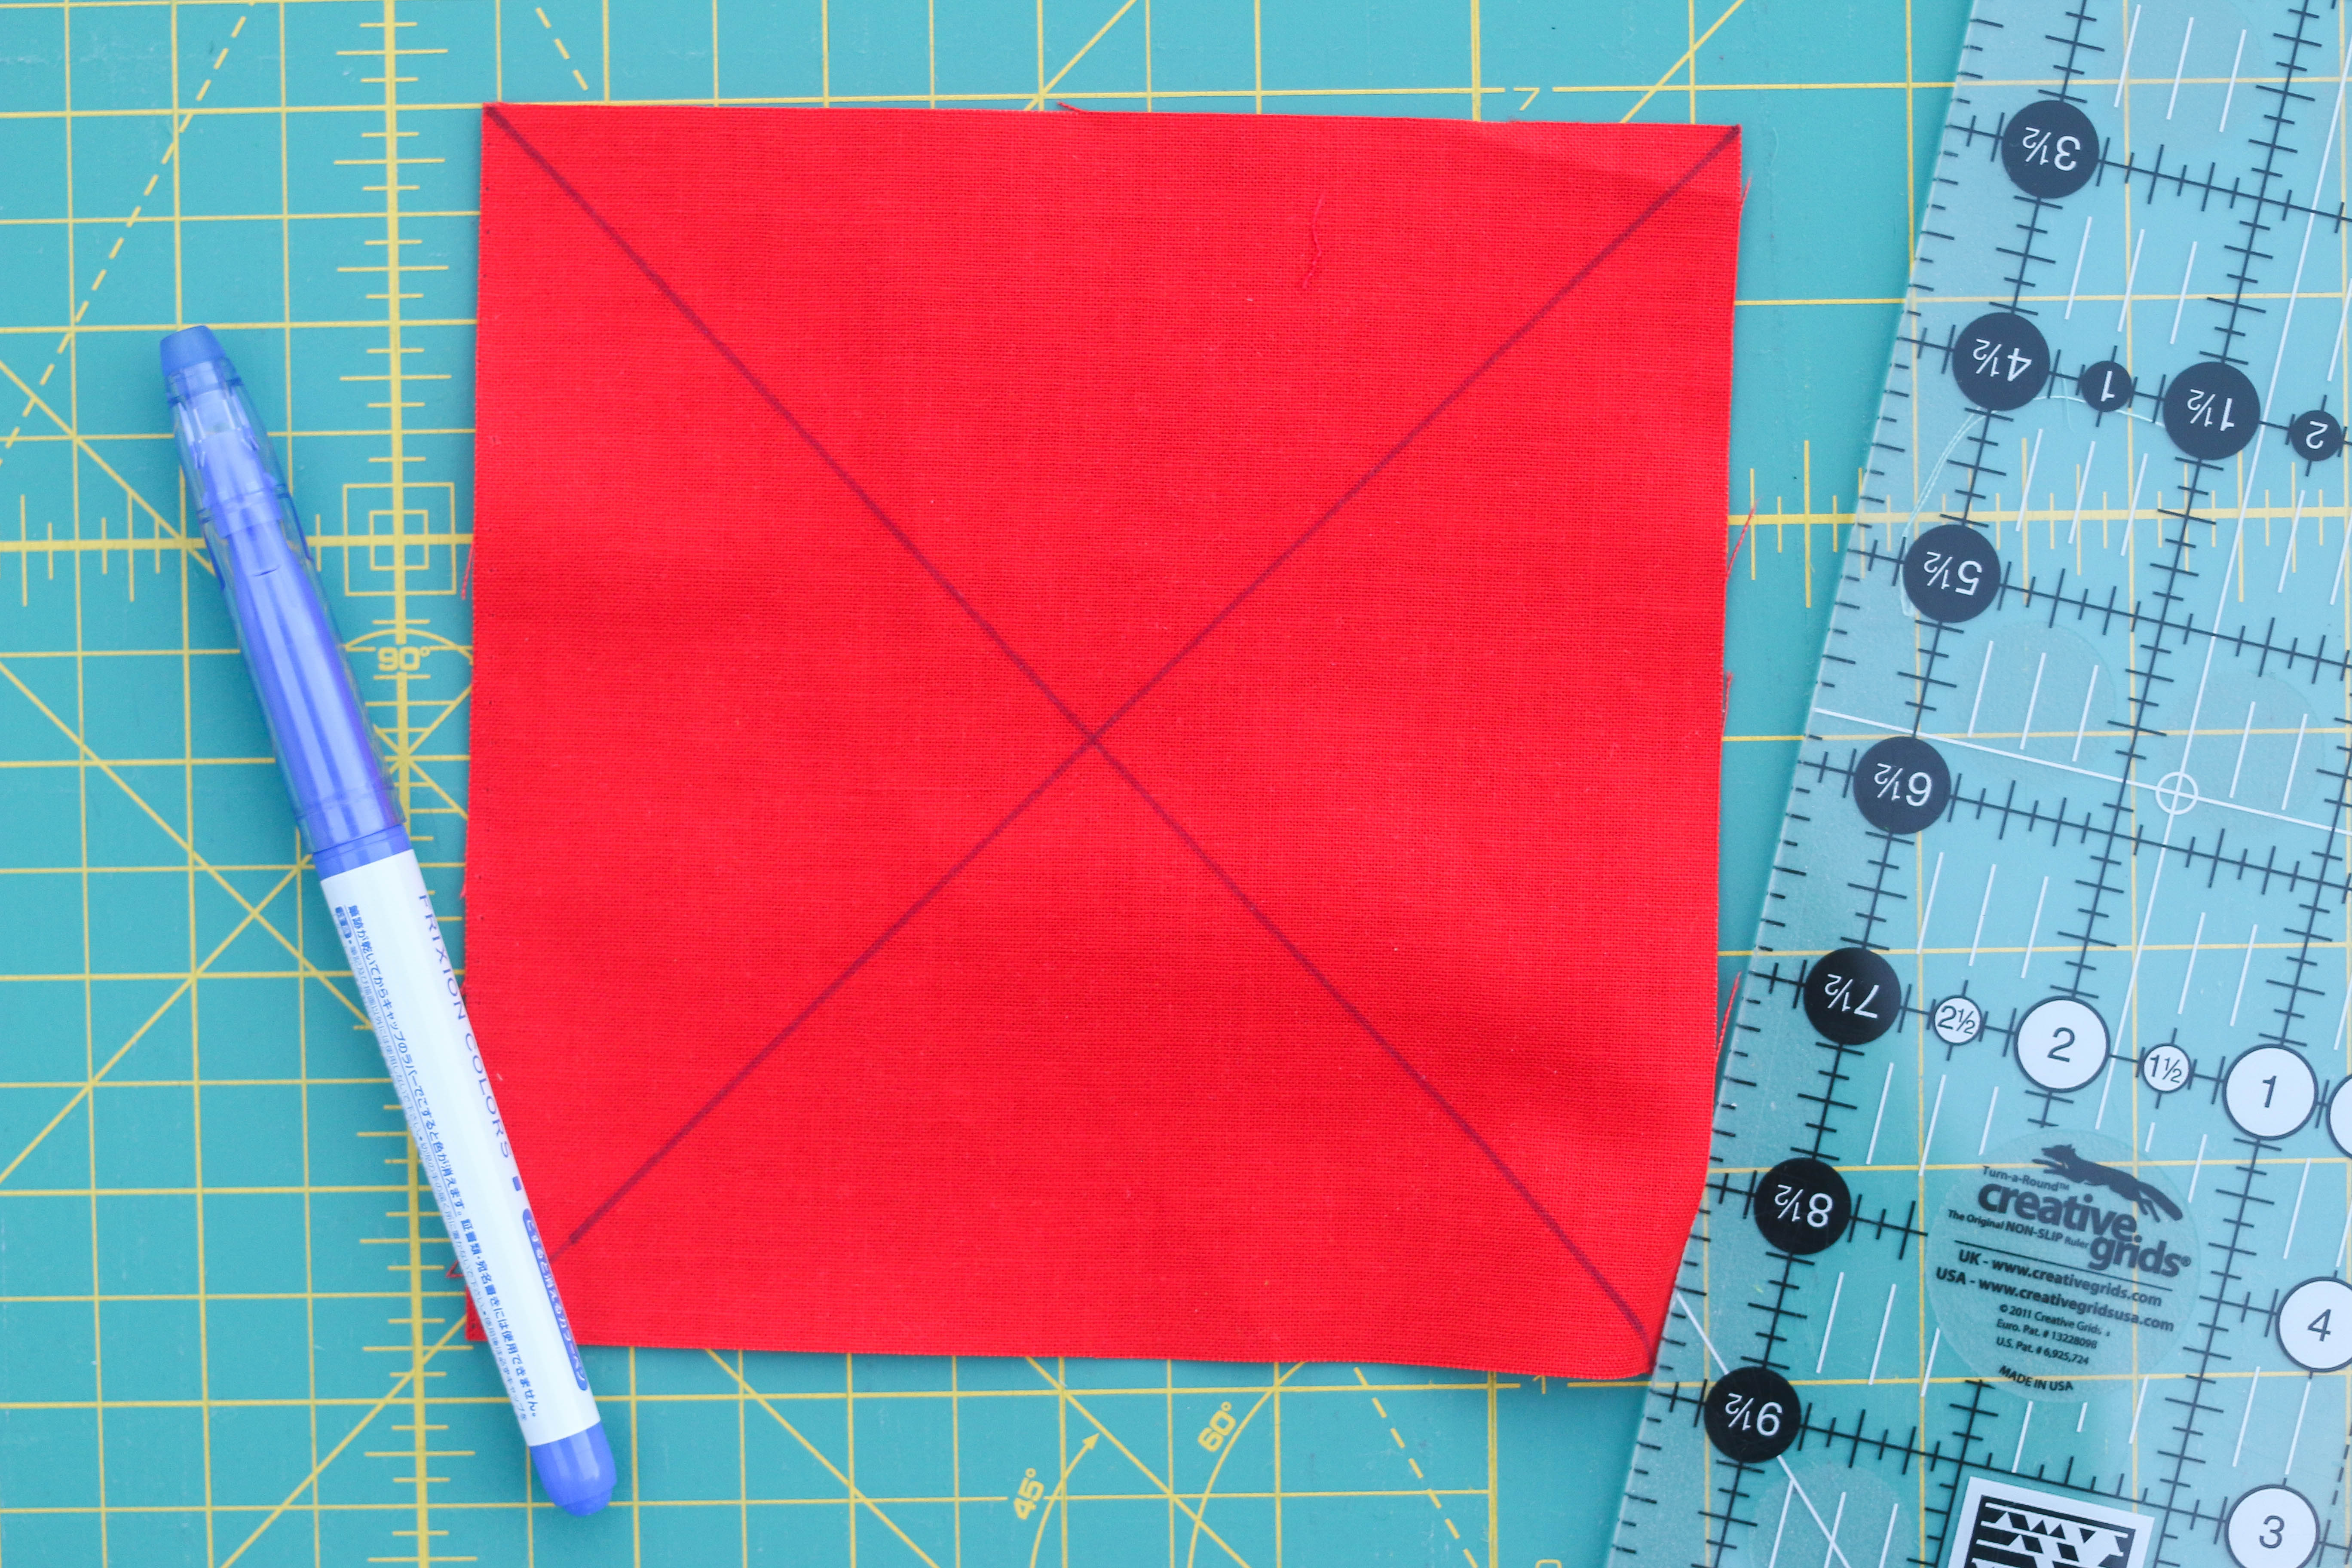
Mark diagonal lines on the back of 8 of the 6″ squares, from corner to corner in each direction.

Pair each marked square with a different color unmarked 6″ square, right sides together. Stitch along each side of both unmarked lines, 1/4″ from the line.
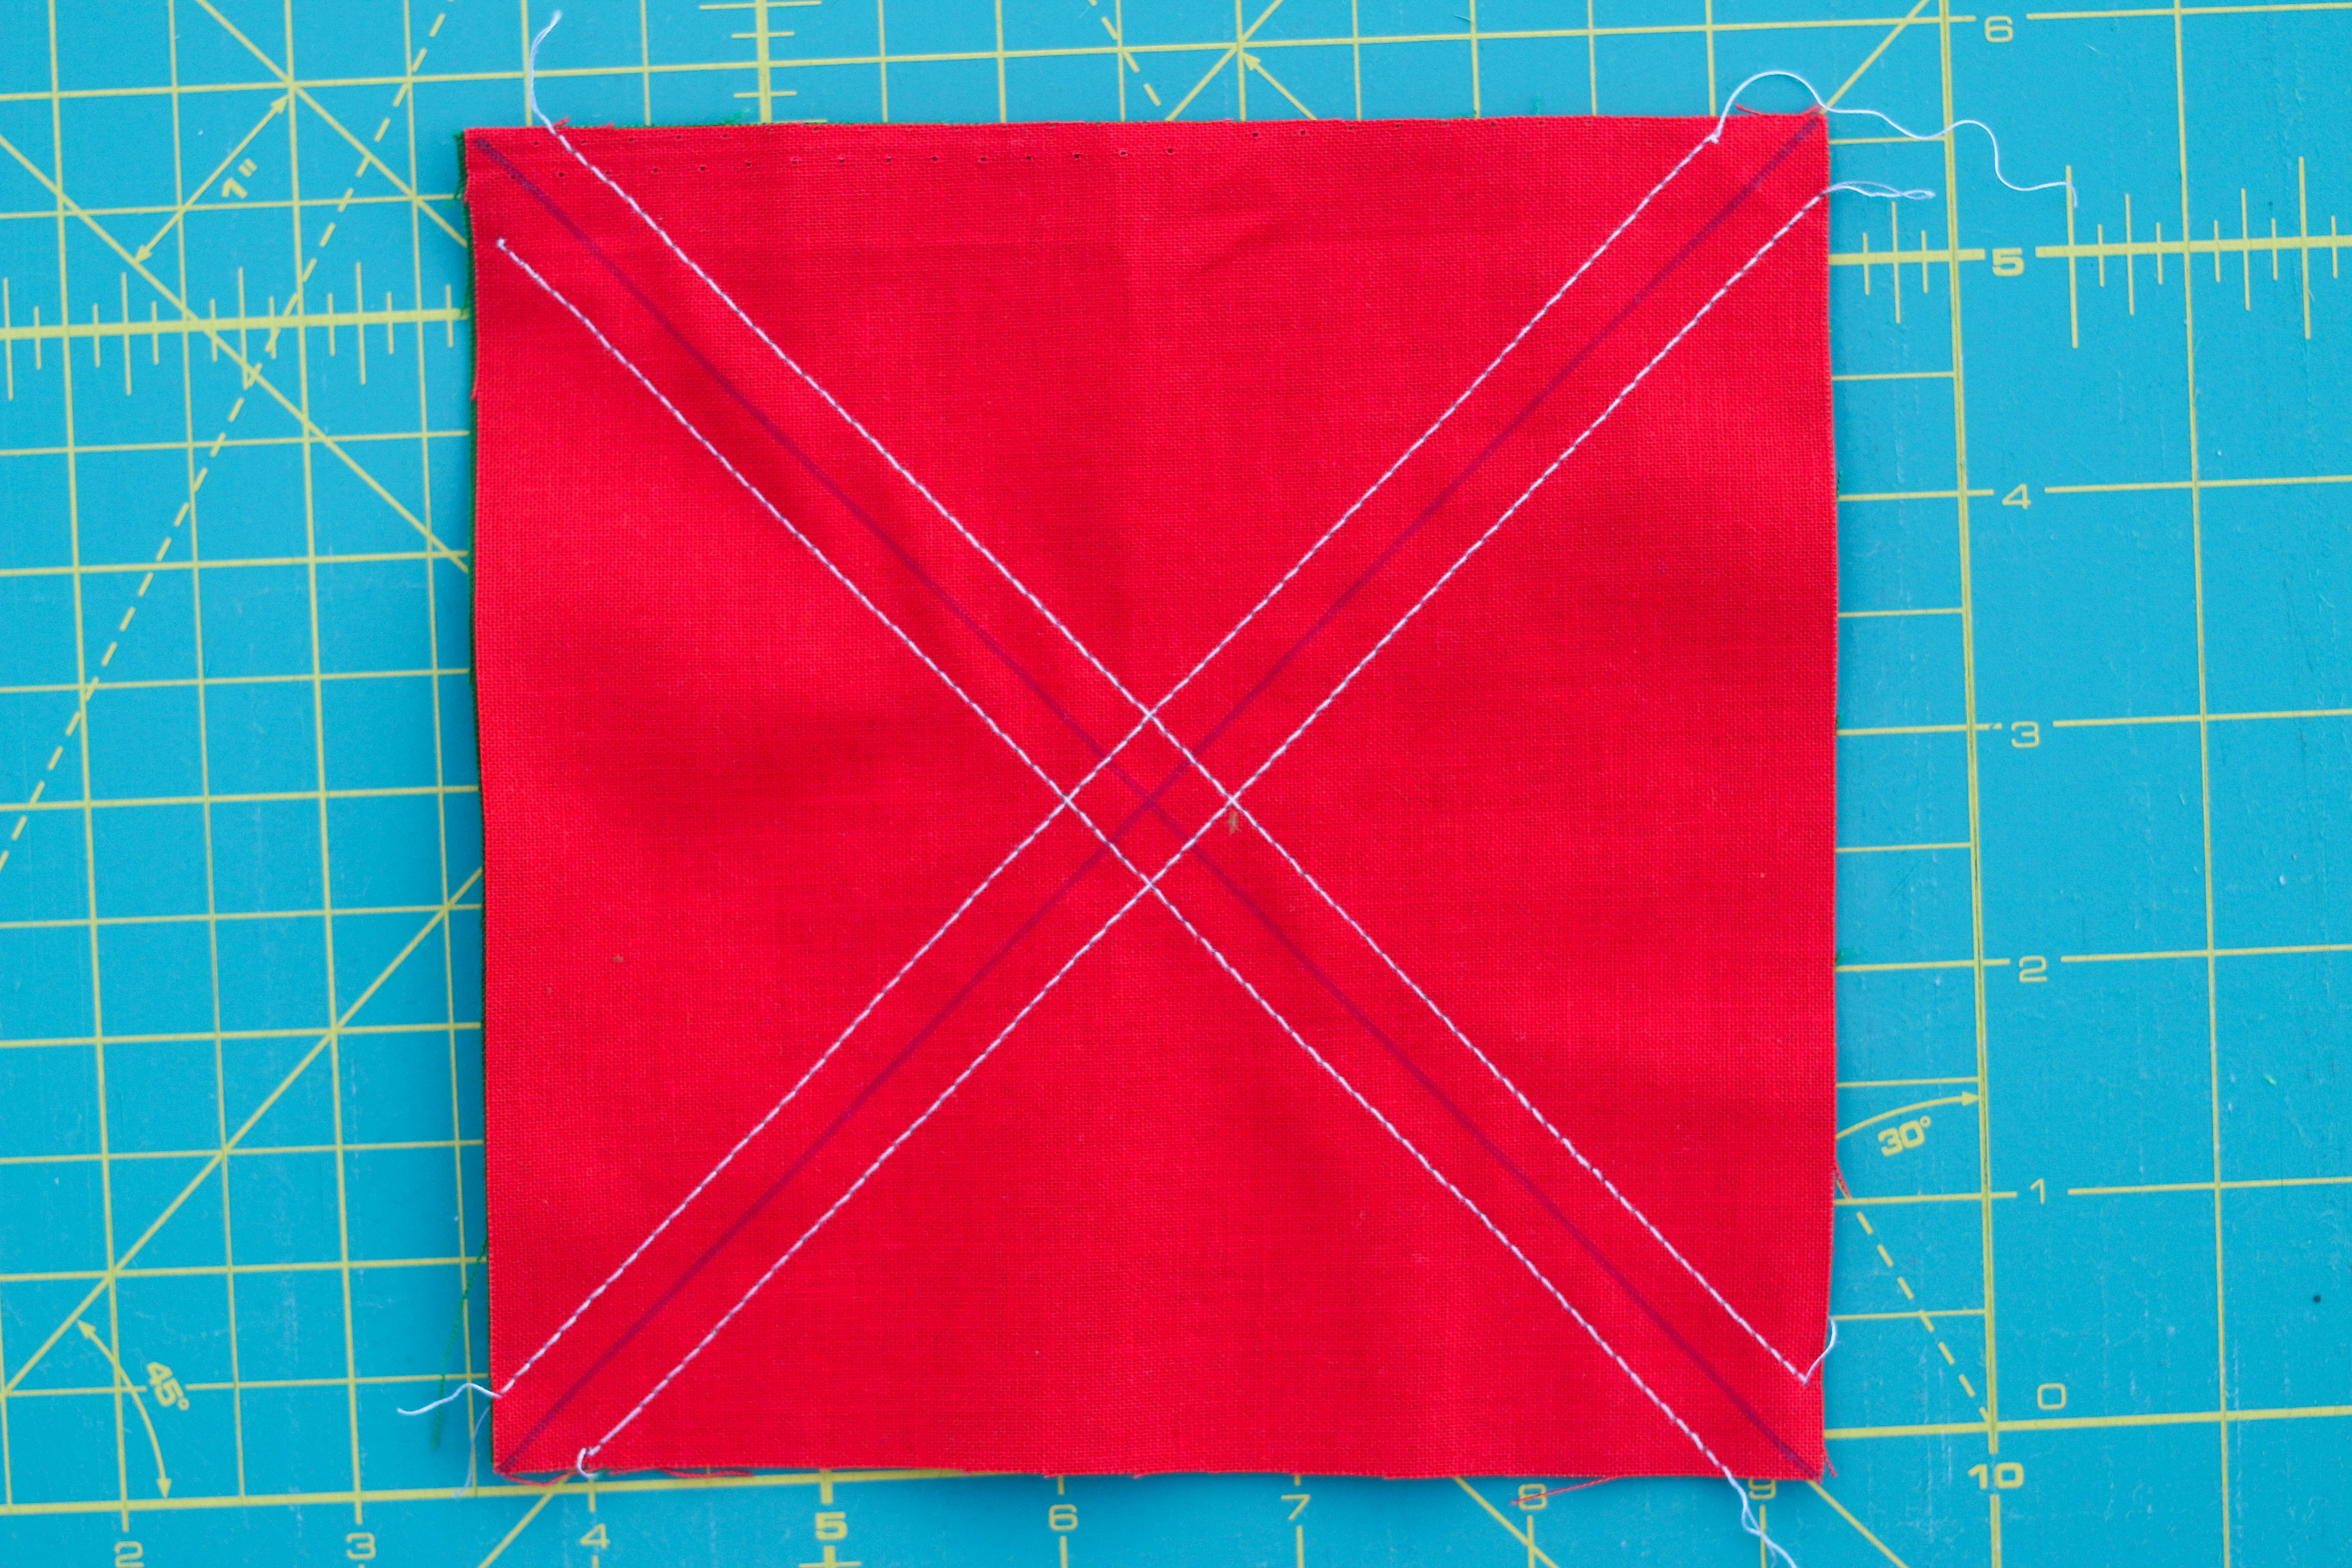
When you’re done, it should look like this.

Cut the stitched squares in half, straight through the intersection of the marked lines.
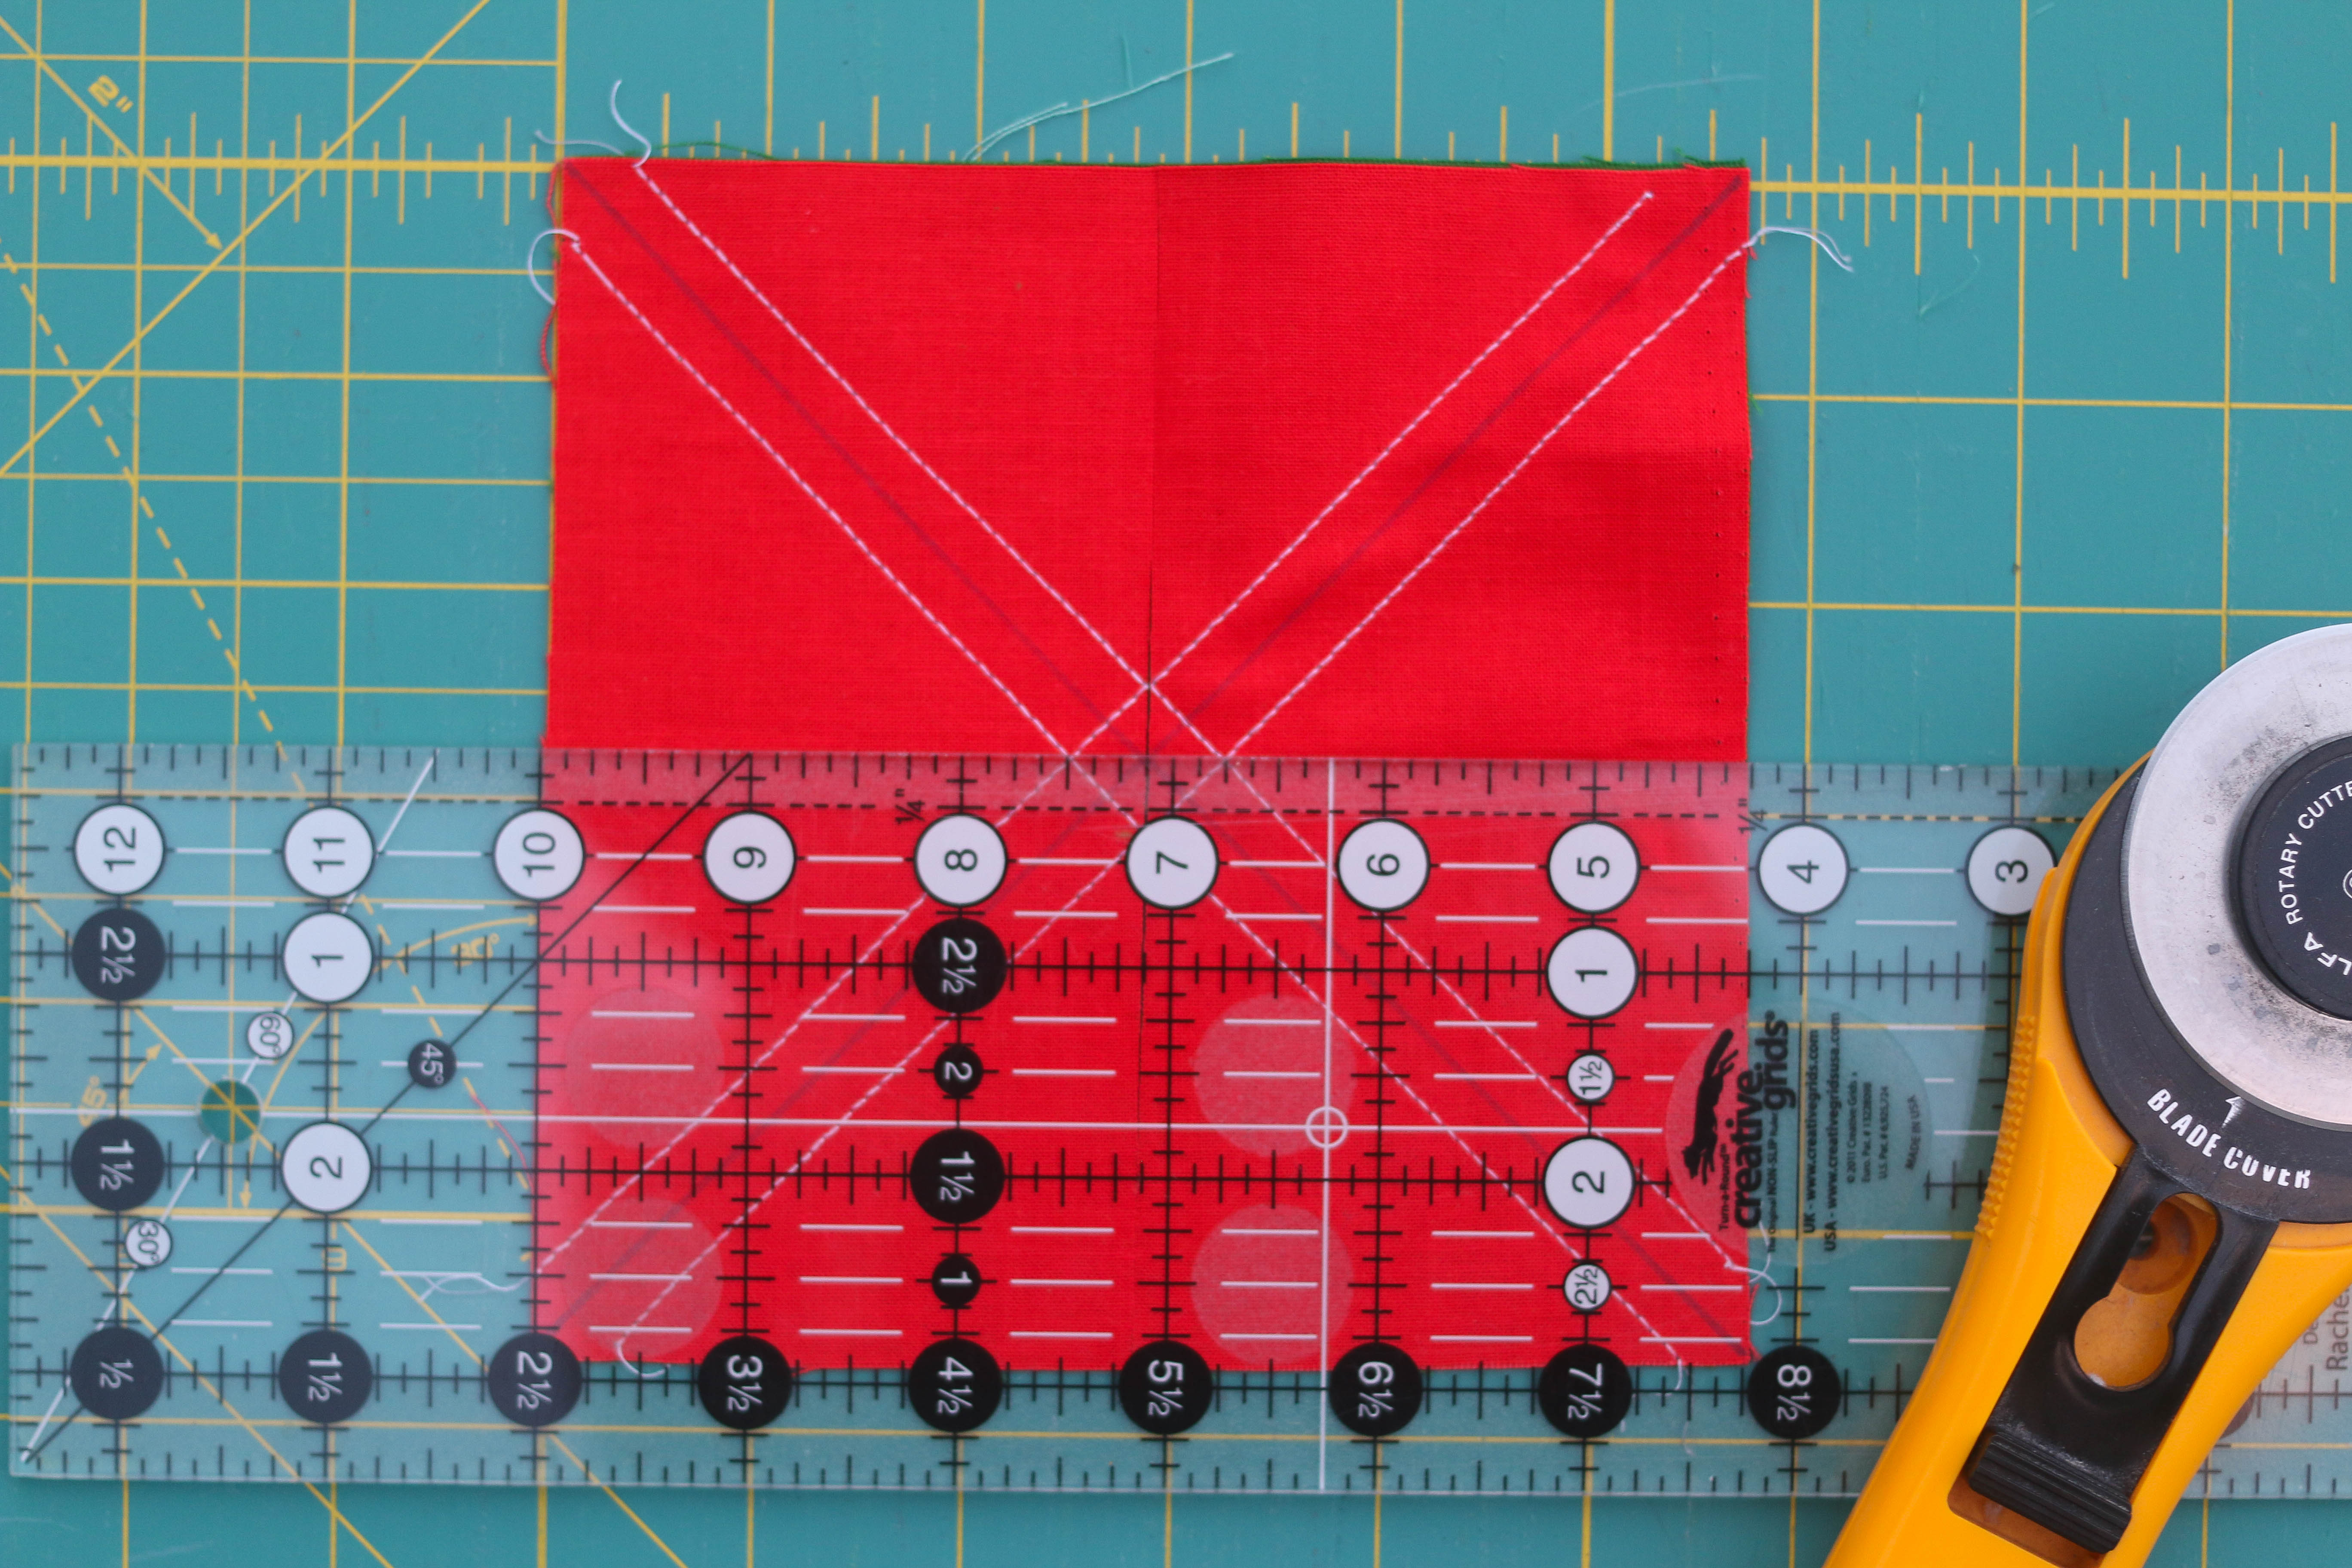
Without moving the square, cut the stitched squares in half again, in the other direction.

Now cut along the marked diagonal lines in both directions.
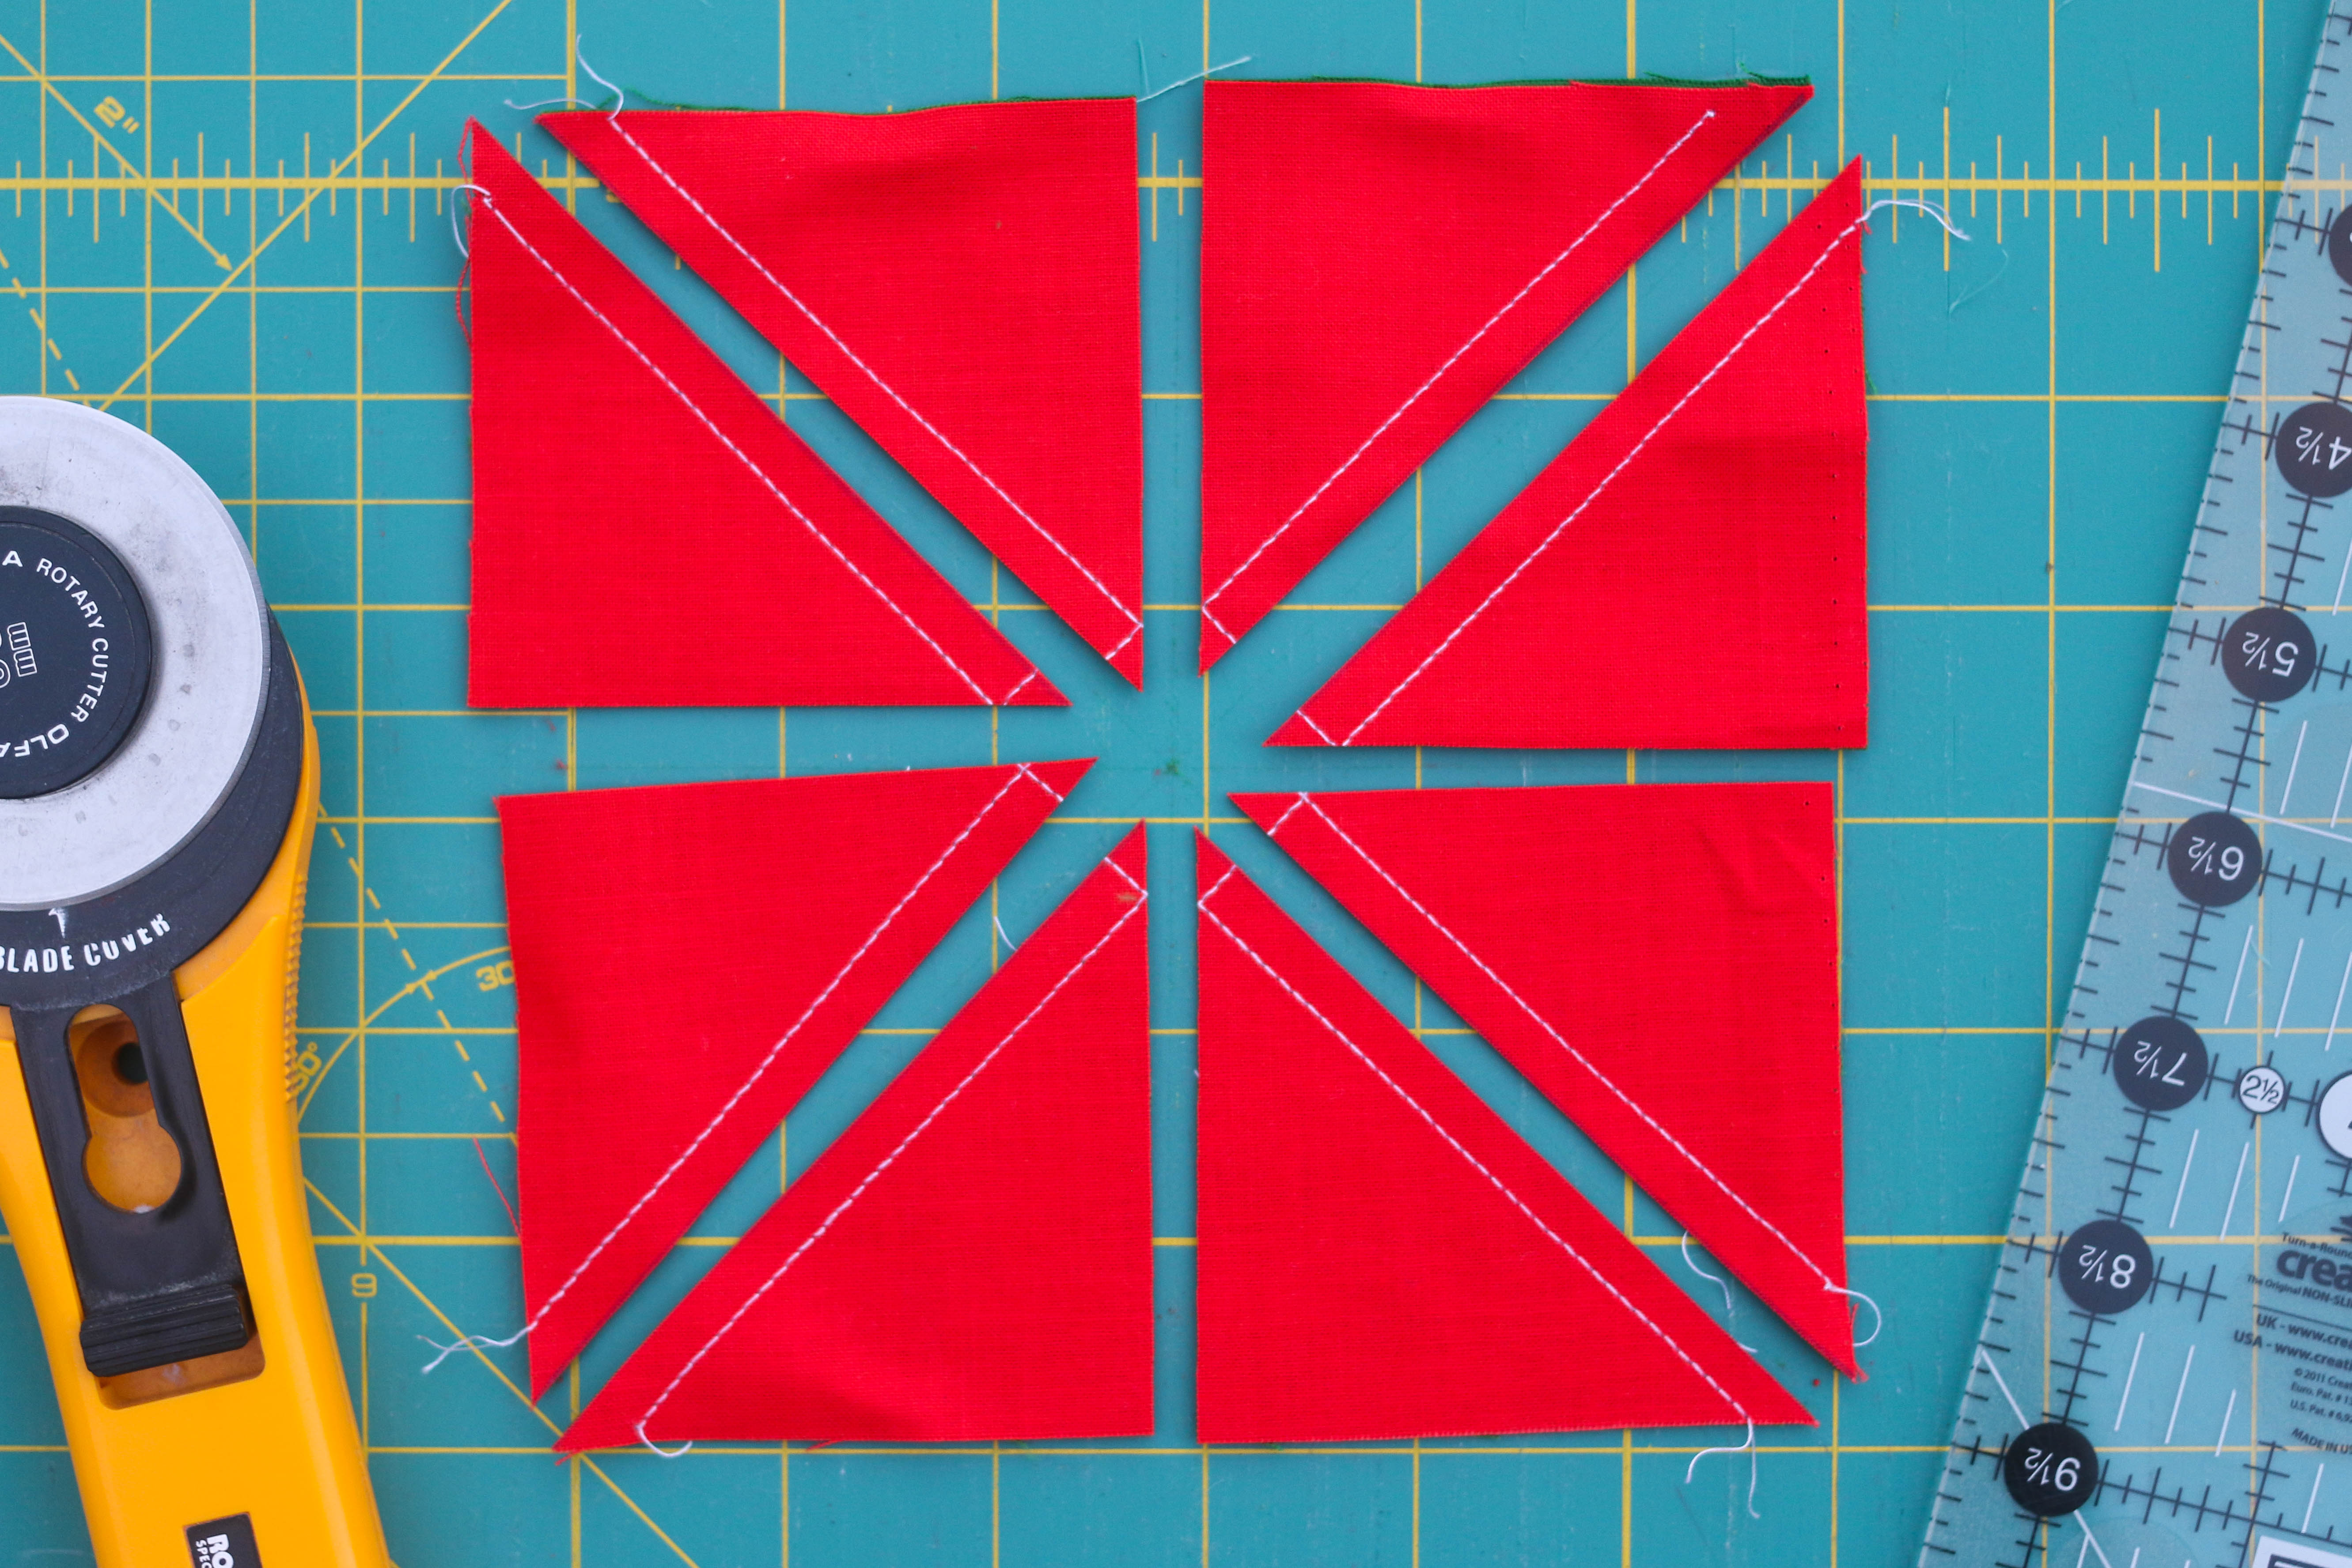
Ta-da! You now have 8 half-square triangles (HSTs)!
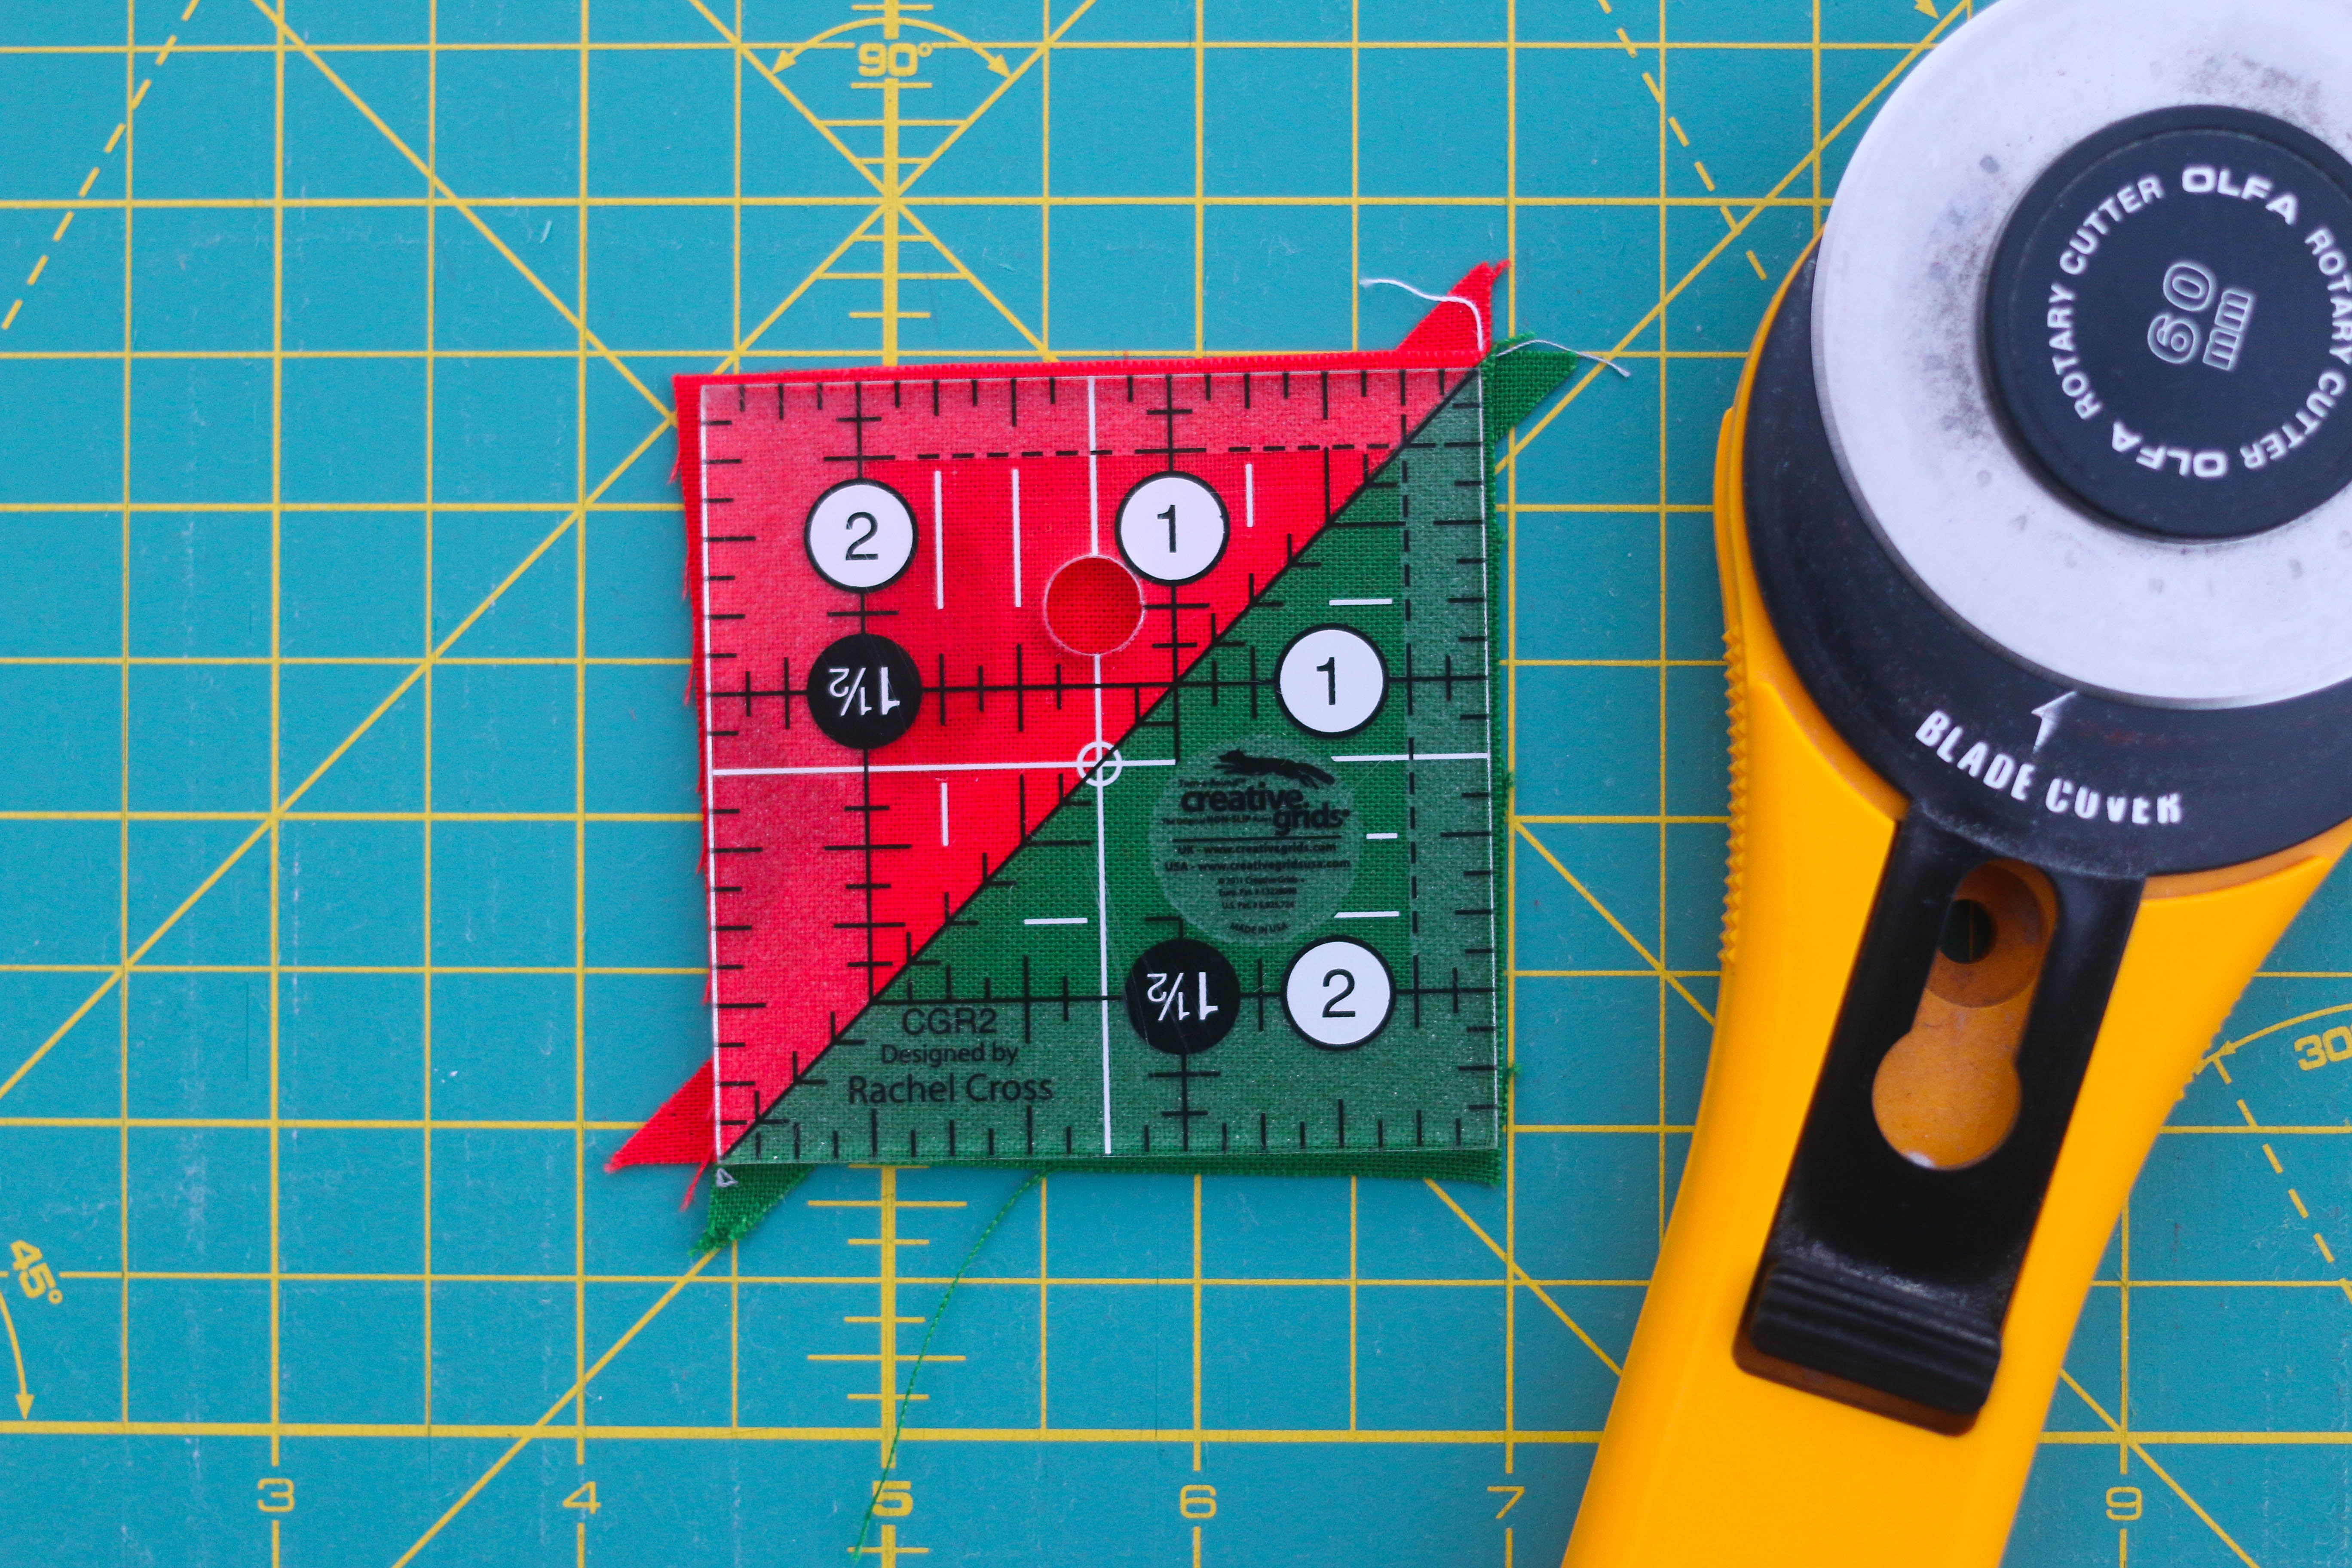
Press the HSTs open and trim to 2-1/2″ square. (This tiny 2-1/2″ square ruler is perfect for this task!)
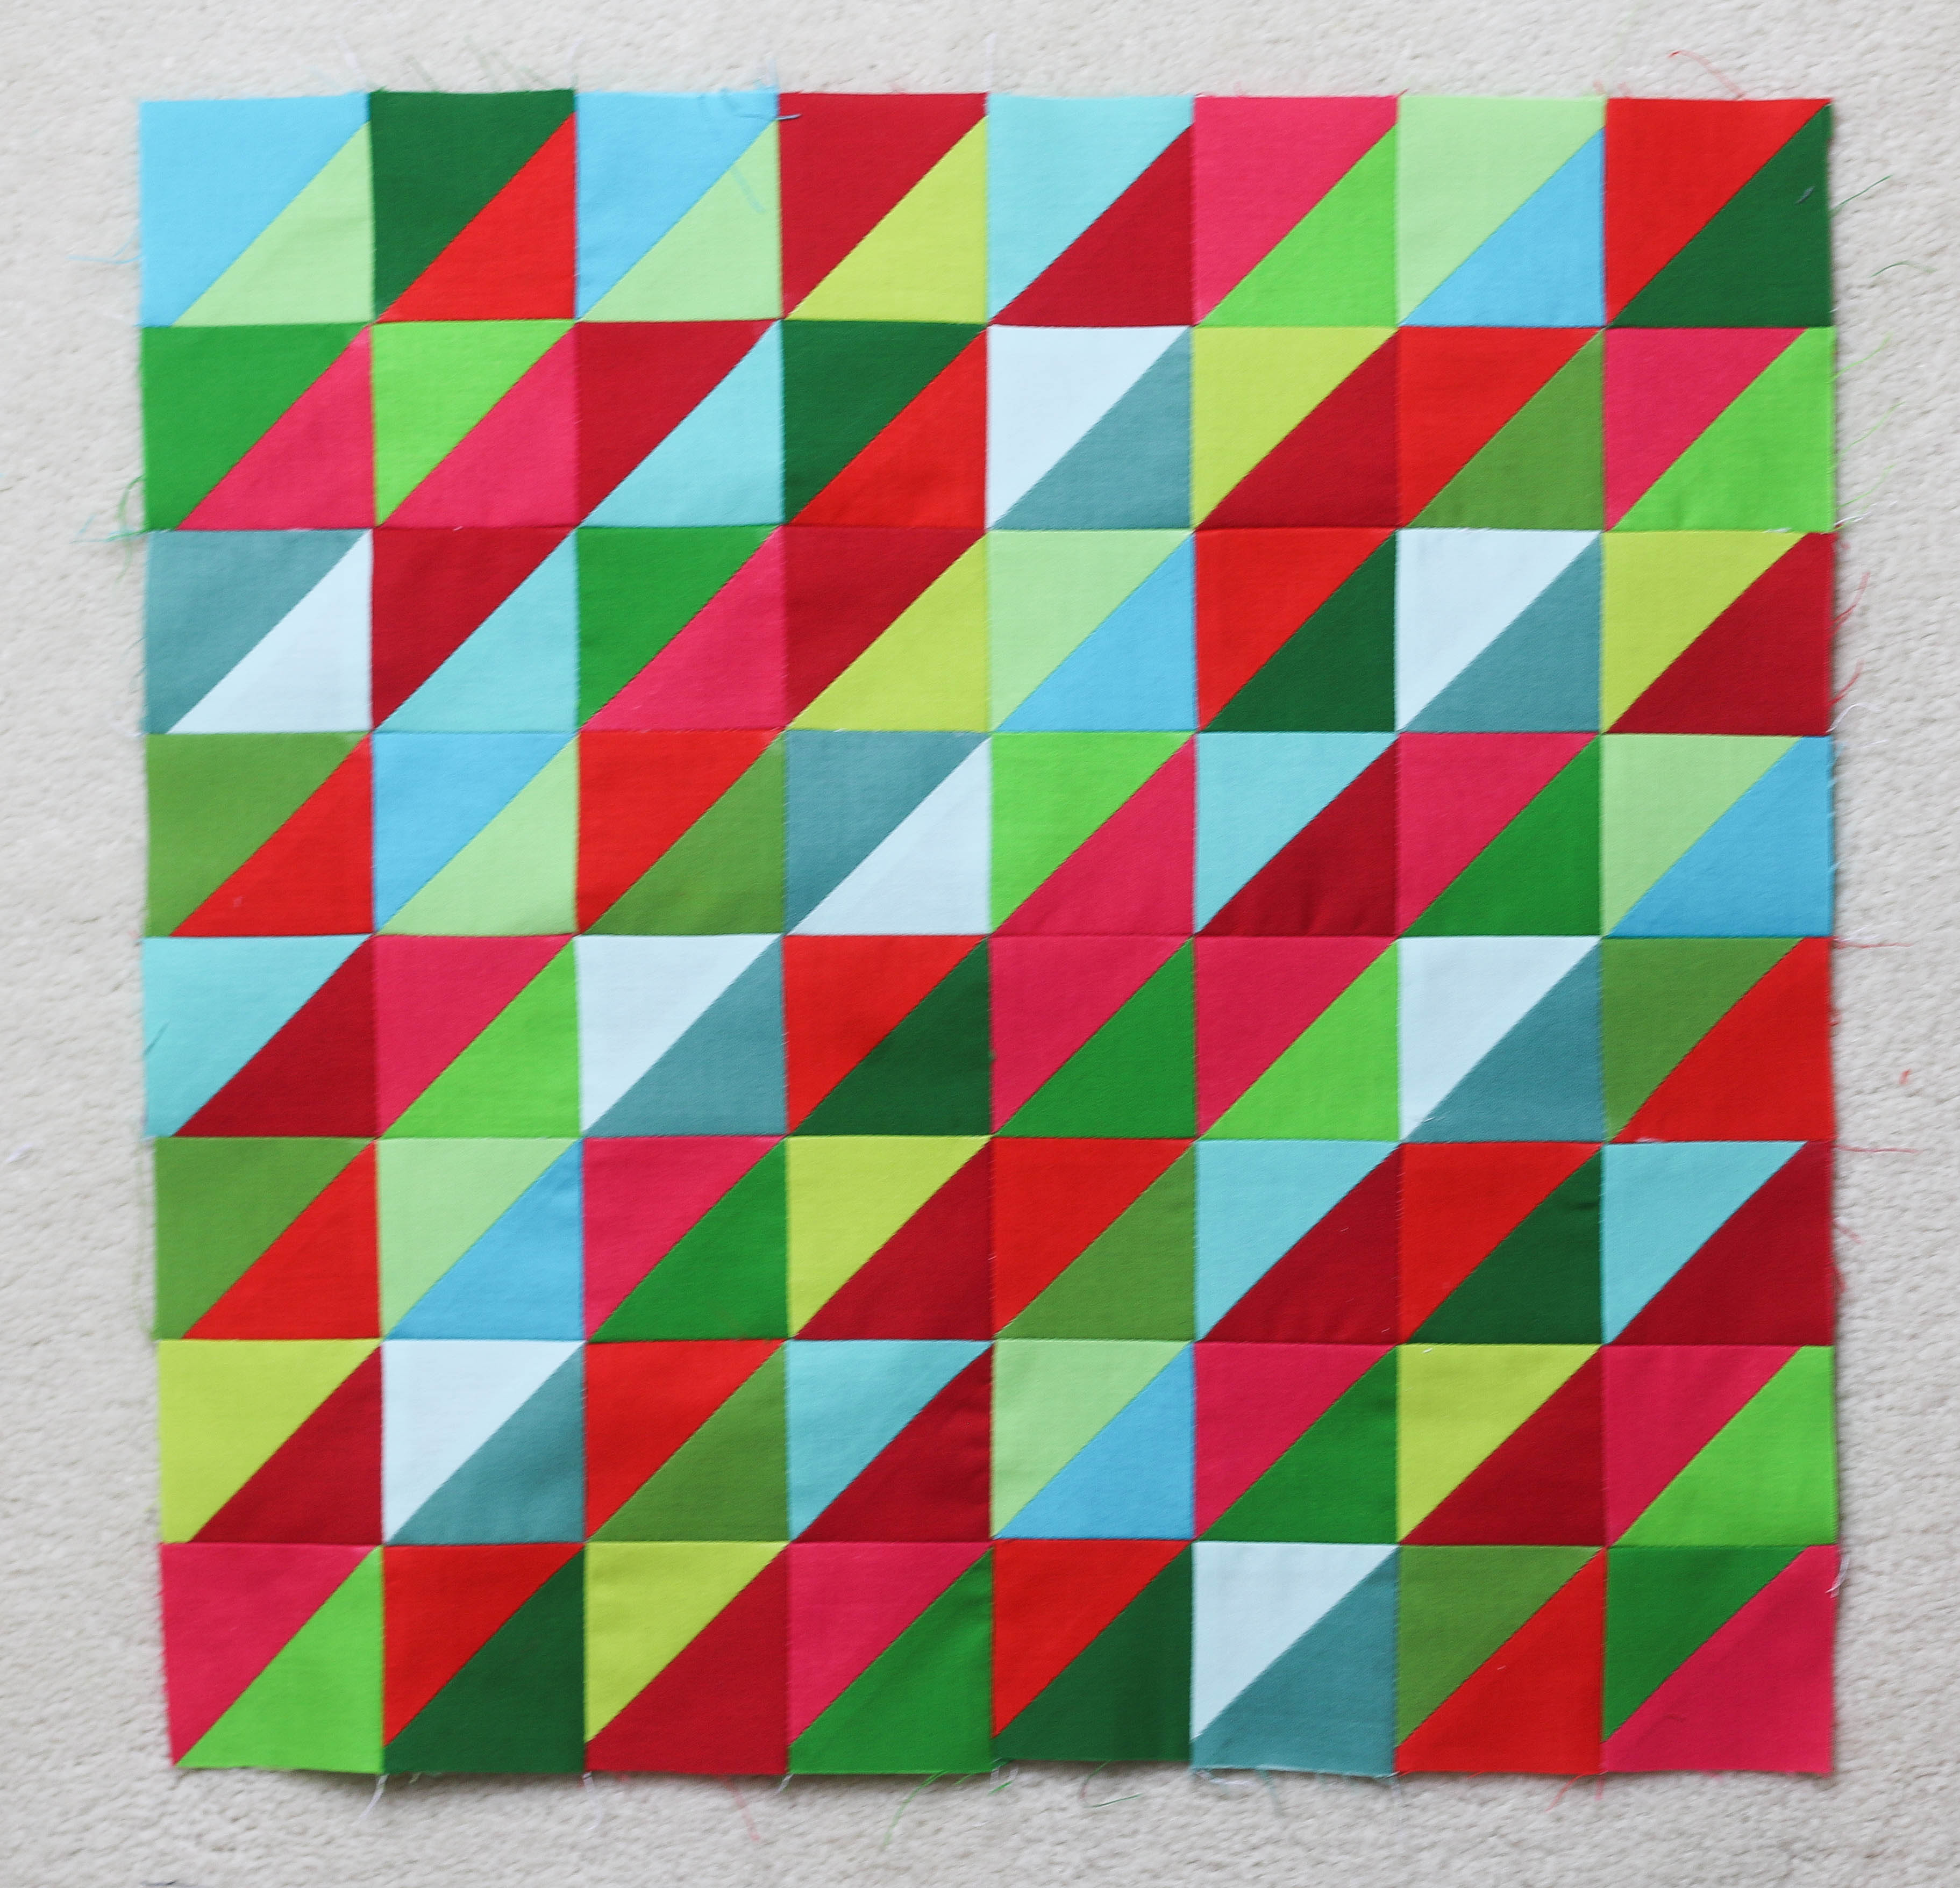
Repeat this process with the other 6″ square to make 64 HSTs.
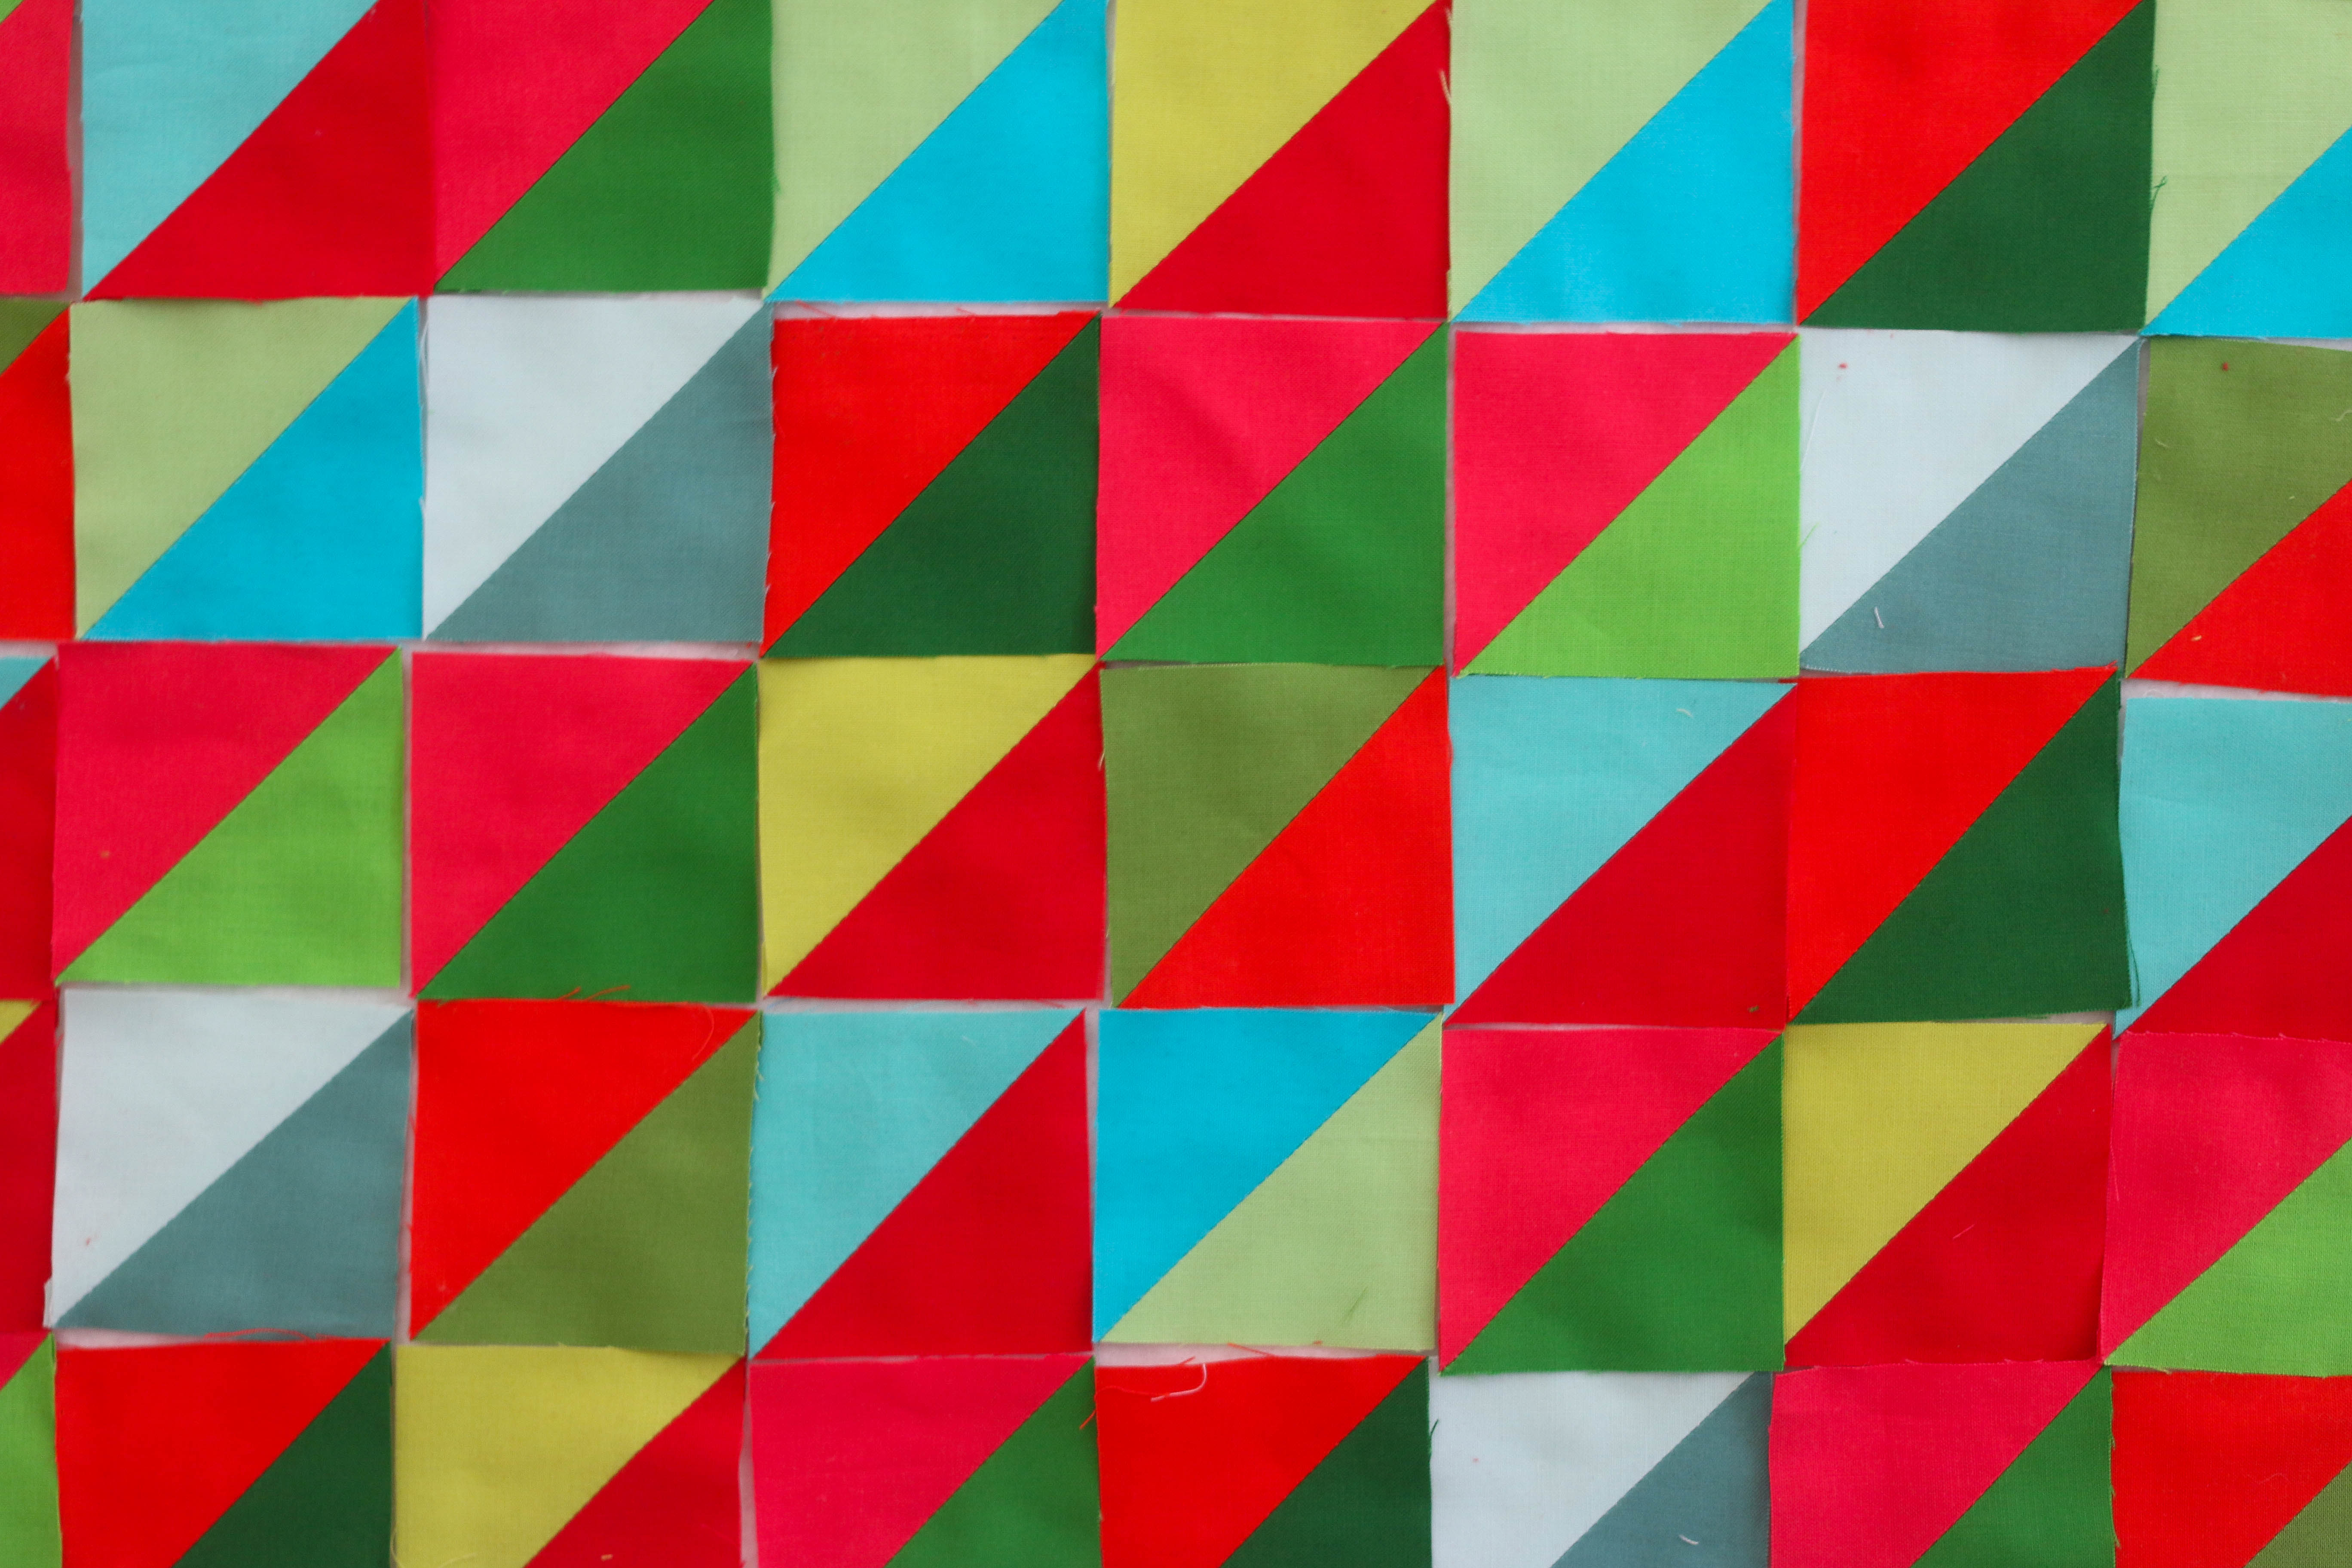
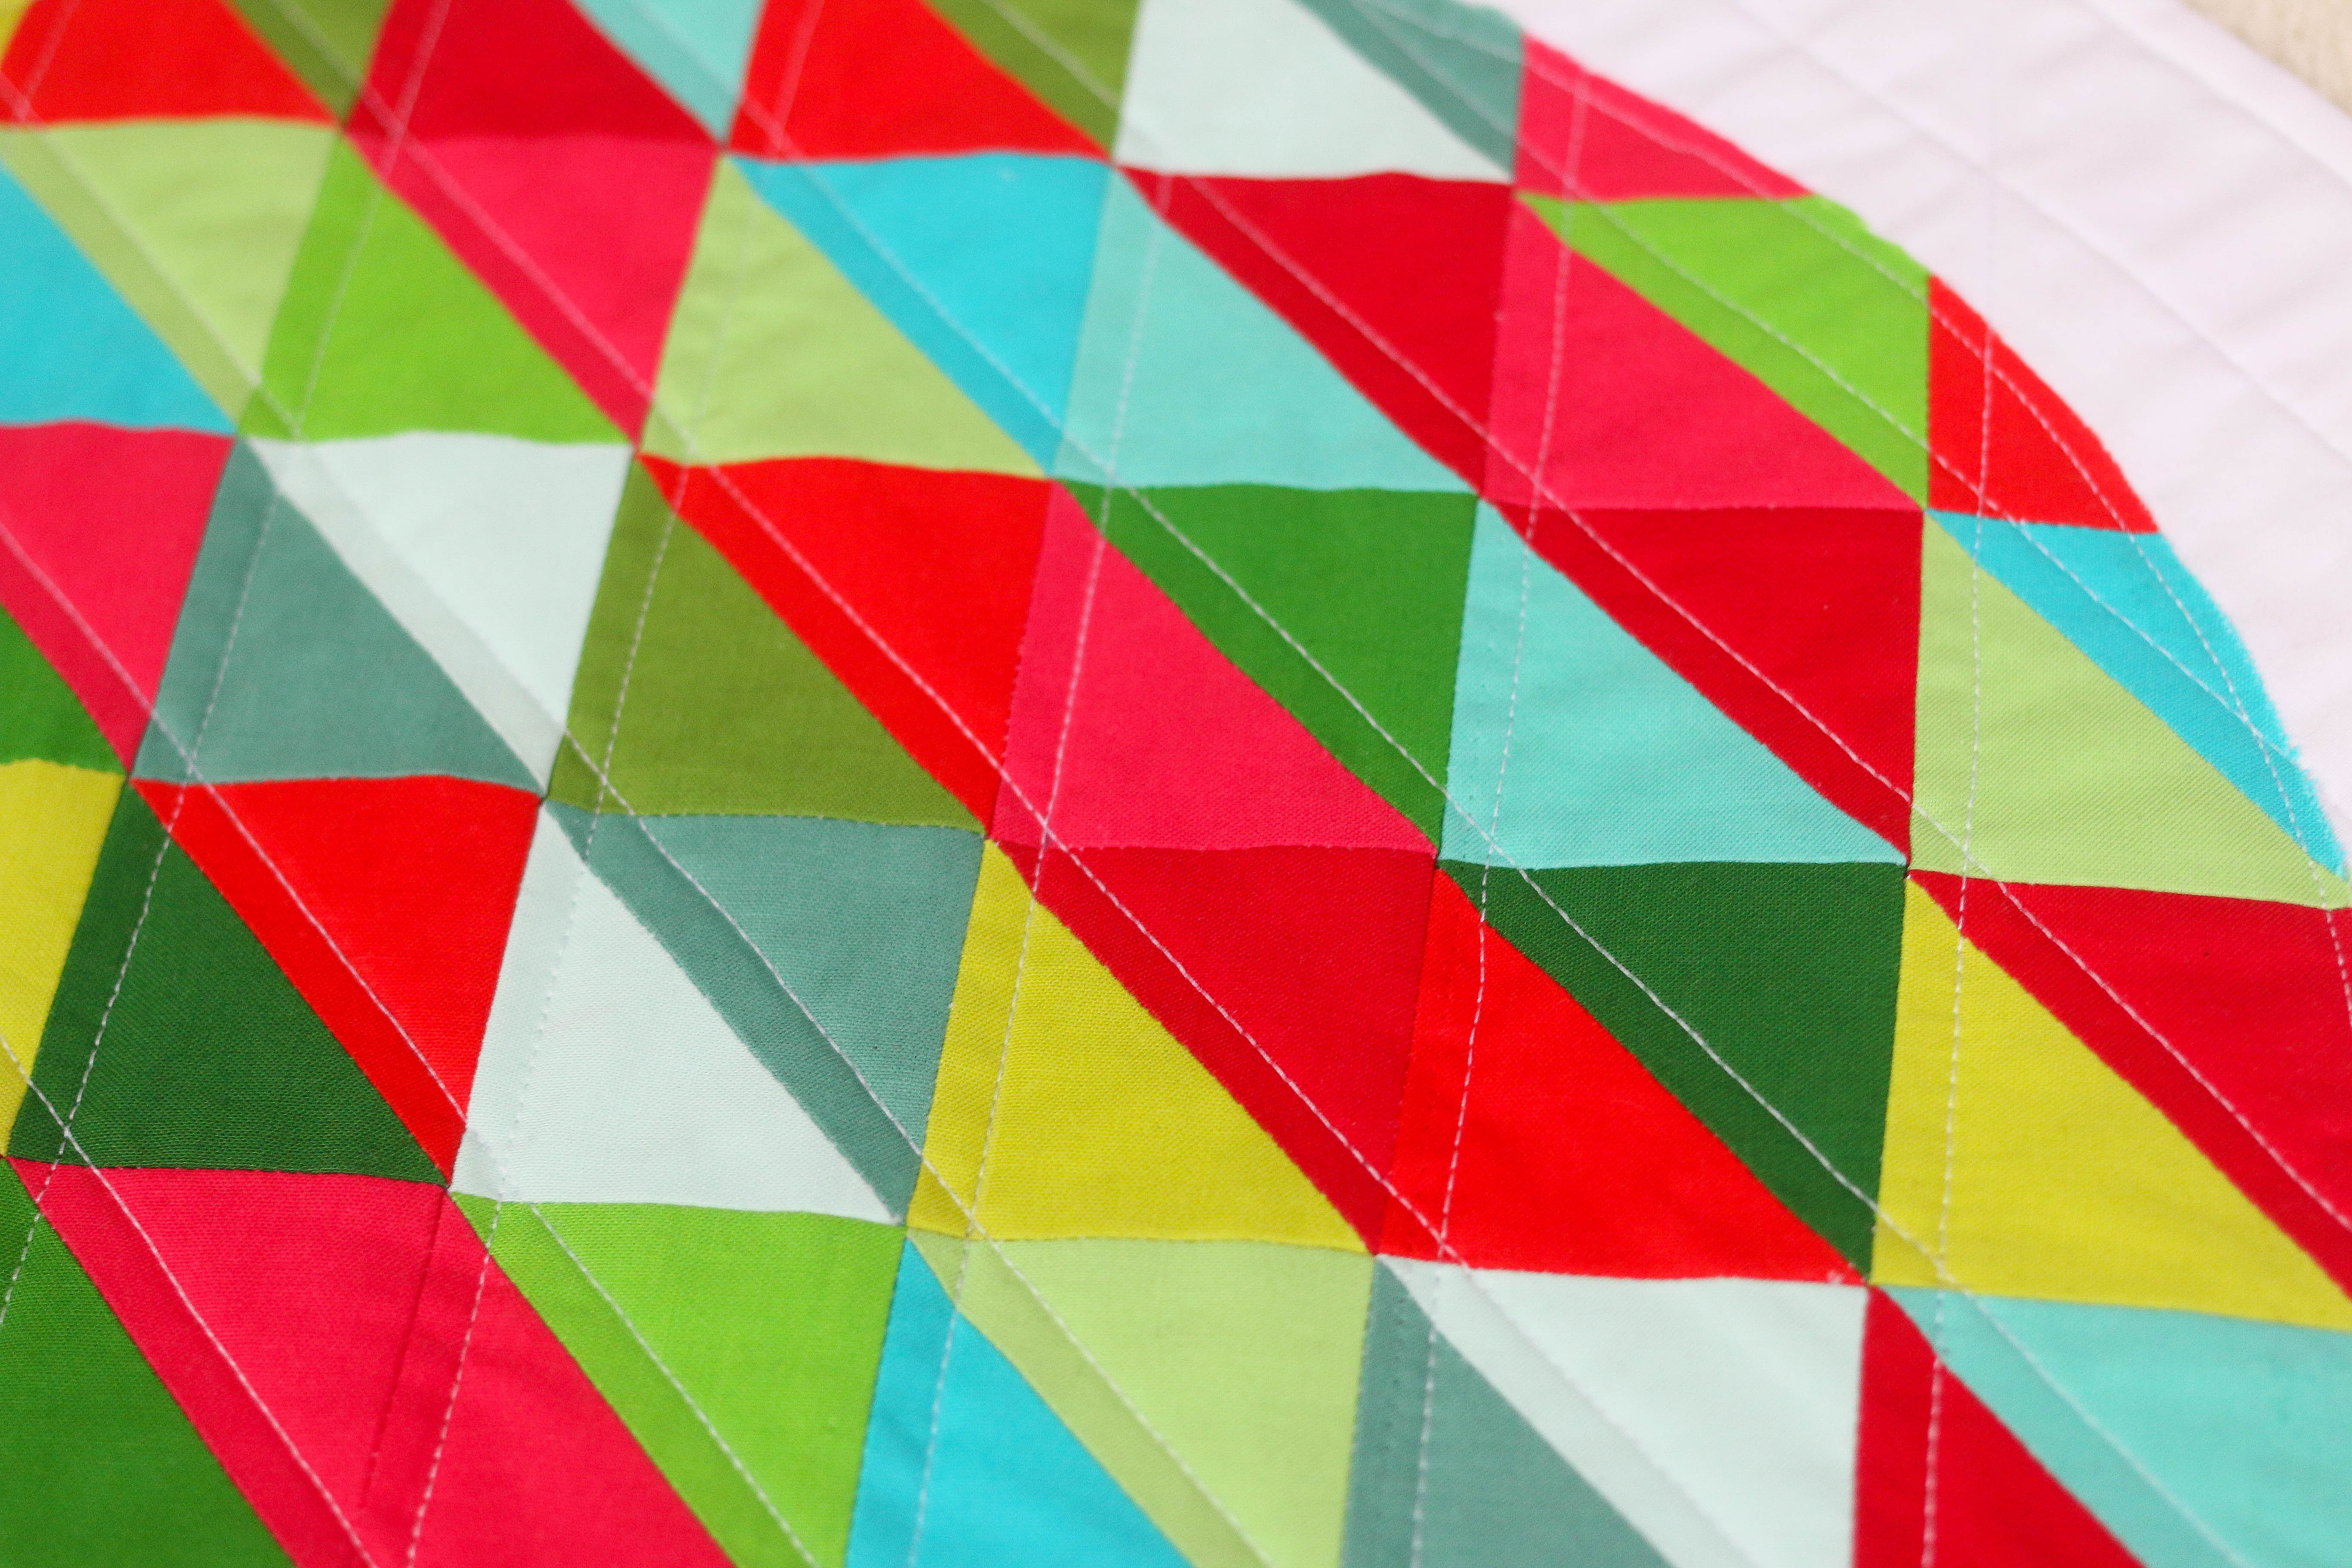
Now for the best part! Lay out the HSTs, 8 across by 8 down. There are tons of options for your layout here—you can lay out the HSTs with all the seams going in the same direction, like I did, or in zig-zagging directions, diamonds, etc. With a little advance planning, you could even make an ornament with zig-zag strips or some other cool pattern.
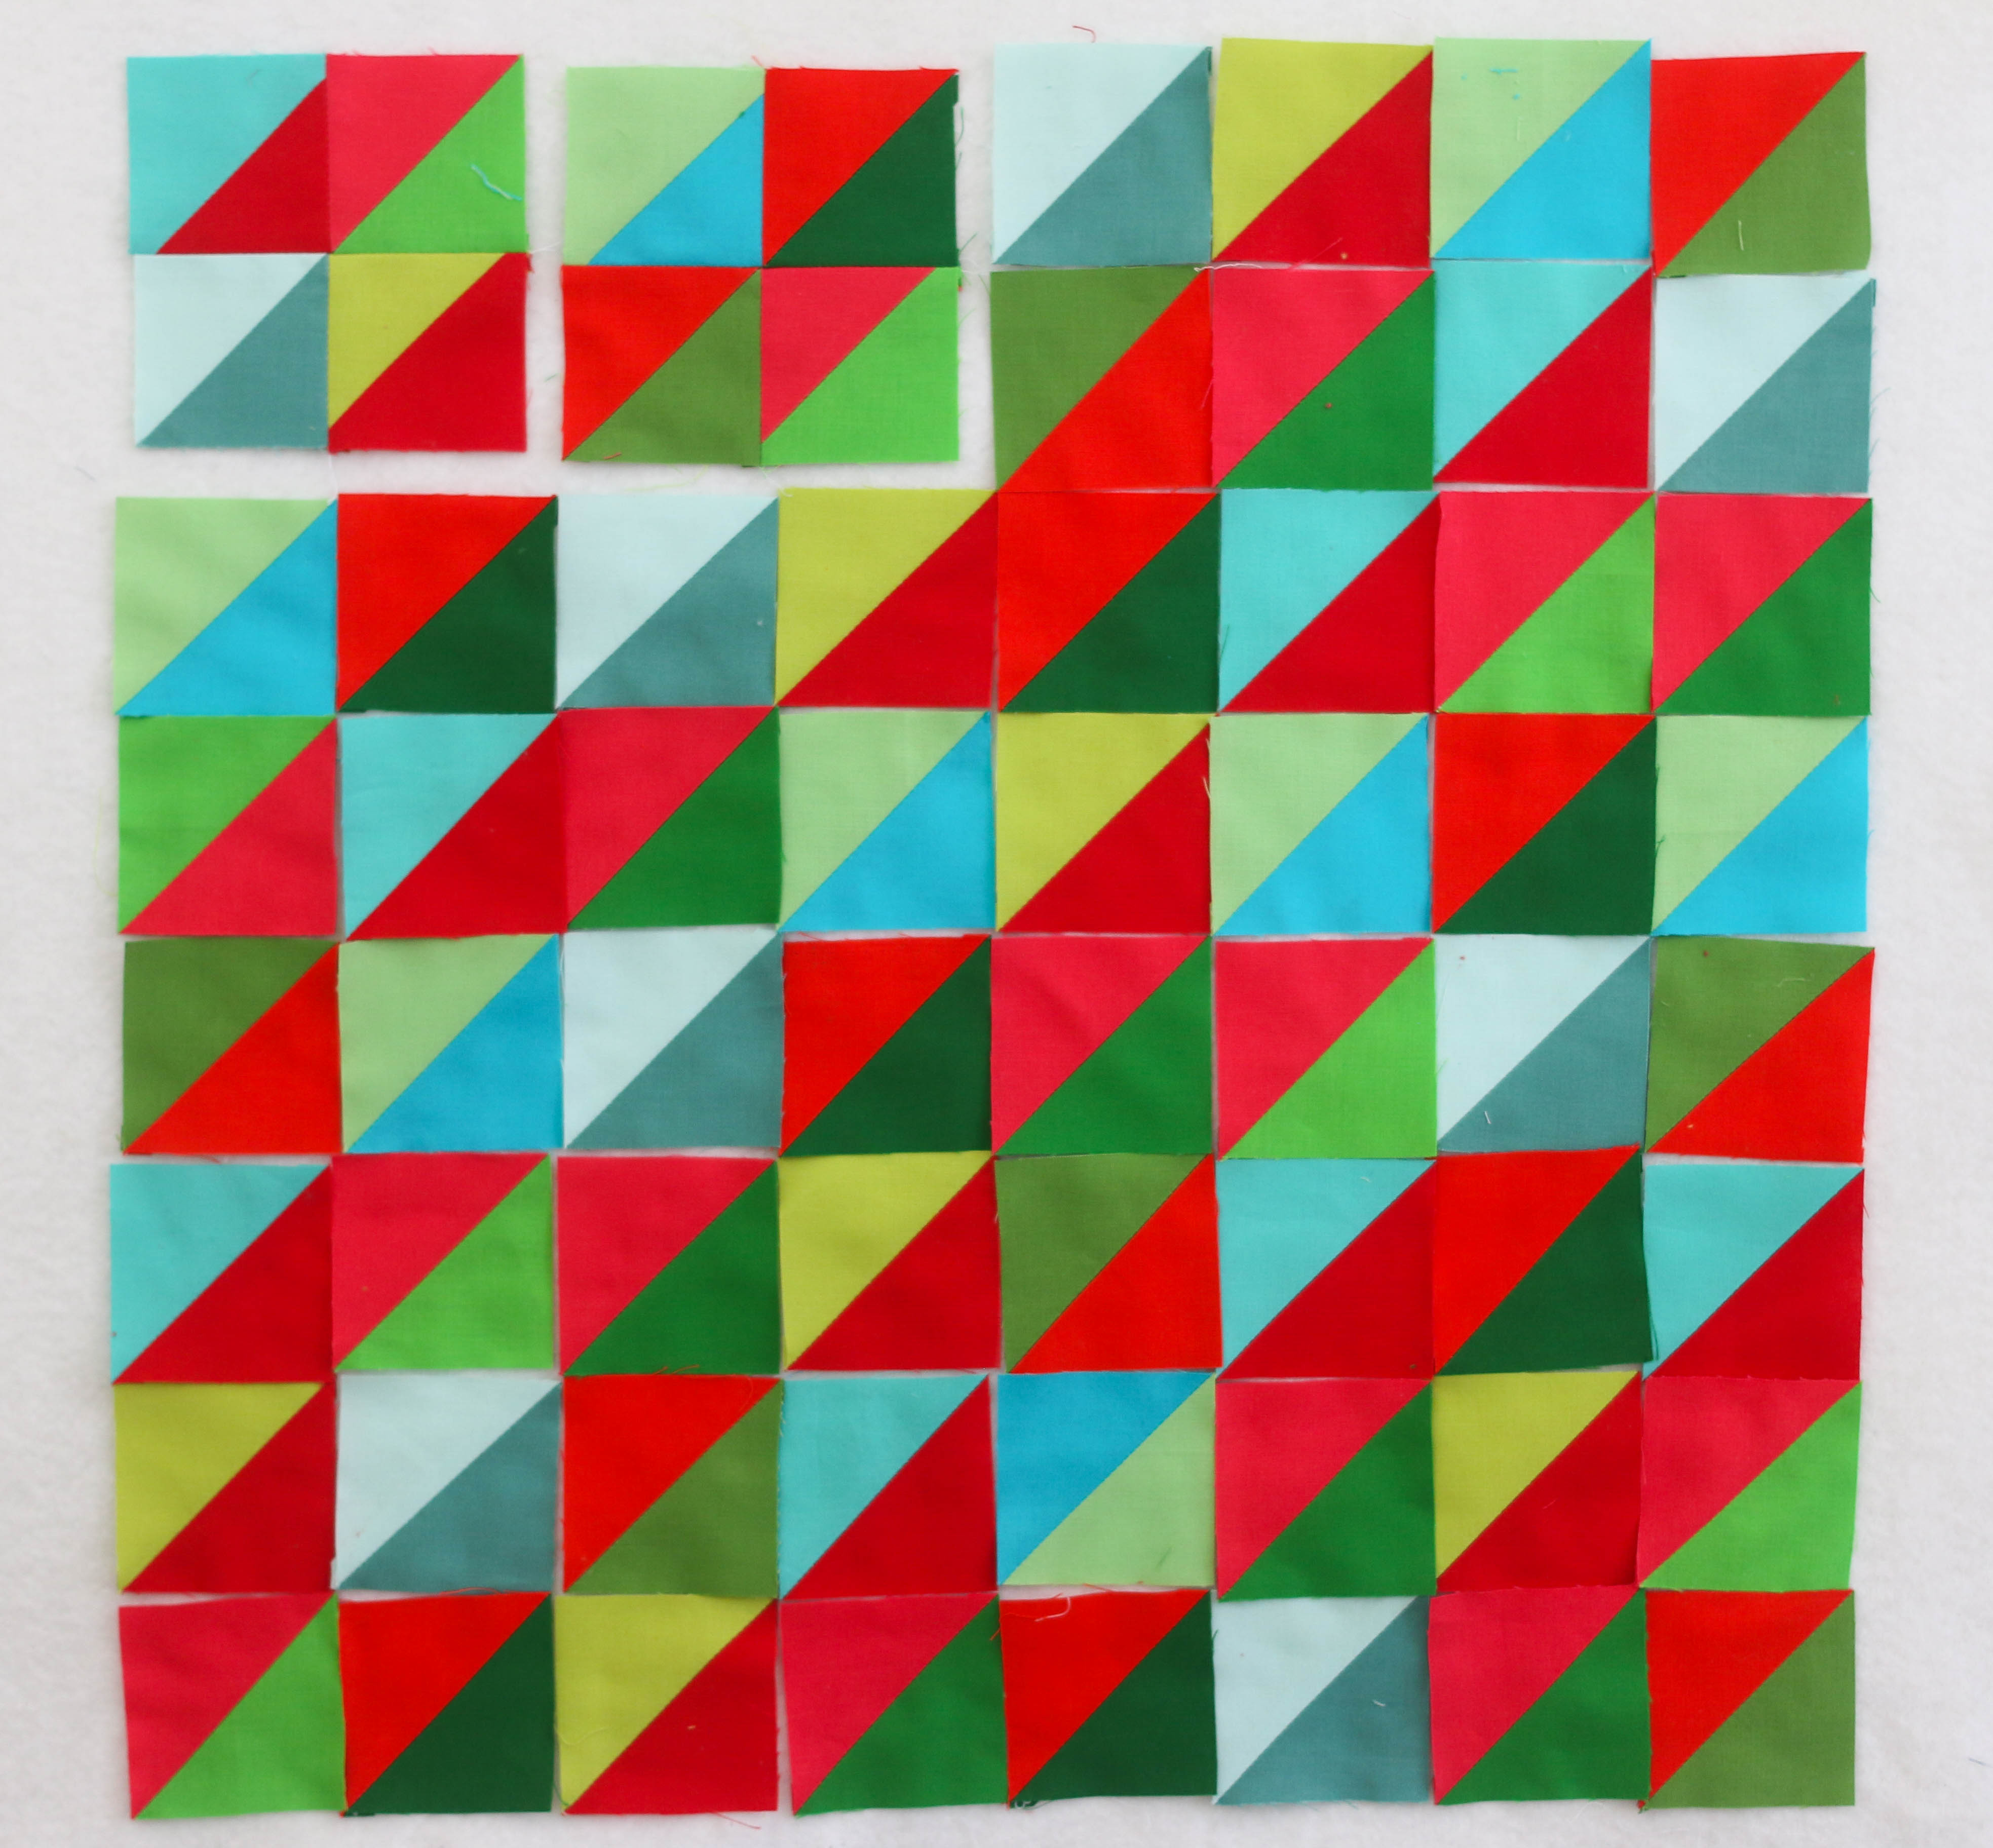
With your layout complete, sew the HSTs together into groups of four, as I’ve started doing in this photo. I like to press all my seams open, but if you prefer side-pressed seams, just make sure to alternate the direction of the seams for each group of four.
Sew together the blocks of four into one large 16-1/2″ block.

Here’s where things might get a little scary. You’re going to draw a large circle on your 16″ block and cut out the circle. To trace my circle, I used this 16″ round drink-serving tray. But any large plate, platter, or tray between 14″ and 16″ diameter would work.
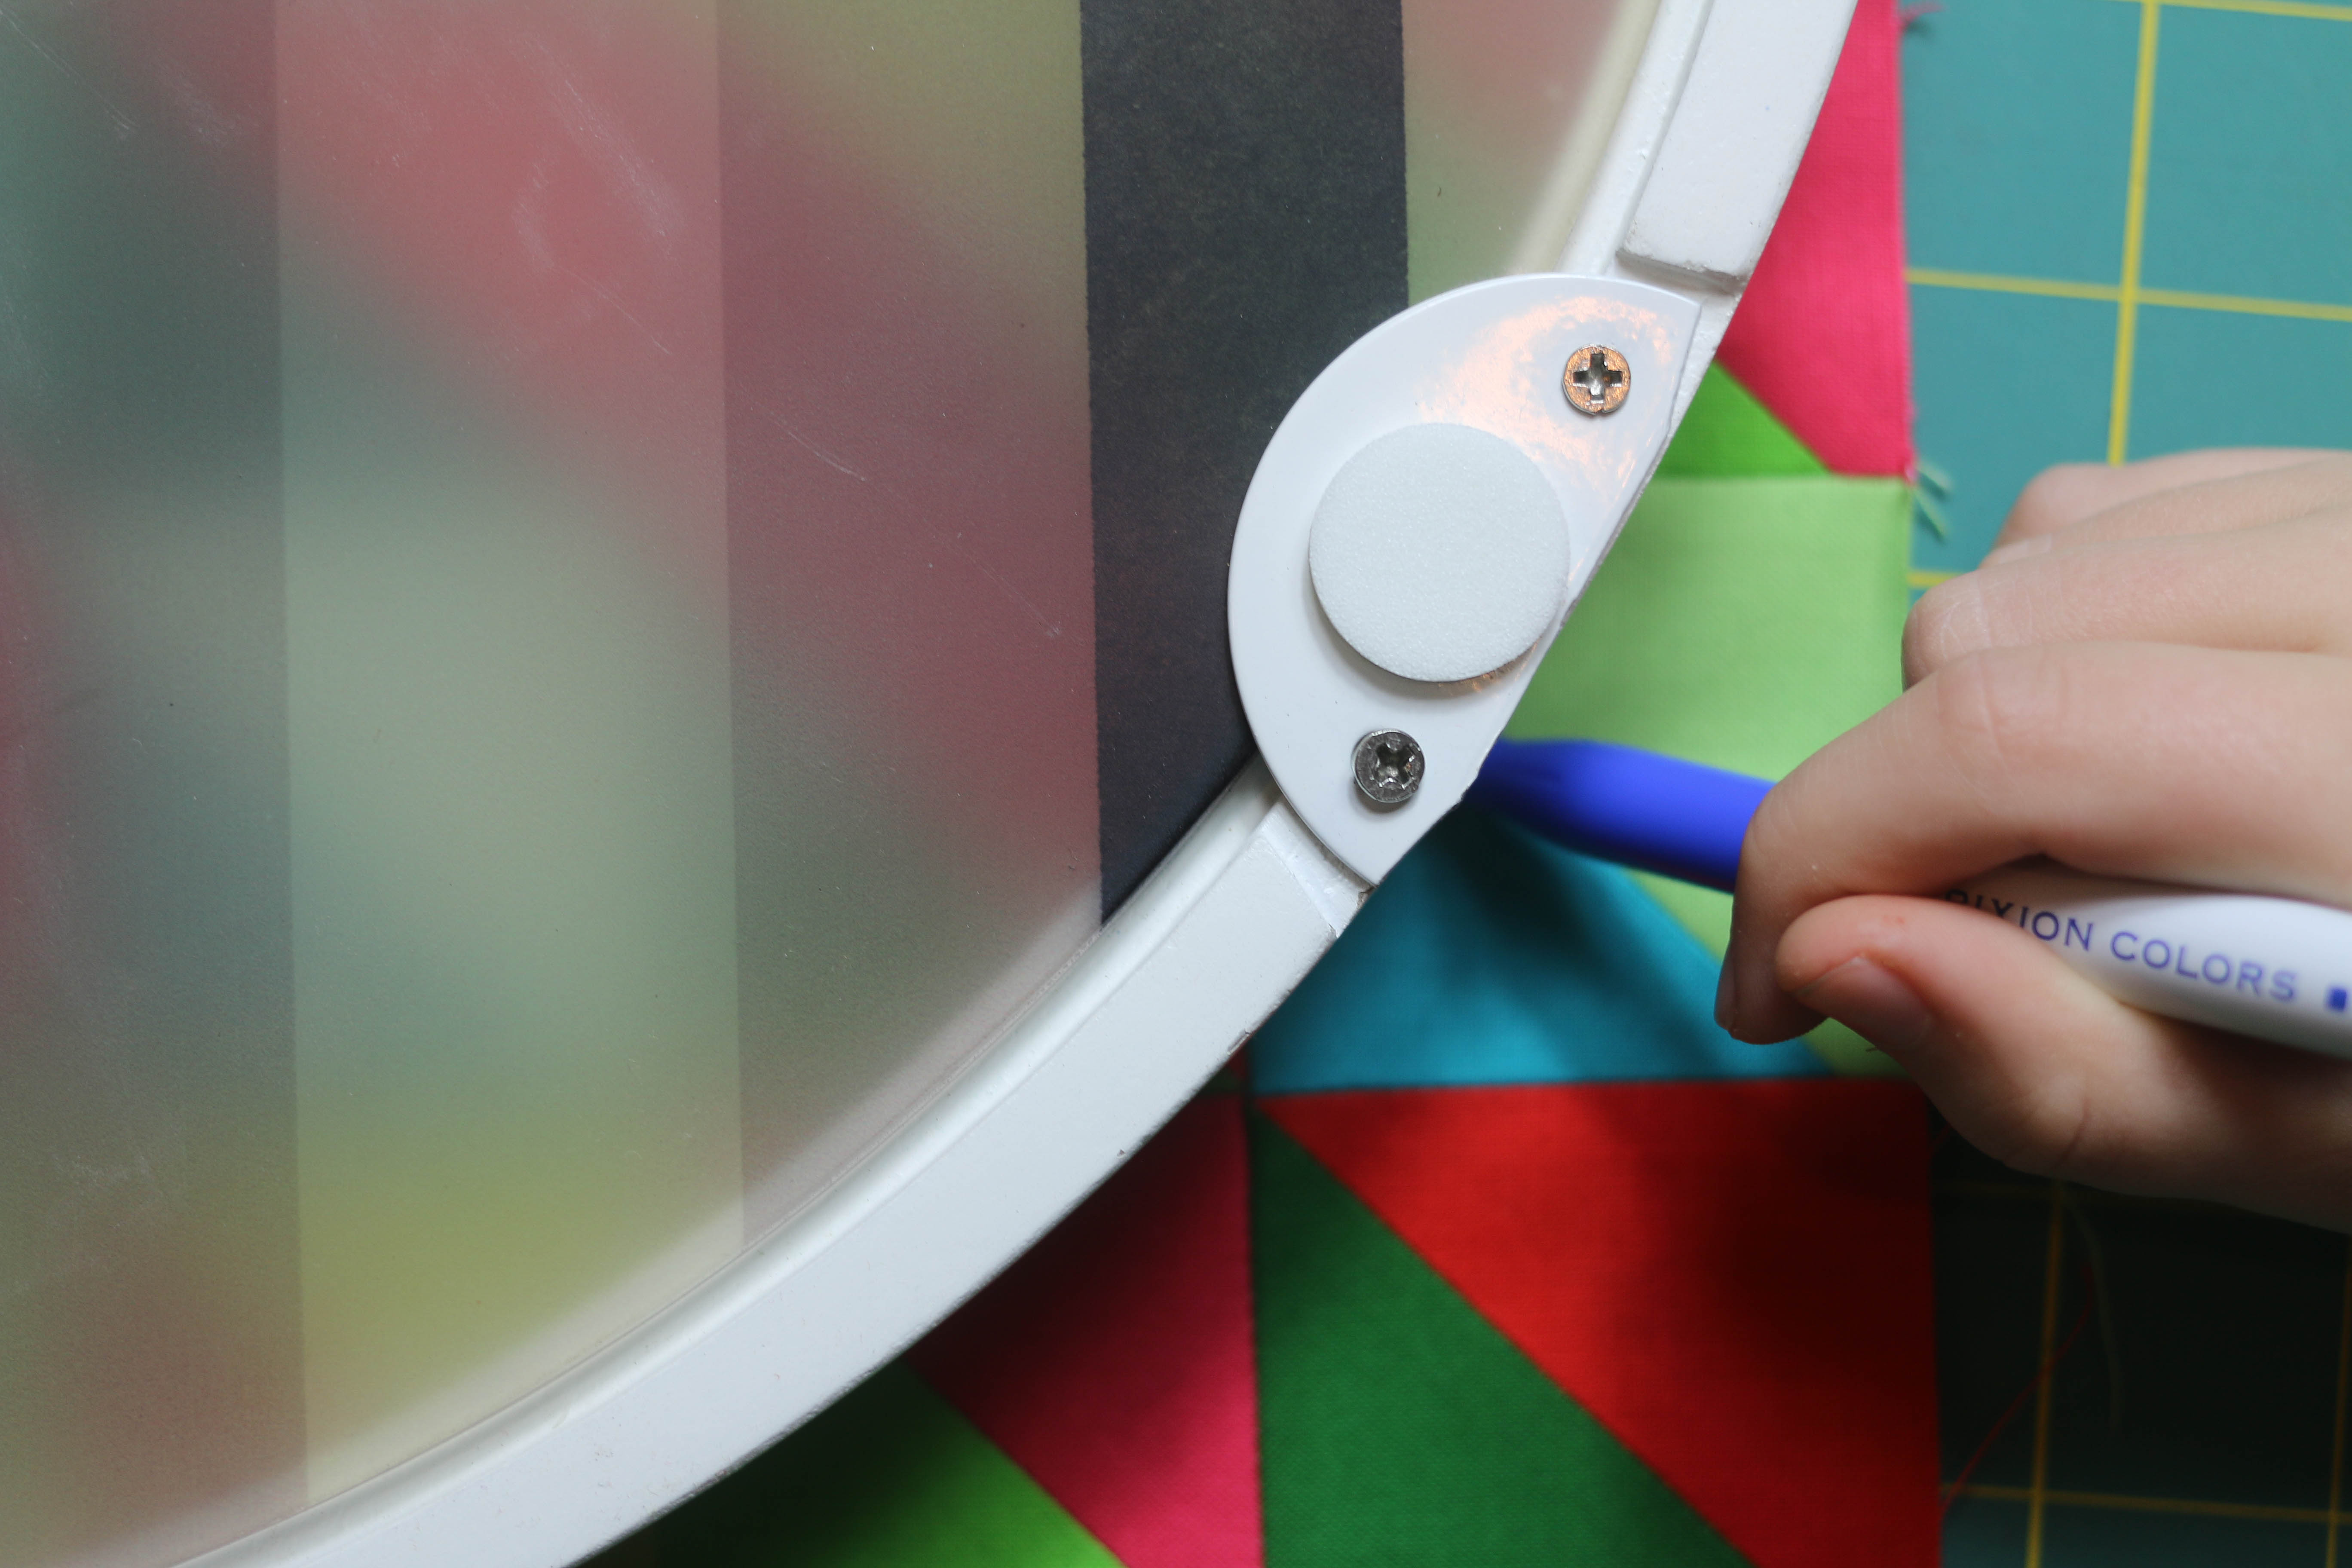
Just trace around the tray or plate to create the circle.

And cut!
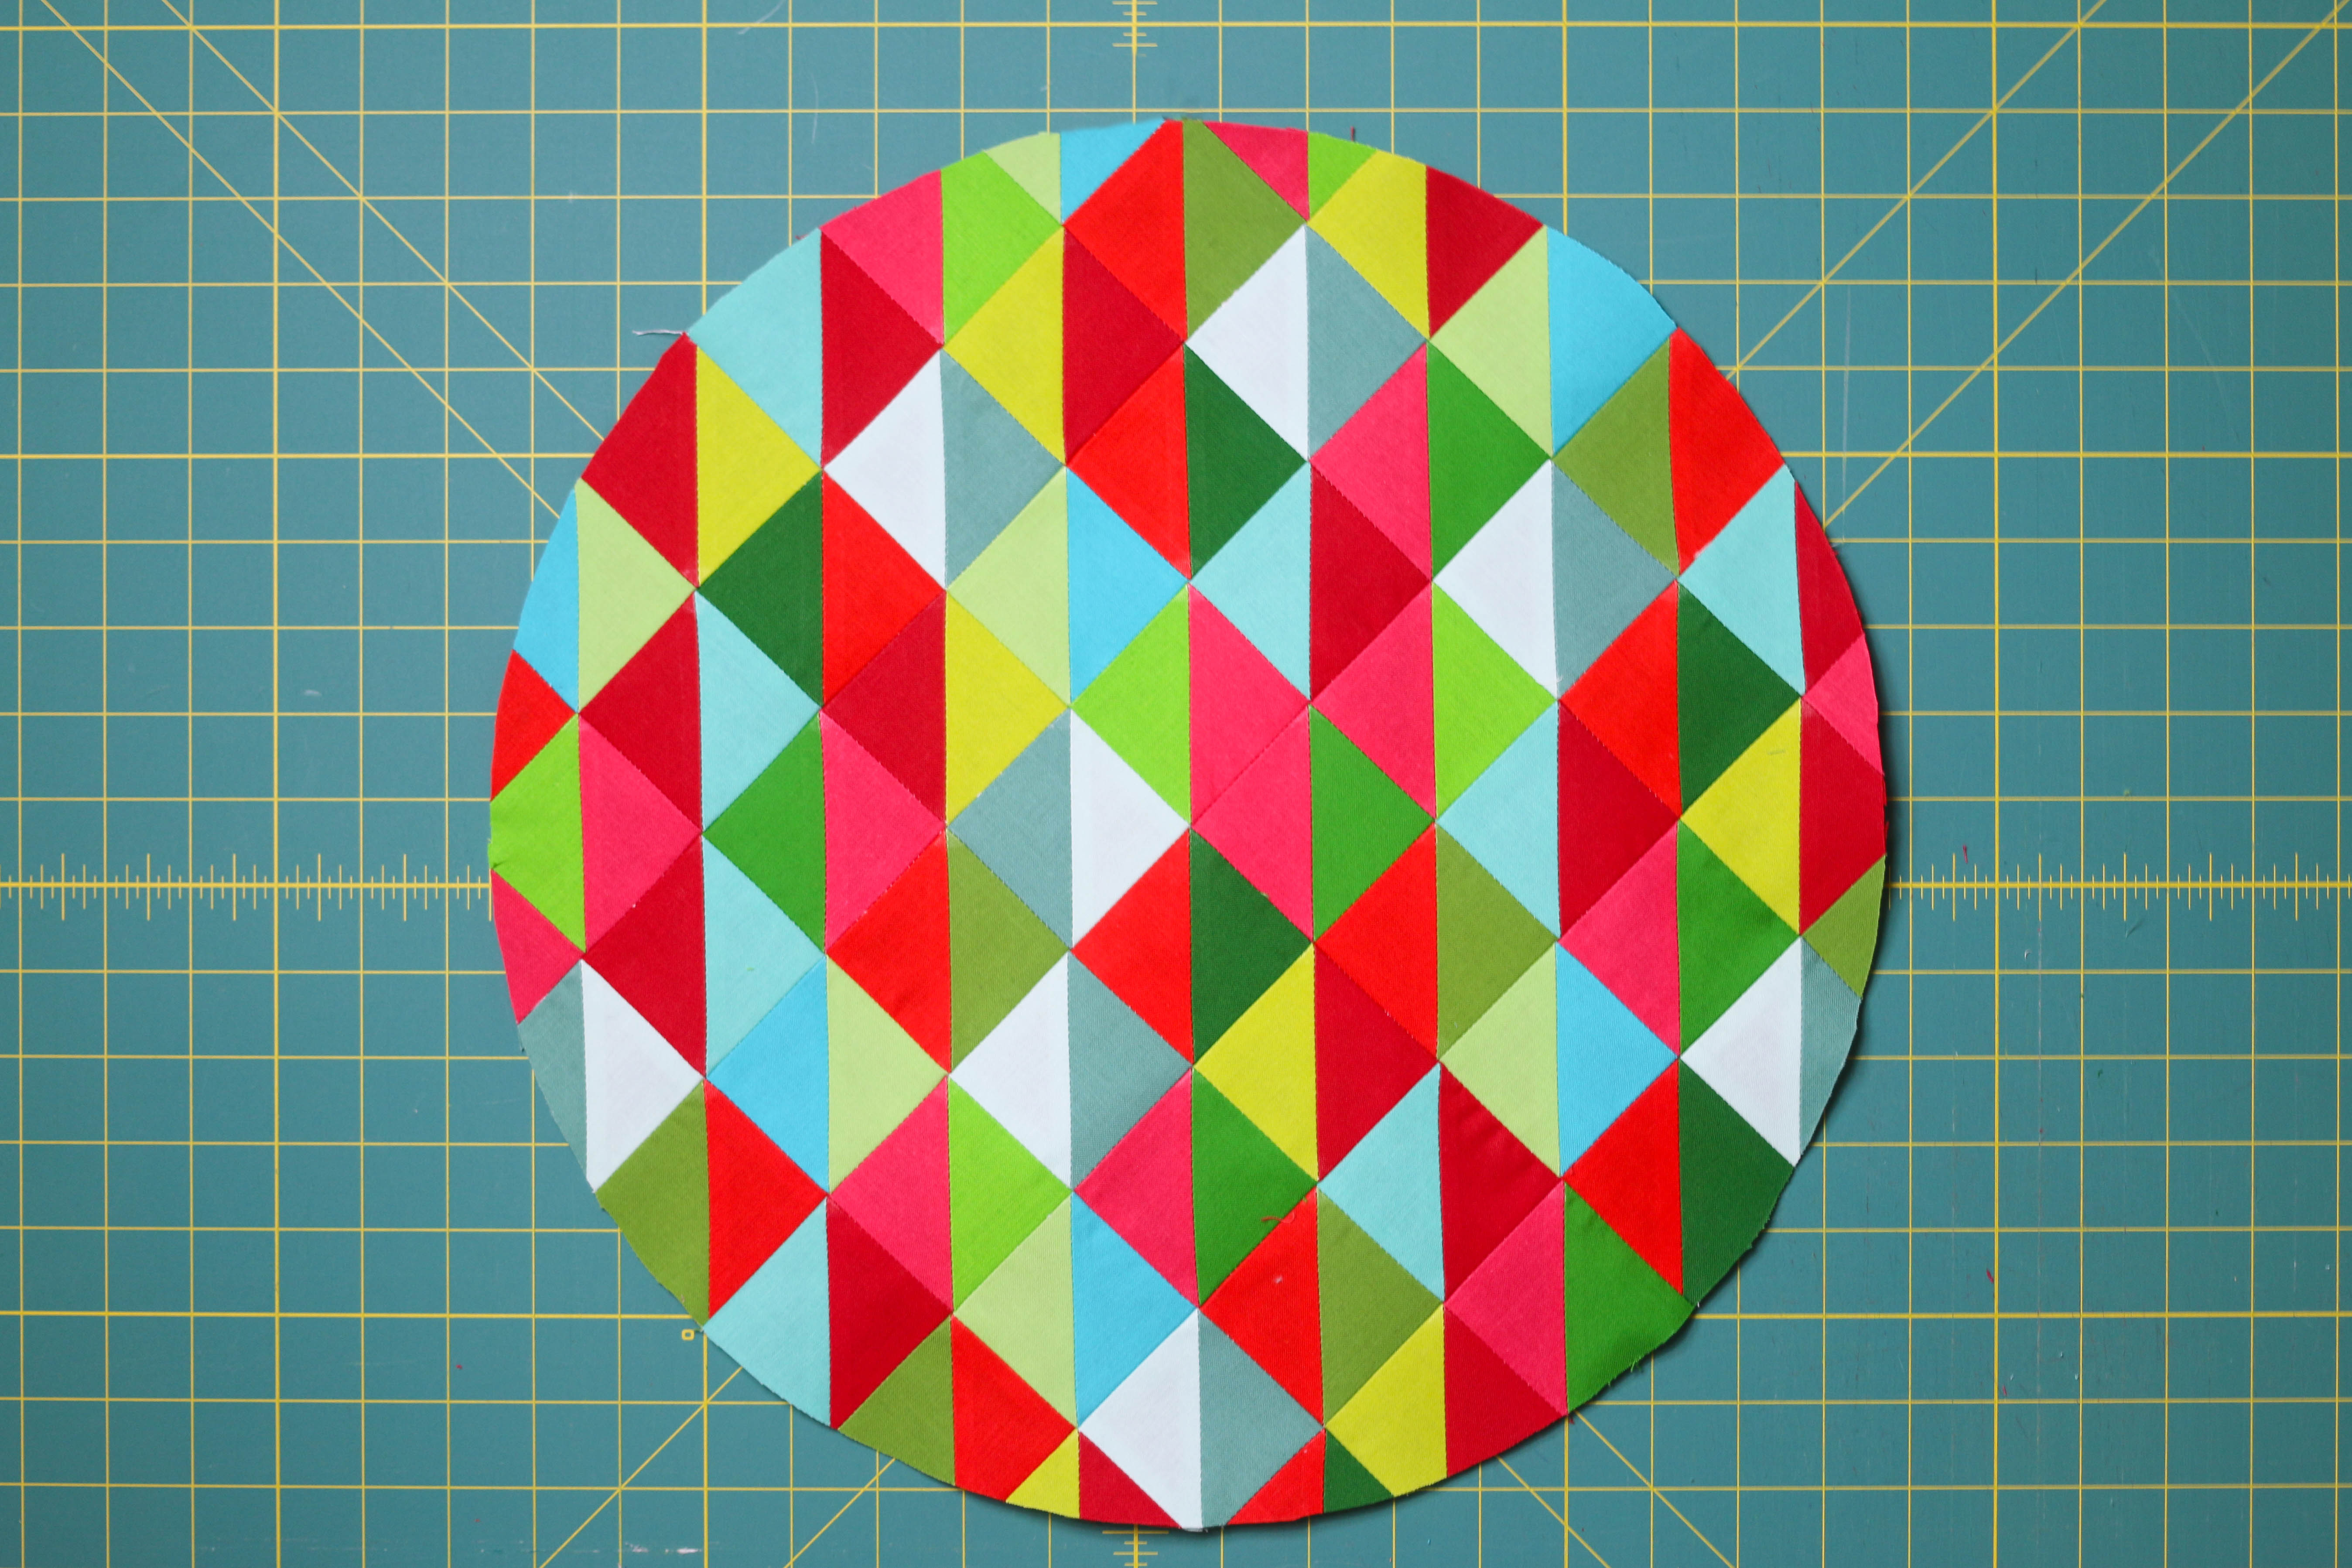
Does it look like a Christmas ornament yet?
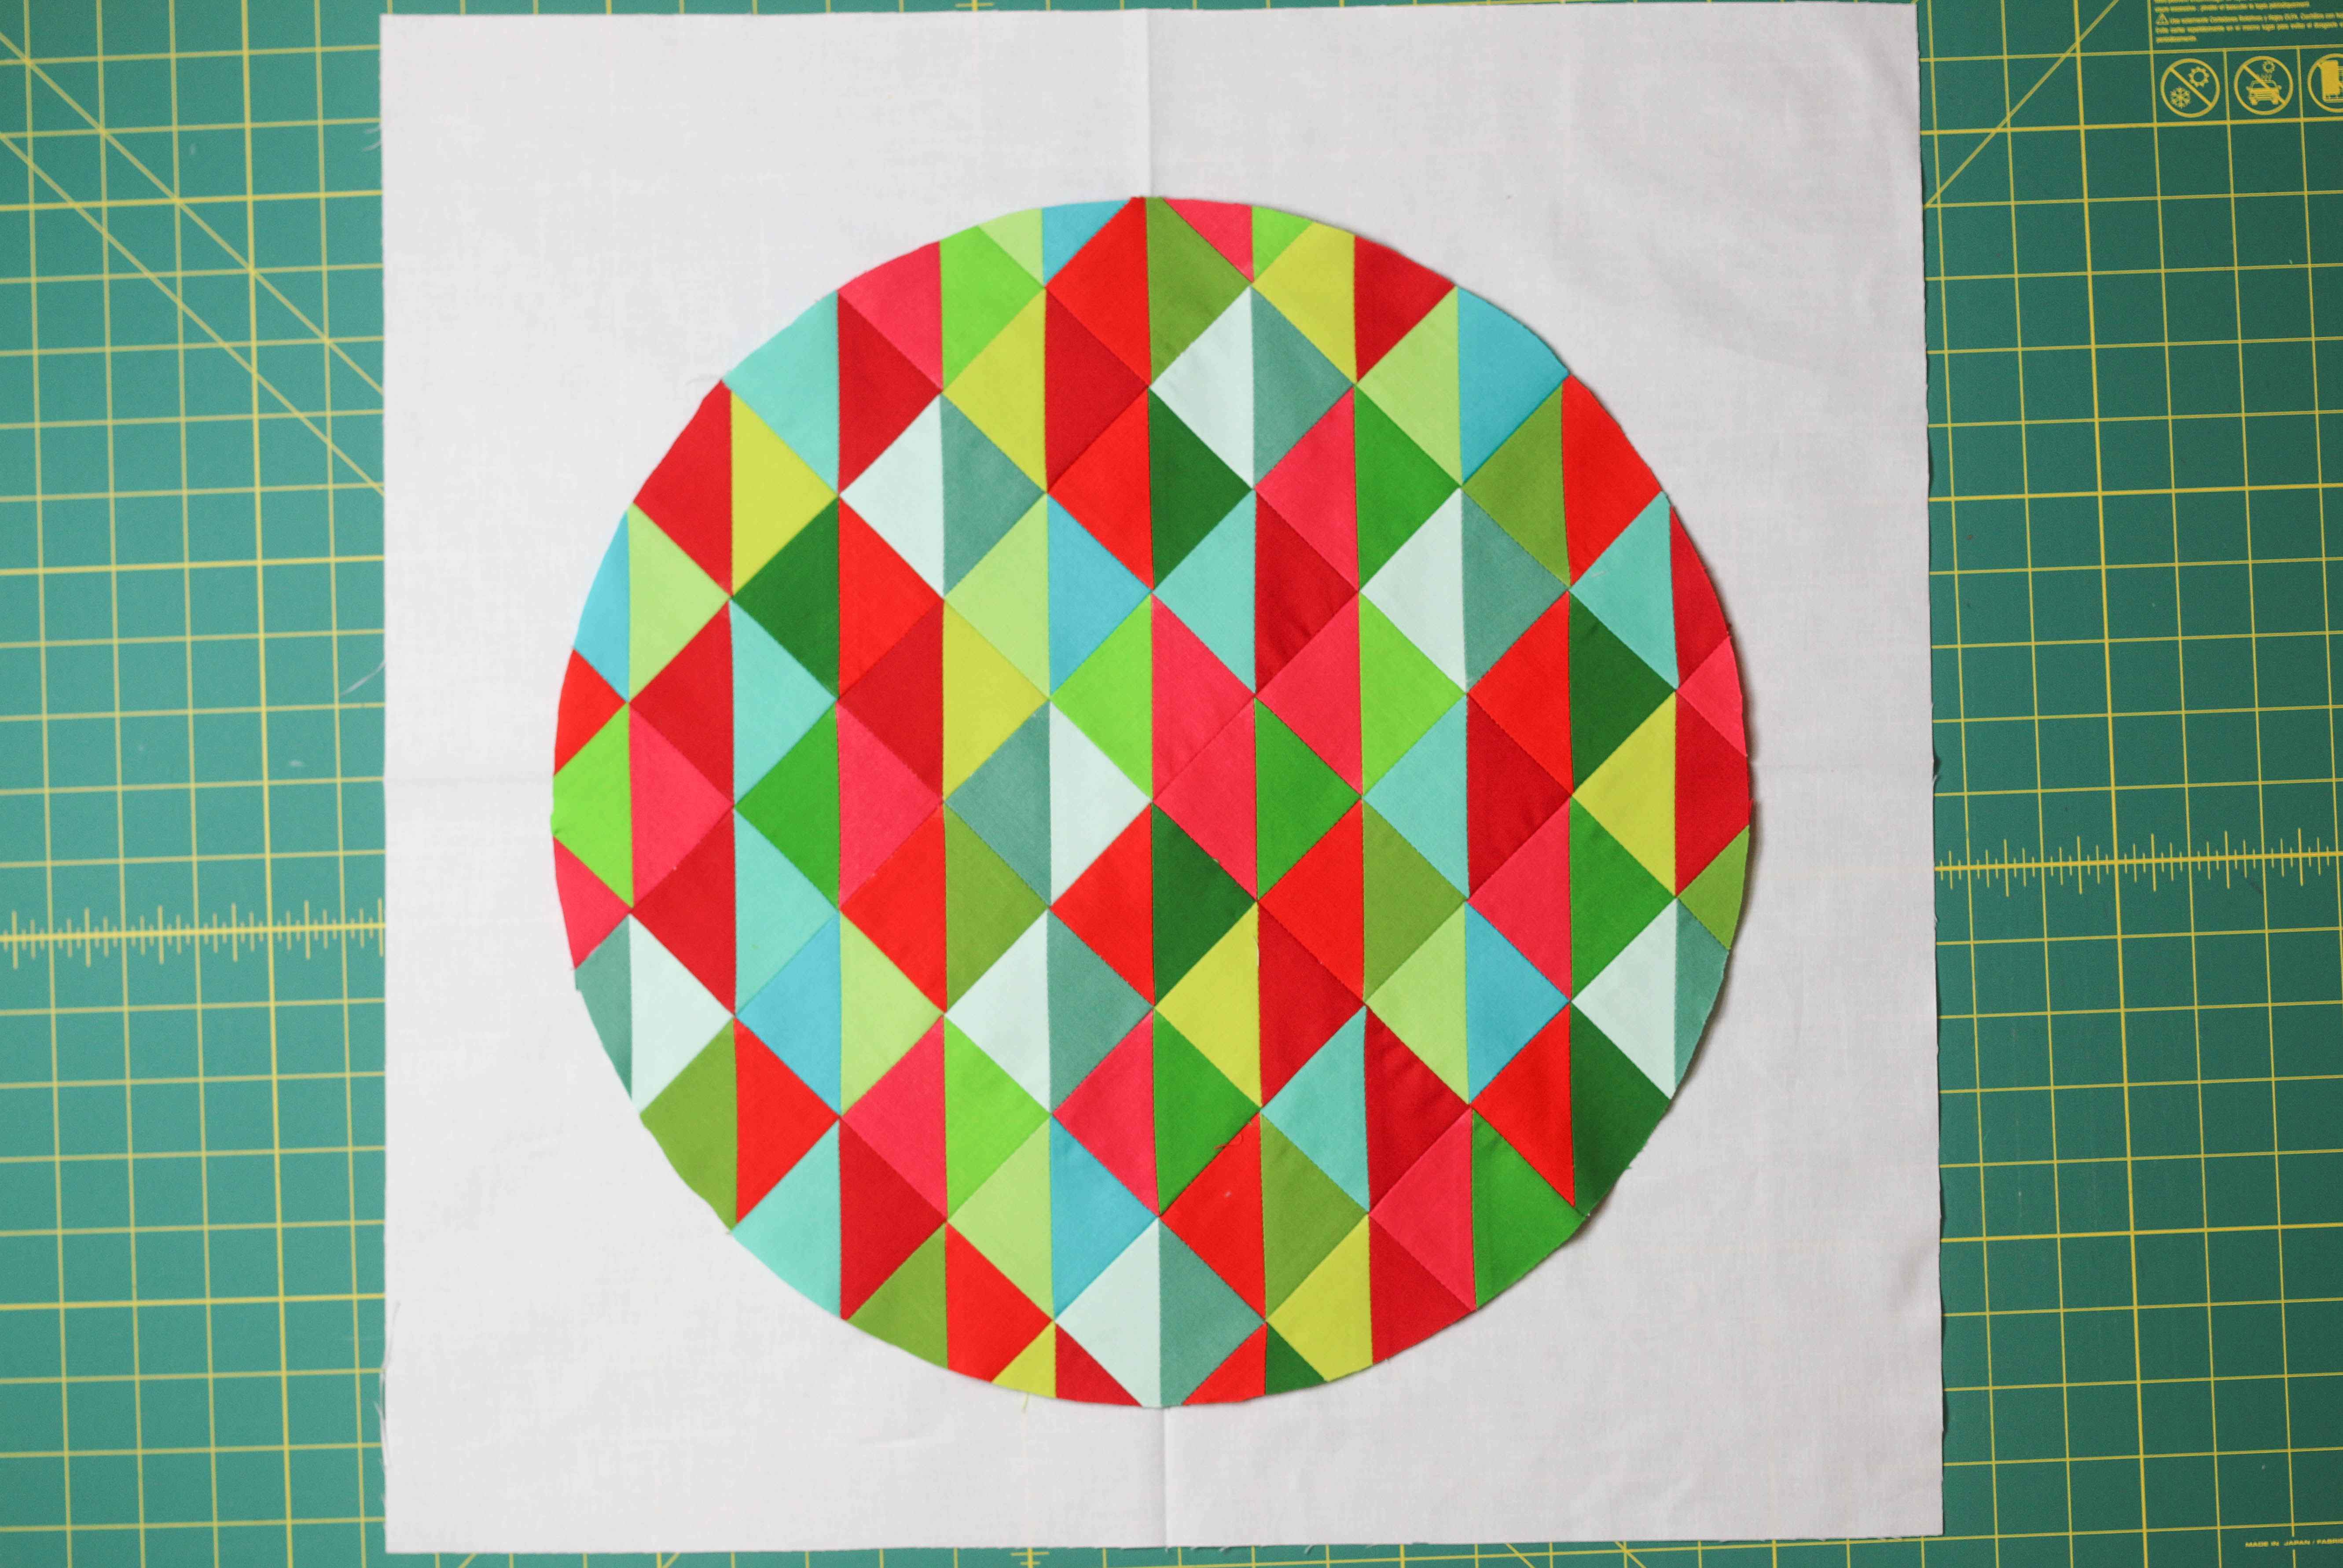
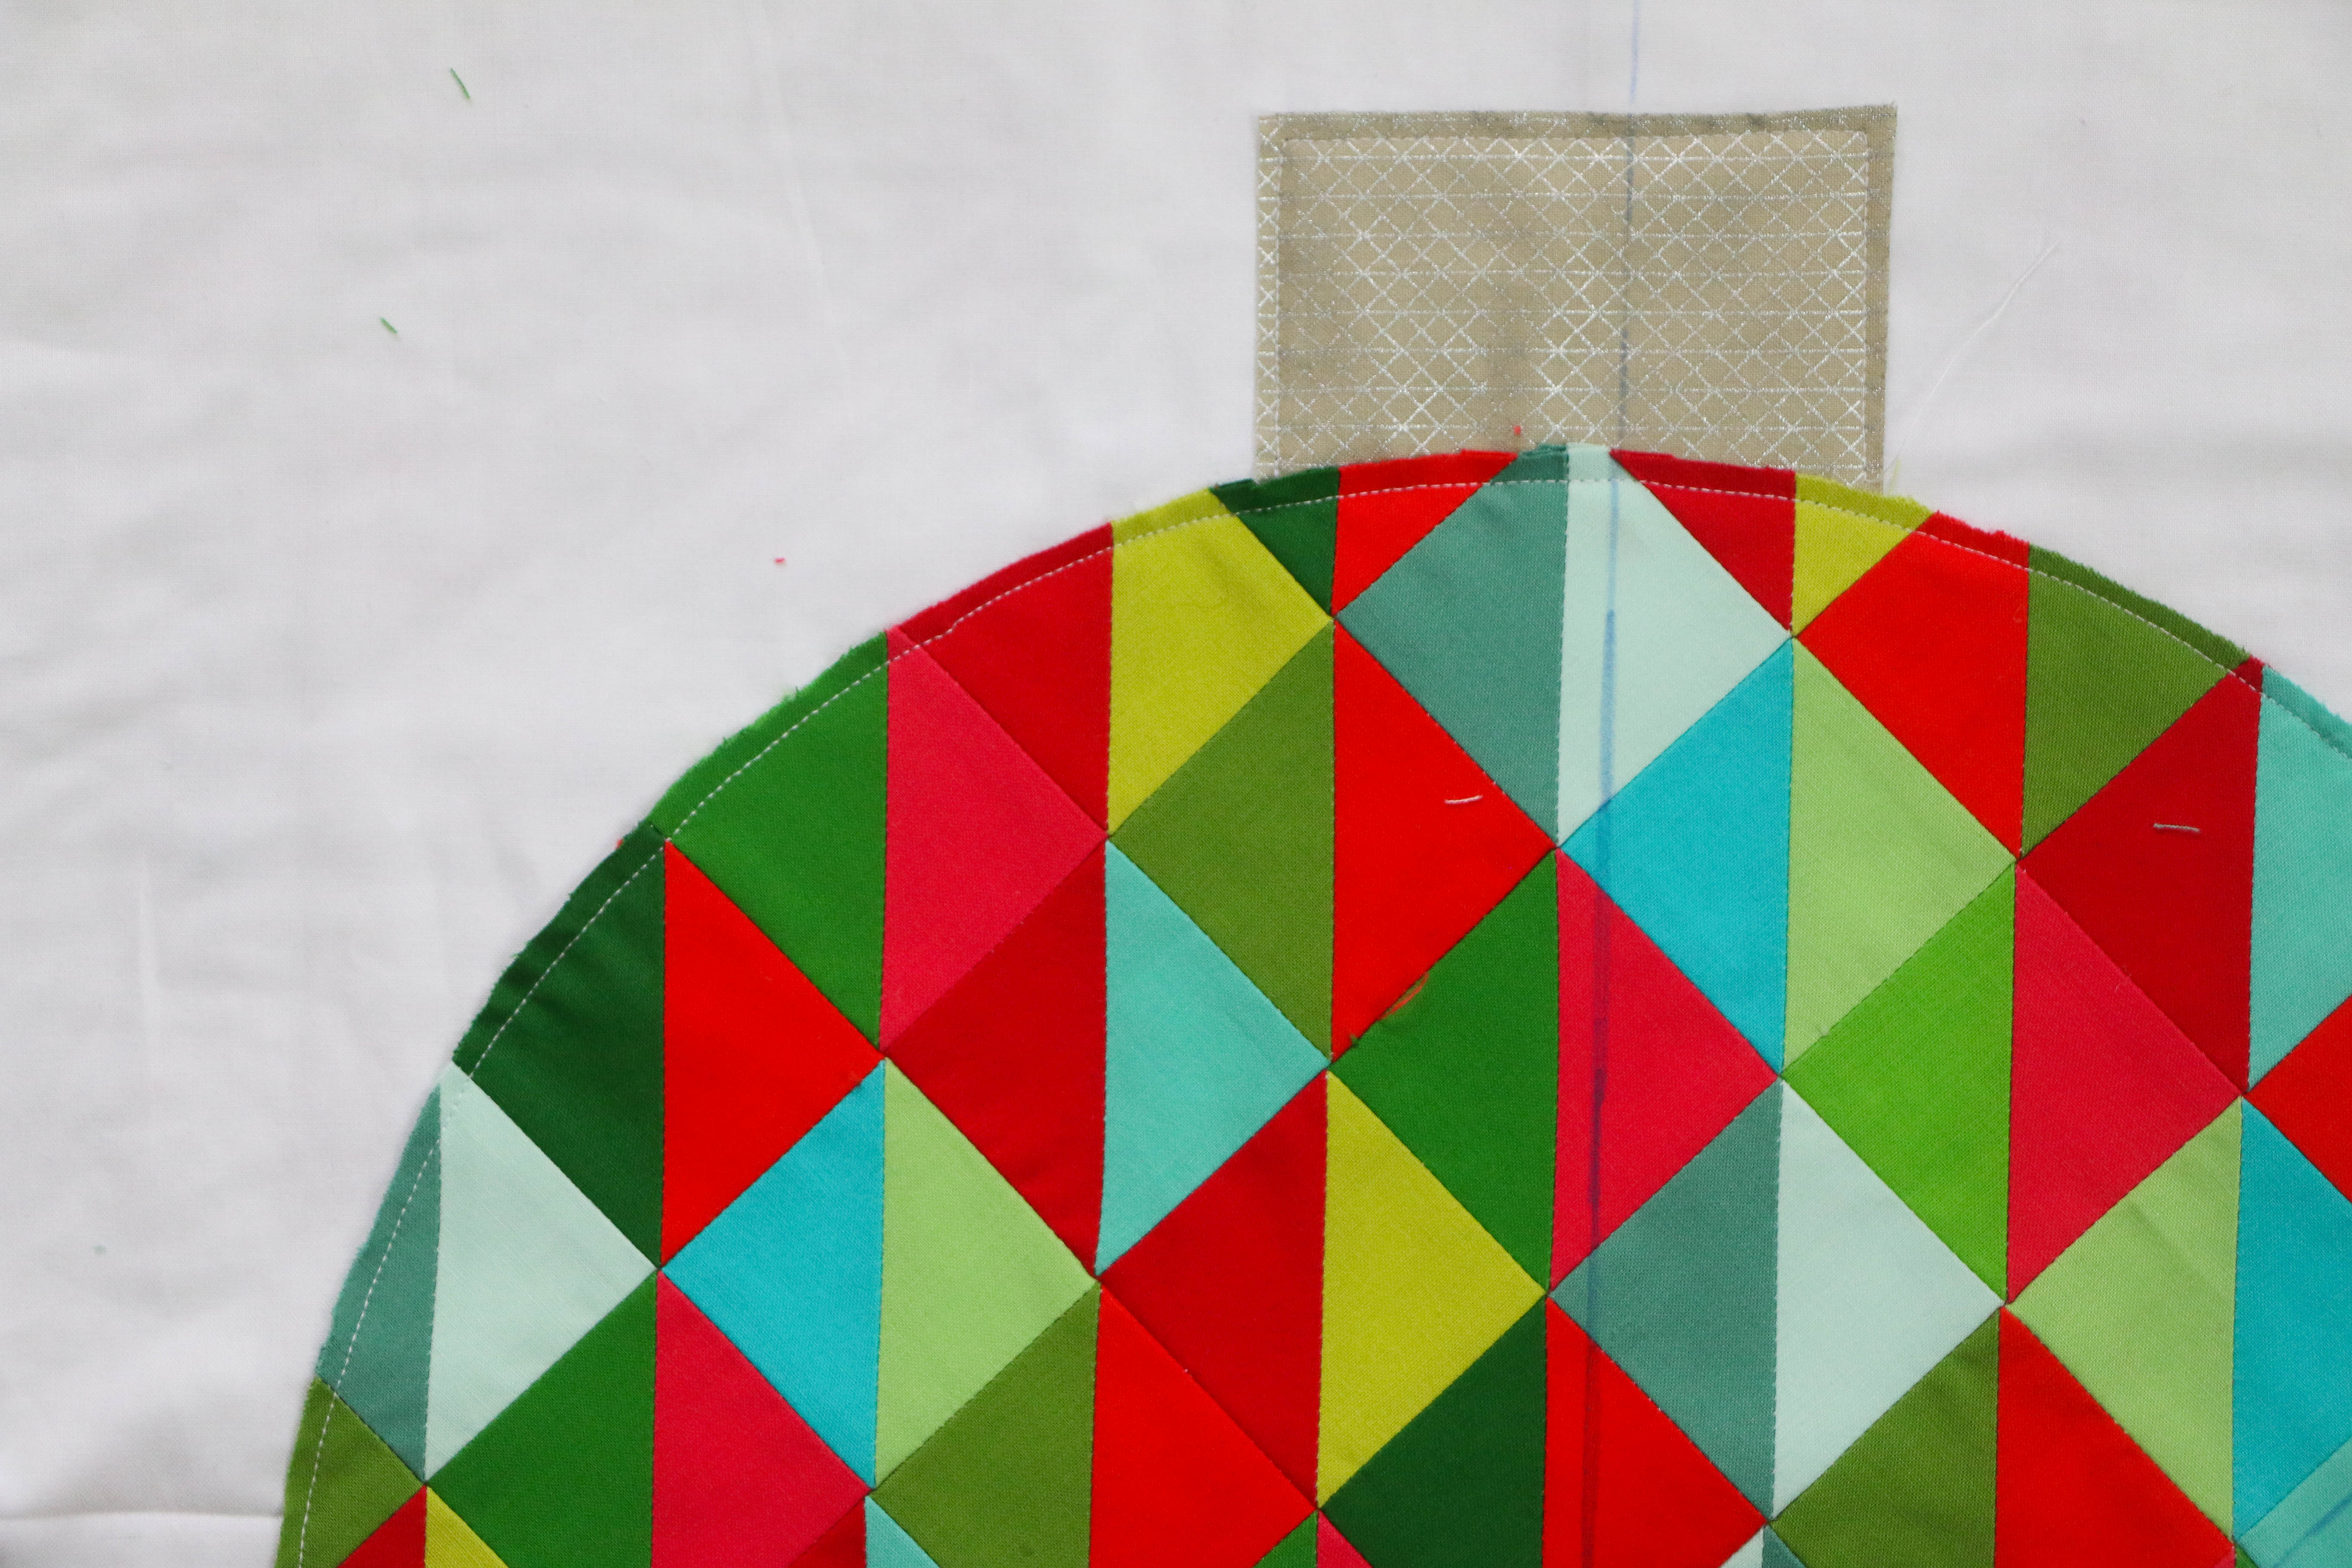
Take your 21″ square background fabric piece and press it in half in both directions to crease it. This will help you find the center when placing your ornament. Leave space at the top for the little silver cap on your ornament!
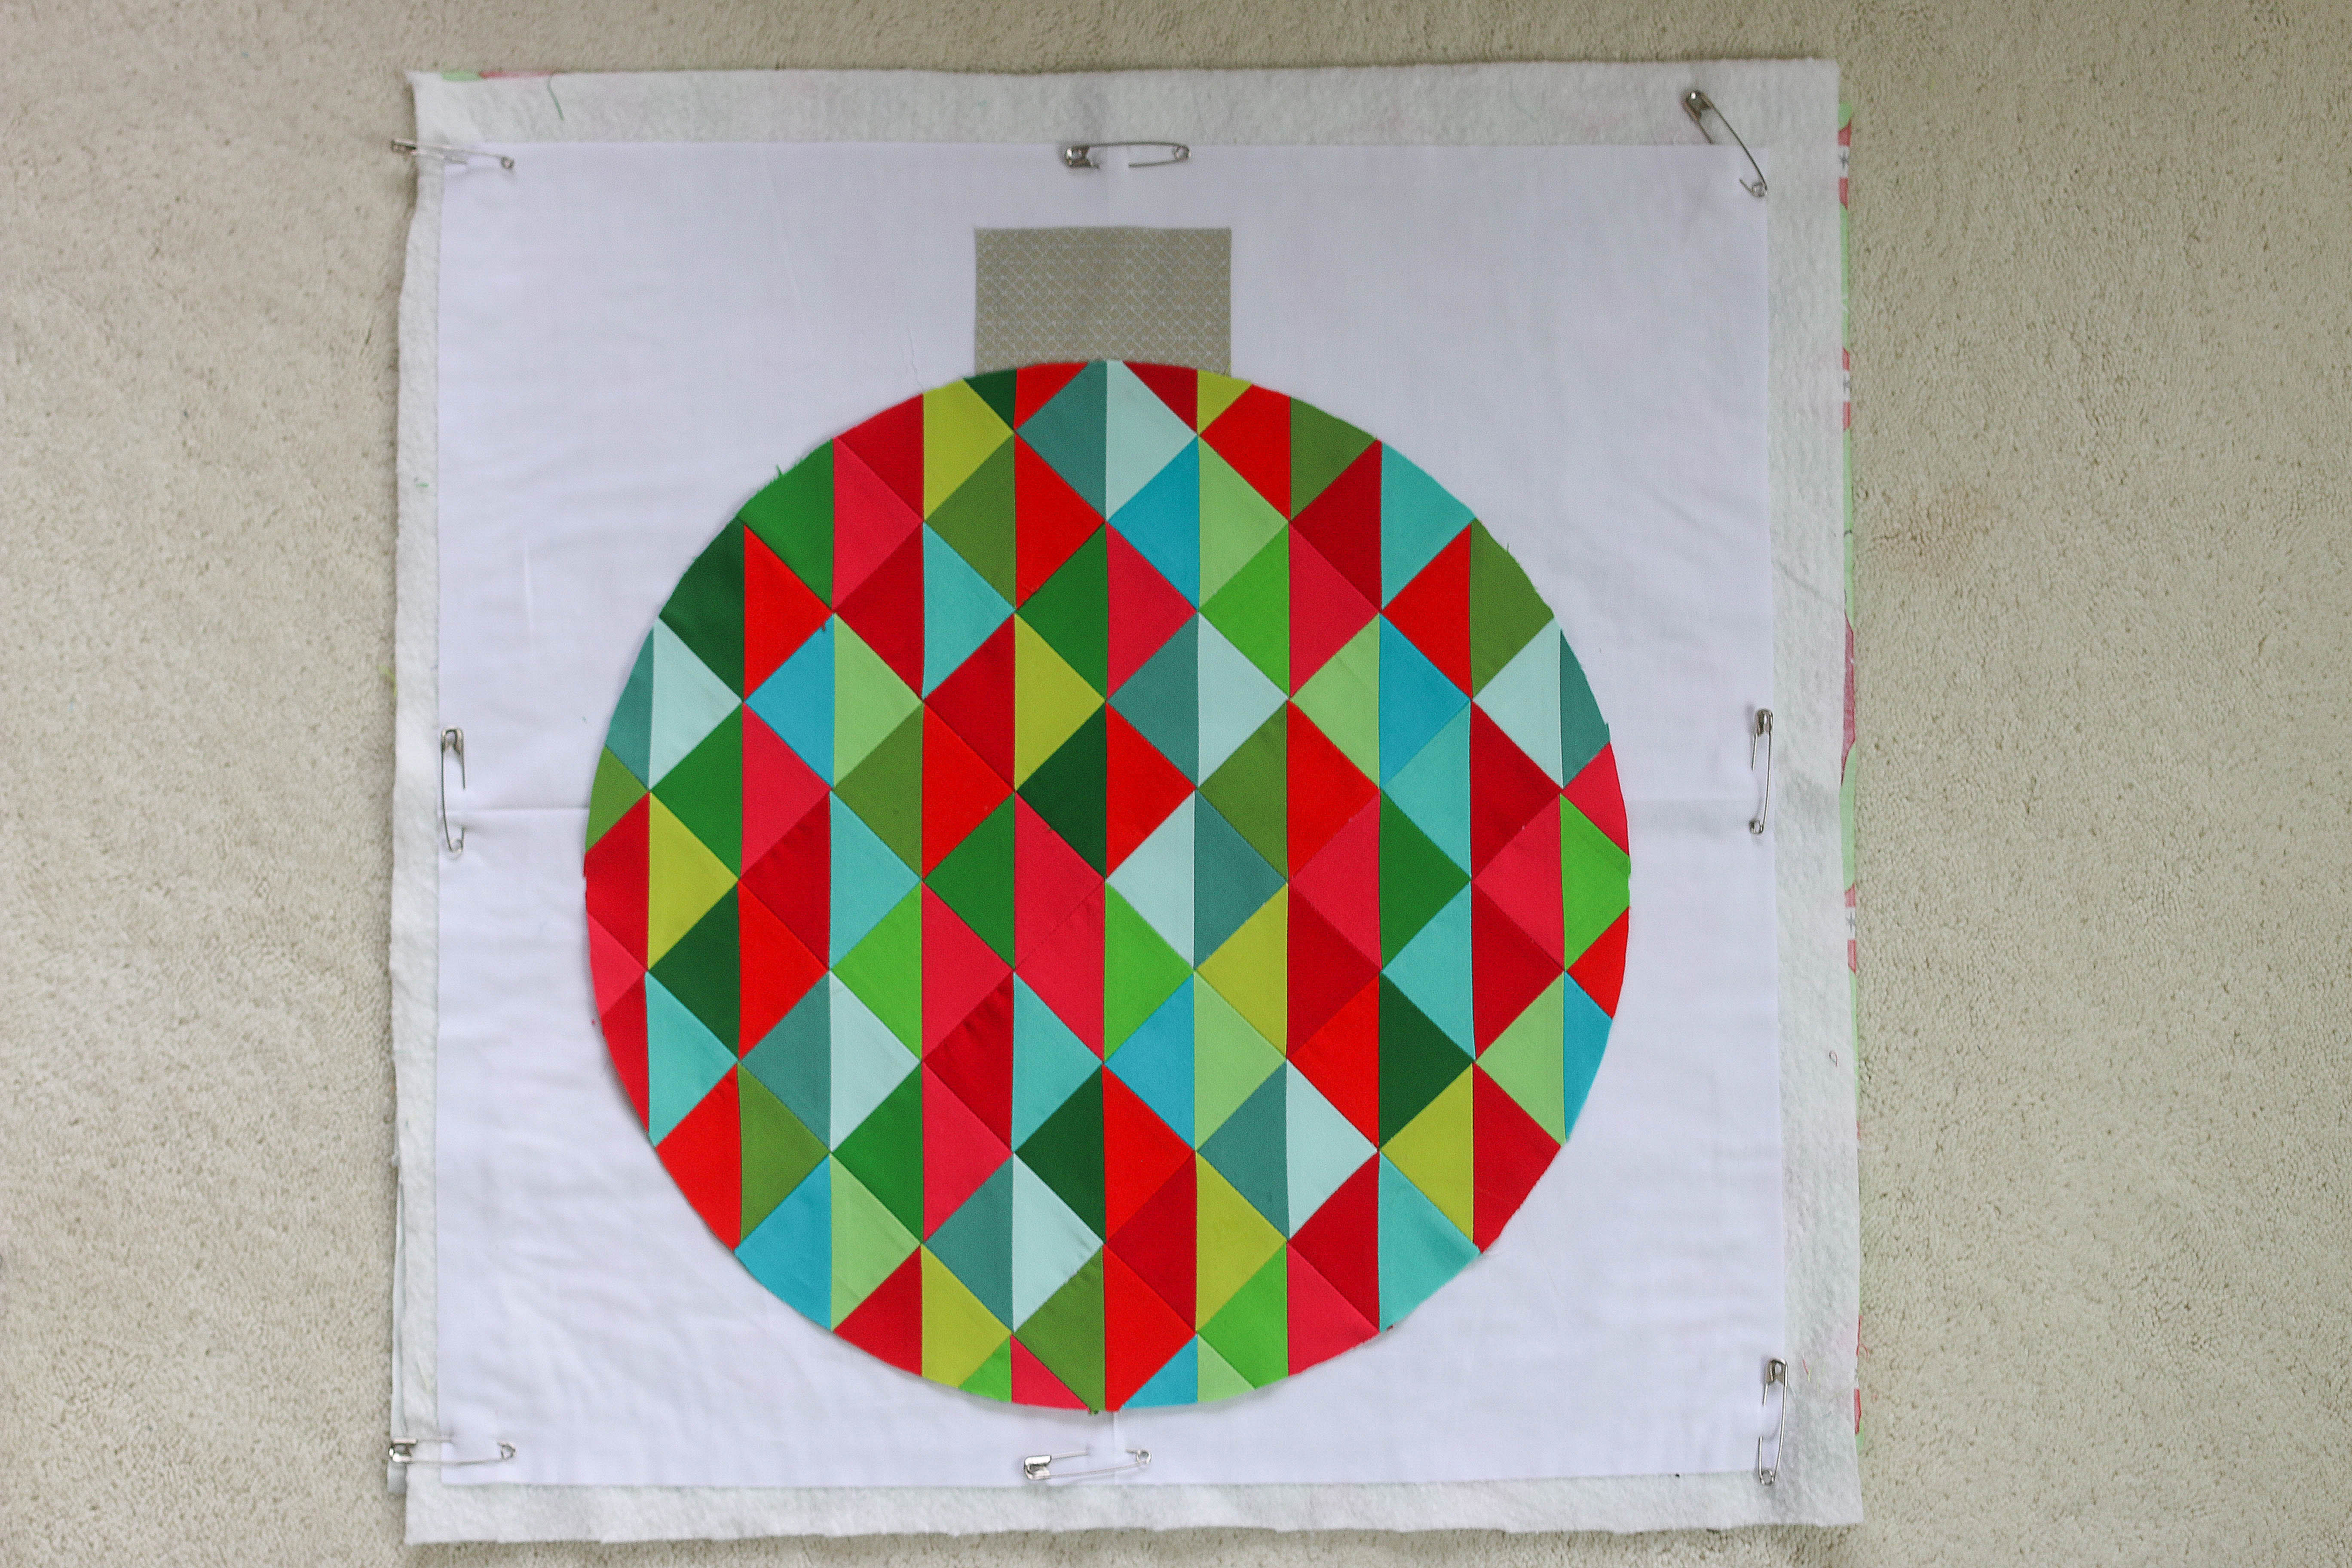
To make things easier and quicker, I used my adhesive quilt basting spray to baste the mini quilt and attach the ornament pieces, all at the same time. Just slip the edge of the silver ornament cap underneath the ornament ball as you spray and attach. (I use 505 brand spray.) Combining these steps also means that your applique stitches will do double-duty as quilting stitches!
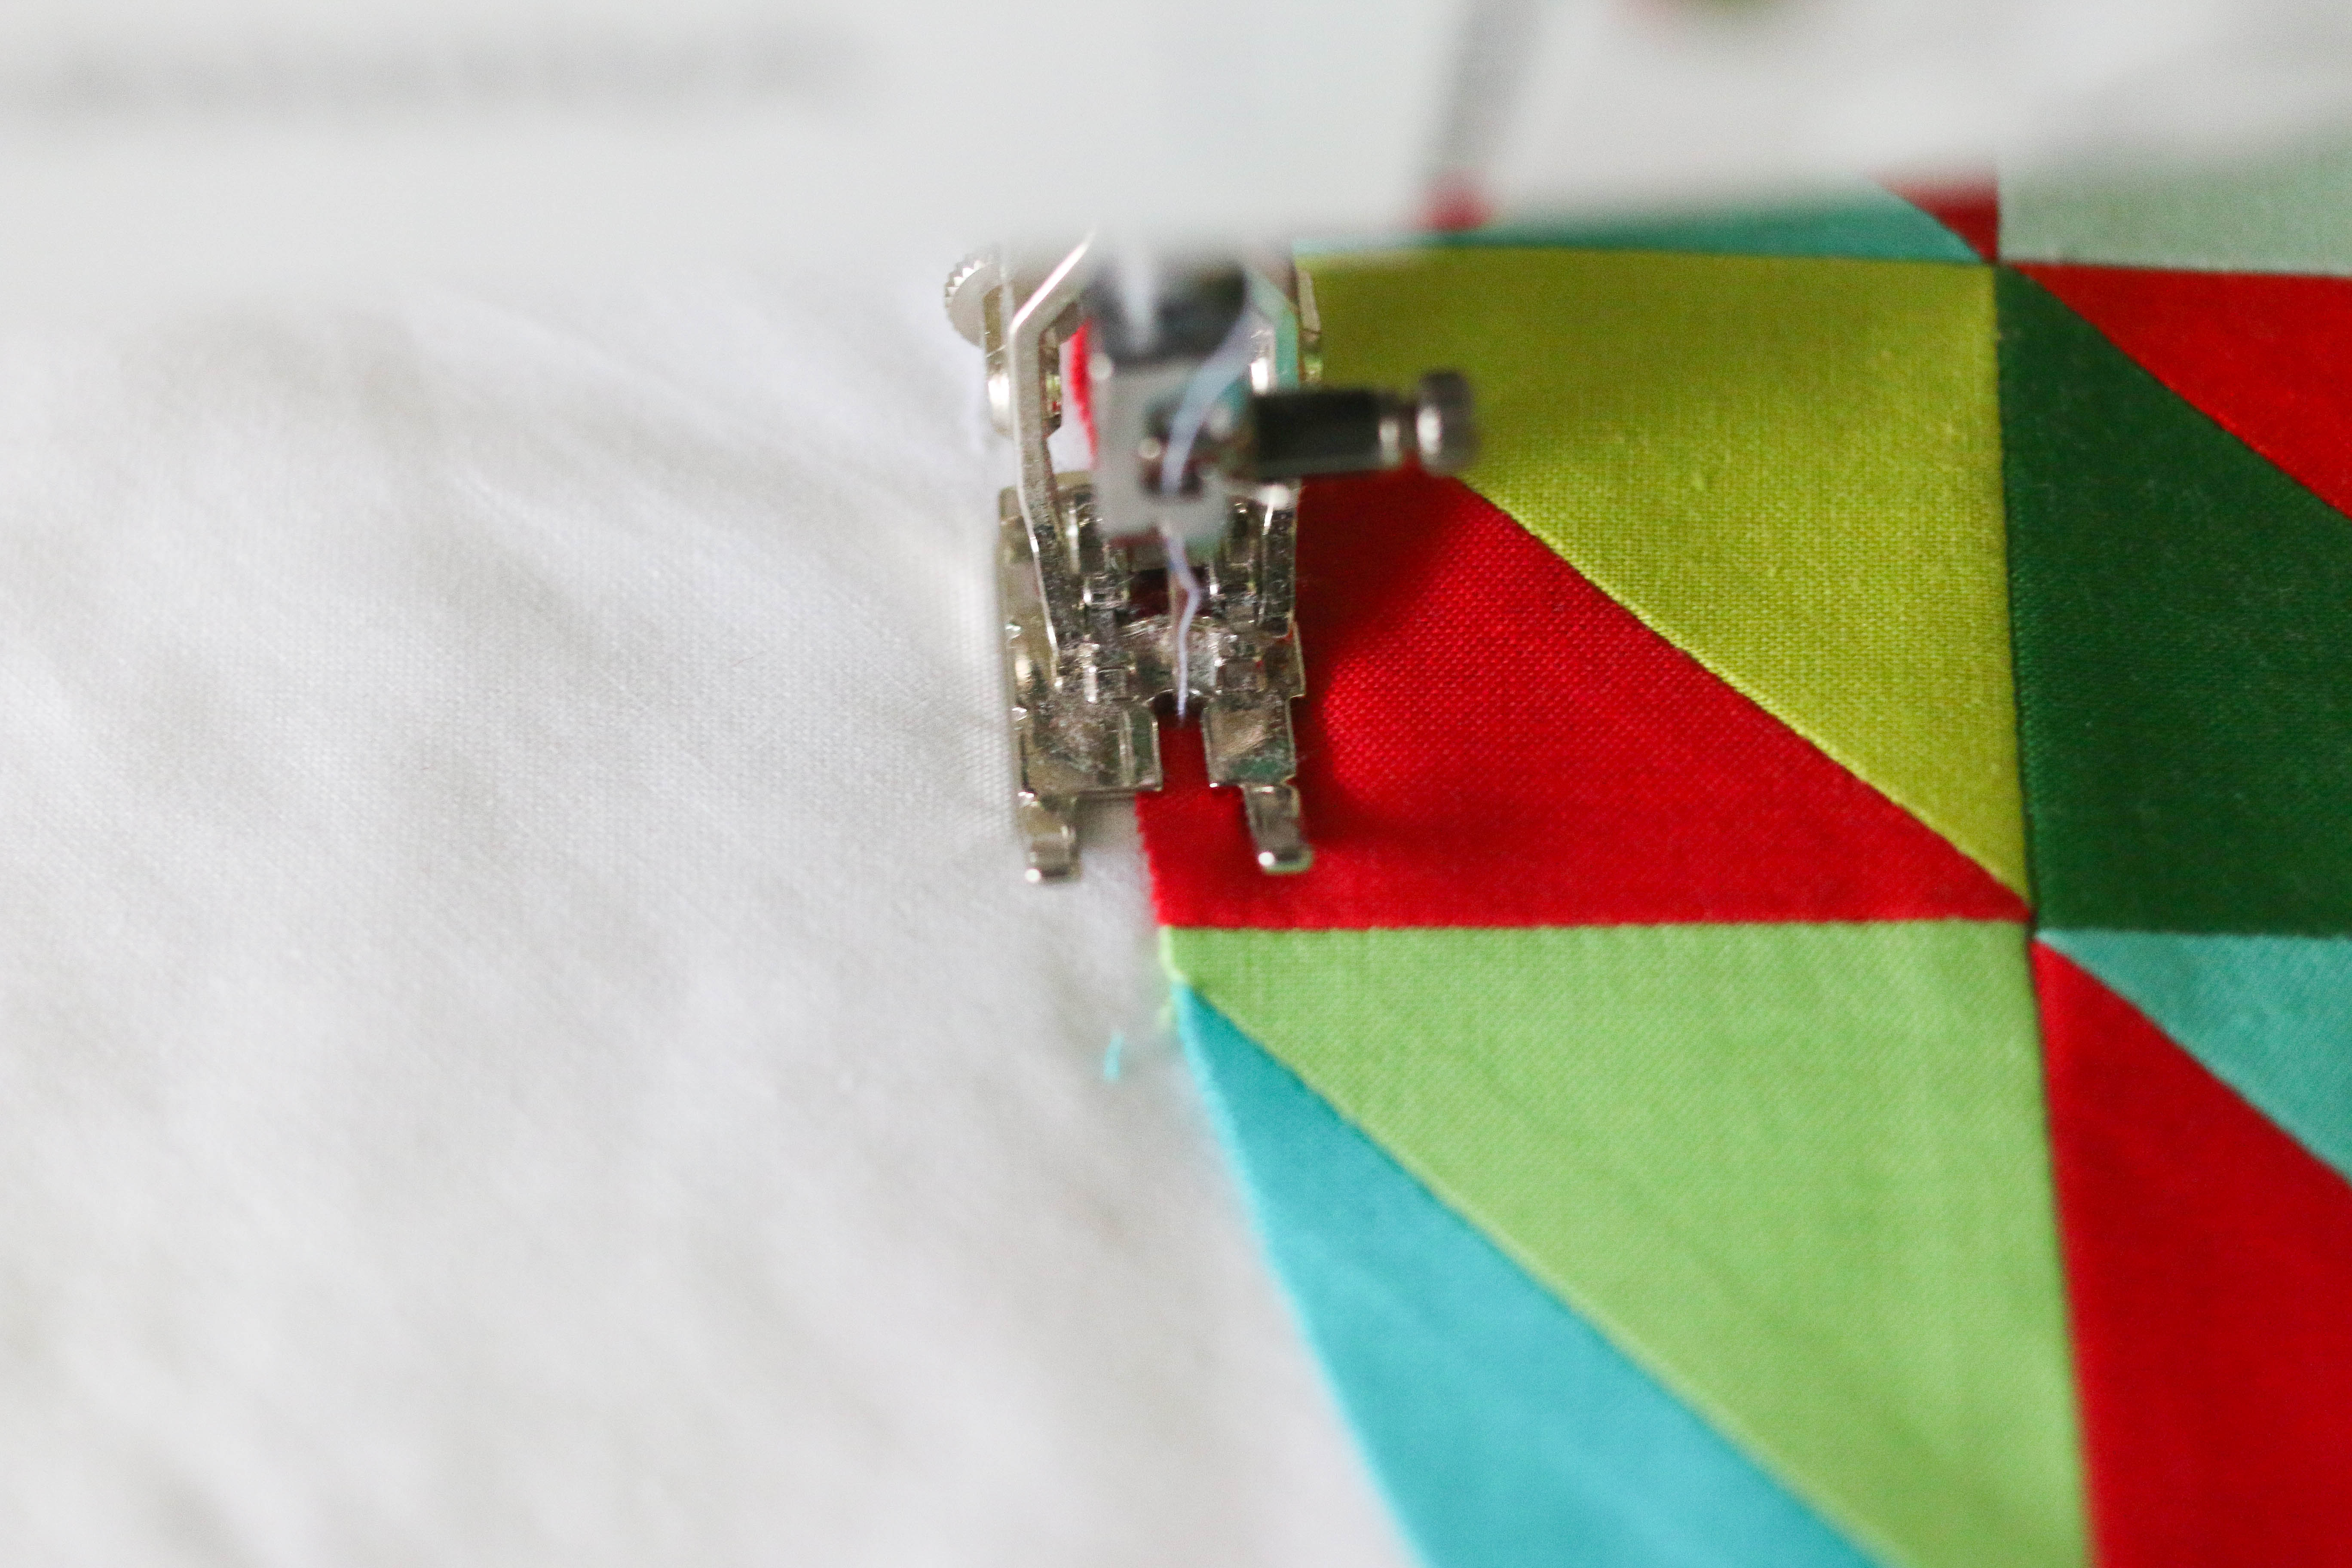
Appliqué the ornament pieces as desired (if you’re appliquéing after basting the quilt like I did, be sure to use your dual-feed or walking foot). I used raw-edge appliqué and straight-stitched around the edge of the pieces, 1/8″ from the raw edge. While using my Patchwork foot #97D foot on my B 770, I could use the line just to the left of the needle to keep my seam at 1/8″. (With raw-edge appliqué, you will get a bit of fraying around the edge, especially where you cut the circle on the bias. I don’t mind the look, especially for a mini-quilt which won’t be washed or heavily used, but you don’t want any fraying you may want to choose a different appliqué method.)
I quilted my ornament quilt with straight lines that followed the seams of the HSTs. In order to keep the lines straight past the edges of the round ornament, I marked one line in the middle, then used the guide bar on my dual-feed foot to quilt the remaining lines.
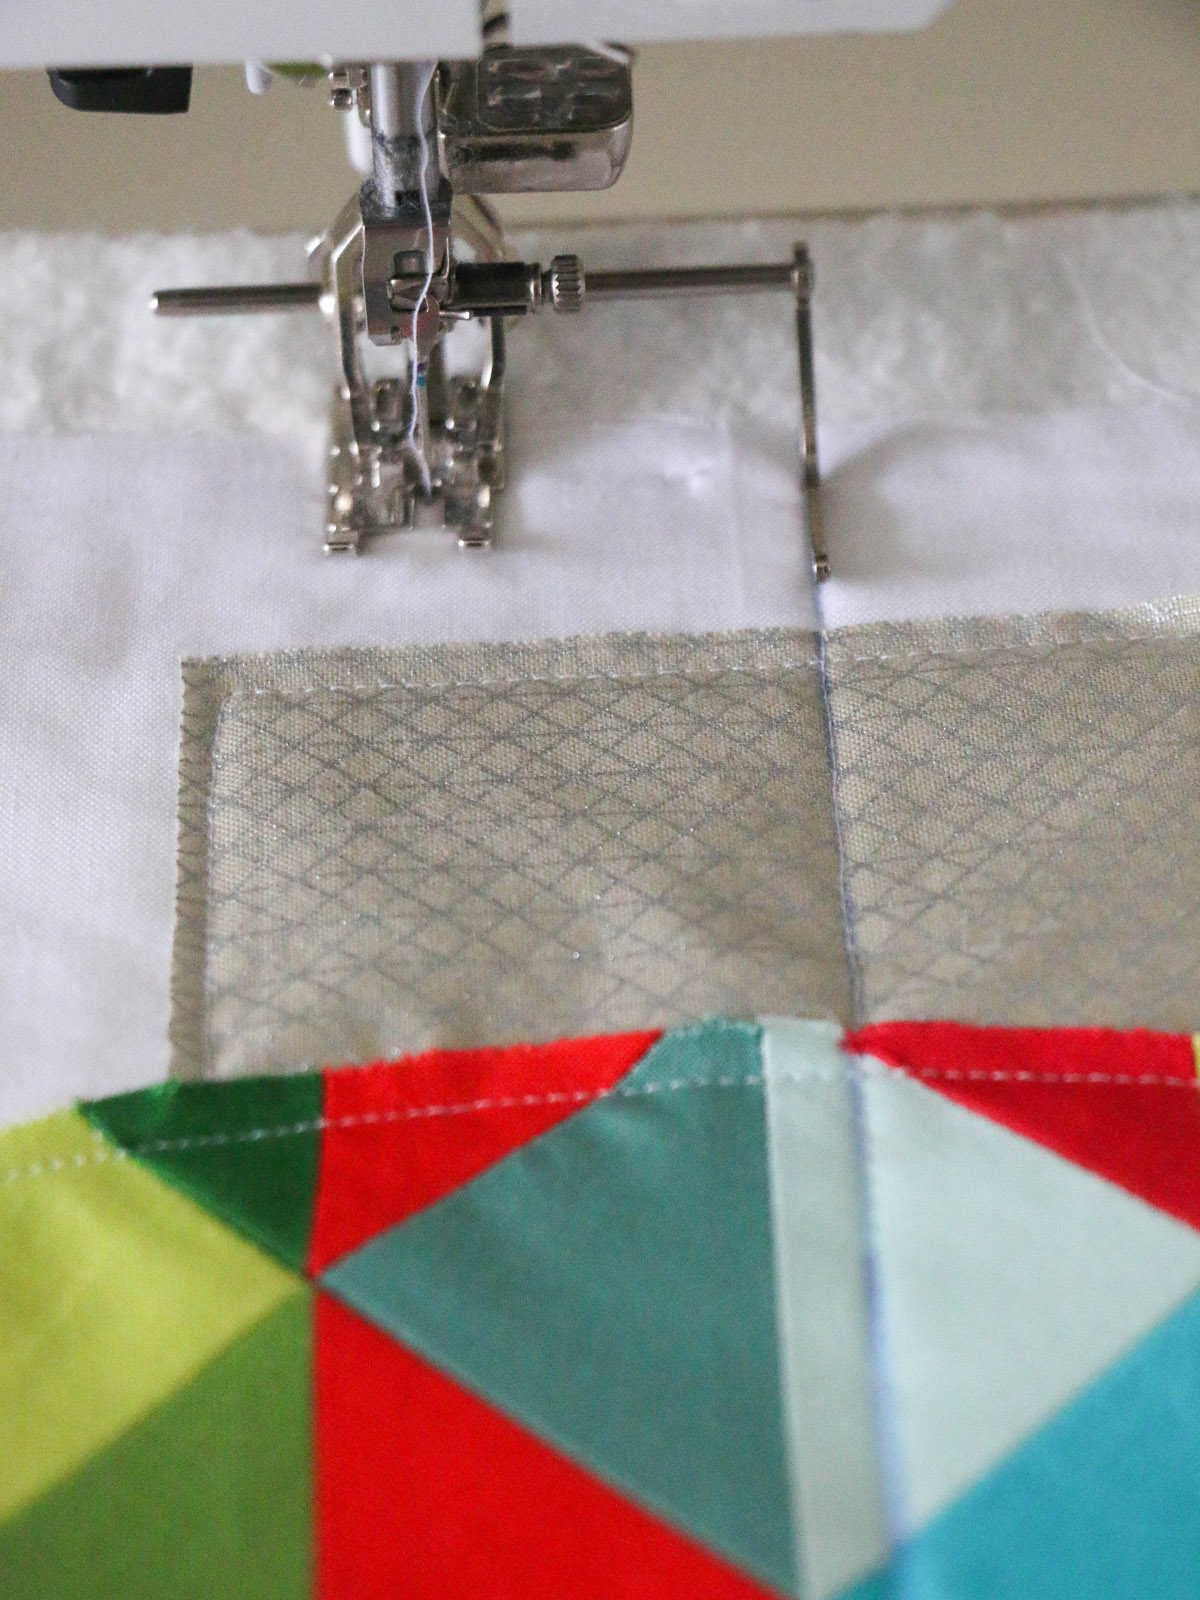
Like so.
And there you have it: A simple, fun little project that will add to your holiday decor this season.
Enjoy, and happy holidays!
Used Products


What you might also like


156 comments on “Holiday Ornament Mini Quilt”
-
-
Working on a Thomas Kinkaid lap quilt for my son for Christmas.
-
Yes! I have a snowman wall hanging I use every year as well as quilted stockings I made the first Christmas my husband and I shared 43 years ago, and Christmas placemats, too.
-
-
Not a quilt, but working on poinsettia table runner
-
I have several quilts that I have made for the holiday season. 2 1/2 quilts are machine embroidered quilts. I was working on the half-finished one yesterday when I ran out of thread, darn. I should have seen it coming. I also have an advent quilt that I made in a class several years ago. I love turning the blocks around everyday to see a cute design. I love this mini ornament quilt. I will definitely have to try this one. Thanks
-
I have several wall hangings, table toppers, stockings and for this year I made a diamond log cabin star tree skirt. But not an actual quilt, maybe for next year….
-
This is really pretty!
-
Not yet! I’m always too busy sewing gifts yo get around to any sewing for myself. I want to though!
-
Yes, it’s a Grinch quilt.
-
Yes! An 8′ Skinny Santa wall-hanging. A welcoming site to most when entering our home for
festivities. -
Such a pretty quilt! I don’t have a Christmas quilt but many smaller handmade decorations.
-
Holiday quilts I’ve made have been given to love ones. Some day I’ll make one for me!
-
No, not a quilt. However, I have been happily engaged in making several table runners for the holiday season that will be machine quilted. I have been helping a single friend with stage IV kidney cancer since June (taking her to doctors appointments, chemo, hair and nail appointments, doing her grocery shopping, cleaning her house, etc., etc.) so I am not as far along on these projects as I would like to be. Having said that, I am thankful this holiday season for the opportunity I have been giving to serve others.
-
I have a Christmas sampler that was one of my very first quilts. We hang it up every Thanksgiving.
-
The first quilted wall-hanging I made was a Christmas tree. I’d just had one lesson of a beginners’ quilting course and only knew hand piecing, so that’s what I did! The mini quilt measures about 18″ square and is all batik. I added a sprinkling of tiny dark green glass beads which catch the light beautifully. Each year I hang it in my hallway facing the front door.
-
Last year I made a throw-sized snowman quilt. I displayed it on the wall, hanging from the rod in my living room (that has a different quilt displayed the rest of the year) and this year it is back up for the season.
-
No, I don’t have any quilts made just for the holiday season, but I have done machine embroidery projects–a 3-D free-standing nativity, an advent calendar, and many many FSL decorations to give as gifts. I love Christmas, especially the Christmas Story of Jesus’ birth in Luke 2. Have a very merry Christmas!
-
Almost looks like stained glass in the middle of the circle very nice nice triangle ideas also
-
I made Christmas throws for the whole family last year! Thanks for the giveaway!!
-
I made an advent calendar. The back is quilted and each day has a machine embroidered design with a pocket on the back. The attach to the backing via mini clothespins.
-
Yes! I made a wallhanging of centerpiece of counted cross stich with quilted border … Glada Yule … which means Merry Christmas in Norwegian.
-
I have a quilted Christmas tree skirt, but the quilt for my bed is an unfinished log cabin in Christmas fabrics.
-
no large quilts, but I have a few quilted cards that I have made!
I would love to be able to do a holiday quilt!!! -
Yes I do, I made a king size one just for Christmas, using my favorite Christmas prints.
-
Not yet, but it sounds like a great idea. Maybe that will be my January project…….
-
just picked up my Christmas Gift Box quilt from the long arm quilter : )
-
Just finished a Christmas tree with little pearls to hang small fabric ornaments
-
Thank you! I love mini projects.
-
I made a Santa Claus quilt last year and draped it on my couch.
-
I can do this, I’m not a quilter but I know I can do this!!!
-
Yes! It was made for me by a dear friend.
-
I have a Christmas flannel quilt that I just made last year and a quilted wall hanging of Christmas cactus that must go up
-
Just learning how to quilt so nothing finished yet
-
No special quilts.I’ve been busy with bags.
-
I haven’t been quilting that long so I don’t have a Christmas quilt. I had hoped to make one this year (per my hubby’s request), but life got really busy the past three months. Maybe there’s time enough to make this cute little wall quilt before the holiday!
~Debbie
-
I do not have a quilted item for the season yet, but I love the ornament and will be making it soon.
-
My twister tree is one of my favorites.
-
I have one quilted and not bound, one pieced and not quilted and one in the works. The first two made it to the beds last year just to make the rooms pretty for Christmas Eve and Christmas. With good luck I’ll get the one bound this year!
-
Thanks for reminding me … I have two Christmas quilts I should bring out for the holidays.
-
I haven’t made a Christmas quilt. I think I might make one for next year. Thanks again for new ideas.
-
Sadly, no special quilt. ?
-
I have not made a Christmas quilt, but I have a red/green star quilt that my mother made. 🙂
-
I have a red and white applique quilt that I need to get out this week and hang.
-
I like this little ornament pattern. I am going to try it.
-
Definitely on my to do list. I do have a tree skirt that I made last year.
-
No, I don’t have a special quilt for Christmas. I’m just getting back into quilting since I bought a new sewing machine.
-
I do not have a Holiday Quilt. I have a holiday Pointsetta taberunner cut out it is aging like fine wine in my to do basket. May be next year!
-
I have a special Christmas quilt I put on my living room sofa every December
-
I don’t have a Holiday quilt but I have the material. This is a cute block!
-
Yes I have several Christmas quilts!
-
Not yet!! I’m planning one!
-
No Christmas bed quilt (yet), but a favorite table runner I’ve used for several years. Have made other table runners for myself and gifts.
-
Yes, I just finished a Christmas Tree wall hanging that I added lights to at the last minute. Just what it needed to make it perfect!
-
I just finished a Christmas themed wall hanging that I plan to use every year.
-
I have completed a couple of Table runners and a tree skirt, a quilt per say is on the to do list. Maybe next year.
-
I have a lovely poinsettia quilt wall hanging, still waiting to be completed. It was a free pattern several years ago from Quilter’s Newsletter Magazine.
-
I do have a Christmas quilt….my gift to me. I made a Present Quilt from French General Joyuex Noel. I love snuggling in it.
-
Haven’t made a quilt. Just upgraded my Bernina and am ready to learn.
-
Working on OESD Gingerbread Houses as mini-quilt for wall hanging. Thanks for chance to win a book!
-
I’ve been mad at work sewing a quilt for my mother in law. She lives with us and is always commenting on mine, so I thought the perfect gift for the woman who has everything she wants is one of her own.
-
My daughter made me a Christmas throw because she said I would never get around to making one for myself.
-
I made a Christmas Tree Quilt out of 2 1/2″ strips of fabric. I quilted it and used a fleece backing. Fun on the outside and warm to wrap up in.
-
I haven’t made a Christmas quilt but have paper pieced a skinny tree wall hanging and quilted a tree skirt as a gift.
-
I made a Santa quilt years ago that still comes out to play every December.
-
I don’t have a Christmas quilt (of any size) now, but this seems to be an easy one to start with!
-
No, I don’t have a Christmas quilt for my bed, but there’s always next year!
-
I have a quilt I made using a Hoffman fabric which had chickadees and cardinals in the print. I fussy cut the birds, and then made 9 patches to go in between the fussy cut squares. The quilt is so beautiful with the gold, black, red and green Christmas colors. I always love to see it on the back of my couch when December comes!
-
I’m finishing up “Friends for Christmas” by Lynette Anderson.
-
I have made quilted table runners, but haven’t tackled a quilt as of yet.
-
Not working on a quilt this year, but lots of little projects like a tablerunner and napkins.
-
Yes, I did make a holiday quilt last year and kept it up all year long because the colors match my living room and the xmas pattern is subtle.
-
I do not have a holiday quilt. Perhaps that should be on my list.
-
One of my UFO’s is Christmas Bell wall hanging – I may finish it this year!
-
I have a countdown wall hanging that I made a few years back but still need to make my Christmas Quilt. Thanks for the chance to win!!
-
Working on some machine embroidery projects, but need to get another quilt started.
-
I am working on Christmas quilt right now but I have used a Pottery Barn quilt since 1998!
-
I just finished a Christmas sampler last summer – handquilted and won first in local fair. So I now have a Christmas quilt to display!
-
I too have a quilter tree skirt that I use every year but I have a couple of wall hangings in the queue to make eventually.
-
No I don’t have a Christmas quilt but maybe next year.
-
I have a quilt that I love. It’s called anRibbon Quilt using fun Christmas fabrics. It’s the first auiltni finished after purchasing my Bernina. Love my machine.
-
Yes I have a Christmas quilting project. Nancy Halvorson’s HoHoHos from several years ago. Still in progress. Small ornaments, great fabric line. Have yet to finish one. Love the book. This year.
-
I’m working on the layout of the second “heart” quilt. They will be 5″ squares and half square triangles to make a heart.
-
Yes, I made a Christmas Sampler this year and I love it!
-
I made a Christmas alphabet sampler out of flannel about 12 years ago. I always enjoy taking it out along with my Christmas decorations. Like most quilters, I give almost everything I make away as gifts. I love having something I actually crafted, even if it’s just for a short time each year.
-
No, I have never made a holiday quilt but I am imagining one and it may take a year or two to put it all together…idea to implementation.
-
I made a quilted Christmas tree skirt. I also have the top of a Christmas quilt made using one of Kaye England’s patterns (still need to quilt it!).
-
Beautiful!
-
I’ve been quilting for over 30 years and haven’t made a Christmas quilt yet, nor a tree skirt. I have table runners and fabric for more table runners. The mini Ornament quilt is a possibility for this year if I get going.
-
I have made quilted holiday potholders for gifts.
-
I am looking for this fabric in my stash as we speak!! Can’t wait to start! Too Cute!!
-
I have a snowman wall hanging that is almost finished, and a table runner made with border prints, but no Christmas quilt.
-
I have a log cabin Christmas tree wall hanging that I made years ago when I was first learning to quilt and it’s still one of my favorites.
-
Made a Christmas sampler quilt designed by my LQS several years ago; great design, great friendship. Love to quilt!
-
I tend to make a new Christmas quilt every year, so I have quite a large amount of Christmas Quilts in various sizes. This year, I made a wallhanging size quilt with a gorgeous panel from Laurel Burch featuring a colorful peace dove.
-
I made a king size quilt from Quiltmaker magazine’s Cardinal quilt pattern from the 90’s. That was back when I was still making cardboard templates and tracing and cutting out. It is machine pieced and hand quilted. The quilt goes on my bed every Christmas season.
-
This is on my to do list. Maybe this Christmas I will get a Christmas quilt started
-
I’m a new quilter, so I don’t have a special quilt for the holidays but I hope to have one by next year. I don’t usually care for modern designs but I love this mini ornament quilt! Thank you!!
-
Made an appliqued Twelve days of Christmas quilt from the Quiltmaker magazine. It goes on my wall each Christmas.
-
Have some mini quilts and quilted pillows for the Christmas season.
-
I have a (what I consider) beautiful log cabin quilt that was a BOM from my LQS…turned out lovely, and I have added various Christmas button to make it even sweeter!
-
I made a table runner from a Cherry Williams pattern.
-
I don’t have a Christmas quilt yet. I’m newer to quilting and haven’t ventured into things just for fun yet. Hopefully, I’ll get something Christmasy done by the end of next year. The mini ball quilt is so adorable! Maybe I’ll start small!
-
I am new to quilting. No special quilts, but I am making a tree skirt.
-
Most definitely. I love Christmas quilts. Your ornament is very cute.
-
Great project and tutorial! I don’t have a special quilt yet but I have started one ; ) Thanks for the chance to play!
-
I have not made myself a Christmas quilt yet.
I have made some pillow covers for myself and embroidered them with holiday images.
Seems like I am always making things for other people! -
I’ve made several including one I just finished based on a block of the month by Sindy Rodenmayer of FatCat Patterns. It’s called Christmas Row x Row.
-
I have made some Christmas table runners and placemats, but never a full size Christmas quilt. Thanks for the great giveaway!
-
No holiday quilt. Maybe sometime soon.
-
I have a Christmas quilt with cute cats and holly.
-
Not yet! I’m a relatively new quilter. But I have a pattern of Nordic snowflakes I’m planning to make 🙂
-
Not yet, I’m still a relatively new quilter.
-
I don’t have a special quilt made just for the holiday season, but I would like to make the Holiday Ornament Mini Quilt you posted here. The colors are beautiful and the shape is classic.
-
It is a quilt for the tree, a tree skirt. I made it years ago before I knew what a seam allowance was so it is very imperfect and yet perfect because it reminds me how far I have come and reminds me to let go of perfection. Merry christmas!
-
Yes, and an afghan that I made 35 years ago.
-
Working on a “Grinch” quilt for this holiday.
-
Fun tutorial!!
My special Christmas quilt is a Judy Niemeyer quilt done in reds and greens. I’m going to hunt up those leftovers to do your ornament. -
I made a quilted Christmas tree skirt just for our tree that matches our stockings. I also made one for my son and his wife with matching stockings.
-
I have some banners,but no quilts for the Christmas season.
-
Cute mini quilt!
-
I do not have a Christmas quilt but have several Christmas table runners. My project this year is a quilted Christmas tree skirt for my grandson (almost done).
-
I have a Christmas Tree Log Cabin quilt I made decades ago, when Eleanor Buirns was first getting started with quilting. I attended her class, and got to sew along side Eleanor, it was loads of fun, and that quilt has gone up every year since making it!
-
Well, I have the top finished but it is not quilted yet. (sigh) So, I guess it is not a quilt yet – but in the works! Merry Christmas! and thank you for the tutorial and fun!
-
Made a bunch of Christmas mug rugs for a charity stocking programme. And stuffies for my niece and nephew. A Christmas quilt would be fantastic and I quite like this wall hanging! (on a side note, I love the quilt on the cover of this book!)
-
So many special Christmas Quilts hang in our home
-
A mystery quilt in red and green calico from 20 yes ago. !
-
Little Ornament Quilt is so cute, I think I will make one of these and use them to go with the Christmas cookies I hand out to the neighbors. My favorite Christmas quilt was one that I made last year, it was by Jodi Barrows, out of the book “Square n Square”. It taught me a new way of piecing and came together quite nicely. Unfortunately it is packed away right now due to painting.
-
Yes, a few years ago I made a bargello in the round christmas themed table topper. I had a lot of fun making it.
This year I have not been able to make anything for two reasons. One is I had a knee replacement done a few months ago and am still on the mend.
Merry Christmas every one. -
I do not but would love to do a small quilt to toss on the my bed for accent as I usually change the bed linens attire just for Christmas. Thanks for the giveaway.
-
I have made three quilts but still need to bind them. I am dragging my feet on that.
-
Yes, I made a scrappy Interlocking Chains quilt with Christmas fabric.
-
Does anyone know what line of fabric is used in the ornament?
-
Hi there! I used Kona Solids by Robert Kaufman for this quilt, but any solids would work! : )
-
-
Going to visit my niece and her family. I just gave her my best Bernina so I can upgrade. Yippee!
-
I have a special quilt for xmas. I have my friends one of my orphan crossover blocks and she gave me back the best quilt with it in it. I love it.
-
Thanks for the pattern, Lee! I posted a picture of my version on the Bernina USA Facebook page under the original post there.
-
This is such an adorable project! Thank you Lee, for designing it. I made three of them, though I took some liberties to change it up. My HSTs are 1-3/4″ finished, so I made fewer of them to make an 11″ diameter circle. I added a hand-embroidered (chainstitch) “wire” to the top of the cap. My wall hangings ended up 15″ X 18″, and I like every one of them. They’ll be gifts in 2017!
-
I love Norman Rockwell-my sister bought a Christmas panel & quilted a very nice size wall hanging, which I put up every Christmas! Thank you, Sussan
-
I really enjoy the projects and am almost finished with the fall leaves.
-
I have too many Christmas quilts and not enough walls!!! I love this design. It is bright and cheery and fun
-
I love how you post all these wonderful projects. I’m not the smartest computer person in the world. Is there an easy way to print the instructions? It would be nice to have that option.
-
Love this delightful ‘easy’ small quilt! A happy one! (I too would love a way to print out directions::)) )
-
It took me a while to gather the wonderful fabrics for a Nativity reverse applique small quilt that I did for my Sister-in Law. I love seeing it hang on their balcony railing at Christmas time.
-
No, but I’m inspired to start with this darling ornament quilt! Thanks.
-
I have a Christmas Quilt I made a few years ago, I was a pattern from the Bernina Store and used my embroidery attachment as well as my Bernina sewing machine. I still like it.
-
I do have several pieces done for the Holidays. Wall hangings, Door hangings and throws. I do love Xmas. Being that Halloween and Thanksgiving are right around the corner, I now realize I need more Fall pieces.
I am going to do the Ornament and get yet another for Xmas. -
I have seasonal quilts & runners for every season…well, maybe not Columbus Day.
-
Claudia Creations Christmas Embroidery Quilt.
-
I have several holiday quilts. I love Christmas quilts!! I try to work on one or two each year during the holiday season.
-
I wish I did – it is on my list of things to make!
-
I have mug rugs, table runners and wall hanging Christmas quilts. I am working on two quilts for Christmas. One is a tree the second is boxes that look like packages.
-
I have two quilts that are special for Christmas. The oldest is a Christmas panel with gingerbread men that I hand quilted and embellished nearly thirty years ago, and the second is a needle-turned appliqué quilt featuring a snowman representing each month of the year. December has the snowman dressed as Santa.
-
About 15 years ago I made a quilted wall hanging kit with a fusible appliqued black silhouette of a reindeer in front of a large green moon. It was one of my first applique quilts, and I was very pleased with how it came out. I’ve made several pieced table runners and place mats. I have 2 paper pieced quilts in construction and it would be GREAT if I got them done before Christmas. (-:
-
I have a Christmas quilt but not one I made. I make and quilt Christmas tree skirts for extra large trees.
The skirts that are special, are the ones I have made for our daughters and for our home.
Leave a Reply
You must be logged in to post a comment.

Finishing the binding on a 12 Christmas Balls Ornament Wall hanging. I enjoyed doing the smaller mini quit. Thank you for the opportunity to be in the drawing.