Are you planning to Tie One On™ on Wednesday, November 27?
No, we’re not talking about spiking the eggnog, we mean putting on an apron. The Wednesday before Thanksgiving is Tie One On Day™, an occasion for spreading a little joy and goodwill in your neighborhood or town. Created by EllynAnne Giesel, award-winning author of The Apron Book: Making, Wearing and Sharing a Bit of Cloth and Comfort, Tie One On Day™ is an opportunity to put the “give” back in Thanksgiving.
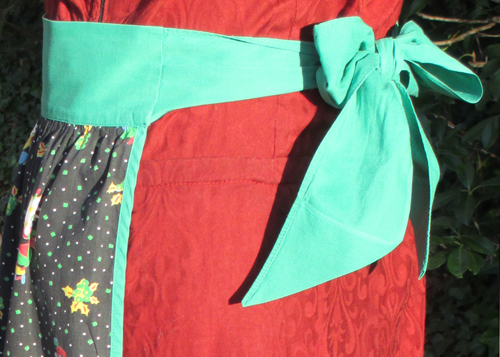
It’s easy to celebrate Tie One On Day™. Start with an apron, wrap it around a homemade treat, insert a friendly, uplifting note, and deliver it to someone who might be spending the holiday alone or could use a cheerful reminder that someone’s thinking of them. For more information and ideas, visit EllynAnne’s website, Apron Memories.
For the rest of this week we’re going to provide you with several ideas for making your own aprons. Today I’ve “dissected” one of my favorite vintage aprons. Tomorrow we’ll post Erika’s Modern Quilt-inspired Log Cabin Patchwork Café Apron, and for Friday’s linky post I’ve collected some of my favorite apron projects from around the web. We’d love to see the aprons you make, as well as your “Tie-One-On” efforts. Send photos to me at weallsewblog.com and I’ll share them with everyone in a picture gallery.
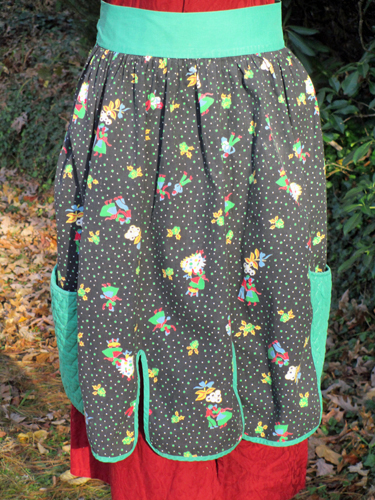
Let’s get started! Here is my vintage apron:
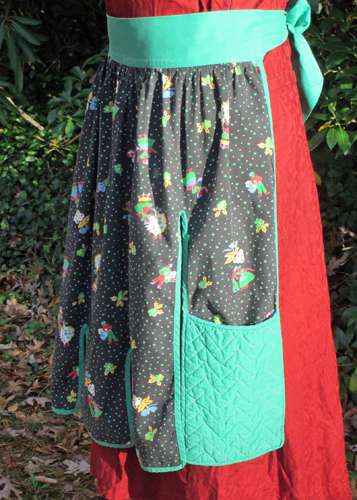
Have you ever seen an apron like this, with built-in potholders? This was my mom’s; she wasn’t using it any more so she gave it to me 🙂 All those flaps make it look complicated, but it’s actually a simple design. One big rectangle with long slashes to form the flaps for the potholders, plus a few shorter ones in between for decorative effect. The potholders are made like pockets, but with a thick quilted piece for the front.
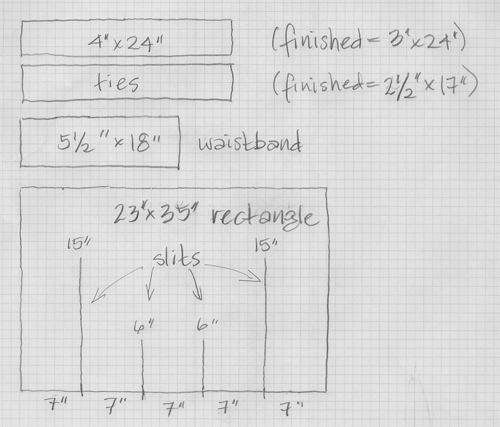
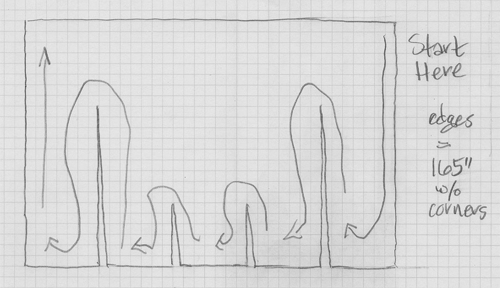
Before any “dissection” can begin, everything needs to be flat and unwrinkled. After pressing, I measured all the parts of the apron – length, width, seam allowances, etc. To give you an idea of how I record all of this information when I’m drafting a pattern for a project, here’s a scan of my sketch. (I love graph paper. Give me a mechanical pencil and a pad of 4 x 4 or 10 x 10 graph paper and I’m a happy camper.)
Based on the measurements I took, and looking at how the vintage apron is assembled, here’s how I would put one together today, approximately 50 years after the original was made.
Step 1) Cut and mark the fabric pieces.
Cut a 23″ x 35″ rectangle for the main body of the apron. If using a one-way print, be sure to mark the top of the rectangle. (There’s nothing more embarrassing than finishing a project and finding out all the trees are upside down.) Using my drawing as a guide, draw lines 7″ apart and parallel to the side edges of the apron; two lines 15″ long (closest to the sides) and two lines 6″ long (toward the center).
From a coordinating fabric cut four 8″ x 10″ rectangles for the pockets/potholders, a 5½” x 18″ rectangle for the waistband, and two 4″ x 24″ strips for the ties. You can’t tell from the pictures, but my vintage apron uses the selvage as the finish for one long edge of each tie strip – clever, huh? The other side has a narrow rolled hem. The green is thinner and more tightly woven than a quilting cotton, which is what I’d probably use to make this apron, so I’d make the ties differently. I’d cut my strips an inch wider and stitch a ¼” double fold hem on both long edges. For a finished width of 3″, cut the tie strips 4″ wide. The ties on this apron are 24″ long, which makes a nice bow on my mannequin… but… her waist is 28½” inches around. You’ll want to adjust the length of your apron ties accordingly.
You’ll also need enough bias binding to go around the apron, including the slits, plus the top edge of the pockets/potholders. I measured a little over 5 yards around all the edges, without adding extra for going around the corners; 6 yards should be plenty, with some left over for “wiggle room.”
Step 2) Make the quilted pockets/potholders.
I don’t know if this was done on the original apron, but I’d reinforce the edges of the slashes with some stitching. Set your machine for a straight stitch with a length of about 2 mm. Stitch along one side of your marked line, from the raw edge to the point, pivot, and stitch down the other side of your line; the lines of stitching should be less that ¼” apart, coming to a point at the end of the line. After stitching around each line, carefully cut between the lines all the way to the pivot point. Be careful not to cut through the stitching at the point!
Cut two 8″ x 10″ rectangles of batting for the inside of your potholders. I’m pretty sure there’s loose cotton batting between the layers in this vintage apron, but I’d use Insul-Bright, The Warm Company’s heat reflective batting, instead. (I have a big piece that I cut up as for projects as needed: flat iron case, potholders, mug rugs, etc.) Baste the layers together with temporary fabric adhesive (I like 505 spray) or a few pins, then quilt the layers together. There’s a chevron design on my apron pockets, but you can use anything you want, from simple straight lines using a walking foot or free-motion stitching with a freehand quilting foot or BERNINA Stitch Regulator.
Trim the quilted pieces to 7″ x 9″ and bind one short end of each rectangle. (See binding suggestions in Step 3.)
Place a pocket/potholder on the right side of the apron at the bottom of each side flap, with the bound edge at the top. Pin the layers together, matching raw edges.
Step 3) Bind the edges of the apron, including the slashes.
Begin binding at the upper right corner of the apron, down and around the flap, up and down the slash, around the three short front flaps, around the second potholder flap, and up to the top edge. The staystitching around the slashes will stabilize the edges, which is especially helpful at the top of the slashes. Here’s another of my graph paper sketches.
Here are a few ways to bind the edges:
- Use a bias binder attachment. Cut bias strips the width of the opening of your binder, sew them together with diagonal seam, trim the seam allowances to 1/8″ and press them open. Bind the edges following the instructions included with your binder, taking extra care when going around inside and outside corners. Basically, the bias tape goes in the flat slot at the front and is double-folded as it is pulled out the other end. The apron edges goes in slot under the binder. The needle stitches the edges of the bias binding together together as they emerge from the binder, securing the fabric edge inside the fold.
- Use purchased bias binding. You’ll probably need two packages (3 yards each) of ¼” double fold bias tape. Stitch the two pieces together, then apply using the instructions on the package. The basic technique is to place the edge of the fabric into the folded bias tape, with the wider side of the bias tape underneath and narrower side on top. From the top, edgestitch very close to the inner fold; the wider fold underneath the fabric will also be caught in the stitching.
- Make your own bias binding using a bias tape maker. Part of the fun of making your own bias binding (or using a bias binding attachment) is selecting the fabric. You can use prints, stripes (my favorite), polka dots, whatever you like. Cut bias strips the width recommended for your bias tape maker. Follow the instruction with the accessory to make your own folded bias tape. Basically, the flat bias strip goes into the flat slot and is folded into the proper configuration as you pull it out the other end. Press it flat as it comes out of the bias tape maker, then apply like pre-folded bias binding.
Once all the edges are bound move on to…
Step 4) Attach the waistband.
I like to “pre-crease” my waistbands before attaching them; it’s so much easier to fold them evenly while they’re still flat. Fold the waistband rectangle in half lengthwise, wrong sides together; press. This fold will be at the top edge of the waistband. Fold under a scant 1/4″ along one long edge (“scant” means a little less); press. Fold under a little more than ¼” along the other long edge. Does this sound familiar? It’s the same way bias tape is folded, with one side a little shorter than the other. Once the lines are nicely creased, open the piece flat again.
Gather the upper edge of the apron using your favorite technique. Here are two popular options:
- Sewing a line of basting stitches just inside the seam line. Select a straight stitch, turn the stitch length to 5 mm, and loosen the needle tension just a little bit. From the right side, sew a line of stitching a scant 1/4″ from the edge. Working from each side, pull on the bobbin thread to gather the fabric. (This is kind of like pulling a curtain along a curtain rod.) Gather it to about an inch narrower than the waistband, then place a straight pin about ½” from each end and wrap the thread tail around it to anchor it. Tweak the gathers so they’re spread evenly across the width of the apron.
- Sewing TWO lines of basting stitches, one inside the seam line and one outside the seam line. (I prefer this method, even though it requires a few extra steps.) Set your machine as above and stitch the first line of basting stitches as above, then sew a SECOND line of basting stitched ¼” below. There will be two bobbin threads on each side; pull as above to gather the upper edge of the apron. Notice how the two lines of stitching hold the gathers in place a little better. Gather the apron to about 1″ narrower than the waistband. Anchor the ends with pins and adjust the gathers as above. (Don’t forget to remove the basting stitches from below the waistband when your apron is finished.)
Place the gathered edge right sides together with the “fat” ¼” edge of the waistband, with the ends of the waistband extending about ½” beyond the edges of the gathered apron. Stitch the apron to the waistband using a slightly-wider-than-¼” seam allowance. Fold the waistband along the creases marked earlier and place it right side down on a flat surface. The scant ¼” folded edge should cover the stitching on the back of the apron slightly. (Don’t worry if it doesn’t; we’ll fix it later.) From the right side, stitch-in-the-ditch along the lower edge of the waistband. (That means to stitch directly into the seam line. An edgestitch foot with a center guide is helpful here.) Turn the apron over; is the folded edge caught in the stitching? Yes? Woo-hoo, it worked! If not, well, that’s okay; it just means you’re like most of us – well, like me, anyway. I never seem to have everything end up in just the right place. If the gaps are more than ¼” long, I get out a hand-sewing needle and whipstitch the waistband fold to the seam. Anything shorter I just leave as it is. (I know it’s not perfect, but it’s just an apron. No one’s going to see the inside of the waistband when you’re wearing it, right? Sometimes not quite perfect is good enough. Besides, you probably have better things to stress over.)
Step 5) Add the ties. (This isn’t exactly how my vintage apron is constructed, but it is how I would do it.)
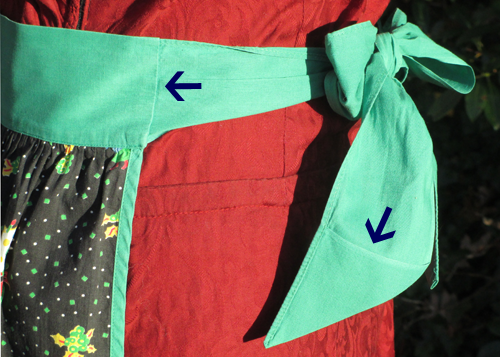
Narrow hem one long edge of each tie strip. (That means turn under ¼” and press; turn under ¼” again and press; then stitch close to the inside fold to hold the hem in place.) At one short end, fold the corner up on the diagonal, wrong sides together, so the short raw edge is even with the raw edge of the not-yet-hemmed long edge. Press. Now narrow hem the second side of each strip, catching the end of the tie in the hem and creating a little triangular pocket. You can see how that looks in the lower right corner of this photo:
Almost done! Fold the ends of the waistband in even with the sides of the apron. Insert the straight end of the tie about ½” into the waistband, making sure the right side of the tie shows on the right side of the apron. The ties are a little wider than the waistband, so fold a pleat in the middle to take up the excess. You can see this at the upper left corner of the photo above. Make sure the folded edges at the end of the waistband are even. From the front, sew very close to the end of the waistband, securing the ties. Turn it over; did the stitching catch the folds on the back? Maybe. (This is even trickier than applying bias binding.) If not, one option is to sew over the join again, this time with a zigzag stitch about 3 mm wide. The zigs and zags are far enough apart to catch both edges even if they don’t match exactly. Another option is to get out that hand-sewing needle again and whipstitch the edges in place.
Done! Do you have an apron you’ve “dissected” and used as a pattern? I’d love to see it!
What you might also like
2 comments on “Are you planning to Tie One On™ on Wednesday, November 27?”
-
-
I’d love to see it when you’re done! Jo
-
Leave a Reply
You must be logged in to post a comment.





I have been looking for a pattern like this for several years. My mother in law tried to explain this apron that she had 50 years ago. I am good at following a pattern but could never come up with the apron. Now I can make her one. Thanks