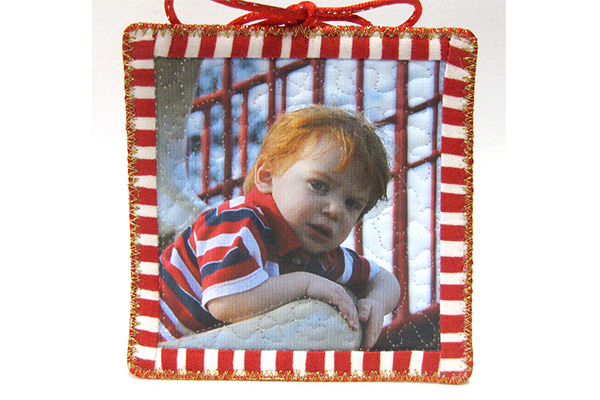
EASY Stitched Photo Ornament
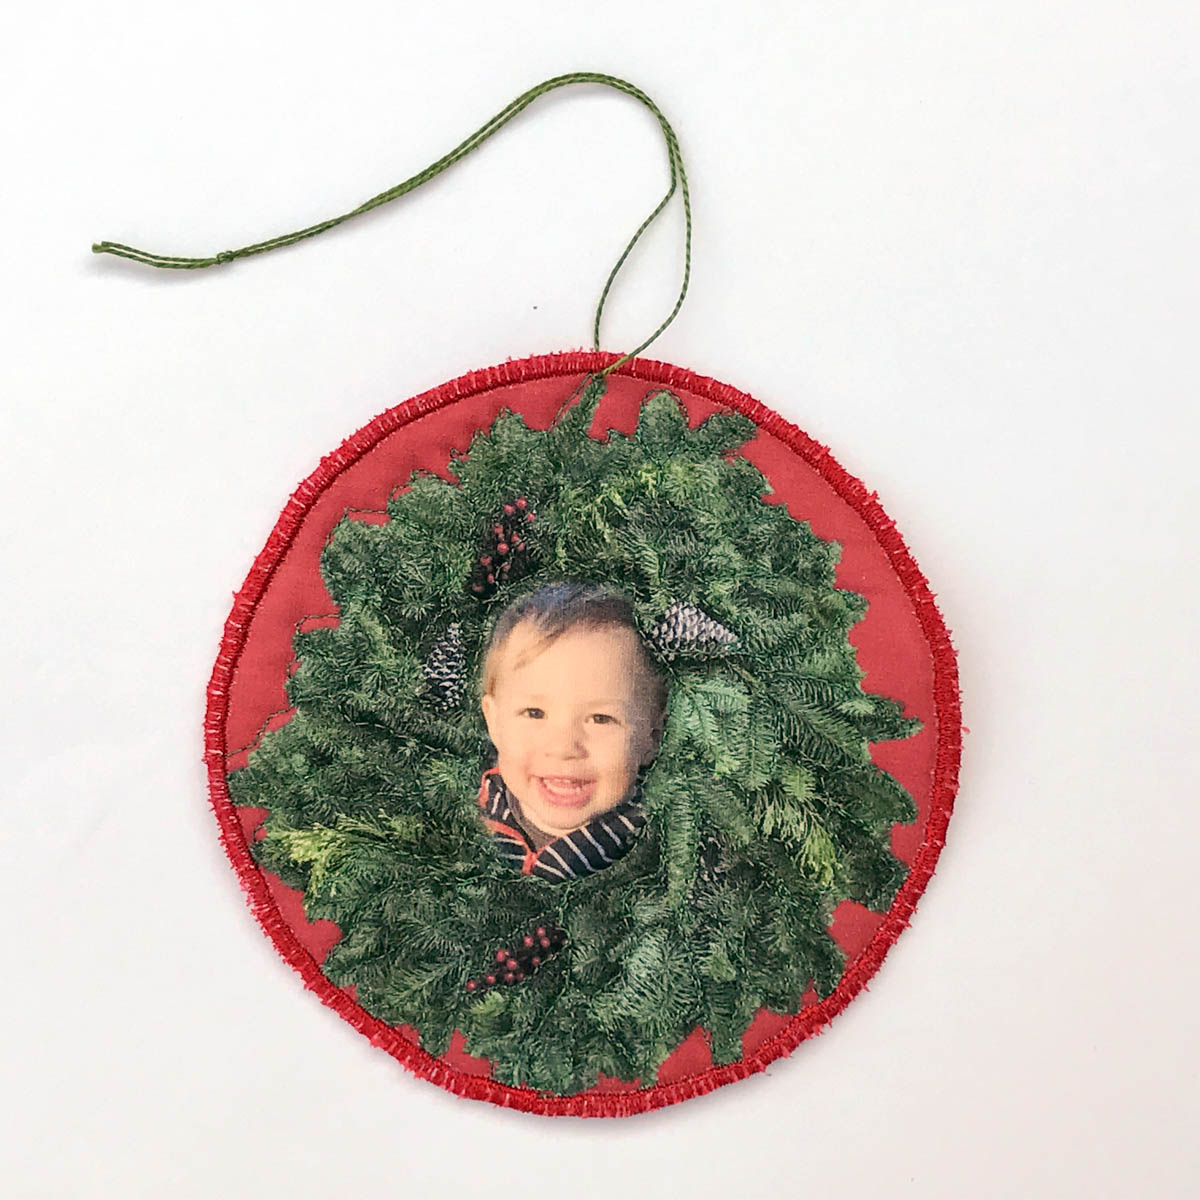
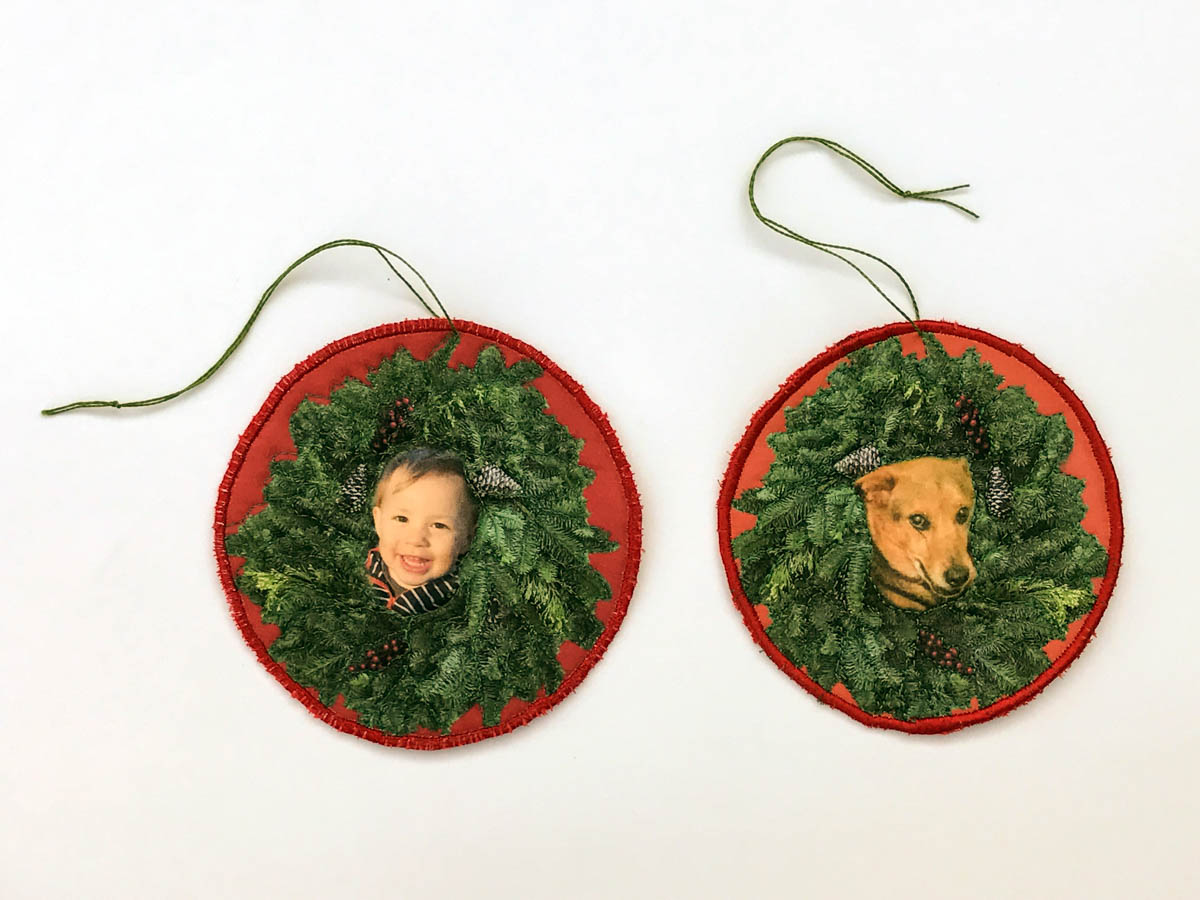
Are you looking for a unique ornament to hang on your tree or to give to a family member or friend this holiday season? If you have a digital camera, a computer and an inkjet printer, you can print your photos on fabric and create a personalized ornament for your holiday tree. In these examples I placed my friend Alice’s son, Max, in the center of the ornament. You can also place a photo of a favorite pet looking through the wreath.
There are only 10 steps to stitching this ornament once you have your printed inkjet fabric.
Step 1
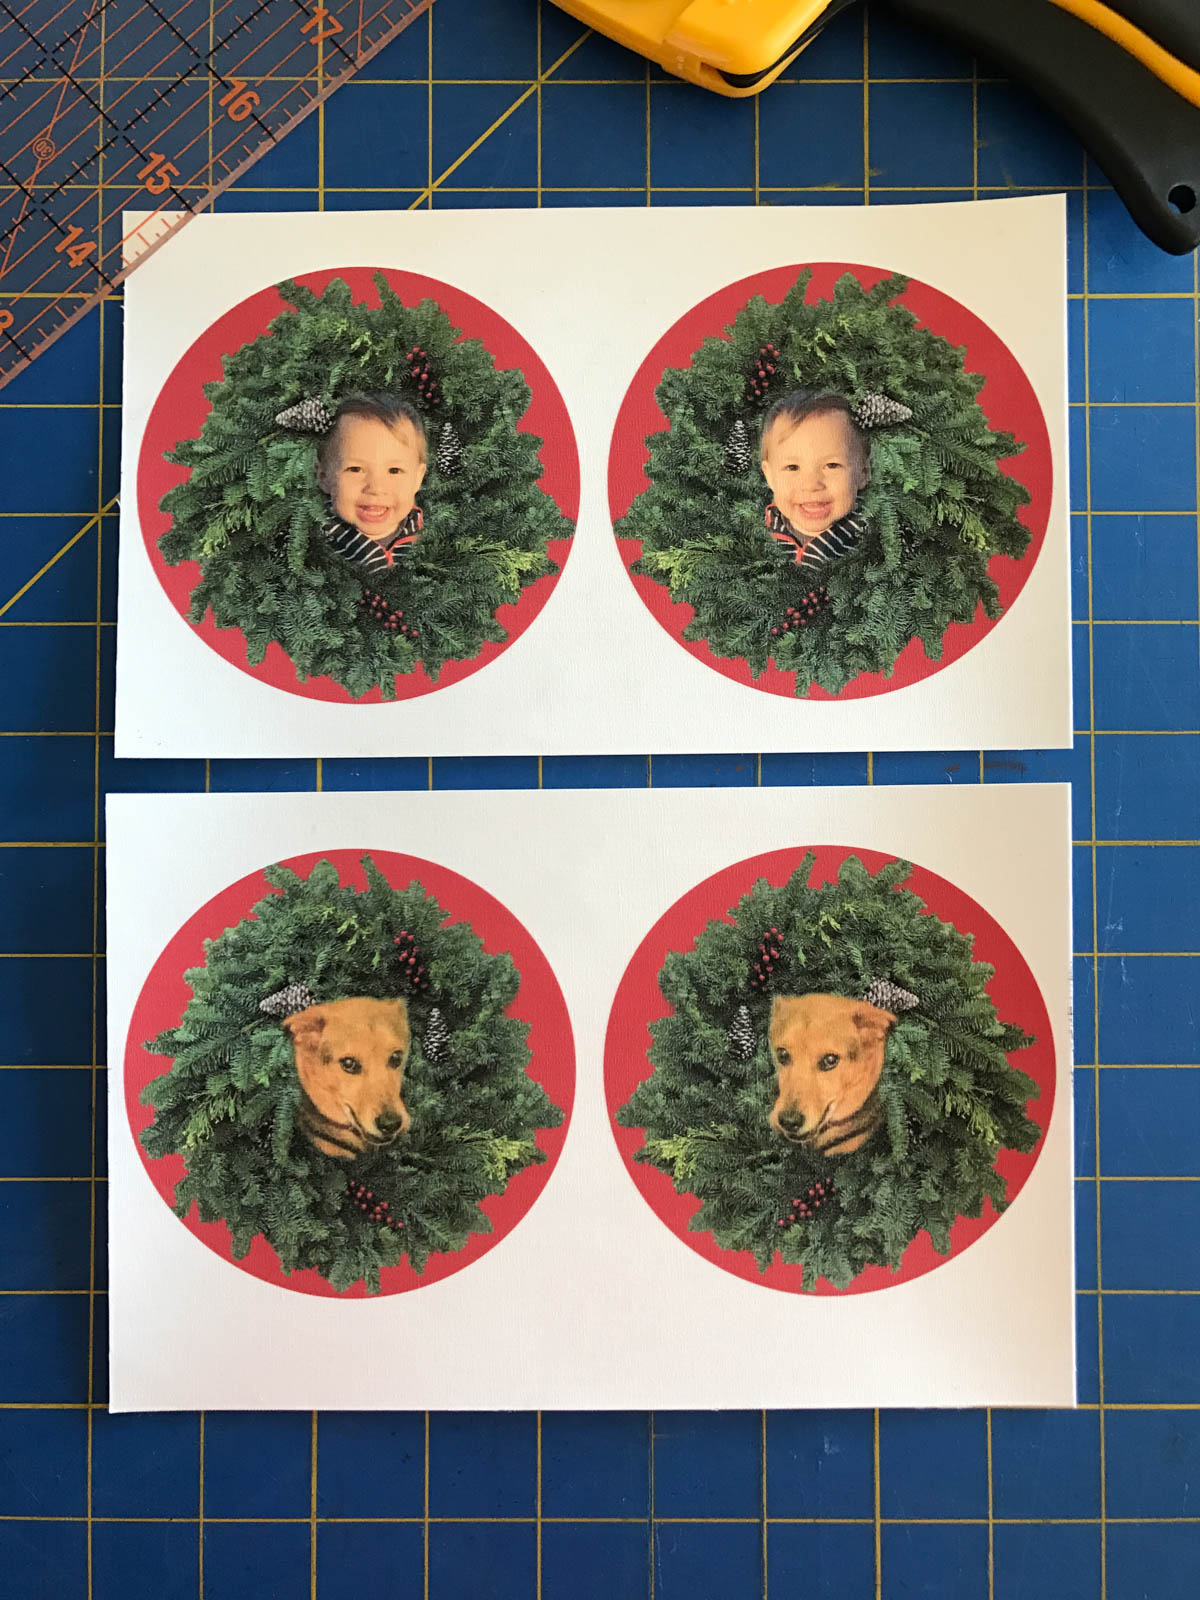
Once your fabric sheet has come out of your inkjet printer, let it dry. Once dry, cut the four images into equal squares.
Step 2
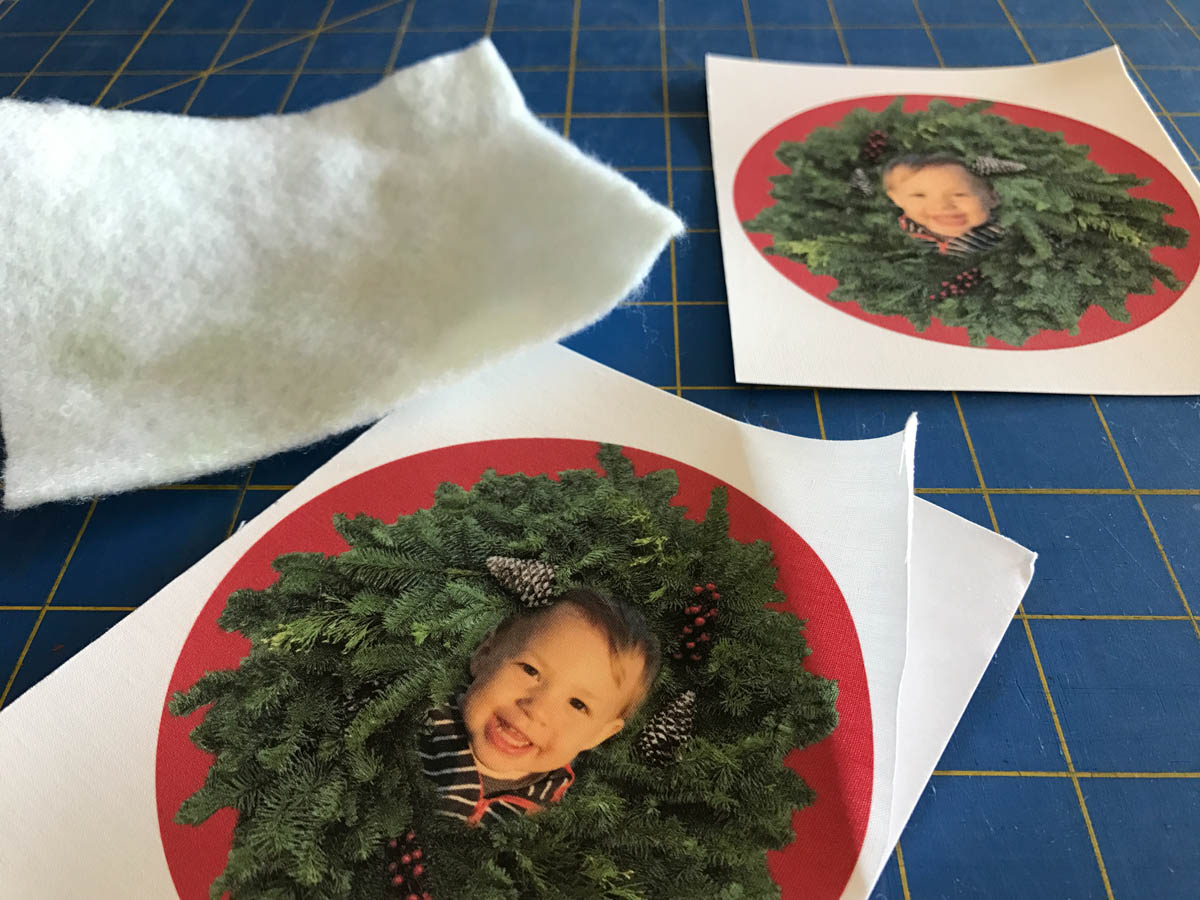
Cut a piece of batting to the same size. I used Dream Green, a polyester batting made from recycled plastic bottles. Peel the fabric off the paper backing on the inkjet printable fabric.
Step 3
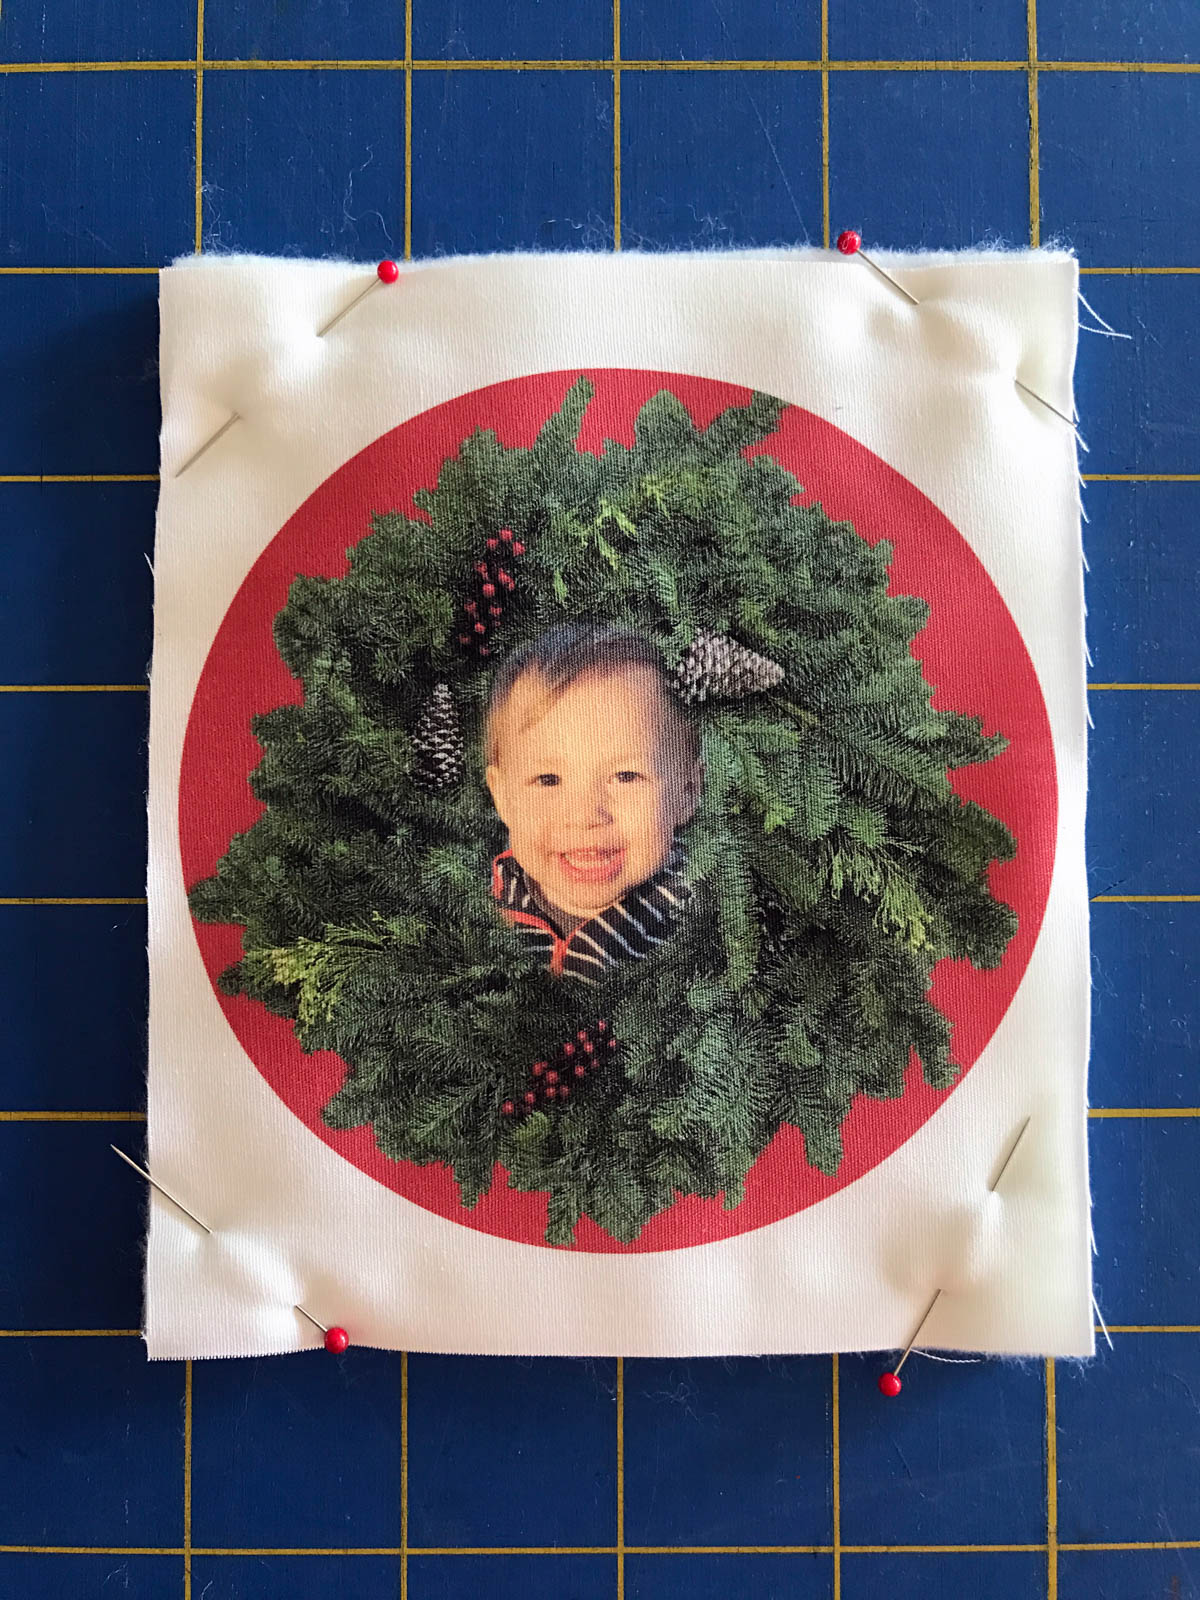
Put your fabric sandwich together, taking care to align the front and back pieces of your printed fabric. Note that the back piece of fabric is the mirror image of the front. Careful alignment of the front and back fabrics will place your stitching in the same place. Stitch on the top or front of your sandwich and the bobbin stitches should be in the same place on the back. Pin the four corners.
Step 4
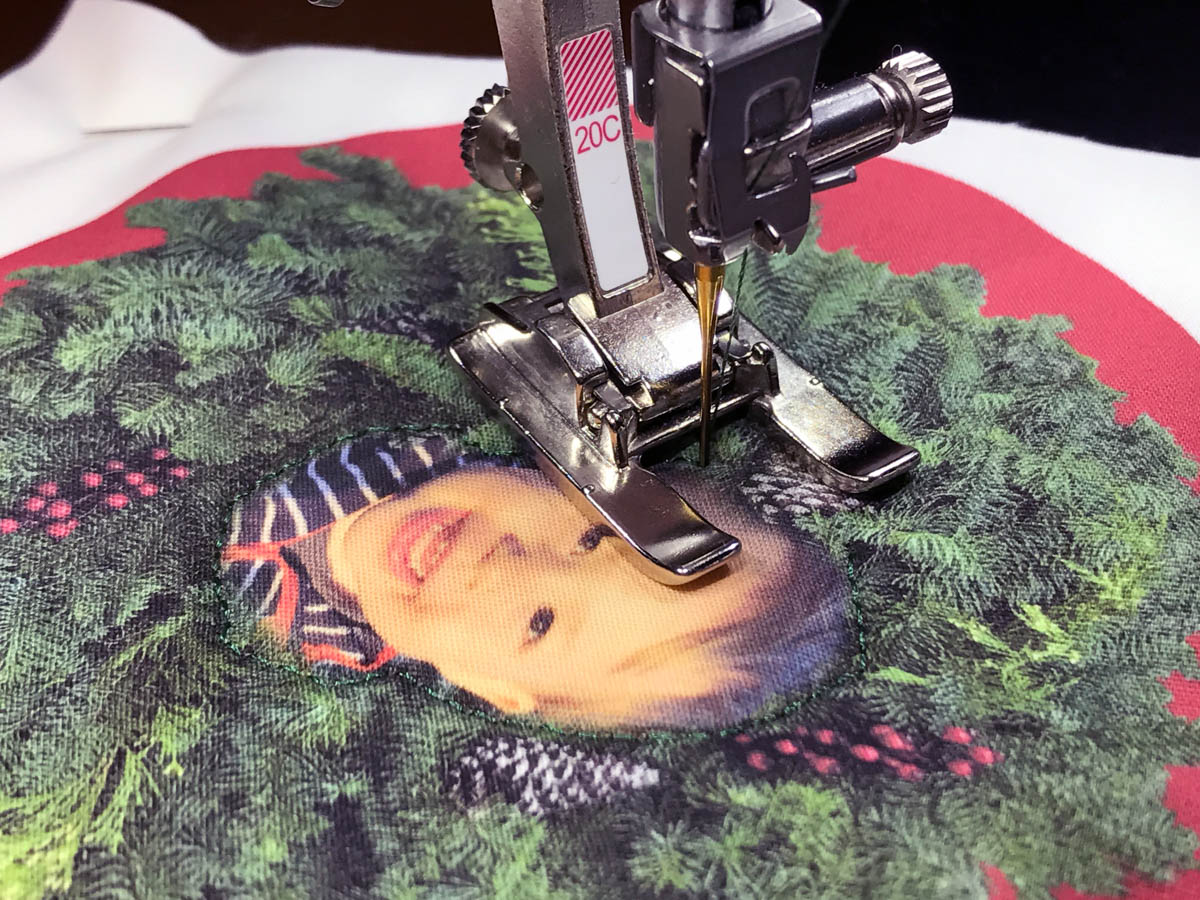
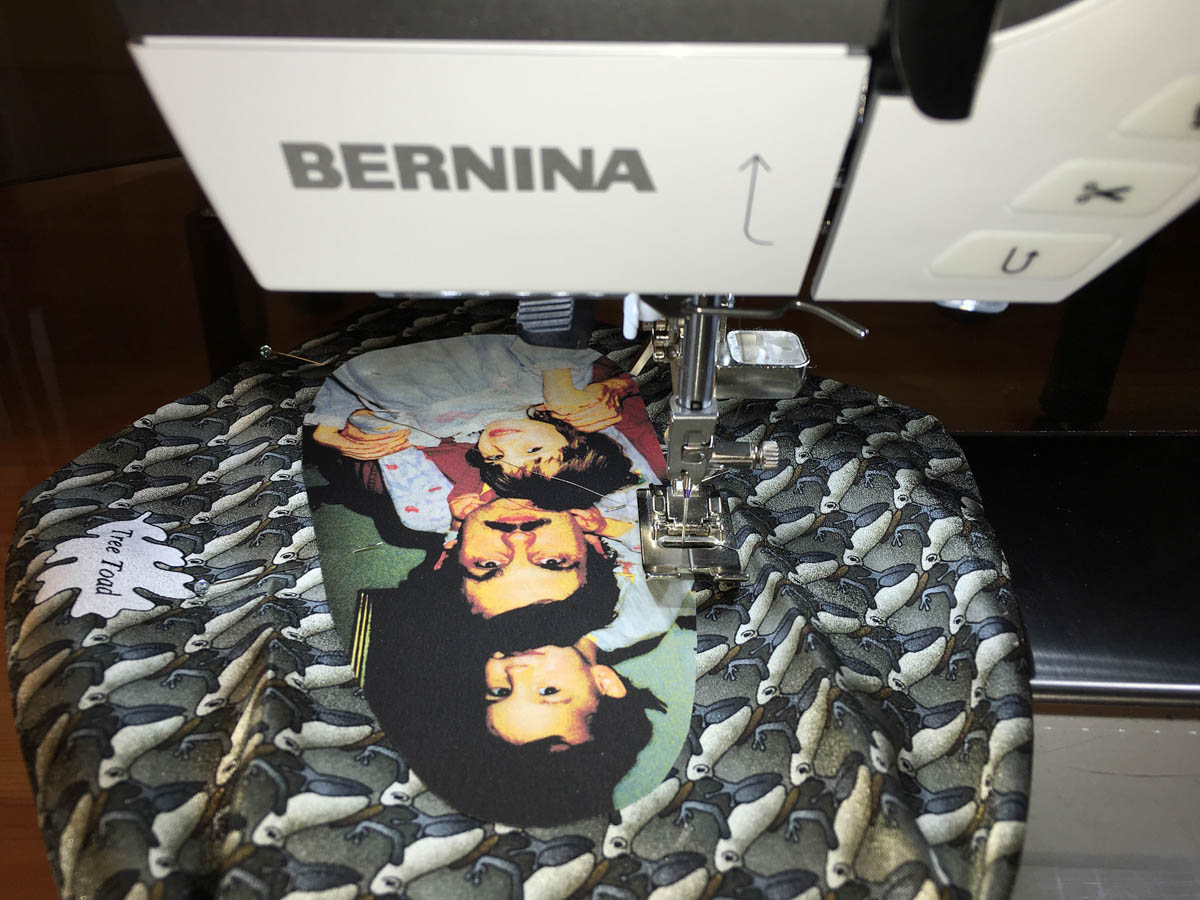
First, stitch the image in the center of the ornament. Because I wanted a lot of visibility in stitching close to the center image, I used the BERNINA Open Embroidery Foot #20. My sewing computer is a BERNINA 770 QE and one of the things I enjoy about it is the hover function. Using it, I could accurately stitch around Max’s face peering out from the wreath.
Step 5
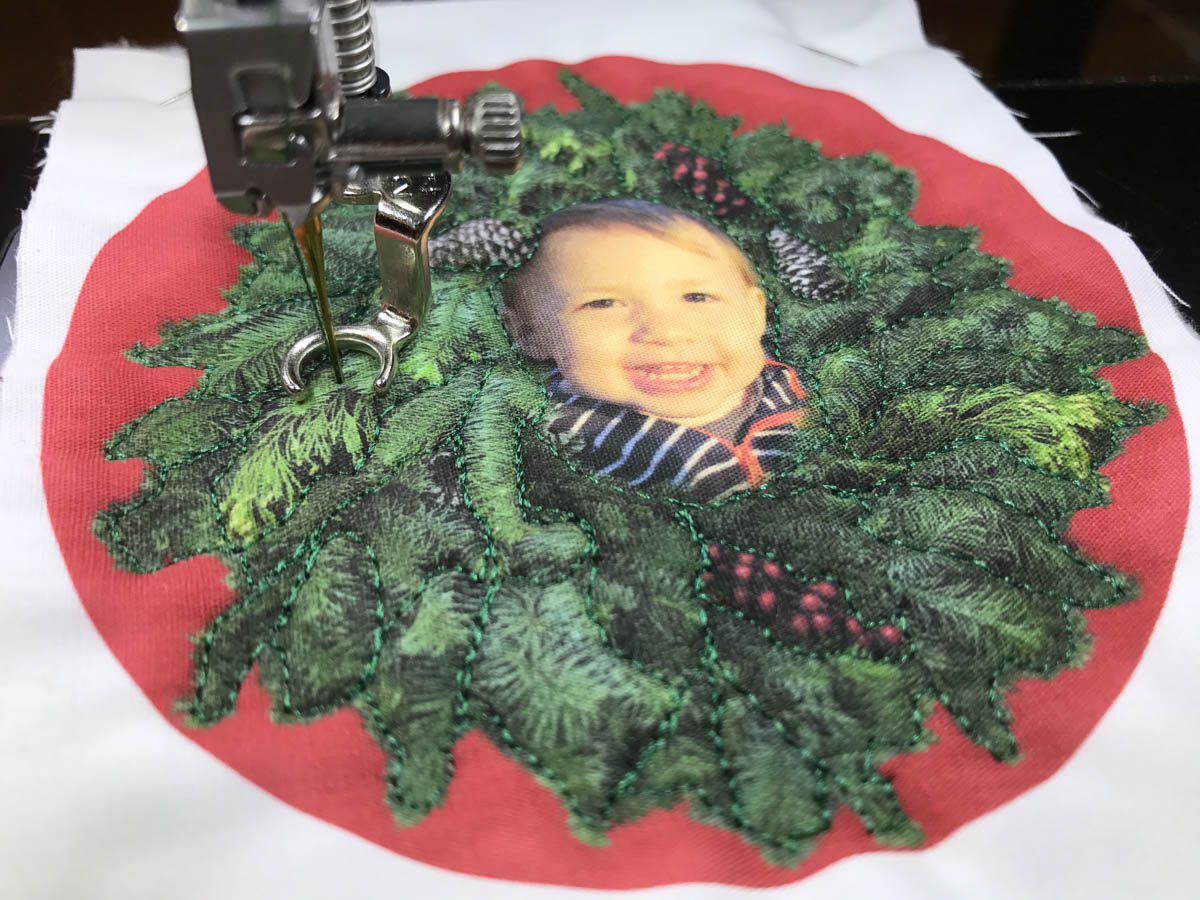
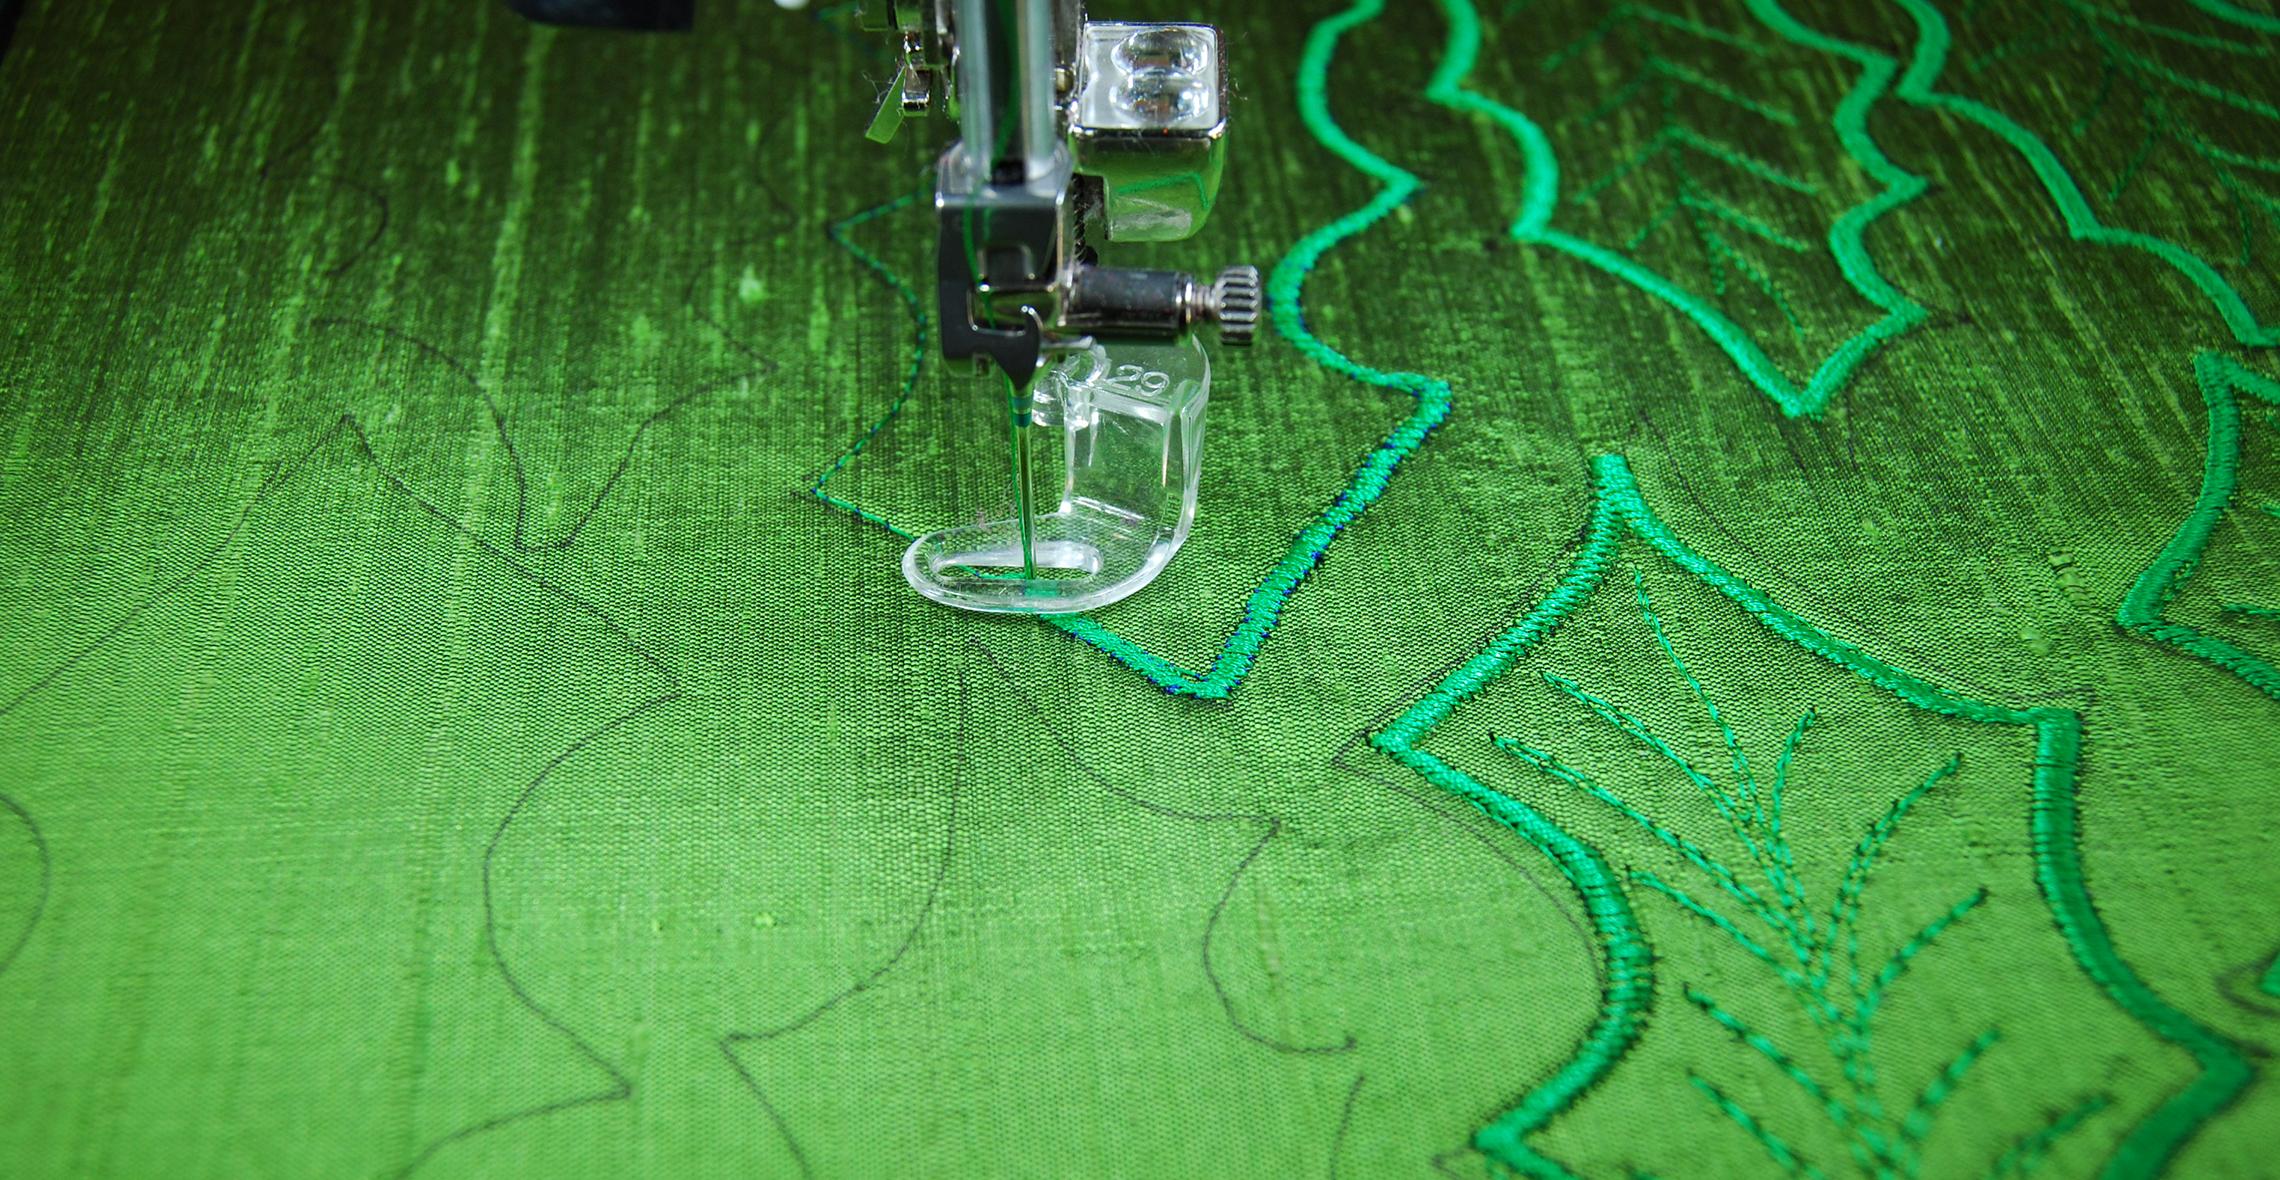
Lower the feed dogs for free-motion quilting. Stitch the outside of the wreath first, using the BERNINA Free-motion Embroidery Foot #24.

Step 6
Stitching inside the wreath gives extra dimension to the individual branches.
Step 7
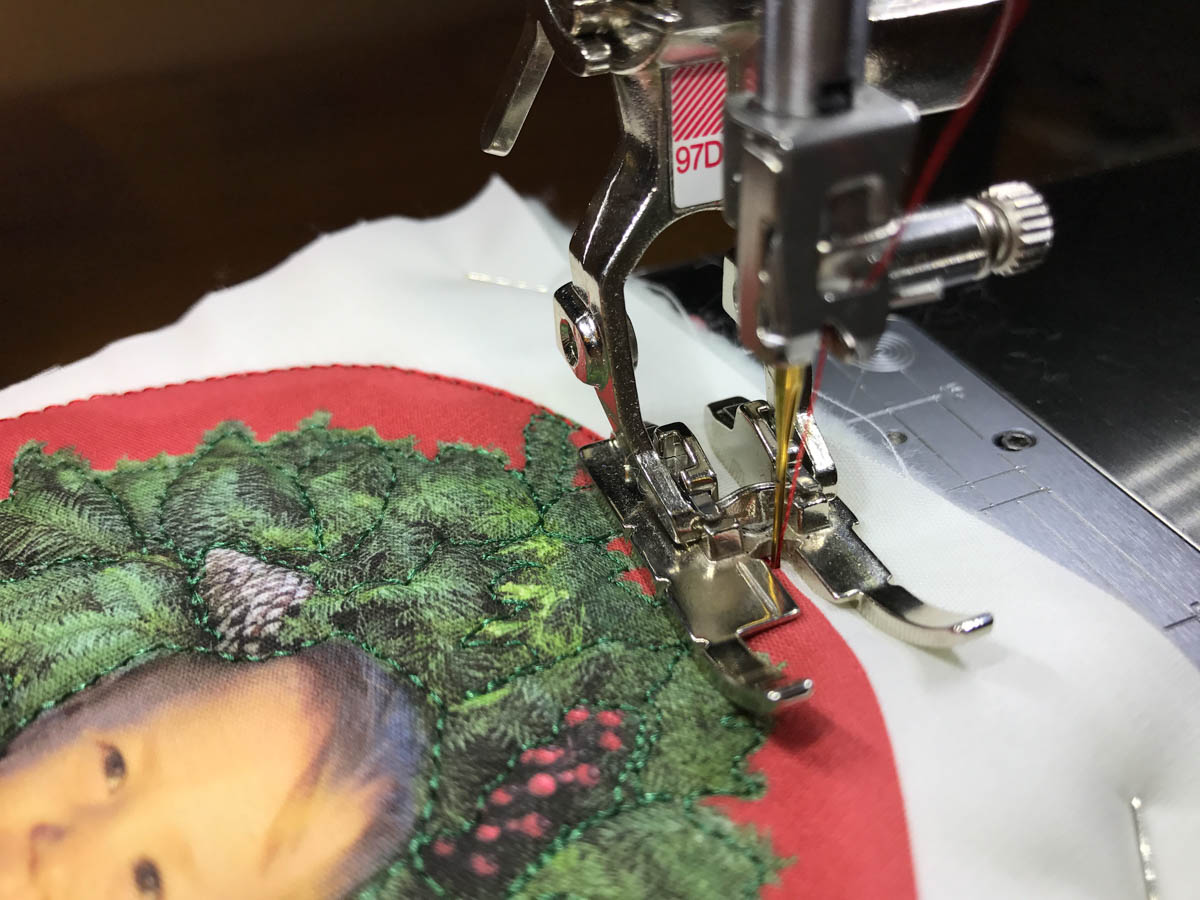
Next, raise the feed dogs for straight stitching. I used the BERNINA Patchwork Foot 97 D to stitch a securing line around the edge of the ornament.
Step 8
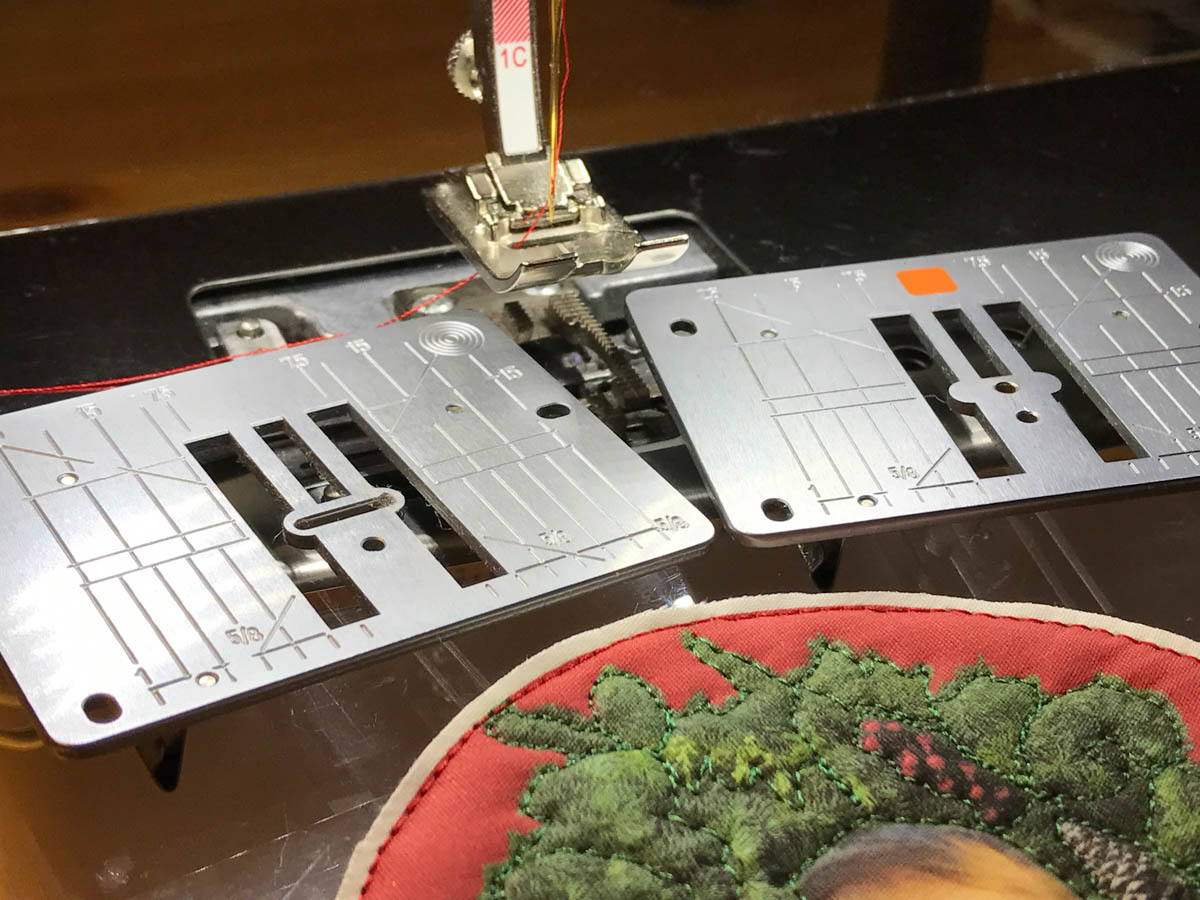
Change the straight stitch plate (right) and replace it with the 9mm stitch plate (left) that allows for a Zig zag stitch.
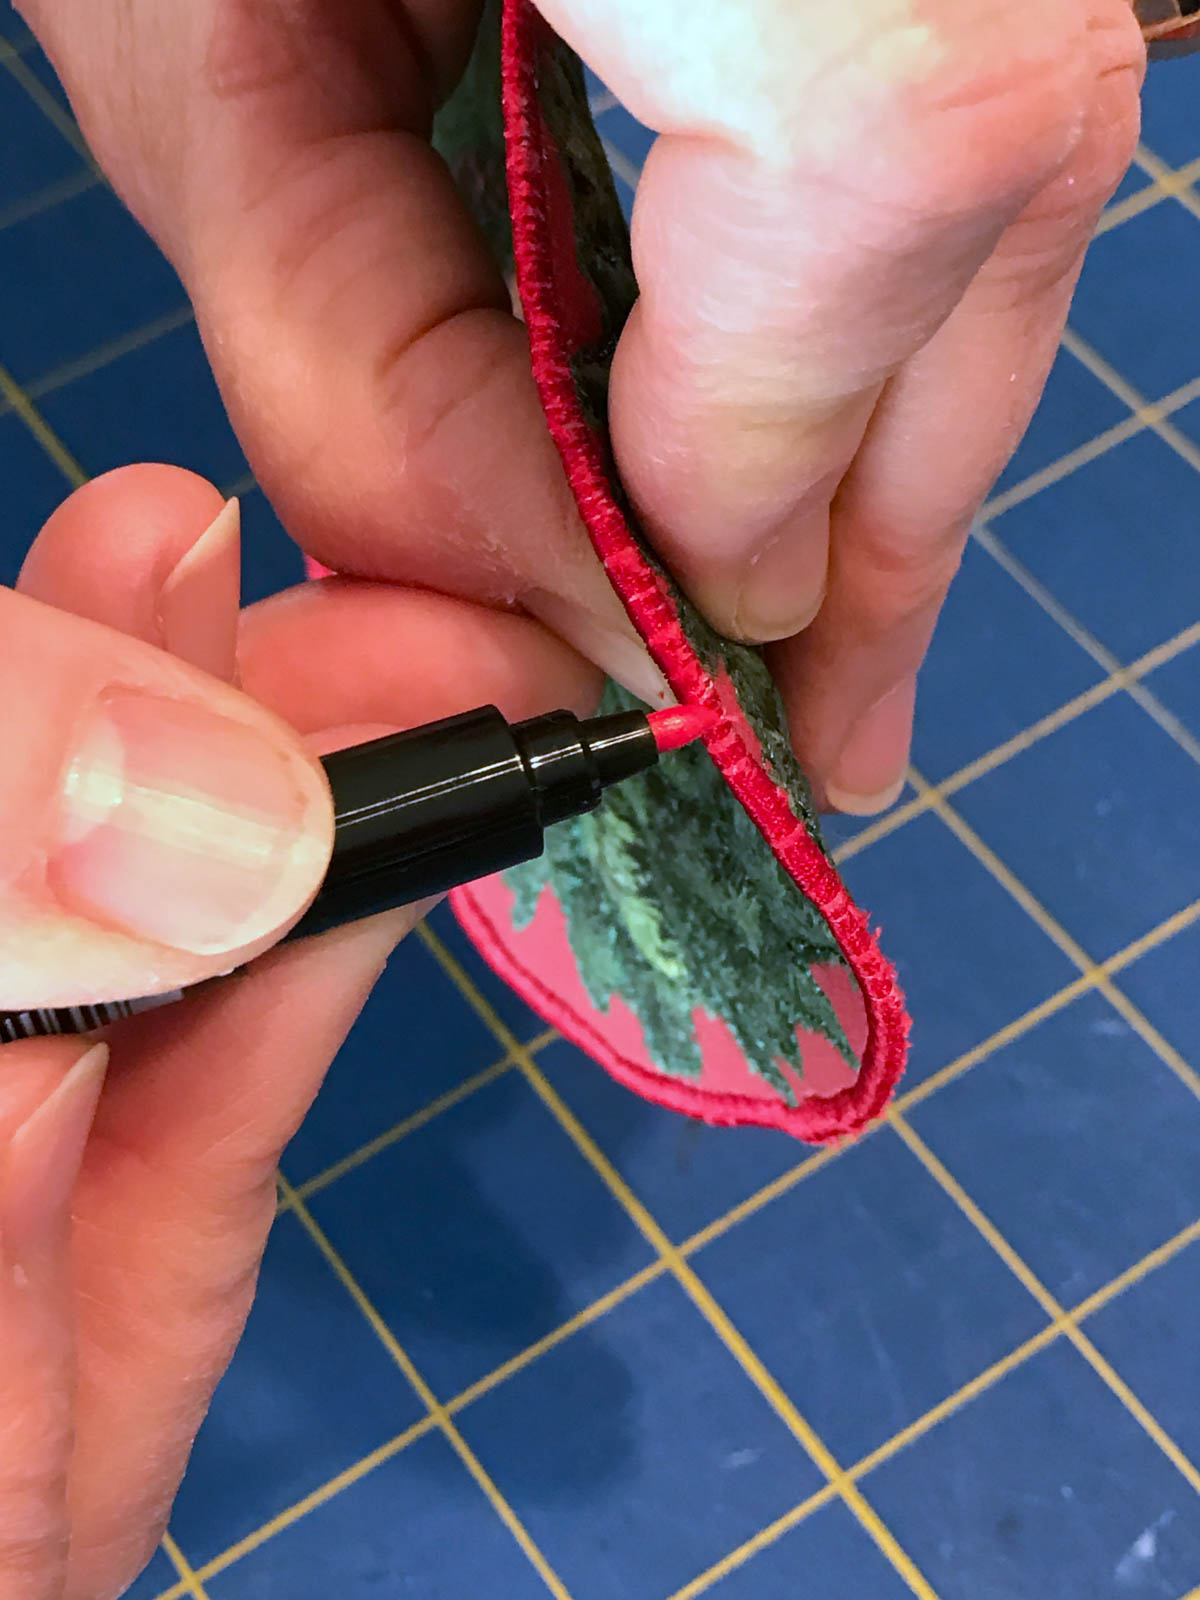
Step 9
Stitches Zig zag No.2 or the Satin No. 1354 on the BERNINA 770 can be used for this step. Guide the edge of the fabric into the center of the Reverse Pattern Foot #1C. For a clean edge finish, position the ornament so the needle goes into the fabric on the inside of the Zig zag stitch and just over the edge on the outside. My stitch settings on the BERNINA 770 QE were width 4.0 and height 0.30.

Step 10
Trim any stray threads, being careful not to cut into the edge stitching. You can also use a fabric marker on the edge where the batting shows, or touch up any white areas that show through the stitching.
Thread a 10-inch length of perle cotton or other heavy weight thread through the ornament to hang it on your holiday tree.
So, how did I get the picture of Max peeking out a holiday wreath? Here are 20 steps I used to make the digital fabric for the fabric ornament above.
Step 1
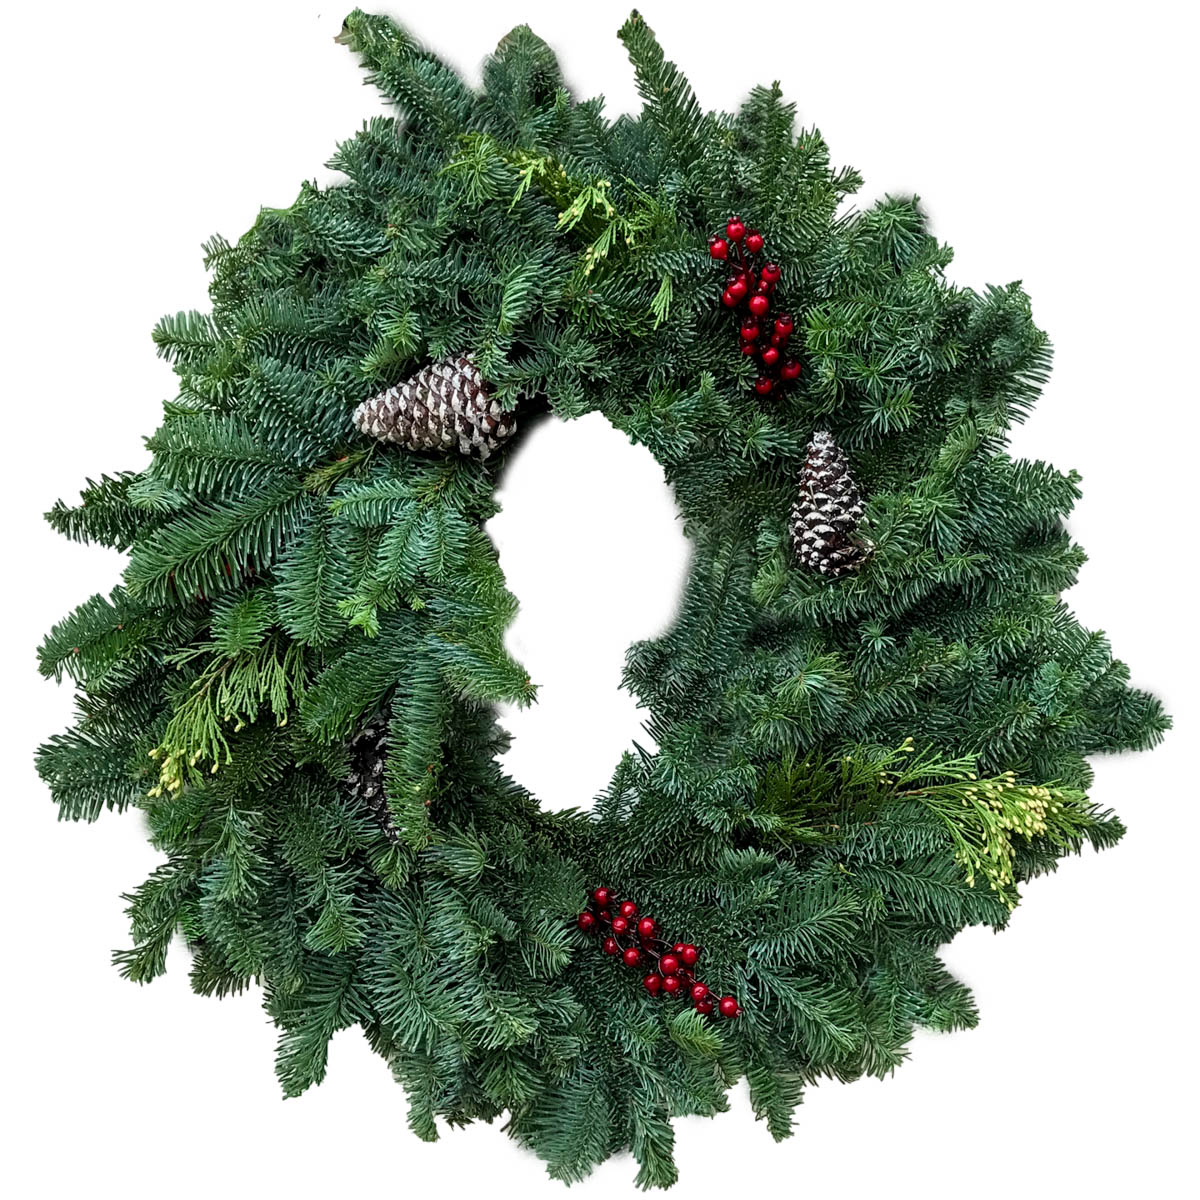
Start with a photo of the holiday wreath on your door. I used an iPhone7+ and took this photo of the wreath on the “Square” setting. If you can’t do this easily, a copy of my wreath photo is available for you to use. Image: Wreath Transparent 4×4
Step 2
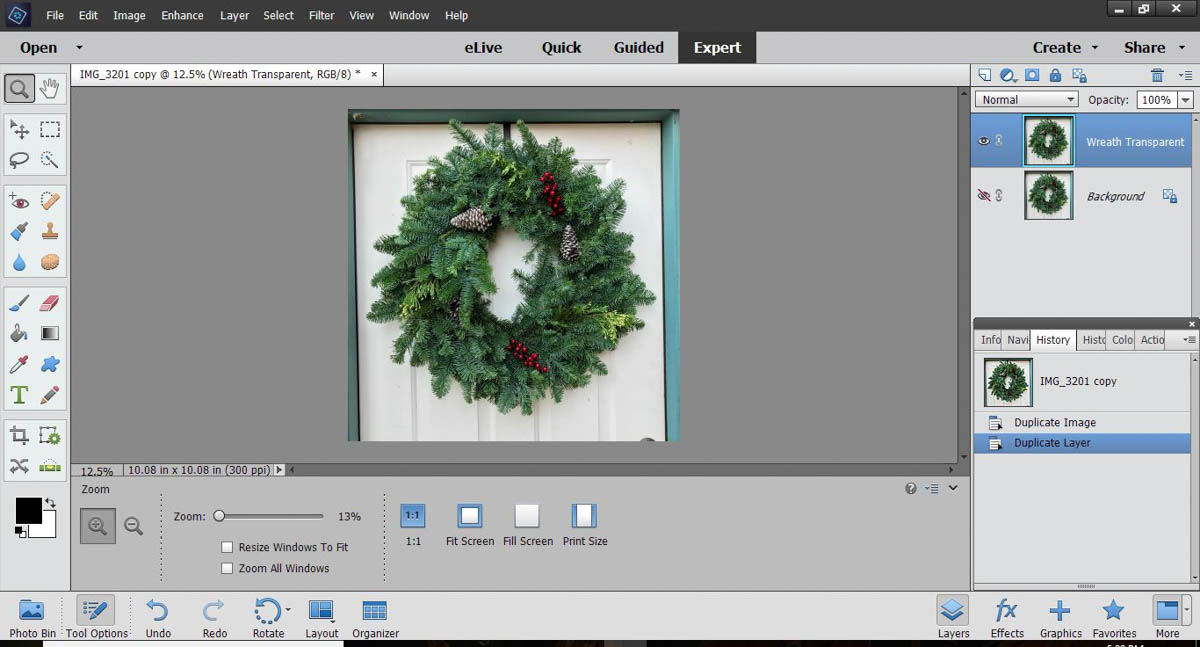
Import the photo from your digital camera into your computer. I used the photo processing app Adobe Photoshop Elements (PSE) to create the images that I printed on inkjet fabric sheets.
Step 3
Open the picture of your wreath in PSE and make a duplicate, or copy, of it. Then close the original picture file. This way you are working on a copy and if you make any mistakes you have not harmed your original image. Next, make a duplicate of your background layer. I called it “Wreath Transparent.” Turn off the “Eyeball” in front of the “Background” layer.
Step 4
Using the “Quick Selection Tool” select the entire door outside of the wreath and delete it. Again use the Quick Selection Tool to remove the center of the wreath. This will place just the wreath on a transparent background. Zoom into the image, and using the Eraser Tool, clean up any parts of the background that you did not get with the Quick Selection Tool.
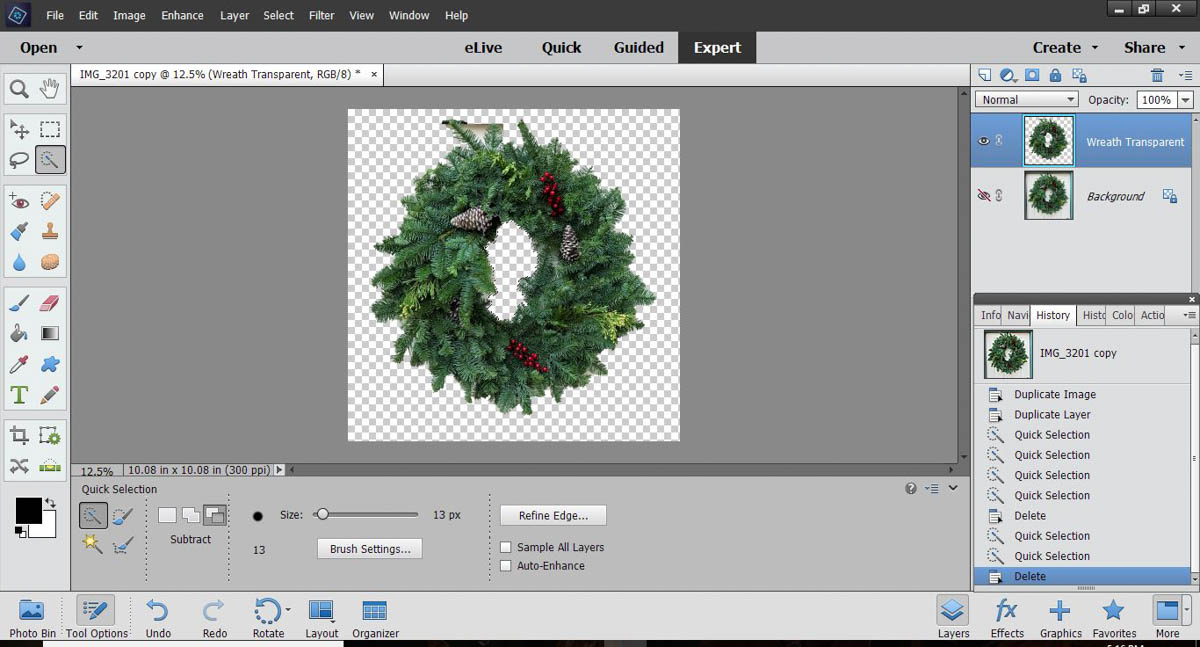
Step 5
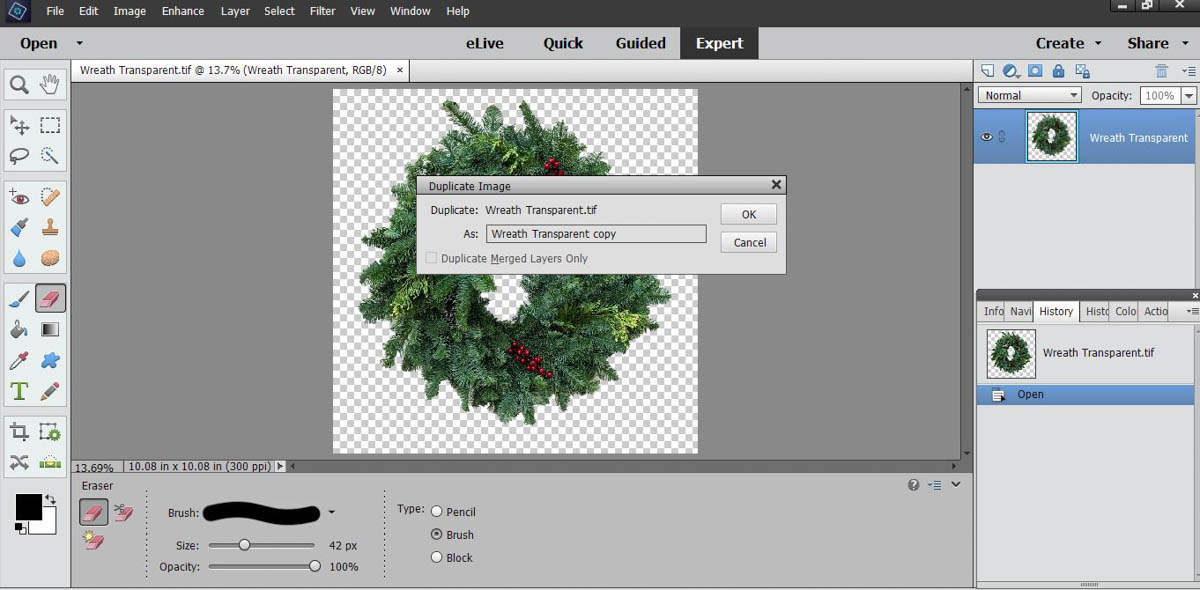
You can now delete the “Background” layer and save the image of the wreath on a transparent background. It needs to be saved either as a TIFF or PNG file to preserve the transparency. Next, make a copy of your Wreath Transparent image because, again, you want to work on a copy, not the new original that you have just created.
Step 6
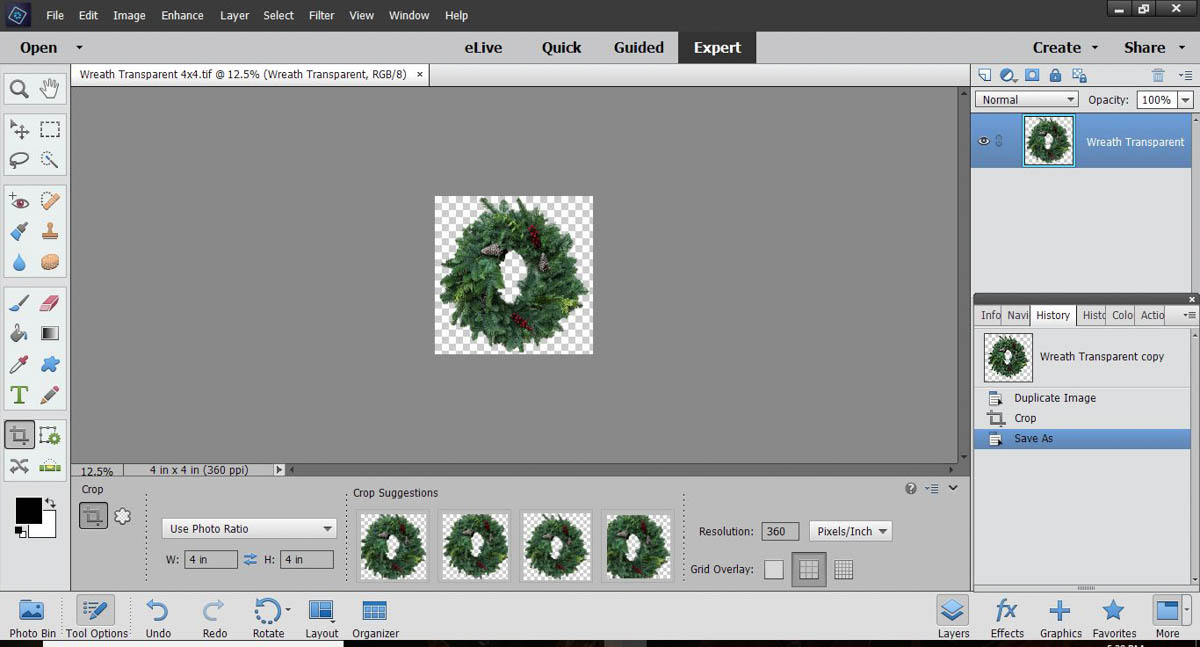
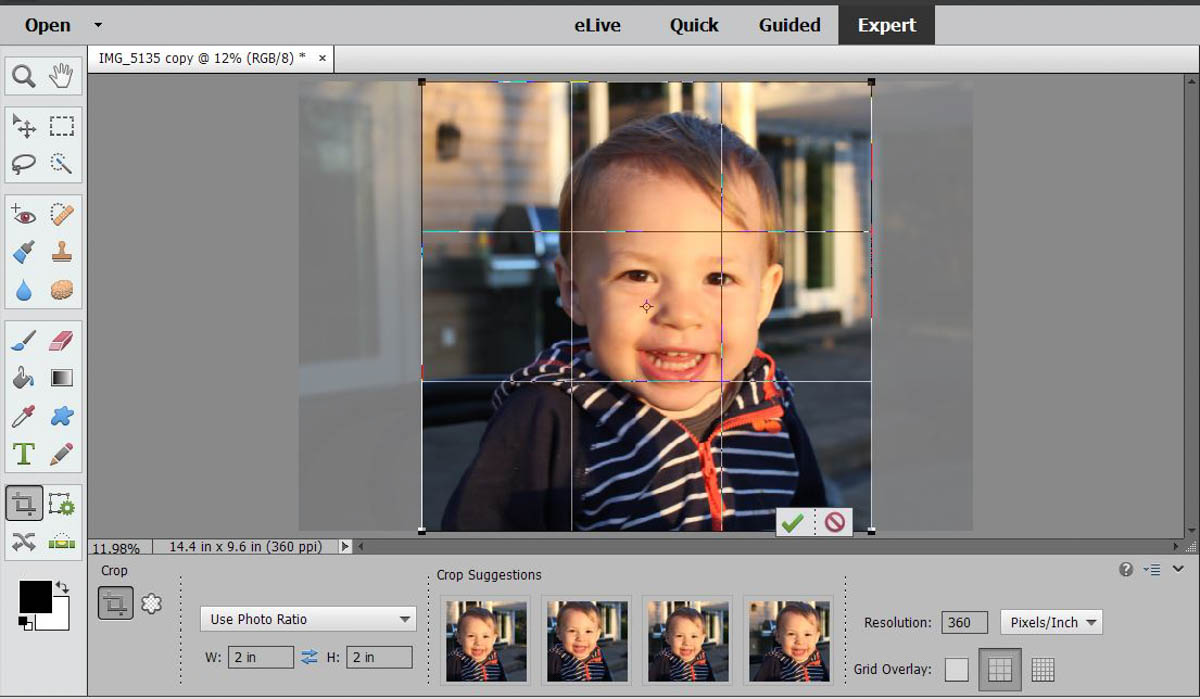
Crop the image to the size that you want. I chose to make this a 4-inch ornament. I set the width and height at 4 inches each. Most importantly, because I will print this on an Epson printer, I set the resolution to 360 pixels per inch (ppi) which is the native resolution of the printer. If you are using the image of my wreath, all of these steps have been done for you.
Step 7
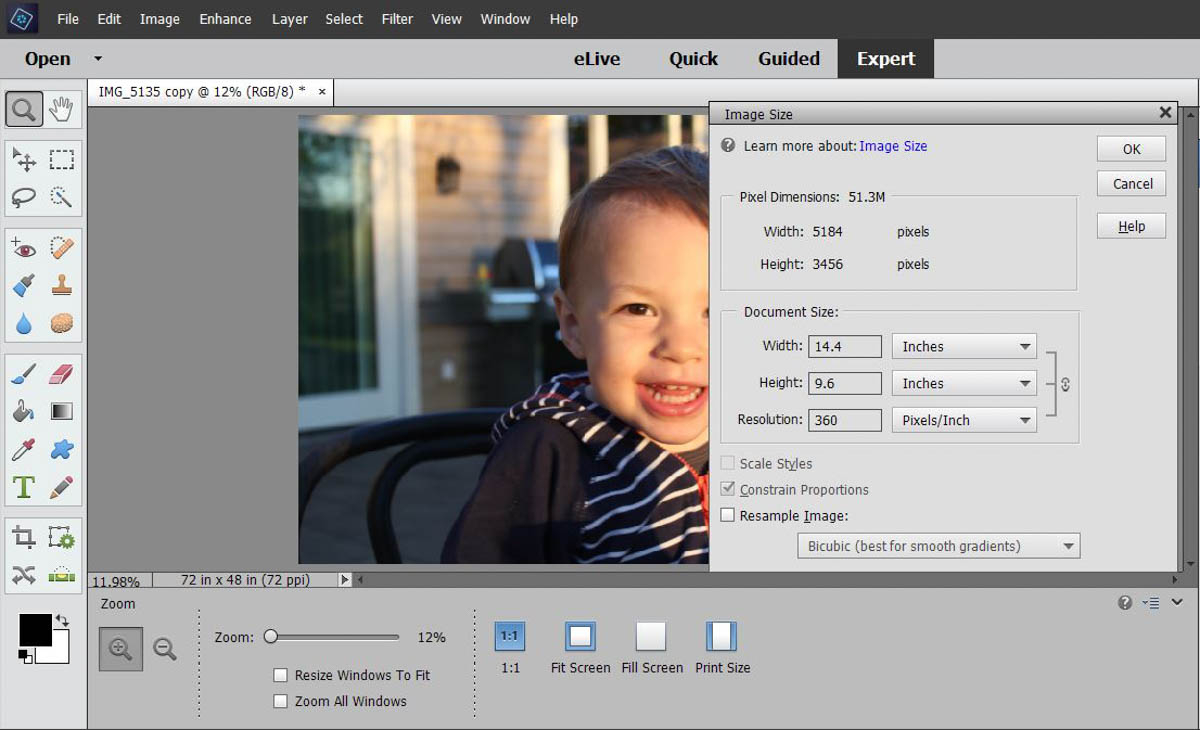
Open the photo that you want to put in the center of the wreath. In this case, it is Alice’s son, Max. The image from her camera is 72 inches by 48 inches at 72 ppi. I wanted to know how large this image was at my printer’s resolution of 360 ppi. From the top menu bar, go to Image and drop down to Resize, and across to Image Size. This opens the Image Size dialog box. Unclicking the Resample Image box allows the resolution to be changed without changing the size of the file. I changed the resolution to 360 ppi.
Step 8
Next I cropped the portrait of Max to 2 inches by 2 inches.
Step 9
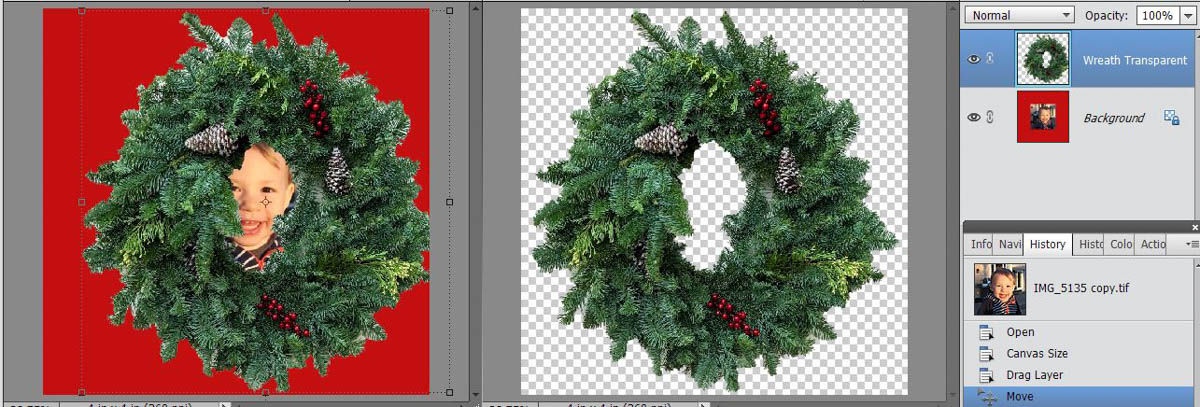
Remember, the ornament size is 4 inches. Go to the Image menu and drop down to Resize and this time, over to Canvas Size. When the menu opens, change the canvas size to 4×4 inches with a colored background. I chose a dark red.

Step 10
With the photo of Max open, I then opened my Wreath Transparent 4 x 4 image. I went to the Window drop down menu and selected Images>Tile. This places both images on the screen together. From the Layers Palette I dragged the “Wreath Transparent” layer to the image of Max. This places the wreath over the image of Max on a separate layer.
Step 11
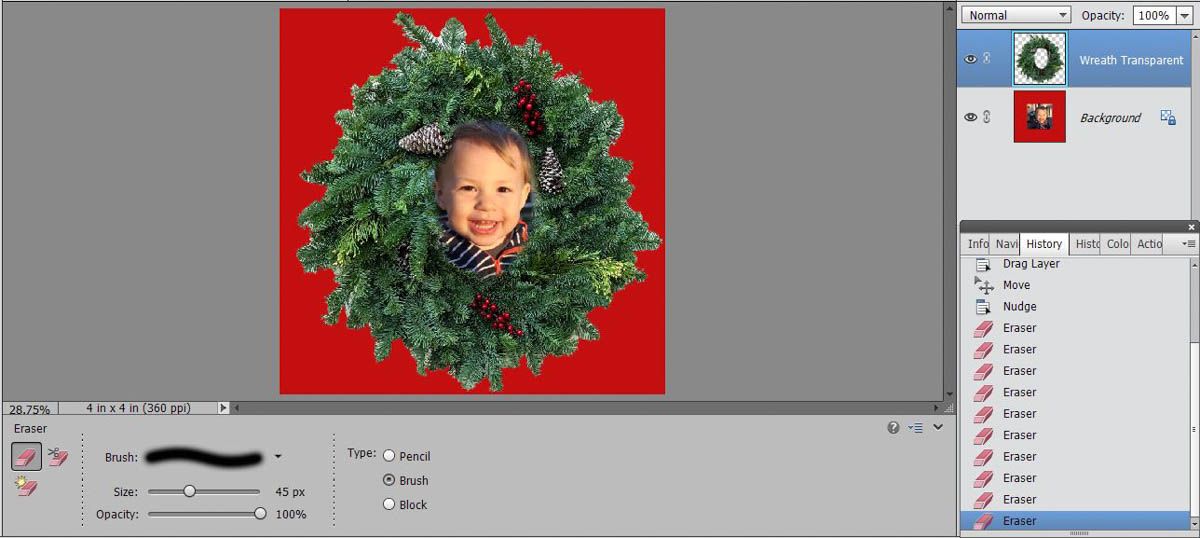
You can use the Move tool to reposition the wreath over your center photo. Close the copy of the wreath that was used to create the layer above your photo. Because the wreath is a separate layer, the eraser tool can be used on that layer to remove parts of the center of the wreath to reveal Max in the center. I like to use a soft round brush and remove a little bit at a time. In this way there are no sharp edges, and if I make a mistake and remove too much I can back up in my work history.
Step 12
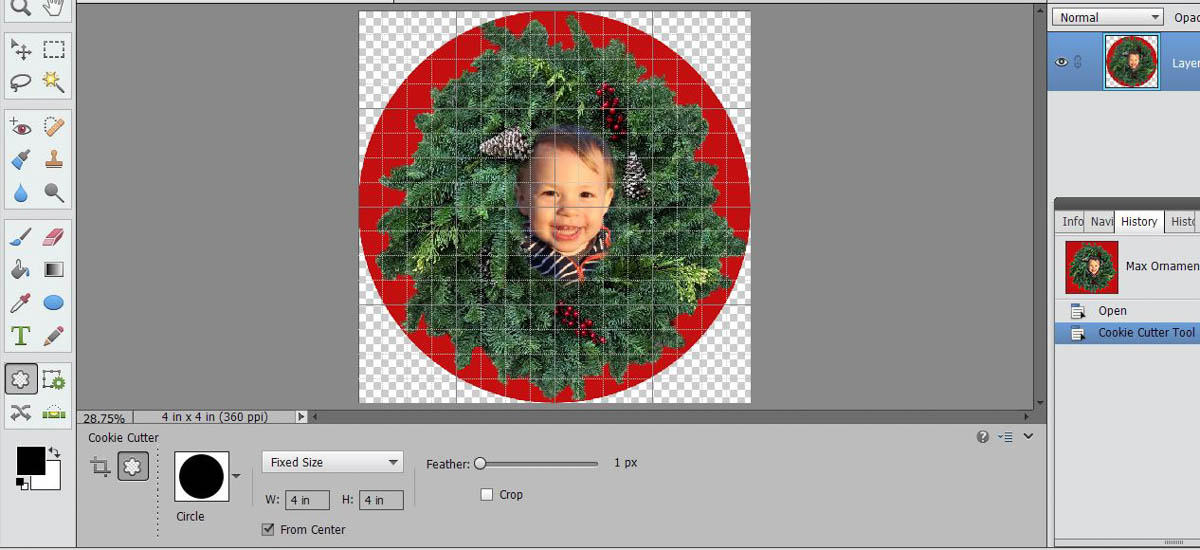
The image I have of Max looking out through the wreath is square. I want to make it round for my ornament. With the Tool Options selected in the bottom tool bar, click on the Crop Tool. In the Tool Options next to the Crop Tool is the Cookie Cutter Tool. Clicking on the Cookie Cutter gives you a new menu of options. The default shape is a heart. Clicking on the down arrow next to it opens a window for the Custom Shape Picker. Select Shapes and scroll down until you find the Circle Shape. With the Circle Shape chosen, to the right are options for the size of the shape. From the drop down window, select Fixed Size. This activates the width and height boxes: enter 4 inches in both boxes. Below it is a checkbox From Center: click on it, selecting that option. From the top toolbar under the View drop down menu, select Grid. This places a grid over the image and allows you to easily find the center of the picture. Click on the center of the image and you will get a perfect circle and the rest of the image will disappear, and the background will be transparent. Clicking on the green checkmark in the bottom right hand corner of the image will save this action.
Step 13
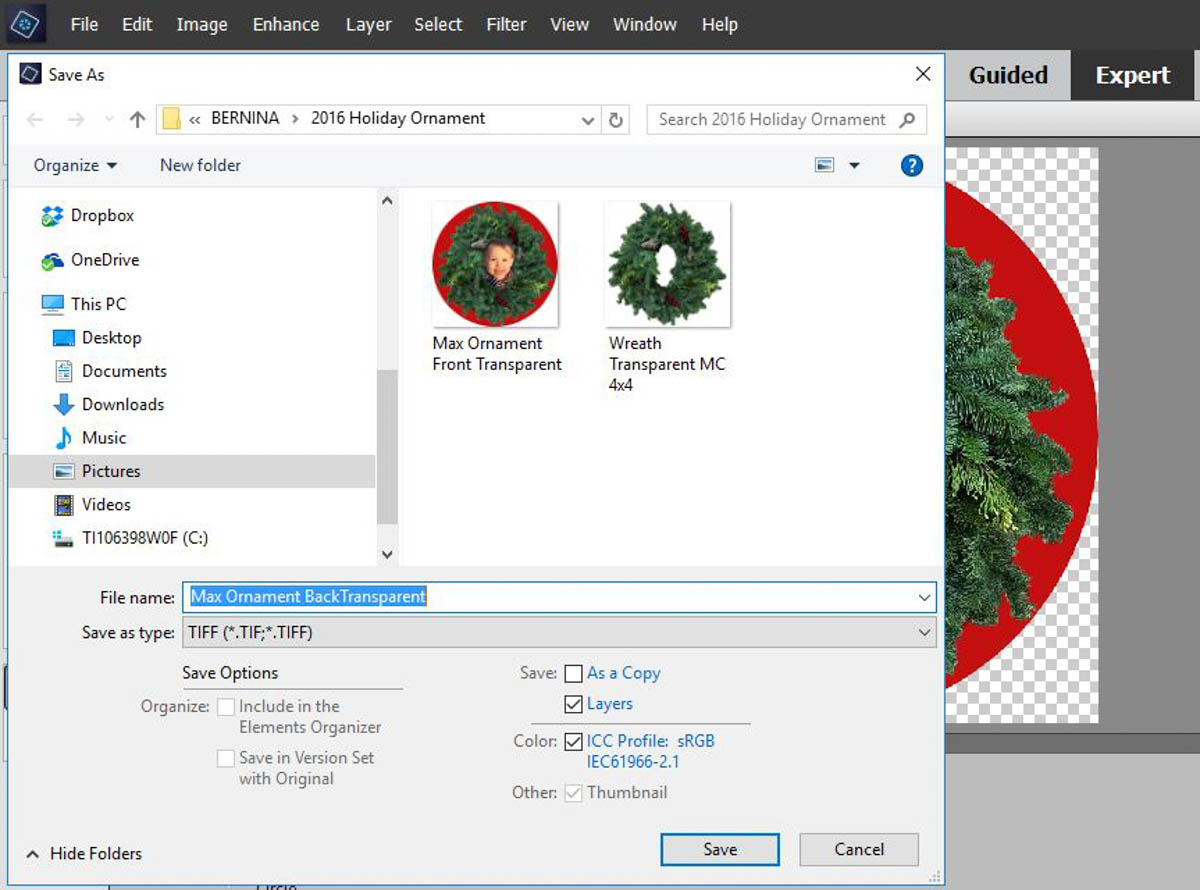
Return to the View drop down menu on the top menu bar. From the View drop down menu, click on Grid and it will disappear from over the image. From the File drop down menu select Save As, and save the file to a folder, giving it a name such as “Max Ornament Front.” I like to save files like this as a Tiff, because Tiffs preserve transparent layers. Once the file is saved, you can make a duplicate of it for the next step. Close your original file, and working on the copy, go to Image drop down menu and select Rotate. This opens another window next to it: select Flip Horizontal. Flipping it Horizontal creates a mirror image for the back of your ornament. If you line up your top and bottom sheets on your fabric sample, your bobbin stitching will match the stitching on the top.

Step 14
Save this new flipped image in the same folder with your other images.
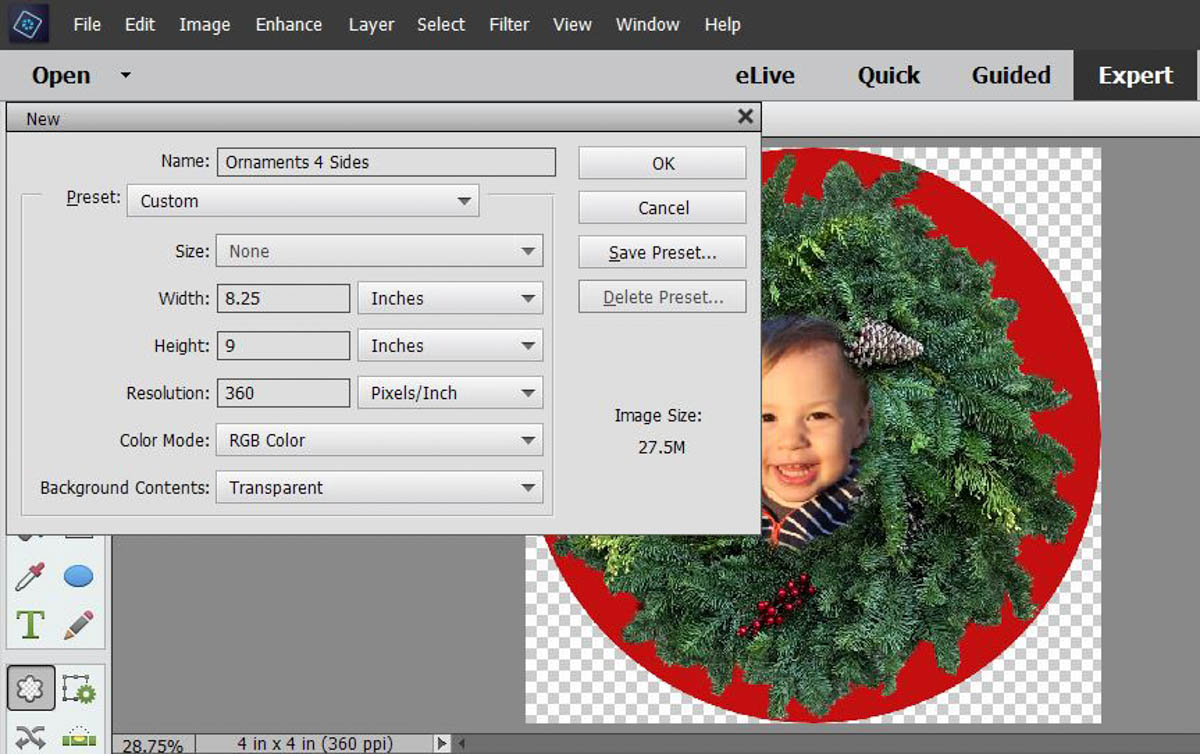
Step 15
Open a new file with a transparent background. Select inches for your new file, set the resolution for your printer. Many printers have a native resolution of 300 pixels per inch. The Epson printer I use is 360 ppi. The Color Mode is RGB and the Background Contents are Transparent.
Step 16
Once the new file is open, also open the front and back images of your ornament. Again, go to Window>Images>Tile. You will have three windows open. Highlight the front ornament file and again dragging from the Layers Palette, place the front ornament on your new file. Repeat this process with the back ornament file. Use the Move tool to accurately place each one in a corner of the new file.
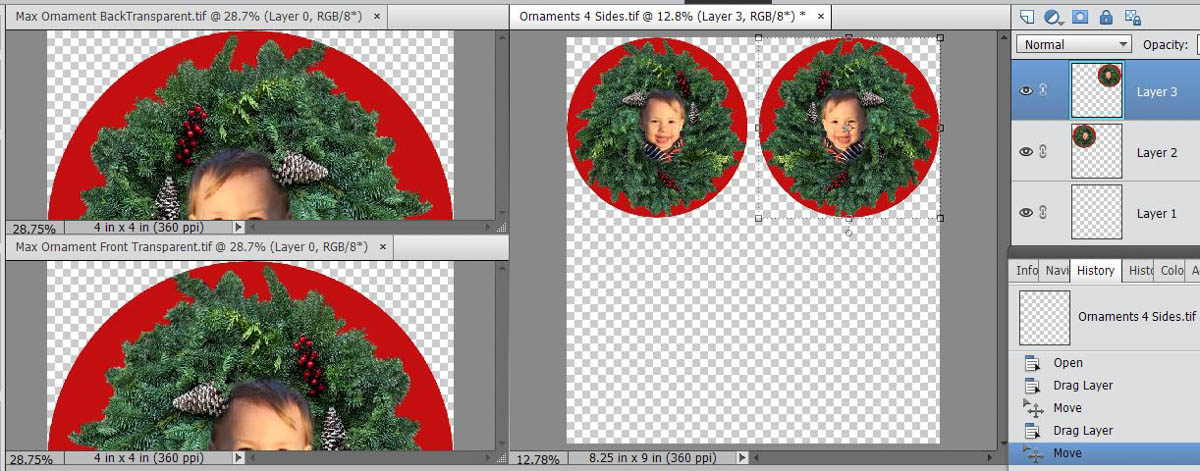
Step 17
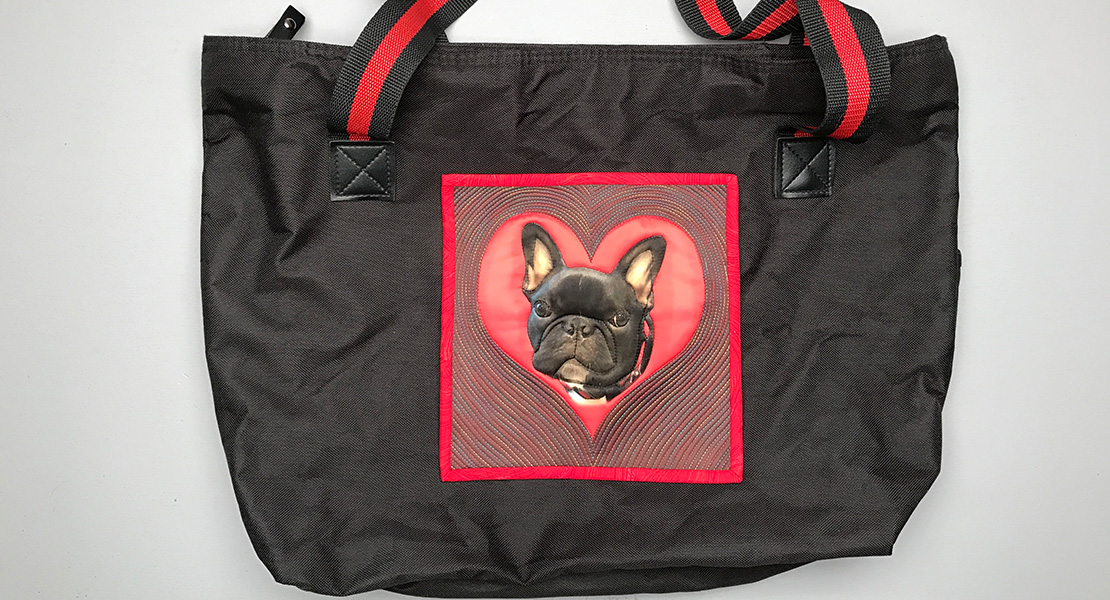
You can get four Ornament sides on one sheet of 8.5 x 11 inch inkjet fabric. In this case, I used the above procedure and brought in images of a friend’s dog. There are a variety of inkjet fabric sheets that have a coating on one side to capture the ink. In this case I used Threads 100% Cotton Poplin from BREWER.
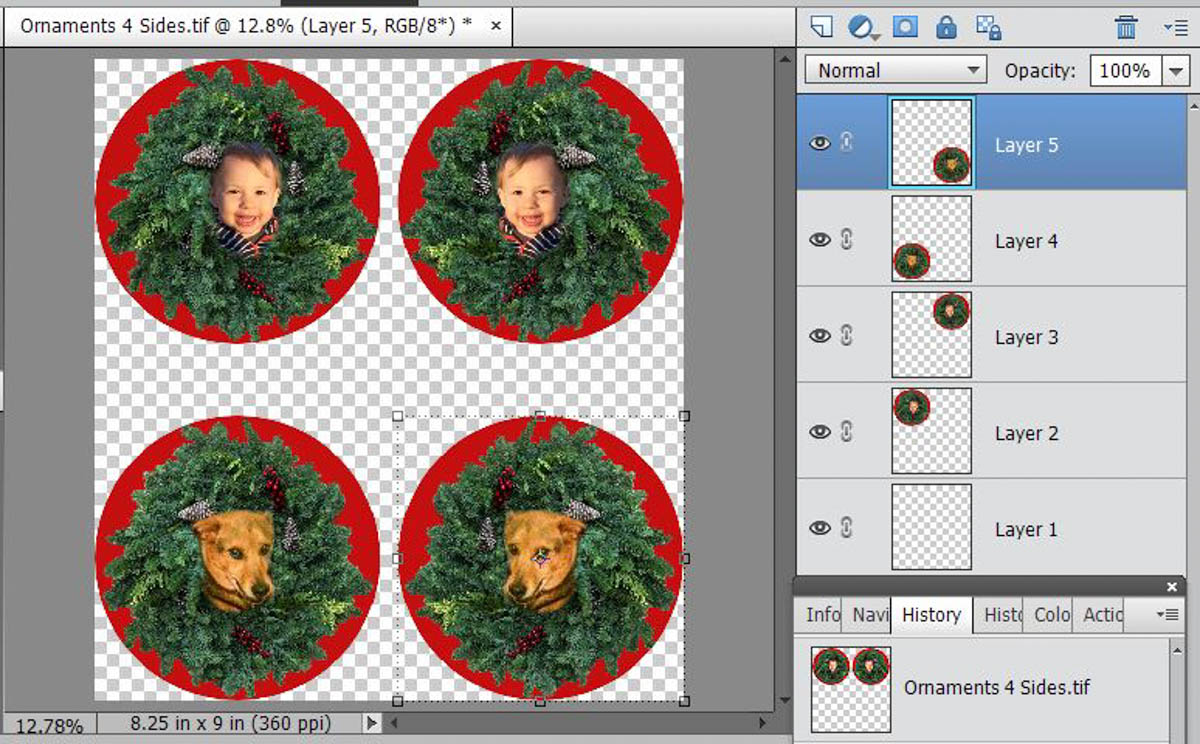
Step 18
Once I have my four sides in one file, I go to the top menu bar Layer, and drop down to “Flatten Image.” Now I am ready to print the sheet of inkjet fabric. From the File drop down menu, select Print and the Print Menu opens up. It is important to change option 5 Select Print Size from the default 4″ x 6″ size to the Actual Size of your file.
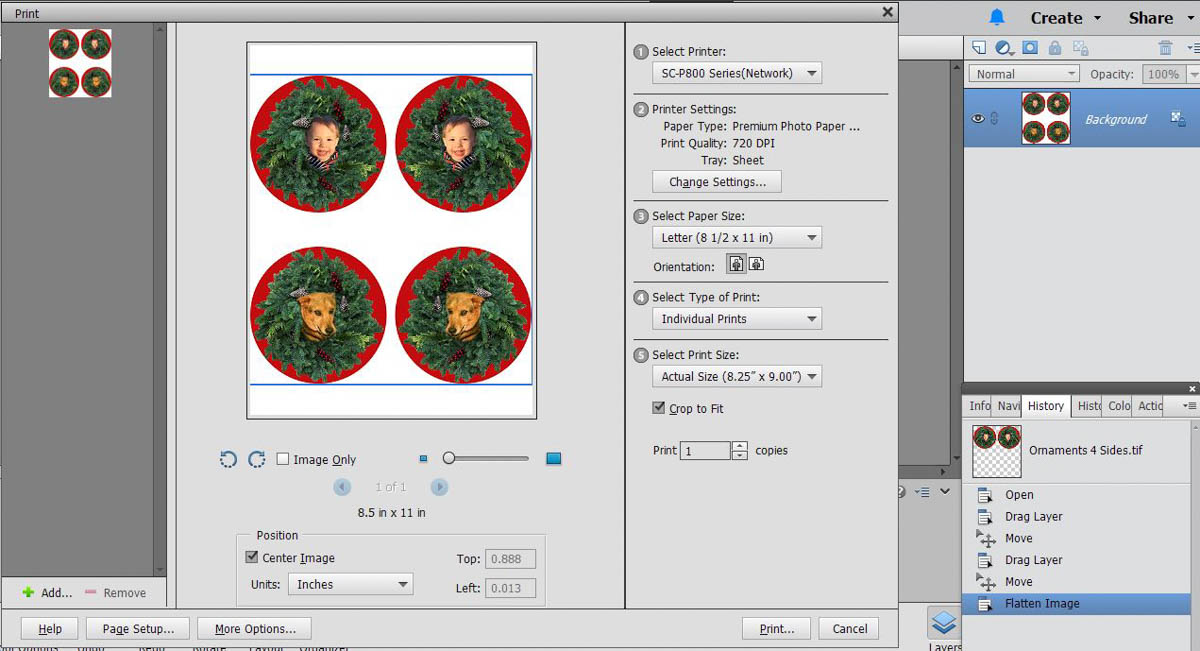
Step 19
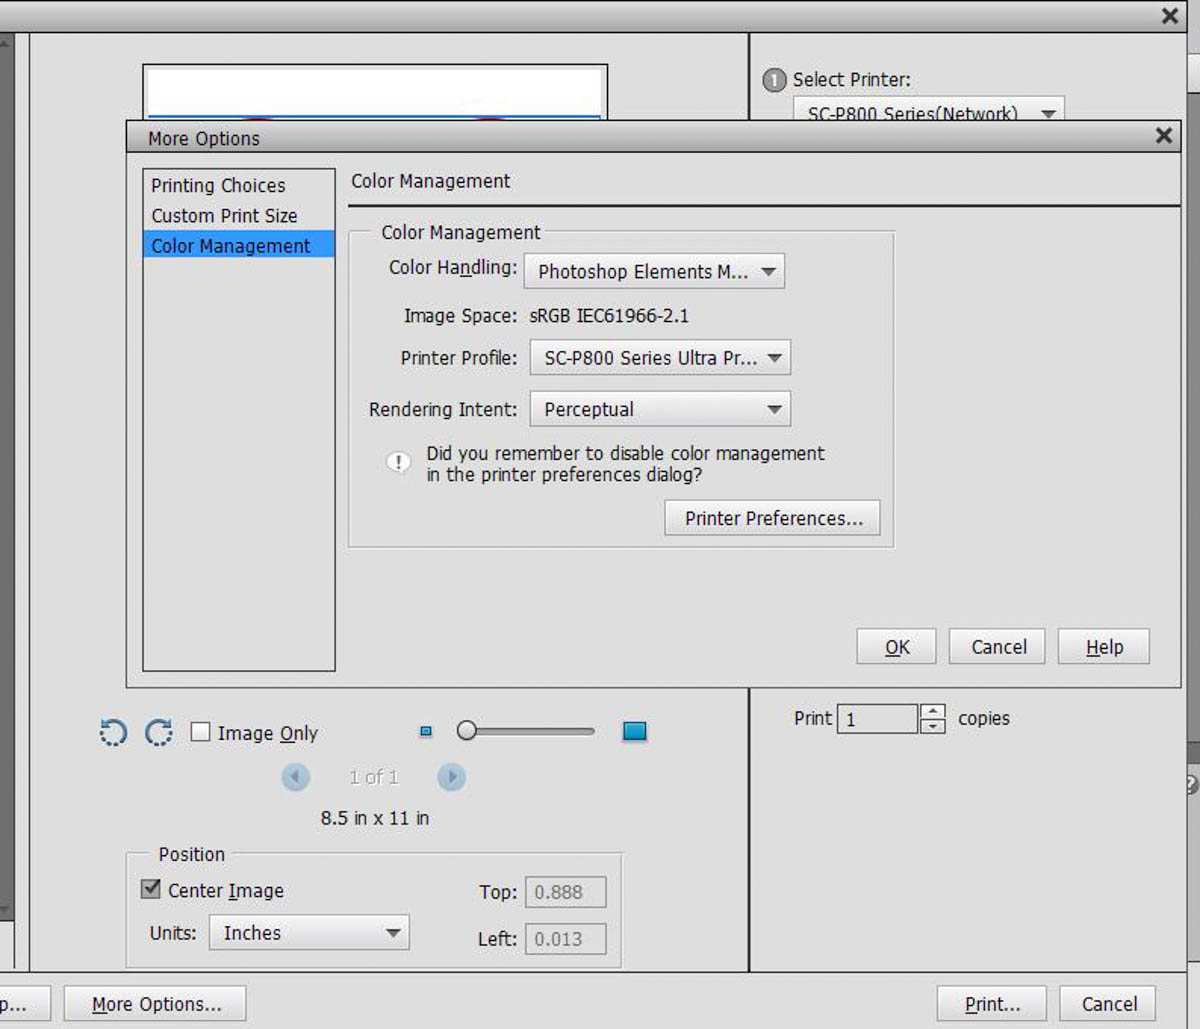
At the lower left corner of the Print Menu is a box “More Options.” Click on it and go to the third choice on the bottom, Color Management. The default Color Handling is to let the Printer Manage Colors. This seldom produces the results that you want. Change this to Photoshop Elements Manages Colors. This is one of the most important things you can do to get good color on your fabric sheet. If your printer has profiles, select the one for Ultra Premium Presentation Matte. Rendering Intent should be Perceptual. Printer Preferences will take you to the Advance Settings.
Step 20
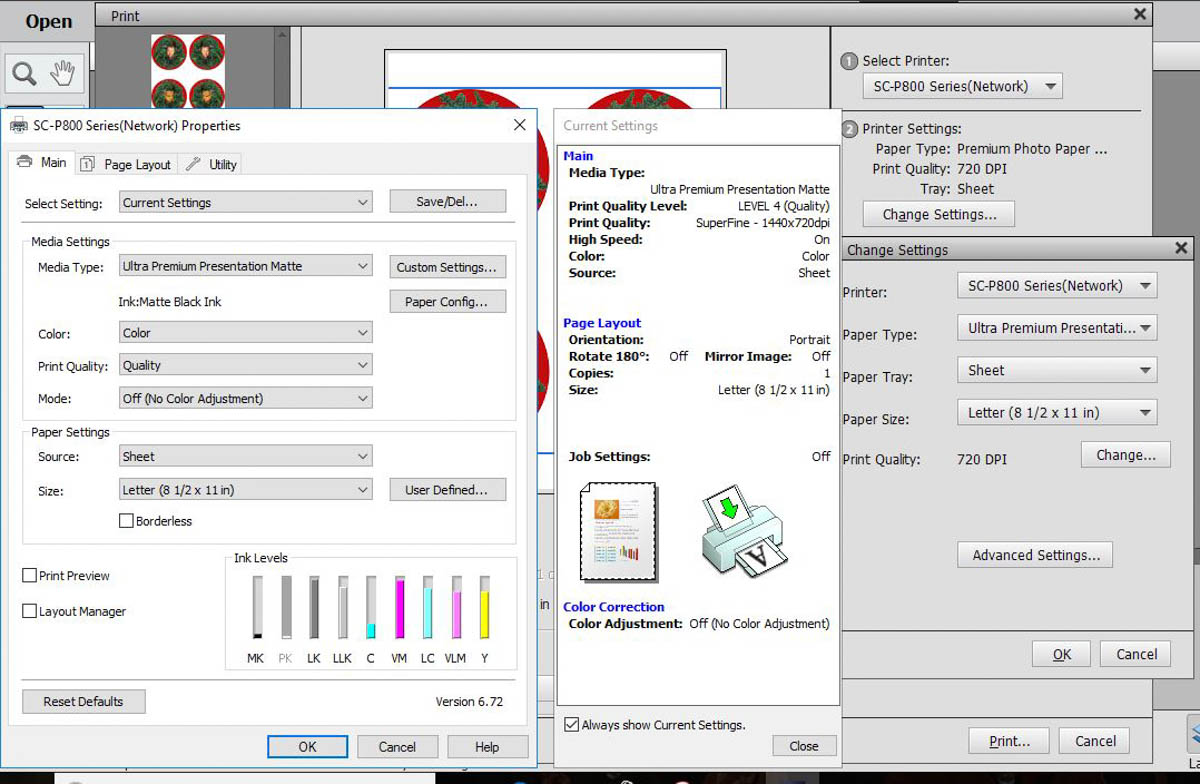
You can also reach the Advance Settings from the Print Menu Option 2 Printer Settings. Click the Change Settings window and in that window click on Advanced Settings. Here are the Media Settings I use. Media Type: Ultra Premium Presentation Matte. Since we are letting PSE manage the color, the setting for Mode is “Off (No Color Adjustment).” These are the settings that I use with my printer. The settings on this menu will vary according to the printer that you are using. You may not have all the options that are shown here. Click OK until you get back to the main print menu. Clicking Print gets the inkjet fabric sheet printing. Once it is printed, you have the fabric for your holiday ornament.

Our December 18 Gift for You:
Today’s gift is a set of three BERNINA Ornaments to one awesome WeAllSew fan.

All you have to do is post a comment below answering the following question:
Do you create handmade ornaments?
A winner will be chosen at random on December 18, 2016 and announced the following week!
Good luck!
The contest is open for comments until December 19 at 12:00 midnight Central Time. Click here for contest rules.
Congratulations to WeAllSew reader “terry487,” the winner of our December 18th gift. Enjoy!


What you might also like


57 comments on “EASY Stitched Photo Ornament”
-
-
Yes, I mostly create ornaments on my embroidery machine.
-
yes it’s fun for everyone
-
Yes! Well, not in a few years!
-
Yes, I have made the photo ornament from Carol Ann Waugh’s post last year. I made one last year for my grandson’s first Christmas and one this year. He did not like Santa very much this year though. I love this photo ornament idea too. Thank you so much for walking us through how to the computer part of adding the wreath to the photo. As I was reading the first part of the post I had no idea of how you did that. I really appreciate your thoroughness.
-
Yes! Thank you.
-
Cool, keeping this idea for next Christmas.
Thanks -
Yes I do. We moved into a new open concept apartment in October and we decided to get a smaller Christmas tree than we had in the past. On this tree I put nothing but ornaments that I have made.
-
Yes I love creating handmade ornaments. I use all kinds of materials.
-
When I was younger, I used to make a number of handmade Christmas ornaments. Now when I hang them on the tree I remember the time in my life when I made them. Special memories.
-
When I was teaching school, we always made handmade ornaments for parents. Coming up with something new each year was a challenge. Now that I am retired, ornament making hasn’t been a priority.
-
Yes, this year mini stocking hats. Cute ornaments! Thanks!
-
I used to. I have a lot of cross-stitched ornaments I love.
-
I have made fabric ornaments in the past but not this type. It looks like a great idea and your instructions using the Bernina presser feet are very thorough. Thank you.
-
2 years ago I made quilted Christmas balls. Instead of hanging them on the tree (mine is a small tree) I display them in a fabric basket made of Christmas fabrics. It adds cheer to our powder room!
-
Cool idea!! I don’t make ornaments but this would be really fun for next year!
-
Yes, i have created handmade ornaments in the past, but not this year.
-
I make handmade ornaments when time allows. This year I have plans to make them, but it may not happen until January.
-
I have made ornaments, but not in the last few years. They are the ones that bring back the memories of Christmas past. Love them.
-
I used to make ornaments but haven’t in a very long time.
-
This year is the first year I’ve made FSL ornaments. It’s been so much fun.
-
Yes, I enjoy making all types of ornaments.
-
I have always made a lot of homemade ornaments I think they are special because each one is made with love.
-
Fun ornament and thanks for the great instructions! Yes I make ornaments but I haven’t had the chance yet – but there is still some time! Thanks for the chance to play : )
-
I have been making handmade ornaments for as long as I can remember. Now-a-days they are a little more professional. Love making them.
-
I have some cross-stitched ornaments framed in very small grapevine wreaths that I hang on my “country” decorated
Christmas tree. -
Yes!!
-
Yes, I like to make my own ornaments.
-
I haven’t made any lately, but I have a collection of handmades that include: felt, counted cross stitch, stuffed fabric, covered styrofoam, hand painted, hand made ceramic, clothespin, stained glass and crocheted. I also have many that were handmade by my children.
-
Yes. I made a really cool poinsettia ornament out of just two circles of material. You just sew the two circles together, leaving an opening to turn it inside out. Stitch the opening closed. Fold the circle in half and mark the ends of the fold, then fold it in the opposite direction and mark the ends of the fold. Tack these four points together, then flatten out the material so that the tacks fall in the center. The flat part is shaped like a square. With a little clever folding of the material at the corners, you have a poinsettia! I sew a yellow flower-shaped button in the center of the flower , then hang a string at one of the corners to hang it. There’s a video on YouTube showing in more detail how this is done.
-
We are just beginning to use the photo snap features and this project will be a good way to actually utilize the features of our software.
-
Yes. I made adorable mice last year thanks to Cloud Craft.
-
Yes. This year we helped kids at our office Christmas party take small squares of fabric and push them into a Styrofoam ball. You do this until the ball is covered and then push in a loop of ribbon to hang. You can use a screwdriver or round popsicle sticks to push the fabric in.
-
I have in the past but don’t every year or anything.
-
I have made many handmade ornaments over the years. I didn’t make any special ones this year though.
-
Yes we make ornaments, and re-do old ones. I appreciated the photo editing tutorial. Lots of details and explanations which have helped me understand the Adobe photo editing program gathering dust inside my Mac. Thank you. Save layers in a .tif format.
I like the 23 foot for applique, good visibility. Circular guide maybe except somehow without making a thumbtack hole in the middle of the kid’s face? Hmm.
-
I have created many ornaments over the years and plan to continue for many more to come. I have machine and hand embroidered ornaments and made tatted lace ornaments.
-
I do photo ornaments with my grandson’s pictures every year. They grow so quickly.
-
Yes, I have made many ornaments over the years. Some quilted, counted cross stitched, knitted, and made with felt.
-
I always make homemade ornaments with my grandchildren
-
Yes. They are fun and well received.
-
Yes, I do. I am making little gingerbread people and Mr. and Mrs. Santa Claus ornaments this year.
-
Every year since I was a child!
-
I did make an applique Christmas tree ornament this year
-
I try to make a handmade ornament for each child each year!
-
Hand embroidered felt ornaments are my favorite to make.
-
I love homemade ornaments especially those my son made in school and Sunday school
-
I’ve never made any ornaments. Yet!
-
Great instructions … Thanks. Have made and received many handmade ornaments over the years and will continue. I love the FSLace ones and do miniatures for the tabletop tree in my sewing room.
-
Yes each year I try to create something each with my 3 grandsons so they will have an everlasting memory. Try to incorporate a picture, hands, etc.
Usually we try to do the craft together; or I start it & then they may complete it during one day before Christmas Day so they can hang on their tree. Or ones they can give to their parents. They seem to look forward to it each year. Love the idea you have shown above. Will save to do next year.. -
I have been making handmade ornaments forever! I’ve used kits with felt and sequin and beads to create several characters. I crocheted snowflakes and the Sesame Street gang. I sewed birds (doves?) in red and green fabrics. More recently I’ve made several of the freestanding lace or other machine embroidered ornaments from the CDs that Bernina was giving away with purchases.
-
Yes I have in the past but not for awhile.
-
Every year I make individual ornaments with the recipients’ names on them. It is definitely a work of love!
-
I just made two last evening. Memory ornaments for my cousin.
-
I made a lot of the folded Danish star to give as gifts.
-
I have been making ornaments for all my family members with their name and year emboridered on the back for nearly 30 years. they fill the tree!
Leave a Reply
You must be logged in to post a comment.

I have gotten handmade ornaments in the past from my great aunt and I used to make paper crafts but I have not made any in the last year or two. It seems like the holiday season flys by so fast and by the time I am finished with gifts, I just do not have time.