How to Hem Jeans: Easy Step-by-Step Guide
Hemming jeans has a reputation for being hard . . . breaker of needles . . . shivers! Yet, it doesn’t have to be!
The process of hemming jeans is just as simple as with any other pair of pants. The only potential challenge is the thickness encountered at the cross seams. And there is a straightforward way to deal with that . . . without breaking needles.
The Jeans hemming process in 1-2-3 steps
- Measure and pin the length of the finished jeans legs.
TIP: Measure each leg separately as your legs may vary slightly in length (mine do by about 1/4 inch). - Trim the hem allowance to 1 1/8 inch and double turn.
- Stitch down the hem.
NOTE: This tutorial is based on a 1/2 inch double-turned hem, similar to that found in ready-to-wear jeans.
The secret to a successful and easy jeans hem is in the tools.
What you will need for hemming Jeans
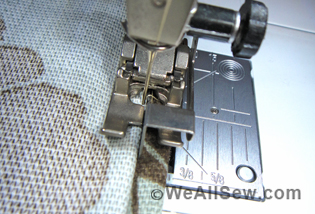
- A reliable sewing machine. I’m thinking any of my BERNINAs. The images below were taken from hemming a pair of jeans on a trusty 3 Series BERNINA, our entry level machine. It cruised through the project without blinking.
- Free Hand System (FHS). If your machine has this feature, don’t miss out on it! It will leave your hands free to handle the jeans leg, especially with a double turned hem, especially while placing the bottom of the leg around the BERNINA Freearm.
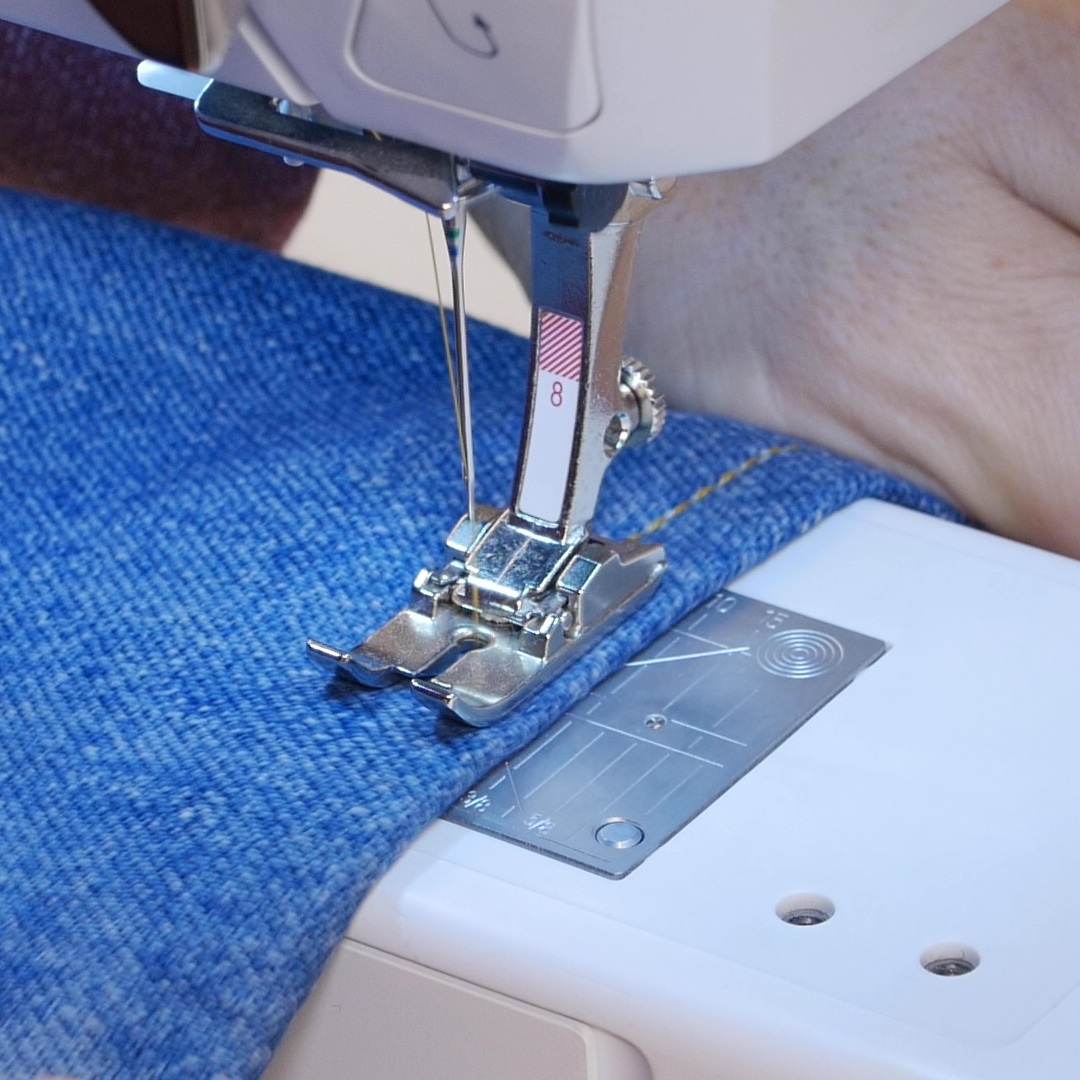
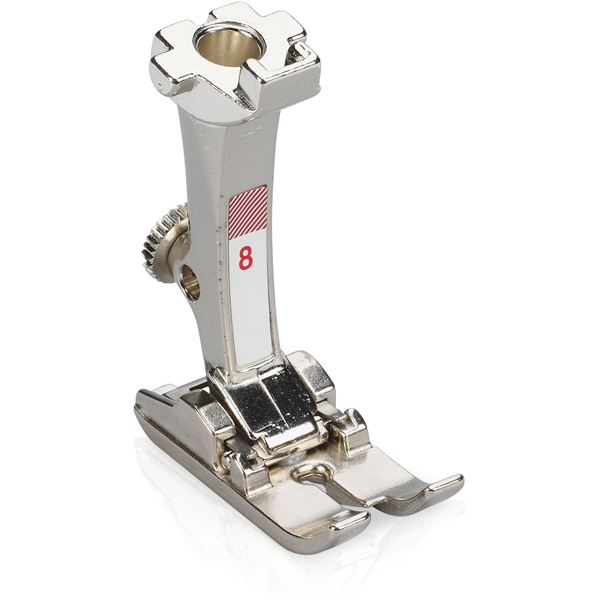
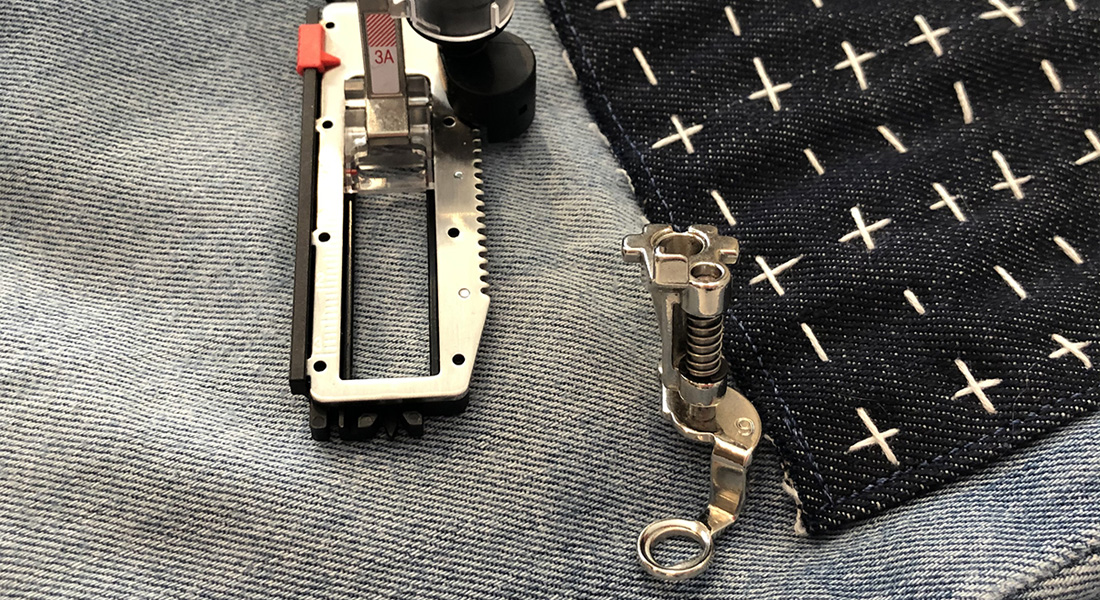
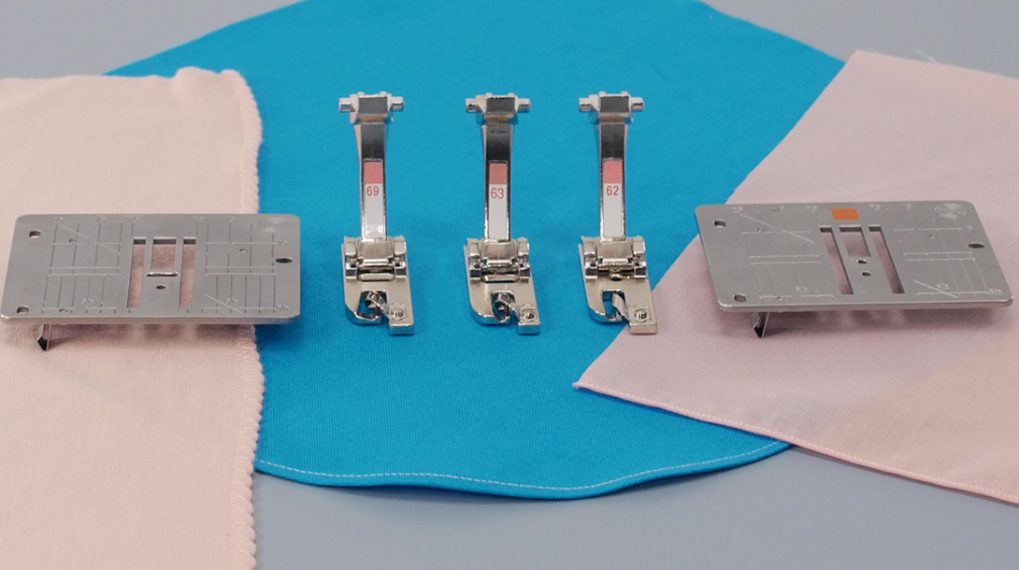
- Jeans Foot #8
- It is a straight stitch foot to aid in going through heavy layers.
- Straight Stitch Plate
- In combination with Foot #8, it helps prevent needle bending, which can lead to broken needles
- Jeans 90 needle
- Jeans needles are sharp, a must for hemming denim.
- They also have a stronger shank compared to other types of needles of the same size.
- A size 90 is usually sufficient if using common sewing threads (as in this tutorial).
- If using the thick yellow or gold ‘jeans’ thread, a Topstitch needle size 100 may be necessary.
- Height Compensation tool
- Composed of 3 thin plates that pivot on a rivet, this tool allows you to insert a thin/medium/thick layer under the bottom of a presser foot to level it against uneven fabric layers.
- Perfect for leveling the presser foot when it reaches or leaves behind a thick cross seam.
- For regular jeans, using 2 plates was sufficient in this tutorial.
- Sliding Hem Gauge
- We will be using the 1 1/8 inch mark on the gauge to mark the hem allowance.
- Chalk tool for marking the hem allowance
- Sharp scissors or Shears
- Sleeve pressing board or roll
- Recommended for easier pressing. It is much easier to press the hem when it’s exposed rather than having to insert the tip of the iron inside the jeans leg
- A sleeve board is also convenient for tabletop pressing of small items. It collapses for easy storage when not in use.
- Sewing thread of choice
TIP: If you need to match a ‘gold’ or yellow heavy jeans thread for the hem, use an embroidery thread like Isacord in both the needle and bobbin and use a triple stitch to stitch the hem. Embroidery thread is much easier to work with than the heavy jeans thread.
- Isacord comes in over 400 colors, so you’re guaranteed to find the perfect color match (even if the original thread on the jeans has faded).
- For smaller quantities, the same embroidery thread is sold under the Mettler Polysheen brand in small spools, so you don’t have to buy 1000 yards of thread just to hem a pair of jeans.
If you’re an embroiderer, you may already have a color of Isacord close enough.
- You can also use regular sewing thread like Mettler Silk Finish or Metrosene to sew the hem with a triple stitch. Sewing thread comes in enough colors that you can match the original jeans thread on the garment closely enough.

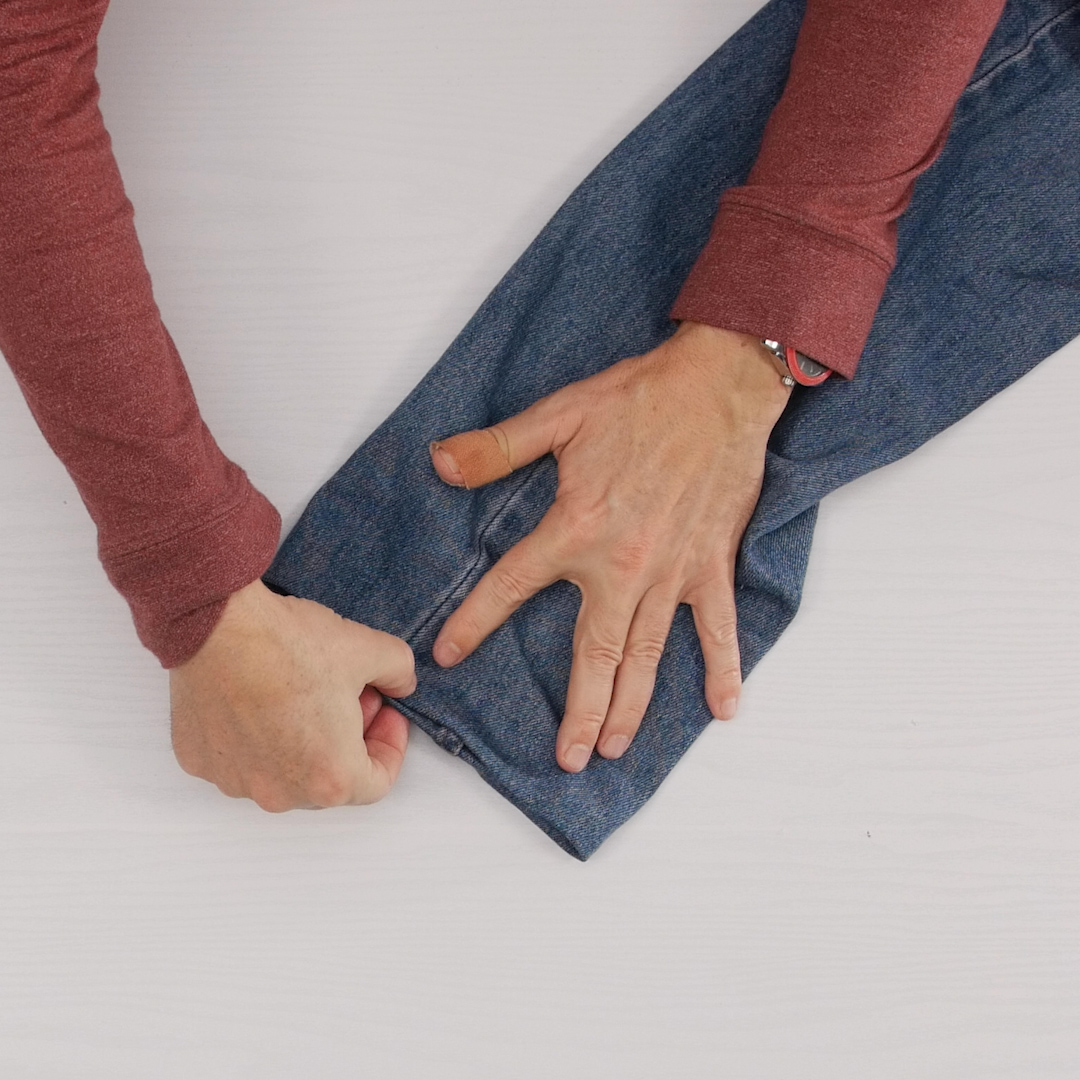
Step 1: Pin or Press the hem in
This is the part where you invite a good friend for coffee, as it is not easy or even possible to measure your jeans leg length without bending down, which distorts the length, have someone turn in the excess length for you.
You can use pins to hold the hem as folded in. Once pressed in, the pins can be removed.
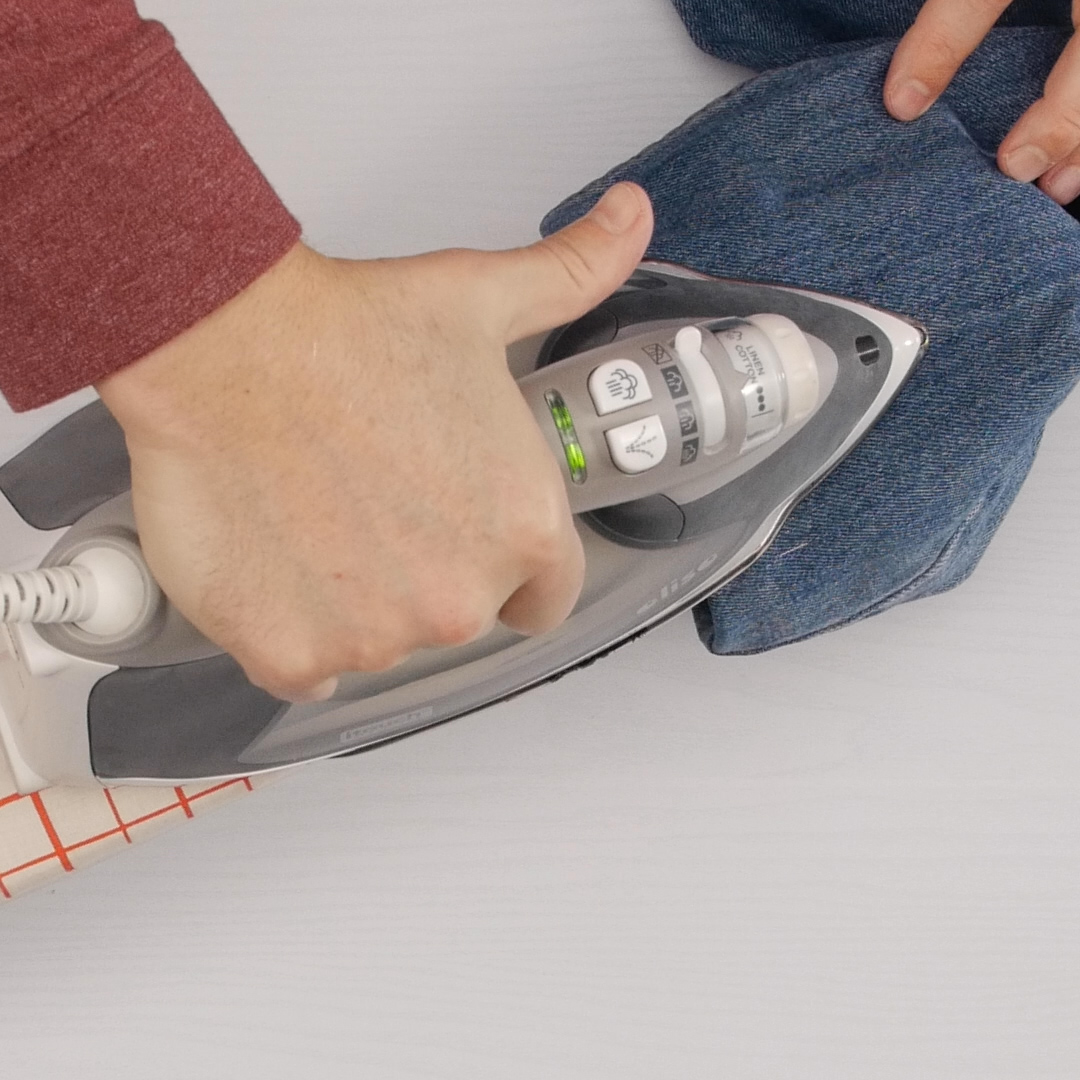
TIP: Press the hem like you mean it!
- Use a DRY iron set to cotton.
- Puff some steam while pressing down the hem fold: this will relax the fibers and let the fold ‘collapse’ under the weight of the iron.
- Keep the iron stationary for a few seconds after to allow the crease to set under the now dry iron.
- Did we say pressing? Yes! So rather than glide the iron a few inches to continue, lift it, reposition, lower it back on the hem fold and repeat the steam/set process.
- If you drag the iron across the hem fold, it is apt to distort the hemline and make the turning in of the hem allowance more difficult, if not uneven.
NOTE: If you only need to take a little bit off the bottom of your jeans and don’t have a generous excess length, you will need release the original hem first:
- Use a seam ripper to clip the stitching of the original hem.
- Release the original hem completely and press flat.
- Continue with the steps above.
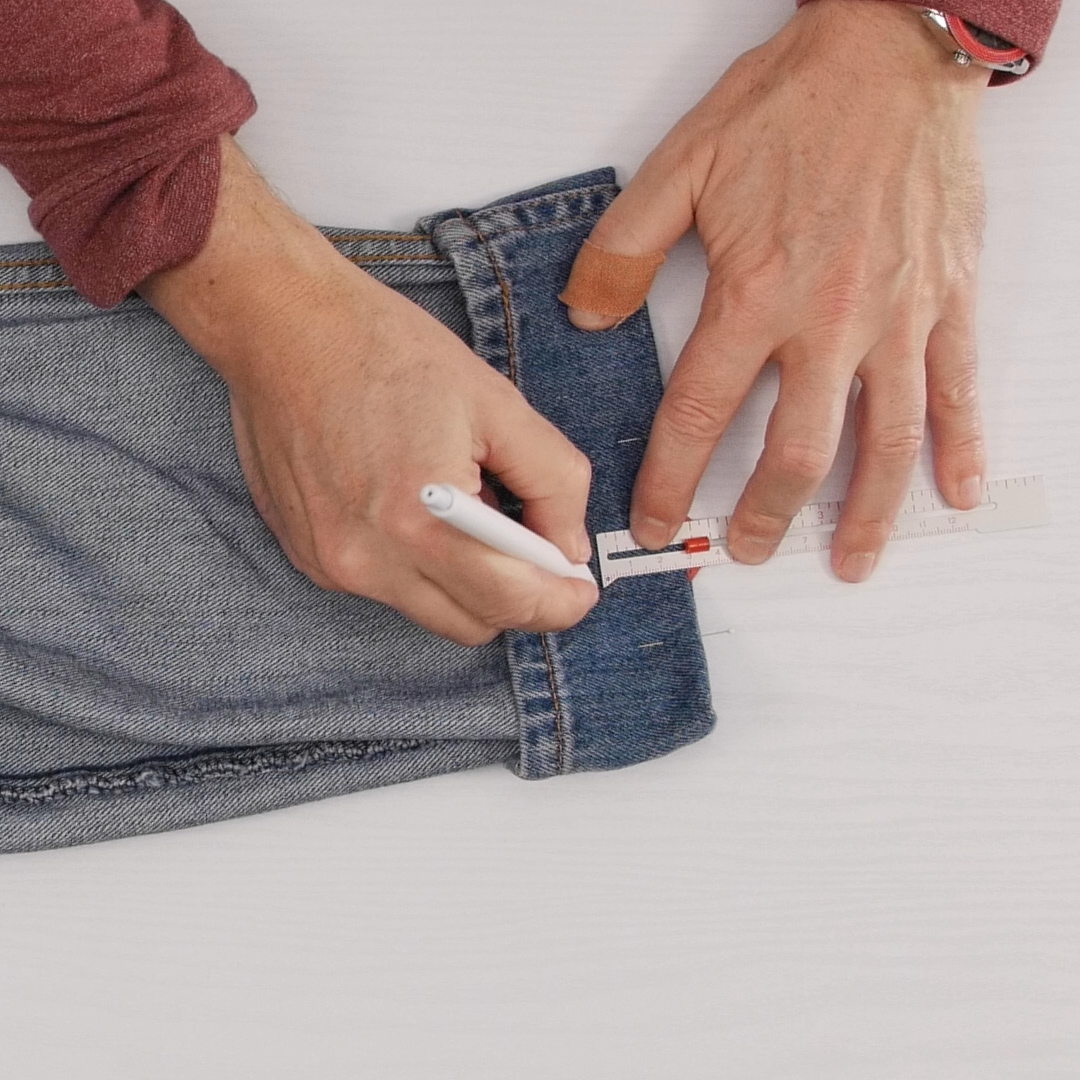
Step 2: Mark the hem allowance
- Turn the jeans legs wrong side out.
- Set your hem gauge to 1 1/8 inch.
- Place the red slider of the gauge against the fold.
- Mark the hem allowance with the chalk, using the end of the gauge as a guide.
TIP: Marking every inch or so will make it easy to trim the allowance without having to draw a continuous line along the entire hem.
- I usually remove the pins after the marking is done.
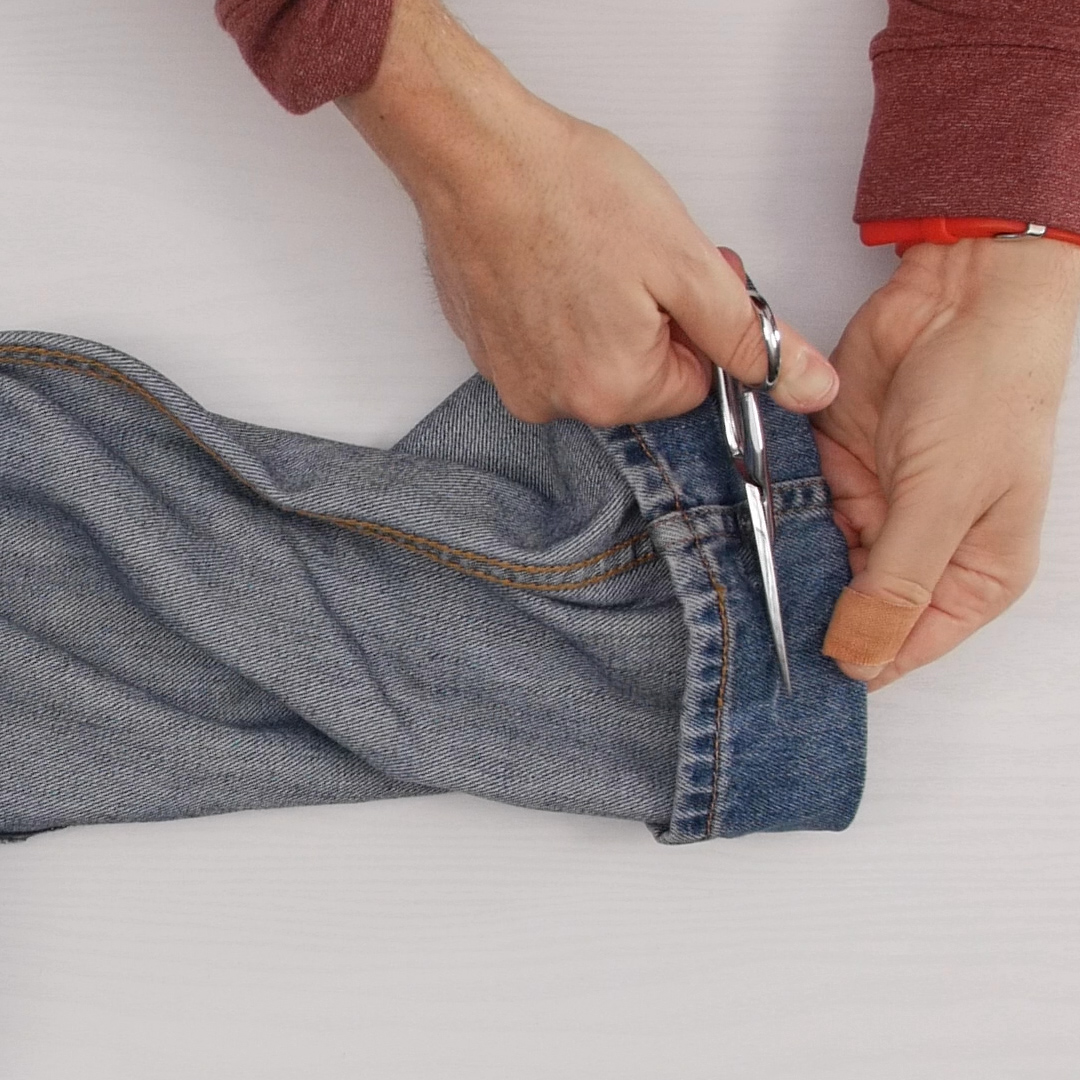
Step 3: Trim the excess length
Using your sharp scissors:
- Cut in at a diagonal to reach the chalk markings.
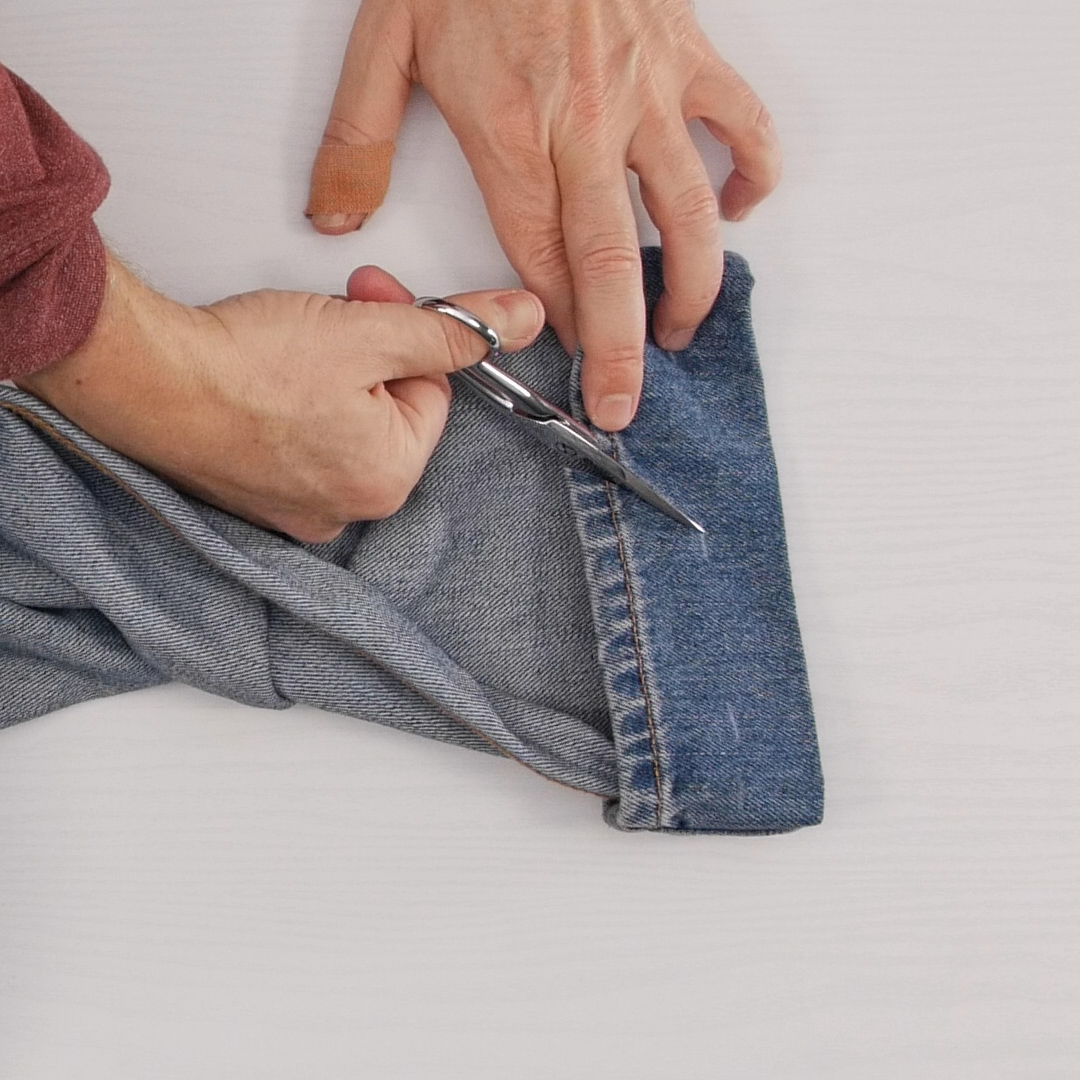
- Pivot and trim the excess length along the marked line,
TIP: By cutting in at a diagonal, it is easier to pivot into the marked line. If cutting in at a perpendicular angle, the pivot is not only more difficult, it can be less accurate.
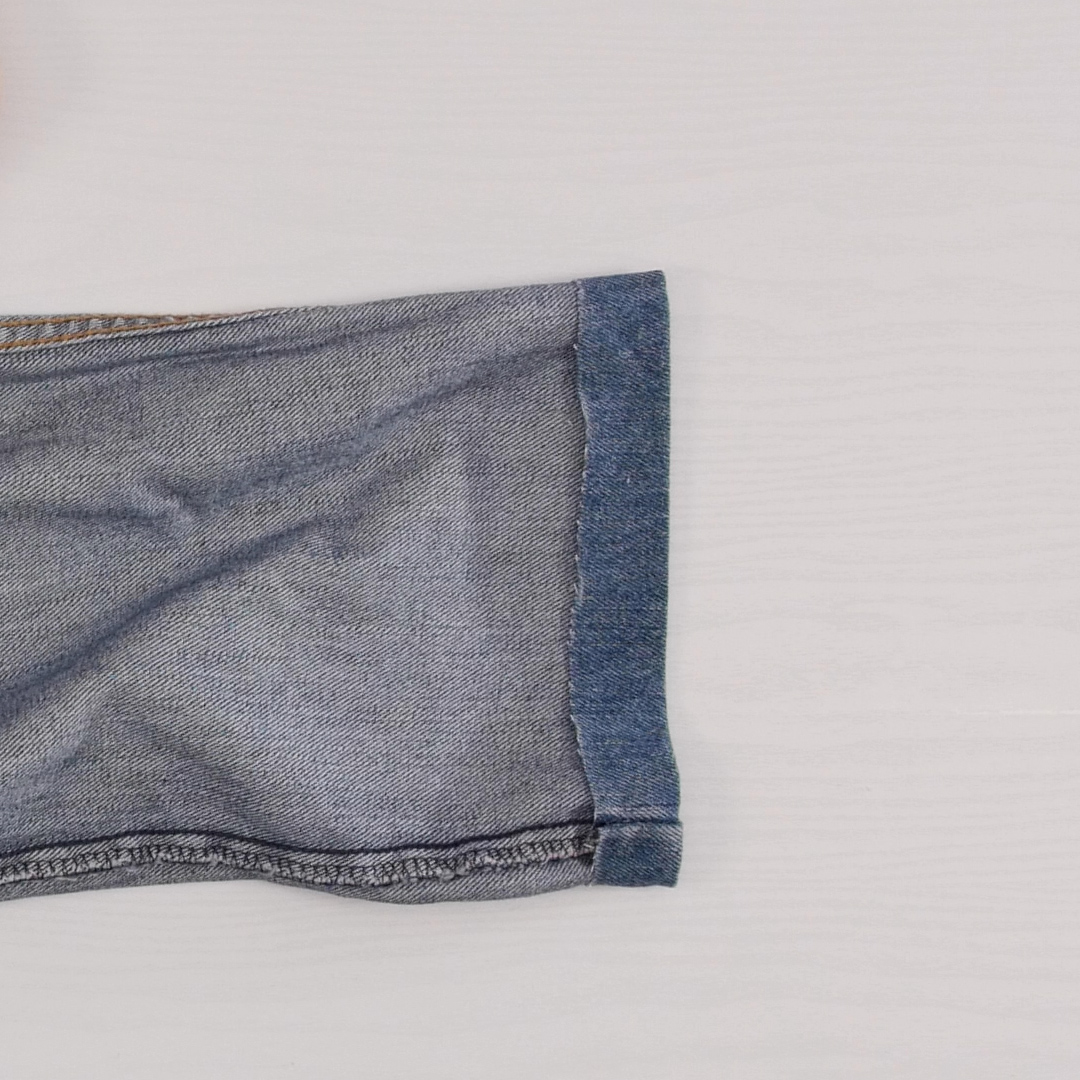
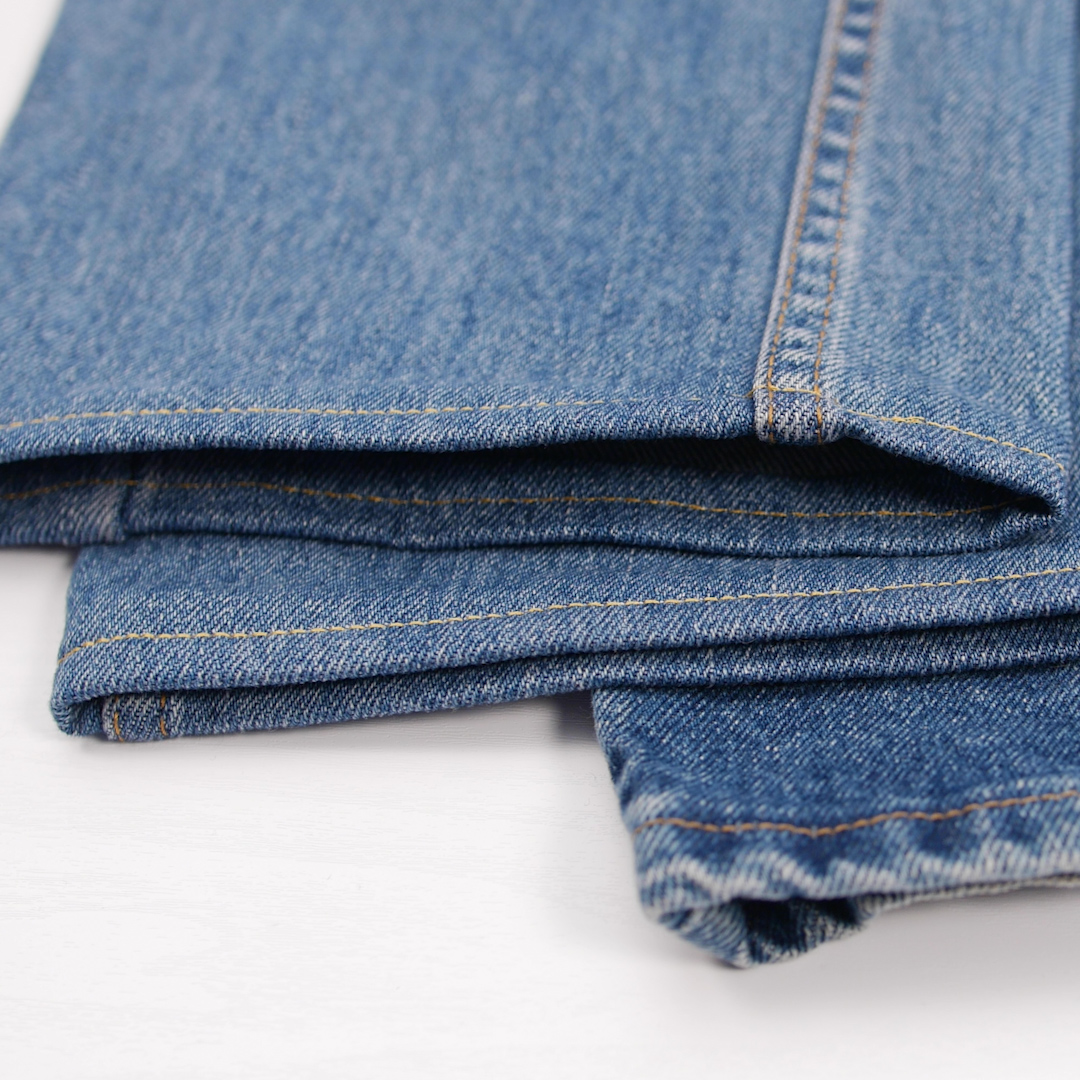
The trimmed hem will look like the following:
Step 4: Double-Turn the hem allowance to form the hem
Optional: Feel free to spray starch or use sizing on the hem allowance before you double-turn and press it. It will help in forming the hem and will make it stay pressed in place better.
With the hem already trimmed and the bottom edge of the leg defined by the fold:
NOTE: You may have wondered why the hem allowance was trimmed at 1 1/8 inch and not just 1 inch. Here’s where you find out.
- Pull back the raw edge and turn the hem allowance once, leaving a small gap (scant 1/8 inch) between the raw edge and the original hem fold.
- Press this first turn to set it (this will make the second turn easier).
NOTE: If the cross seams are particularly bulky, you can trim the seam allowances from the vertical leg seams within the hem allowance. Care is needed in doing so, to avoid clipping the side seams open. Generally, I’ve found that this step is not necessary if using a Jeans Foot with a Straight Stitch Plate and a size 90 jeans needle.
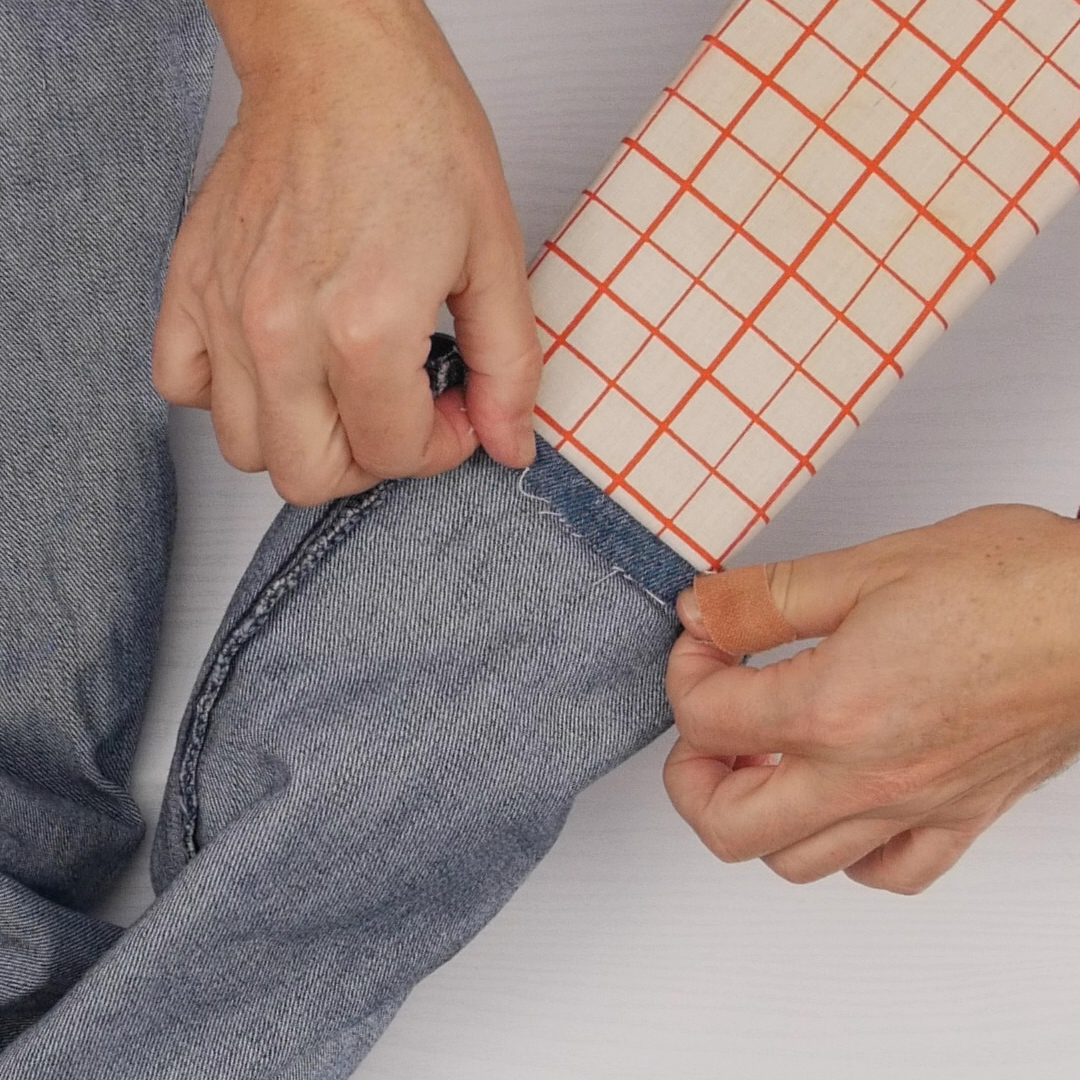
- Turn the folded hem allowance again on the original hem fold.
TIP: By allowing an extra 1/8 inch hem allowance used in the first folding, we allow the second turn to lie flatter. When a double turn is done with the raw edge snug against the main fold, it puts tension into the second turn and leads to a hem that tends to flare up after stitching. This ‘gap’ turning method yields a hem that lies perfectly relaxed and flat.

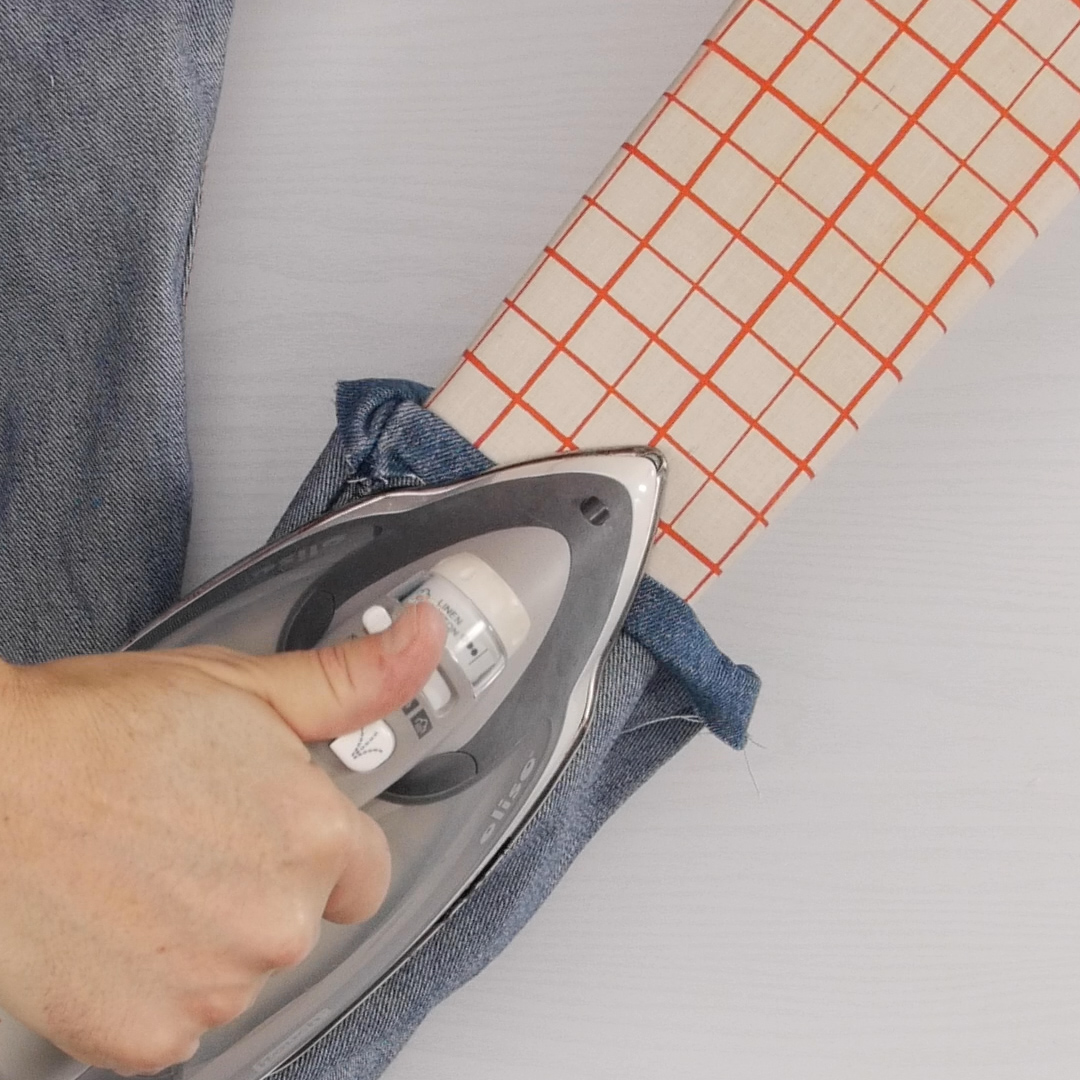
A well pressed hem is an easy-to-stitch hem.
This is where a sleeve board comes in very handy. Compared to working the iron into the leg of the jeans on a flat ironing board:
- It allows the jeans leg to wrap around the board undisturbed (easier)
while - allowing the segment of the hem being pressed to lie completely flat (better).
With your iron set to cotton/dry, press the final hem using the same method as above for the initial pressing of the hem:
- Position Dry Iron
- Puff Steam
- Press Dry for a few seconds to set
- Reposition and continue
To pin or not to pin… that is now the question 😉
I never pin my pressed hems as the pins themselves distort the shape of the hem. Not only that, they tend to bend when going through three layers of denim, especially near the cross seams.
If you want your hem to stay put as you’re about to turn the jeans back to right side out, use Clover Wonder Clips instead. They work better, don’t disturb the hem and are easier to remove as you stitch the hem.
It’s now time to head to the machine… after one more step:
- Turn the jeans right side out.
Your ready-to-sew hem should look like the following:
Now for the actual hemming of the jeans!
TIP: If your machine has the BERNINA Dual Feed feature, take advantage of it! Jeans Foot #8D will work even better than a regular Foot #8. It combines the straight stitch feature of Jeans Foot #8 with the added traction on the fabric.
With the steps above completed, stitching the hem will be straightforward.
- Stitching will begin at the cross seam on the inseam (inside of the leg).
- Place the jeans leg on the free arm of the machine, right side out.
- Align the bottom edge of the leg with the 3/8 inch seam marking.
TIP: Use the Free Hand System to lift the presser foot (bonus: it will also drop the feed dog!), making it easier to slide the jeans leg around the free arm of the machine and to position the bottom edge of the hem along the seam marking on the machine.
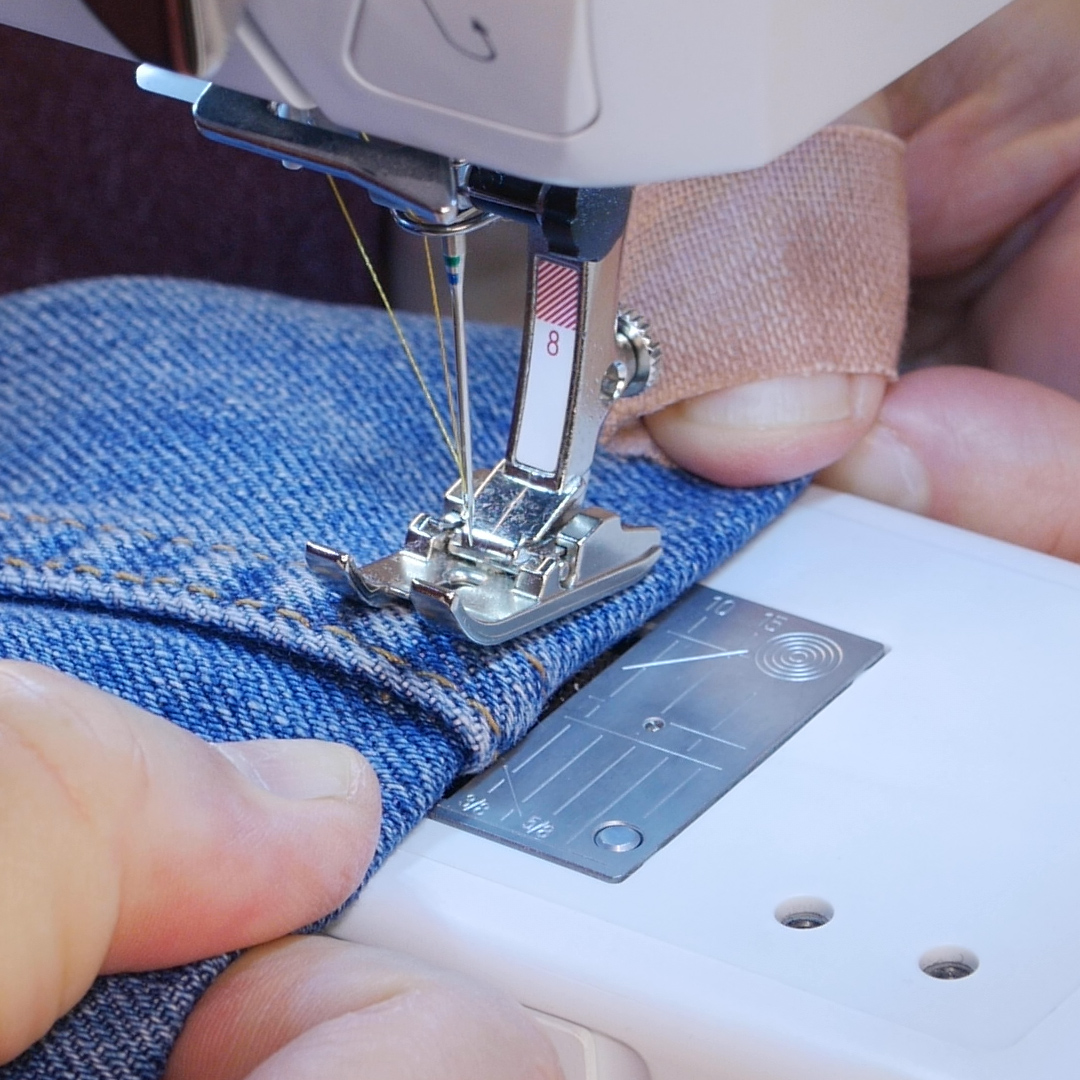
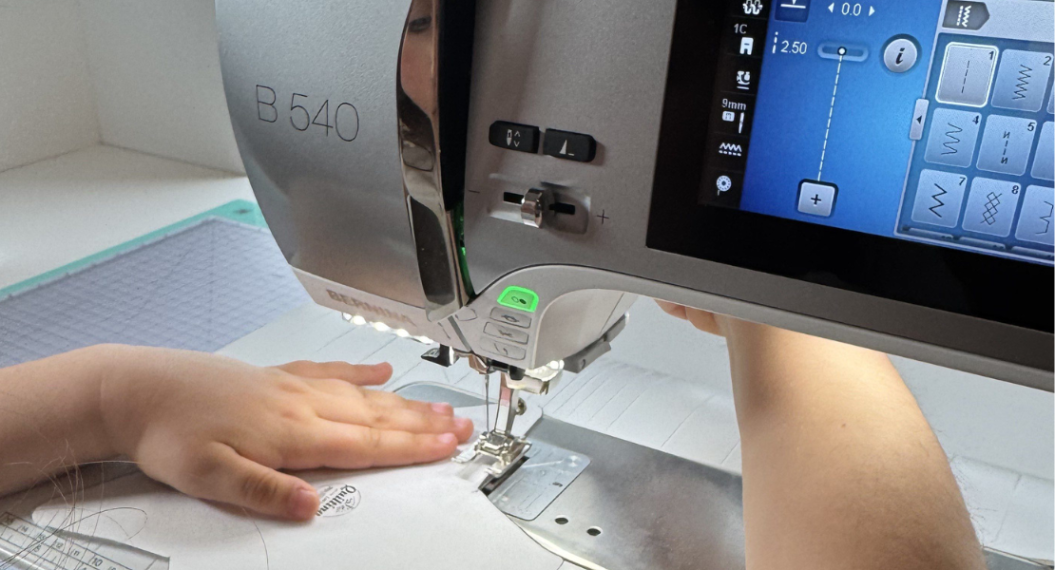
Step 5: Secure the hem seam at the beginning
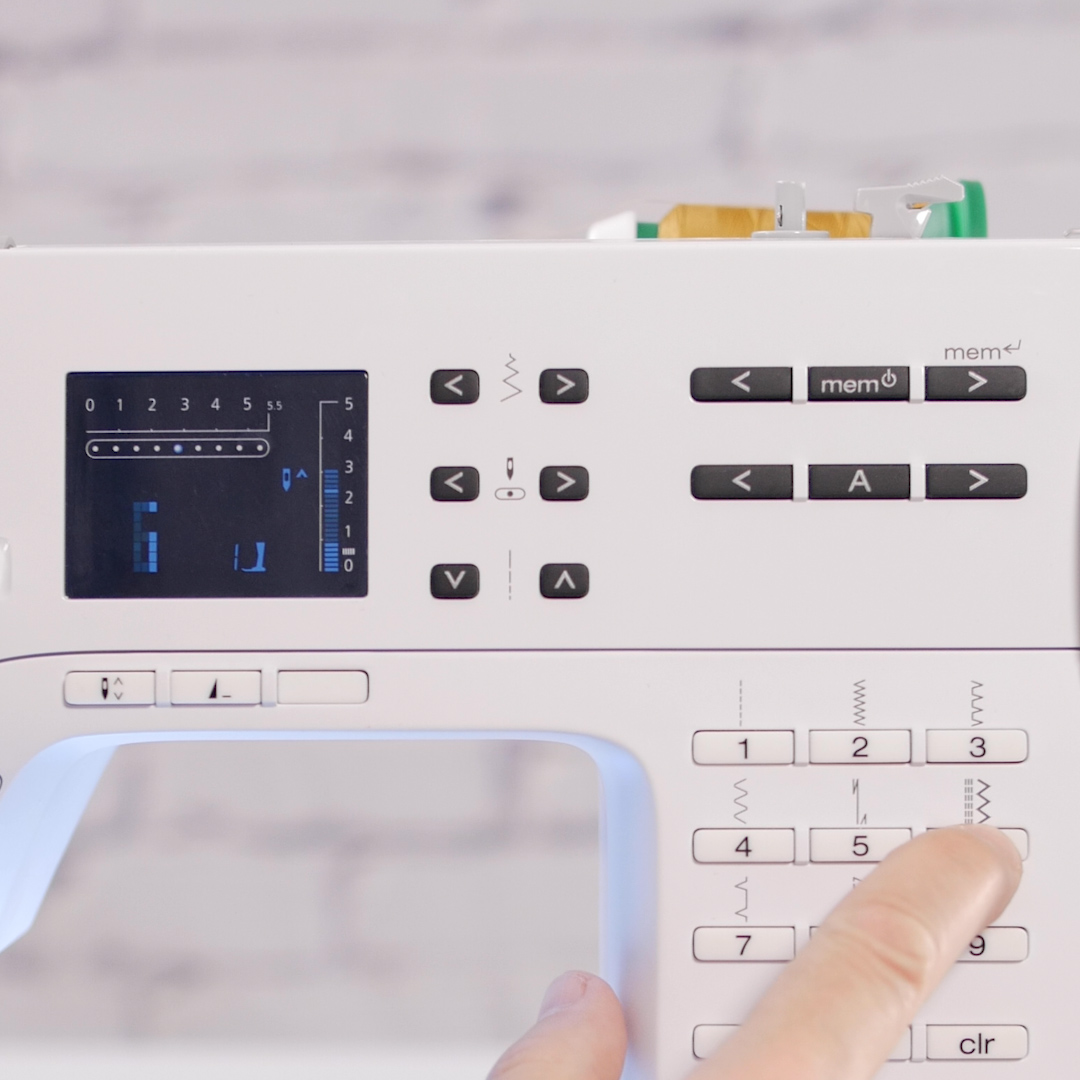
- Select the Straight Stitch, length 0.5 mm (for short locking stitches).
- Select the Needle Down function: this will help keep your hem aligned and avoid ‘jogged’ stitches.

Use the Height Compensation Tool under the front of one toe of the foot:
(2 plates should be enough to level the foot)
- Secure the beginning of the hem seam at the cross-seam, 5-6 stitches.
- CAUTION: To avoid breaking the needle, do not place the height compensation tool across the whole front of the foot, where it would come under the needle.
- Once the securing stitches are sewn, keep the Height Compensation Tool under the toe of the foot, needle down in the fabric, so you can change the stitch to a Triple Straight Stitch without disturbing your hem placement on the machine.
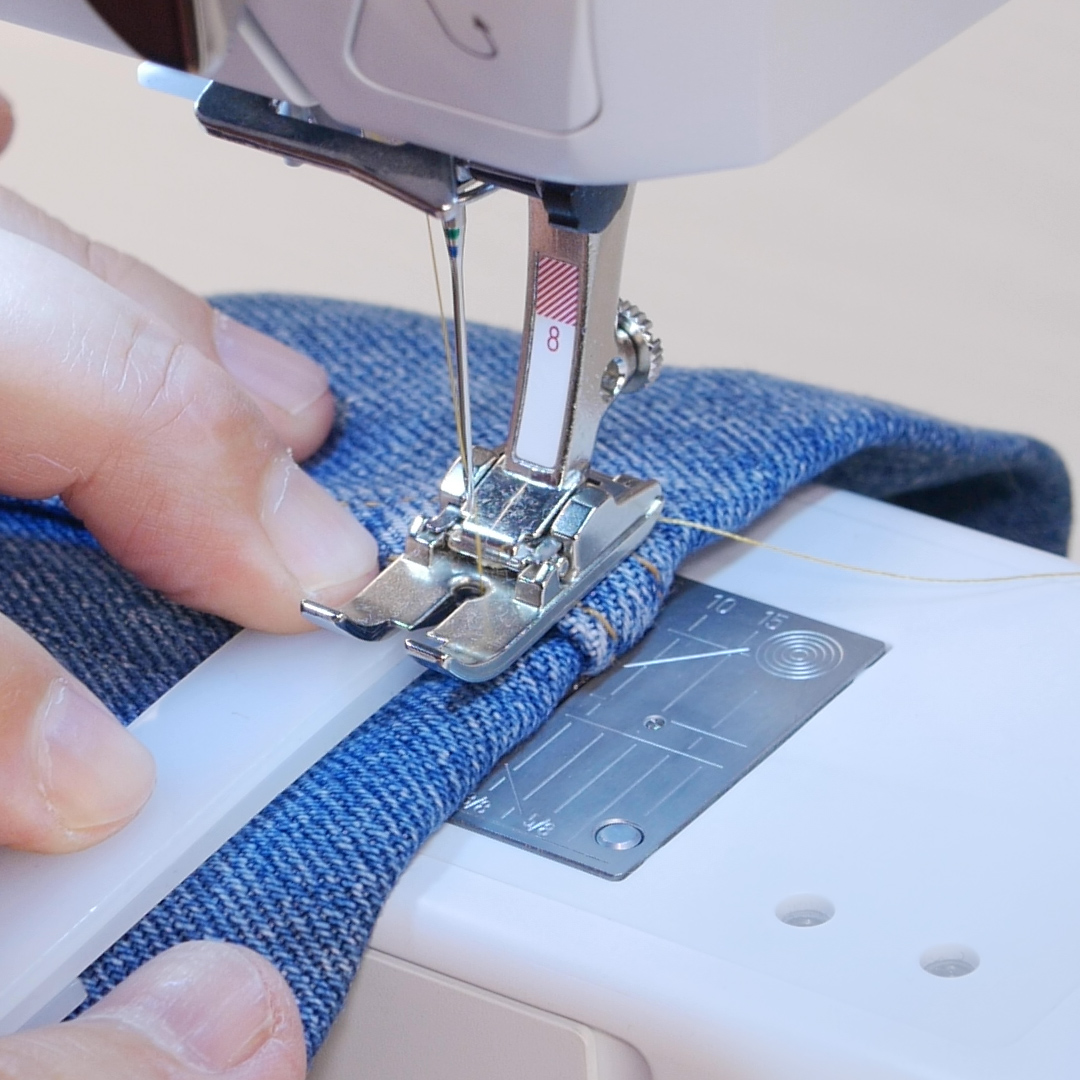
Step 6: Stitch the hem with a Triple Straight Stitch
- Select the Triple Straight Stitch / Stitch length = 3 mm.
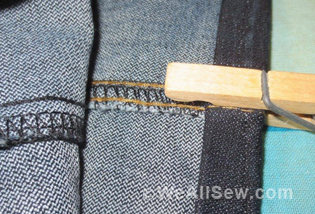
- Begin sewing the hem seam, just until the foot is clear of the cross seam.
After a few stitches, the rear of the foot will be past the (thick) cross seam.
- Pause sewing (the needle should stop down in the fabric).
- Remove the Height Compensation Tool from under the foot.
TIP: Use the Free Hand System to raise the foot, making the removal easy. The foot will automatically lower back in place once your release the FHS.
- Continue sewing around the hem (3/8 in seam allowance) until you wrap around to the beginning (cross seam).

On the home stretch:
When the front of the foot (toes) reaches the edge of the initial cross seam and before the front of the foot rises to accommodate the cross seam:
- Pause sewing (with the needle down in the fabric).
NOTE: Your active stitch should still be the Triple Straight Stitch as the seam is not complete yet. - Use the FHS to lift the foot and place the Height Compensation Tool under the back of the foot, leaving about a 1/4 inch distance behind the needle and the tool (as a triple stitch goes in reverse every 3rd needle penetration, we don’t want to risk stitching through the tool).
- Continue stitching until the triple stitch completes the seam, all the way to the starting point on the cross seam.

Step 7: Lock the stitches at the end of the hem
With the presser foot now on top of the thicker cross seam, the Height Compensation Tool is no longer needed, the foot being level.
Once your triple stitch reaches the starting point:
- With the needle down in the fabric, switch back to the Straight Stitch
TIP: Your machine will remember that the Straight Stitch was set at a ‘securing’ length of 0.5 mm! - Stitch 5 -6 short securing stitches
- Optional: Sew the securing stitches in reverse to conceal them into the hem seam
TIP: All computerized BERNINAs since 1986 remember the settings for at least the last 2 stitches you’ve used (current generation models remember settings to ALL stitches you use while the machine is turned on). This special (and super useful!) form of memory is called Temporary Altered Stitch Memory.
To learn more about Temporary Altered Stitch Memory and how it works, watch the following video clip:
https://www.facebook.com/BERNINAUSA/videos/924823904643100/
One leg down, one to go!
Repeat on the second leg and you’re ready to wear your jeans, now hemmed just to the right length.
Enjoy your hemmed jeans!
Used Products


What you might also like


5 comments on “How to Hem Jeans: Easy Step-by-Step Guide”
-
-
I agree. The extra information about securing stitches and stitch #6, triple stitch, were especially helpful. Great tutorial! Thank you.
-
-
What chalk marking pen do you use?
-
Since the chalk marks are concealed and don’t need to be erased any brand of chalk pencil you can find locally will work. I’ve also used a Chaco Liner (chalk powder dispenser with a fine toothed wheel). In my experience:
* Mechanical chalk pencils (with refills) are more convenient (and less messy). The finer ones (0.9 mm) can drag and pucker finer fabrics, being so fine. A coarser chalk will glide better on the fabric, especially at an angle.
* chalk pencils that you sharpen manually (like a regular pencil) let you have a softer, blunter point. That can be useful to prevent puckering finer fabrics as you mark.
* I’ve also used a Chaco Liner (chalk powder dispenser with a fine toothed wheel) -
This is a great tutorial. It covers all the details that make your hemming look professional.
Leave a Reply
You must be logged in to post a comment.

Wow, I never knew about the Triple Straight Stitch until having read this. Amazing stitch, thank you.