How to Sew a Kids Busy Book, Part 6: Assembly
Our BERNINA Busy Book Series is now on its 6 month! We have several pages done and ready to assemble. Let’s use this month to learn how to finish the page edges and create buttonholes. First, we’re going to experiment with decorative stitches to create a neat and beautiful edge finish. Then, we’re going to have fun playing around with different buttonhole programs. So gather a variety of colorful thread, your Open Embroidery Foot #20/20C/20D and the Buttonhole Foot #3A and let’s get started!
Machine Set Up
- BERNINA 590
- Open Embroidery Foot #20/20C/20D
- Buttonhole Foot with Slide #3A
Materials to Assemble the Kids Busy Book
- Completed busy book pages
- An assortment of thread in various colors (40 wt and 50 wt)
- Clover Wonder Clips
- Temporary marker
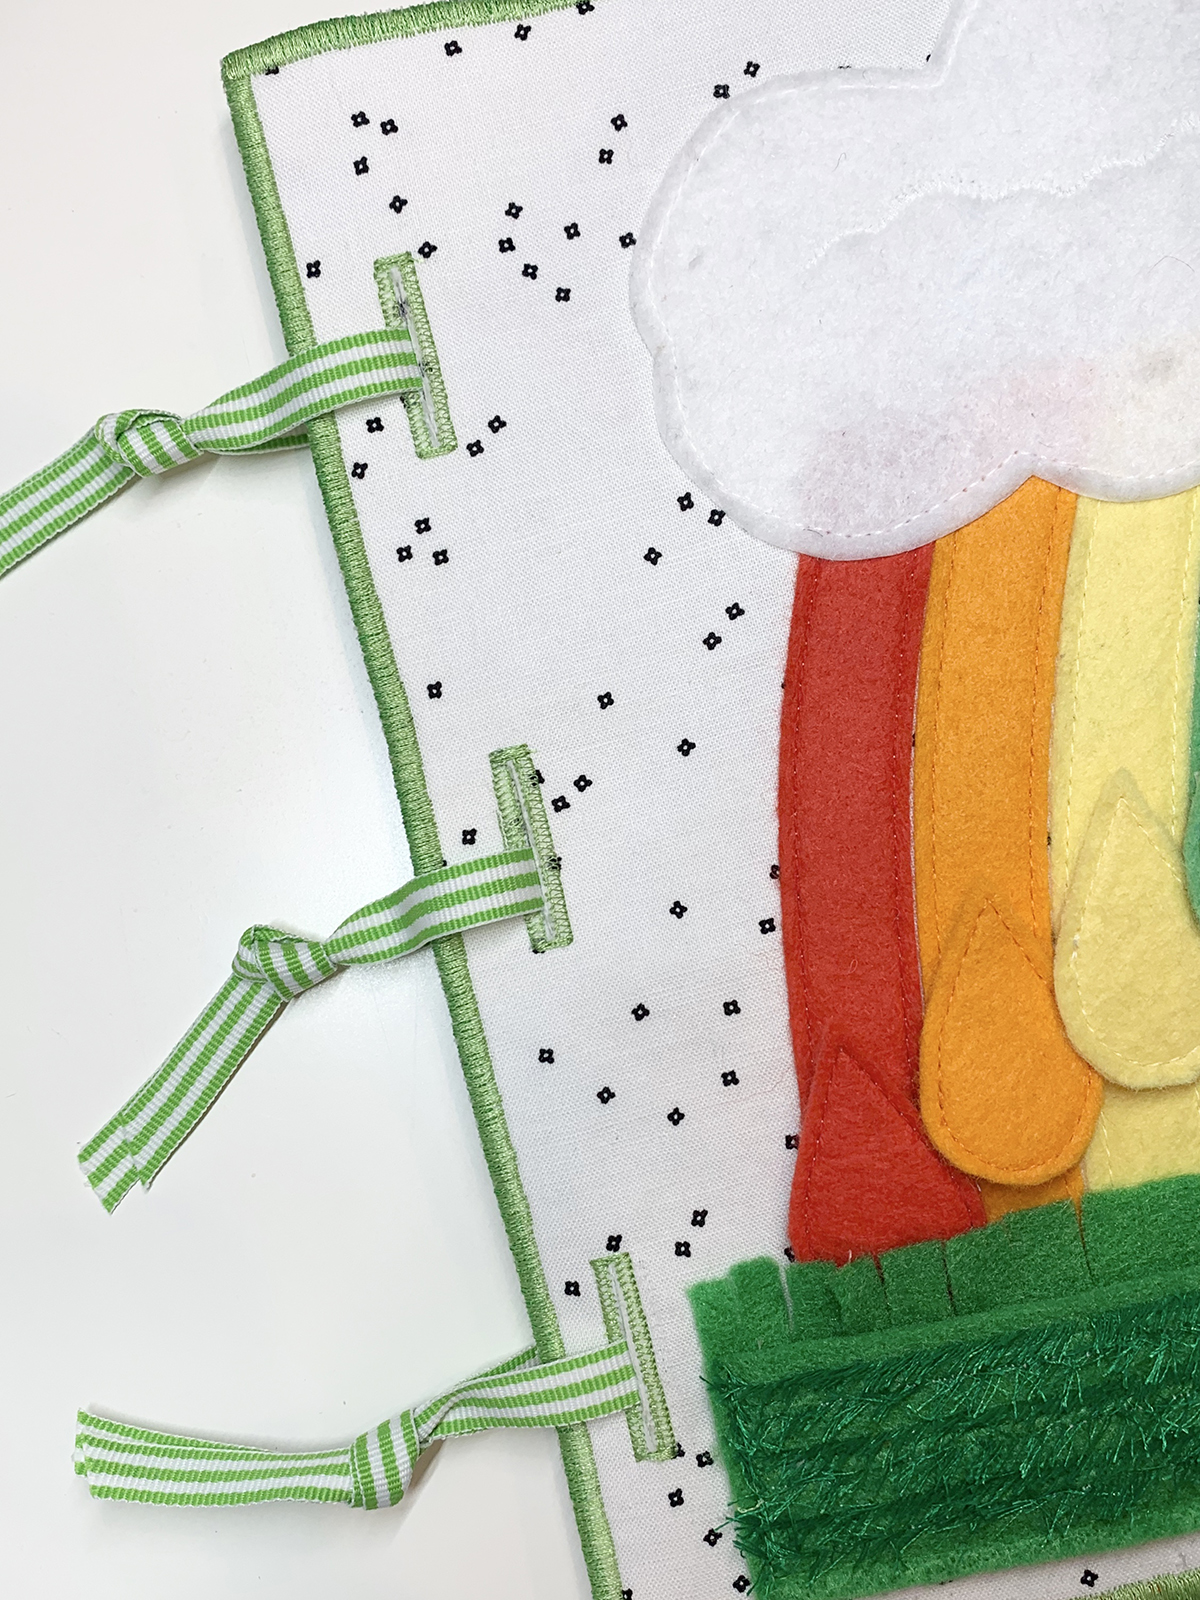
- Binder rings or ribbon
- Optional: Crinkle Material by Crinkle World
- Optional: Dritz Fray Check
Prep Pages
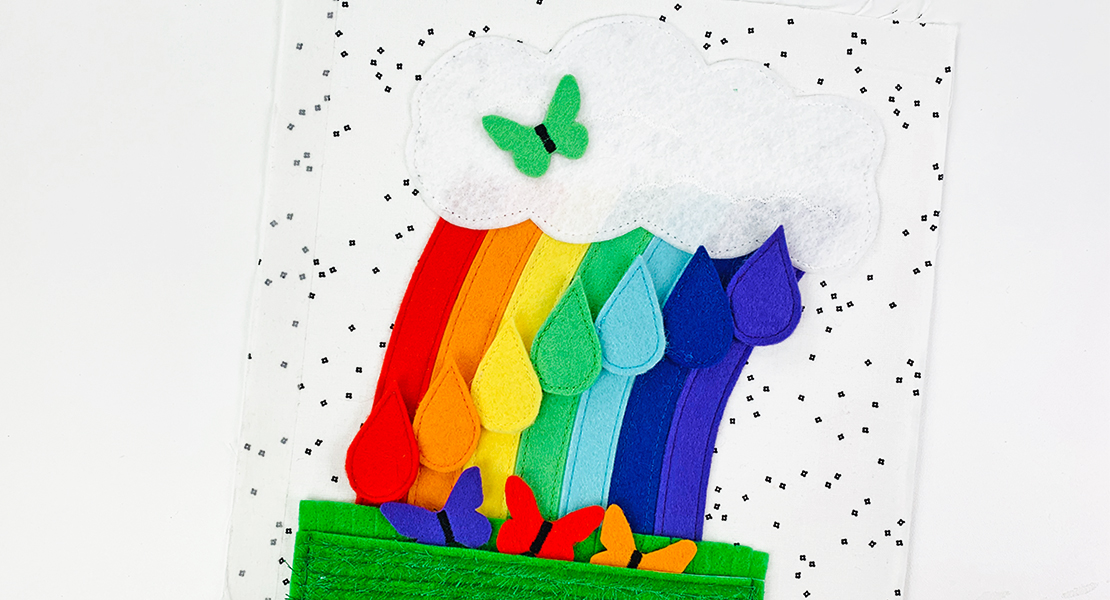
Place two completed busy book pages back to back. I am using the Piggy Bank page and Rainbow page. Use Wonder Clips to hold the pages in place. Pins are fine too but this is one of those times Wonder Clips work so much better.
Option: Add Crinkle Material between pages. I cut mine 8” x 8” and placed in center so it wouldn’t interfere with the decorative stitching and buttonholes.
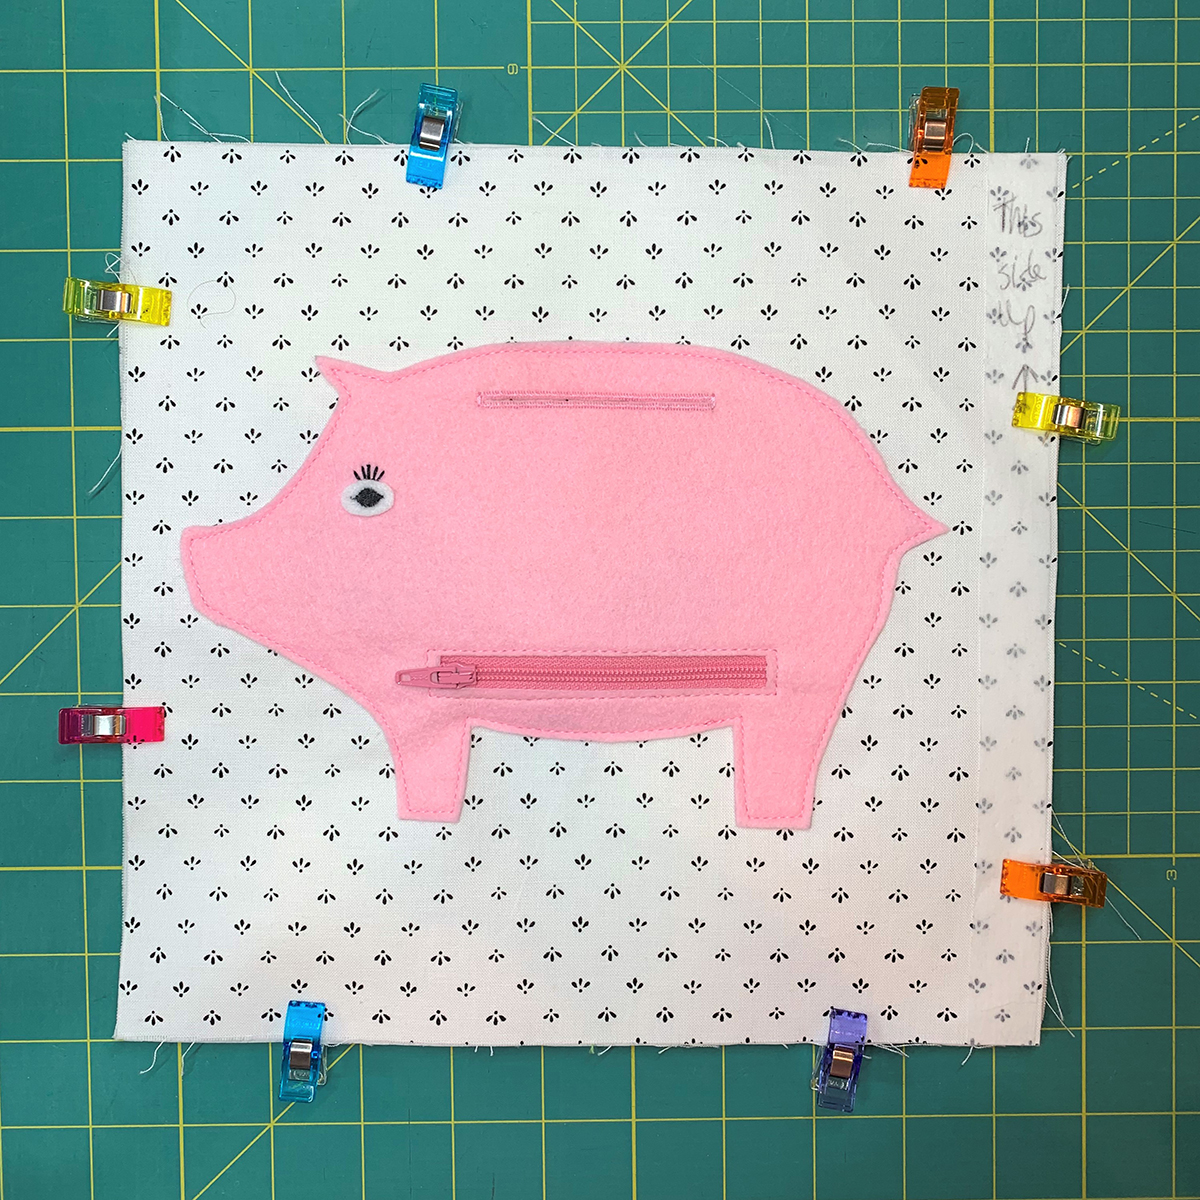
Note: Remove the temporary tape from the sides that were used for placement. I did not remove mine and had to pick all the pieces out. Ugh!
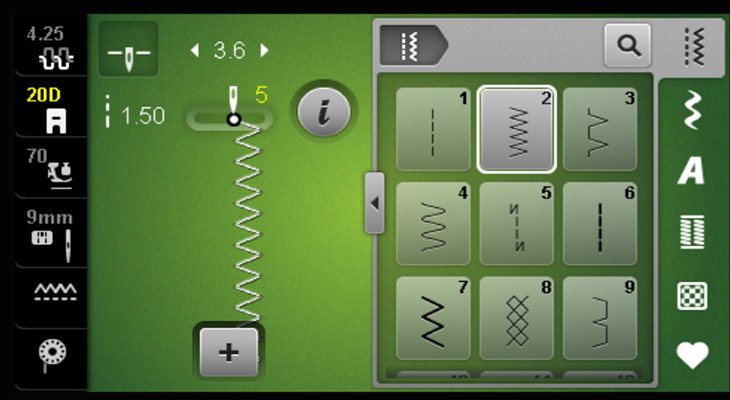
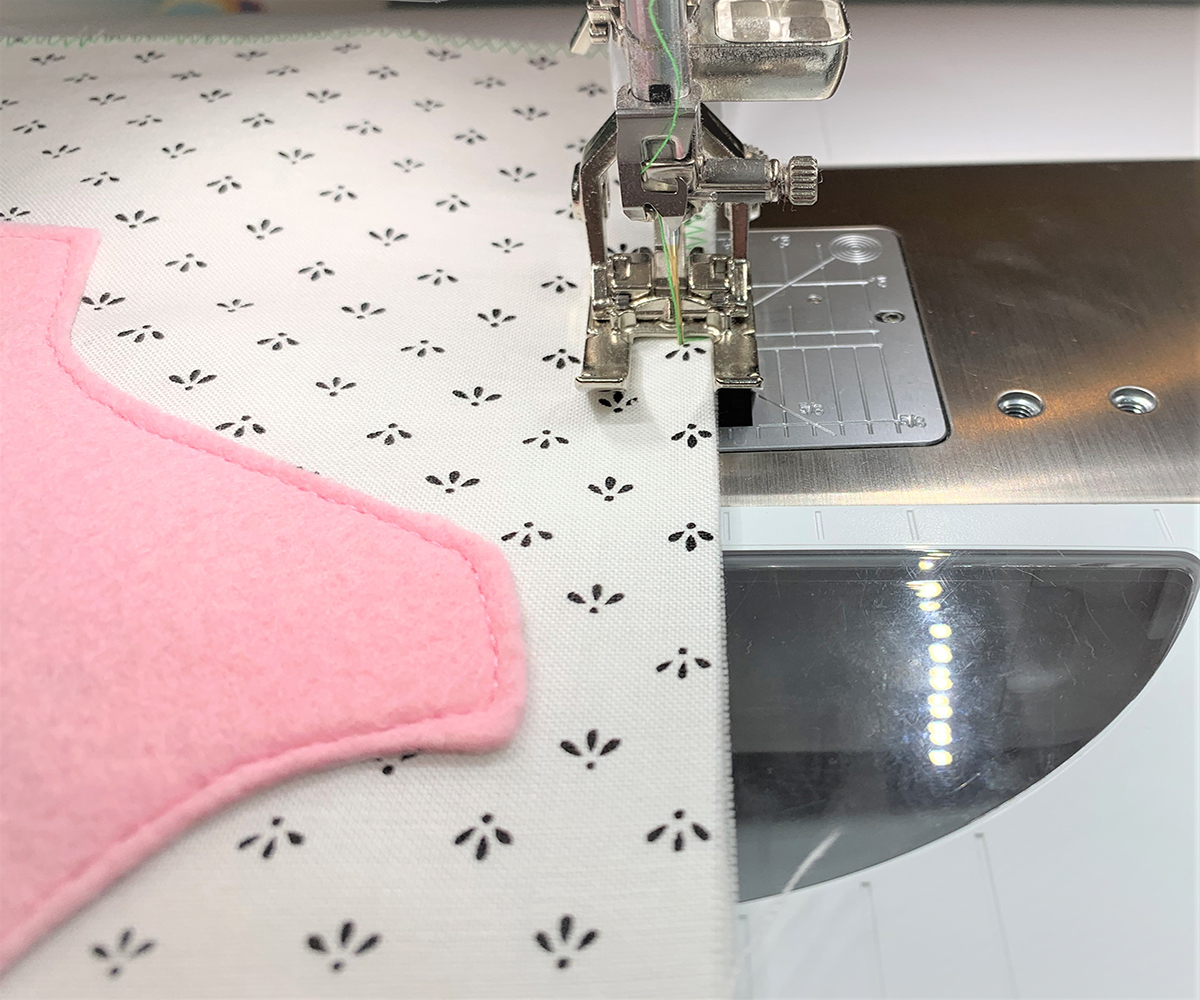
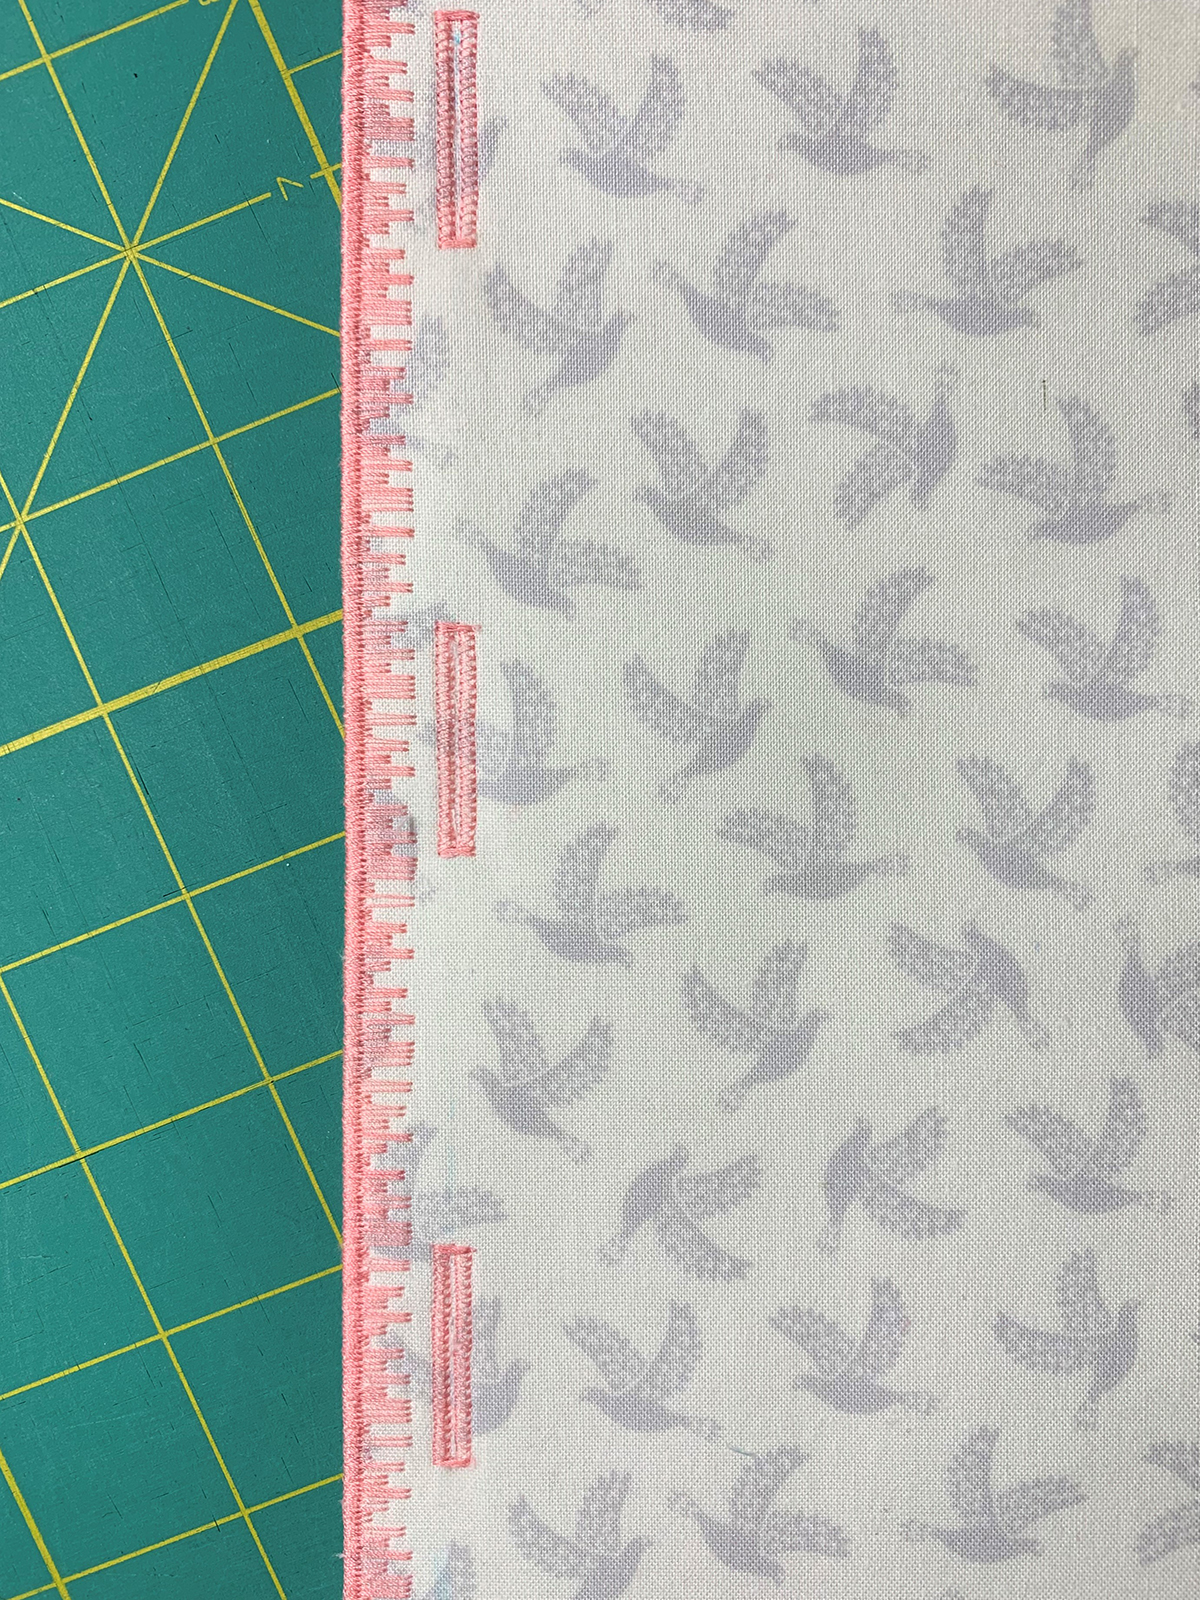
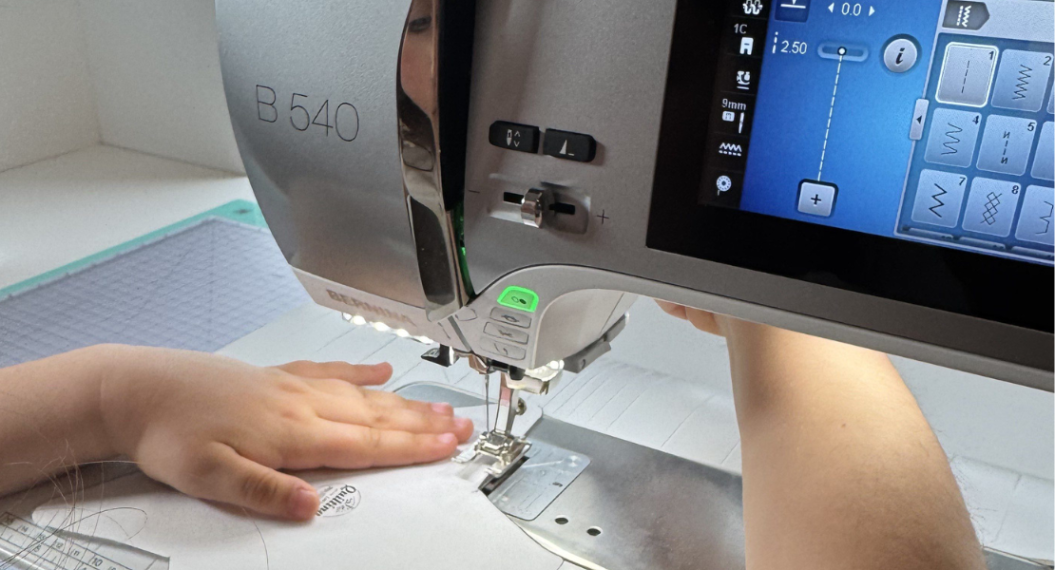
At your machine, attach Open Embroidery Foot #20/20C/20D, select the foot on the machine and select Zig Zag Stitch #2. Keep the stitch width and length at defaults and move needle position to 5. For this step, you can use plain white thread to match background. Or if you don’t want to change out threads, add the thread you will be using for decorative stitch edging.
Align the edge of page with the inside right toe of the foot.
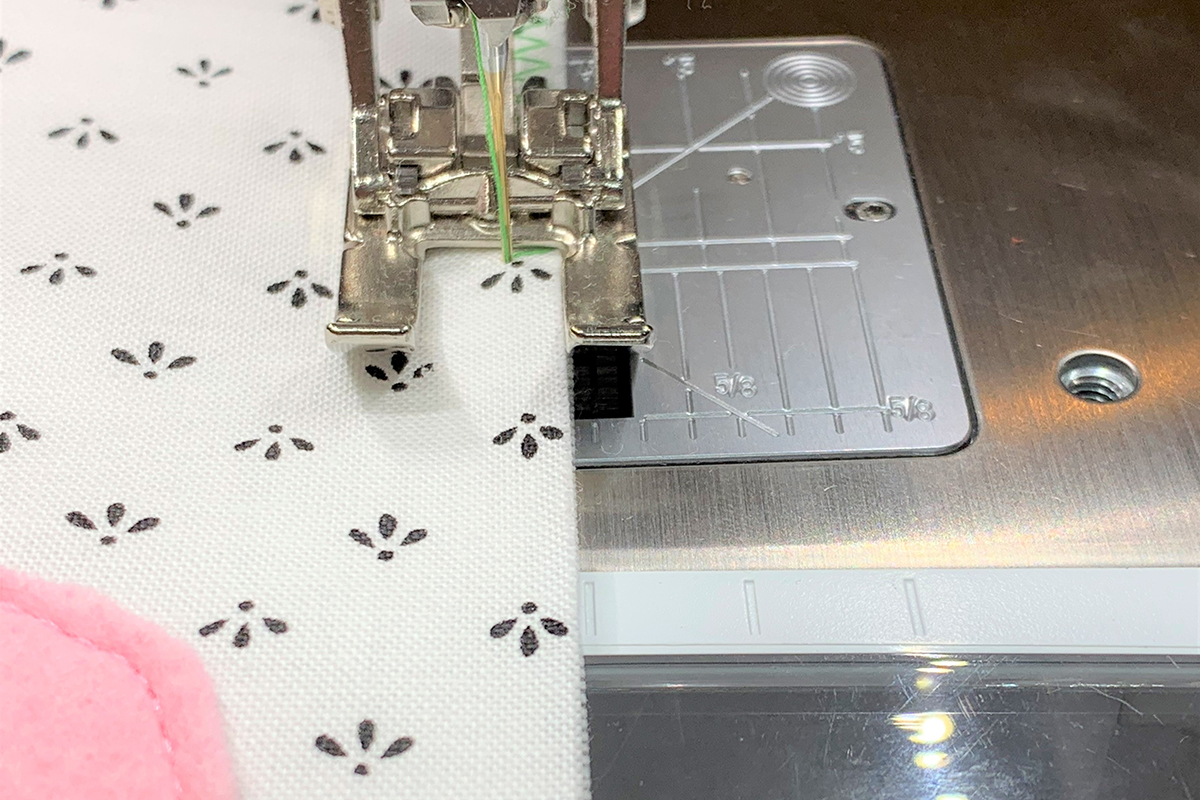
Stitch around the perimeter of the page. This will help secure the pages before the dense decorative stitching.
Optional: Use a cotton swab to apply a no-fray product, such as Dritz Fray Check, to the edges before next step.
Decorative Stitch Edging – Satin Stitches
With the busy book pages already backed with stabilizer, this makes a great foundation to add decorative stitching to the raw edges. Most busy books are finished with binding but I think the decorative stitch edging looks so much better and is loads more fun! This is where you can get really creative! You can do every page in different thread colors and decorative stitches. Or you can do the same decorative stitch in different colors. Or different stitches in the same color. The possibilities are endless. Let’s start with basic satin stitches to give you an idea of the technique, and then I’ll show a couple different options. After that, feel free to take off on your own!
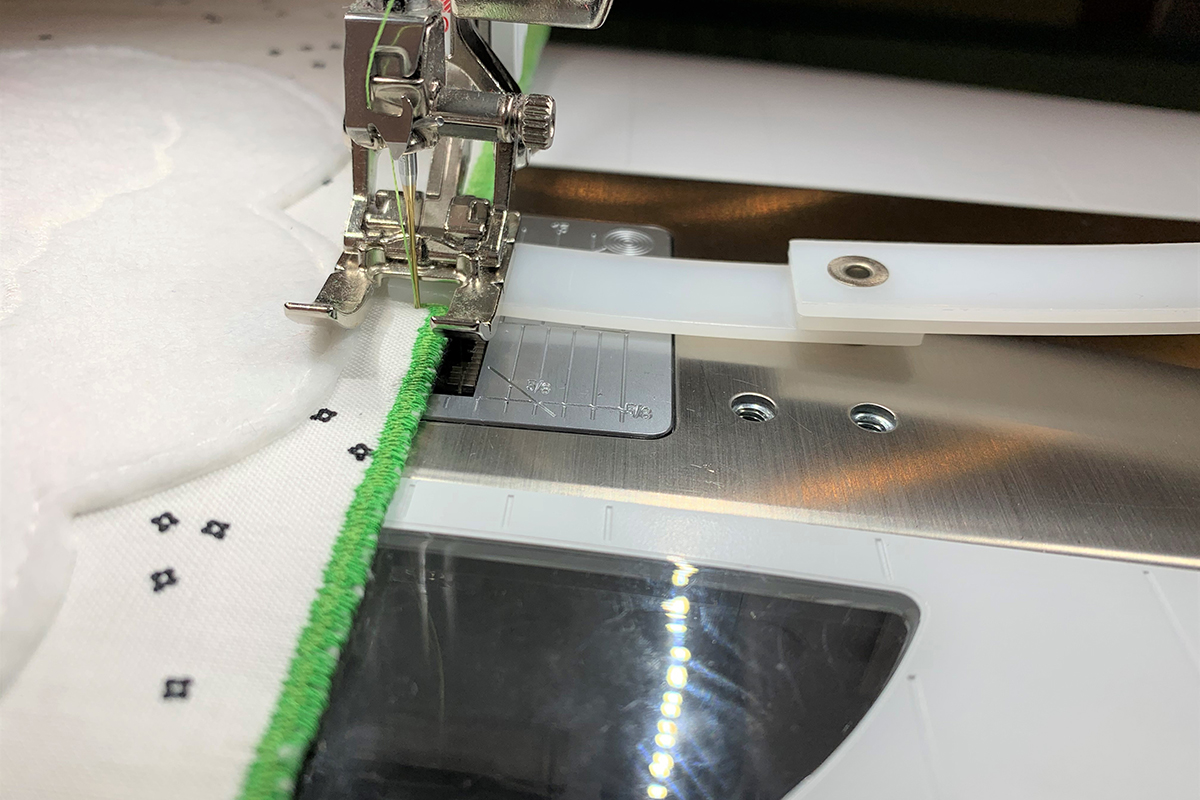
At your machine screen, you should still have Zig Zag Stitch #2 selected and Needle Position at 5. Change the stitch length to .30.

Note: Remember to remove the temporary tape from the sides that were used for placement!
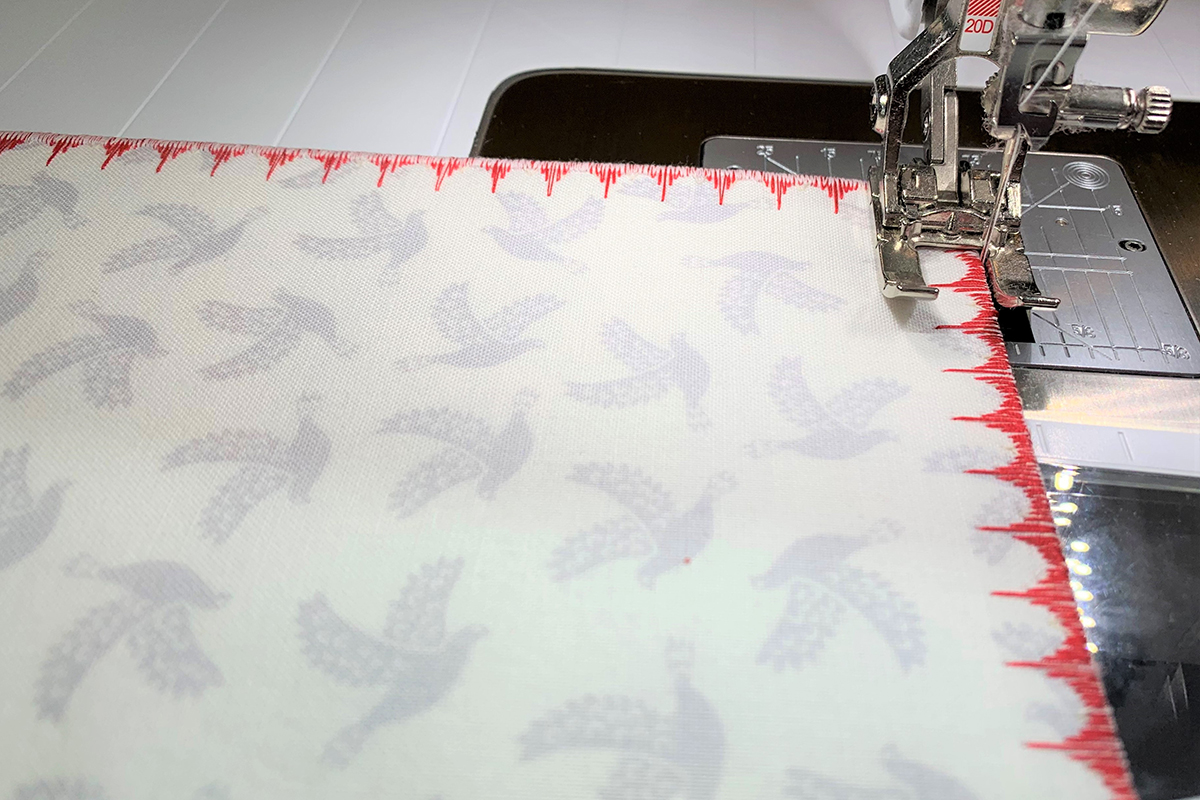
With the Open Embroidery Foot #20/20C/20D still attached, align the edge of pages with the inside right toe. With thread of your choice, stitch around the perimeter of the pages and secure.
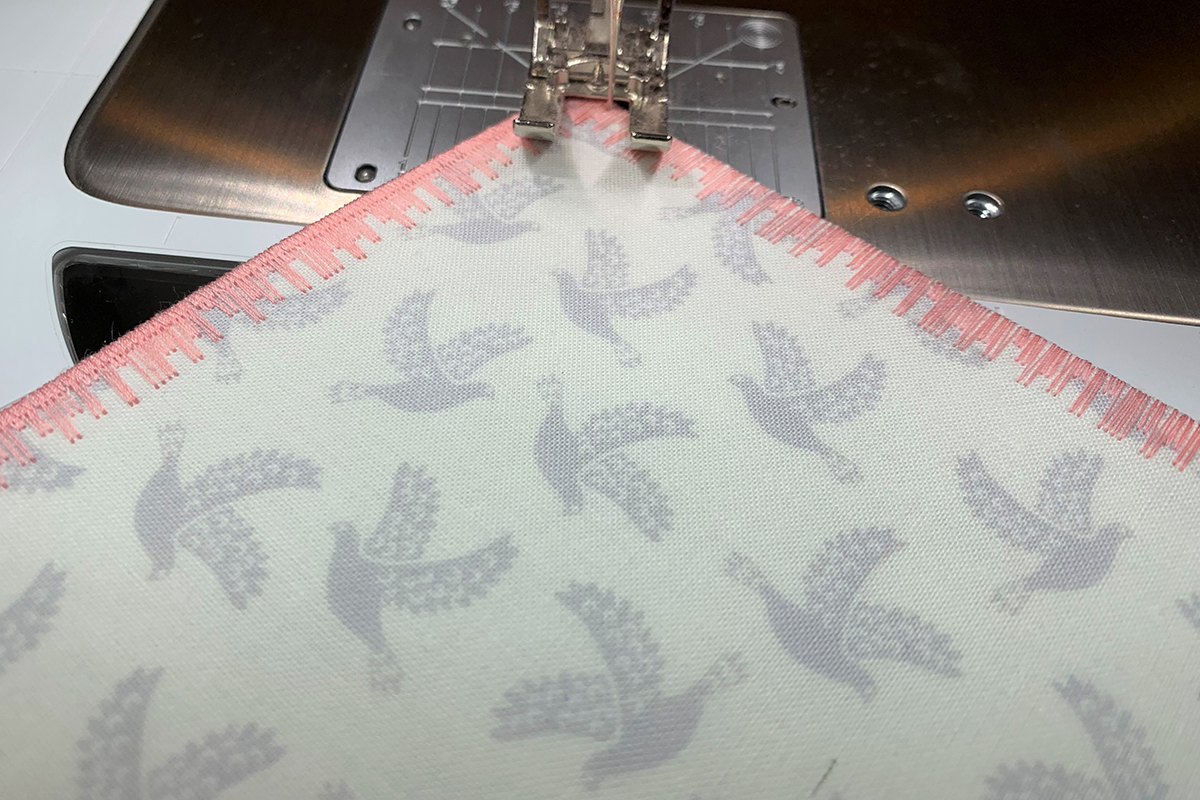
As you can see, the finished edges look good, but not great. I can see little bits of white poking out of the edge stitching. To get a neat, finished look, we need to go around one more time. Increase your stitch width to about 4 and stitch around perimeter once more. When you near a corner, slow down and stitch to the end until you are a hairline off the fabric. Carefully pivot without pulling on the threads too much (use your Free Hand System) and place fabric about 1/4” under the foot. Sew in reverse a few stitches to the original pivot point. Now, sew forward until you get to the next corner. Repeat. This will reinforce your corners. Don’t worry if the needle falls off the edge when stitching the corners. My corners look better when I do a stitch or two off the edge.
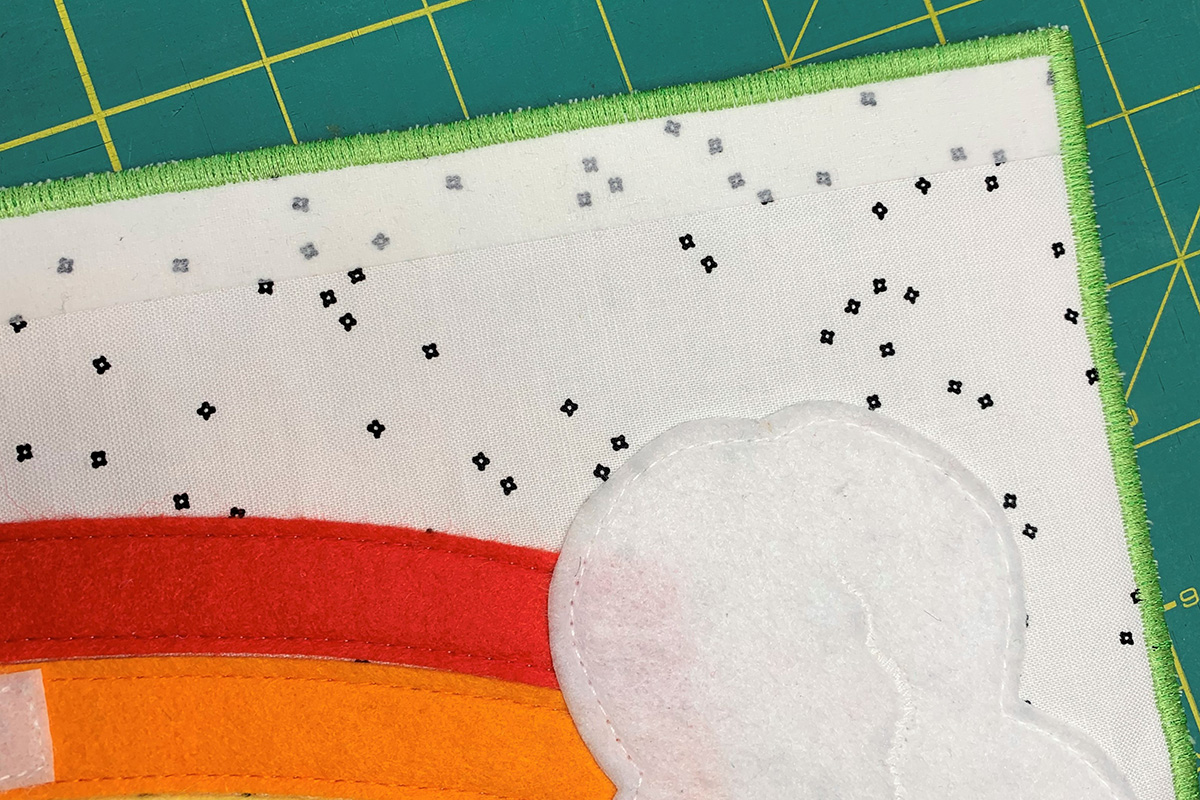
The picture below shows how the stitch width is a bit wider – notice the needle lands a bit further to the left of original satin stitch. Also, notice I am using the height adjustment compensation tool to get past the cloud. Keep this tool handy (all BERNINA machines come with one). Without it, my stitches will look skewed or off-kilter when going over uneven areas.
The finished edges look so much better after that second go around! It’s similar to painting walls. That first coat looks ok, but the second coat makes all the difference! Another option is to decrease the stitch length to make a denser satin stitch the first time around, but I preferred the look of going around twice. I think the edges look more defined and neat. I love how BERNINA gives you options!
Decorative Stitch Edging – Variations
So we’ve covered basic satin stitch edging. But why stick to satin stitches when your machine can do so much more? Did I mention that BERNINA gives you options? Pictured below are a couple different decorative stitches that will give your pages a fun, custom look. Notice that the decorative stitches for this application need to have a straight edge along one side.
I am using practice pieces. I recommend you do the same if you want to practice the technique, play around with different stitches, and/or different color threads. My practice pieces are 5” x 10”. I added the same stabilizer I used for the busy book pages to keep it consistent.
Let’s start with Decorative Stitch #427. You should still have Open Embroidery Foot #20/20C/20D selected on the screen. Go into the Information Menu and select the Mirror Image Left/Right icon to reverse the decorative stitch. Change Needle Position to 5.
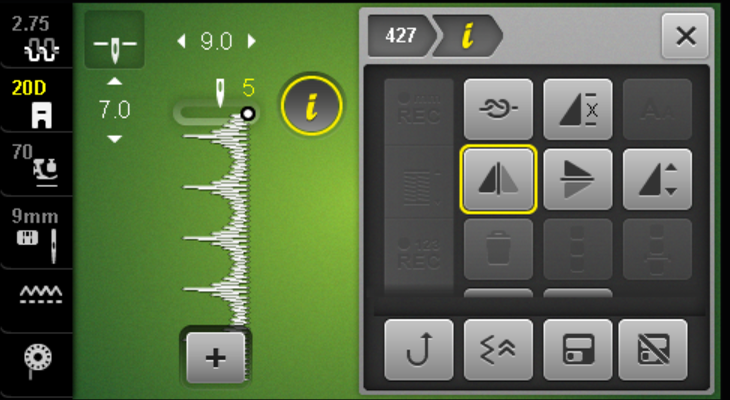
Decide if you want to add a color thread that would blend in with the busy book page or stand out. If you want the edging to blend in, use a white or light thread. If you want contrast, use a bright or dark thread. Whatever you decide, the color should complement your page. I am using Aurifil 50 wt thread. The Aurifil 40 wt thread is a good choice also.
Start stitching! Usually I start at the bottom edge where the start/stop point is least noticeable. When you near a corner, slow down, stop a hairline off the edge of fabric, carefully pivot using your Free Hand System, and continue. Don’t worry too much how the corner looks, as we will cover it with satin stitches in the next go around.

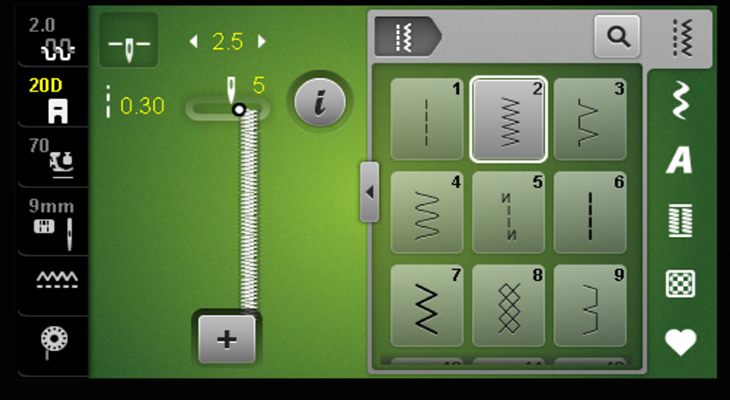
Now let’s give the edge a neat, finished look by sewing around the perimeter one more time with a narrow satin stitch. Select Zig Zag Stitch #2, change Stitch Width to 2.5 mm, change Stitch Length to .3 mm, and Needle Position to 5.
Change color thread if you want to add a second color. I am using white thread because I wanted to tone down the bright red.
When you reach a corner, stitch to the end until you are a hairline off the fabric. Carefully pivot without pulling on the threads too much (use your Free Hand System) and place fabric about 1/4” under the foot. Sew in reverse a few stitches to the original pivot point. Now, sew forward until you get to the next corner. Repeat. This will reinforce your corners. Don’t worry if the needle falls off the edge when stitching the corners. My corners look better when I do a stitch or two off the edge.
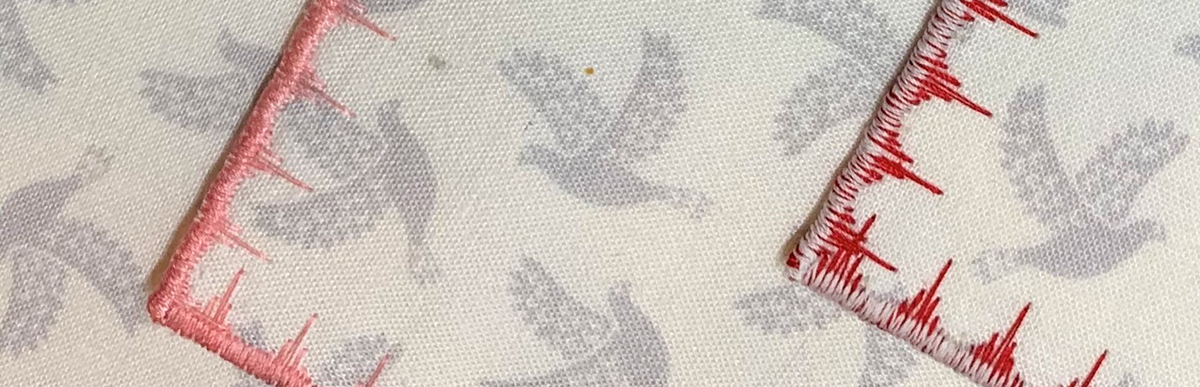
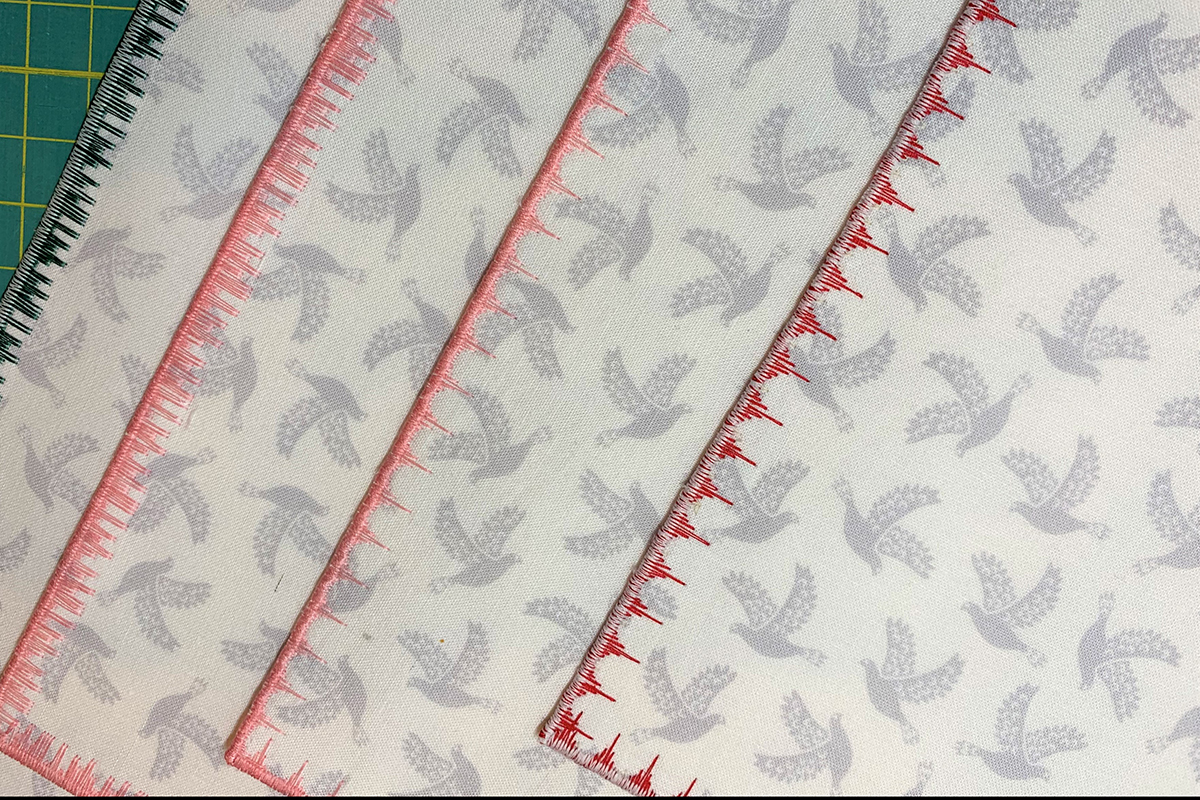
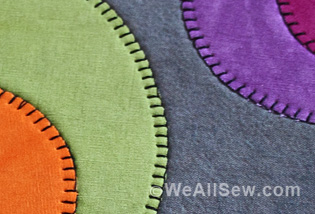
Following is a picture using Decorative Stitch #419. (Remember to mirror image the design in your machine.) Pictured below is a close up of how much better the edges look by adding the narrow satin stitch. On the left side, the satin stitch has been added creating a neat, finished edge. On the right side, it has not. See the difference?
Here are some of my practice pieces. All the thread colors are Aurifil 50 wt except the green on the right, which is an Aurifil 40 wt. I toned down the red and green thread by adding white thread for the satin stitches. Play around and have fun! Follow this tutorial and then make it your own!
When you are ready, stitch the edges of your busy book pages and then set them aside for buttonholes.
Add Buttonholes
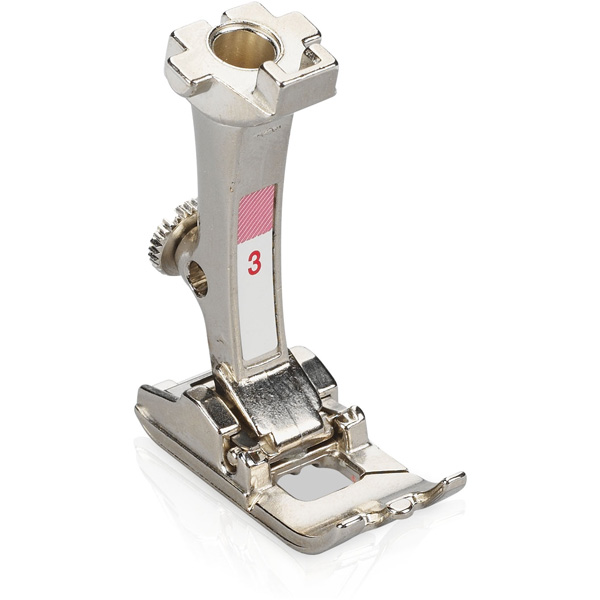
Time for buttonholes! Get out your BERNINA Buttonhole Foot #3A. This is an automatic buttonhole foot. There is a sensor on the foot that the machine reads when you make the first buttonhole. Every buttonhole stitched after the first one will be the same size.
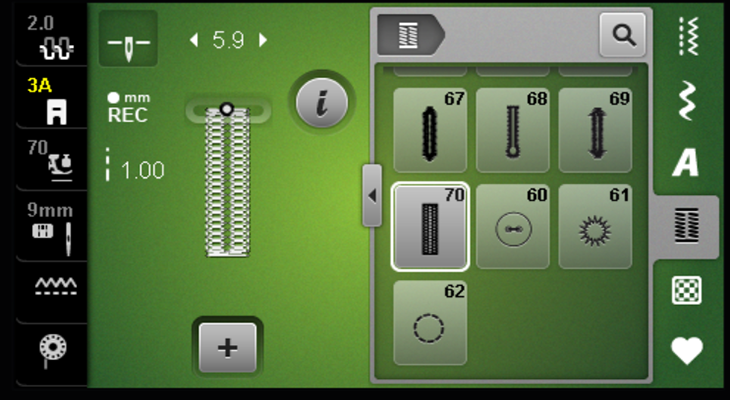
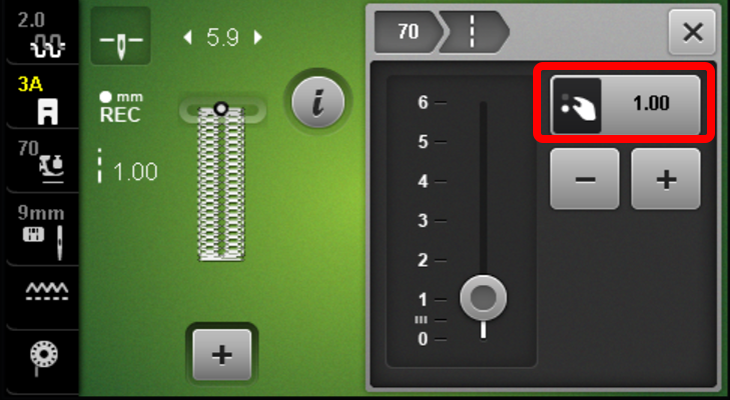
Select the Buttonhole Menu on your machine screen. Select a buttonhole that interests you. I like Buttonhole Program #70, which is a decorative stretch buttonhole. Use the Help icon on your machine to learn about each buttonhole.
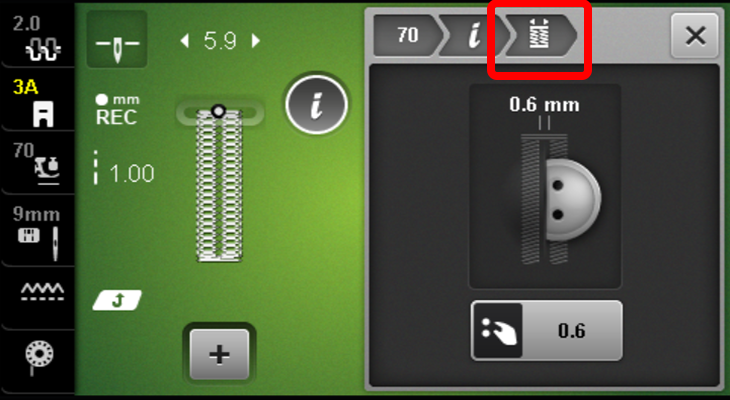
I am going to keep the slit width, bead width, and bead density at the default settings, but you can adjust all three. Remember BERNINA gives you Total Stitch Control! The Slit Width Adjustment icon is in the Information Menu. The default is .6 mm.
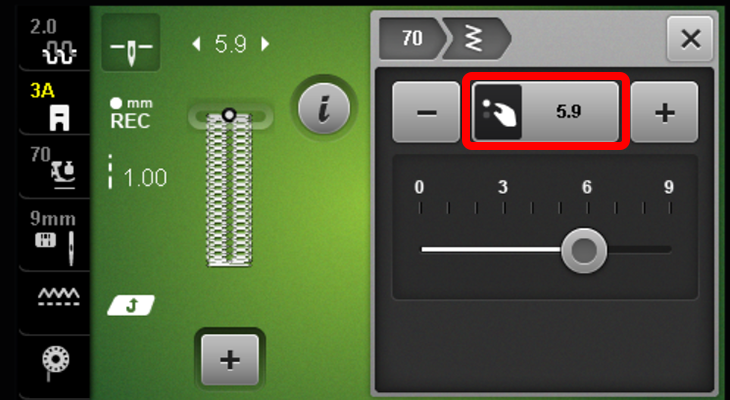
To adjust the bead width, select the Stitch Width icon or use the upper Multi-function Knob.
To adjust the bead density, select the Stitch Length icon or use the lower Multi-function Knob.
Use your practice pieces to test out different buttonholes. Play around with the variety of styles and find one you like for the busy book pages.
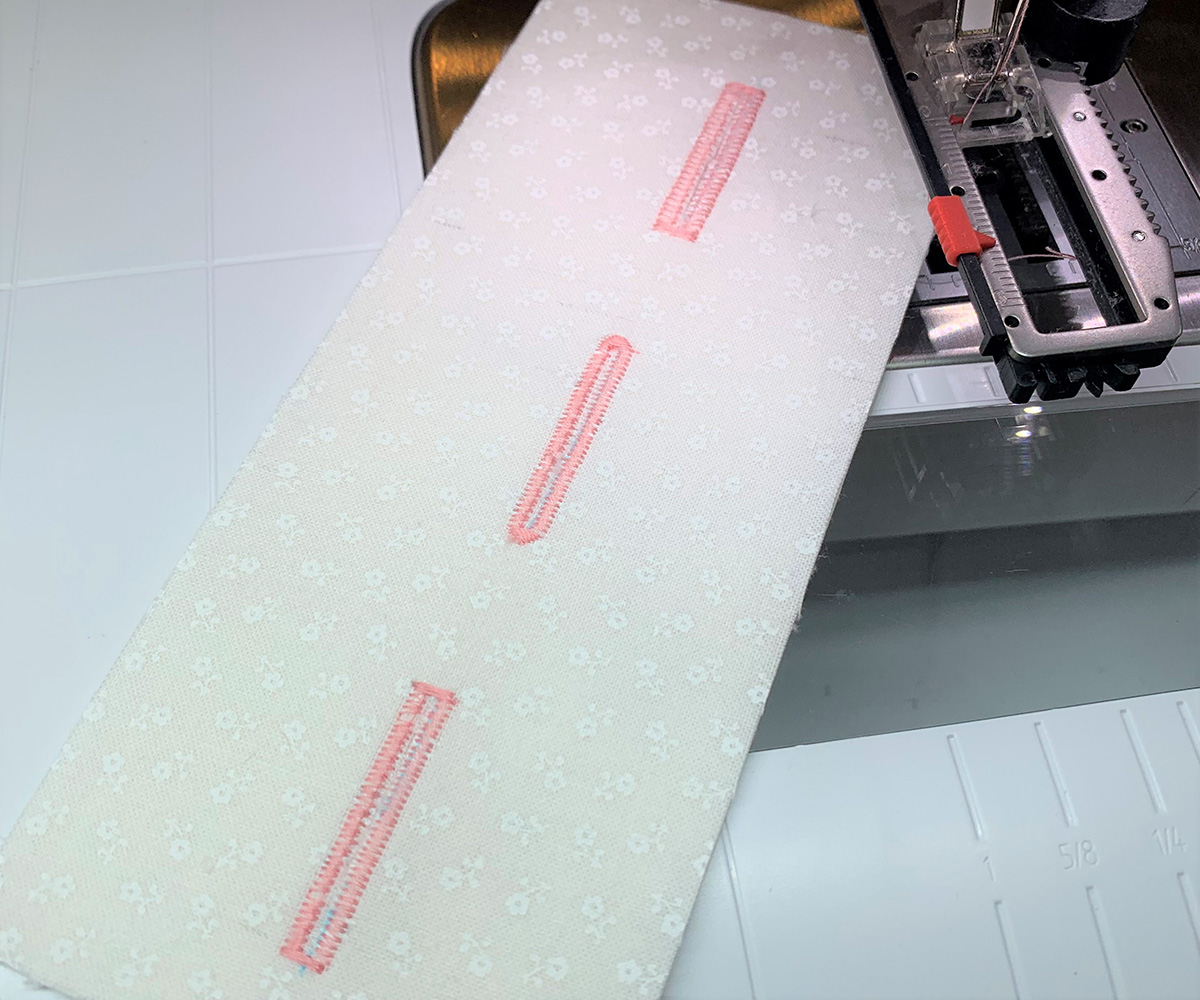
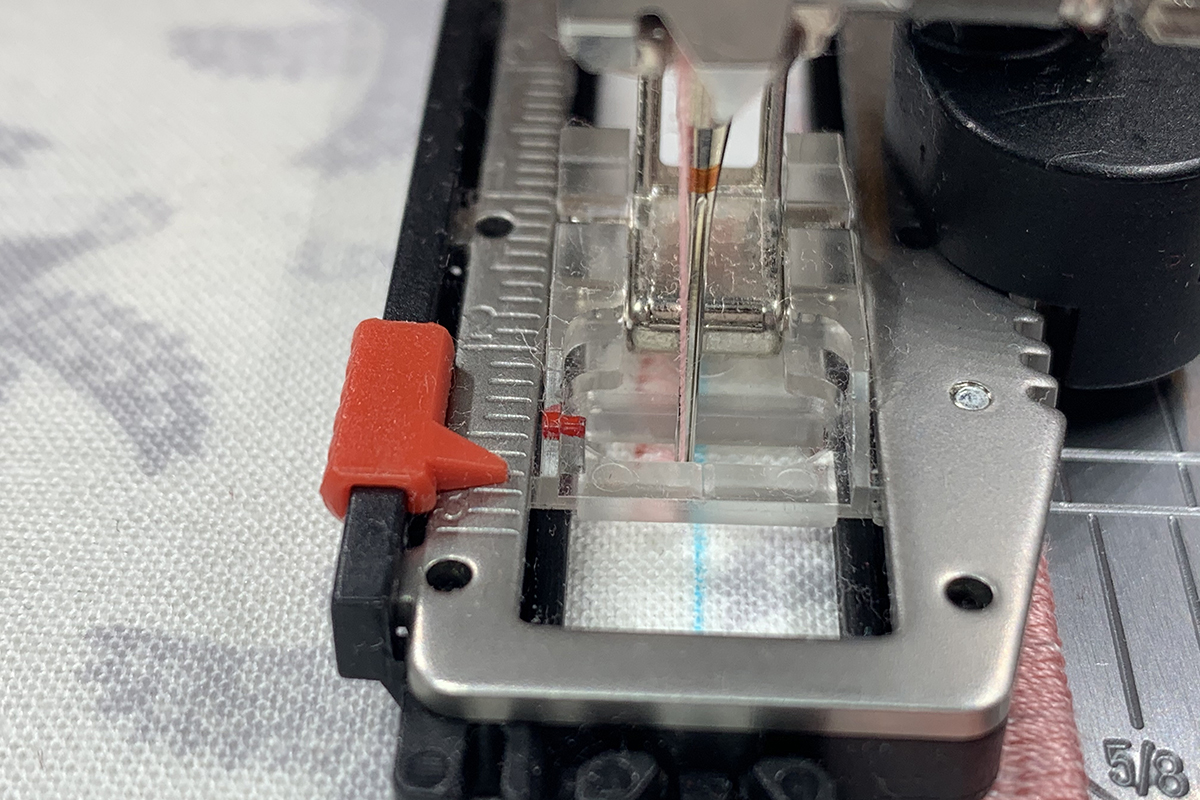
With a temporary marker, draw a line down the side for buttonholes about 5/8” from the edge. Then, place a dot at 1.5”, 4.5” and 7.5”. This will be the starting point of each buttonhole. I am making three buttonholes, but two would be fine also.

Attach BERNINA Buttonhole Foot #3A, and use the same thread used for finishing the page edges. Align the foot so that the first marked dot is right under the needle and the center mark on the foot is on the marked line. You can use the red sliding tab as a visual marker if you want to adjust the buttonhole length. Stitch out!
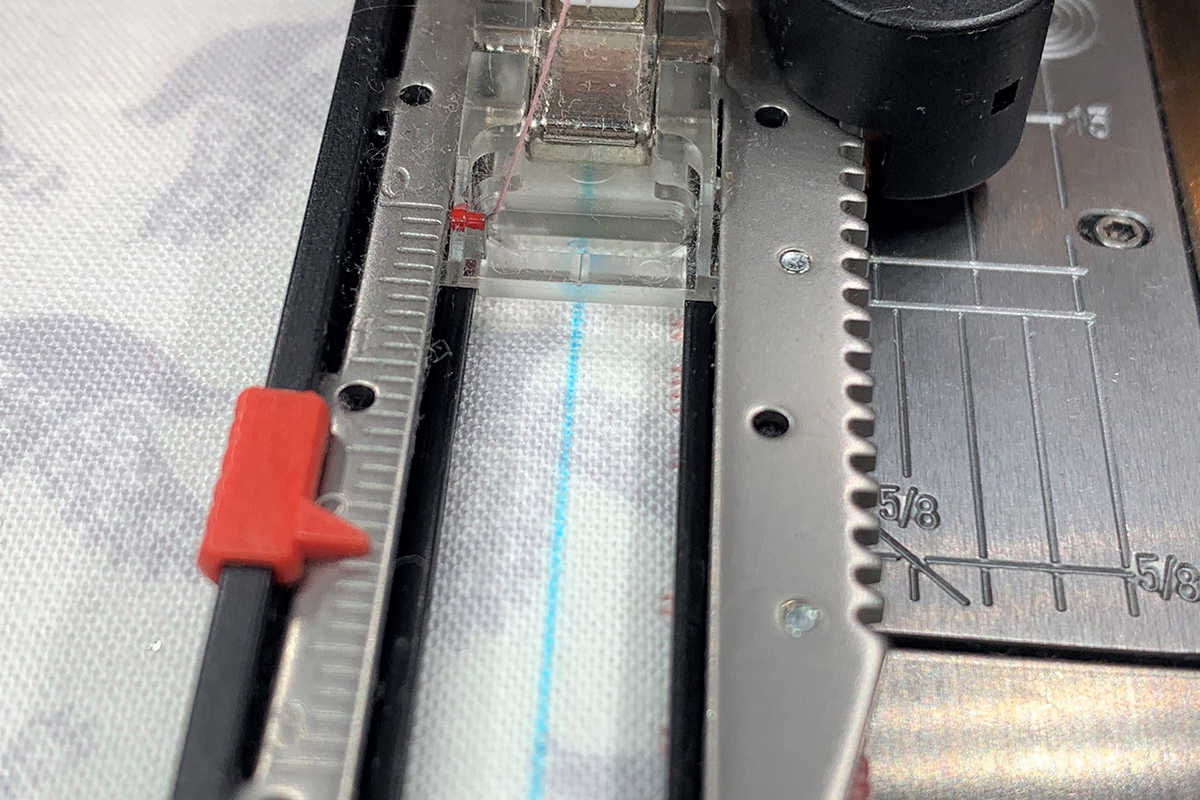
Align the foot over the next marked dot and center line. You can use your Start/Stop Button and let the machine do the work while you keep the marked line centered with foot.
Once you finish the buttonholes, use a buttonhole cutter to carefully open the slits. Now you can use this page as your template. Place the finished page over an unfinished page and mark through the buttonholes. Easy!
If you want to learn more about different options for creating buttonholes with a BERNINA, check out this post.
Add Binder Rings or Ribbon
Decide if you want to add binder rings or ribbon to your pages. I added ribbon to mine because that’s what I had around the house. Both options work great allowing you to add pages as you make them, remove pages as the child grows or gets bored with them, and rearrange pages.

Continue to finish your page edges and add buttonholes every two pages. I love how these turned out and how there are so many variations to explore with my BERNINA. It’s all about options and Total Stitch Control!
Until next month…

Kids Busy Book Series
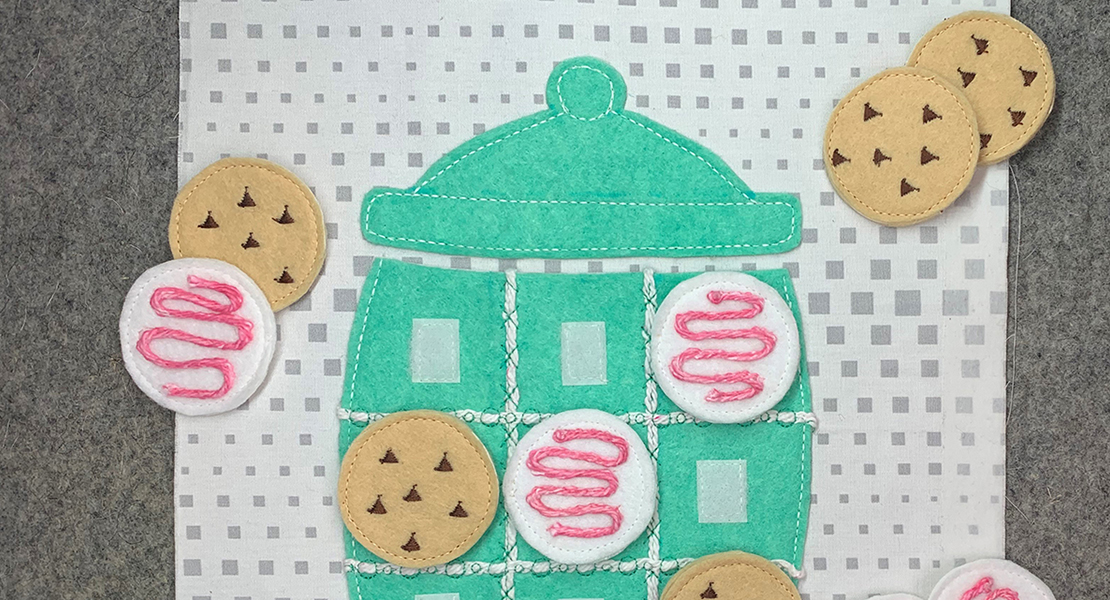
Part 4: Cookie Jar Tic Tac Toe
Used Products


What you might also like


18 comments on “How to Sew a Kids Busy Book, Part 6: Assembly”
-
-
Hello. I will have a title page and hopefully more in the coming months! I am planning 2021!
-
-
I have LOVED this series. Not only do I have a cute book, but I am learning SO much about my machine. THANK YOU and I hope there will be more!
-
Yes! My goal was to learn the machine while making a fun project for the kids and grandkids. So glad you are enjoying the tutorials!
-
-
Am making 2 of these busy books and am all caught up. I’m leaving the last page “unbound” in case another page comes along though. If no other pages, I may play with my creativity and couch a cord to make a maze or something–ending with a “Made by . . . ” label. This has been a lot of fun! Thank you for all of your efforts!
-
Great idea! I will have a title page coming up in next couple months. Wow – two! That’s incredible! So glad you are enjoying them!
-
Oh, great idea to make a maze!
I was thinking of the rhyme 1, 2 buckle my shoe….I’ve been having fun figuring out the 9, 10 big fat hen. Removeable from the nest, with an egg cracked open and maybe a chick hiding under a flap of the nest….of course I would have to use crinkle plastic….
I agree, this has been so fun. I have learned a LOT! Thank you Julie. Love these tutorials.
-
You are welcome! Thanks for letting me know and glad you are learning along the way!
-
-
-
Is there a kit for this book. I just discovered the blog
-
Hello. There is not a kit as I have been making and posting the tutorials every month or two. Something to think about in the future!
-
-
Will the next installments be ready in time for Christmas? Great fun, an excellent tool for learning ones machine as well as for the child who will receive the book. Thank you.
-
Hello. The next page posted today! Enjoy!
-
-
Thank you so much for these tutorials! I was not able to take advantage of the lessons from the BERNINA store when I purchased my 770QE at an AQS Quilt Show. We don’t live near the BERNINA dealer who sold it to me. The manual is not very helpful for a lot of things. Your tutorials have been invaluable!
-
You are welcome! I’m so glad the tutorials are helping you get to know your machine. Once you know the basics, the creative possibilities are endless!
-
-
How do I place the 8 in square of crinkle paper in the sandwich ? Flat? How is it used to make a sound ? I’ve only used it once and it was wadded up .
Thanks
El-
I’m not sure what brand you have but place it in flat. Maybe try securing it with temporary glue. The one I have is made by Crinkle World and it make sound when you touch it!
-
-
I’m making my nephew a busy book for Christmas but, i’m a bit confused. There are 5 pages which leaves the honey pot page without a backing. Am I just supposed to sew a 10×10 piece on the back to finish? I see the shapes page is two sided so can’t sew that one on the back. Thanks!
-
Hello. You should end up with a Rainbow Page, Piggy Bank, My Family, Cookie Jar, Bear & Honey Pot, Shapes and Colors (2 sided), and title page. This is 8 pages. I hope your nephew loves it!
-
Leave a Reply
You must be logged in to post a comment.

Hi Julie,
So glad to get the next installment….will there be more pages or is this the final lesson?