St. Patrick’s Day Wall Hanging
Hello fellow makers!
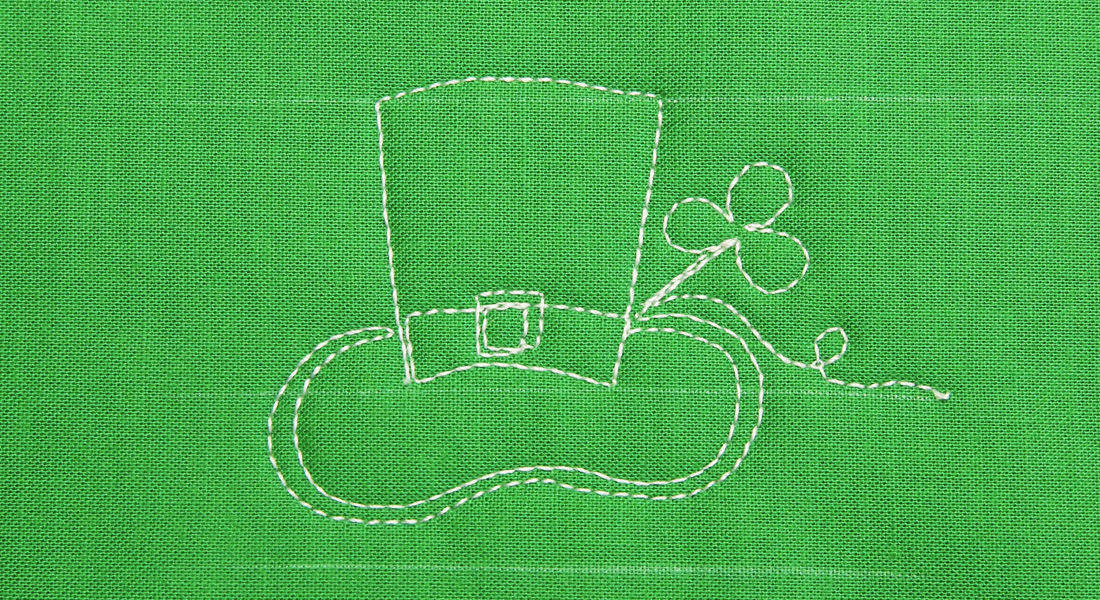
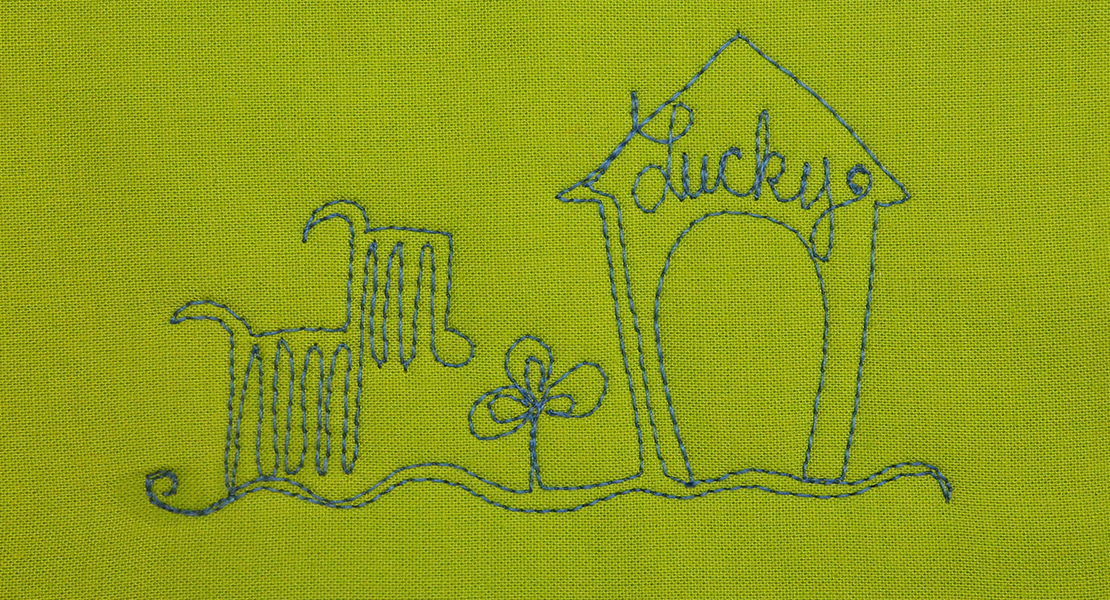
Did you know that a four-leaf clover is said to stand for faith, love, hope, and luck? Why lucky, you ask? Well, four-leaf clovers are very rare, and so they are considered lucky if you find one! Instead of finding your own luck, why not create your own magic with something handmade, especially with St. Patrick’s Day around the corner. Bring the “luck of the Irish” to your home this year by piecing together this stunning four-leaf clover wall art! You can hang it outside your door or place it inside for all your guests to admire during a St. Patrick’s dinner celebration.

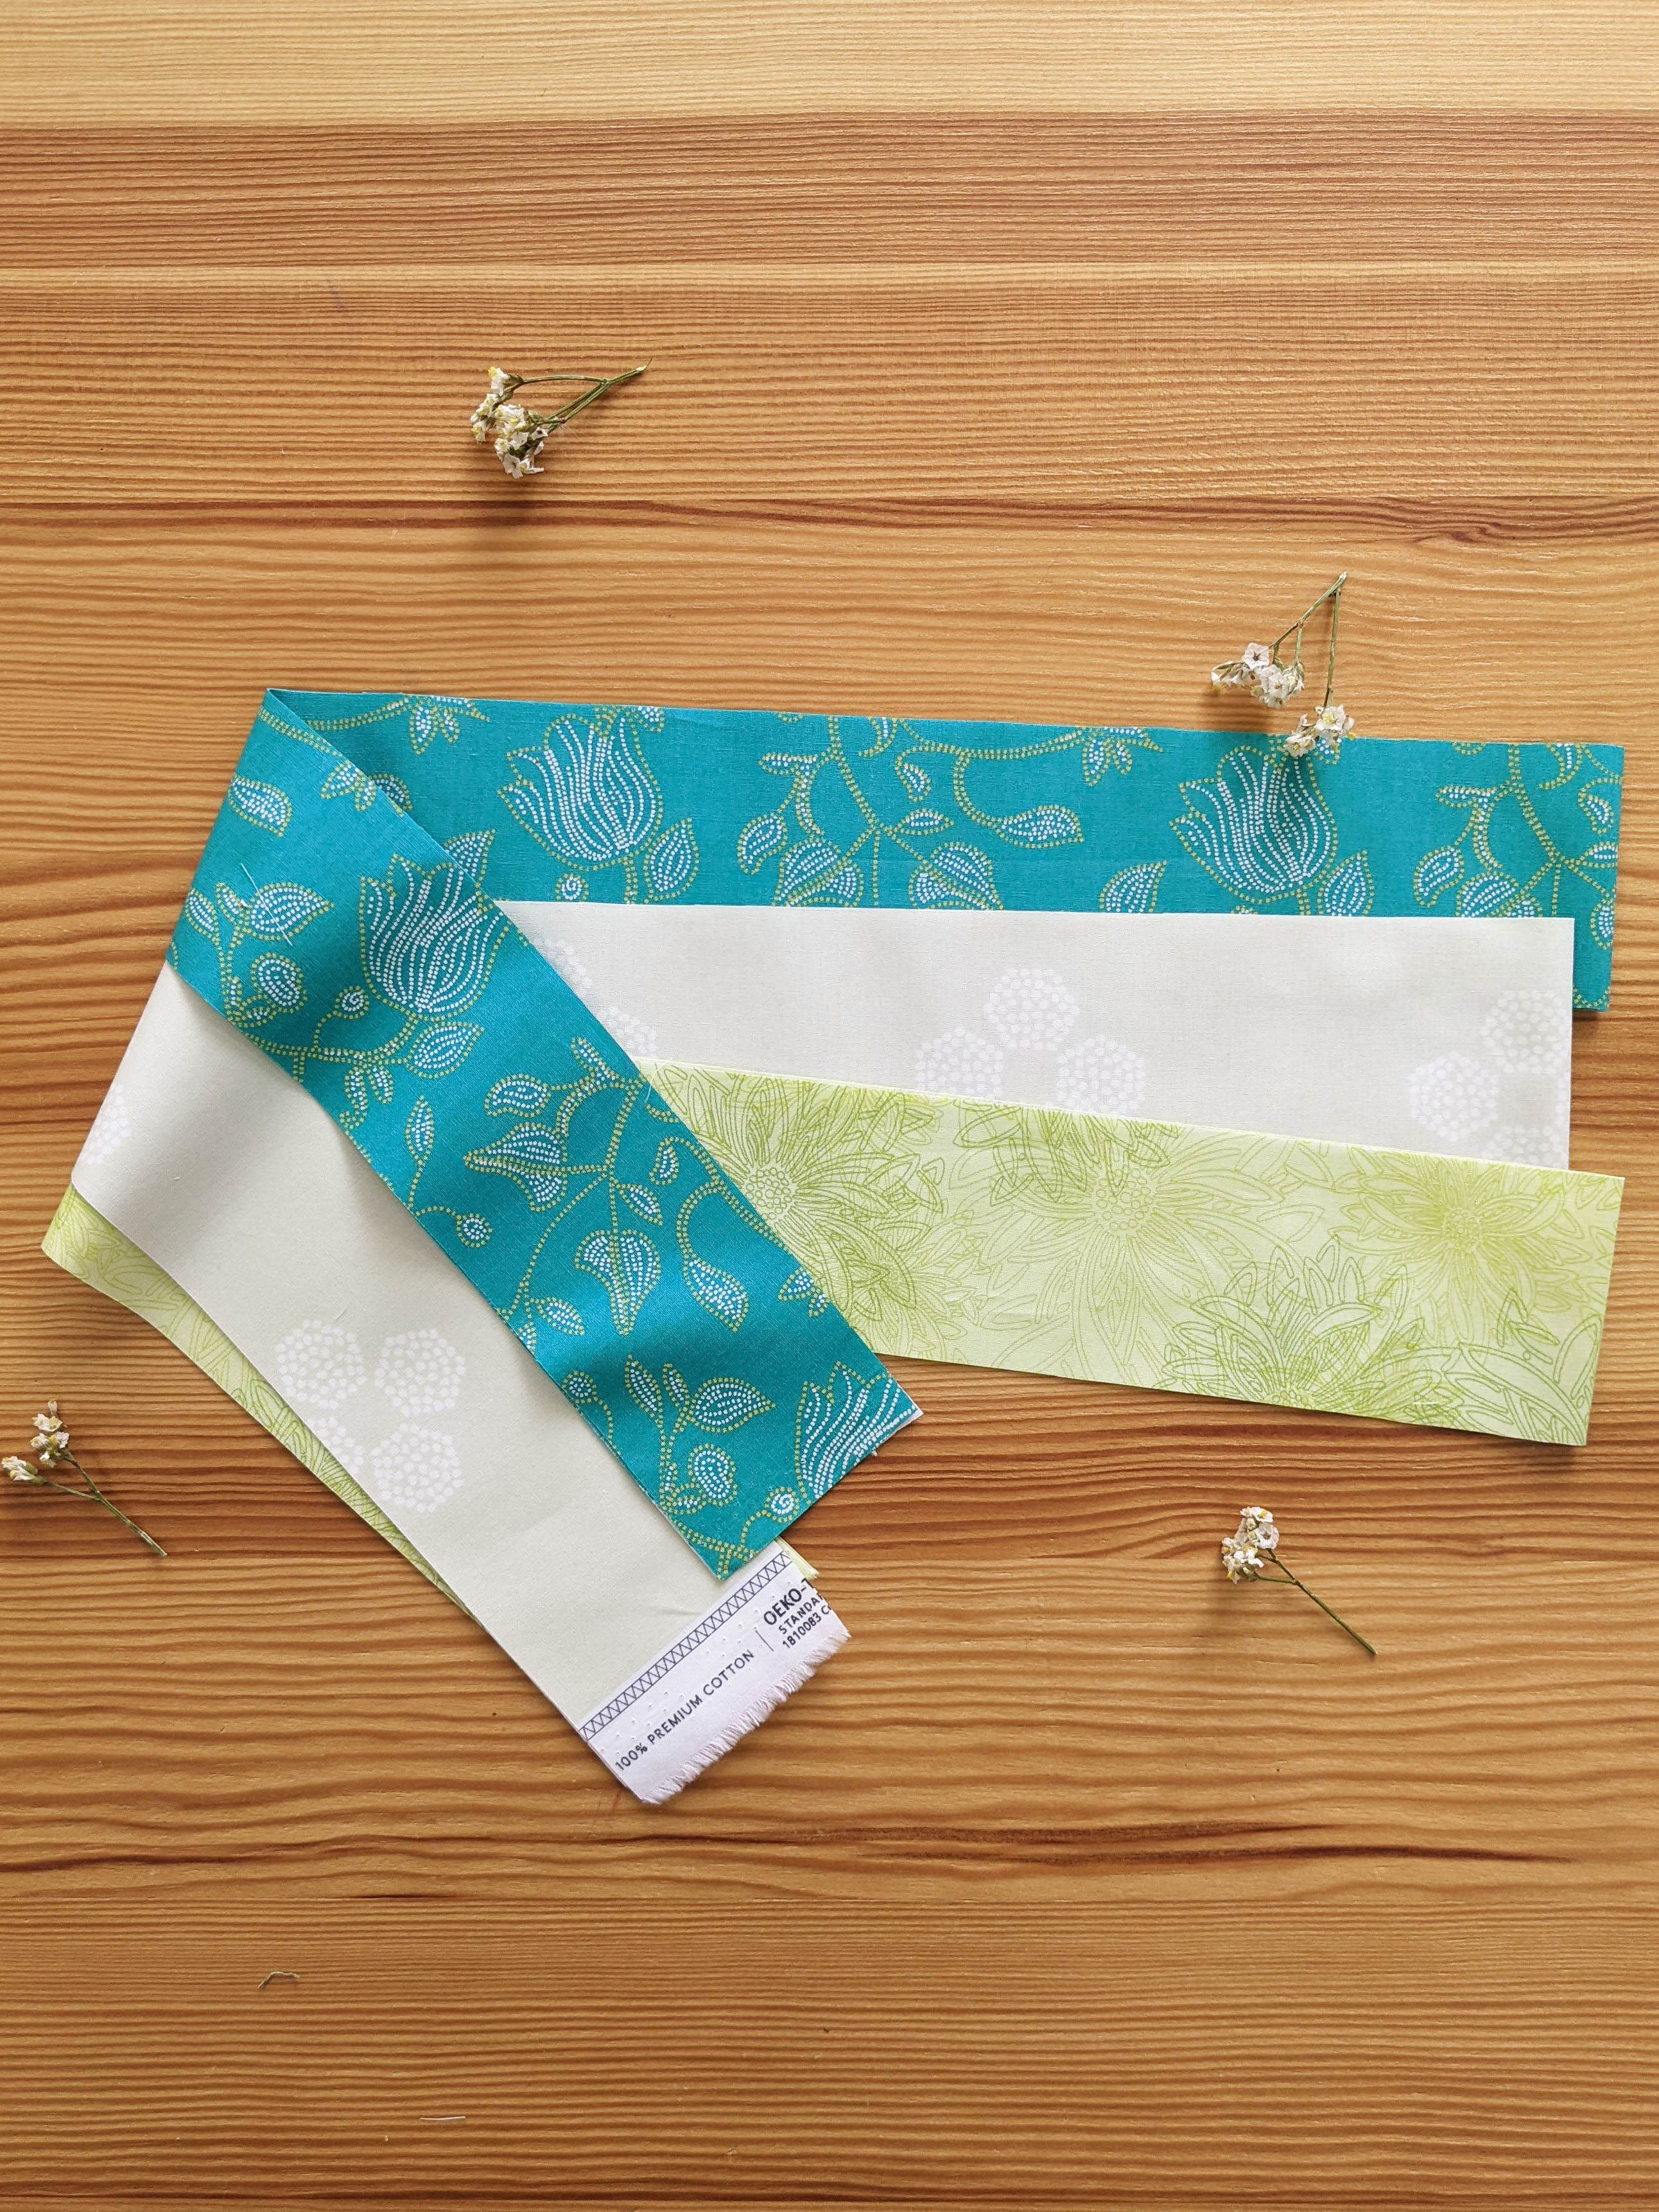
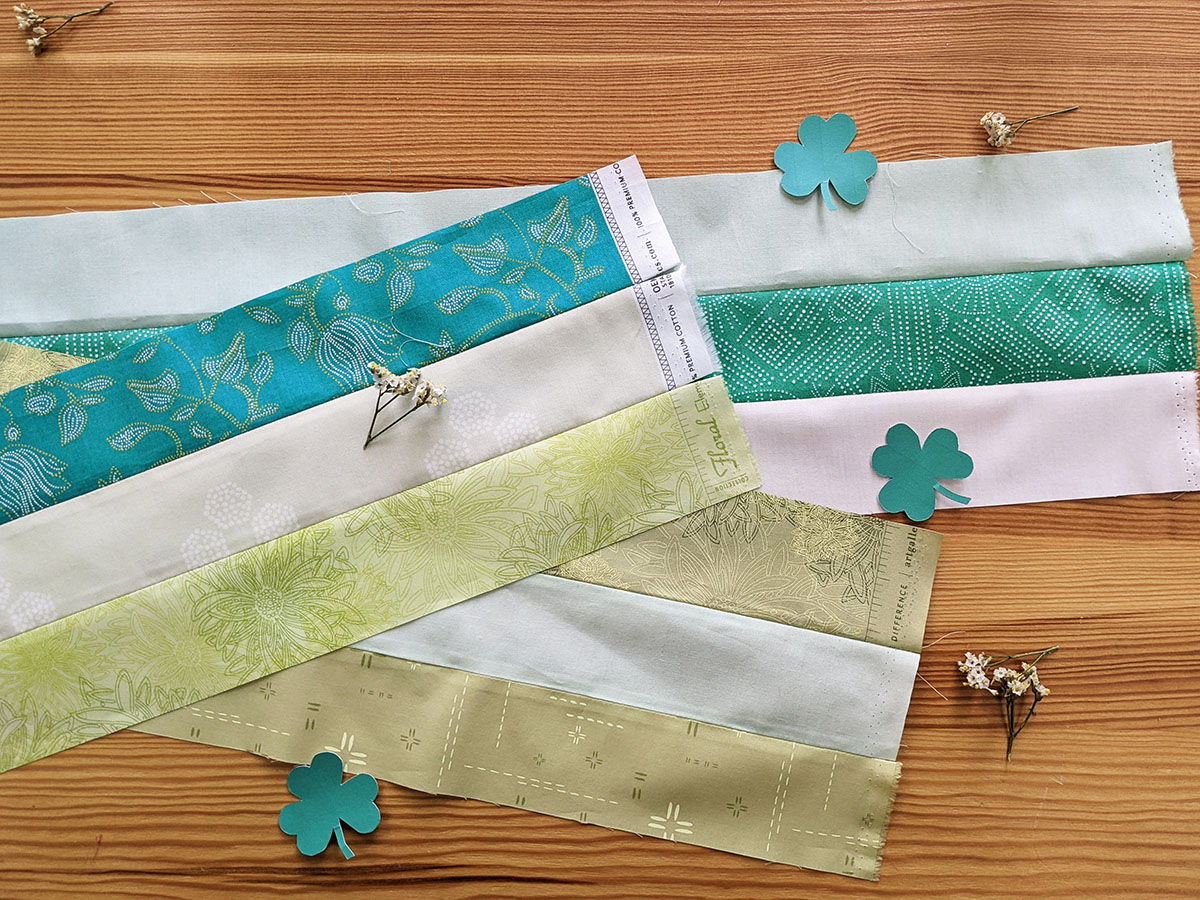
For this project, I used two techniques, which are strip piecing and nine patch blocks. To begin, I gathered some of my favorite green prints, including fabrics from my Nuncia collection in “Buenos Aires Pampa,” “Your Path Clover” from Jessica Swift’s Flight Path, our AGF Vert Fusion collection in the print “Droplet Petal Vert,” and combined these prints with our Pure Solids, Floral Elements, and AGF Linen.
Have fun making this project!

Materials to Sew a St. Patrick’s Day Wall Hanging
- Fabric A — 1/8yd
- Fabric B — 1/8yd
- Fabric C — 1/8yd
- Fabric D — 1/8yd
- Fabric E — 1/8yd
- Fabric F — 1/8yd
- Fabric G — 1/8yd
- Fabric H — 1/8yd
- Fabric I — 1/8yd
- Fabric J — 5/8yd

Additional Materials Needed
- 23” square of batting
- Quilting and sewing thread
- Scissors
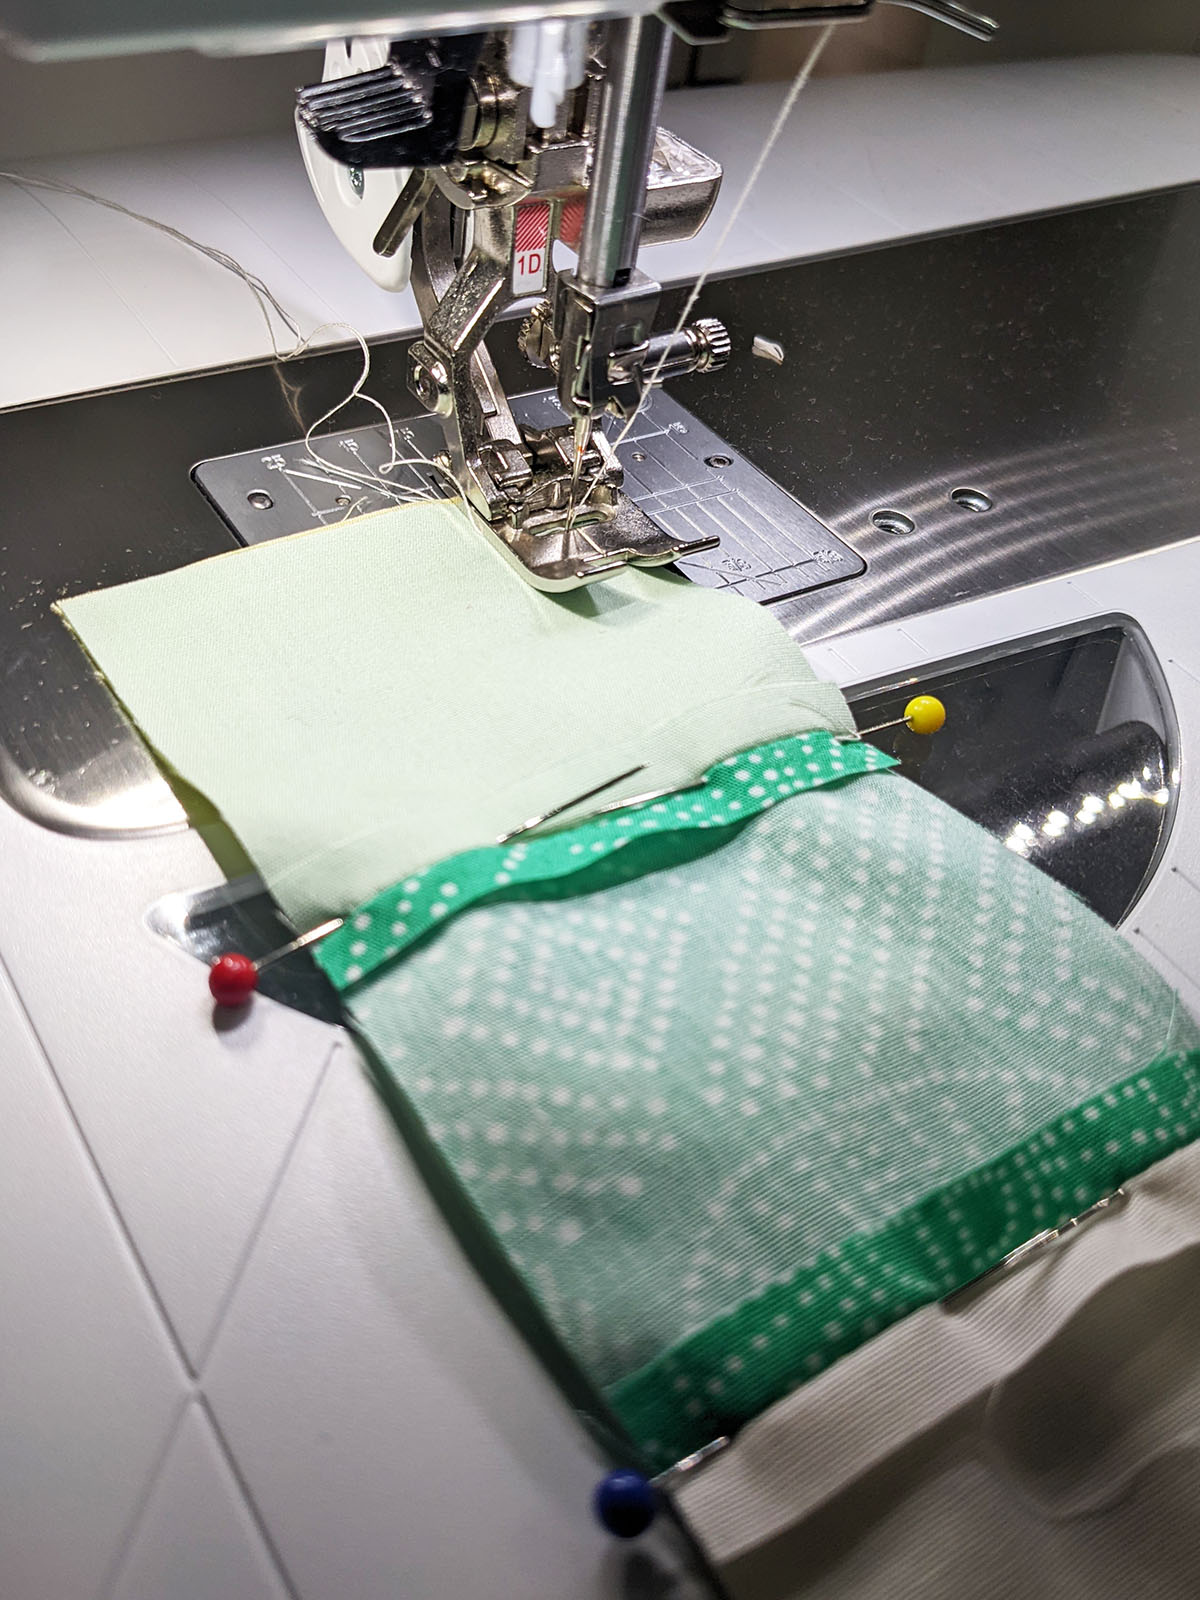
- Reverse Pattern Foot #1D
- Steam-a-seam 2
- Needle
- Clover Template

Cutting Directions
- One (1) 2 1/2’’ x WOF strip from fabrics A, B, C, D, E, F, G, H and I.
- One (1) 22 1/2’’ square from fabric J.
- One (1) 2 1/2’’ x 21’’ strip from fabric J.
Instructions to Sew a St. Patrick’s Day Wall Hanging
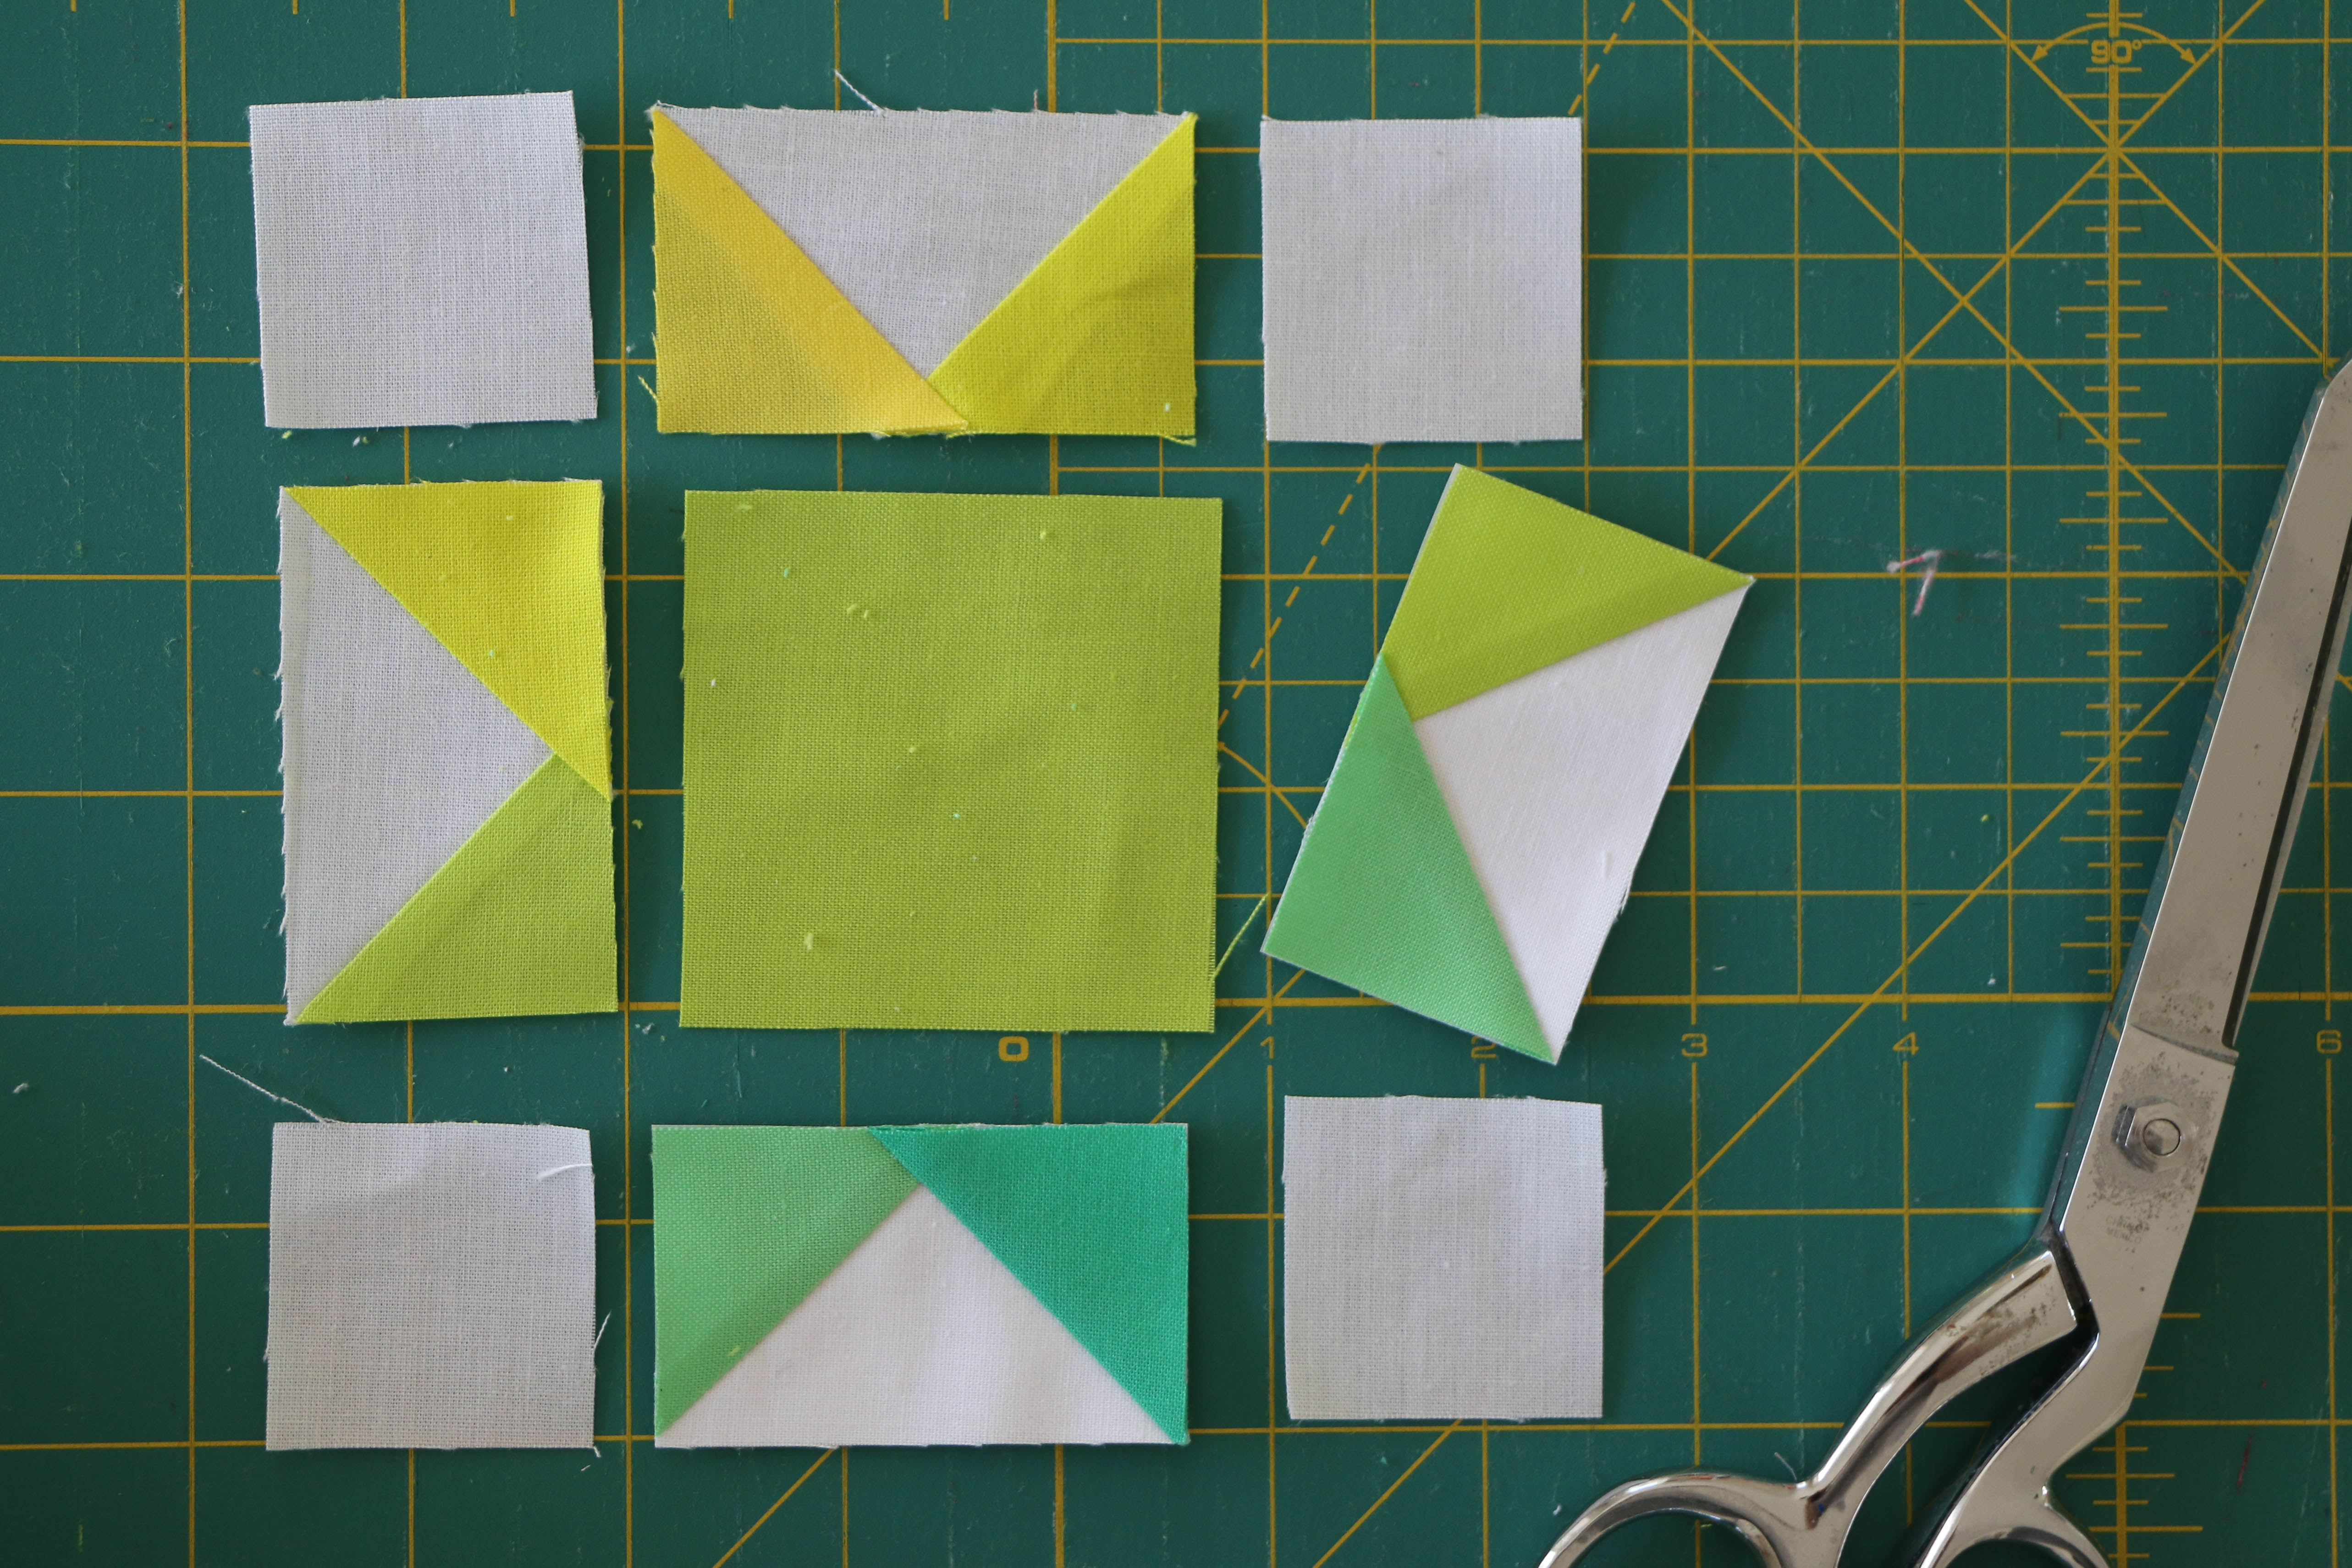
Step 1: Sew the Strip Sets
To sew strip set 1 (SS1) join one (1) 2 1/2” x WOF strip from fabrics D, B and at a 1/4” seam allowance.


For SS2, join one (1) 2 1/2” x WOF strip from fabrics G, E and H.

Sew right sides facing together at a 1/4” seam allowance.
For SS3, join one (1) 2 1/2” x WOF strip from fabrics A, C and F.
Once you have your three (3) strip sets, let’s cut the strip pieces!
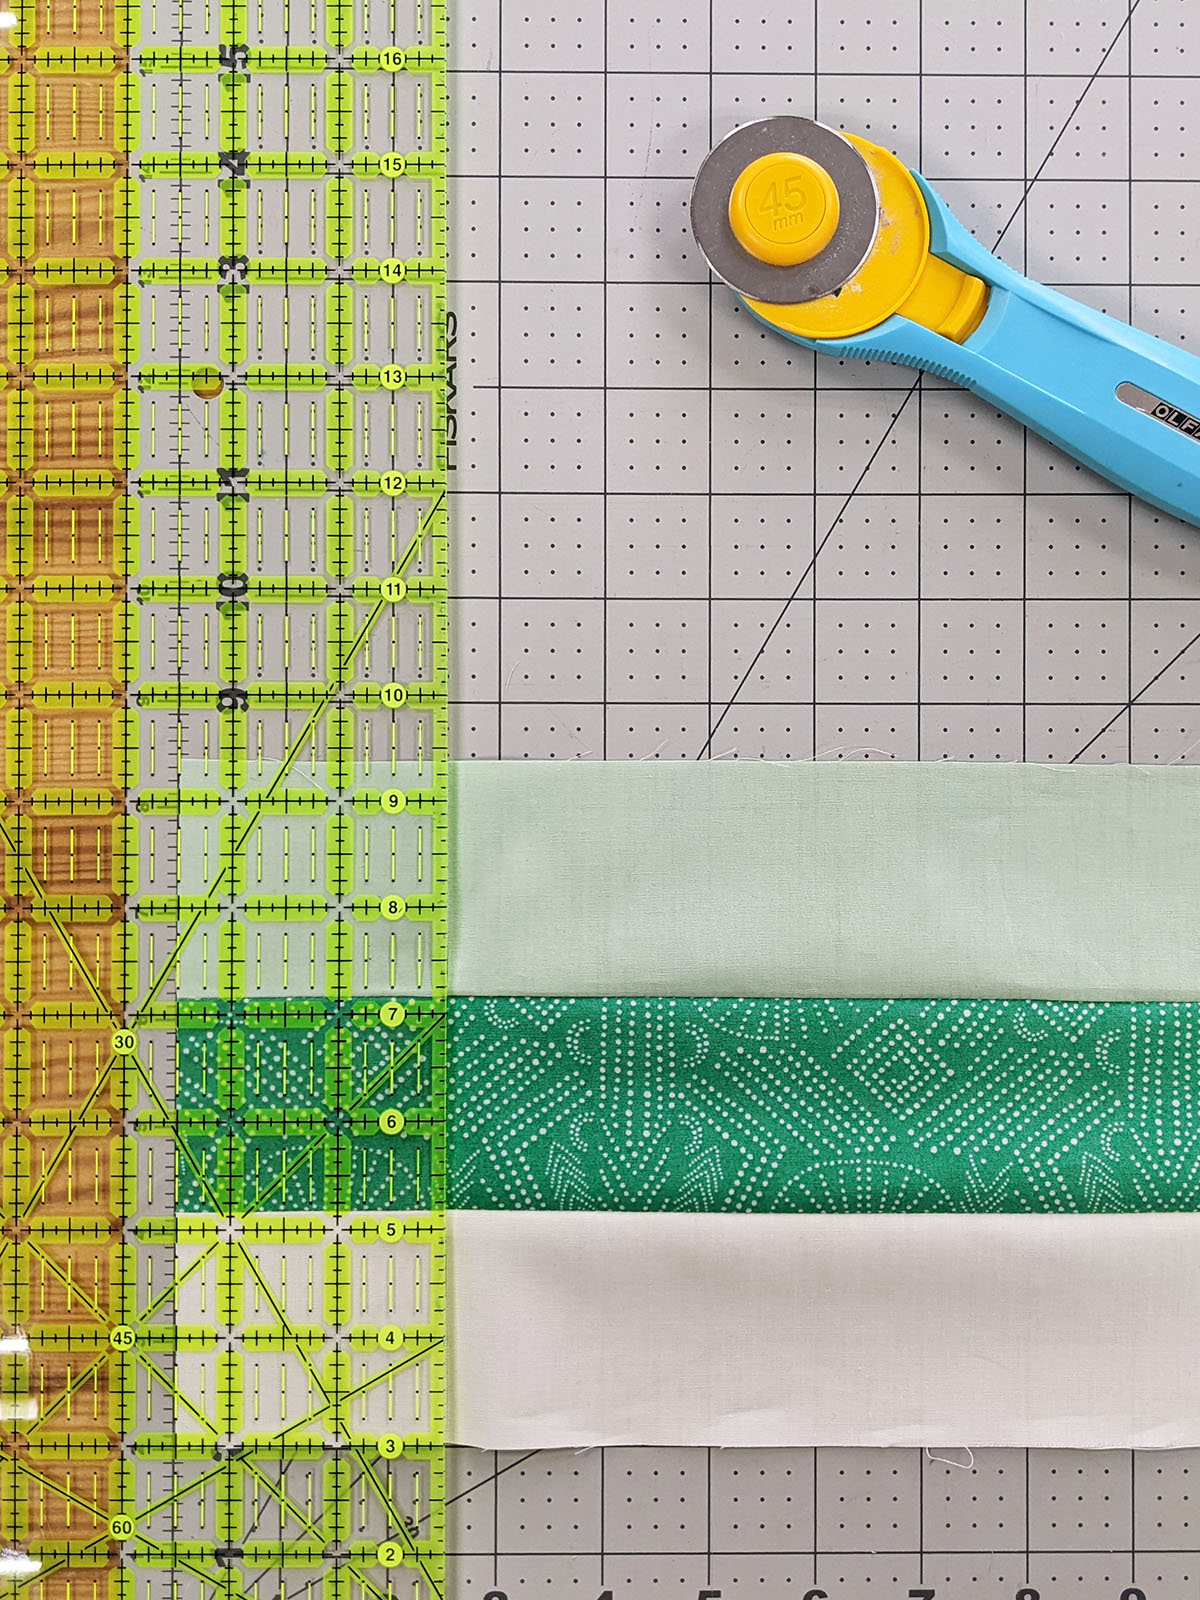
Step 2: Cut the Strip Pieces
Take a ruler and your rotary cutter and cut your strips sets at a 2 1/2” width.
Cut nine (9) for SS1, SS2 and SS3.
Finish cutting your strips sets and let’s get to do the construction of the nine-patch blocks.
Step 3: Assemble Nine-patch Blocks
Have fun assembling your nine-patch blocks. Take one (1) piece from each strip set and start joining them in order to create your blocks.
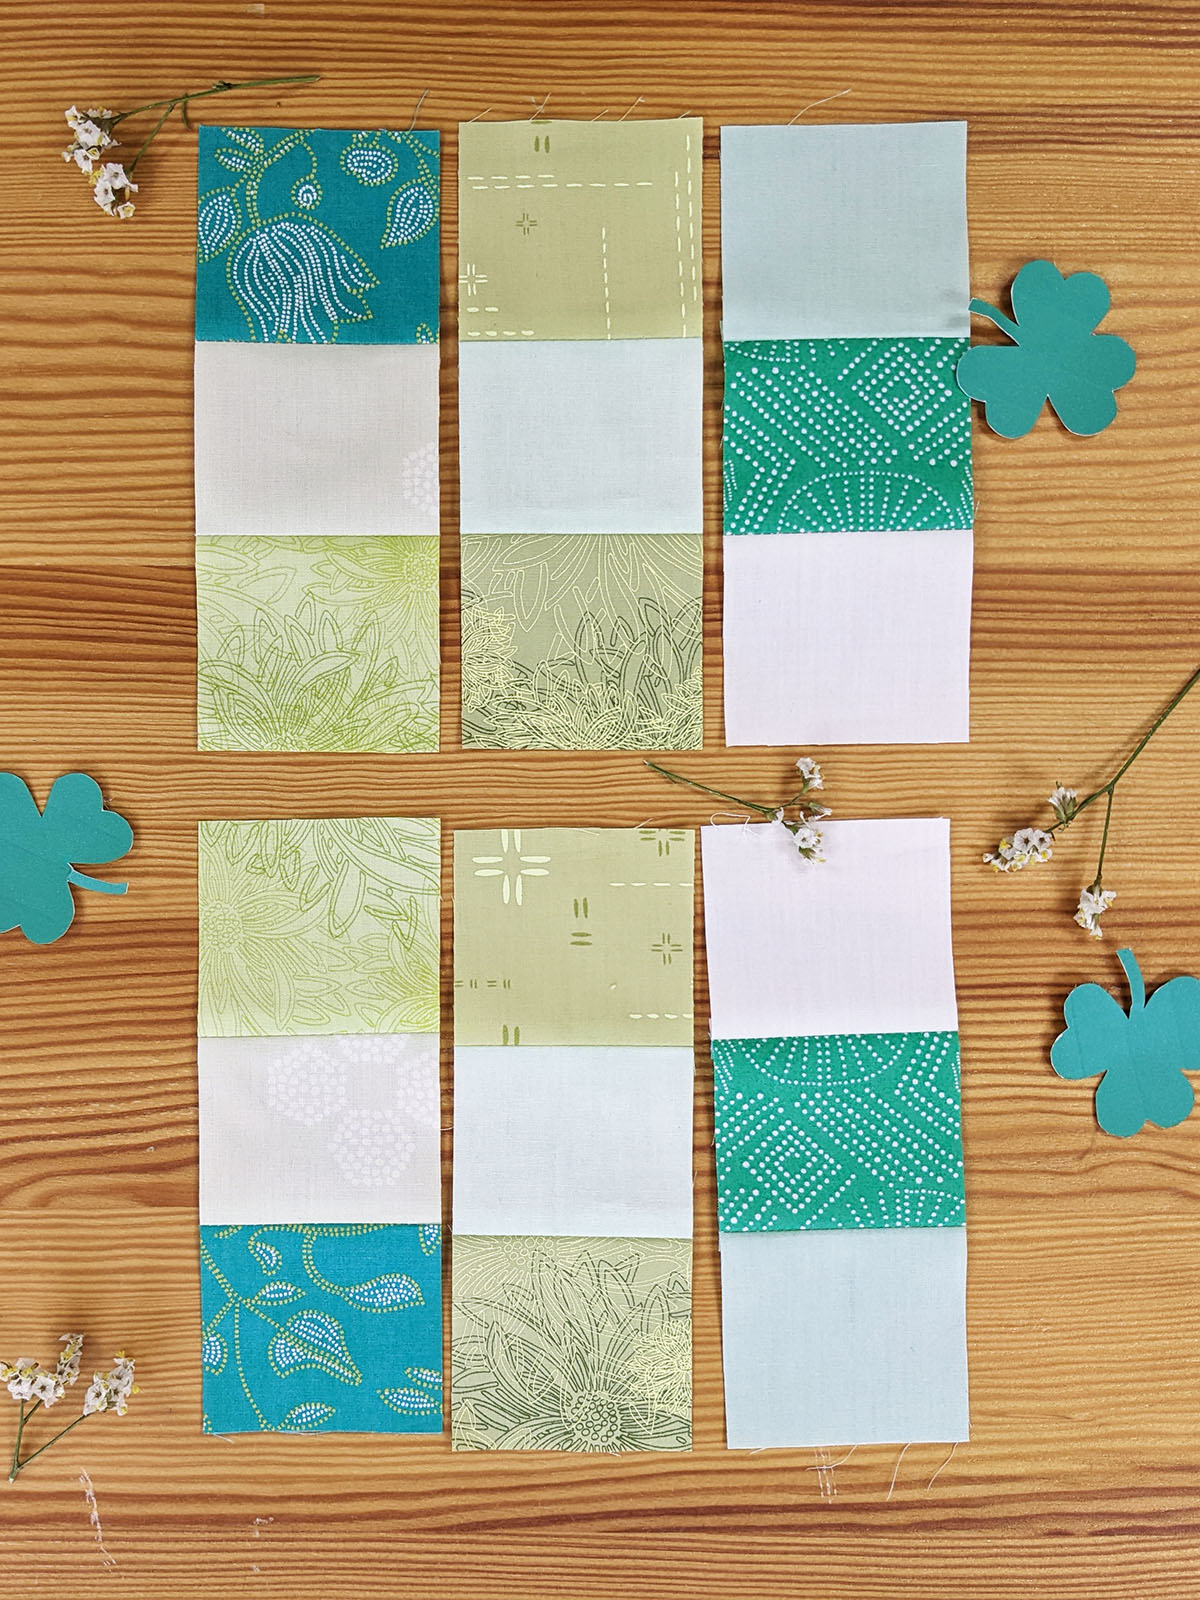
I created two blocks combination which you can play around by flipping it or rotating it until you’re happy with your wall art top.
Create a total of nine (9) blocks of your desired combination.
Each block should measure 6 1/2” x 6 1/2”.

Step 4: Join Blocks
Take three (3) blocks by row. Join each block.

Then, join each row creating your clover top.

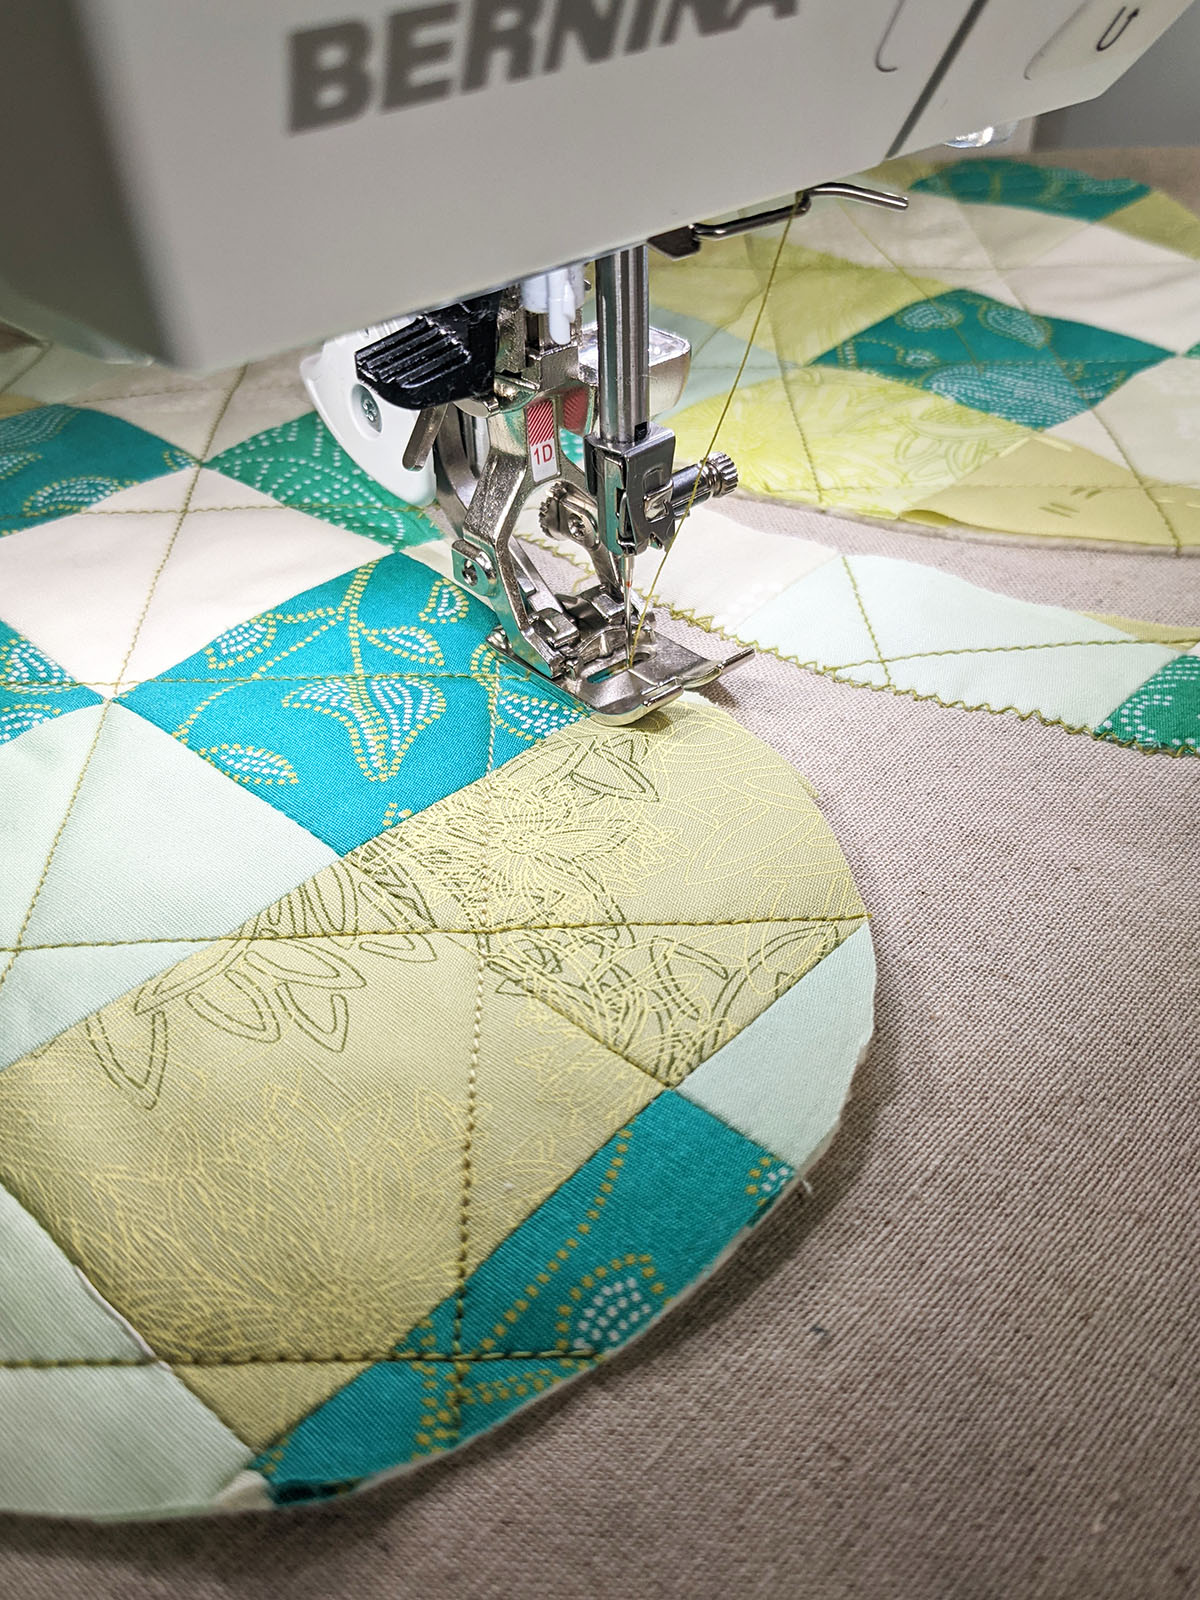
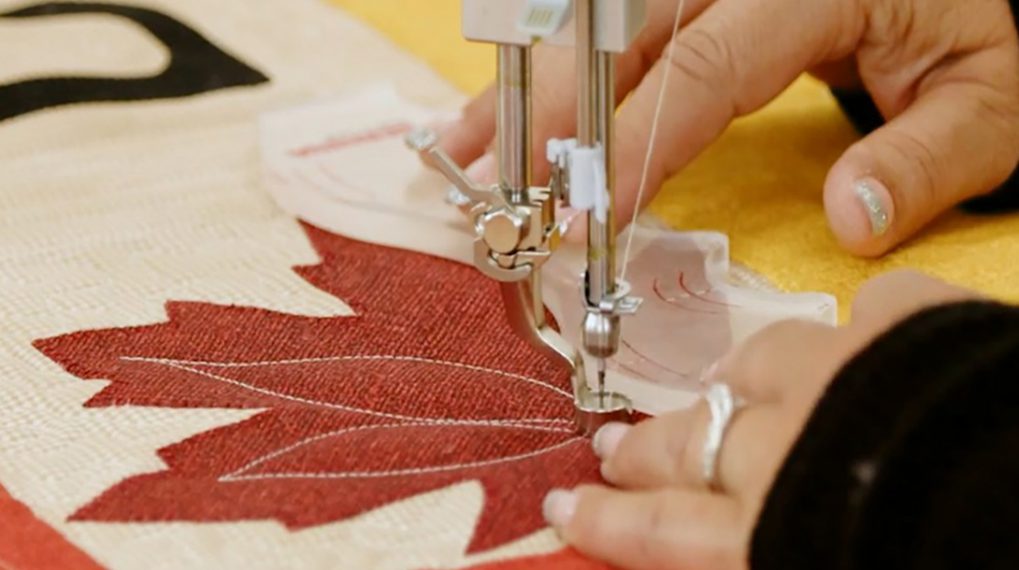
Step 5: Quilt
Place your batting piece on the wrong side of the assembled unit, pin all around and quilt as desired.
For my wall art, I decided to trace diagonal lines at a 2” distance, creating a diamond effect. And I wanted to use a multicolored quilting thread to go along with my St. Patrick’s theme.
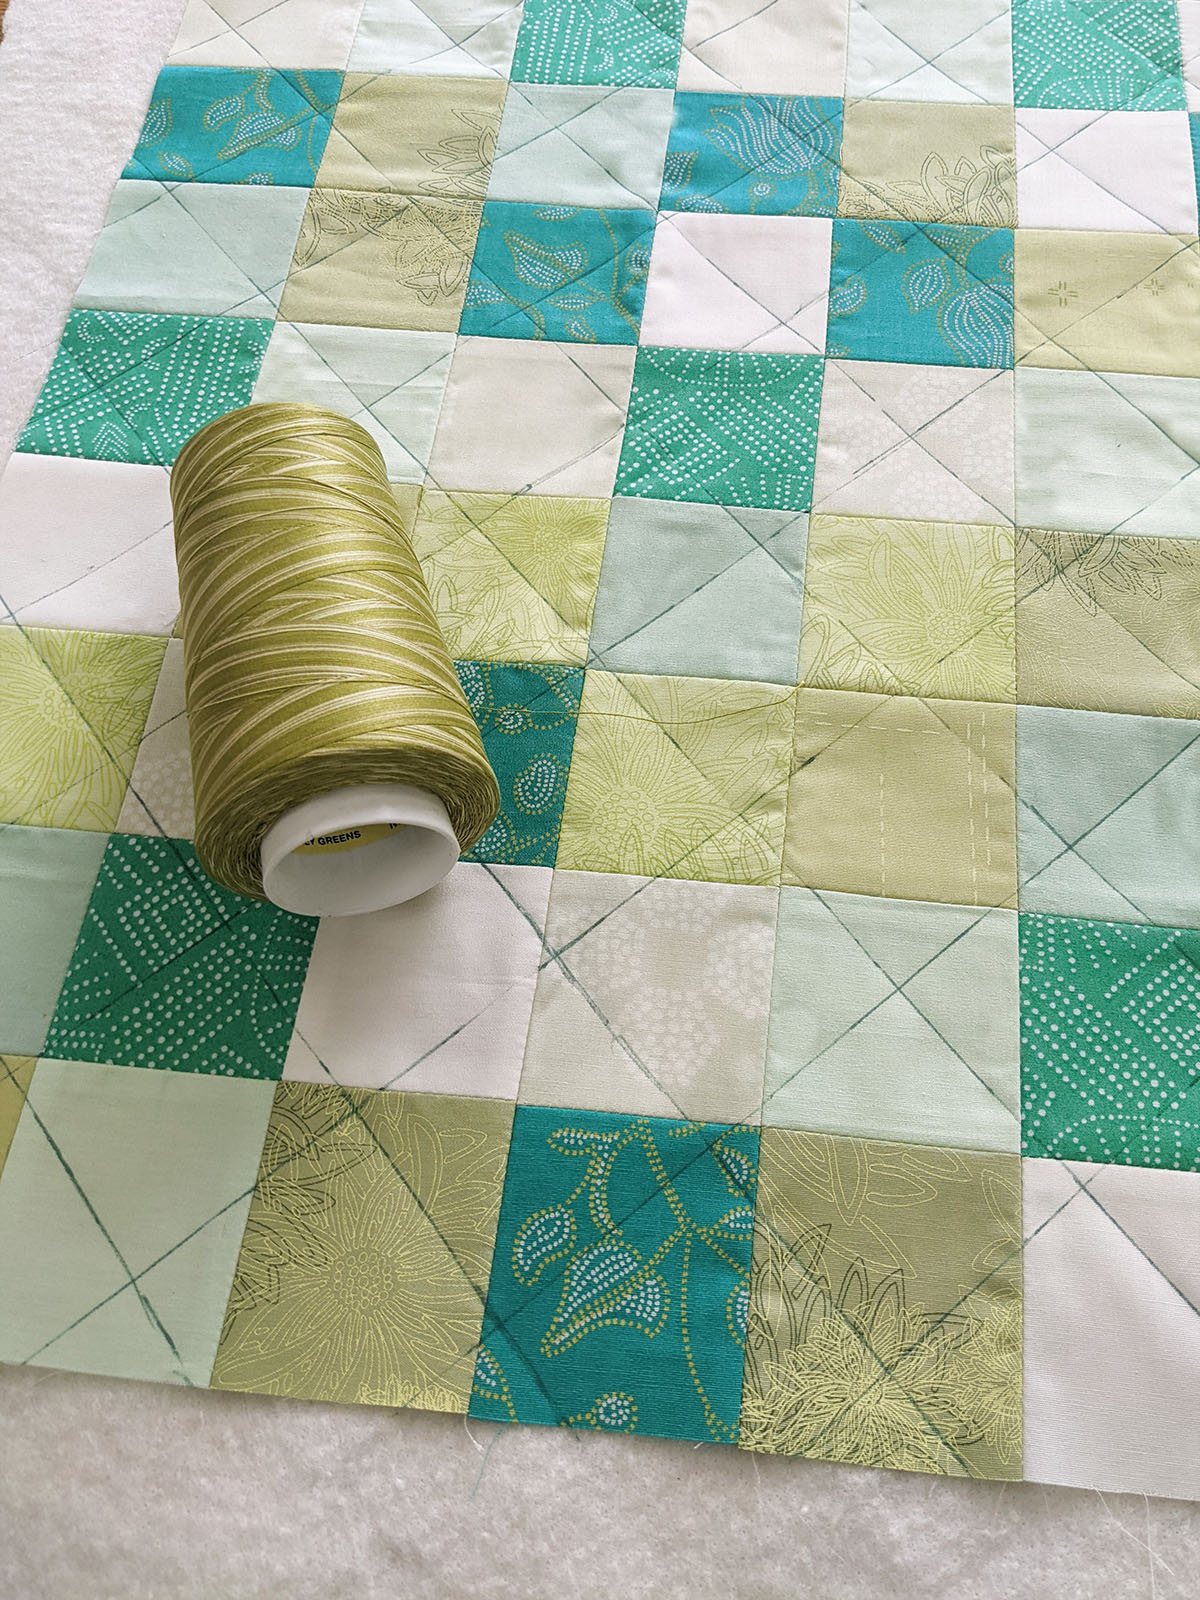
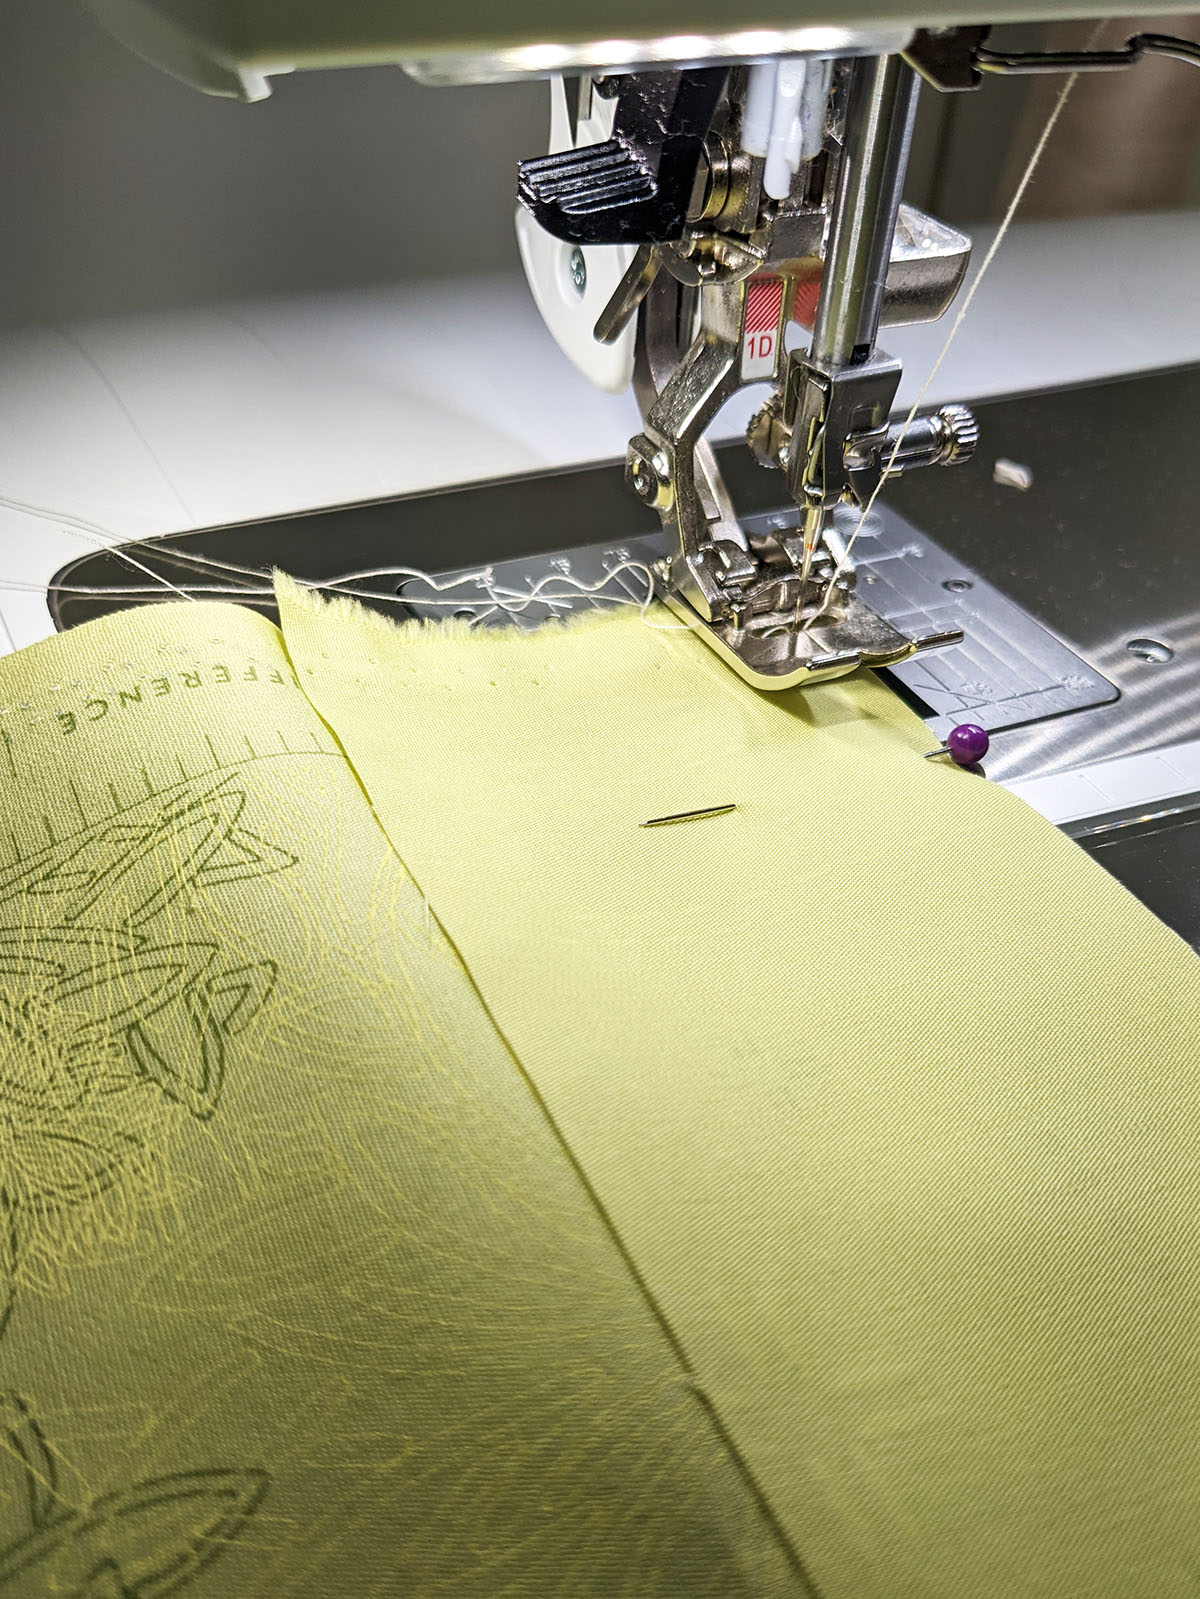
Using the Reverse pattern Foot #1D I was able to make perfect stitch lines.

Step 6: Steam-a-seam 2
Now, flip your piece so you have your backing fabric facing you. Take two (2) strips of steam-a-seam 2 (double-sided) and place it on the batting side of the unit.
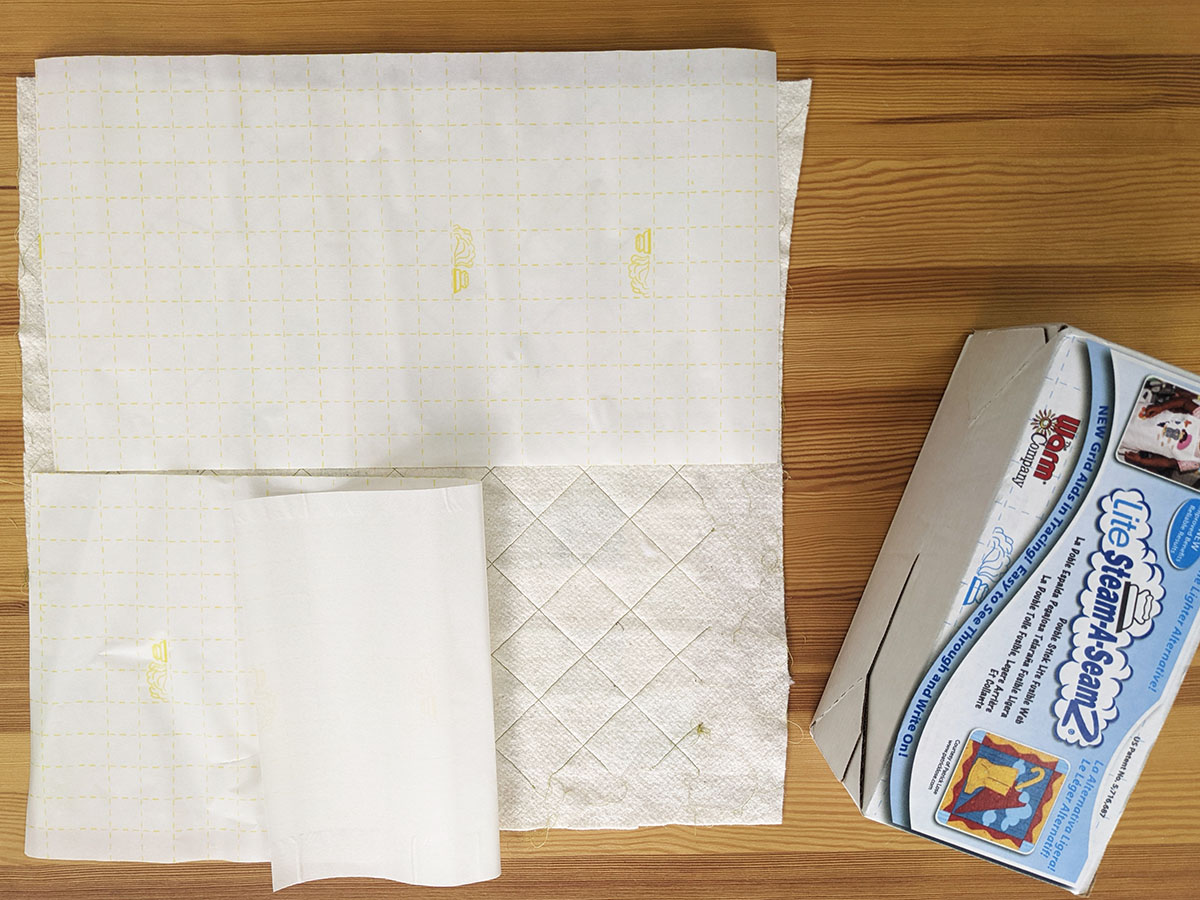
Use your iron to press and glue the seam-a-seam to the batting fabric.
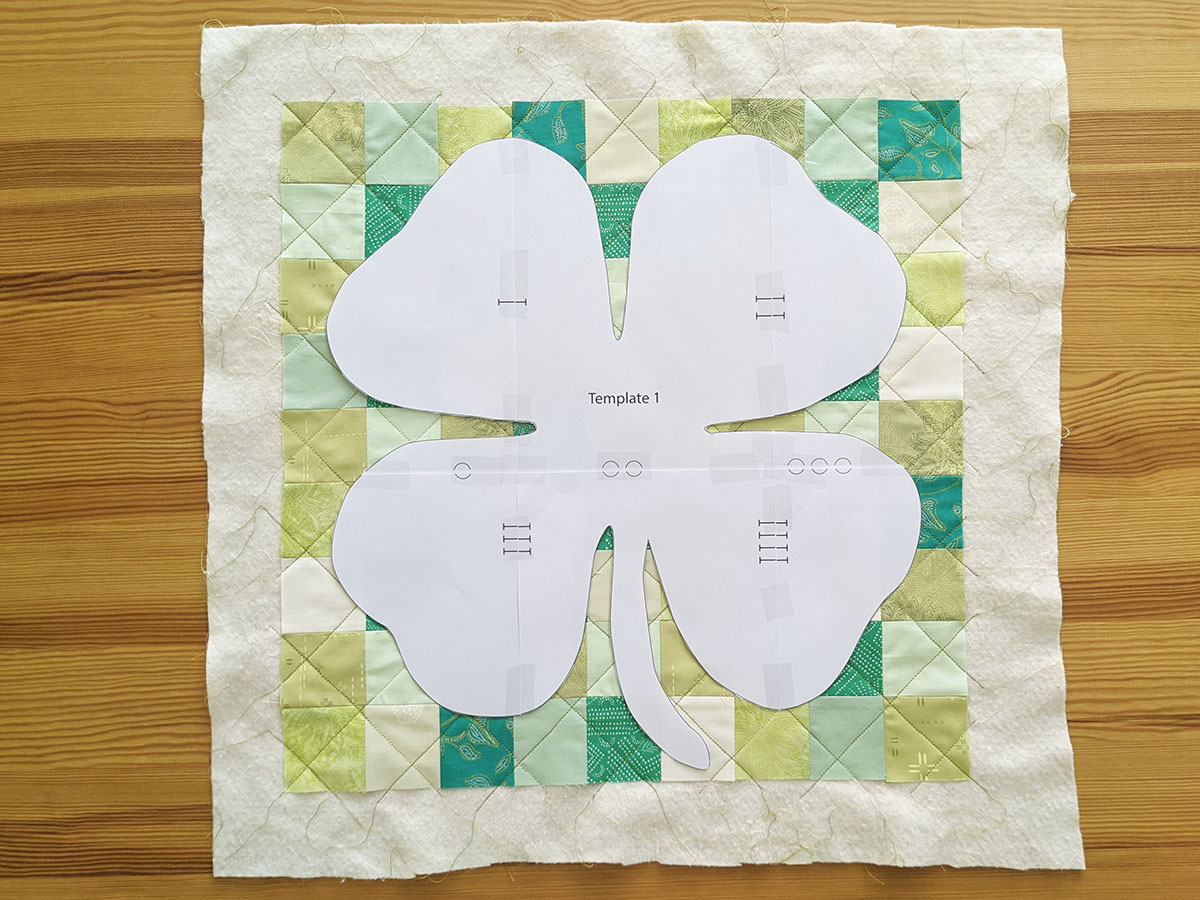
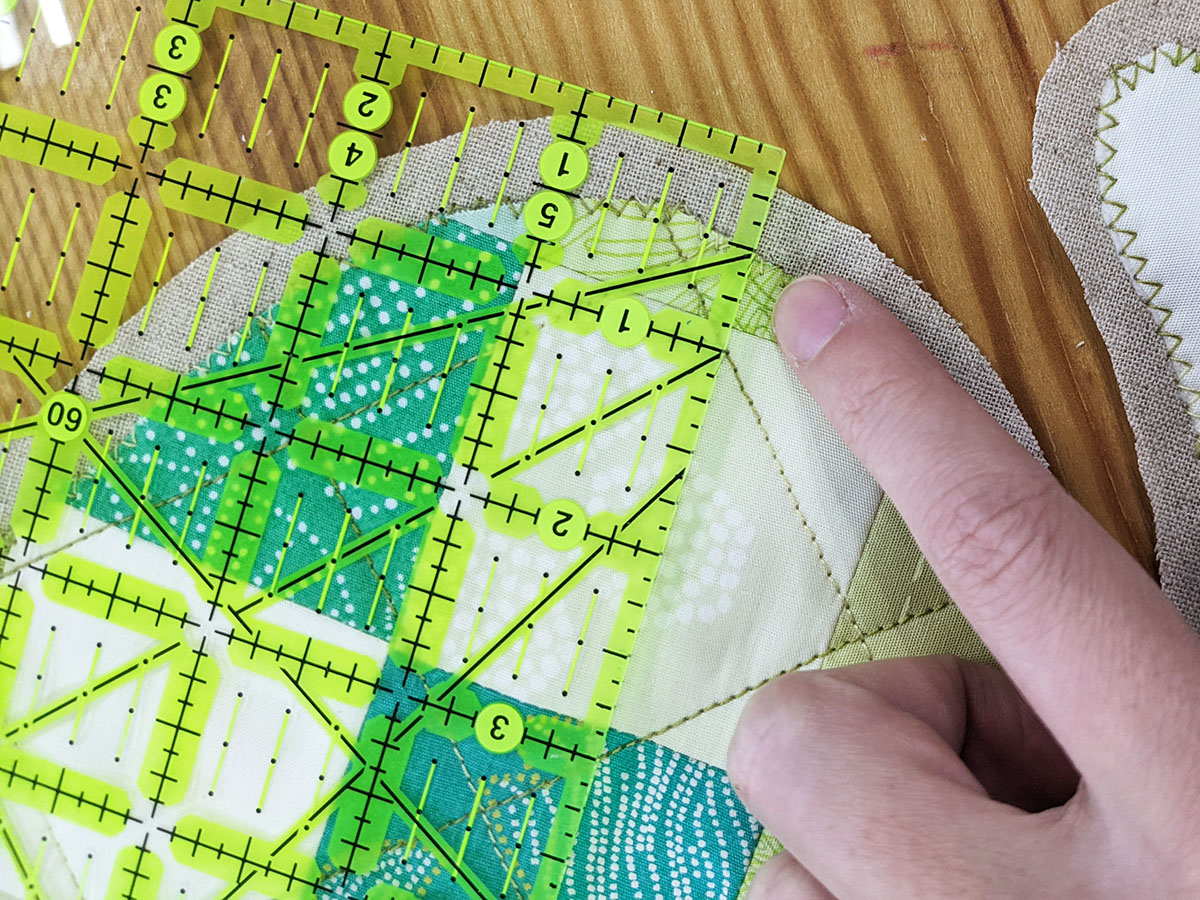
Step 7: Trace and Cut
Place the template 1 on top of your quilted piece, trace the shape of the clover and cut.

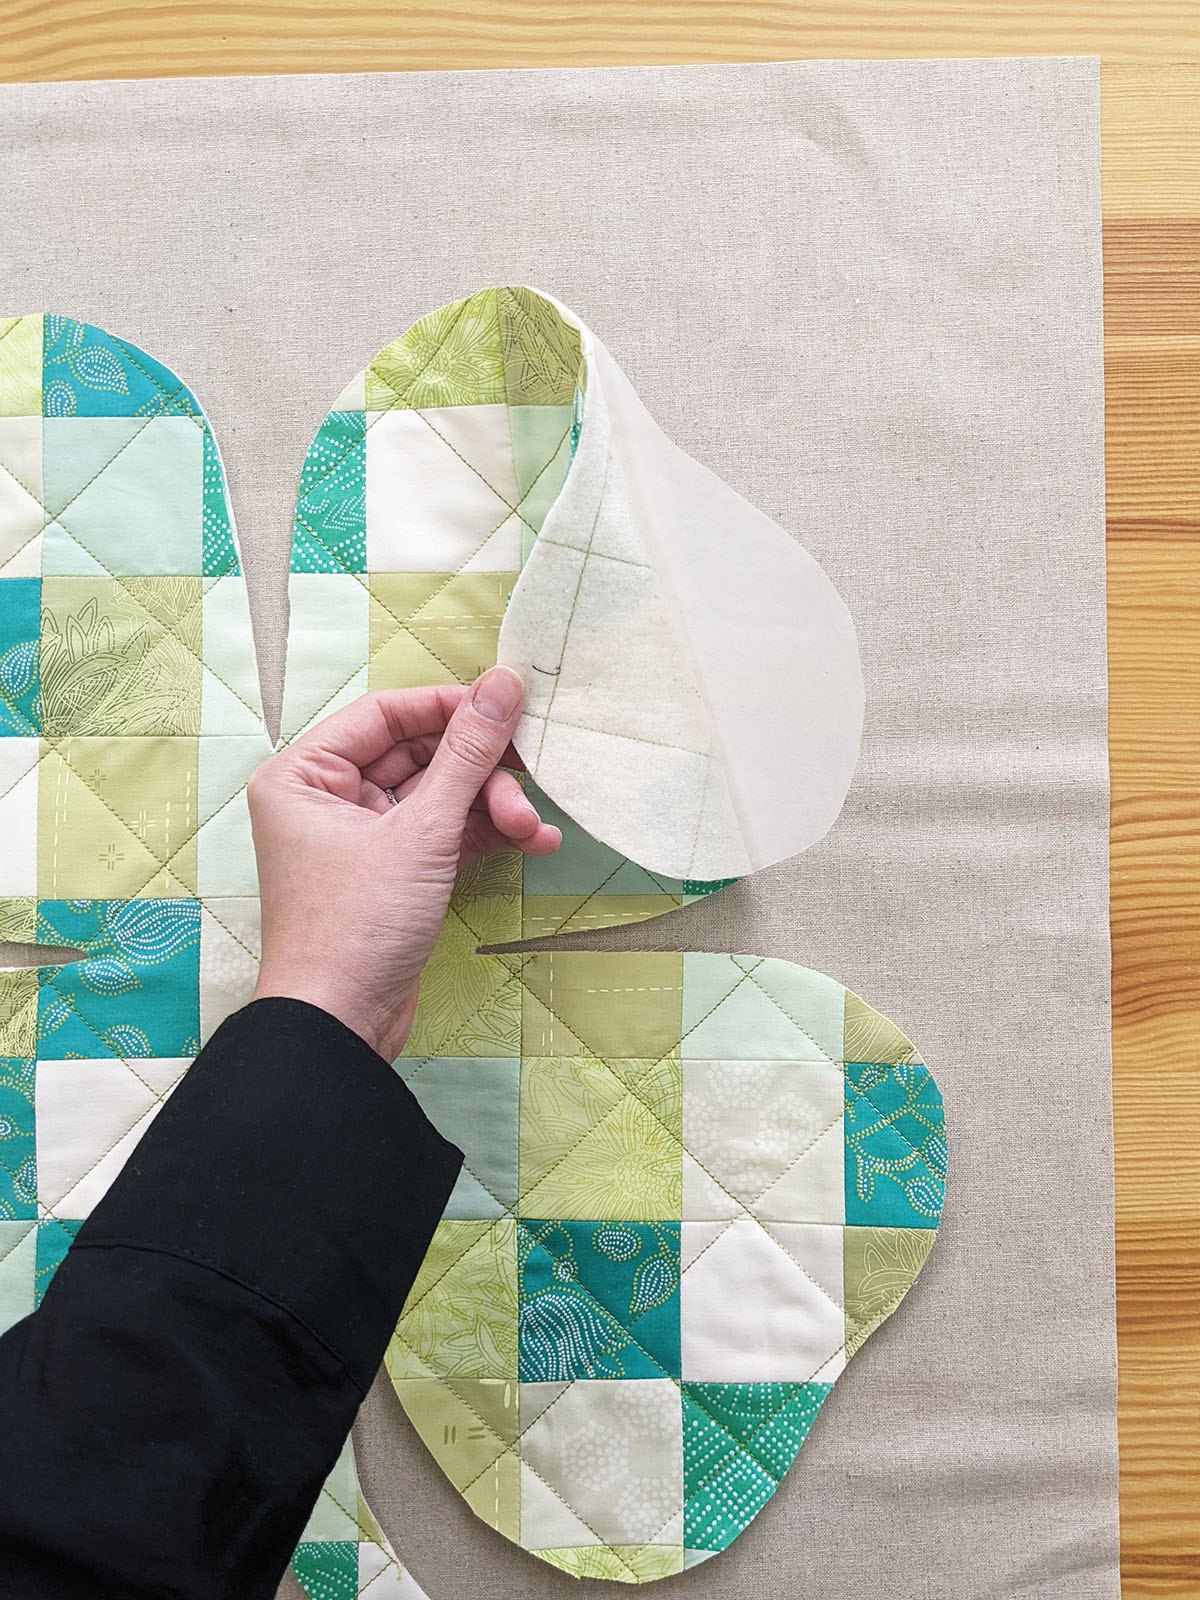
Step 8: Remove Steam-a-seam Paper and Press
Take one (1) 22.5” square from fabric J and position your quilted piece on top of fabric J square.
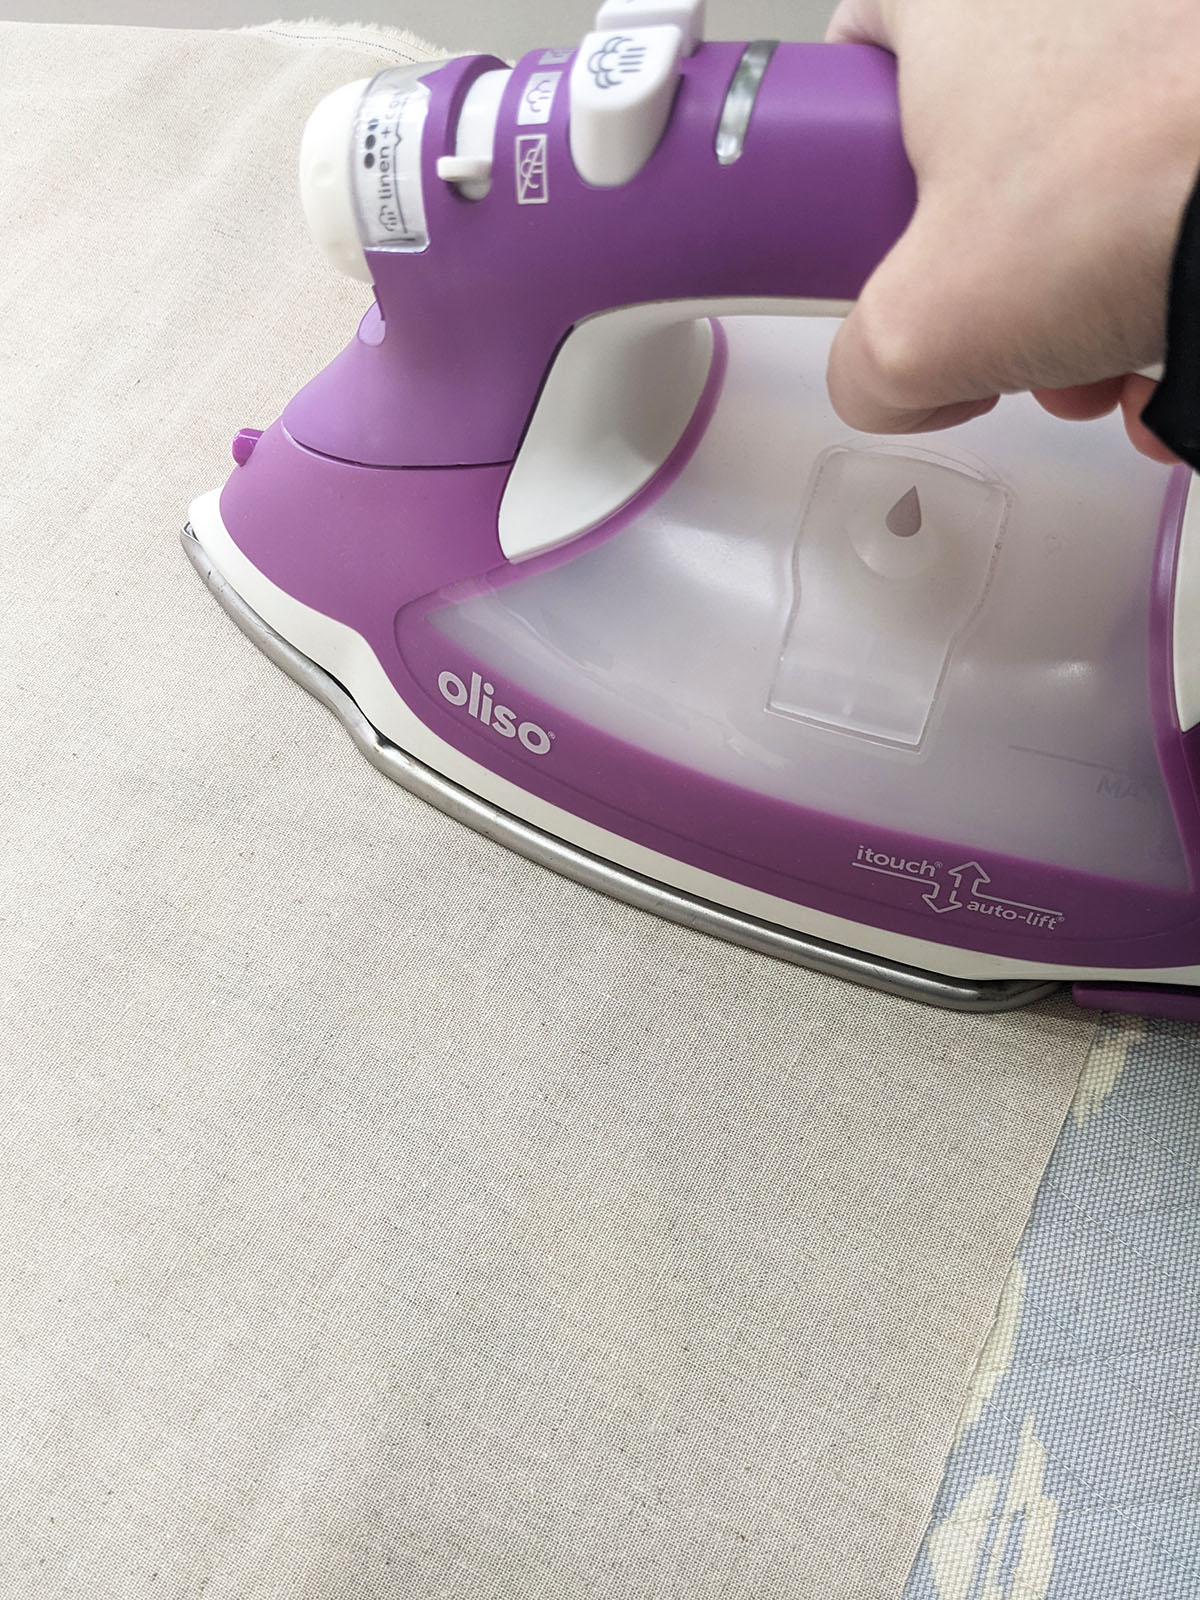
Then, carefully remove the steam-a-seam paper from the backing and stick your clover onto fabric J.
Flip the piece making sure fabric J is facing you. And with your iron, press carefully gluing the steam-a-seam to both pieces.
Step 9: Decorative Edge Stitch
Now, using a zig-zag stitch or any desired decorative edge stitch, sew all around the edges of the clover.
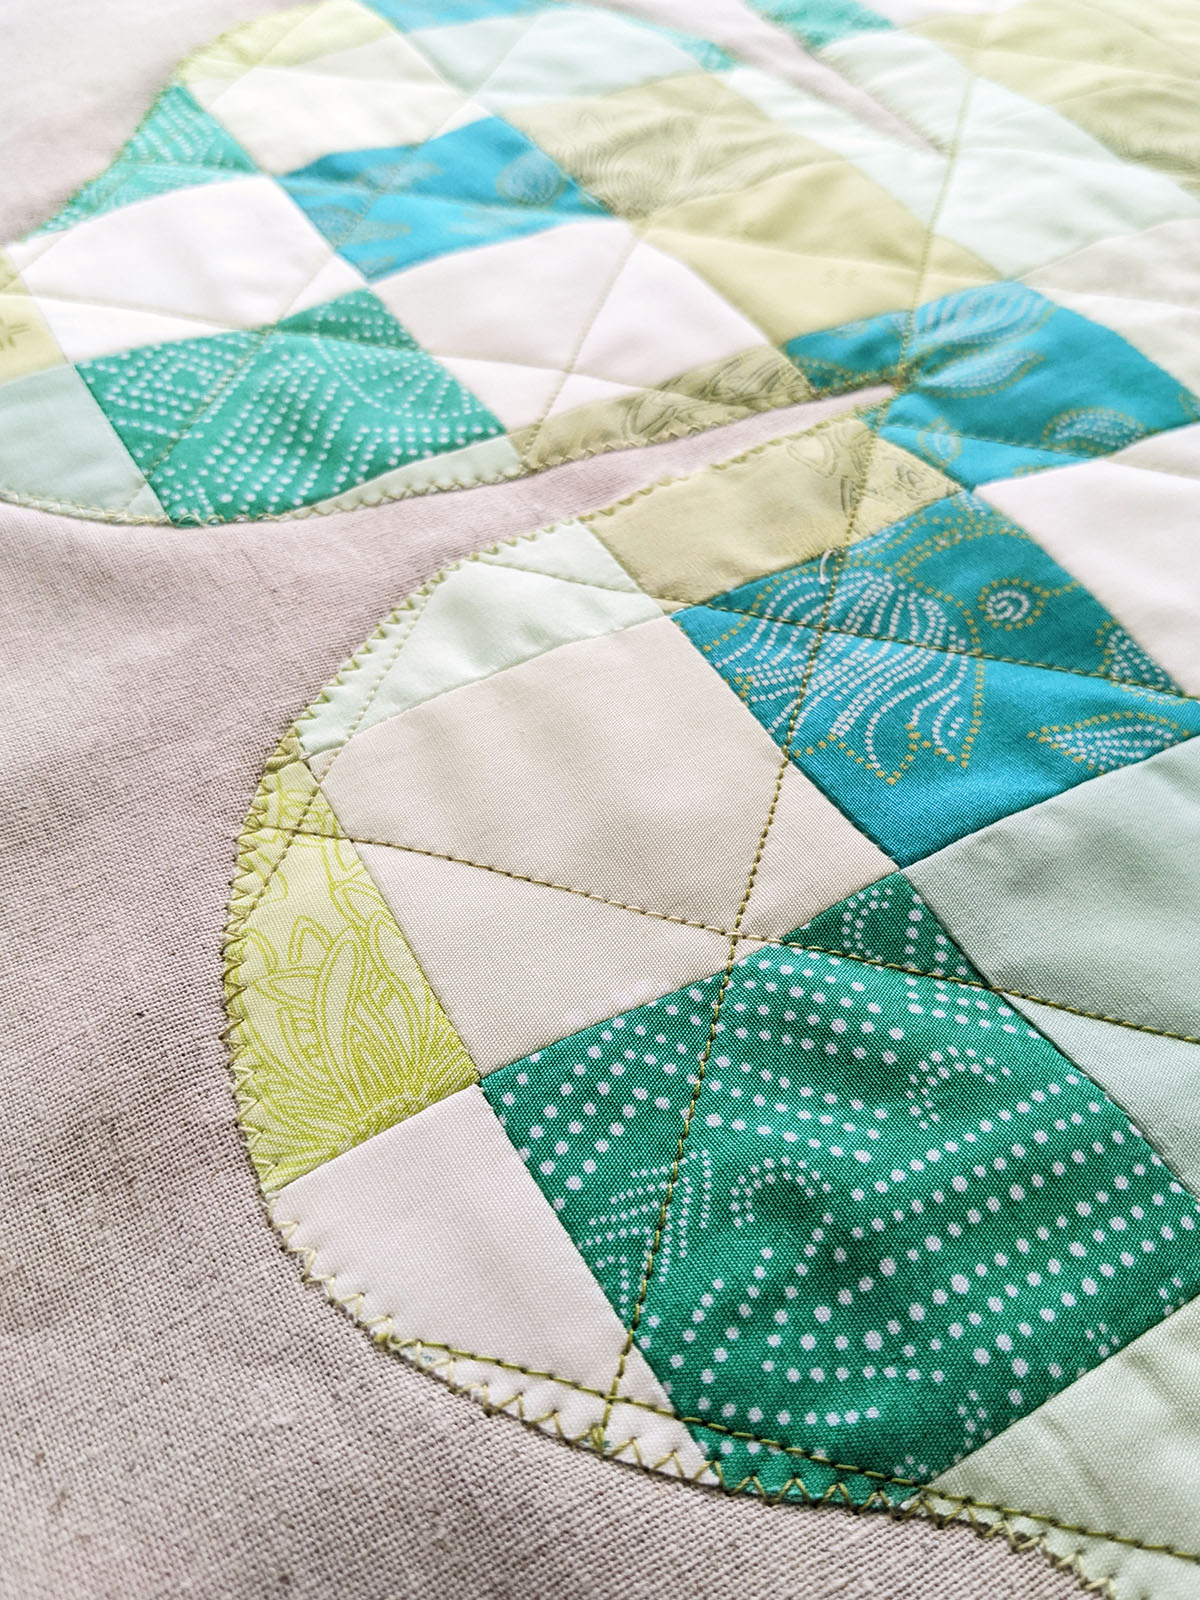
Cut away the excess fabric by leaving about 1/2” of fabric J from the main piece. You can use Fray Check on the edges of fabric J in order to avoid fraying. You can also give it a different look and make fringe out of fabric J. In this case, I used Fray Check.
Step 10: Create Strap
Take one (1) 2 1/2” x 21 strip from fabric J and create your strap.
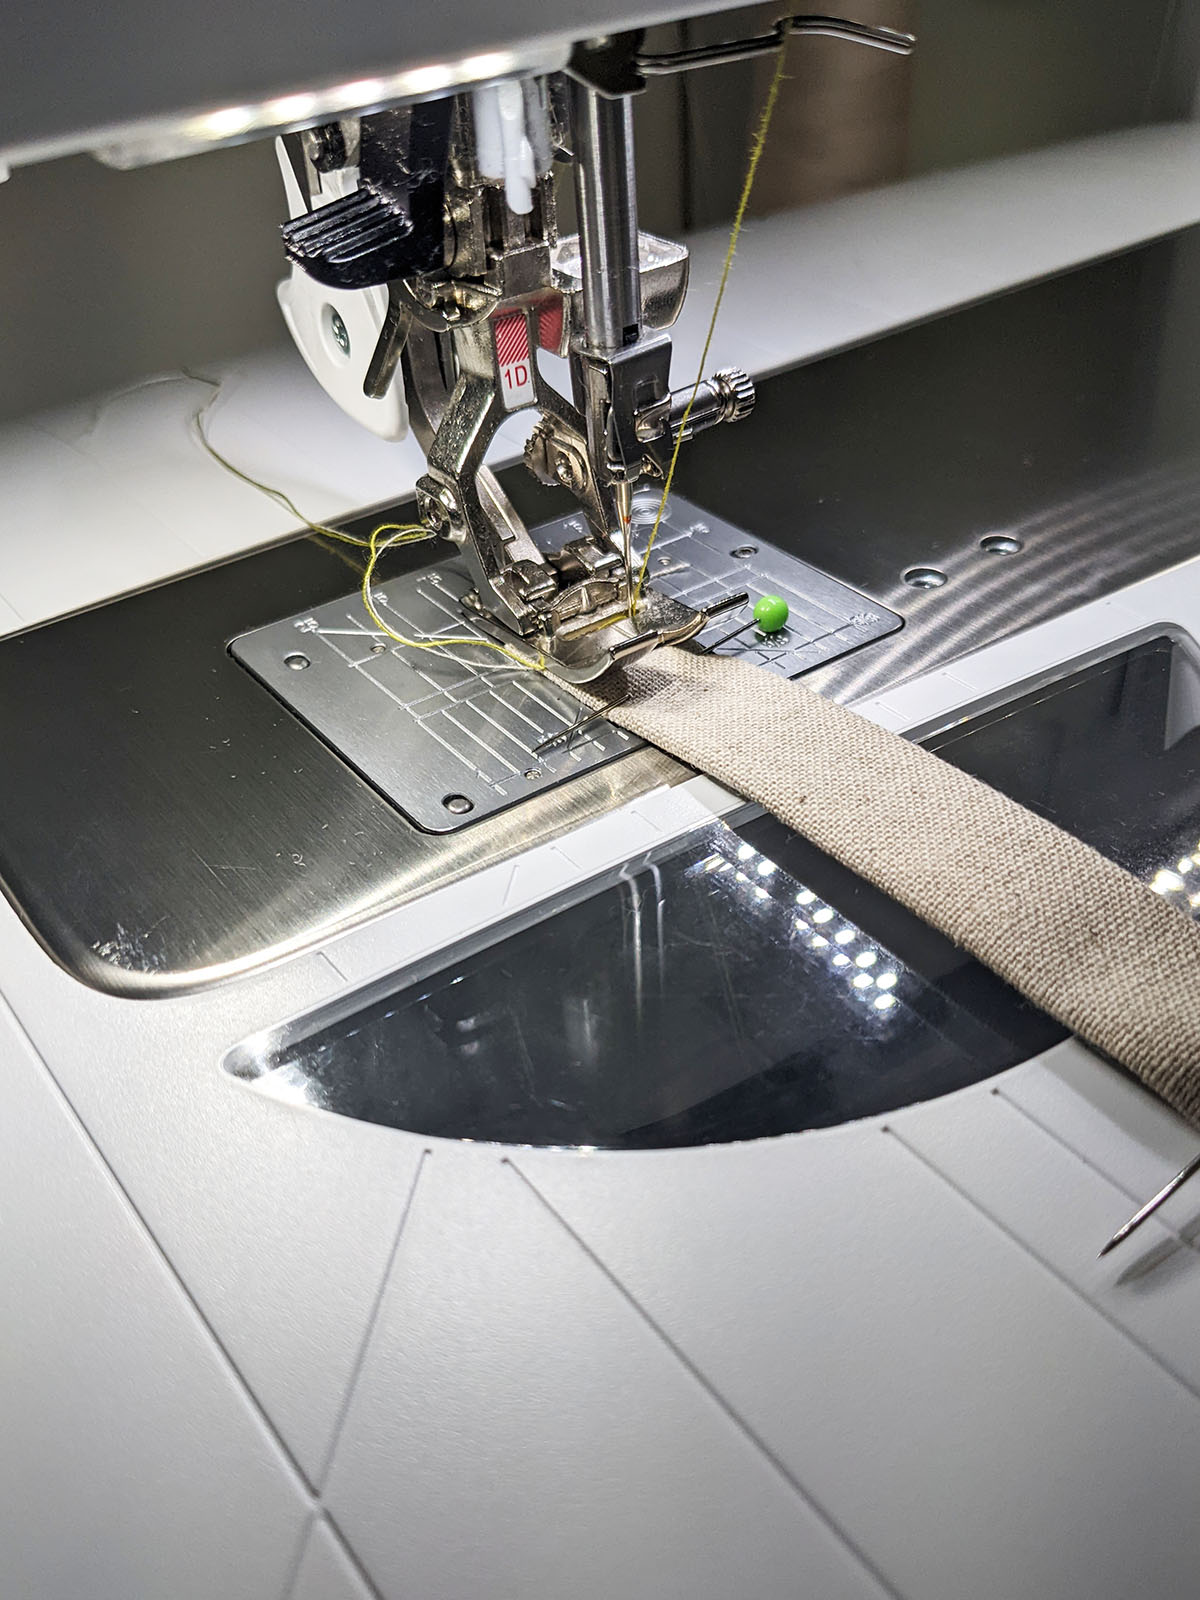
Sew your handle on the back of the wall art, 3” away from the top. Hand stitch your handles.
Your St. Patrick’s Day wall hanging is done!!! Slainte!!!
Used Products

What you might also like


358 comments on “St. Patrick’s Day Wall Hanging”
-
I have started making table toppers and wall hangings for all year. I love sewing Christmas presents. I think 4th of July is my favorite holiday to sew for!
-
Spring and Easter sewing is so fun after a cold winter!
-
I can’t wait to make this !!
-
My favorite holiday to sew for is Halloween. I love the contrast in colors. I can make quilts and costumes that are so much fun
-
Thank you for this sweet little St Patrick’s Day clover! The four leaf clover always reminds me
of head, heart, hands and health to God! ? -
I love to sew for Christmas, but this wall hanging might get my attention from now on and sew for St. Patricks day!
-
St. Patrick’s Day is my absolute favorite ?
-
I love to sew for Christmas also but I like St Pat’s day also
-
I have bins of Christmas theme wall hangings&
. placemats Advent Calendar , etc. e nud te senmore spring -
I love making small projects for all the holidays but I especially love Christmas because that holiday last the longest.
-
I like all of the holidays, but i love fall colors and Thanksgiving is perhaps my favorite.
-
I have just started back into sewing after many years, right now I’m making something for each holiday.
-
I enjoy sewing gifts for all. Christmas is my favorite, birthdays, and get well gifts follow right behind. I guess that would be personal holidays! What a great contest, thanks!
-
So hard to choose just one but any patriotic theme in red, white & blue!
-
-
This 4 leaf clover wall hanging is one I will make to celebrate St. Patrick’s Day! I’d love to make it with this Art Gallery bundle. My favorite holiday to sew for is Valentine’s Day, then Christmas following closely behind. duchick at gmail dot com
-
Adorable St. Patrick’s Day Wall Hanging and lovely fabric too!
-
I can’t wait to make this !! Halloween is my favorite, I love all the ideas that are posted for the holidays on , Weallsew.
-
Christmas tops the list. However, I enjoy sewing/embroidering for all seasons and holidays.
-
-
Only one? I sew for them all, but I’ll say Christmas and Halloween top the list.
-
My favorite holidays to sew for are Christmas and Halloween. I am looking to make table runners for each month, maybe I should start with March and St. Paddy’s Day!
-
Yes! Halloween and Christmas are such fun holidays to see for
-
-
-
I have to say winter, since we don’t need quilts in any other season.
-
My favorite season to sew in is the Summer — more light comes in the house, and I get to be barefoot! It is a more comfortable way to sew in the Northwest.
-
Valentine’s Day and of course Christmas
-
Christmas, if I give myself an early start!
-
I like sewing for Spring. Happy flowers, bright and cheery.
-
Love the Fall holidays the most but St. Pat’s is my ‘early’ in the year fave! Cute pattern and this Sullivan will be smoking one today!
-
My most favorite holiday to sew for is Christmas.
-
I discovered that I have the most table runners made for Thanksgiving and Christmas and decided that I needed to start making some for other times of the year. I have been pulling some spring looking fabric but now I will definitely be making something for St Patricks day after seeing this cute shamrock.
-
I love to sew for Spring the most. I love the fun spring prints and colors, and they also work for Summer too. Thank you for the wonderful giveaway!
-
Love the wall hanging! Thanks for the detailed instructions!
-
I’ve been sewing and making FSL for Mardi Gras—special for Louisiana!
-
Halloween is my favorite holiday to sew for. I have a sweet but ornery black cat that puts up with my grandchildren. So what better holiday to sew for?
-
My favorite holiday to sew for is Christmas. I start in January and try to get all my gift projects finished by December 24th.?
-
seasonal table toppers are fun. My favorite is fall.
-
I sew for all holidays, but my favorite is Christmas, because I sew gifts, and as I sew for each person, it is an opportunity to think about and pray for that special person.
-
I love to sew and decorate for most all holidays, but of course Christmas is my very favorite!
-
I like to sew for each season but my favorite is Fall!
-
I enjoy sewing for the Fall season the most. There’s just something about the warm Fall colors and themes.
-
My favorite holiday to sew for is Halloween. Throw size quilts with cute Halloween creatures are my favorite.
-
I have just started wall hangings for all the holidays/ seasons, but my favorite it Christmas.
-
I love sewing for all the holidays. Each one is different and I enjoy celebrating them all. It helps the year to go by with excitement. Thank you for the chance at the giveaway.
-
The project is great.
-
My favorite season to sew for is spring because there is not pressure of any holiday to prepare for and I can sew spring and summer clothes then that I wear most of the year since I live in Florida. Spring is when the patterns and fabrics that I use most are available.
-
Really cute. I like sewing for Christmas. Halloween is my second favorite. I’m a huge part Irish so I’d better get cracking and make this shamrock!
-
Christmas or Summer
-
I’d love to make this four leaf clover to hang on my kitchen wall. It looks like such a fun project!
-
My favorite season is Christmas. I love making FSL Christmas ornaments fir my family. The kids love them!
-
I find myself sewing mini quilts and tablecloths to display/use for every holiday of the year. Having said that, Valentines is my favorite. Reason: everything I have made for said holiday is color coordinated (same fabrics in each item) and look beautiful when displayed/used in the same room.
-
I love to sew all year long, but my favorite holiday to sew for would be Christmas!
-
I would say Halloween and Christmas are the ones I sew the most for. Now that I am retired, I plan to sew for all seasons/holidays.
-
When the grandchildren were younger, I sewed for all holidays! Now it’s only for Christmas and birthdays!
-
I like making things for Christmas — at least, that’s what it seems like when I look at my holiday-themed fabric stash!
-
I like to sew for Easter.
-
Christmas by far is my favorite season. I make gifts for the family for that season.
-
I love quilting and sewing for all holidays! I usually make something for each holiday! Love using my Bernina!
-
I’d have to say Christmas if I have to choose one as I make many gifts.
-
My favorite is Christmas-Winter. I have started to sew seasonal placemats for TV tables at my mom’s as she eats at them watching the news instead of at the table.
-
I like to sew for the fall. This includes Halloween & Thanksgiving.
-
LOVE this idea,I will definitely add it to my Beginners sewing classes! So easy to make and enjoy.I needed an easy decoration formy front door and I love quilting! it’s a WIN WIN!!!! Thanks “sew” much
-
Christmas sees a lot of sewing in our house BUT now that Spring is around the corner I seem to be changing my tune. I really can’t name a favorite.
-
I love to see for Christmas. There are so many fantastic fabrics to choose from! I can’t seem to stop with just one project.
-
I love all Holidays but my Favorite is = I love Halloween I love the getups people come up with it expands their creativity side
-
I love sewing for Halloween and Thanksgiving! The fall colors and shapes are so homey.
-
For holiday sewing, Halloween & Fall in general have topped my list for years. I like to make Christmas gifts, too. Then, there are birthdays… There are all kinds of reasons for sewing!
Thanks for sharing the cute Shamrock wall-hanging tutorial! -
I like to sew for spring. The colors are so cheerful.
-
My favorite is whatever holiday is coming up. 😉
-
I enjoy sewing for Christmas. So many beautiful Christmas fabrics!
-
Love to sew for Christmas.
-
Love to sew for the Holidays but Christmas is the over the top one!
-
I love to sew for all seasons. Quilts in fall and winter, wall hangings, table toppers and pillows for spring and summer.
-
Love this shamrock, looks fun to make! My favorite season to see for is Easter, a new dress for my granddaughter and maybe a table runner with embroidery eggs and bunnies.
-
I like to do holidays throughout the year, such as St. Patrick’s, July 4th.
-
At first glance I thought you have bound the edges of that. Great idea of dry check and just cut around! Thanks
-
I love to sew for every season and holiday, so don’t ask me to choose. My most recent project for all holidays is a quilted dust cover for my piano keys.
-
Christmas is my favorite. Lots of ideas but no time to finish. ?
-
My Favorite Holiday is any one’s birthday… I get to choose specific items, projects and colors for each person and every single person that gets one is over thrilled and very appreciative of what they have received……and it warms my heart with joy to know how much they love what they have received. Other than that I LOVE every holiday I love to decorate and when someone comes to visit and they like something I’ve made, then they may receive it as they are leaving. As I can always make another!!!!
-
I love sewing for all the seasons and holidays – especially if it involves my two great-grandsons.
-
I enjoy decorating for all holidays! I am over the top with Christmas and Easter. We live in south Texas so Christmas is the beginning of winter for us and afew weeks before Easter begins our spring.
-
Favorite holiday to sew for is Halloween because costumes can be so much fun to make for the kids and for me, but also sewing wall hangings, table runners, oven mitts. All spooky themed in those autumnal oranges, browns, reds as well as greens and purples. By far my favorite season as well as a fun filled holiday that gets the creative juices flowing. Love this St Paddy’s day make though.
-
I would have to say lately Halloween but I’m gearing up for Easter now. You can’t have enough projects for the seasons.
Happy St Pats everyone. -
I love sewing St Patrick’s day projects for the Grandkids to remind them of their heritage.
-
I love to sew gifts for Valentines Day. Love the reds!
-
My favorite holiday to sew for would probably be Christmas and Easter, however, I find myself sewing items throughout the year for the special holidays.
-
My favorite holiday to sew for is Christmas. There are so man projects to make for enjoyment, decorations, and gifts to share on this holiday.
-
Very pretty. Favorite holiday is Christmas. Love making tree ornaments.
-
My favorite holiday to sew for is Christmas
-
I love to sew for Christmas, but I have so much for that holiday that I will have to start sewing for some other one!
-
Winter! I make Chanukah gifts.
-
I love the fabric choices!
-
I love making Halloween things!
-
I really like the sparkle of the Christmas season! I love to give personal gifts of the projects I make. People seem to appreciate them more than store bought.
-
Halloween is first, Christmas is second.
-
Easter is my favorite because I sew dresses for my granddaughters!
-
Hi I love Christmas quilts but right now I am going whole hog on some Halloween ones!!
-
I really like the greens and celery colors used in this project. Simple yet decorative.
-
I love sewing for all the holidays! But fall sewing and Christmas are the most fun. I could sew Christmas all year around!
-
Who doesn’t love all the holiday and sewing all the fun wall hangings and gifts. But if I have to pick to pick one it would be Christmas.
-
My favorite holiday of all to sew for is Christmas. I also love sewing for other holidays too and love the 4 leaf clover
-
I love sewing projects for Valentine’s Day. I love hearts so much, even my wedding ring has hearts on it. My next favorite is sewing in the fall so I can get warm blankets done before the snow flies and it gets cold.
-
Whatever the upcoming holiday is is my favorite
-
By far Christmas is my favorite season for sewing despite it being such a busy time of the year. I say every year that I needed to start my projects earlier, but I never seem to learn.
-
I would say, Christmas is the season I most like for quilting projects! However having said that, each season brings so many beautiful quilting opportunities. This was a challenging decision/ choice. ?
-
I love to see Christmas ornaments for myself and for gifts. On Christmas Eve my grandkids each pick out an ornament from my tree to keep.
-
My favorite season and holiday to sew for is Fall and Christmas! But I have sewn and enjoy sewing for St Patrick’s. I made vests for my daughters to wear in elementary school.
-
Christmas is so fun! Love red & green fabrics. Halloween & all the wonderful prints with it would be second! Love sewing for ALL holidays! This shamrock will be a fun addition! Thank you! Love We All Sew!
-
Looks like a good project to teach beginners. I know our daughter would love having a shamrock hanging in her home!
-
Christmas is my favorite holiday to see for. Love wall hangings and quilts.
-
My favorite holiday for which to sew is Christmas. I make a lot of family gifts using my sewing/embroidery/quilting skills. I am the only family member who does this so all gifts are unique for the others.
Thank you Bernina We All Sew for all the great tips and ideas. -
Cute pattern! I make napkins and quilted placemats for every season but Halloween is my daughter in law’s favorite so I sew a lot of different things for that one. (Quilts, wall hangings, table decor, rug). So fun!
-
My favorite holiday to sew for is Christmas!!
-
I love sewing gifts for Christmas, and also make wall hangings for this holiday, and want to make a new tree skirt for this Christmas.
-
Christmas is my favorite holiday for sewing gifts. But Easter is fun too!
-
Which one is my favorite?? Oh my I love making stuff for every holiday & season! Every month I put up different deco based on that month ? My home currently is decorated with St. Patrick Day wall hangings, quilts & etc ?☘️?
-
My favorite is Christmas. I make a lot for friends and family.
-
Christmas and Halloween are definitely my favorite holidays to sew for!
-
Great project. I have table runners for holidays but nothing to hang. This would look good between my front door and glass door. Thanks for the tutorial.
-
I love the St Patrick’s day wall hanging and have never made one. I usually make things for Valentines, Easter, 4th July, Thanksgiving and Christmas. Christmas used to be a big thing for me as I had lots of parties. With Covid around, I have slowed up on most things.
-
I love this shamrock pattern. I love making fall and autumn things
-
St. Patrick’s Day is a favorite holiday in our home. We use hand painted shamrock napkins, embroidered placemats and gold coins at every turn! Irish music and laughter all day add to the celebration.☘️Tis a blessing to be Irish!☘️☘️☘️I would love to win the bundle and create this lovely four leaf clover door hanger!☘️
-
I enjoy Christmas sewing the most!
-
Definitely Christmas for gifts and decorating, especially for friends
-
I enjoy Easter and Christmas as my favorite holidays to sew.
-
Definitely Christmas for gifts and decorating… Especially my friends that don’t quilt or sew, they love them so much
-
I also love Christmas the best, probably because I want to decorate and make unique gifts for others.
-
Favorite holiday is Thanksgiving, gathering of family and friends!
-
I enjoy Christmas most because there are so many possibilities. I also enjoy making a little something for Valentine’s Day (30 or so giveaways) and we will have to make some for St. Patrick’s Day. of course, then there’s Easter projects and birthdays for the rest of the year!
-
I have only just begun quilting. I am not sure which holiday I can choose right now. I am working on making window hangings for my front door area which has 2 windows that are 10.5 inches wide by 70 inches tall. So far I have two for Halloween, and one each for Valentine’s, Christmas/winter, and St. Patrick’s Day. It is slow going since I either have to find a block that fits, or change layouts to make blocks fit. I am having lots of fun, though!
-
Even though I sew various holidays, Easter is my favorite.
-
I live sewing for Valentine’s Day! And Christmas fabrics are always great too 🙂
-
Halloween for sure! so much fun fabric. I also consider it the beginning of the holiday season, and am excited to pull out all my fun decorations!
-
Cute “Shamrock” ☘️☘️, great tutorial.
Love all holidays, but Halloween and Christmas are most favorite to sew for, tomorrow is March 1st oh no I’m already getting behind, lol -
I love to sew for Christmas. I usually start around now so everyone gets a little something special.
-
Love learning new things, and this was just the jump start I needed to get sewing on my new Bernina. I Love sewing all the time but Halloween, and ravens specifically are my passion. Happy stitching.
-
My favorite holiday to sew for would be Christmas, but I want to make decorations for all of the holidays and am especially fond of St. Patrick’s Day! I would love to win these gorgeous fabrics to make this darling wall hanging!
-
Love to sew for Christmas ?
-
Christmas is my favorite for themed quilting. I’m making plans to masks a Christmas quilt for each of our 9 grandchildren.
-
Love the Irish green, orange, white thread colors on the other add! I love to sew for Halloween!
-
I love the shamrock. It would make a great trivet, too.
-
What a cute wall hanging honoring St. Patrick’s Day and Beginner Instructions a plus!
-
A quilt for any and every season. If I have to pick one, I guess it would be spring because I love flowers.
-
I sew for a lot of the holidays but the top is Christmas
-
Happy St. Patrick’s Day! Thank you for this pattern. It’s adorable. My mom found a 4 leaf clover, two hours before she went into labor with me. So, I have one in my baby book. Appropriate because of our Irish heritage!
I love to sew for Halloween because of all the wonderful and different fabrics. Of course, any holiday is a good time to sew!
-
My favorite holiday to sew for is Christmas..You can make so many things to hang from ornaments to stockings to wall hangings and doorpieces. Love it!
-
I’m only just getting started sewing, but I love to sew Christmas items the most…for now.
-
I just finished 3 shamrock door hangings so right now I’d say I enjoy The multiple shades of green for St. Patrick’s Day. Although to be honest I’d say it depends on the time of year because in the fall I love the autumn colors.
Thankm you for this month’s pattern. -
My favorite season to sew for is winter, because there are so many different color combos, and so many cute fabrics keep coming out. I’m working on a couple of Christmasy quilts right now, which I’m hoping will be ready in time for Christmas 2023.
-
My favorite holiday to sew for is Thanksgiving. I love thanksgiving. I’ve go much to be thankful for.
-
I love sewing for Easter with bright and colorful spring fabric.
-
I enjoy making wall hangings, table toppers, and towels for all seasons. It is nice to have your home show the holiday spirit – regardless of the season.
-
I love sewing birthday cards that can be framed or used as a mug rug or pincushion after the big day!
-
I love the 4 leaf clover idea … it will be hanging on my front door this St. Patrick’s Day. My husband is Irish …. a great surprise for him.
-
Love this wall hanging. Ready to start cutting strips and ready to see it. Thanks for another awesome project!
-
Hi! My favorite holiday for sewing projects is Christmas, followed by Thanksgiving. ???
-
I really enjoy sewing summer garments – bathing suits, tank tops, skirts, and shorts
-
I love anything fall so I like doing Thanksgiving quilts and placemats and runners.
-
Love the colors and the idea. I use a little luck at this point in time.
-
I love all seasonal projects for my home but I love Thanksgiving/fall projects. I sew a lot of small gifts for my 8 grandkids for holidays.
-
Christmas and St. Valentine’s Day are my favorites to sew for.
-
I don’t really have a favorite, but I’m still looking for a good Chanuka design.
-
My favorite season to sew for is Easter. The pastel color is pleasing to the eye.
Every year I make cute bags for my grandkids and fill them with goodies. It’s gotten to be something they look forward to. -
Christmas is definitely my favorite season to create items
-
My favorite season to sew for is Halloween.
-
Christmas
-
Gosh, it’s hard to pick one holiday. I love sewing gifts for friends’ birthdays and making gifts for Christmas.
-
I love to sew for Christmas, weddings and birthdays. I sewed a table runner using four of the above shamrocks and that was fun too. I guess I just like to sew no matter what the reason!
-
This is just the pattern I need for St Patty’s Day
-
I love to sew for Christmas because most things I make become gifts.
-
I love St. Patrick’s Day and was looking for a new small wall hanging. I also plan to adopt this pattern for placemats and table runners for myself and my daughter. I think your fabric selection is great! Thanks for providing this easy pattern!
-
Love the Shamrock! I love sewing for ALL the holidays. But I guess Christmas if my favorite!
-
Christmas/winter although I enjoy some new project for each holiday. ?
-
I’ve just begun sewing holiday things since retiring. I do love Christmas, but I think 4th of July is my favorite.
-
I would love this fabric bundle. The fabrics are very calming.
-
I love stitching things for Christmas/winter but I just created my first Valentine’s Day table runner. Started my first St Pat’s Day runner and I might be hooked on sewing for a greater variety of holidays now!
-
Fall and Halloween are my favorites, but plan to sew this St. Patrick’s Day
wall hanging…lovely greens! -
I LOVE to make Christmas quilts and other items! I am now trying to make table runners and wall hangings for other holidays rather than Christmas — one can only use so many items for each holiday.
-
All holidays are fun to sew for but Christmas is my favorite.
-
Lovely fabrics! I like having decorations for all holidays–have pillowcases for most! However, I’d say Christmas is my favorite.
-
Pure Irish (American), I love Pat Bravo’s St. Patrick’s Day Wall Hanging and the Art Gallery Fabrics Pat used to make it. My favorite holiday to sew for is Halloween.
-
I like sewing for fall.
-
My favorite holiday to sew for is Valentine’s Day. Valentine’s Day is a pretty and lovely holiday, full of joy and love, and the fabrics are both cute and beautiful.
Thanks WE ALL SEW, for the St. Parick’s Day idea. I was hoping you would come up with an easy idea, and you did not let me down! -
Love to sew anything Christmas!!!
-
I love making Easter/spring items to welcome a happy season! I usually make 3 of each thing, one for each of my grown daughters.
-
Nice project. Thank you
-
Oh my goodness, I don’t know how to decide…. All holidays have their own charms, but I guess I would have to say Christmas probably wins out. There are so many beautiful fabrics available for Christmas.
-
I too sew for all the holidays especially like Christmas and valentine’s day
-
I would have to say that making halloween costumes was always a favorite.
-
My favorite holiday to sew for is Christmas. This year I have three Christmas quilts in process for family members.
-
For me, I think I like most seasons especially Christmas and spring.
-
I love sewing for the Fall and Autumnal Holidays!
-
I like Fall/ Halloween for first favorite. Second favorite is Christmas.
-
For holidays my favorite sewing is making Christmas gifts. I enjoy just for fun sewing for my grandchildren or pet rescues.
-
My favorite holiday to sew for is Christmas, as there are so many choices of things to make.
-
I love sewing for SPRING 🙂 Its so fun and all the bright and happy colors makes me feel bright!!
-
I like sewing during Christmas. The bright colors and the atmosphere around the house is conducive to Christmas sewing projects.
-
So cute!
-
My favorite season and holiday to sew for is Summer and halloween, I am more of a garment sewist, everytime I see one of these quilting or embroidery projects – I am getting closer to adding to my hobby.
-
I like to sew for all holidays!
-
This looks like a fun quick project. Thanks!
-
Christmas is my favorite holiday to sew for because there is an assortment of beautiful fabric. I have the perfect fabric to make this St. Patrick’s wall hanging, so will start as soon as my bowl cozies are complete. Thanks
-
My favorite holiday to sew for is Halloween, especially using “glow in the dark” fabric
-
Sounds like a fun project. I like to sew for Christmas the most.
-
Love sewing for the Summer holidays, but end up doing more sewing at the Christmas holiday season, making gifts and giveaways. Cute Irish charm. I need a good green table runner for the Month of March.
-
Christmas is my favorite time to sew for. However, I have been thinking that I would make a quilted door knob hanging for each major holiday.
-
Thanksgiving/fall is a great time to make sewing creations–beautiful colors for the tablescape.
-
I like to sew gifts for Christmas, so that must be my favorite holiday to sew for.
-
Christmas is my favorite, I like to change things up once in awhile. I’ll sew up the Shamrock then I’ll have something for St Patrick’s Day.
-
I sew for all seasons but Christmas/winter is my favorite.
-
I would have to say Christmas! I love to make quilted ornaments as an extra surprise with each gift. I am all ways on the look out for a unique little ornament idea!
-
For me it’s Christmas. I love giving hand made gifts. Second choice would be Fall/Winter because as Chris K says that’s when we need quilts.
-
I must admit, I get most excited over Halloween sewing. I can’t resist black cats and all that orange!
-
I enjoy making table runners for summers since we have so many summer outdoor gettogethers!
-
Love your St. Patrick’s wall hanging!
I do have to say that making items for
Christmas brings me the most joy of
all the seasons!
Thank you -
I love to sew for Christmas…quilts make wonderful gifts
-
I love sewing decorations for all the different holidays to make our home feel festive throughout the year.
-
I would have to say Christmas, because I love the holiday.
-
I’d really love to have a table topper or small wall hanging for each holiday; Christmas,New Year’s,Valentine’s,St.Patricks Day,Easter,Spring,Memorial Day,Flag Day,July4th,Summer,Labor Day,Birthday Month( nearly all our family birthdays are in October),Thanksgiving. I’m working on it happening!
-
Love the fabric and idea. Look forward to trying this out.
-
I like sewing for Christmas, or any holiday and giving the things I sew to family and friends. Sewing/quilting is my PASSION!!
-
I’m excited o start sewing the Clover Wall Hanging. I think I’ll add a bit more green fabric. Thanks for the download.
-
I like to sew for Christmas. I collect angels and snowmen
-
l sew quilt tops in the summer then quilt them during the winter months.
-
Easter! Of course there are many other seasons but the little dresses for Church, baskets for Easter hunts, and seems like so many babies being born around then, Baby showers to make gifts – I always make burping pads ( never can have enough!) with cute animals like bunnies. So adorable.
-
I really like to make for all seasons, but of course my favorite is Christmas.
I think the season should be longer. I do try to do some with a winter theme
so I can use them into Jan and Feb. -
Easter is a favorite. I enjoy making bunny and eggs projects. Have all girls (daughter, grand-daughters & great-grand daughter). They love Easter items like placemats, purses, stuffed animals, etc.
-
I don’t sew specifically for holidays or seasons; a beautiful quilted piece seems appropriate at any time of year.
-
My absolute favorite holiday to sew for is Halloween!! I just can’t get enough of it! I decorate my house like crazy, both inside and out. I love to make bags and wallets and coin purses with a holiday theme to them too!!!
Thanks for the giveaway!
Jen F.
-
Grandchildren’s birthdays! I just finished a dress for one and have two dress up costumes to make for two other grand daughters in the next month. Lucky me, they are excited and love what I sew for them.
-
I have lots of holiday things that I’ve made, but not a shamrock!
-
I like to sew for every holiday, but Christmas is by far my favorite. You can enjoy your Christmas display for at least 2 months!
-
My favorite season is Spring. I love flowers! Decorating towels with flowers is fun while waiting for my blooms to sprout.
-
Love Christmas sewing!!!
-
Christmas is my favorite because I like to make FSL ornaments and other fabric ornaments.
-
It’s Toss up between Christmas and Easter.
-
Christmas is my favorite.
-
I love to sew things for Christmas the most, but I also love sewing for Halloween. Beautiful fabrics and I love the colors. I am having a blast sewing on my new 770QEPlus. My first Bernina I bought back in 1997 and can’t believe all the new things that my 770 does. II have even learned to do the embroidery.
-
I do most of my holiday sewing for Christmas.
-
Christmas is my favorite holiday, but this year I am making table toppers for all the seasons this year.
-
Valentine’s Day is my favorite holiday excuse to make a quilted project.
-
I seem to do more for Christmas, but looking forward to doing other seasons. The St. Patrick wall hanging would be fun to make!
-
Halloween and Christmas are my favorite holidays to sew for but I have a goal to make something decorative and representative of each month. So far I have only March, May and June to go!
-
Christmas! I make lots of Christmas gifts.
-
I love to sew gifts for the autumn holidays- Thanksgiving. The fall colors make wonderful table runner gifts.
-
Springtime is my favorite. I love the colors, especially after a gray cold winter.
-
I like to sew for fall and winter holidays. It’s great to be indoors where it’s warm!
-
I love seeing during winter/Christmas! There’s some many fun and festive items to sew, plus my birthday and my fur child’s birthdays are in the season!
-
St. Patrick’s Day has to be my favorite it’s my daughter’s birthday. But I sew for all of the holiday’s. I also love Halloween and Christmas
-
I make guest towels and table runners for all the seasons. The Shamrock wall is very cute and will make a good addition to my collection.
-
I too have been making table runners for the different seasons. My favorite season to quilt for is winter. I love using the whites and adding blues to them for the chill factor even though quilts make you feel warmer.
-
I love sewing all year round but Christmas always holds a special homemade surprise for my kids and grandkids.
-
My favorite season for sewing is Winter and next is fall. I like sewing seasonal wallhangings and table runners but most of my recent quilts have specific themes that fall during Winter months.
-
Great little idea for the many Irish fans in my family! I love sewing a Halloween item every year for myself but Christmas gets most of my sewing work!
-
love the cover wallhanging. thanks for sharingit
-
Cute wall hanging. Thanks for the pattern.
Sewing for Christmas and Valentines are my favorite holidays to sew for. I give most of the things I make for gifts. -
My favorite time of year to sew? Can I say ALL YEAR??? Otherwise, I’ll pick winter. A nice snowy day is a wonderful day to spend in the sewing room.
-
I would have to say my favorite season to sew would be the fall because of all the beautiful colors and pumpkins are so fun. I do love all the seasons though.
-
I sew most at Christmas. I make gifts throughout the year for Christmas. I do love sew alongs and make quilts in them.
-
I love to sew for all of the holidays and seasons! I love sewing for St. Valentine’s Day because I like all shades of pink and rose.
-
I love to sew for the Fall season. I love the colors associated with the autumn season.
-
My favorite season is winter. Who doesn’t like snowmen? At least the kind that doesn’t melt! Being part Irish I will print off the directions and pattern and start dreaming of making the four leaf clovers. Directions are very detailed so making shouldn’t be a problem and the photos are a plus. Thanks for the inspiration.
-
Christmas tops my list as favorite holiday to make for.
-
My favorite sewing season is winter, especially to sew gifts for family & friends.
-
As mentioned above, I love to sew for Christmas especially to make gifts but I also live to sew for St Pat’s day to honor some parts of my heritage~
-
Christmas has always been the season when I make the most projects.
-
I also would say winter + those holidays. Currently, I need to do something for St. PATRICK’S DAY.
-
I have started making wall hangings for every month, LOL I’ve only got about about 5 made so far!
-
Love sewing for all the holidays…and I have some adorable St. Pats fabric I could use…But I’d love to win!!
-
I love sewing Christmas projects! ?
-
My husband and I have bought our first house and I have been so excited to decorate it for the different holidays. So I have been making table runners, wall hangings, placemats, napkins, etc. to celebrate them.
-
Beautiful fabrics that bring many ideas to celebrate St. Patrick’s Day.
-
What a great project to make for St. Patrick’s Day. I can’t wait to get to the sewing room!
-
Hi, my favorite is Halloween. Every year I make a new decoration for the front door, and usually try something new that I haven’t tried before. I just love the Halloween fabrics so that holiday’s stash is huge. Makes me so happy ?
-
Christmas is always my favorite season for sewing, crafting, and quilting
-
I enjoy Christmas projects the most but have no trouble finding fun projects for all holidays. What’s not to love when using my BERNINA machines.
-
My favorite holiday to sew for is Christmas.
Decorations, gifts, special clothing, pjs, home decor….I love sharing the things I make with family, friends, and others!
-
My favorite sewing holiday is Thanksgiving. I love using the warm fall colors.
-
Thanks for the neat Shamrock pattern, I’m going to make for my front door! Guess fall is my favorite season to sew for but Patriotic is a close second as Red-White-Blue theme is always in season!
-
I do like sewing for Christmas the best! But i love to sew all the time 🙂
-
I love to sew for Christmas and Birthdays!
-
I love sewing for all holiday seasons! From Valentine’s Day to St. Patrick’s to 4th of July to Halloween to Christmas! I love making my friends, family happy on these holidays!
-
I love the idea of having pillow covers, table toppers, t shirts & banners for every holiday. I’m making them for both daughter in laws & granddaughters
Terry -
I have seen mostly for Christmas then 4th of July. Trying to make something for all the holidays though.
-
I love the colors of springtime, greens, blues and browns (earth) as I am also a gardener!
-
I like to sew for Christmas. I made the quilt ornaments last year as we give an ornament to our grandkids every year. But I also like to sew for St. Paddy’s day. Thank you for all the good tips and patterns.
-
Winter/Christmas is my favorite
-
Hmm.. that’s a tough one. I’ve just started doing seasonal quilts and monthly bench pillows, so it’s whichever I’m working on! haha Each project brings me happiness.
-
I enjoy sewing for the 4th of July (as well as Thanksgiving and Christmas). 🙂
-
By far, Christmas is my favorite holiday for sewing and quilting, but any holiday is inspiration!
-
I mostly sew gifts for Christmas. Valentines Day would be a second choice.
-
Christmas is my favorite holiday to sew for, though I never start early enough to finish all I intend to make. Maybe this year I’ll work on Christmas in July gifts!
-
My favorite holiday is St Patricks Day! Irish born! For Me, It’s about family,faith,love and grateful to who made you and the people in your life. I love this day of celebration! I would love this wall hanging. As a new sewer it would be a great project to practice my skills.
-
Love to sew for Christmas, including tree skirt, table runner and placemats.
-
Fall is my favorite…. I just love fall colors!
-
I love making seasonal door hangings and table runners! Great break from quilting.
-
Looks like a good project
-
I love sewing for all seasons. I do most of my quilting for christmas as gifts for family and friends. I also make quilts for wedding, baby and college dorm quilts. I’m called the quilt lady by family and friends. Have quilts and wallhangins in every room of my house.
-
My favorite is sewing for Christmas – home decorations and tree ornaments! Fall is fun, too.
-
As for a favorite holiday to sew for it has to be Christmas, for gifts but actually I prefer to sew wedding presents and baby quilts.
-
I most enjoy sewing for Christmas, however I have more time in the spring, so Easter is also a favorite!
-
Love Christmas season the most. Table toppers, quilts, ornaments, towels, absolutely everything!
-
Christmas is my favorite season to sew for. I love making gifts 🙂
-
Oh my! I can’t pick just one! I keep a small winter tree up all year round and I change the ornaments, many of which are homemade, for each holiday and in-between it’s just green. I just took off the Valentine ornaments and now this lucky 4 leaf clover has inspired me to make small 4 leaf clovers for my tree!
-
My favorite holiday for sewing is Christmas as it puts me in a festive mood, even if I start in July!
-
Hello everyone,
I Love Halloween. I would sew my kids costumes of whatever they wanted. When my kids were little, the day after Halloween I let them stay home from school. We all slept in then woke up and made pancakes for breakfast. Then we would all sit around the table and go through their candy. Safety first. Then we ate candy all day.
So many great memories.
Alisam1960 -
This pattern cute, cute but I’m in love with red trucks thinking about doing one for each month and change, from tree to heart,to shamrocks, then tulips, flags, leaves, pumpkins,, turkeys, and I have my tree ready and waiting for Christmas ’22!
-
Christmas is my favorite holiday to sew for my family. Love all seasonal designs.
-
Looks like a quick and easy project. I will look through my stash for fabrics.
-
I’m fairly new to quilting, so all holidays & celebrations are great reasons to sew! Looking forward to Spring/Summer colors!! ?
-
I don’t have a single holiday favorite. I love sewing for all of them and changing out quilts and decorations for each one.
-
I love to sew for all the holidays. But realized I haven’t sewn for St. Patrick’s day. What a great little project to quickly make. Thank you for the chance to win this awesome bundle.
-
My favorite “holiday(s) is/are Birthdays because I can create projects and sew all year long!!
-
I love to sew spring flowers in pillows and wall-hangings as it just brightens everything up after a long dreary winter. I love what you did with the St. Pat’s shamrock.
-
Definitely Christmas, although like to sew for any holiday!
-
My favorite season to sew for is Christmas but I also like making a few things for other holidays.
-
I love to sew home decor items and quilts. Lately, I have been making seasonal wall hangings and decorative pillow covers. I love sewing for the Autumn season!
-
Love to sew for Christmas!
-
I love sewing for every season on my Bernina!
-
I love sewing year round. I don’t know that I have a favorite holiday or season to sew for.
-
My favorite is Christmas! You can tell by how many Christmas quilts, table runners and pillows I have made.
-
My favorite season to sew/quilt is winter& Christmas…. red & green, snowmen and snowflakes.
-
Love everything to quilt for Christmas and comfort quilts for people in need
-
I love sewing for Christmas, but since getting my embroidery machine I’m starting to make pillow covers for every holiday and even seasons like Spring, etc. Can never have too many decorations for any season, lol.
-
My favorite holiday season to sew for is Christmas!
-
Love to sew items for the Christmas Holiday Season!
-
Such a fun project! I plan to do with with my granddaughter.
-
Love to sew seasonal wall hangings! my favorite ones are for spring and Easter.
-
My favorite holiday season to see for is Christmas.
-
I love sewing for spring and summer. St Patrick’s Day is the perfect kick off to spring!
-
This is just adorable. Christmas is my favorite holiday to sew for, but Easter is my second favorite. Thanks for the fabric-win opportunity!
-
Halloween! Grandsons love it when I make costumes.
-
Lovely project, Julie! I love to sew for fall & winter but really need to up my game for spring & summer!!
-
I enjoy all holidays! However my favorite is Veterans Day when we honor those who have kept and continue to keep us free.
-
Although I love to sew for all seasons; my favorite season would have to be winter/Christmas because it is easier to handle those wonderful Cuddle/Minky/flannel fabrics when it is cold out and I like to make quilts for others. I also like sewing table runners, placemats, cloth napkins, and toppers. Having matching holiday themed items to use is fun.
-
I love to sew for Halloween and Christmas. My two favorite holidays.
-
I love sewing for Christmas! I completed my first ever Christmas table topper! It has a colored (with crayons) center, that is enhanced with hand embroidery of a flower, holly leaves and berries and a few sprigs of Christmas tree greenery. Then there are star blocks surrounding the center piece and graduating borders. The pieces were tiny (1.5 inches) and I had said I would never do a quilt with tiny pieces, but it turned out a lot better than I thought it would and I had a blast doing it!
-
I would have to.say Valentine’s.
-
I luv to sew Christmas items…lap quilts, wall hangings, table toppers, mantle stockings, etc.
-
I love to make things with US patriotic colors.
-
My favorite season to sew for is the Wedding Season. I love to make wedding quilts for my family and close friends.
-
Definitely Christmas! So many cute designs for kids and adults.
-
My favorite holiday is Thanksgiving!
-
I love sewing for Christmas because of all the great gift ideas and embroidery designs. But, the colors and beautiful autumn designs for autumn/Halloween are probably the most enjoyable for me from a sewing perspective.
-
I love sewing projects for my sons and their families’ homes for all of the seasons.
-
I enjoy sewing for the Christmas season.
-
I love to sew for birthdays!
-
I enjoy making different projects for friends and family.
-
I love to sew items for people’s birthdays. It’s special and unique to each person. Of course, Christmas and Easter are great to sew for. I also like St. Patrick’s Day – our family has a party each year — I’ve made bowl cosies for everyone in the family one year and shamrock pins another, etc.
-
Thanksgiving. Love the colors. Cooler days.
-
My favorite to sew for are birthdays-personal holidays.
-
I enjoy sewing for the special people in my life.
Leave a Reply
You must be logged in to post a comment.

St. Patrick's Day Wall Hanging Fabric Bundle Giveaway
This giveaway is now closed. Thank you to all of our WeAllSew fans who entered!
Congratulations to our winner(s):
Keep an eye out for the next WeAllSew giveaway!