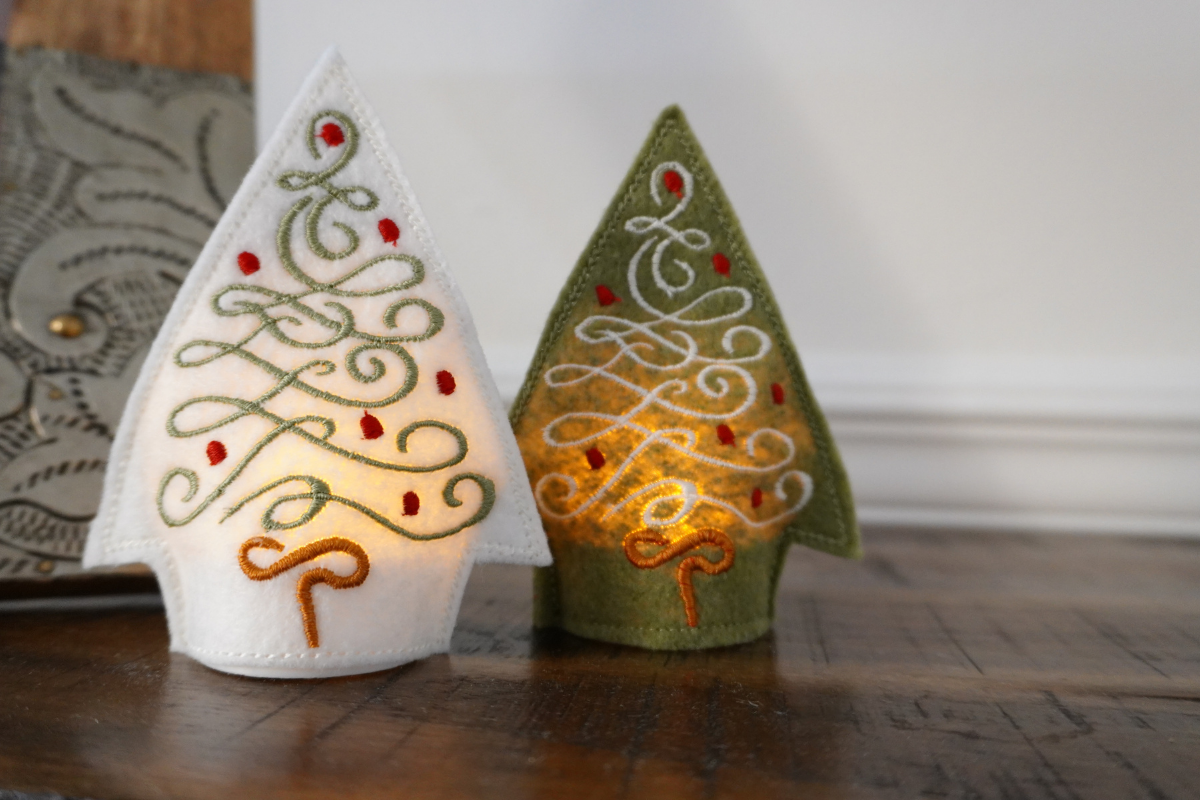
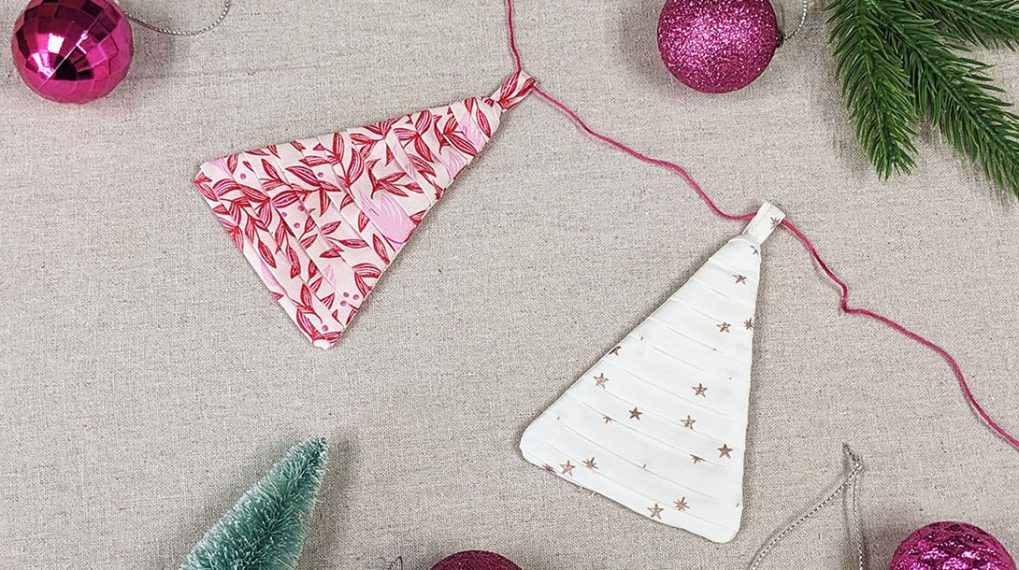
Christmas Tree Tea Light Cover In the Hoop
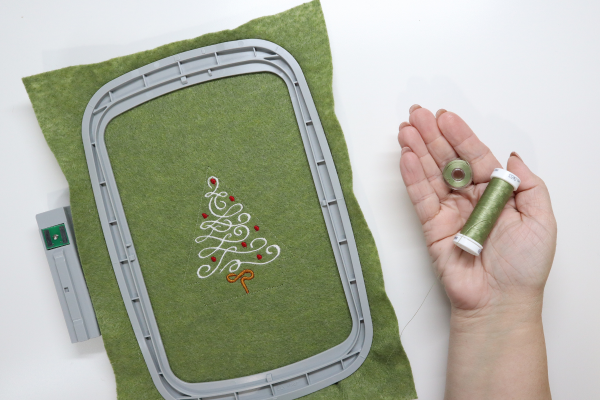
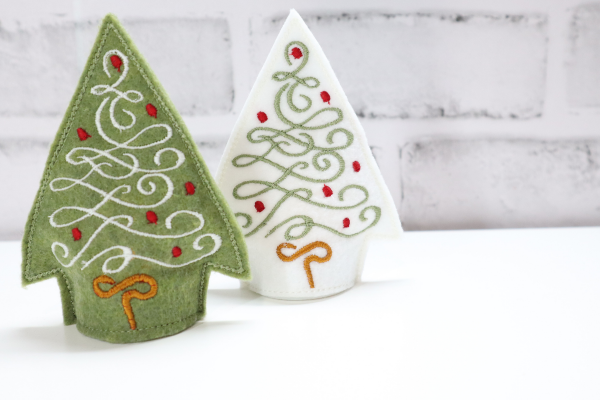
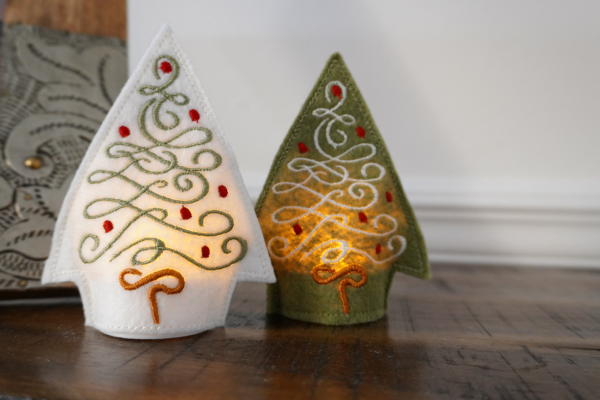
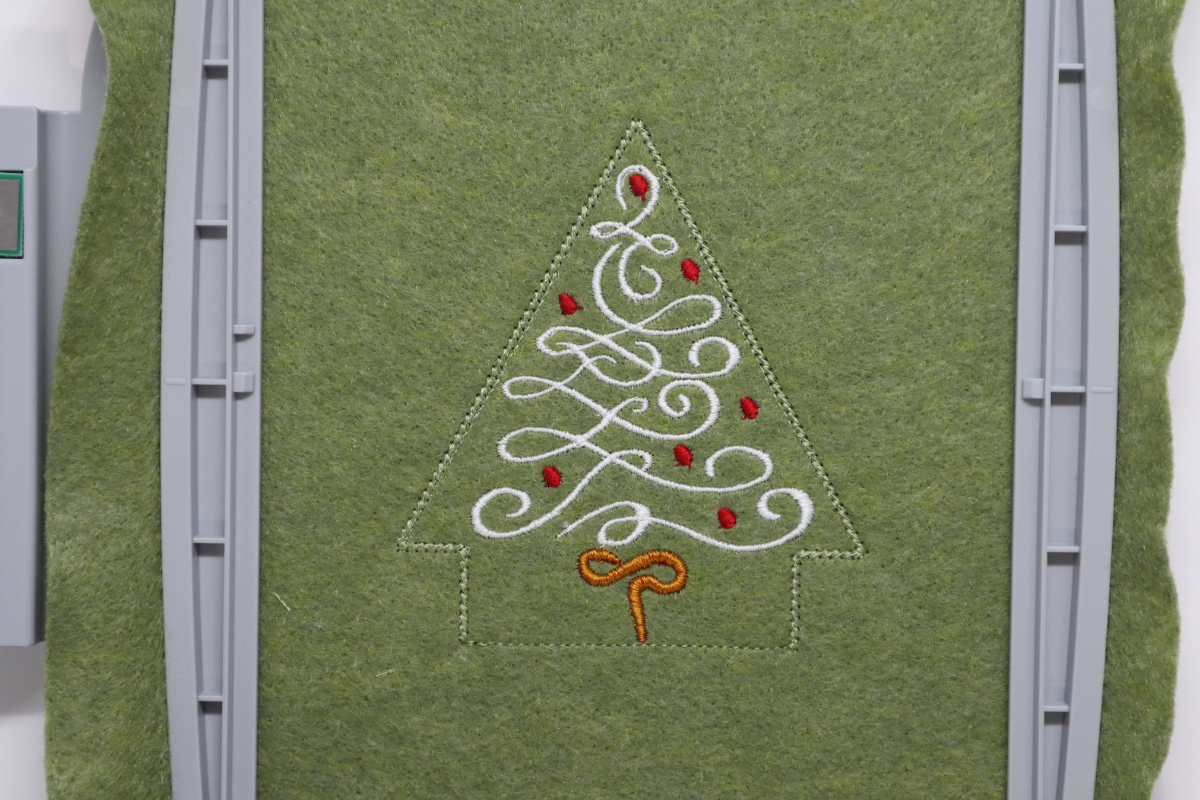
Are you ready to make something adorable with your embroidery machine for the holidays? I’m so excited to share with you this fast and fun In-the-Hoop machine embroidery project. What is In-the-hoop you might ask? It’s a project created using an embroidery machine where the construction is done inside the hoop as opposed to a sewing machine. The tree tea light cover project’s total size is 3-1/2″ wide by 4″ tall, so use the smallest hoop that comes with your machine that this design will fit into. I’m using my bernette 79 and using the Medium hoop, 120×180 mm.
Hello my Sewing Bees, my name is Sue O’Very owner of Sookie Sews and BERNINA Expert. You can find me on Instagram at @SookieSews and my website SookieSews.com where I have hundreds of machine sewing patterns, embroidery designs, and In-the-hoop projects. Ok, let’s get stitching.
Materials and Supplies to Make a Christmas Tree Tea Light Cover In the Hoop
Measurements are Width by Height
- (2) Felt 9″ x 12″
- Embroidery thread i.e. Mettler Polysheen
- Match the felt color – Green
- Tree – Cream
- Trunk – Brown
- Balls – Red
- 60 weight bobbin thread
- Empty bobbin
- Embroidery needle 75/11
- Fabric Shears
- 5.5″ All-Purpose Craft Scissors i.e. Sookie Sews
- EZ Hook n Snip i.e. Sookie Sews
- Tea Lights
- Clear adhesive tape

Steps to Make a Christmas Tree Tea Light Cover In the Hoop
- Wind a matching bobbin with the thread that matches the felt, in my case green.
- Insert a brand new embroidery needle, 60 wt bobbin, and the thread that matches the felt, in my case green.
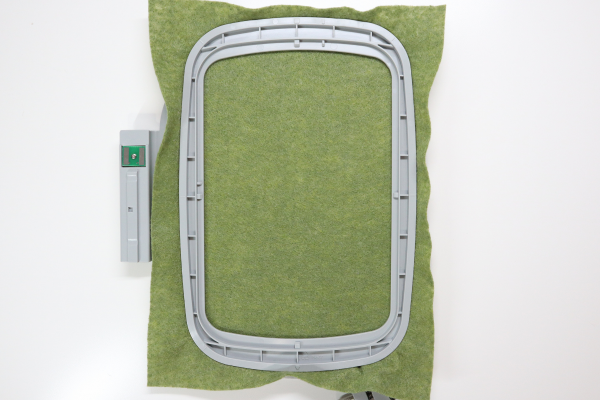
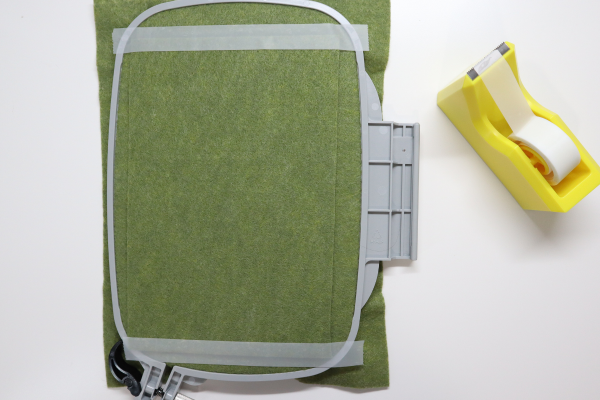
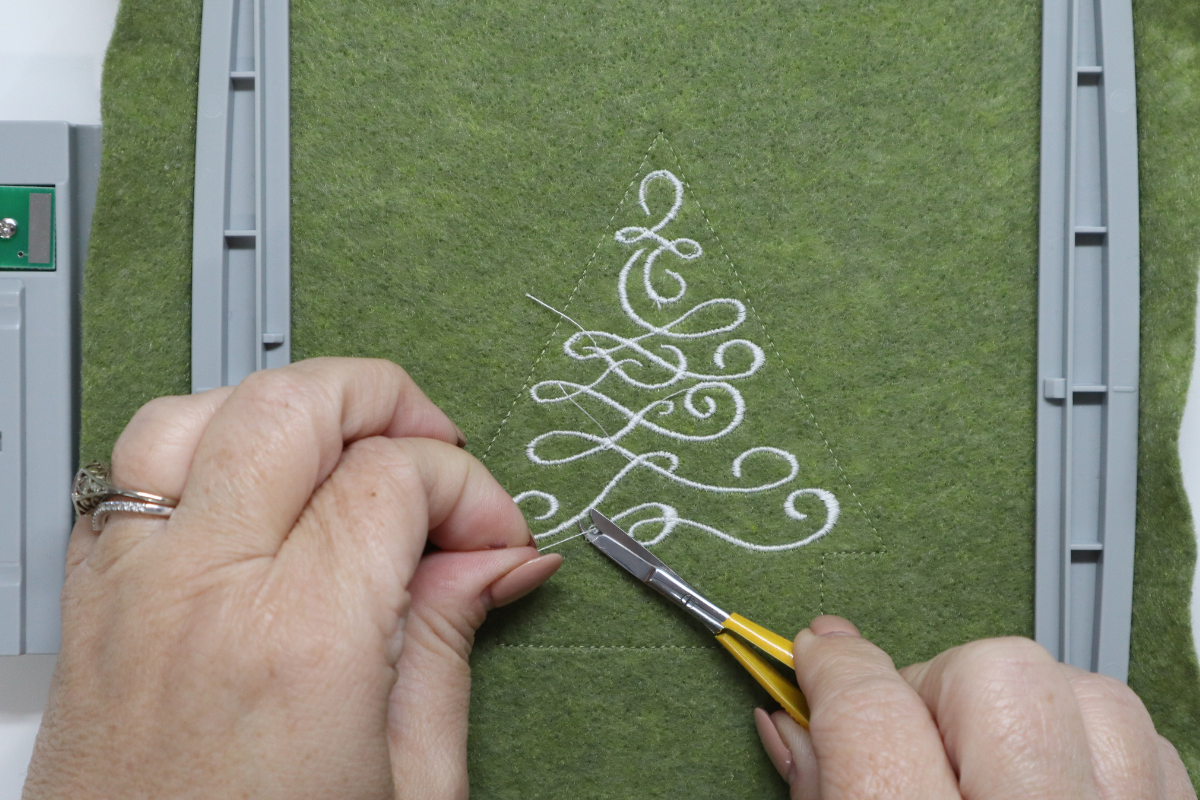
- Hoop one piece of felt.
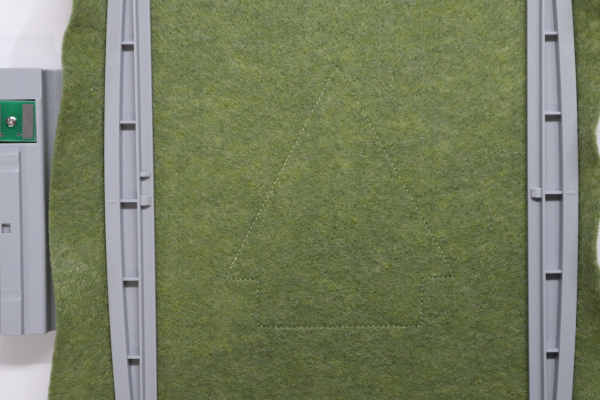
- Insert hoop into the machine and sew Stitch #1, the outside tree stitch, this will be shown so if you decide to make it a contrasting color, keep that in mind.
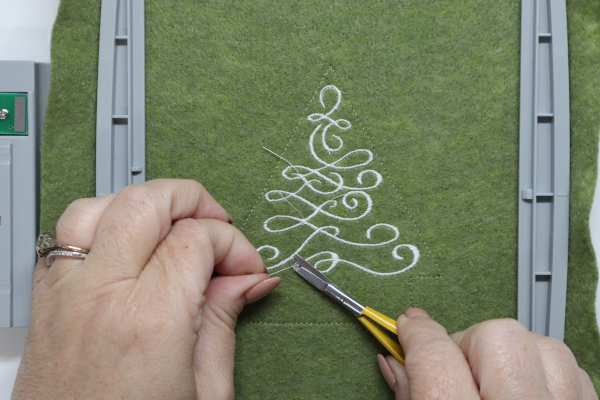
- Change thread for the tree swirls. In my case, cream and sew Stitch #2. Clip any jump threads that didn’t get cut by the machine.
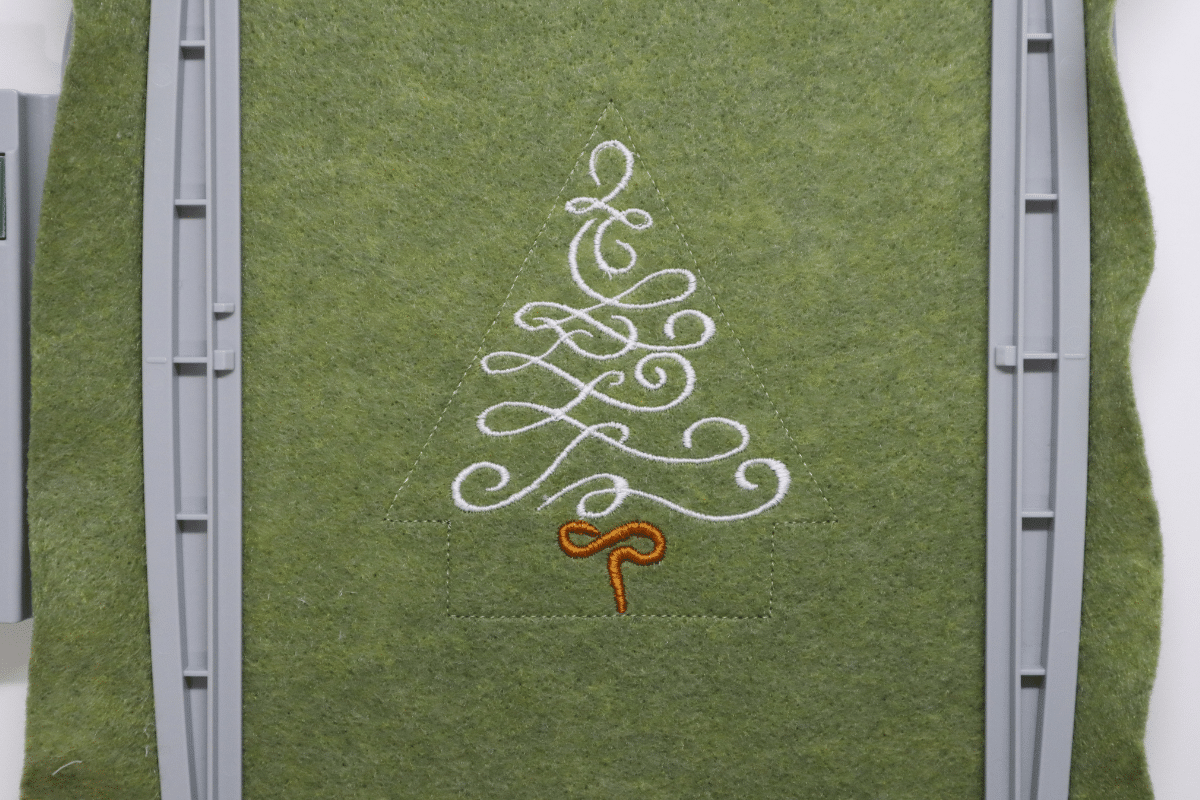
- Change thread for the tree trunk. In my case, brown and sew Stitch #3.
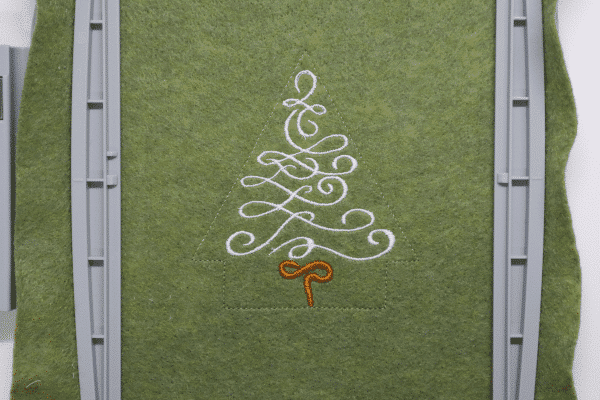
- Change thread for the balls. In my case, red and sew Stitch #4. Clip any jump threads that didn’t get cut by the machine.

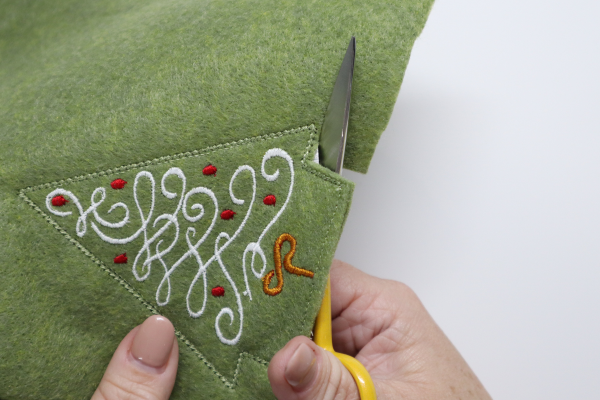
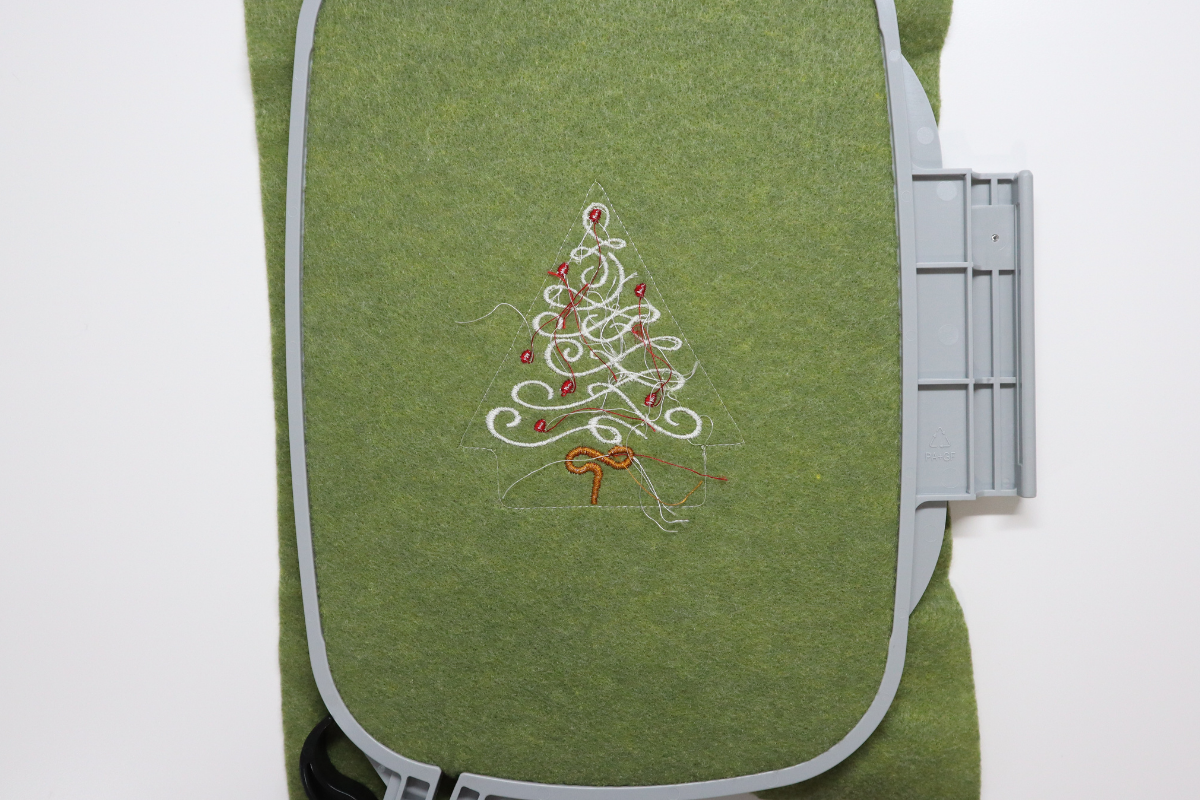
- Remove the hoop from the machine and turn the hoop to the wrong side facing up. Cut the second piece of felt in half (4-1/2″ x 6″) and place it over the wrong side of the embroidery design stitching. Use clear tape to secure it in place.
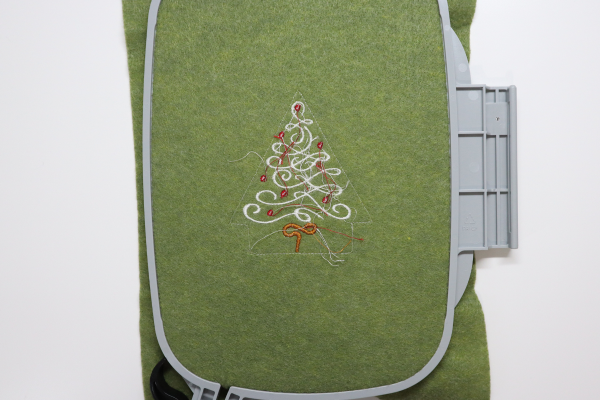
- Change the top and bobbin to the thread that matches the felt, in my case green.
- Insert hoop into the machine and sew Stitch #5, the final outside stitch.
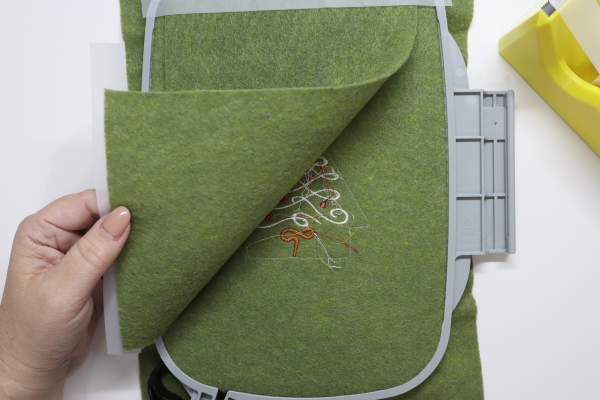
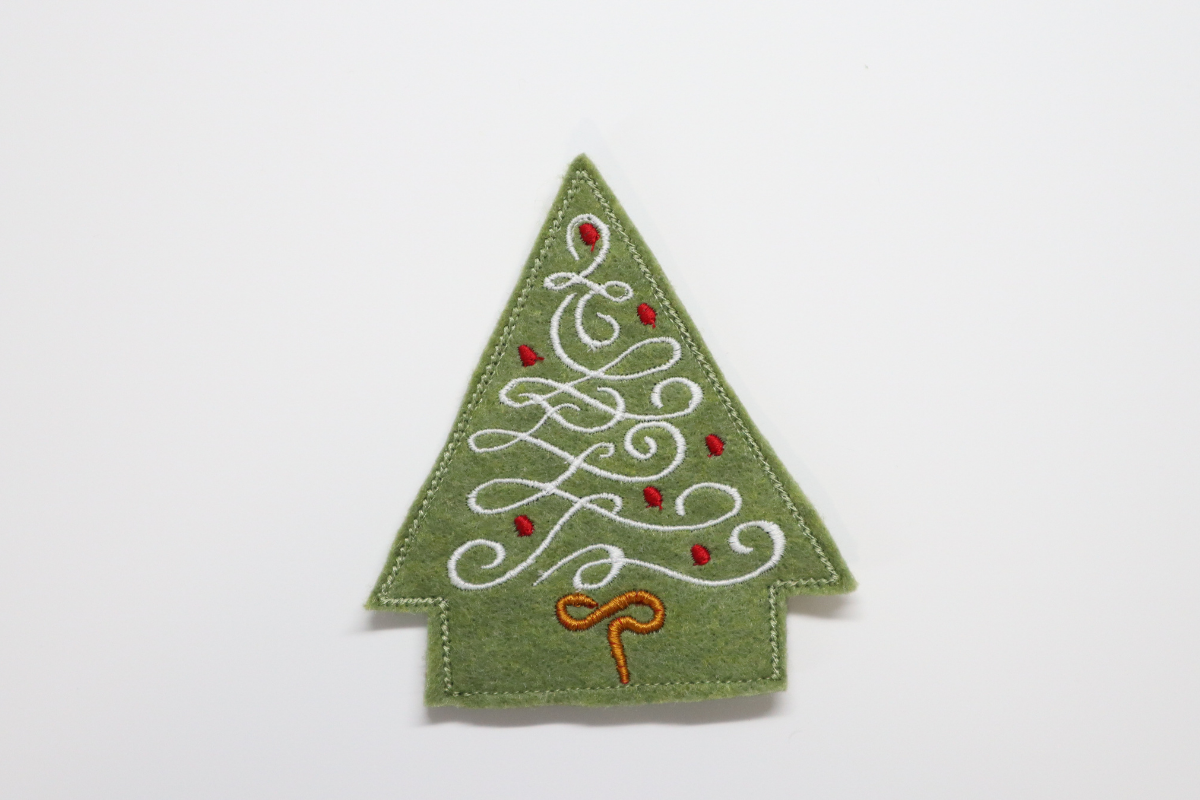
- Remove the hoop from the machine and the materials from the hoop. With the 5.5″ All-purpose craft scissors cut around the outside stitch about 1/16″-1/8″ away from the edge, do not cut the stitches.
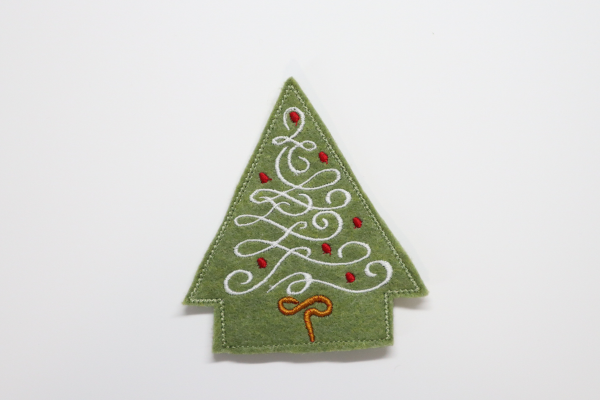
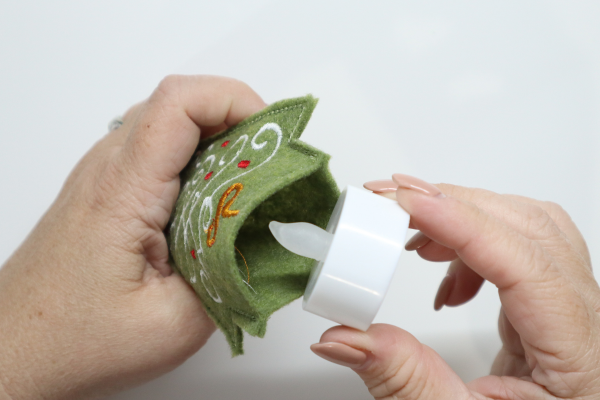
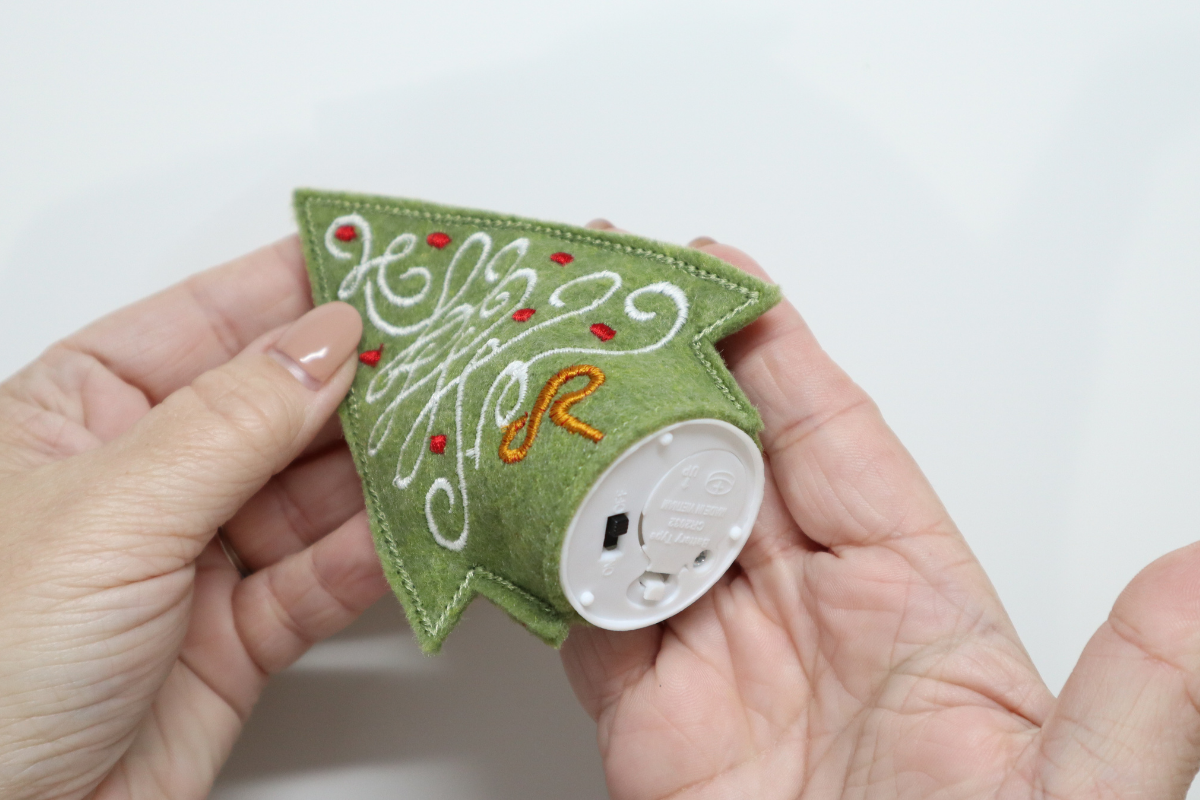
- Slip the bottom of the tree opening over the tea light. Turn on the tea light. Keep making more to grow your very own magical Christmas forest of trees.


I hope you enjoyed this easy In the Hoop machine embroidery project and make many of these. When you make yours, please snap a shot and tag me @SookieSews and @BERNINAUSA!!
Used Products


What you might also like


45 comments on “Christmas Tree Tea Light Cover In the Hoop”
-
-
Hello! Thank you for your comment! Here is the link to the embroidery design from Sookie Sews!
-
-
Cute but where is design located ???
-
Hello! Thank you for your comment! Here is the link to the embroidery design from Sookie Sews!
-
-
I may be missing the obvious, but I’m not seeing a link to this design.
-
Hello! Thank you for your comment! Here is the link to the embroidery design from Sookie Sews!
-
-
Did I miss something? Where do we find that lovely tree embroidery file? Or do we stitch it freehand?
-
Hello! Thank you for your comment! Here is the link to the embroidery design from Sookie Sews!
-
I may be missing something but I do not see a link for the Christmas tea light covers made in the hoop. I see the directions but no design. Please help. Thank you
-
Hello! The download is located here: https://weallsew.com/wp-content/uploads/sites/4/2021/12/Christmas-Tree-Tea-Light-Sookie-Sews.zip
When you click the link, the .zip file should automatically download to your device. Thank you and happy stitching!
-
-
-
-
Where do I download the design?
-
Hello! Thank you for your comment! Here is the link to the embroidery design from Sookie Sews!
-
-
Is there a download link for the design?
-
Hello! Thank you for your comment! Here is the link to the embroidery design from Sookie Sews!
-
-
Where can I find this embroidery design?
-
Hello! Thank you for your comment! Here is the link to the embroidery design from Sookie Sews!
-
-
You forgot to state where to get this particular design. It’s so cute.
-
Hello! Thank you for your comment! Here is the link to the embroidery design from Sookie Sews!
-
-
Sue,
I would love to make a few of these but cannot find the design, nor on Sookie Sews website.-
Hello! Thank you for your comment! Here is the link to the embroidery design from Sookie Sews!
-
-
I apologize, but I don’t see the link to the embroidery design. Where can the tree light design be found?
-
Hello! Thank you for your comment! Here is the link to the embroidery design from Sookie Sews!
-
Thank you. I’m trying to order the tea lights you mention but your website doesn’t allow you to enter the order without applying for a business option????
-
-
-
I love these little trees. Where can I find the embroidery design for them?
-
Hello! Thank you for your comment! Here is the link to the embroidery design from Sookie Sews!
-
-
Which embroidery design did you use? It’s a very cute project?
-
Hello! Thank you for your comment! Here is the link to the embroidery design from Sookie Sews!
-
-
Such a cute gift to make for someone. Thank you!
-
OK – I went to the OESD site and they have the tea lights but they are warm not cool. Waiting to order pending what your advise. Thanks
-
Wow! SookieSews and Bernina, Adorable project! Thank you for sharing!
-
These are sew cute but I don’t have an embroidery machine. I sure would love to know the dimensions of this felt tree so I can make one by hand that would fit a tea light. Thank you.
kakingsbury at verizon dot net-
3 9/16″ wide by 4″ tall
-
-
These are SO cute! Just finished two of them, and had a problem with both of them. As it’s finishing the last stitches, and wants to return to the start/end, the presser foot does not go up, nor does the needle. So it broke/bent the needle. First time I thought it was something I did, but it happened exactly the same way, in the same spot, on the second one. Help please??????
-
Please send me the link to the embroidery file for the Christmas tree tea lights. Thanks!
-
-
Thank you for the cute design. I immediately downloaded it to my Bernina Software and was easy to do. Now I just have to decide what colors I want to use. Such a cute idea.
-
What weight felt did you use that you were able to embroider it without using stabilizer?
-
Just craft felt from Michaels
-
-
Thanks for the great tea light trees. I made a bunch to give away as a tree ornament! they are fun!
-
That is awesome! Please do post a photo and tag both me @sookiesews and @berninausa
-
A very nice tree!
But if your felt is too thick or your light is too weak, you can make holes in the felt with the hole punch. They are just Christmas lights.-
Good point! Thanks for sharing
-
-
These are great table favors for our dinner
-
For sure! Please do post on social media and tag both me @sookiesews and @berninausa
-
-
Thank you so very much for this adorable project. I had a fun afternoon making a mini Christmas tree forest. I made off-white and green trees and all came out great
-
I bet they are lovely!! Please do post on social media and tag both me @sookiesews and @berninausa
Leave a Reply
You must be logged in to post a comment.

Looks adorable – where can I find the tree pattern?