Fabric Mini Basket
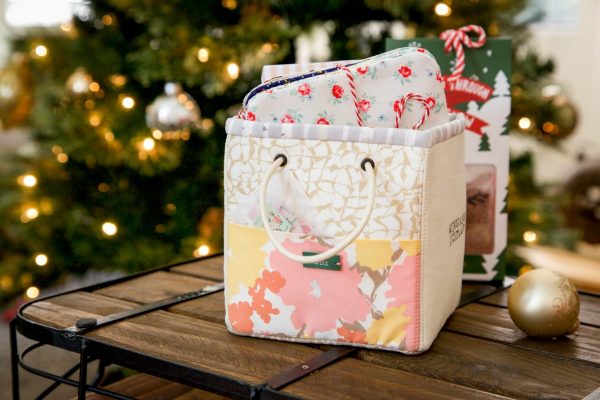
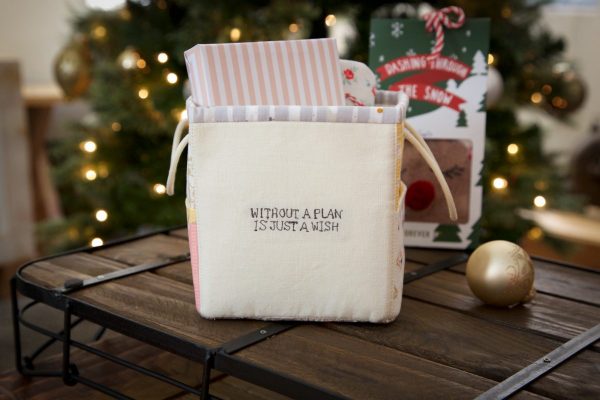
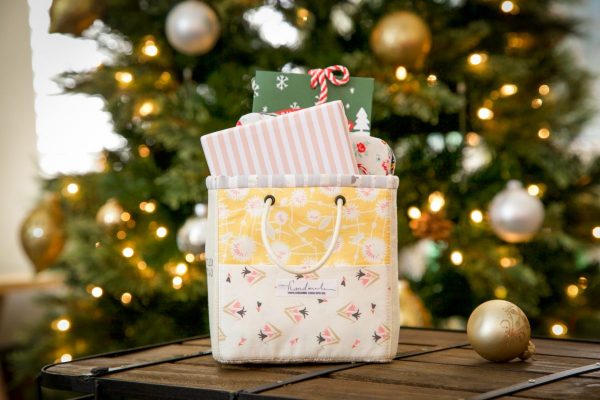
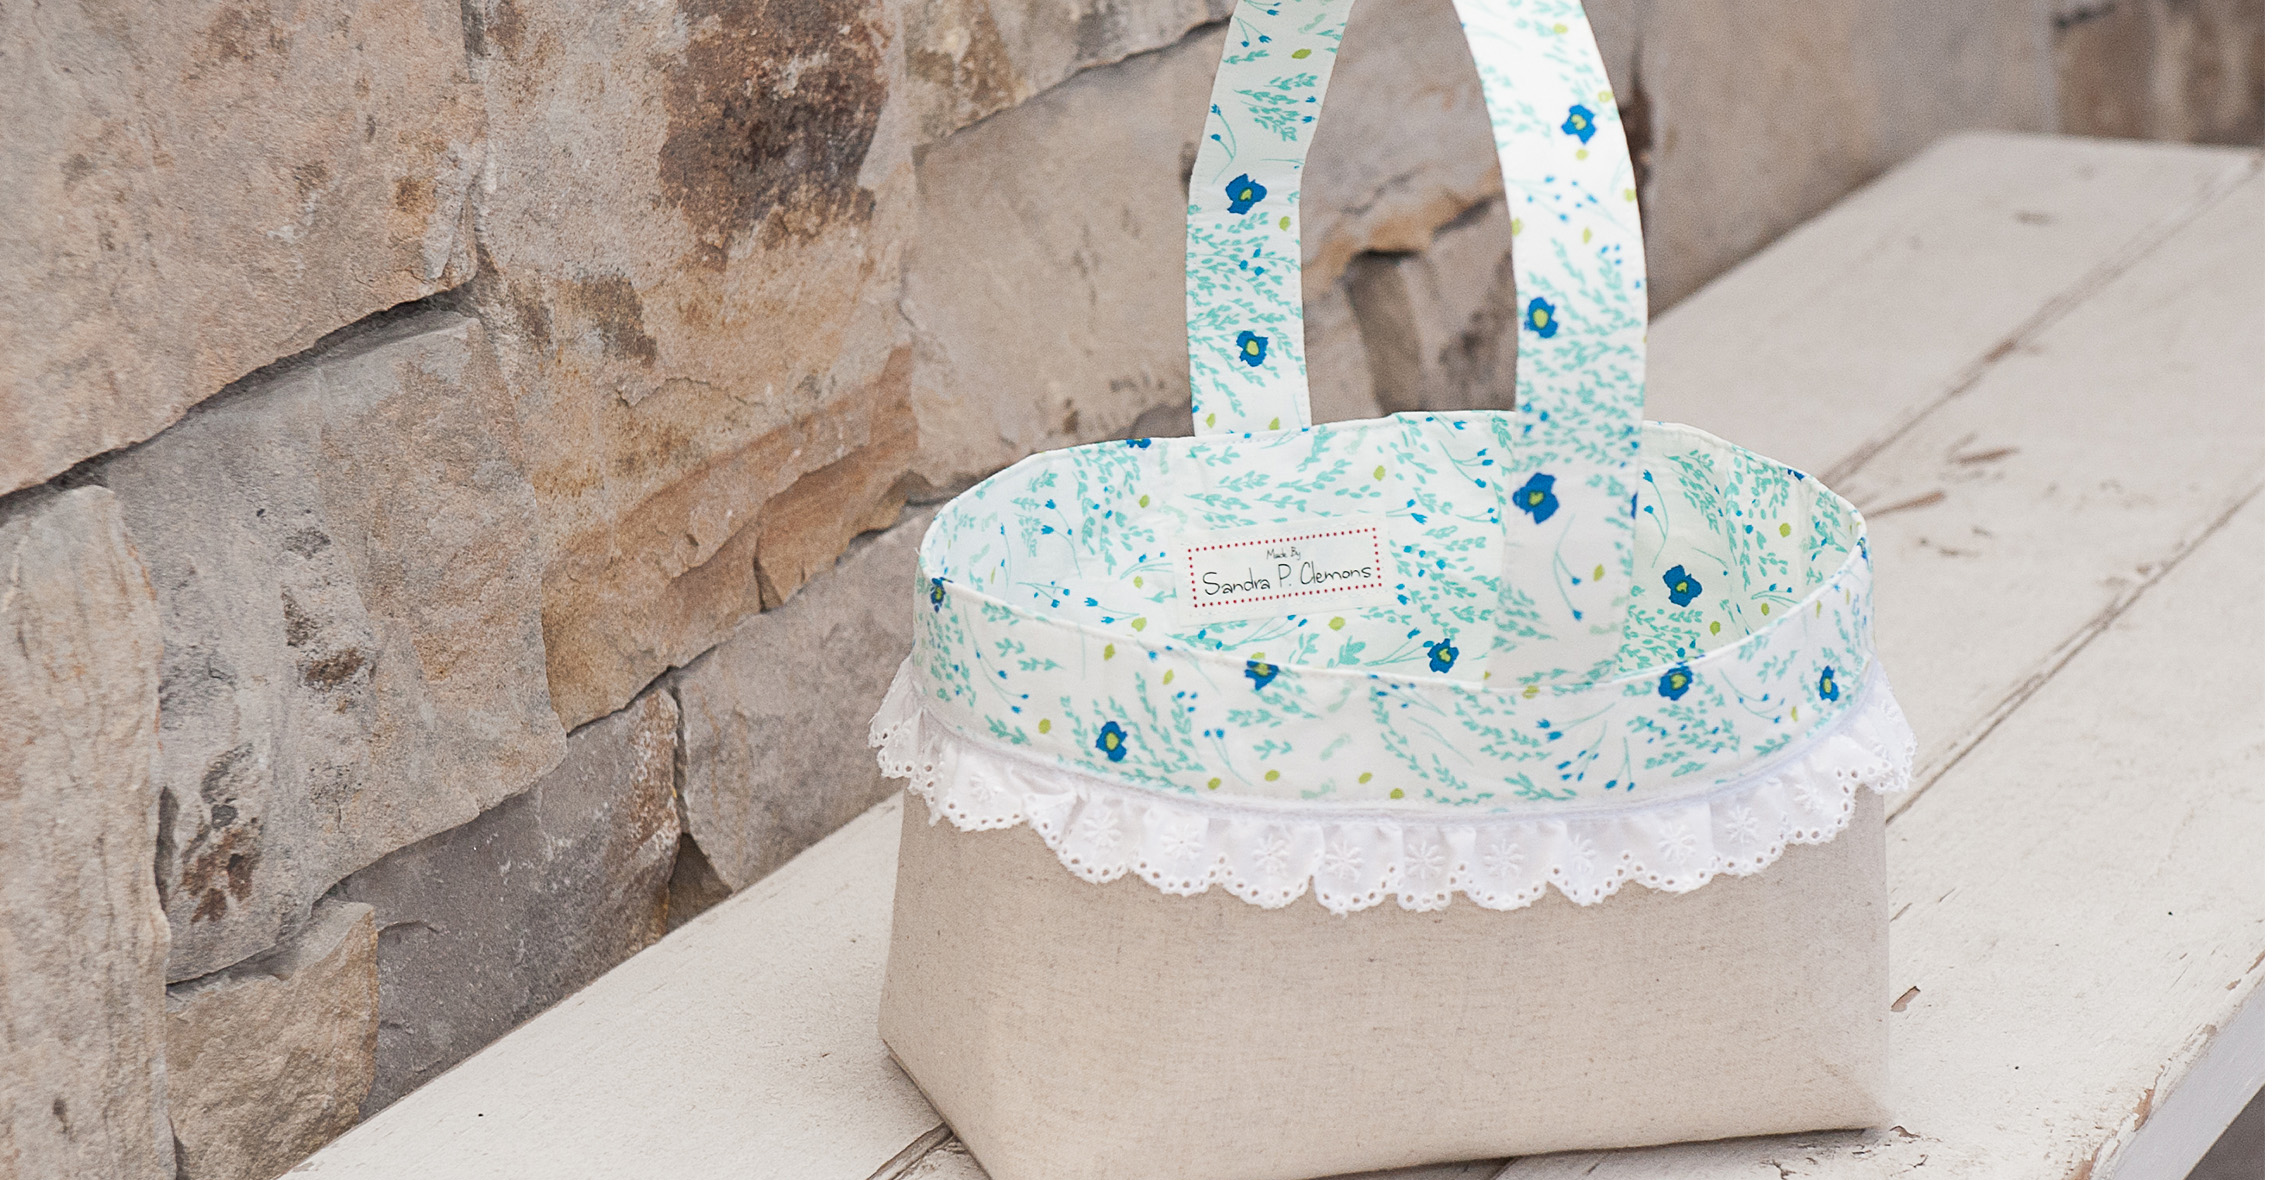
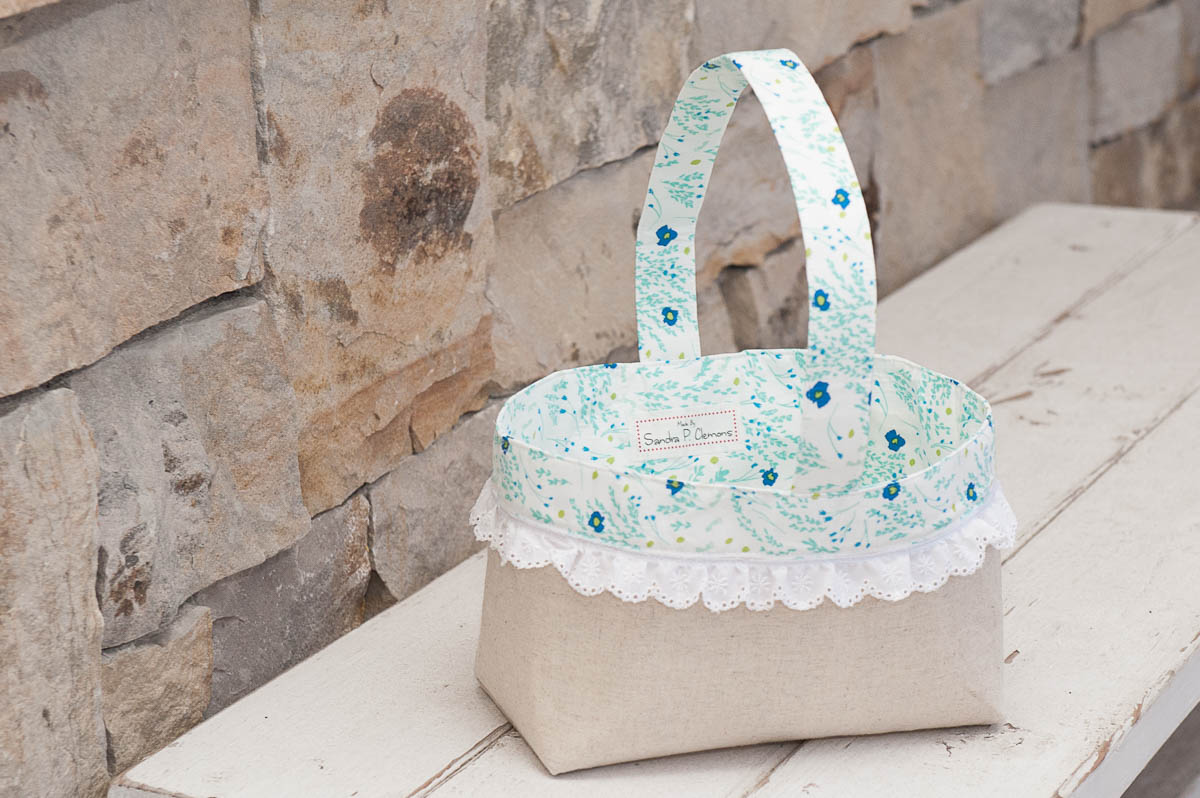
We can never have enough storage and when it comes Christmas season, a handmade storage basket makes the best gift. Add personal charm with sewing machine embroidery faster than ever. I hope you enjoy making a one of a kind DIY fabric basket today.
Finished basket size = 5″ x 5″ x 5 1/4″
Materials to make a fabric mini basket:
- Download the Fabric Mini-Basket Rose Template
- 2 (two) 5 1/2 inch square of cream solid fabrics
- 2 (two) 5 1/2 inch square of printed fabric (see what I used here)
- 2 (two) 6 x 5 1/2 inch rectangles of print fabrics for pockets
- 1 (one) 20 1/2 x 6 inch rectangle of print fabric for lining
- 2 (two) 6 x 6 inch square of print fabrics for bottom
- 1 (one) 20 x 5 inch rectangle of fusible batting (medium weight)
- 1 (one) 30 x 2 1/2 inch strip of binding fabric
- 2 (two) 3 x 5 1/2 inch rectangle of fusible interfacing
- Stabilizer
- 28-weight gray thread for machine sewing (or gray embroidery thread for hand embroidery)
- Your sewing machine: I sew on BERNINA 350 PE
- Open embroidery foot (BERNINA Open embroidery foot #20/#20C/#20D)
Embroidery
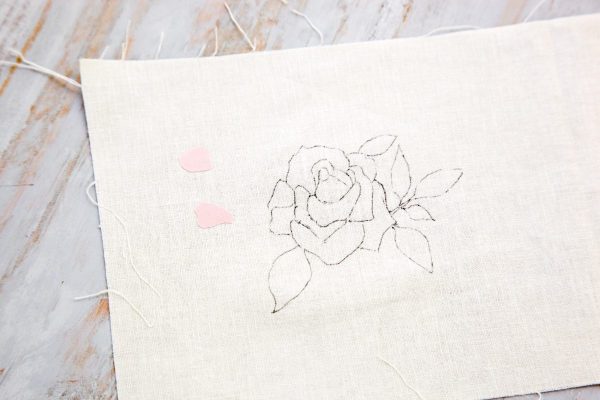
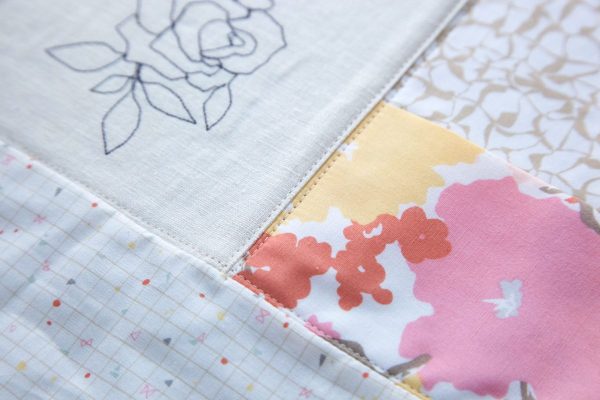
- Download the Rose Pattern for the Fabric Mini Basket above. Transfer the rose on the cream solid fabric centrally using a fabric marker.
2. Thread the sewing machine with the 28-weight gray thread and shorten the stitch length to 0.7mm. Attach an open-toe appliqué foot (BERNINA Open embroidery foot #20) to see better. Place a piece of stabilizer on the back.
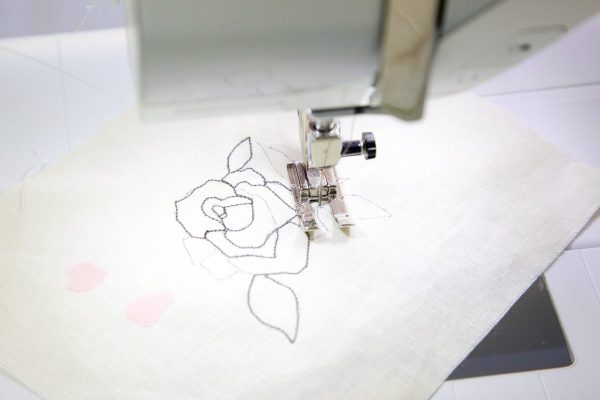
3. Using a regular straight stitch, sew around each letter. Sew the rose pattern on the remaining cream solid fabric following the same steps.
Check out Minki’s video tutorial for “How to Fill in Letters and Spaces“.
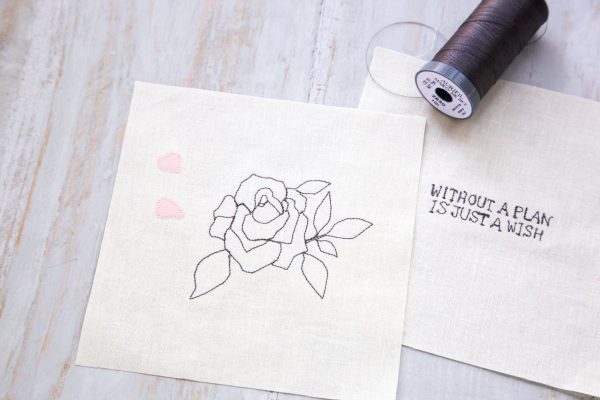
Making basket units
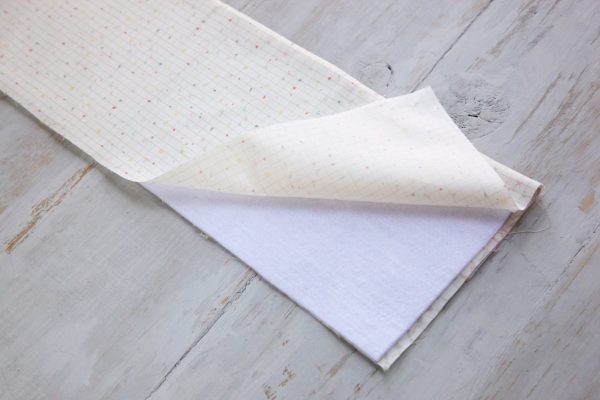
4. Fuse 3 x 5 1/2 inch fusible interfacing on the wrong side of 6 x 5 1/2 inch pocket fabric matching one side. Make two and fold in half.
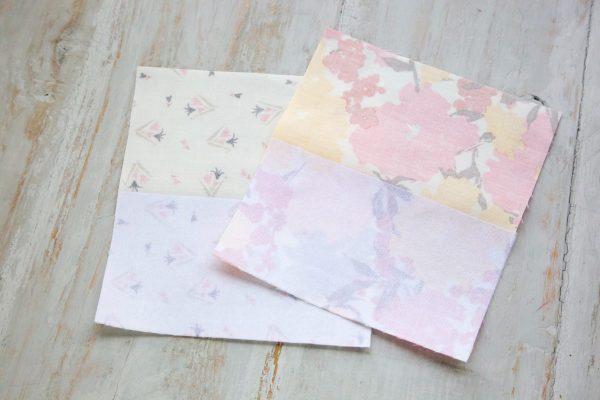
5. Place a pocket atop of 5 1/2 in print fabric. Sew the embroidered piece and the pocket unit together. Make two.
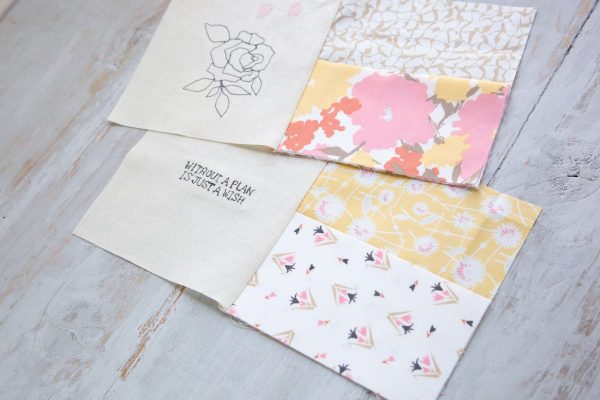
6. Sew all the basket units together matching short raw edges and press seam one side.
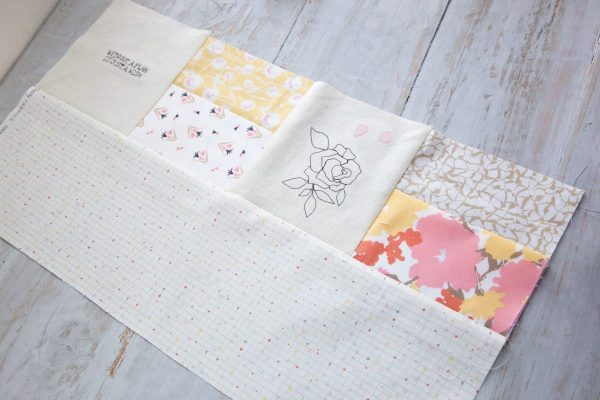
7. Sew the 20 1/2 x 6 inch lining fabric to the basket and fuse 20 x 5 inch fusible batting on the wrong side of the basket unit.
8. Topstitch 1/8 inch from each seam line between side panels and pockets.
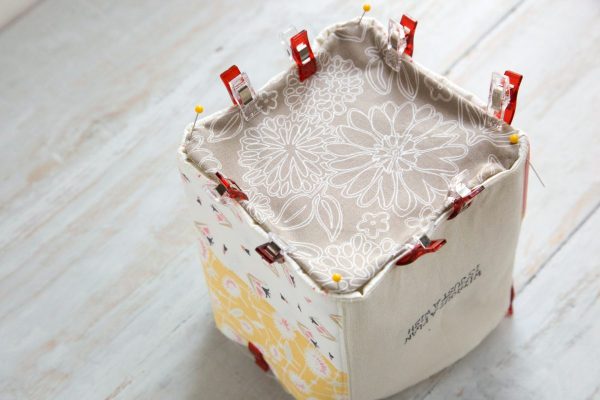
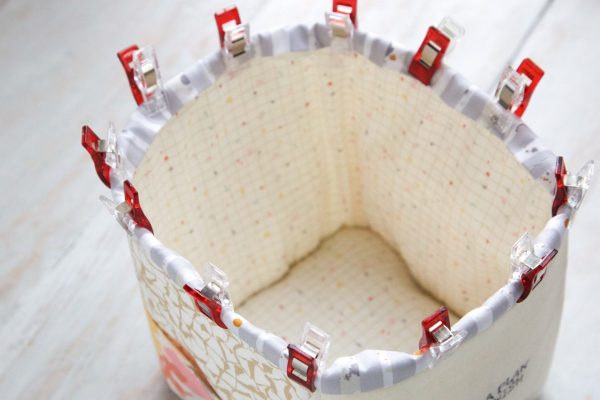
9. Fold in the lining, press well and pin the top raw edges.
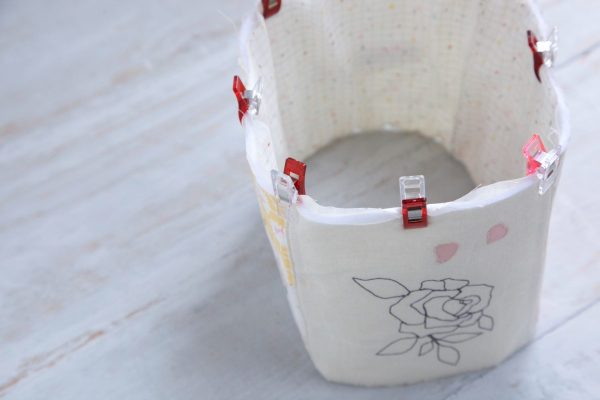
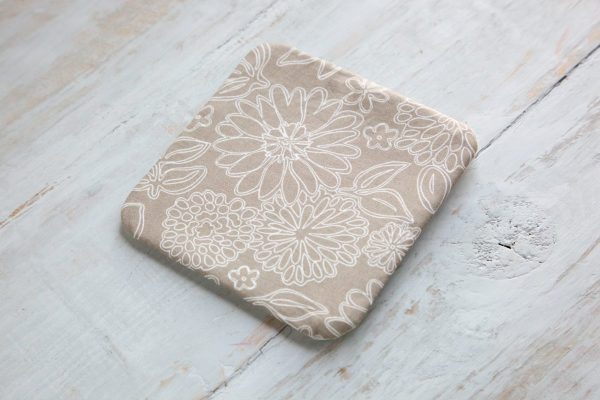
10. Fuse 5 1/4 inch square fusible batting on the wrong side of 6 inch square bottom fabrics centrally. Sew two 6 inch square bottom fabric together, right side facing, with 3/4 inch seam allowance, leaving a 3 inch opening for turning. Turn right side out and press well. The bottom should measure 5 1/4 inch square. Hand stitch opening closed.
Assemble and finish
11. Pin the bottom unit and the basket unit in place and hand stitch to assemble. Use 100% cotton Quilting thread for sturdy finish.
12. Sew the binding to the top edge of basket and fold the binding over to the back of the basket and then hand stitch in place to finish.
13. Embellish the pocket with labels if you have one. Attach the handles using eyelet tool.
I hope you enjoyed my tutorial and have a happy sewing!
Minki
What you might also like
144 comments on “Fabric Mini Basket”
-
-
I use 4 drawer plastic storage carts. They are on wheels so very handy.
-
Use foam “pool noodles” cut to length to roll and store quilting projects such as appliqué.
-
Keep the cat’s away from the sewing machine
-
I try to reorganize abit after each project.
-
After completing project I clean my machine, sort all my leftover fabric and put everything in its place before starting a new project.
-
It’s easy to make a plan but hard to follow through. Putting things away is the key, and pre organizing the room for the next project!
-
I try to put everything I got out the day of sewing back where I got it, that way the next time I sew things will be neat. “I TRY.”
-
-
I can’t give tips for being organized. When I am working on one of my art quilts, it looks like a bomb exploded 🙂
-
Putting things away when you are finished using the. If only I did that.
-
I use a RASKOG rolling utility cart from Ikea. It is easy enough to slide in and out under my sewing table as I prepare to sew or if I need to hand sew, I can wheel it out next to the chair. They also sell plastic inserts with compartments which fit into the tiers. I use them to hold all my little items; bobbins, snips scissors, seam rippers, tape measures, etc.
-
Put things away as soon as you are finished with them.
-
I’ve discovered no matter how many wonderful ways I have to keep my sewing/craft room organized, none of them work if I don’t put things away. So, my best tip for organization is to put everything away when you’re done using it. Sounds simple but not always easy to do!
-
I use plastic storage boxes– one for each primary color. I stack them up in a closet. For projects, again I use plastic storage boxes labeled with the project name. I put the patter or book, fabric, and other notions that I need for the specific project.
-
I am the worlds messiest sewer,chef, you name it totally disorganized. I loose my scissors, marking pens, needles ect all the time. I never remember where I put them. When I am done with a project they go back where they belong, no problem there. Hope someone has an idea to help me keep track of supplies while doing a project.
-
Try making a short apron with multiple pockets to put everything you’re using while working on your project. You can make the pockets as large or small as you need so each one has something you need. Skinny for marking pens, larger for scissors, quick unpick, tape measure, etc. Just be careful the ends of sharp objects are protected in your pocket. Try a wrist pin cushion for pins and needles.
-
-
I keep my sewing room at least fairly organized most of the time:). My biggest objective is after finishing a project I pick up and put away everything left over from that project and anything that has accumulated during the project.
-
Lots of labeled drawers and plastic bins sorted by color and type.
-
I am an organizer “wanna be”. I use craft drawers to organize my fabrics and other supplies, keeping like items together. I try to work on one item at a time, but that doesn’t always happen.
-
I use tubs with labels to organize everything in my sewing room. With several projects going at once and more then one person using my sewing room, it is important to keep everything organized.
-
To help me keep true to the adage “a place for everything and everything in its place,” I use tray to hold whatever tools and notions I need for the project at hand. When my project is finished, I sort everything back to its place. Works for me!
-
At the end of the day,”Put it away!” All the small tools have a designated spot. When I don’t put things away, I loose them. Then I go out to buy another item. Soon after I find the one I lost. When buying items for one project that I don’t plan to sew right away, I try to keep all items together in a specific drawer or box. It drives me crazy to have everything but the pattern when attempting to start a new project.
-
Stacked drawers.
-
I have no tips. I’m so unorganized!
Actually my best tip is that I have a dresser with each drawer designated for different fabric types/interfacing.
-
I try to keep each project I’m working on in it’s own container ( basket, bag, etc) that way I can just grab and work with all the ingredients in one place.
-
small sewing thread snips at each sewing machine and in my sewing basket (also 1 by 6 inch ruler)
-
I label everything and use lots of clear containers so it’s easy to see what’s inside the drawer or box
-
I wish I was more organized, but when I am it is so much easier to come into my sewing room even for a few minutes and get something done. However it seems like every time I get organized, I go to the thrift stores and find excellent deals on fabric and notions of all sorts that gets piled up on my cutting table and then it doesn’t take long to get un-organized yet again.
-
I have a rollaway cart with five transparent drawers where I house my five current sewing projects separated in each drawer – pattern, fabric, coordinating thread, notes, and pieced blocks. It helps me stay organized in my sewing area.
-
Lots of plastic bins to keep everything sorted out.
-
Clean up after every project.
-
My best tip is to staighten up after every project- but I am one of those people who can’t think straight with a lot of visual clutter?
-
Hi! I am an “organize everything” person as I am more productive in working through projects-large and small. I learned many, many years ago the value in organizing my sewing room! My tip? Take a long look at your room, buy any size/shape containers to keep your smaller supplies together. fyi… I keep some of my fabric on bookshelves, others in an amoire and others in a close storage room in the biggest containers sold at Home Depot! I keep all my presser feet in small-sectioned plastic organizers with attached lid. Then I take black Sharpie and label each section. I keep “all things embroidery” together. You get the idea……
So now that your room and sewing area area organized—KEEP it that way by taking a few extra seconds and putting things back where they came from!! Now you have more time for sewing & embroidering!!
Merry Christmas! Linda-
Great organizing tips!
-
-
I use baskets for everything!!!
-
I recycle lots of nice boxes and jars. I will use a fancy candy box that has no writing on it with and maybe keep all my velcro in it. I organize my scissors and tools by using recycled glass jars. I’m anxious to see what others give as their tips….hopefully I will learn a new one. I’m obsessed with the fabric mini basket and hope to make it in the near future.
-
Keep things contained in boxes or drawers. Don’t use bags. Sharp edges look neater and are easier to stack. Pins, scissors, and all little things need to have a drawer home so they are put away when not in use. If you can find a place for it, do so and put it back there when you aren’t working with it. You’ll be happier when you want to start a new project. You will know exactly where to start.
-
I use little hair ties to put around my spools of thread so I don’t have thread unraveling all over. They are the little elastic round ones
-
I use clear plastic containers for notions and supplies and label each one so I can know at a glance what is inside. When I purchase fabric for a project tha I might not start right away I tie it together w3ith a copy of the pattern I’, going to use it for
-
I wish I had a tip…. Maybe when I organize my space I’ll have one to share!
-
I use small baskets, totes and pretty boxes to categorize and organize tools, supplies and books. My favorite tote is one that one of my kindergarteners gave me last year. It is a stylized penguin and is as cute as can be.
-
I am generally an organized person anyway, but I love drawers, shelves, pretty containers. Everything has a place — though some of it apparently has its “place” all over the top of our guest bed, which lives in my craft room. The bed stores a lot of “in progress” projects for me. Last year I bought a 9-compartment shelving unit that stores all my craft supplies/cardmaking papers and stamps wonderfully. The closet and 2 cupboards play host to my fabric. Two plastic containers travel with me every time I go out of the house to sew, and all of my needles, threads, presser feet, etc. live in those.
-
Always looking for a way to help with all the little pieces and tools so they stay in one place. It is alway amazing how thing go missing while you are sewing.
-
I like to use those stackable wire cubes. They’re inexpensive, modular, and you can supplement them with the collapsible canvas boxes that will slide neatly inside a wire cube.
-
I like baskets and bowels
-
I use baskets and bins for everything in my old house with only 1 full size closet – the others are under stairs or in corners or 15″wide.
-
I need all the tips I can get. My sewing room is a disaster as I write. Maybe I will get organized after Christmas.
This cute mini fabric basket could be very helpful. Thanks -
I like baskets and bins
-
Hi, I like to keep a small scissors snip close to my sewing machine on a magnet. Keeps a scissors close by! Thanks for sharing! MERRY CHRISTMAS ALL!
[email protected] -
Oh man, I am not organized, cause my sewing area is a small portion of my bedroom. I have taken over multiple dressers
-
I keep a small basket on my sewing table to keep all my sewing odds and ends from cluttering my table. I also use a Matchbox cars plastic storage box to store all my thread spools. It’s the perfect size. I also use plastic shoeboxes to store all my large fabric scraps and organize them by color.
-
Baskets and bins help keep my sewing room organized.
-
Organized? Wow…clean as you go. If in fact you have properly organized in a way that makes most sense to YOU and have everything easily accessible, putting it away and keeping it organized and the space uncluttered should be easy…in theory anyway. Does it work for me? Sure…maybe…
-
My sewing space is cluttered while I am working, but when I finish a project I put everything away then clean and oil my machines before getting out supplies for the next project. That is my best tip for staying organized.
-
I use bins for my fabrics which I sort by color.
-
I use lots of plastic containers. I have at least a couple dozen clear plastic shoe boxes. When I start a project, I keep all the parts together and then I don’t lose them. Should I work on another project, (I always have several going at once), it is easy to find the project I want to go back to.
-
I have a desk with a cupboard and shelves under it which fits my Bernina, and
various canisters for holding sewing accessories. The shelves also hold my sewing basket so everything has a place and space. -
“When in doubt, throw it out!”
Really it’s “When in doubt, give it away,” but that doesn’t rhyme. This policy ensures I always have room for something new! -
A bin for every project so I can clean up and put away each day!!
-
Everything in its place. I have lots of baskets, pencil holders, etc. for everything. When I am done working on a project everything gets put away.
-
Keep your tools in the same place…all the time. Rulers/rotary cutters always on my mat; patterns all in one place, and pins always by the machine. Like most of the people who commented, being organized is nice, but in my little world, I’m much more excited to keep working on a project, and then frustrated when I can’t put my hand on something I know I have! Help me be more organized!!
-
My label maker. I have lots of drawers and having them labeled makes finding things so much easier.
-
Put tools and fabric away as soon as am finished with them. Of course, sometimes it takes a very long time to finish!!!!!
-
I have places for everythig and find if I PUT THINGS BACK that I can stay pretty well organized. I have each project in its own labeled box and shelves for allthe boxes!
-
I like to have a small pad of paper close by to write reminders for current projects. If I change the size of a stitch I am using, and have to stop before the project is completed, I jot down the stitch # and it’s length and width. When I return to my sewing room, I check my notes and can get back to the correct stitch without wasting time guessing!
-
I try to organize my sewing materials in a basket so as to find them.
-
I have a large sewing table with 2-3 baskets that my supplies go in while I’m sewing. Everything goes back in it place once I’m finished sewing for the day. The project I’m working on may stay on the table so I have easy access to it for the next sewing session.
-
I like to keep my fabric folded inside plastic shoe boxes. This is a great fabric box
-
Hey! I have been following Minki Kim for a while now through feedly. Super happy to see her pop up here:D
My tip is to have a place for everything and put everything in its place. That first part is key, otherwise, the second part can’t happen!
But, like so many others, I don’t follow this tip well, so I have a second tip: get a large tray (mine is a big 24″ whicker basket type serving tray) and as you craft, keep everything within its confines. This helps quickly move it around the room and stash it in a closet if you need to hide it pronto! It keeps the mess from getting out of hand, which makes finally putting things away much easier, to boot!
-
Put it away after I’ve used it…Sometimes it’s hard to do…
-
The only way to stay organized for me is to clean up my work area each time I finish a project. It makes it easier to start the next project without all the clutter that accumulates while working on a project.
-
Wish I had a sewing space! Working on room I usually use so am using dining table. Best advice is to label storage you use.
-
I keep everything organized in baskets. I need to know something is where I left it. Problem being I have a husband who has PTSD and moves stuff then he doesn’t have a clue where he moved it too. I have resorted to hiding my favorite sewing tools. If Alzheimer’s every hits me it is going to be a treasure hunt for my daughter to sort through.
-
To stay organized in my sewing work space, I have all supplies sorted in clear bins with labels on the bins. That way I can find everything quickly.
-
I have a closet in my sewing studio. I stack see – through containers that are labeled in my closet. After I complete projects, l sometimes reorganize to make better use of existing space. It feels good to vacuum and clean after finishing the old before diving into the new!
-
My favorite tip to to put everything away back in it’s proper spot when I am done so I can find it again when I want it. I do let the sewing room get to be quite the tornado at times, but when I’m done, everything gets put back properly!!
-
Keeping projects in plastic ziplock bags or boxes with the thread, zippers, etc. helps me stay a bit organized..
-
A waste basket handy near my sewing table, and a sweep up at the end of the sewing session.
-
I try to keep things in bins, baskets and tins. When they need to be moved its easy, the trick is to always keep similar items together.
-
At the end of each sewing “session” , I take 10 minutes to do a clean up. Everything back in its place. It makes it much more desirable to start another sewing session. Everything is tidy and ready to start again!!!
-
I put fabric away after finishing a project, before starting the next! Thank you.
-
I’m so much more organized now that I have a peg board!
-
Cute basket! One thing I like to do is to put bobbins/threads or presser feet in a ramekin to keep things together when switching back and forth while I am working on a project. Thanks for the chance to play : )
-
I agree with everyone else’s comments. Best advice for myself is clear the work space before I leave the area and don’t let things pile up ‘for later.’ A place for everything and everything in its place… I know is has been said before, but its perfect advise for me.
-
My best tip is to label containers, drawers and bins with what is inside. Once you read the label, you can quickly decide if that’s what you’re looking for. No more digging and searching through each one!
-
Clean up a bit each day you sew – put in place items you won’t need when sewing the next day. This helps declutter the space daily.
-
I have a 24 drawer CD cabinet that I rescued from side of the road. We painted it white then used small vintage spools of thread for drawer pulls. Then we labeled each drawer to place sewing notions in.
-
I like to organize fabric and thread by color so that finding matches is less stressful.
-
I have a plastic carry case that looks like a fishing tackle box. It has 3 layers in it. I put all of my sewing notions like seam rippers, needles, pins, thread wax, small 6″ rulers, pens, pencils–just anything small that could get lost. It’s all right there easily accessable. When I have a class all I have to do is pick up the “tackle” box and off I go.
-
I made a peg board and painted and framed it, that way you can see where things are but it’s also easy to put away.
-
I don’t clean up much when in the midst of a project but when done I cut my scrap pieces to a 2×3.5 size and throw in my basket set a side for a scrappy quilt.
-
I’m like so many others and wish I was more organized so that I actually had a good tip.
-
I would like to ask if these project pages offered a nice pdf file for downloading.
-
Hello sewtired, thanks for your comment! While we don’t offer the tutorial already formatted in a PDF file, fans are able to use different methods to print from computer. You might try printing from your browser, either saving the tutorial as a PDF file for later reference, or sending straight to your printer. Happy sewing!
-
-
Lots of cubbies, bins,magazine files, and a large bookcase. I always tidy up my sewing when I start a new project.
-
I shop my local thrift shops to recycle what they have, such as an old jewelry box, that has now become my hand sewing box, or cupcake tins to hold buttons by color for when I am working on a project. I also keep my eyes peeled for things, like the accordion style wood cup holders to hang aprons or bags. If it isn’t in good condition, I clean it up and paint it to match my color scheme of the day! Keeping things simple makes more time for making!
-
I have to have my sewing room organized in order to sew. Not to say my sewing room stays neat as I I sewing because it isn’t. I clean up after each project and put everything in the right place.
-
The best and easiest thing to do is
Tidy up and put everything away at the end of each sewing session! That way you know where everything is when you come back, and/or your kids have not run off with it:). Mine have a strange attraction to using my sewing feet as pretend skateboards for shopkins and other small toys:) -
I just got some clear thin plastic dividers ant to separate TShirts, but I am going to stack my fabric between them to get better organized!
-
Pick up all usable fabric scraps and place them in a basket for cutting and using later. I get into a routine of unplugging my iron and coiling the plug on my pressing board so I don’t leave the room without it turned off. Put all trash in the small can and empty it. Cover my machine. Next time I walk in to my studio, everything looks fresh with nothing to clutter my creativity. I also have many clear plastic containers labeled for zippers, lace, cut fabric squares, etc.. One of the must useful clear containers are my large plastic ones I buy from the hobby stores that have a closeable top – perfect size for 12 inch quilt blocks or to hold current projects – plus you can stack them as high as you can reach.
-
After each project I try to put everything away and start with a clean slate. You notice I said ‘try’.!!!!!
-
Put it all away! I have trouble putting things away as I need to have things out in order to be reminded to work on them, but if they’re FINISHED I have no excuse! Thanks for the giveaway.
-
I will make this one for sure. The only tip I have is put things away after you use them
-
Lots of baskets and tubs to organize fabric and sewing items (check out dollar stores and discount centers). I always return things/items to their appropriate space after I have finished with them.
-
I have just had my sewing room redone and I have collected really useful boxes and organised my stash. We’re Beril sits(that’s my Bernina 770) on IKEA tresal table which works really well, I have Curver baskets small and medium so that all things stay in the right place and on hand when I want them, it really looks lovely and works for me.
-
I like to have a waste paper basket right at my feet for all the threads and cuttings so that the area stays free of waste.
-
“PUT IT AWAY” AND DON’T FORGET “TURN OFF THE IRONS” The last thing I do before leaving the room. If its a necessary item I put them to one side in a small container but when the project is done, It needs to go to it’s home.
-
I have two large pegboard walls in my studio. They are incredibly helpful in organizing embroidery hoops, rulers, cutting tools, temporary spray, machine oil and much more. Everything is visible and easily accessed and stored. It’s easy to clean up during or after a project by hanging everything back in its place.
-
I use a revolving chef’s tool holder to keep my sewing and crafting tools organized. And a book shelf for fabric. My pdf patterns I keep in note books…each pattern and instructions gets its own sheet protector. Of course I keep my favs in one go to notebook!
-
Use clear plastic lightweight see through plastic boxes/containers that stack well. I place coordinating fabrics and /or projects in them so they can be kept together and easily viewed. They also hold embellishments like lace, yarn, ribbons,patterns etc. Then use plastic boxes for thread. All of these stack neatly on shelving units and can be easily nested on bookshelves next to quilt books.
-
i try to keep things organized by keeping each project in a seperate container. So far this has worked for me. When i need to work on a special project i just grab the right container and everything i need is there.
I even keep my extra fabric in clear totes so i know which one to grab when i need a special color for a project, all stacked nice and neat in my book shelves. -
I always put my sewing essentials back where they belong and I always check my bobbin and clean my machine if I have done a lot of sewing. I also love these kinds of baskets for keeping my little red clips, my pattern weights, and fabric scraps in. Always helps to have piles neat and threads cleaned up. Love this basket pattern!!!
-
If you have a lot of stuff and not enough room for the stuff you have, it is a struggle to be organized. This is what I have found in my case and probably most of us have this same situation.
So when i start a project, I organize the materials I need in one place. I give myself the grace to let the clutter accumulate during the project.
When I finish the project, I’m free to reorganize and in doing so often find some buried treasure and a project to go with it. Then i start all over again. No stress.
-
-
I love Tins and collect them in all shapes and sizes to put my sewing utensils into. I have several for each of my 3 machines! This makes clean up easier when I’ve sewn too long and am too tired to think and remember where I put things the next day! 🙂
-
I can think of many ways this little basket will come in handy. Plan to make several for gifts!
-
Your little basket is adorable! Thank you for the tutorial. 🙂
And thank you for the chance to win an autographed edition of SEW Illustrated. How fun to win that! Great prize.My best tip for staying organized is an oldie but a goodie: But things away as soon as you are finished with them. That so keeps down the clutter. It helps to have a place to put everything…..
-
I always tidy up the room completely, sharpen all tools, change sewing needle and put a drop of oil in my machine after each project. I have fun while sewing amongst the clutter. Little containers like these are all over my sewing room keeping like items together. Have even used them to store fat quarters.
-
Never let it get to the point it becomes overwhelming to start again. Always clean up and put away clutter
-
Clean up at the end of each day, no matter what.
-
I use see through boxes and foam pieces to wrap my materials. If I could just make myself put everything away after use it would be great.
-
Small plastic drawer sets, 15 x 15 x 3 lidded clear plastic project boxes and tubs, lots of tubs. Time to return items when finished for the day.
-
I try to keep individual projects in baggies while working on them or switching back and forth
-
I use little rope or fabric bowls by my machine to catch feet and other odds and ends while sewing. Try to put everything away at the end of each project, back in the shelves or storage boxes. Then everything is clean and ready for the next project.
-
Still so hard to keep my sewing room tidy because it’s very small, but I put things back after my projects.
-
I am typically a well organized person; but when it comes to sewing, those skills just don’t work. At the ‘end of the day’ ie when the project is finished, I intend to put things back where they belong; but by the time I’ve finished, I have begun another project. So there’s no point to put things away just to get them out again.
-
Limit myself to two projects and keep the required notions; patterns & instructions; threads in a “project” basket. Then put everything away from that project when it is complete.
-
My tip for staying organized in the sewing room? I have a designated place for all my tools. I have a scissor caddy just for scissors, ruler rack for rulers, mason jars for marking tools and next to my sewing machine is a mini trash bin and a bobbin donut.
-
My organizational tip is forget about being organized and be creative! Clean up when you are done!!
-
I have a place for all my notions and supplies. As I work I keep things in a tray and replace everything as I
finish with notions, tools, and supplies. Everything has a place and everything is in it’s place. Happy Holidays! -
1) organize projects into ziploc bags, or for larger projects, lidded plastic storage boxes
2) clean up after a project is completed….tools away, thread re-filed, usable scraps stored, pattern filed, waste scraps tossed or recycled. Machine cleaned and oiled. -
I have stackable racks to increase things that I use most often right in front of my workspace. Everything is within reach and I TRY to put items back immediately.
-
I try to put things away as I go
-
Everything has a special place. Put it away when done and clean up at the end of the sewing session
-
After years and years of quilting, working on multiple projects at a time, I have come to learn that I need to put EVERYTHING that is relative to a project into one box or bag or whatever you use. That means, thread, fabric, pattern, backings, stabilizers, and embellishments, along with whatever you have finished to date. Makes it really easy to pick up where you left off and not get discouraged cause you have to spend an hour looking for everything you need again.
-
I too tidy up after each project because I can’t work in a messy room. I don’t begin a new project until the old one is completed (except for hand sewing which I do in front of TV). My fabrics are kept in labeled plastic boxes from Costco, and color/theme sorted. So are my stabilizers and patterns. My son built me open shelves to keep the plastic boxes on – at a glance I can see what’s in them.
-
I bought 12×18 galvanized steel sheets from Lowe’s, covered them with pretty contact paper, and stuck them on the wall next to my sewing machine with Velcro command strips. I populated these sheets with magnetic shelves, boxes, and bins to hold my notions. Looks pretty and all my notions have a home.
-
I have 3 machines and a serger. I keep a duplicate set of basic tools in a stand up organizer at each machine such as thread snips, tweezers, small flashlight, lint brush, oil, sticky notes, pencil, blue tape, 6 “ ruler, pin magnet holder, fabric clips, bobbins, wooden chop stick, magnifier, and seam ripper.
-
i use an old ironing board that is hung on the wall and hang my rulers, rotary cutter, etc. from peg board hooks, so everything gets put away after use.
-
I have a very small sewing room with 2 machines, a cutting table and a cabinet. That is all that fits in that small room so to make more storage I added lots of shelves that hang on the walls. Everything has to have a place and I utilize every corner and storage container. The shelves are the wire closet shelving so I can also hang things from the bottoms.
-
I keep small baskets like these and others everywhere in my sewing room, and always clean up after each project.
-
I am a “Oh I like that material buyer and then try to get everything from contrasting/completing colors and thread.” I had an idea of what I wanted to do with it when I bought it, but find when I am ready to move to that beautiful material, I have forgotten what I wanted to do with it. I have plastic storage boxes so when I make a purchase(s) I place all the items I purchased for the project in the single box. I also put on top of the material the project or pattern I thought about using inside the box to help me remember. The clear plastic box allows me to see the material within which pulls me to working with the fabric/project
-
Keeping my sewing space neat and tidy
-
The pattern misses a step between 8 and 9 where the long rectangle gets joined to form the cube. And the bottom square should be sewn with a 1/4 inch seam allowance, not 3/4.
Leave a Reply
You must be logged in to post a comment.





My favorite tip is “Put everything way before you leave your room.” Now I just need to figure out how to accomplish this. LOL