Hat Embroidery
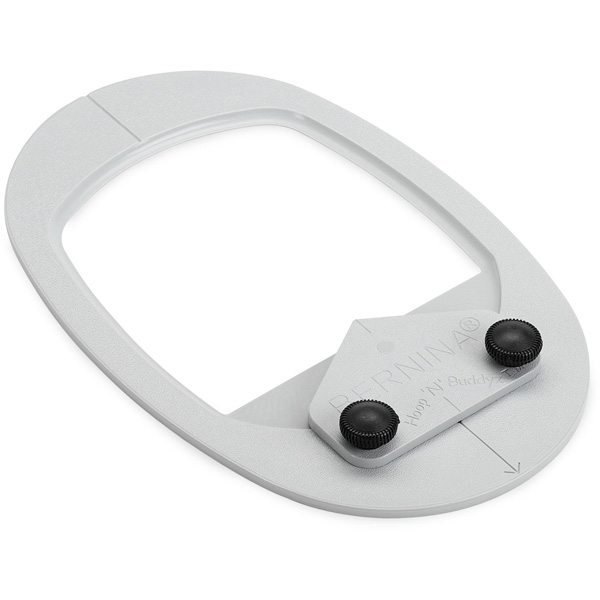
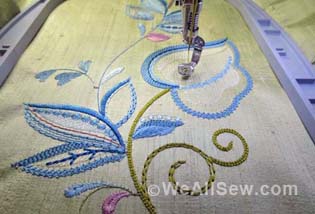
Ready for warmer weather and outside fun? Ready for a new cap sharing the season’s desire for new growth and beauty? Creating an embroidered cap on my home single needle embroidery machine was quick and fun. I used the embroidery accessory that is a hoop insert called the Hoop ‘N’ Buddyz. This insert will make it easier to embroider a cap on my BERNINA embroidery machine. I used the BERNINA 790 PLUS, but the insert works with the Large Oval embroidery hoop on most BERNINA embroidery machines.
Caps are a very popular accessory for all ages both male and female, and I bet you have been asked if you could embroider one or two!

Note: Check your machine to see if the Buddyz hoop insert is listed as an available embroidery hoop option, as you do not want to cause damage to your machine.
The Hoop ‘N’ Buddyz cap insert is compatible with the BERNINA large oval hoop and embroidery capable machines from the B 180 E model to current machines. You will find the Hoop ‘N’ Buddyz insert as an option in the hoop menu in our current line of embroidery capable machines. If your BERNINA does not have the Hoop ‘N’ Buddyz insert as an option in the hoop menu (with the exception of the B 830 E model, see below) you can select the large oval hoop and position the embroidery design to the upper area of the hoop. Use the Check feature to confirm that the design is within the available stitching area of the hoop insert and will be in right place when you begin sewing.
With the B 830 E model, the Hoop ‘N’ Buddyz cap insert is only compatible with the most current firmware update. Please check with your local BERNINA store to make sure you have the current update before attempting to use the Hoop ‘N’ Buddyz cap insert with the large oval hoop in the B 830 E to avoid damage to your machine.
It was fun to play with embroidering on caps. I thought I would share a few tips and tricks that will help you have fun also!
Materials Needed to Embroider a Hat
- Cap—unstructured (unstructured cap works best, the inside of the unstructured cap has no support material, it is not stiff and has more flexibility)
- OESD StabilStick TearAway Stabilizer
- Isacord Embroidery Thread
- BERNINA Drop-Shaped Embroidery Foot # 26
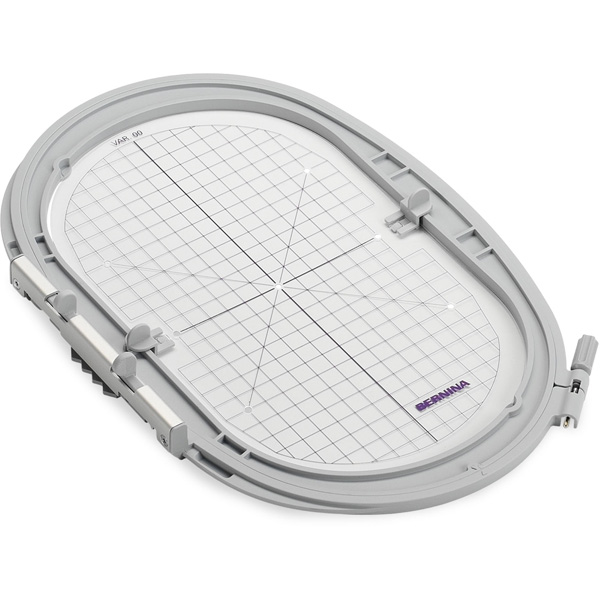
- BERNINA Large Oval Hoop
- BERNINA Hoop ‘N’ Buddyz hoop insert
- Embroidery Design (prepared to fit the stitching dimension area of the Hoop “N” Buddy)
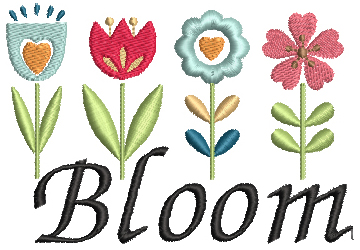
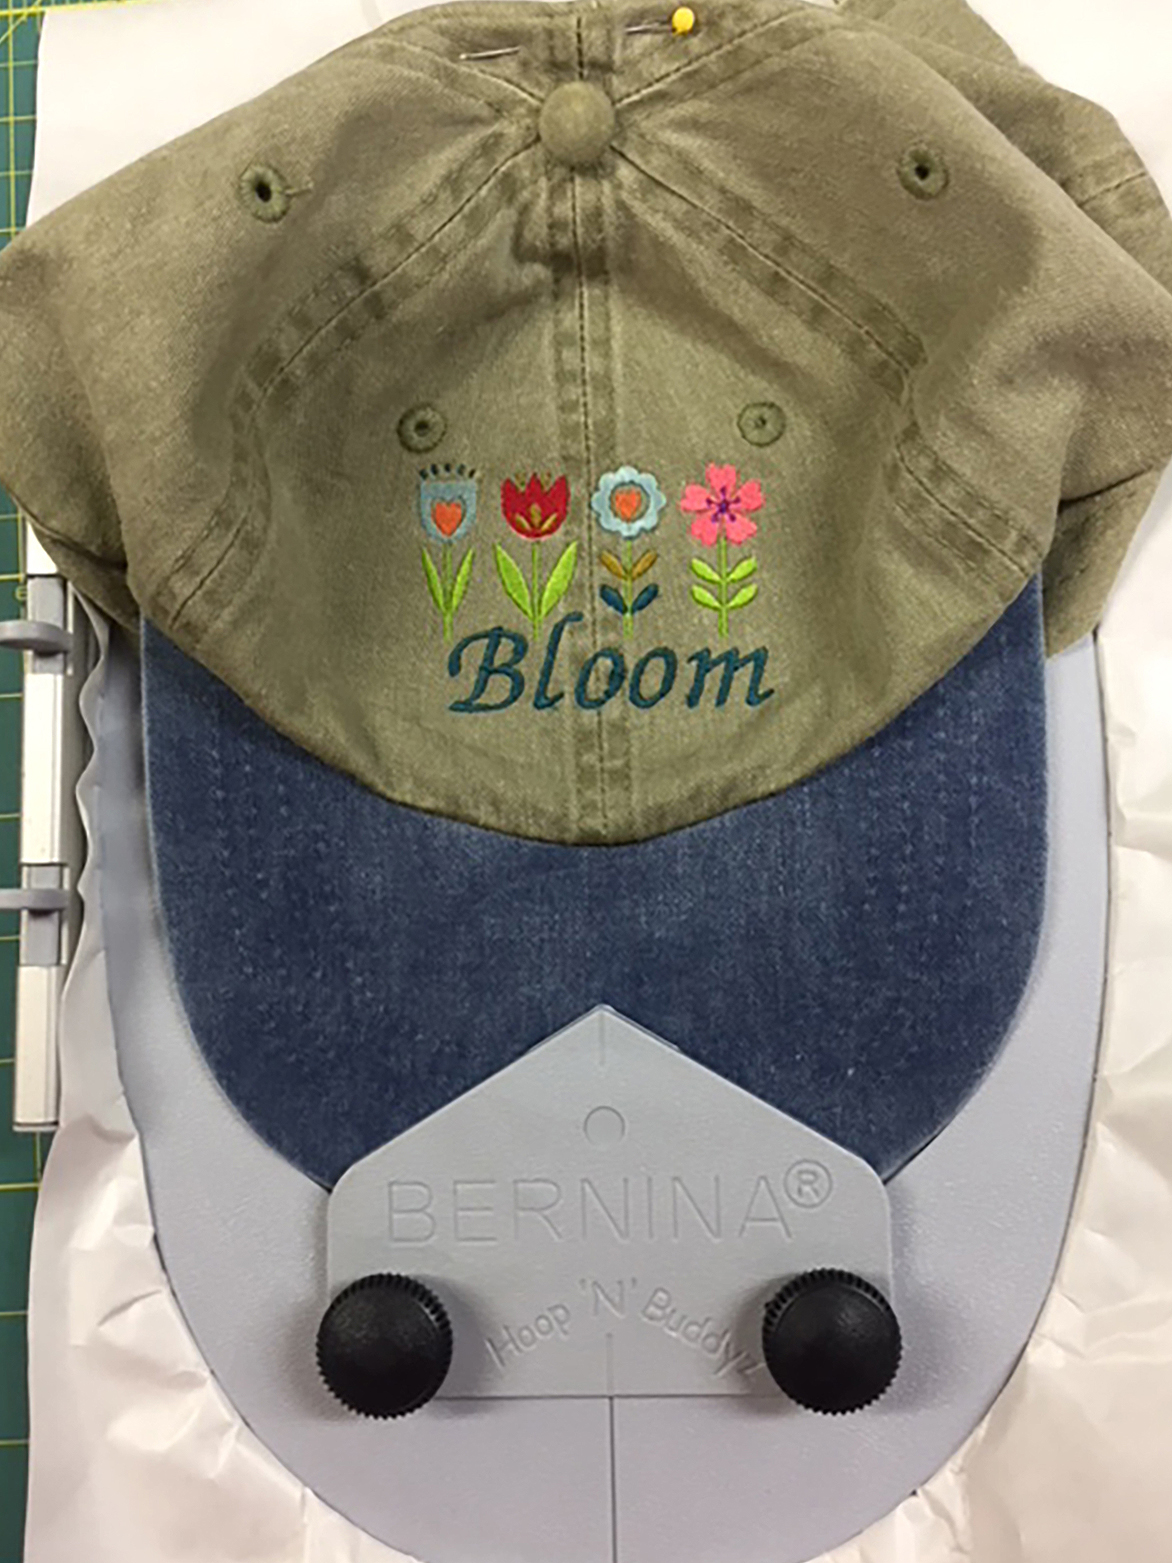
- Note: The design used for “Bloom” cap is from the B790 PLUS design folder # 3 Children Embroidery Category, and the lettering was created using the Zürich font from the Alphabet Folder.
Setting Up the Embroidery Design
My design was set up using the BERNINA 790 PLUS embroidery machine. The Group/Ungroup and Rearrange tools made it so easy to get the design ready for embroidery.
In addition to the BERNINA 790 PLUS, the BERNINA 880 PLUS, B 700, B 590 and B 500 Embroidery Machines also include the Ungroup/Ungroup and Rearrange function.
Setting Up a Cap Design on the BERNINA Embroidery Machine
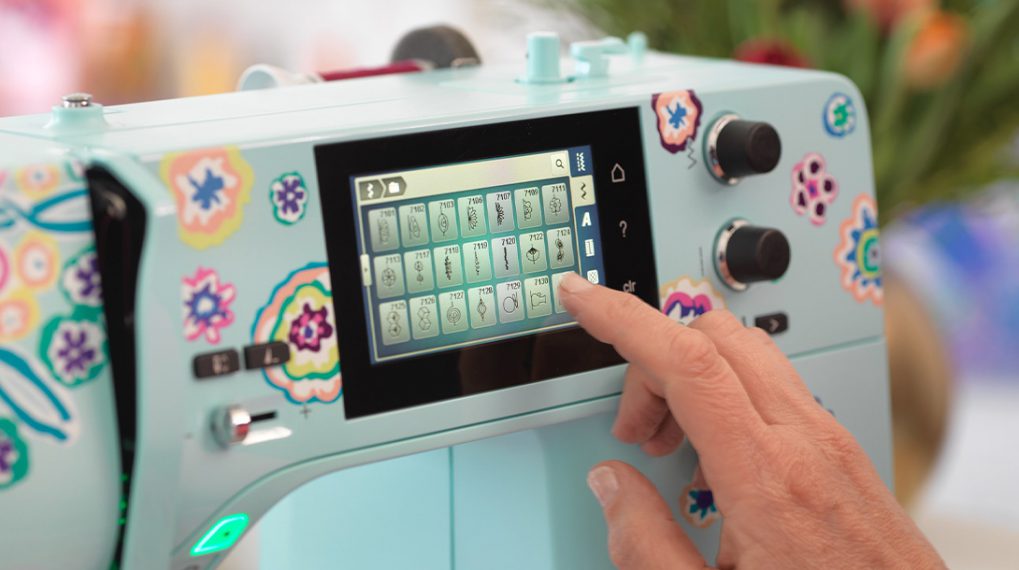
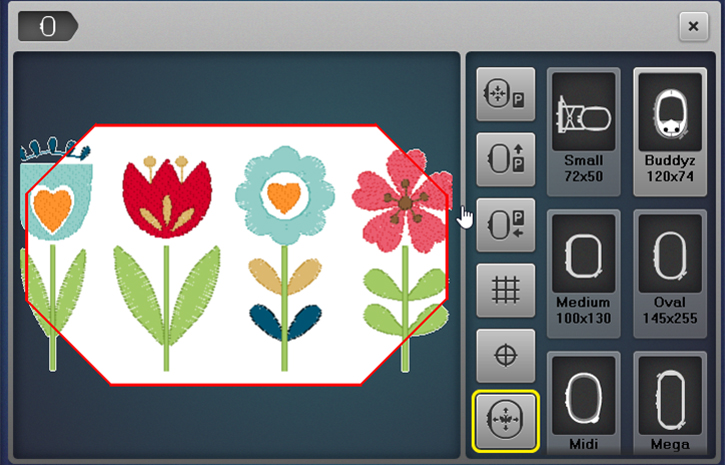
Select a design. (The design shown is a built-in design on the B 790 PLUS, Folder 4/Design 4.)
Touch the Hoop Selection/Hoop Display icon to the left of the editing screen. Choose Buddyz from the hoop selection menu.

You will then see a representation of the hoop in the Hoop Selection/Hoop Display screen. Close the hoop menu.
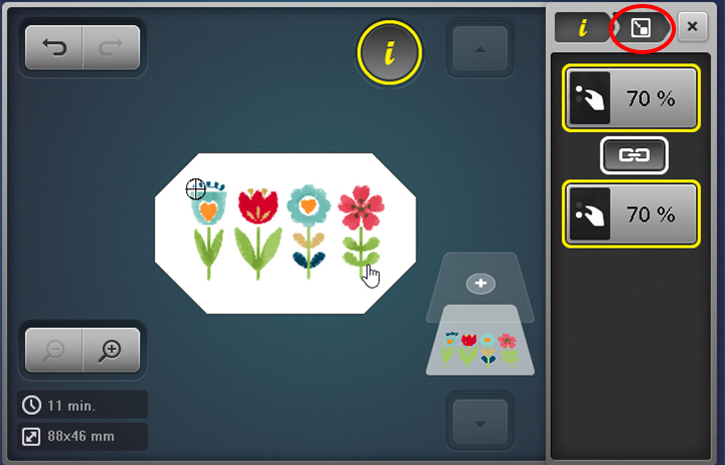
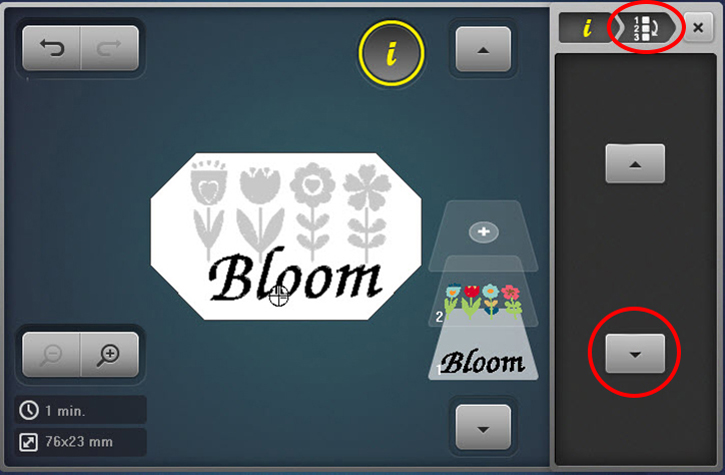
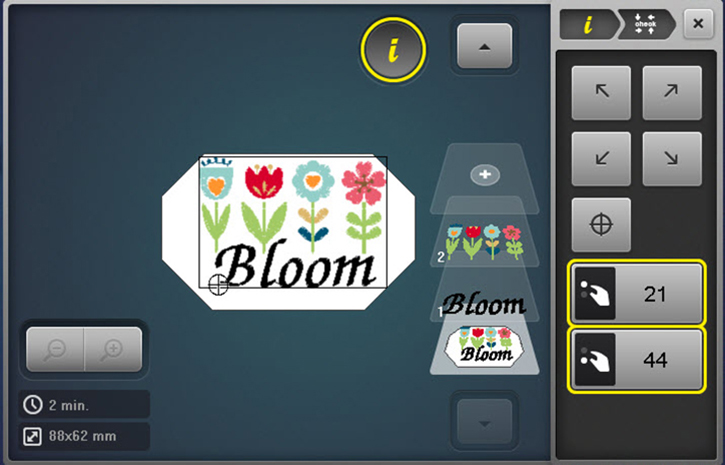
Touch the Information (“i”) menu, touch the Altering the Size icon. Change the design size to fit into the stitching area.
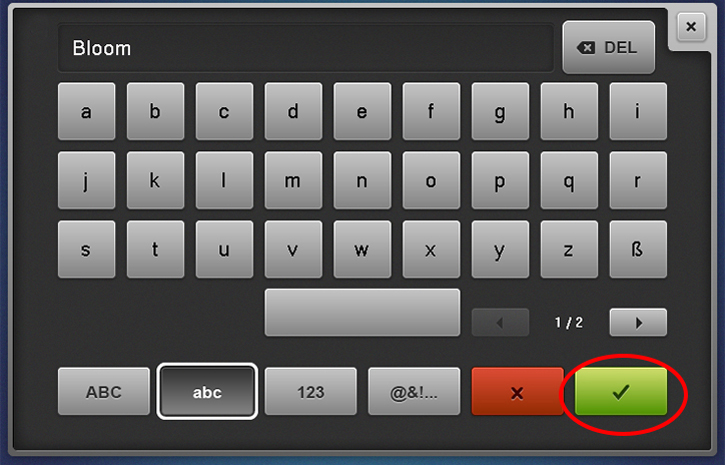
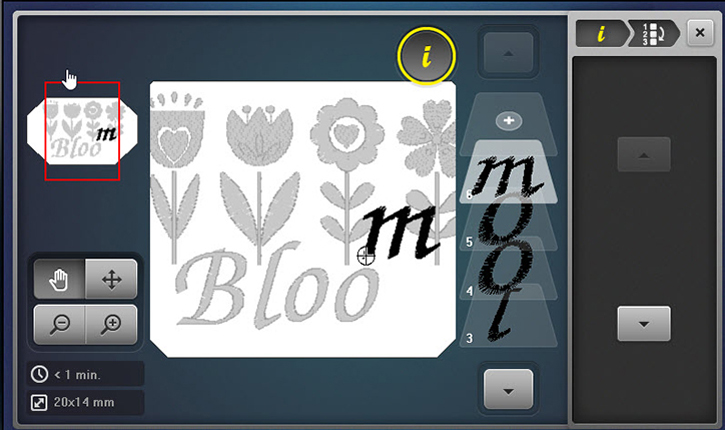
To add lettering, touch Add Motif (the “+” at the top of the Layer Panel). Touch the Embroidery Computer (machine) icon, touch the Alphabets folder, select a font folder of your choice (Zürich is shown), and type in the letters of your choosing (Bloom shown here–upper case “B”, lower case “loom”). Touch the green check to Confirm.
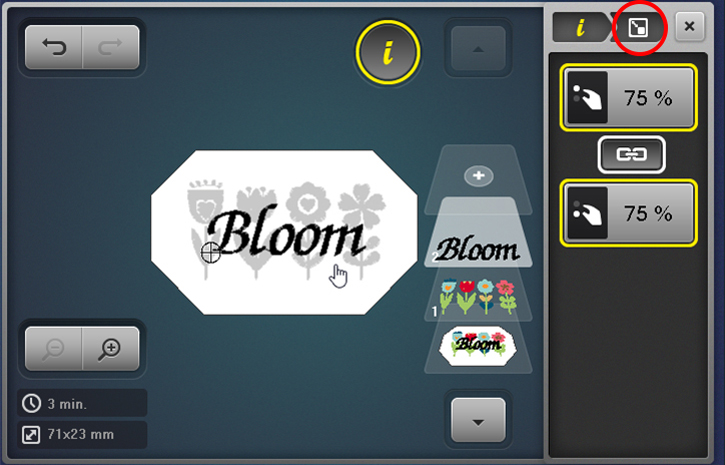
Select the “i” menu and touch the Altering the Size icon. Change size to fit stitching area.
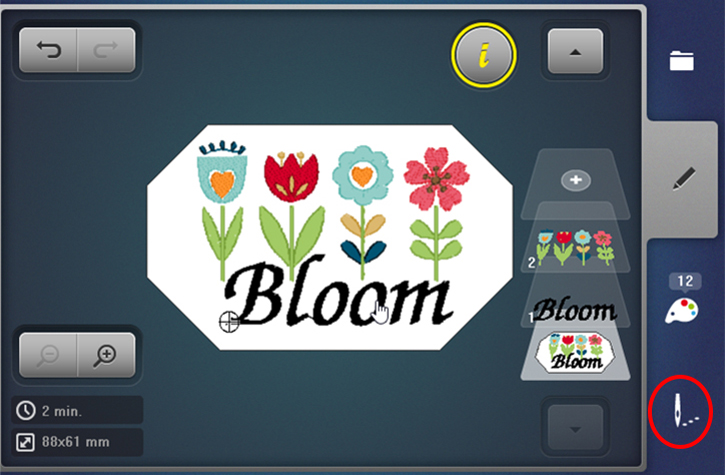
With the wording selected, touch the yellow “i” in the breadcrumb. Scroll down and touch Group/Ungroup. In the screen that opens, touch Ungroup. The lettering is now composed of individual letters.
PLEASE NOTE: The Jumpstitch Length must be set to its lowest number to ensure that the letters will ungroup properly.
Select individual letters by touching them on screen or in the Layer Panel and position them as desired.
Use the Zoom Plus and the Multifunction Knobs to be more accurate with placing the letters.
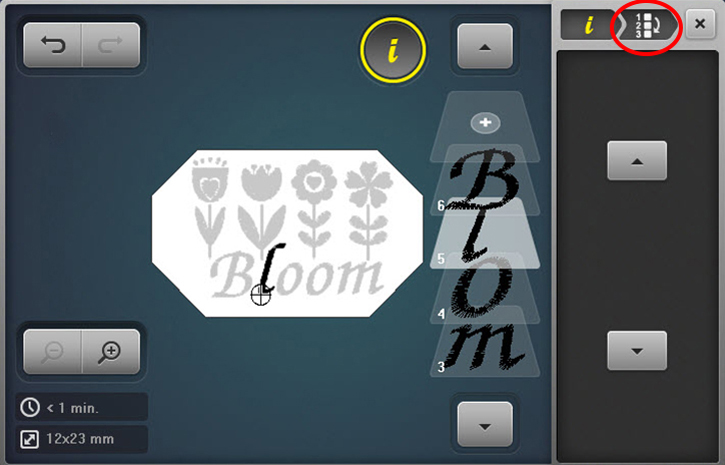
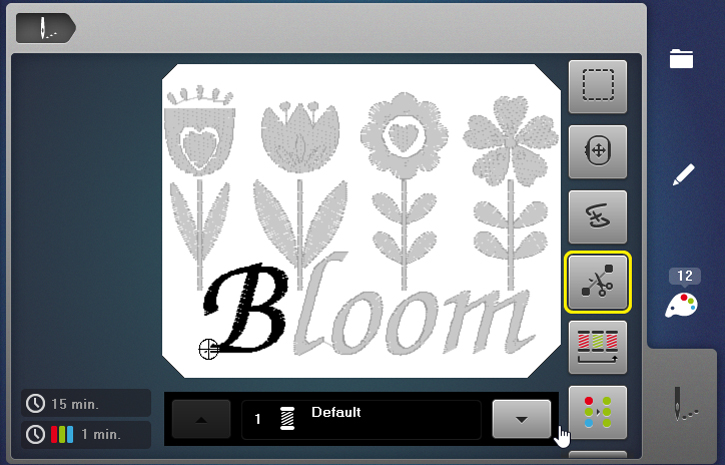
Touch the yellow “i” in the breadcrumb. Scroll down, touch the Rearrange Stitch Order icon.
Rearrange the letters in the Layer Panel so that the letters begin stitching from the center out. In this example, the second “o” and the “m” should stitch first, followed by the first “o”, the “l”, and then the “B”.
To do so, select the uppermost “o”, and use the down arrow to position the “o” below the “B” in the Layer Panel. Repeat to move the “m” below the “B”. The “o” and the “m” are now arranged to stitch first. Now move the top “o” just above the “m”, followed by the “l” just above the “o”.
Now we will regroup the letters into a single layer.
Touch the yellow “i” in the breadcrumb. Scroll down in the edit menu and touch Group/ Ungroup. Touch the bottom “o” in the Layer Panel; then select the Group icon.
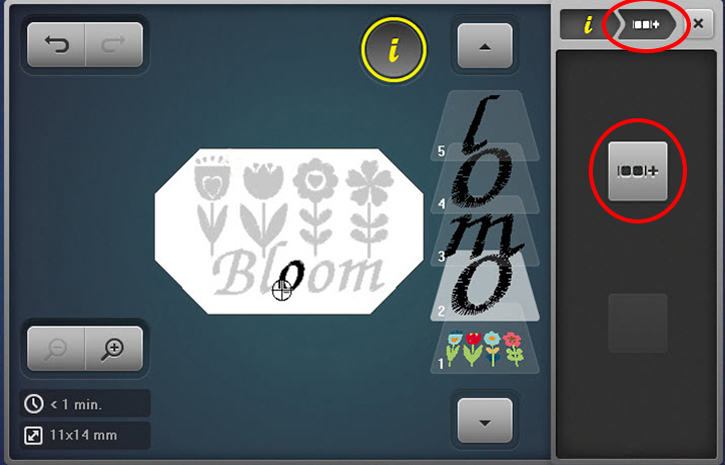
Continue in this manner until all letters are in one layer.
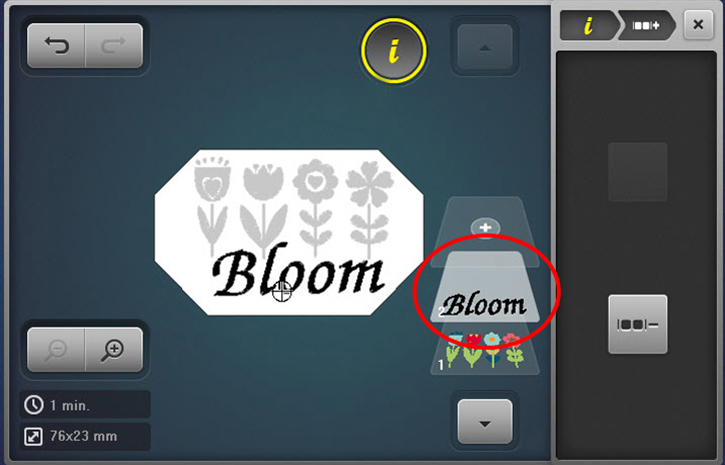
When stitching caps, the best results are achieved by stitching the design from the bottom up (starting with what is the closest to the cap brim. We need to move “Bloom” to stitch first.
Touch the yellow “i”. Scroll down, touch Rearrange Stitch Order. Use the down arrow to move the lettering to be the first thing to stitch (Layer 1 in the Layer Panel).
Close the editing screen, touch the Embroidery OK (needle icon) to open the stitch ready screen. Prepare and hoop the cap, and it will be ready to stitch.
The design in ready, it’s time to stitch the cap.
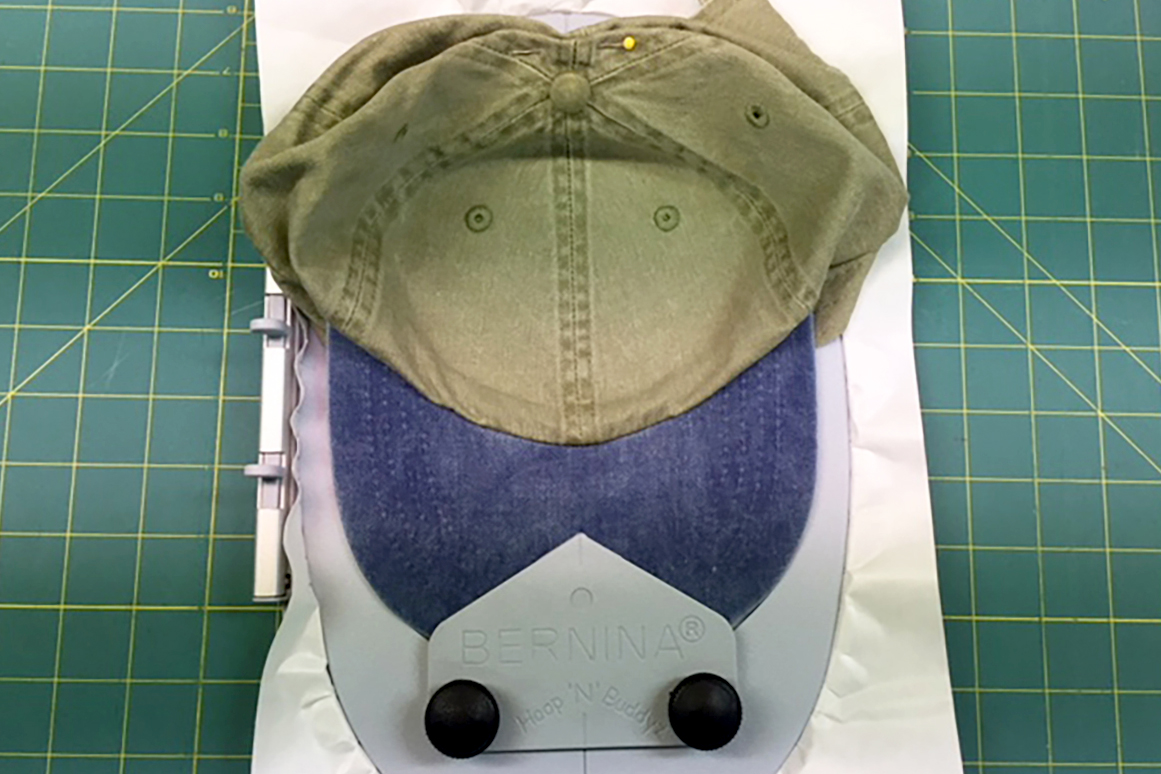
Prepare the Oval Hoop, Hoop ‘N’ Buddyz Hoop Insert and the Cap for Embroidery
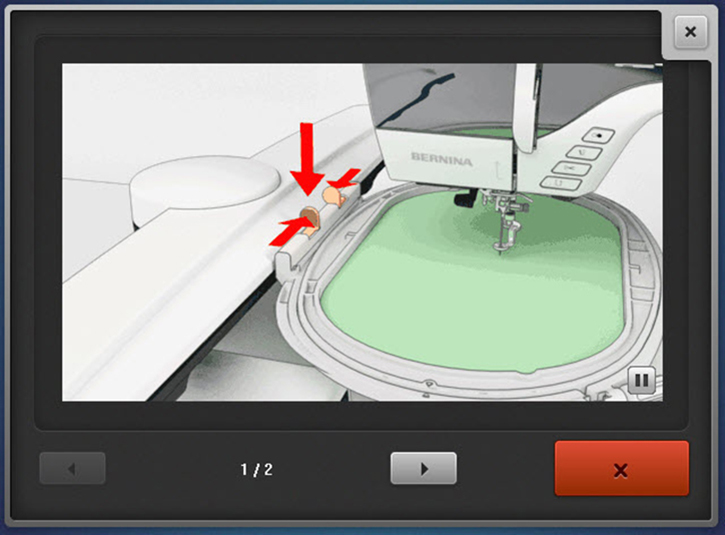
Click HERE to view a tutorial with step-by-step instructions on how to prepare the Oval Hoop, Hoop “N” Buddyz Hoop Insert and hooping the cap, as well as instructions on many other the BERNINA hoops.
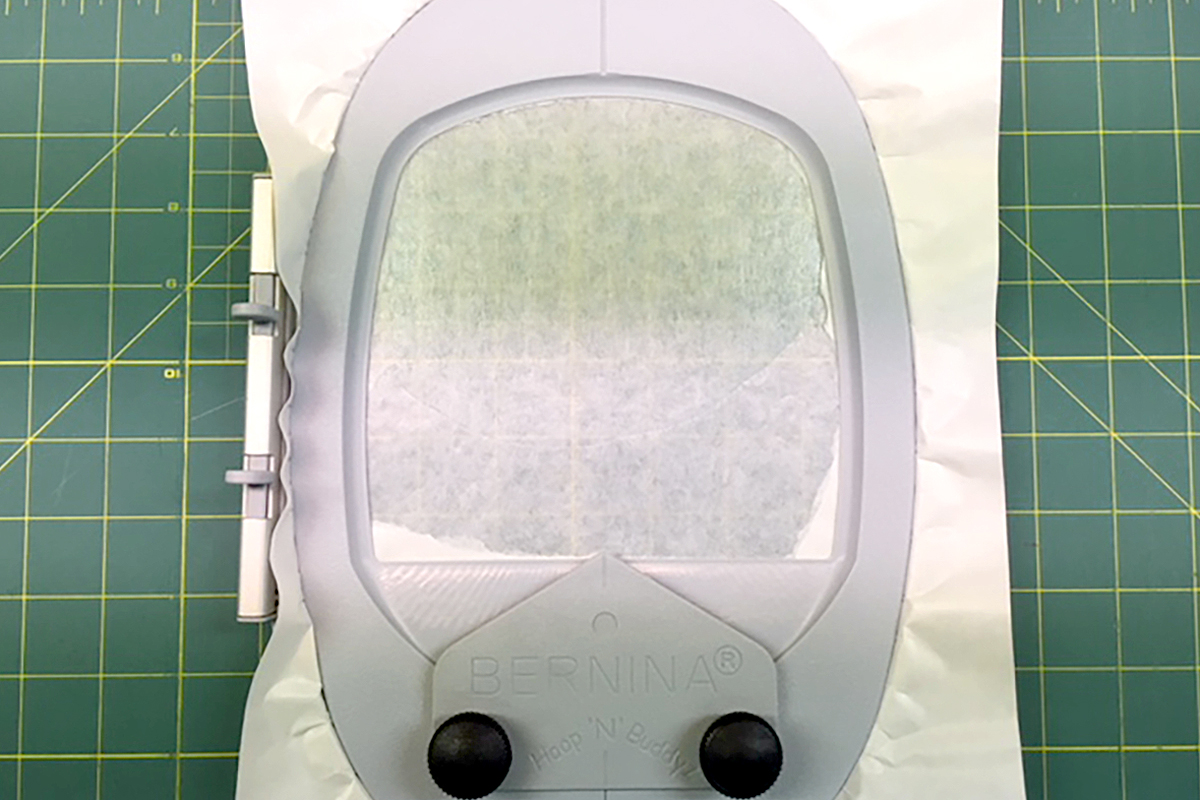
Remove the paper coating from the paper- backed adhesive tear away stabilizer attach it to the back of the hoop insert. Place the hat hoop insert into the outer ring of the oval hoop. Tighten the screw on the outer ring to secure the hat hoop insert. Be sure to align the arrow on the hoop insert with the arrow on the outer hoop ring to make sure the insert is correctly inserted.
Prepare the cap for embroidery, unfasten any snaps, clamps or straps and flatten the bill of the cap. Also make sure that the sweatband is pulled out toward the cap bill.
Attach the cap to the hoop insert. First loosen the clamping knobs on the insert. With the cap right side up, insert the brim of the cap into the hoop insert clamping plate and slide it underneath as far as it will go. Be sure to align the center of the cap with the center line on the clamping plate. Tighten the clamping knobs to secure.
Smooth the cap onto the stabilizer starting at the front and pressing to the back, smooth and pull the excess cap fabric to edges of the hoop insert.
Touch the Embroidery OK (needle icon) to open the stitch ready screen.
Attach the hoop to the machine when prompted.
Touch the yellow “i”. Scroll down, touch Check Motif Size. As you touch each of the four arrows, note the perimeter placement in the Hoop ‘N’ Buddyz hoop insert. Touch the Motif Center to determine if the design is in the center of the hoop insert. Adjust as needed using the Mulitfunction Knobs to move the design.
Touch the Embroidery OK (needle icon) to open the stitch ready screen.
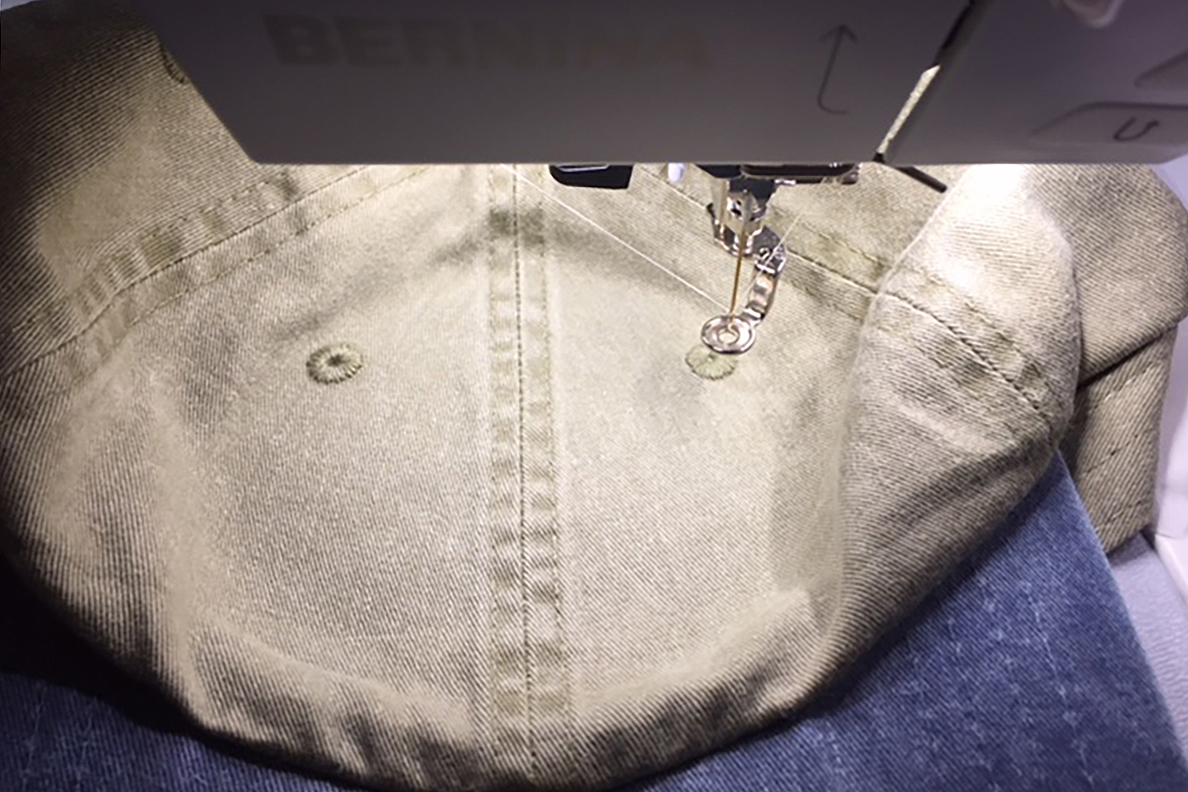
Touch the Start/Stop on the machine and stitch the cap.
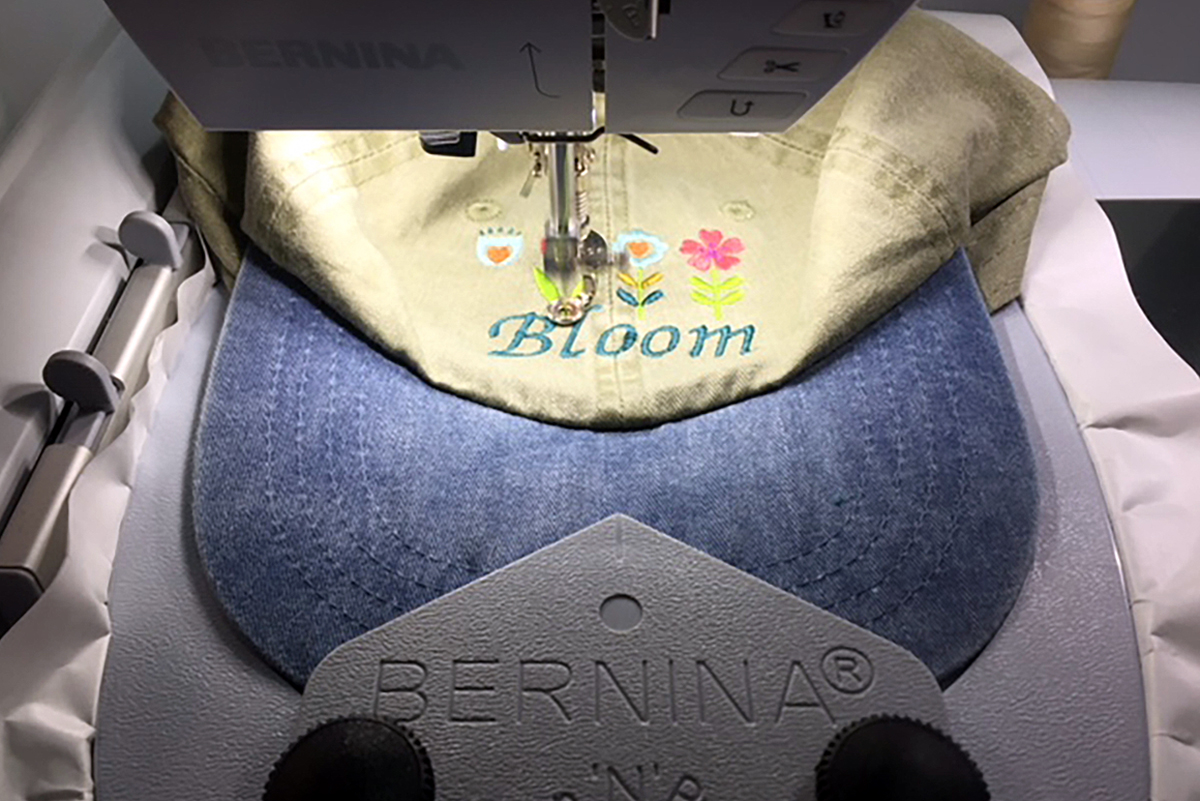
Stitching is complete!
For additional information on embroidering on caps and using the Hoop “N” Buddyz hoop insert, download the Just Embroider It- Hoop”N” Buddyz eBook from bernina.com.
For more information on choosing the correct cap, design placement and stitching a cap, download the Just Embroider It! Embroider on Caps! eBook on bernina.com. Although this eBook has information for embroidering on the BERNINA E 16, BERNINA’s first multi-needle embroidery machine, the information about caps and cap placement is applicable to the home machine as well.