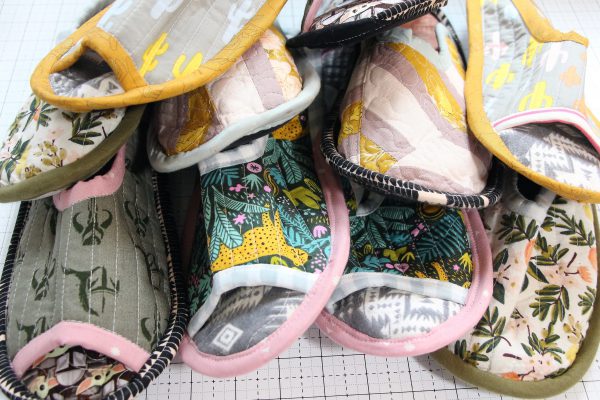
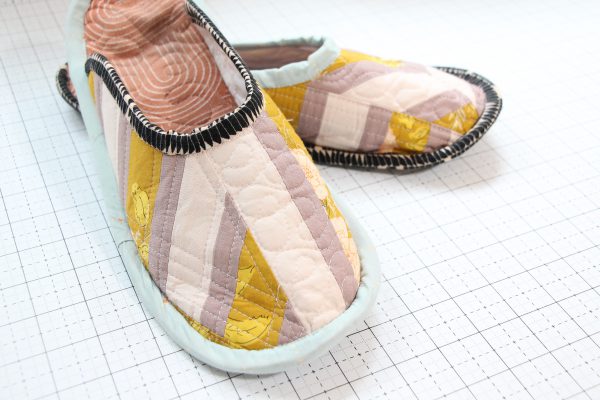
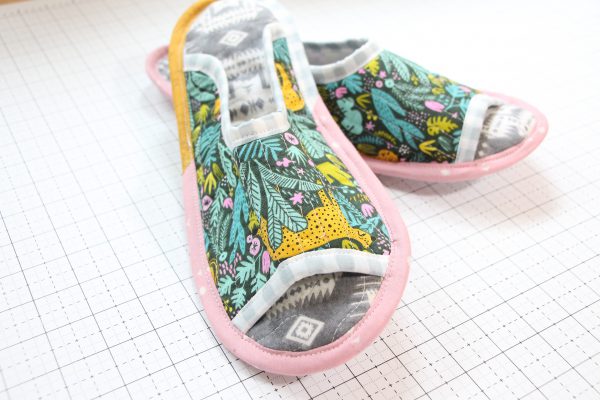
How To Make Quilted Slippers
The first time I ever saw a quilted house slipper was about 6 months before I ever even learned how to quilt!! I was in Thailand with some friends in 2011 and everywhere you would look, there were amazing shoes . . . NOT in my size!!! My big size 10 feet had no business buying shoes there; they just didn’t make them in my size. I would like to say that stopped me from buying a pair of $3 slippers from a street vendor but of course, it did not. They didn’t truly fit my big feet but those house slippers were too cute to pass up even with my heel hanging off the end.
The first pair of quilted slippers I ever made (after a deep dive on Instagram to find out) was all the way back in November 2017 right before my twins were born. I remember wanting a pair of slippers that I could wash because I knew how nasty hospital floors really are after my firstborn and watching too much Grey’s Anatomy. I don’t know if it was unfortunate that those Thailand slippers were long gone, worn through never to return. I kind of think it was fortunate since now at that time I had quilting knowledge I didn’t have before and could make my own. Some that actually fit my foot properly instead of sadly and comically not fitting at all.
I always meant to share my process on how to make them but . . . you know newborn twins and a toddler don’t make for much sewing time. Also, I found out quickly that those slippers, like my Thailand ones, weren’t that durable. They needed a few upgrades and tweaking. If there is one thing about me as a creator I’m most proud of it is my love for finding ways to make handmade LONG lasting items that are super customizable. I mean, isn’t that the true beauty of making something handmade . . . making it show who you are through beautiful fabrics and design choices.
Okay so, before you jump into this quilted slippers project, make sure you’ve completed your quilt panel. My How to Make a Quilt Panel blog post will walk you through how the quilt panel for this project needs to be made. You will need two panels for this project.
- Foot Bed (bottom): This one doesn’t need backing fabric, I like using flannel for a soft cozy footbed.
- Foot Cover (top): This one does need backing. I used plain Kona Cotton White Its on the inside and no one will really see it.
What You Need to Make Quilted Slippers
Oh, wait . . . if you follow me at all Honymfin.com or @honymfin on Instagram, you know I’m a fly by the seat of my pants kinda lady. Basically, when I have an idea I make it up as I go! And then I make it three more times until it’s perfect.
So a few tips I learned along the way that will hopefully help you . . .
- Choose a duck canvas for the sole that is on the dark side. White is nice but gets dirty very quickly.
- If using pre-washed fabrics (I never wash mine), make sure your pattern is 1/2 inch longer in the toe and heel area. This will give grace when washing.
- Sew slowly when adding the final binding.
- If you have slippery floors or are making these for the elderly, you might want to add some anti-skid gripper fabric. It’s the stuff they put on kids’ footy PJs. It should not replace the duck canvas. The duck canvas gives a structure that the anti-skid will not. So this will be another layer over the duck canvas.
- If you have never made or sewn bias tape before, make sure you watch a few tutorials for it first.
- Here are a couple of WeAllSew posts that should help: Refine Your Binding Technique and Binding Three Ways
Time
- Depending on your life and how many you are making but this should take an evening for one pair. I made 9 at one time so a few nights hahaha … I’ve broken it down into steps to help you with your time table.
Stitching
- Length 3.00
- 1/4 Seam Allowance (unless specified)
Terms
- WOF= Width of Fabric
Sewing Tools
- Rotary Cutter
- Scissors
- Quilting Ruler
- Cutting Mat
- Clips
- Pins
- Thread
- MicroTex Needles
- Bias Tape Tool 25mm (2in WOF cut- 1in WOF folded)
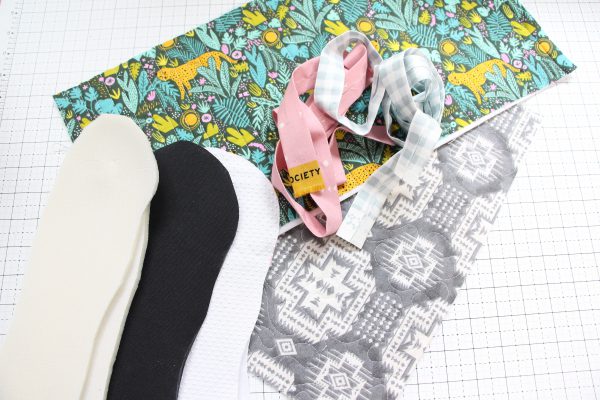
Materials to Make Quilted Slippers
- Top Quilt Panel 9.5in x 19in
- Foot Bed Quilt Panel 14in x 11in (backing optional, and modified for foot length)
- Sole Fabric (duck canvas) 14in x 11in
- Bias tape 1.5in x 80in (can be cut on the straight, better on the bias)
- Pellon Stabilizer 809 14in x 11in
- Flex FOAM (Pellon FF77) 14in x 11in (DOUBLE if you want more padding)
- Anti-Skid Gripper Fabric 14in x 11in (optional additional sole)
Sewing Machine
- My machine is the BERNINA 530 (She is 7 years old)
BERNINA Presser Feet Used
This foot might be the most underrated and underused foot in all of the BERNINA accessories, and I only say that because I’m absolutely in love with it!!! I was a little “meh” about ordering it but once I started using it and realized that it helps sew thick layers like butter, there’s no going back for me!
*As always, you CAN make this project with your standard Presser Foot #1, but you will need to take a slower approach and make adjustments as you go. The different presser feet will make this project faster and easier.
Quilted Slippers Pattern
Before you print, cut out and tape together your pattern make sure you are getting a correct size printout singing the 1inch guide. If not no big deal just size up or down based on your shoe size.
Remember I like options, well I’ve given you a few here.
- Open toe vs Closed toe
- Wide Foot vs. Narrow Foot.
- If you are wanting more cushion in your slipper, print out 2 of the Sole Pattern. Cutting one the dotted line that is 1/4 smaller for the Flex Foam padding and one on the solid line for your duck canvas sole and your Quilt Panel Foot Bed.

Note: Both patterns are included in the download.
Honymfin House Slippers Regular or House Slippers Wide
*Make sure you adjust the pattern for your foot size, scale up or down based on need. I used wide for my husband
Let’s Get Sewing!!!
Steps to Sew Quilted Slippers
Step 1: Sew and Cut
Get your Quilt Panel sewn and cut everything you need so you can lay it all out before starting.
Quilted Panel
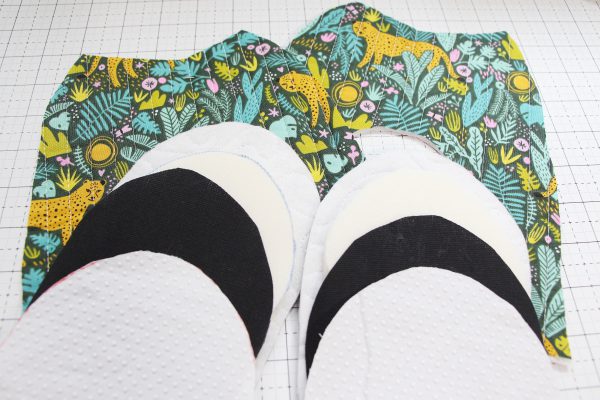
- Use Pattern #1 to mark and cut Top Quilt Panel into 2 pieces. Left foot Right foot. Be sure to flip the paper pattern over when cutting the left side, this will give you the mirrored image of the right foot. OR cut both feet at the same time by putting rightsizes together this will also give you mirrored pieces.
- Do the same thing with the Foot Bed panel

Note: Keep those Quilt Panel Scraps, for further small project!!
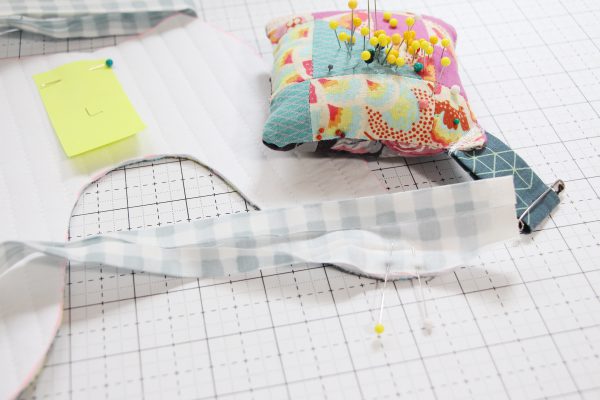
Fabric For Bias Tape
- Cut 2 stripes of 2in x WOF or buy Bias tape.
Fabric Lined with Pellon 809
- Add the Stabilizer to the sole of the slipper Duck Canvas or the Anti-Skid. If you are adding to the Anti-skid on top of the make sure to iron gently as to not melt it. I also recommend Ironing on the back side with a spritz of water to help heat it up.
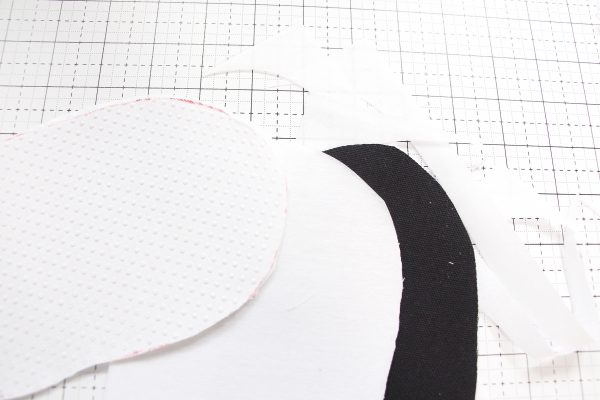
Pellon Flex Foam
- Using the “Inner” sole Pattern cut either 1 for each foot or 2. If you have harder floors you may want a little more cushion. The Inner Sole pattern is 1/4 smaller than the outer, this will help cut down on bulk when sewing together.
Step 2: Sew the Sole Together
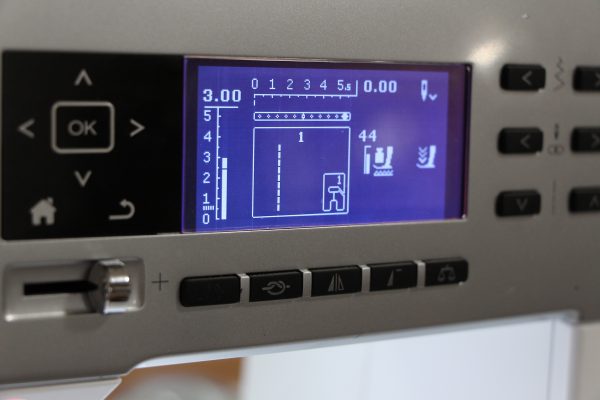
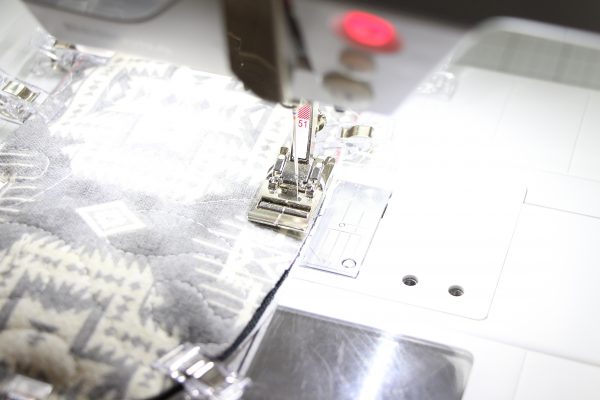
A: Attach the BERNINA Roller Foot #51 to your machine.
- Bump your Stitch length up to 3.00
- Kick you needle all the way to the right.
B: Layer all your pieces and Clip Together
Option 1
- Quilt Panel (Foot Bed)
- Flex Foam
- Duck Canvas
- Anti- Skid W/Stabilizer (Sole)
Option 2
- Quilt Panel (Foot Bed)
- Flex Foam
- Duck Canvas with Stabilizer (Sole)
C: Sew Sole layers with a 1/8 seam allowance. Basically as close to the edge as possible
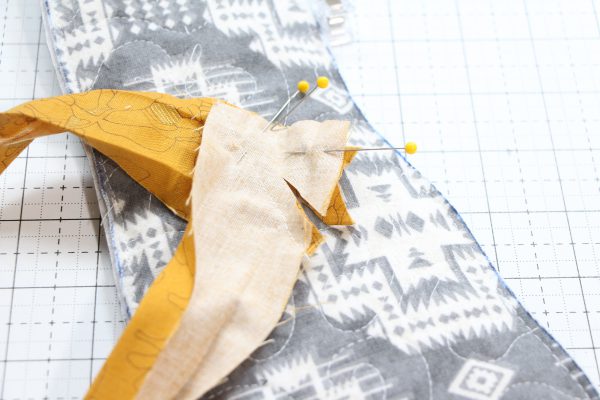
Step 3: Prep That Loop
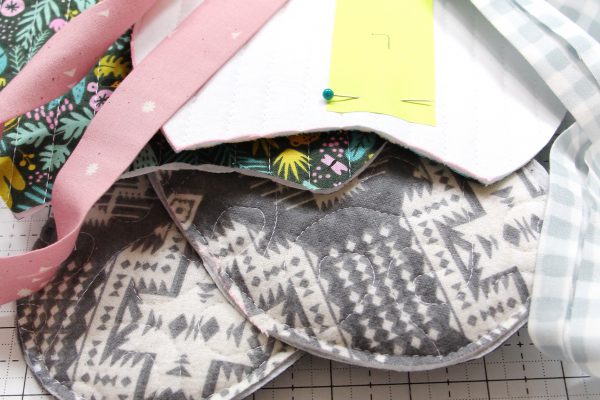
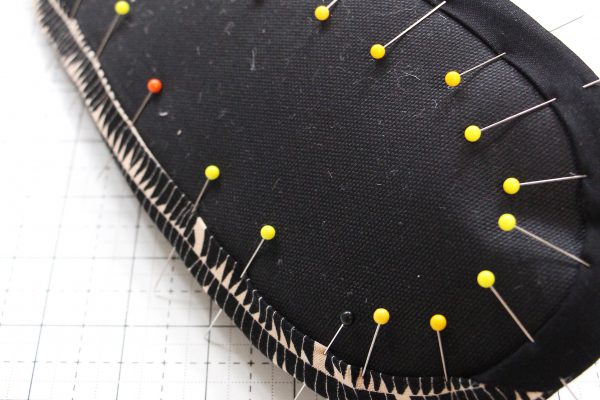
A: First Take the Bias tape you want to use for the foot bed.
- Attach it to the now Sewn Together Sole using clips all the way around be sure to get it on there snug you don’t want bumps or bulging as you attach it at the end.
- Trim it 1/8th to 1/4th from touching depending on the stretch of your tape (all fabrics are different)
- Sew ends together using the diagonal method to create less bulk, this will give you a loop.
- Do this 2x. once for each foot and put aside until last steps.
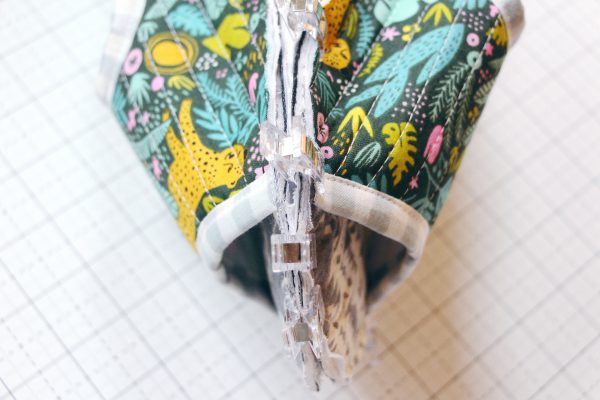
Step 4: Get That Bias On!
A: With the BERNINA Roller Foot #51 still on your machine.
- Keep your Stitch length up to 3.00
- Kick you needle all the way to the LEFT this time.
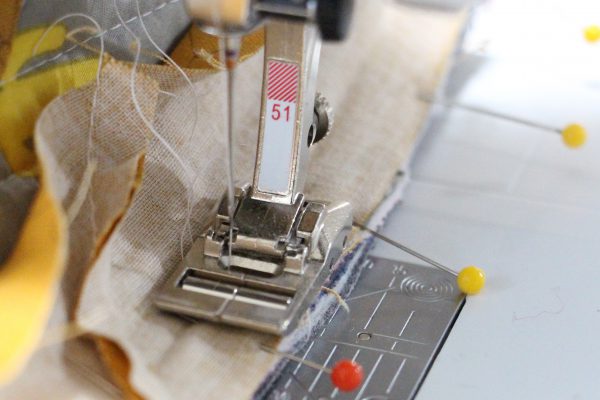
B: Attach Bias tape to both Top Slipper Pieces.
- If you choose the open toe you might need one more strip of Bias tape depending on your WOF and slipper size.
- Working from the Top side (Fun Fabric side) of your Toe Tops Attach your Bias tape. I like using Pins instead of clips for this part.
- The Inner part it a little tricky because of the curve, don’t get scared if you are new to sewing this is no problem. I recommend only pinning about 4pins at your starting point. While sewing past those pins (go slow) pull and place the bias tape.
- Notch out bias tape around the curves of your slipper pieces. ONLY the bias tape NOT the quilted panel.
*Remember to keep tack of right foot – left foot. I used post-it notes

Two More Steps to go you’ve got this!!
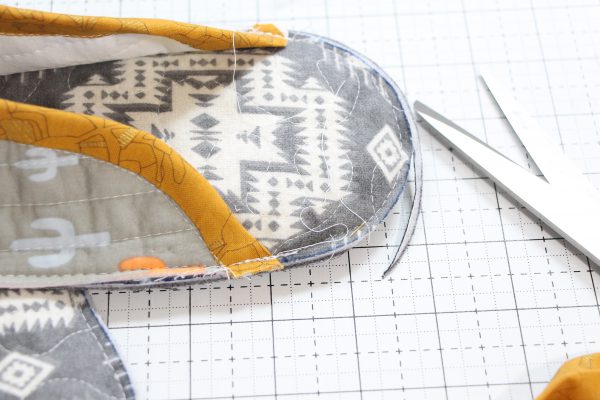
Step 5: Put it Together!
A: Layer Foot Bed to Toe Top (with Bias Tape)
- Left Foot to Left top Clip together
- Sew together using 1/4 Seam
- Back Stitch a couple times at the start and end of each side to give extra strength at the stress points
B: Repeat For Right Foot
*If making the Open Toe version clip together before sewing to make sure your placement matches both slippers.
C: Trim and Clean up edges if needed
Note:When adding Pellon Flex Foam some slippage may happen.
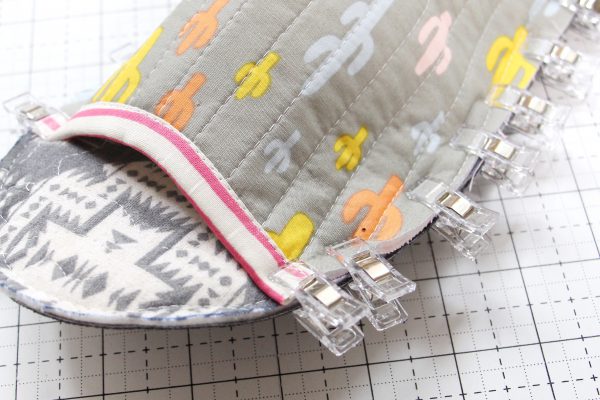
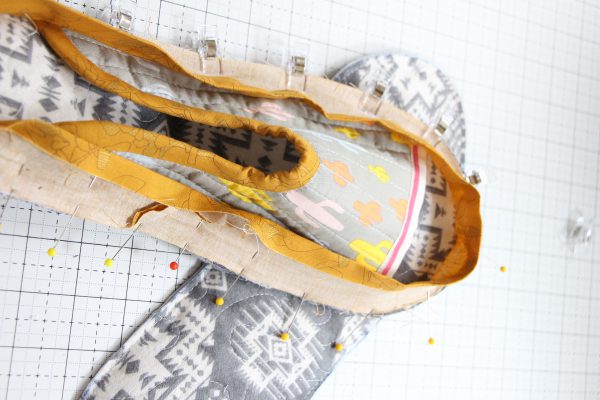
Step 6: Wrap It All Up
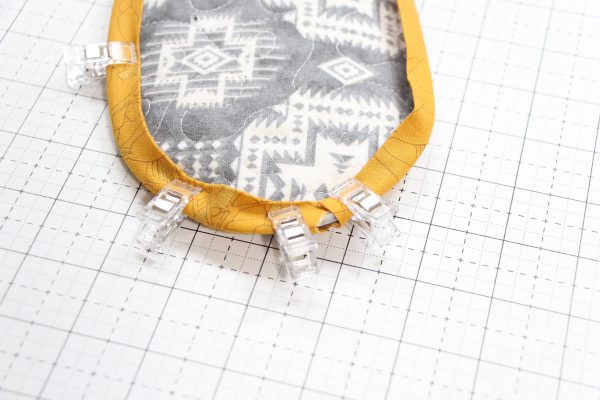
A: Find those Bias Tape Loops you made back in Step 3
- Using Pins or Clips. (I prefer pins for this step)
- Attach the Bias tape all the way around working from the top side of your slipper.
- Fold Over and finish off with either top stitch or stitch in the ditch
Step 7: Wash and Wear!!
Well you don’t have to wash them right away but I always do. The wash will shrink them up, making them even cozier for your little toes.
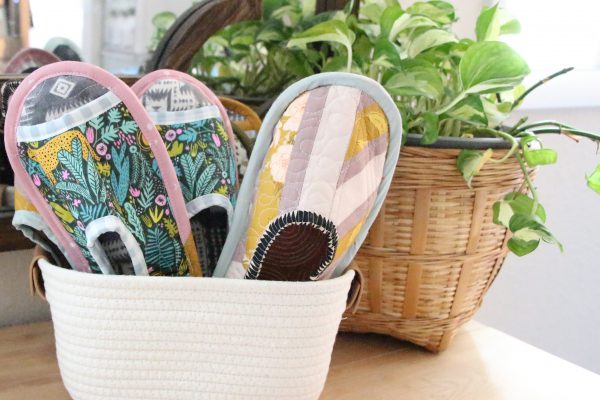
I love these quilted slippers so much! I have always had this vision of a basket full of slippers next to the front door for all my friends to wear. When they come over to visit, they can take off their stiff shoes, slip on cozy homemade slippers and just relax. Can you imagine how nice and welcoming that would be? This is the year I’m gonna make it happen! I hope you do too.
Don’t forget to tag me on Instagram so I can see all the wonder things you’ve made with my quilted slipper tutorial!
Happy Sewing, and thanks for being here!
Aynsley Campbell – Honymfin